Building A Plant Stand
Before we launch into this week’s article…
Gardening Classes with Henry
Lebanon College: Gardening: A Practical Workshop. Garden writer Henry Homeyer will teach you the basics of organic vegetable and flower gardening. From garden design to seed-starting , planting, watering, weeding, mulching, and harvesting, this course will give each student practical knowledge of gardening. Tuesday nights from 6:30-8:30 for 5 weeks, April 3-May 2.Contact Lebanon College to reserve a spot for this5-part workshop www.lebanoncollege.edu or call 603-448-2445.
AVA Gallery, Lebanon. Henry will teach 3 classes at AVA Gallery this spring. You may sign up for one or all of these workshops:
Sculpting the Living Landscape: Starting Flowers from Seed
April 9; Monday, 6:30–8:30pm; One 2-hour class
Sculpting the Living Landscape: Perfect Perennials for the Upper Valley Garden
April 23; Monday, 6:30–8:30pm; One 2-hour class
Sculpting the Living Landscape: Organic Techniques for Enriching Soil and Managing Pests
May 7; Monday, 6:30–8:30pm; One 2-hour class
For more information go to www.avagallery.org or call 603-448-3117.
Building a Plant Stand
It’s time to start planting seeds indoors for late spring planting. Depending where you are (and what this crazy weather does), late May or early June should be frost free, so we have about 8 weeks till planting things like tomatoes.
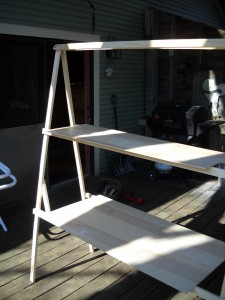
This year I replaced all my fluorescent lights and decided to move plants upstairs to the laundry room. My clunky old metal plant stand would be nearly impossible to get up our spiral staircase, so I built a folding wooden one – and you can, too. It took me an hour to build and cost a lot less than buying one.
First, you need to decide if a plant stand is right for you. Mine is a tall narrow triangle in cross section, with 2 shelves. It is 6 feet tall, 5 feet wide and 2 feet from front to back at the base. It has space for 6 flats or trays, each of which will hold at least 32 plants – more if you buy the smaller six-packs that I avoid (some flats can hold 48-72 plants).
The lumber for this cost me just under $50 and the light fixtures – 4-foot shop lights – cost me $14 each plus $8 for the fluorescent tubes. The stand uses 3 fixtures, so the lights cost about $65, for a grand total of about $115. Looking at catalogs, I see that one can easily spend $500 or more for an equivalent. One could use the same design to make a similar model that would just have one shelf and use one fixture and cost about $75. Then, if you decide you like starting plants in the house, you could add a second shelf and buy the extra lights and shelf next year.
Here is what you need to buy for the model I built:
(10) pieces of 1”x2” pine, 6 ft long
(2) pieces ¼” plywood, 2’x4’
(1) pair 3” strap hinges
(3) 4′ shop lights with fluorescent bulbs
(50) sheet rock screws (1.25” long)
Tools: portable drill with magnetic bit to fit the screws and a measuring tape
Lumber yards will cut all your materials to size for you. Some sell plywood in 2ft by 4 ft sheets. If not, you will have to buy a full sized sheet (4×8-ft) which will cost a little more. In any case, your top shelf is 16 inches wide by 4 feet long, the second shelf is 24 inches by 4 feet, so you will need to ask someone to cut the 16 inch piece to size. You will need to ask them to cut the 1×2 pine boards as follows: six 60-inch pieces, four 72-inch pieces, six 12-inch pieces. So if the store does not have 6-ft lengths, get 12-ft lengths and have them cut to length.
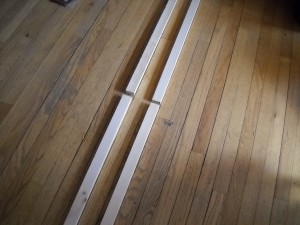
Start by making 2 legs for your plant stand. Lay the 6-ft pieces end-to-end on the floor. Do it on your deck if possible, or next to a wall so that you can get them in a straight line by lining them up with something that is straight. Lay the hinges in place so that you will be able to fold them closed (most hinges only close one way).
Next close up the hinged legs and place them 5-ft apart on the floor. Place 3 of the 5-ft pieces on top of the first side. One should be screwed right at the top, one 24 inches from that, and the last 24 inches below that. Flip over the stand, and do the same on that side. Stand it up, and spread the legs 2 feet apart at the bottom. At this point, your tripod will be wobbly. Let’s fix that.
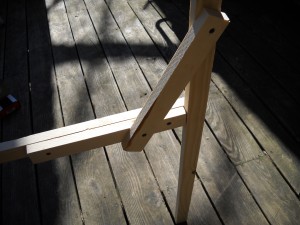
You have 6 pieces of scrap wood, a foot long, left over from making the 5-ft lengths. You need to attach 2 of these to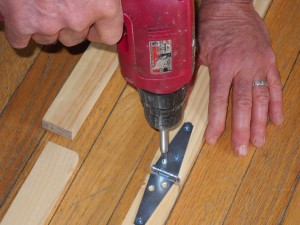 the inside of the bottom cross pieces, one on the front right, one on the back left. Then place your 24-inch shelf on top of the bottom supports and center it. There is 6 inches or so of space on either end of your shelf.
You will now attach a cross brace at a 45 degree angle between the short piece you just installed and a leg. This will keep the plant stand from swaying. Then take another 12-inch piece and attach it across the legs (front to back) 30 inches from the top. That will make prevent the legs from splaying – and make it as sturdy as the Rock of Gibraltar.
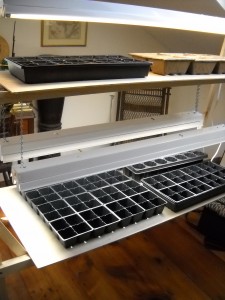
Lastly you need to hang the lights. Mine came with S-hooks and chain, which made hanging the lights easy. If yours do not, you will have to buy them. Most shop lights have a slots and holes on the back side so that you can slip in S-hooks easily to hang it. You can also open a link of your chain and fit it in without an S-hook, just use 2 pairs of pliers to bend a link open.
Starting seedlings indoors is miraculous for me – even after doing it for decades. I hold my breath waiting for germination, and fuss over the seedlings like a mother hen. And when I bite into my first tomato in August, I have the added satisfaction in knowing I brought that tomato into my world – with a little help from Mother Nature.
Henry Homeyer is a gardening consultant, teacher and book author. His e-mail address is henry.homeyer@comcast.net. You may write him at P.O. Box 364, Cornish Flat, NH 03746.
Web Extra: When to Start Seedlings Indoors
I start 200-300 plants indoors each year. When should one start them? It depends where you live and on the type of plant. Let’s start with when. The key factor is when Mother Nature delivers the last of the cold weather to your garden. In my Zone 4 part of the world, conventional wisdom is that it is all right to plant frost-sensitive plants like tomatoes on Memorial Day weekend. I usually put mine out a week after that, to allow the ground to warm up – and taking no chances that a late season frost will kill my tender plants.
As I explain in my books, The Vermont Gardeners Companion and The New Hampshire Gardeners Companion, the phase of the moon does not affect the date of the last spring frost. Those books also list what plants are frost sensitive and which are not.
Here it is, March 27 as I write this, and I have already started onions, leeks, peppers and a few leafy greens indoors. The peppers won’t go outdoors until June, 12 weeks after starting indoors, but the onions (and leeks) will go out in May as they can take some frost. The greens, likewise will go out in mid-May. Most greens I will plant by seed outdoors.
Eight weeks before outdoor planting I will start indoors my tomatoes, broccoli, and kale. My squash plants I start 4-5 weeks before they go out in June. I don’t want them too big, and they grow fast. I start squashes and cukes in 3-inch pots instead of little six-packs.


