• Wobar and the Quest for the Magic Calumet
    Now available for $24.95 including shipping.
  • Now available for $21.00 including postage.
  • Recent Articles

  • Vendors I Like

    click here to buy from Cobrahead Click Here to buy from Cobrahead
  • Cobrahead

    This is the best darn weeder made in the country, and I think I've tried them all. I use it to dig weeds, tease out grass roots, and mix soil at planting time. Neither right nor left handed, it is lightweight and strong.
  • West Lebanon Supply

    I buy all of my organic fertilizers and soil amendments at West Lebanon Supply. They carry several lines of seeds, watering devices, tomato cages, landscape fabric and much more. They also sell pet supplies - and allow dogs in the store!
  • E.C. Brown Nursery

    E.C. Brown Nursery has an amazing selection of high quality trees, shrubs and perennials. The staff is incredibly knowledgeable. Looking for something unusual? E.C. Brown Nursery probably has it.

Get Ready to Start Seedlings Indoors


Starting seeds indoors under lights is a good treatment for the winter blues. It connects me to my upcoming garden and all its benefits. Early March is when I start onions and peppers, though April is the month for most everything else.
 
My wife, Cindy Heath, and I are making a commitment to reduce/eliminate the use of plastics in our life, so we are transitioning away from those handy, dandy flimsy plastic 6-packs for starting seeds. You can, too.
 

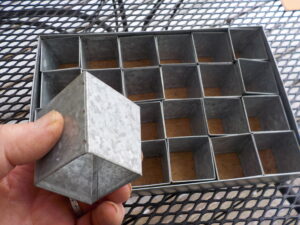
Metal planting cells from Gardeners Supply

Gardeners Supply Company has been offering ways of reducing single-use plastics like those 6-packs sold everywhere. They have sturdy reusable plastic trays for seed starting which have been available for a few years. This year they came out with metal seed starting trays.

 
These galvanized steel growing cells are pricey, but should last a lifetime. For about $50 you get 24 individual, tapered cells and a leak-proof tray to hold them. The cells are a nice big size. The kit is self-watering: it comes with a wire grid and moisture-retaining mat that keeps seedlings hydrated from the bottom of the tray which you fill with water once a week or so. I got one of these kits and looks like a winner.
 
Renee’s Garden is now selling seed starting cell trays made of silicone that are sturdy and reusable, and dishwasher safe. They do not get brittle, they say. I am ordering some to try them.
 

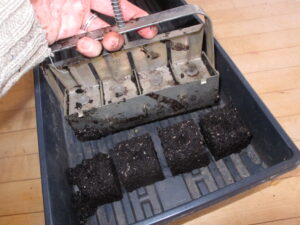
Making soil blocks with a simple press

If you don’t mind extra work and lots of mess, you can make soil blocks using a little metal press that produces 2-inch soil blocks. The mixture includes peat humus, compost, soil, blood meal and minerals. E-mail me for more info about the process.

 
So what else do you need? Lights, growing medium and seeds. Let’s start with lights. To keep your light bill low, I recommend using LED lights. I have some old-fashioned 4-foot fluorescent lights, but have been replacing them with the LED equivalent. These look about the same, but have no ballast (transformer) inside the fixture and use much less electricity.
 
If you replace your old fixtures, don’t just throw the old tubes into the trash as they contain mercury, which is toxic waste. Some recycling centers will accept them, or bring them to an electrical supply company for proper disposal. And if you want to use an LED tube in an old fluorescent fixture, you should remove the ballast. Unless it says “No PCBs on it, it needs to be sent to a hazardous waste collection site also.
 
Hang your fixture about 6-inches over the planting trays. Use “jack chain”, a small-link chain sold at hardware stores. It allows you to raise the lights as your plants grow. Give your seedlings 12 to 14 hours of light per day – they need a good night’s sleep as much as you do.
 

Plastic caps keep seeds from drying out

Most seeds will wake up and grow more readily if you place them on a warm base. Electrical seed-starting mats are great for that, but not really necessary. I use them for things that specify warmer temperatures, like the flower Lisianthus, and for hot peppers.

 
I recommend buying “Seed Starting Mix” instead of “Potting Soil” to put in your planting cells. Why? Seed starting mix is a finer blend and works better. It is made from peat moss, vermiculite, perlite and fertilizer. You can make your own, of course, and I often do – I start 10 flats (trays) or more each year. I also mix in some high quality compost – about 50% of the final product. I also add a little Pro-Gro, a slow-release organic bagged fertilizer.
 
Peat moss is coming under criticism now by the eco-minded community. It is harvested from bogs and is centuries in the making. Coir, a palm fiber, is becoming more available, but I haven’t found it yet in big bags like peat moss.
 
Moisture is key for starting seeds. If the soil mix dries out before they get well established, they can quickly perish. That’s okay with me – I need a reason to get out of bed on gray days in mud season. Gotta check my seedlings and give ‘em a drink after I have my coffee!
 

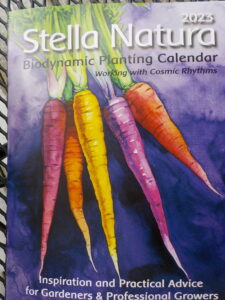
The Stella Nataura calendar gives planting times based on celestial rhythms

You can contain moisture by buying and using clear plastic covers for your flats of seedlings. They are inexpensive and reusable. Take them off after everything has germinated, or most things.

 
A biodynamic calendar called Stella Natura is available for gardeners who want to plant seeds by the phase of the moon, stars and planets. I consult it when planting, and although not foolproof, I think it helps. Available at www.stellanatura.com.
 
So if you want another hobby, grow your own plants from seed. It takes a little practice, but it may make you happy – it works for me!
 
Henry lives in Cornish, NH. He regularly gives gardening talks at garden clubs and libraries. Reach him by email at henry.homeyer@comcast.net.  

 Tips for Buying and Enjoying Cut Flowers


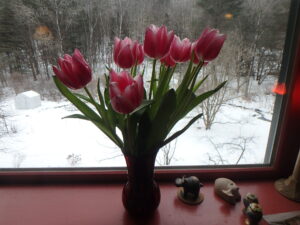
Tulips brighten a winter day

Winter drags on, even though the days are getting longer. The sun is often lurking behind gray clouds, and on a good day we only get about 9 hours of light. I do miss the colors of summer, so I keep fresh cut flowers on our table – even though I have to buy them.

 
Cut flowers are among modern America’s true bargains. For the price of a bottle of wine – or a couple of cups of fancy coffee – you can buy flowers that will grace your table for up to three weeks. But there are some things you should know about getting good table-life for your investment.
 
First, you need to buy fresh flowers that have been carefully tended – and you can’t beat a florist for that. A floral shop has trained personnel who trim each stem in the store every other day and change the water to keep flowers fresh. Cut flowers need to take up water to stay fresh and healthy. Stems tend to scab over after a day or two, which means they cannot take up replacement water, or not much, so they suffer.
 

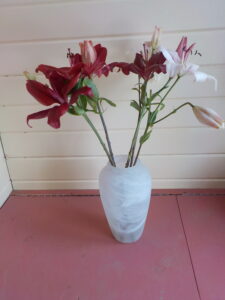
Ask for locally grown flowers like these Asiatic lilies I bought recently

Here are some things you can do to promote longer vase life: cut off leaves that would enter the water in your vase. Leaves will rot, promoting growth of bacteria, which will impede water take-up. Cut off half to three quarters of an inch of each stem every few days, and change the water. Use the packets of white powder that often comes with flowers – it does help.

 
Keep your arrangement cool if you can. Putting it near a radiator or woodstove, or putting it in a sunny window will shorten its life. If you have invested in pricey roses or tulips, you may wish to move the vase to the entryway or mudroom at bedtime to keep the flowers extra cool during the night.
 
Some flowers are better picks than others if you’re on a budget and can’t afford to buy new flowers every week. Here are my recommendations for good cut flowers:
  1. Lisianthus: These look like silk flowers to me: perfect white, pink or lavender-colored bell-shaped flowers on long stems. Tough to grow in the garden, they are perfect in a vase – I’ve kept them for up to 3 weeks.
  2. Miniature carnations: Each stem has 2-4 blossoms. They come in a variety of colors. Mix dark red “minis” with red roses to make a bouquet of roses look fuller. And even after the roses go to Valhalla, the carnations will still be good!
  3. Chrysanthemums: These come in a variety of sizes and colors, from the huge spider mums to little guys. I love the scent of the flowers –it’s not overpowering, but it’s there if you sniff them.
  4. Statice. I grow these for use as dry flowers, which tells you that they really do last forever – even out of water. They come in blue, purple, pink and white.
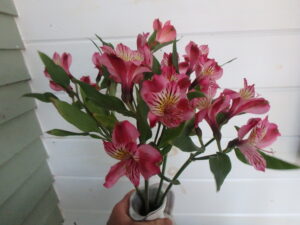
  5. Alstromeria is a long lasting inexpensive cut flower

    Spray roses: Instead of a single blossom per stem, these have 2-5 blossoms, giving you more bang for your buck. These will last about a week – or even more with proper care

  6. Alstromeria: One of the best for long life. Each long stem has clusters of 2-inch lily-like blossoms in pinks and reds, with yellow throats. If you buy them in bud, they will look good for three weeks!
  7. Orchids: While not cheap, orchids as cut flowers can last up to a month. I love dendrobiums, though they are not common, even in floral shops. Cymbidiums have bigger blossoms and also last extremely well.
  8. Kangaroo paws: These Australian natives are fuzzy and cute. They come in pinks, reds, orange and brown, and last very well. Not every florist will have them.
  9. Asiatic lilies: I recently got a bouquet of five nice stems grown in New Hampshire that was sold at my local Coop food store. For $12.95, they will bloom with great elegance.

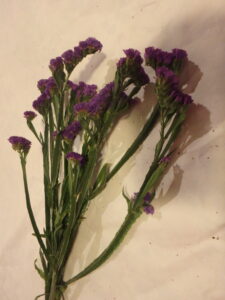
Statice is a good flower for drying and will last for months

You may wish to ask where the flowers you plan to buy are from. Holland, Columbia, Ecuador and Kenya are the world’s top growers and export much of what is available. Some foreign growers have been criticized for producing flowers using strong pesticides and poor labor practices. The Sun Valley group in California is an excellent major American grower of cut flowers – but there is still the environmental cost of shipping them 3,000 miles to us. If you can buy flowers grown locally in greenhouses, do it!

 
Everyone loves to receive the gift of cut flowers, even us guys. So treat your loved one – or yourself- to fresh flowers this winter. They’re cheerful, and can make winter less oppressive for gardeners.
 
Henry lives in Cornish Flat, NH, He is a gardening consultant and a presenter of garden talks with slide shows for clubs and library groups, both live and via Zoom. His email is henry.homeyer@comcast.net.

The Benefits of Organic vs Chemical Soil Treatment


On a cold and snowy day I paused to think back a few years to a conference I attended run by the Ecological Farming Association in Pacific Grove, California. There were several sessions by scientists presenting research confirming what organic gardeners have always known: organic techniques yield plants that resist disease and insects better, and produce better quality and healthier vegetables. There was even data presented indicating that organic practices can reduce weed pressure! I dug out my notes, and would like to share some of what I learned.
 
Dr Larry Phelan, a research scientist at Ohio State University, explained that he wanted to see if organically grown plants attracted insect pests differently than those grown using conventional techniques. He collected soil from two farms that were across the road from each other. The soils were identical except for how they had been tended for the past several years. One farm was organic, the other conventional.
 

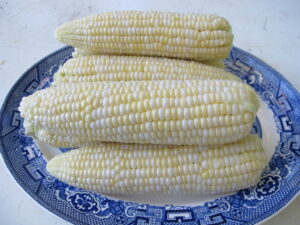
Organic corn from my garden never gets treated with chemicals

To reduce other variables, Dr Phelan brought the soil to his greenhouse, and potted it up in large containers. He then grew corn in containers, adding chemical fertilizers in some, fresh cow manure in some, and composted manure in others, using both types of soil for each method. When the corn was at the appropriate size, he released corn borers into the greenhouse, and watched what happened.

 
Not surprisingly, the corn borers preferred the corn grown conventionally. Not only that, the long term history of the soil mattered. The soil from the organic farm had higher levels of organic material in it, and consistently was less attractive to the borers – even if used with chemical fertilizers.
 
Why should this occur? Dr Phelan explained that plants evolved over the millennia getting their nutrients through the soil food web, depending on the symbiotic relationships between plants and microorganisms. Chemical fertilizers are imprecise, providing nitrogen for fast growth, but often giving too much nitrogen, or providing it all at once. Soils rich in organic matter provide nitrogen and other needed nutrients in a slow, steady stream – the way Mother Nature does it.
 
He said that when a plant gets too much nitrogen, the excess is stored in the form amino acids, the building blocks of protein. For insects, this is like candy for kids or drugs for addicts: they can detect it, and go to the source.
 

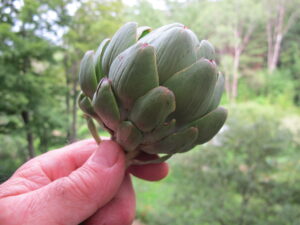
This artichoke from my garden was grown without chemicals

In another experiment, Dr. Phelan grew soy beans hydroponically, varying the amount of nutrients present. The soy bean loopers preferred plants that were out of balance nutritionally. But not just nitrogen mattered. Iron, boron and zinc levels were important, too. And of course, those elements are not present in conventional fertilizers. Chemical fertilizers only offer nitrogen, phosphorus and potassium. Good soil enriched with compost should have everything your plants need.

 
Dr. Autar Mattoo of the United States Department of Agriculture Research Station in Beltsville, Md., also presented some very interesting findings. He compared the health of tomatoes grown with chemical fertilizer on black plastic versus that grown organically using a mulch of hairy vetch, an annual cover crop. He found that tomatoes grown with hairy vetch was dramatically better at resisting fungal diseases, especially those that cause blackening and dropping of leaves, which is often the bane of gardeners.
 
Dr. Mattoo explained that the vetch fixes nitrogen when growing. Which is to say, it extracts nitrogen from the air and turns it into a form that plants can use. It was mowed down before flowering and allowed to stay on the surface of the soil, producing a considerable biomass to nourish soil microorganisms.
 
Compared to chemical fertilizer and black plastic, Dr. Mattoo found a 25-30% increase in yield using vetch. He explained that eventually the organic tomato plants would develop fungal diseases, but that for the first 84 days after transplant (late August for us), there was virtually no leaf blackening. At the same time, the tomato plants grown conventionally were severely damaged.
 

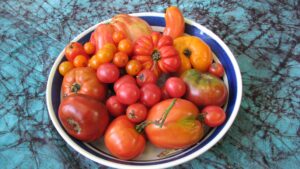
A selection of my homegrown tomatoes

He attributed much of the difference to hormone signaling. Anti-fungal proteins can be produced when specific genes are activated, protecting leaves. He explained that depending on the environmental conditions specific genes are turned on or off. He was able to show this by photographing specific genes in the leaves of the tomatoes to see their size and thus their levels of activity. It appears that something in the vetch stimulated the tomatoes to produce those anti-fungal proteins.    

 
What does all this prove?  Being an organic gardener has many benefits, and scientists are just catching up with us! So as you plan your garden projects for the spring, think about giving up your use of chemical fertilizers. There are plenty of organic fertilizers made from natural, biologically-created ingredients like oyster shells, peanut hulls, cotton seed meal and naturally occurring minerals like rock phosphate and green sand. And of course, compost is a terrific way to increase biological activity in your soil.
 
Many thanks to all you readers who have donated to support Notes from the Garden. If you have been enjoying the column, learning from it and wish to donate, please go to my website, www.Gardening-Guy.com and go to store/donations and follow the prompts. Or do it the old fashioned way, and mail a check to Henry Homeyer, PO Box 364, Cornish Flat, NH 03746.

Building a Simple Plant Stand

Posted on Tuesday, February 7, 2023 · Leave a Comment 


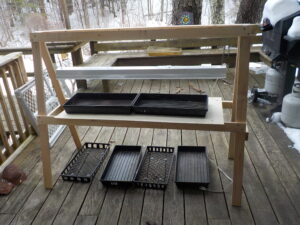
The finished plant stand

As I write this, the wind chill factor is well below zero, and summer seems a lifetime away. But if you are thinking about starting seeds indoors this year, this would be a good time to build a simple wooden plant stand. You don’t have to be a carpenter to build this, or to have expensive power tools. Your local lumber yard will cut the pieces you need.
       

Mine is a simple A-frame, with one shelf, and the space for more plant flats on the floor.  It stands about 4 feet tall, is 5 feet wide from end to end, and 2 feet from front to back at the base. It has space for 4 or 5 flats or trays, each of which will hold at least 32 plants – more if you buy the smaller six-packs that I avoid (some flats can hold 48-72 plants). And if at a later time you want to grow more plants, you can put another four flats or more on the floor and add lights above them.


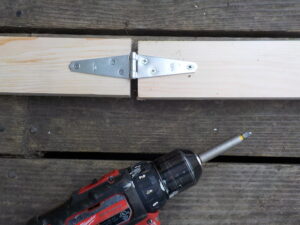
Install the hinges on the 4-foot leg pieces

The lumber for this cost me about $50 and the light fixture  – a simple shop light with 2 four-foot LED bulbs and a plug-in cord – cost $62, although often they are more expensive. Looking at catalogs, I see that one can easily spend much more for a pre-made plant stand. If you decide you like starting plants in the house, you could buy the extra lights next to illuminate more flats on the floor.
 

Here is what you need to buy for the model I built:
 
(4) pieces of 1”x3” pine, 4 ft long
 
(4) pieces of !”x3” pine, 5 ft long                                                                 
 
 (2) pieces of 1×3 pine16” long for cross bracing
 
(1) piece ¼” plywood, 18”x4’ (you can use thicker plywood if you have some)
 
(1) pair 3” strap hinges    
 
4-feet of quarter inch jack chain for hanging the lights and 2 small cup hooks to hang the chain.                                                                                              
(1) 4′ shop light with LED bulb and a plug-in cord                                                         
 
(30)  sheet rock screws (1.25” long)   
 
Tools: portable drill with magnetic bit to fit the screws and a measuring tape     
 

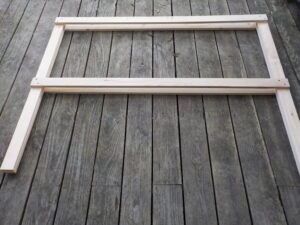
Screw in the 5-foot cross pieces

Most lumber yards will cut all your materials to size for you, but do not have small sheets of plywood. I found that Home Depot does have plywood in 2-foot by 4-foot sheets, and they cut mine to give me a piece 18” by 4’ for the shelf. You will need to ask them to cut the 1×3 pine boards as follows: four 60-inch pieces, four 48-inch pieces, and two 16”pieces.


Start by making 2 legs for your plant stand. Lay the 4-ft pieces end-to-end on the floor. Do it on your deck if possible, or next to a wall so that you can get them in a straight line by lining them up with something that is straight. Lay the hinges in place so that you will be able to fold them closed (most hinges only close one way). A cordless drill with a magnetic bit for Phillips screws will make your work much easier. To start the small screws on the hinges, make a hole first with a nail or awl, or a tiny drill bit.


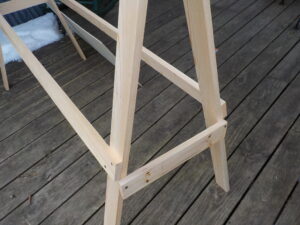
The cross braces add stability

Next close up the hinged legs and place them 5-ft apart on the floor.  Place 2 of the 5-ft pieces on top of the first side. One should be screwed right at the top, one 24 inches from that. Flip over the stand, and do the same on that side. Stand it up, and spread the legs 2 feet apart at the bottom. Then add a cross brace on each end of the A-frame just below support pieces for your shelves.


Lastly you need to hang the light. Mine came with S-hooks and chain, which made hanging the lights easy. If yours do not, you will have to buy them. Most shop lights have slots and holes on the back side so that you can slip in S-hooks easily to hang it. You can also open a link of your jack chain and fit it in without an S-hook, just use 2 pairs of pliers to bend a link open. Screw 2 small cup hooks into a top cross piece and attach the jack chain. The chain will allow you to raise or lower the light – lights should be about 6 inches above the plants.


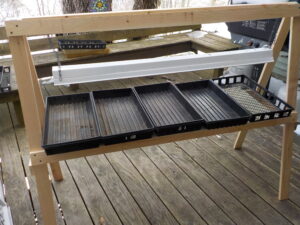
The shelf will hold 4 or 5 flats of seedlings

Starting seedlings indoors is miraculous for me – even after doing it for decades. I hold my breath waiting for germination, and fuss over the seedlings like a mother hen. And when I bite into my first tomato in August, I have the added satisfaction in knowing I brought that tomato into my world – with lots of help from Mother Nature.


Henry is the author of 4 gardening books. Reach him at PO Box 364, Cornish Flat, NH or by email at henry.homeyer@comcast.net.

Filed under Article · Tagged with ,