How to Prevent Tree Death by Bark Mulch or Rodents This Winter
Posted on Wednesday, November 3, 2021 · Leave a Comment
If you have cleaned up the vegetable garden and cut back your perennials, you might be feeling just a little smug – especially since this gardening guy admits he is behind you in completing those tasks. But there may still be tasks for you to do, and important ones for the trees on your property.
Are you one of those gardeners who has fallen in love with bark mulch? Do you use it not only in flower gardens, but also around trees planted in the lawn to keep down weeds, hold in moisture, and keep the deadly string trimmer at bay? If you do, take a few moments to walk around and check out your trees and shrubs.
Bark mulch should never touch the stems of woody plants. You need a donut hole around your trees: a 4-to 6-inch area bare of mulch on all sides of your beloved trees. Why? Tree barks protects the tree from rain and snow, but it will eventually rot if it is covered with soil or bark mulch. And if the rot extends into the cambium layer – the layer beneath the bark – it will, eventually, kill the tree. But mulch is not the only culprit. Many trees are planted too deeply and the flare is covered with soil, which is just as lethal.
If you look at a tree that Mother Nature planted – or perhaps it was a forgetful squirrel – you will see that tree flares or widens at its base. That part of the tree needs to be planted above ground at planting time. Unfortunately, trees sold in pots often have the trunk flare covered with soil and get planted just the way they were in the pot. I have seen trees in large pots with the trunk flare covered by 4 inches of soil or more.
Mulch or soil over the trunk flare does not kill your tree right away. It often takes from six to ten years to see signs of decline. Look at the tips of branches at the top of the tree. Leaf loss there is a definite sign of decline. Early color change in the fall is another sign. That maple that turns color before others on the property? It may be stressed by bark rot caused by damage to the trunk flare.
So examine your trees. If the trunk flare is covered with mulch or soil, you have work to do. If a tree is straight (like a telephone pole) at the soil surface, you need to pull the mulch away. And if you still don’t see a flared area, you need to re-grade the soil around your tree.
Use gloved hands or work gently with a hand tool to remove the soil around the tree until you see the trunk flare. You may notice fine roots in the soil or mulch as you remove it, but these roots can be cut away. You are looking for big roots headed away from the trunk. Keep your hand tool away from the trunk as the bark will be tender, and easily damaged. But the good news is that most trees will recover if you remove the soil or bark mulch and let the bark dry out.
If you have planted a tree on a hillside, I assume you planted it be vertical. But to do that you had to cut back into the uphill side of the planting area to create a flat spot. If, after planting, erosion has moved soil downhill to cover one side of the trunk, remove that. People with excavators working on your property presumably know not to pile soil against the bark of trees, but check anyway. Remove soil as needed.
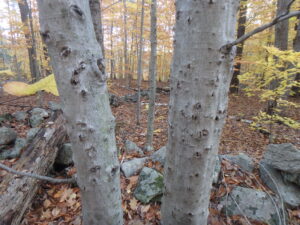
These beeches are infected with a fungus that will prove fatal in time
Another fall task involves protecting young trees from damage by rodents. The worst is the meadow vole. These are little rodents that look a lot like mice – but stockier, with short tails. Think of mice as a ballerinas and voles as hockey players. They often leave tunnels in the lawn grass during the winter.
Voles can reach sexual maturity in just 5 weeks after birth, so they can increase in numbers exponentially, given the right conditions. If hungry enough, they will chew the bark off young trees, killing them by damaging the tender cambium layer and eating the phloem all around a tree, girdling it.
Young fruit trees are the most susceptible to girdling. Older trees have thicker bark, and are generally less interesting to rodents. If you planted an apple tree within the last five years, you should protect the bark. Even though they did not damage the tree in the past, you cannot assume they will not this year. If there are high numbers of voles this year, and a deep snow cover to hide them from predators, they may attack.
The best way to protect trees against damage by voles is to surround the trunk with a ring of wire mesh called hardware cloth. Get some with quarter-inch spacing of the wires, and create a ring 24-inches tall. Make the ring of wire big enough to leave a couple of inches of space between the mesh and the trunk. That will allow the tree to get fatter without meeting the hardware cloth. If you have low branches (within 24 inches of the ground), you can prune them off to accommodate the wire mesh.
Hardware cloth comes in 24 inch rolls. You will need tin snips to cut it and leather gloves to protect your fingers. The stuff is like razor wire once cut. But, having seen what rodents can do, I recommend protecting new trees. There are plastic wraps and special cloth wraps that claim to protect against rodents, and may, but I have not tried them. They are definitely easier to use. So check out your trees, and get busy if need be.
Planting Bulbs for Forcing Indoors
Posted on Wednesday, October 27, 2021 · Leave a Comment
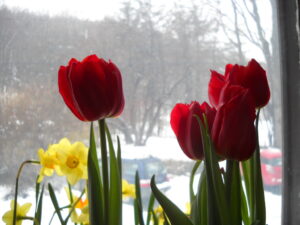
Forced tulips are my favorites
I love the winter, but by March I am ready for spring. I usually have some snowdrops blooming in March on a south-facing hillside, but they are subtle, not bodacious blooms. So I plant lots of bulbs indoors in the fall and keep them cool until it is time to bring them into the warmth of the house, and I get indoor tulips, daffodils and more in March. That’s what forcing bulbs is all about. It’s simple, really, but there are a few tips I can share since I do this every year.
Most bulbs are described on their packages as early, mid-season or late. Go to your local garden center and look for bulbs that are labeled as early bloomers – they are the best for forcing. Buy daffodils, some tulips and maybe some small bulbs like crocus or grape hyacinths. You can plant these bulbs in large pots or even in your window box if you bring it in.
You will also need some potting soil and compost. I make a mix that is half compost, half potting soil for forcing bulbs. I don’t use garden soil because it can be heavy and often stays wet. Bulbs can rot if they are left in wet soil for too long. I often reuse the potting mix that I used for growing annual plants outdoors in summer. I just pull up the summer’s plants, fluff up the soil, add some compost as needed, and make sure it is damp to start. If it is dry, I water it before I plant my bulbs.
Each year I plant about 25 daffodils in a window box that is about 30 inches long, 6 inches wide and deep. I prefer to get all of one kind so that they all bloom at once.

Tete a tete daffodils forced to bloom on a windowsill
I fill the window box a little more than half full with my mixture of compost and potting soil and place the bulbs, pointy end up, in the soil. Once I have them all in place I push them down more and fill up the box with more potting soil-compost mixture.
Be sure to label each pot with the date planted, and what is planted. Later, that will tell you when you can bring it into the warmth. Daffodils take about 12 weeks of dormancy before they should be brought into the warmth of the house, and tulips do better with 4 full months. Little things like crocus can be forced in 8 to 10 weeks.
Often bulbs will send roots out through the holes in the bottom of the pot or send up green shoots telling you they are ready. But don’t rush the process. Tulips brought up early will have nice green leaves, but no flowers.
Ideally temperatures for bulbs used for forcing will be between 32 and 50 degrees, though colder temperatures should not be a problem (my basement often goes below freezing for a few days). Left in a warm location, the bulbs will grow green tops – but not blossoms. Bulbs left in a cold basement or garage will do just fine. Inside the bulkhead to your cellar might be the right temperature, too.
You need to be aware that rodents like eating bulbs (indoors or out) – especially tulips. My basement has, most years, harbored mice and sometimes even a resident red squirrel. Unlike tulips, daffodils are not of interest to rodents as they are mildly poisonous. I keep my pots of tulips covered with hardware cloth (a fine-mesh metal screening available at hardware stores). But wear gloves if you cut hardware cloth to size – the edges are as sharp as razor wire.
You can double your production of blooms by planting two layers of bulbs in a container. Plant big bulbs deep in the pots, add soil, and then plant a layer of crocus or other small bulbs above them.
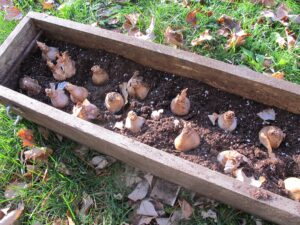
Daffodils being planted in a window box for forcing
It is important to check on the bulbs you are forcing at least once a month, particularly if you have put wire rodent-proofing over the containers. I’ve had shoots try to grow through the hardware cloth and get damaged. If the bulbs are sending up shoots, remove the wire mesh. I also don’t want the soil mix to get bone dry, so I check it and water a little if it’s dry. The bulbs will grow roots when first planted, and then go dormant if kept in a dark, cold location.
When it is time to bring up your potted bulbs into a warm place, let them wake up gently. My mudroom is good for starting them: there is some sunshine but it is cool. Then, once the shoots are up and green, I place the containers on my sunniest window sills – either east- or west-facing.
Most bulbs that have been forced are not likely to flower the following year, even if you keep the foliage alive until spring and plant them outside. I’ve done it, and some daffodils will build up the energy to blossom after a while, but tulips are not so cooperative.
I was a Peace Corps volunteer in Cameroon, West Africa many years ago. There I could have flowers blooming every day of the year. It spoiled me, perhaps, because I still want flowers every day. Forcing bulbs is one way to have lots of blossoms when there is snow on the ground. So don’t wait until mid-December to start your bulbs, get on this project now.
Henry is the author of 4 gardening books, and is a long time UNH Master Gardener. Reach him at PO Box 364, Cornish Flat, NH or
henry.homeyer@comcast.net.
It’s Time for Fall Plantings
Posted on Tuesday, October 19, 2021 · Leave a Comment
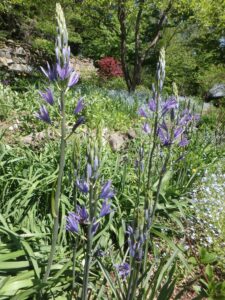
Camassia is a lesser known bulb plant that blooms in May for me
Spring is all about planting, but many gardeners overlook fall planting. Now is the time to plant garlic and spring-blooming flowers planted as bulbs. For me, fall planting is a joy: the thought of bulbs nestled into the ground just awaiting spring fills me with hope. And if you pick a good spot and plant them well, you are sure to succeed.
Let’s start with garlic. I like to say that garlic is, essentially, a no-work crop: plant it, mulch it to keep the weeds down, and then harvest it. Right now, the hardest part will be to find “seed garlic” – nice fat garlic bulbs that you can divide into cloves and plant. Many suppliers have sold out, but try your local garden center or feed and grain store. Don’t buy conventional garlic at the grocery store to plant. It is usually treated with a chemical to keep it from sprouting, and is the wrong kind for New England. Hard-neck garlic is what you want.
When should you plant garlic? Late October is when I plant, but it is fine to plant earlier or later. It’s best to plant after the soil has cooled down, but you will want the plants to establish roots before the soil freezes.
Pick a bed in your vegetable or flower garden that is in full sun, and that has nice, rich soil that retains water but does not stay soggy in rainy times. If you have heavy clay, work in plenty of good compost- either your own, or some you purchase in a bag.
I plant garlic cloves in rows about 8 inches apart. Each clove I plant three inches deep and three or four inches apart. I run my CobraHead weeder down the bed to create a furrow and to loosen the soil. I sprinkle some Pro-Gro or other organic bagged fertilizer into the furrow and run my hand tool through it again. Then I push in cloves, pointy end up, cover it with soil, and pat it lightly.
Finally, I take mulch hay or straw and cover the bed with about 12 inches of loose straw. I know that seems like a lot, but by winter’s end, it will be just 4 to 6 inches of cover. That should prevent most weeds from growing all summer – or until you harvest in late July. I always save my best bulbs of garlic for planting.

I will plant about 10 daffodils between these hostas that will hide the leaves of the daffies after blooming
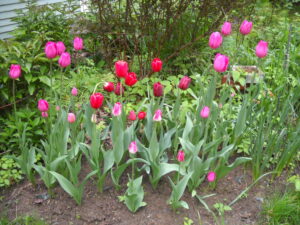
This is also the time to plant daffodils, tulips and all the small bulbs that bloom early. If you have a fenced yard, that will keep the deer from eating tulip blossoms when in bud – a real treat for them. If you have a problem with deer, you might want to avoid tulips, or plant them in pots for forcing.
Tulips and daffodils are generally labeled as early-season, mid-season or late-season. Plant plenty of each. Early ones are generally shorter, and I plant some, but I love the tall ones best. ‘Maureen’ is my favorite tulip: she is 22 to 24 inches tall, and ivory to white. Fabulous in a vase. ‘Menton’ is another nice tall one, pink petals outside with orange and white inside.
Although I have daffodils that still bloom after more than 50 years, tulips are less perennial. My rule of thumb is that if I plant 50, all will bloom the first year, half of that the second year, and half again the third year. So I often plant them as annuals, and pull them or cut off the foliage when I plant annual flowers over them in June.
Bulb planting tools are sold that you can plunge into the soil and pull out a core of soil three inches wide. I don’t like them. Soil sticks to the tool, and I find it much more time-consuming to plant bulbs one at a time. I prefer to excavate a big hole in the ground and plant 25 or 50 at once. Soil augers for your cordless drill are sold for planting bulbs, but most drills are not strong enough to do the job.
Here’s what I do: I select a nice sunny spot that drains well and is not soggy in winter. Then I dig an oval hole about 3 feet long and 2 feet from front to back, which will serve well for 25 bulbs. For daffodils and tulips I want the hole at least six inches deep. I put the soil into a wheelbarrow or onto a blue tarp so it won’t make a mess of my lawn or garden bed.
Tulips are ephemeral, but worth trying
Next I add some good compost and either “Bulb Booster” or slow-release organic fertilizer, and work it into the soil with my CobraHead weeder, a single-tined hand tool. Then I arrange the bulbs in the loosened soil in the bottom of the hole, with fat bottom down, and the pointy head up. I mix some compost into the soil I removed, and carefully fill the hole.
If space is at a premium, you can plant two layers of bulbs in the same hole. Plant the big bulbs in the bottom of your hole and add soil up to two or three inches below the soil line. Then plant small bulbs like crocus, snowdrops, glory-of-the-snow (Chionodaxa spp.) or squill ( Scilla siberica). The small, early bulbs will delight you, and then the daffodils or tulips will overwhelm you – particularly if you forget you double-planted the bed.
I’ve been planting bulbs around my 2-plus acres for decades because spring blossoms are the perfect antidote to a long New Hampshire winter. It is always a challenge to find a spot to squeeze bulbs in, but there is always someplace. This fall I am planting them between hostas I planted last year. The hosta foliage will hide the dying leaves of the daffodils after they bloom.
Henry lives, dreams of spring and gardens in Cornish Flat, NH. He is a long time UNH Master Gardener and the author of 4 gardening books. Reach him at
henry.homeyer@comcast.net.
Fall Chores: It’s Time to Get Started
Posted on Tuesday, October 12, 2021 · Leave a Comment
Those big yellow school buses have been lumbering along for well over a month now, so you know it is time to start getting your gardens ready for winter. This is a good time to work outside: the bugs are fewer and it’s not so cold that you’ll be miserable in an hour.
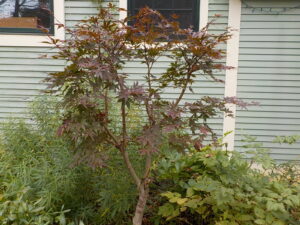
This Japanese red maple was full of clutter before pruning
I recently did some pruning on my Japanese red maple (Acer palmatum) trees. We all know that sugar maples pump sweet sap up from the ground in spring, but did you know that all maples send lots of liquid up in spring, even if not the sweet stuff? Because of that, spring is not a good time to prune. Now is a much better time.
I attended a pruning workshop in 2019 at Shin Boku Nursery in Wentworth, NH. Palmer Koelb has been growing, pruning and selling trees trained in the Japanese tradition for over 50 years. Some of his nursery stock is several decades old, and all of it is beautiful.
One of the things I learned at that workshop is that Japanese red maples are best trained over time. It is better to do a little pruning every year or two than to wait 10 years and need to cut big branches. I was told that I should never use a saw on a Japanese red maple, apparently they don’t react well to removing big branches. Hand pruners are best.
So what did I do? I reigned in the height of my trees. I like them to top out at around eight feet, so I looked for skyward-growing branches and cut each back to a lower fork, one hidden in the foliage. I also removed extraneous foliage and small branches in the interior of the trees, opening up the center of the tree so that the interesting branch shapes are visible. These trees, by their very nature, are not dominated by a single straight trunk, and I want to see the structure of a tree. I remove clutter, and rubbing branches.
This also a good time to shape all your hydrangeas, and prune them to keep them to the size you like. If you want to develop a new hydrangea to be upright, this is a good time to prune out downward-growing branches, and even to stake up a central branch to be the “leader” growing upwards.
I like to collect some flowers for drying indoors. Most of us cannot afford to buy flowers from a florist for the table each week, so picking blossoms now that look good in a dry vase is a good alternative. All the hydrangeas will provide lovely blossoms now, so long as you pick them before frost, which causes them to turn brown.
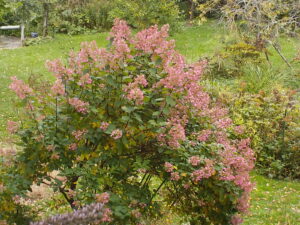
‘Pink Diamond’ hydrangea blooms each year in the fall.
My favorite hydrangea is one called ‘Pink Diamond’. It produces lots of big pointy flower panicles that start our white and turn to pink. In a dry vase the pink will fade a little, but stay quite pink all winter, as will other hydrangeas. The stems on Pink Diamond are stiff and upright on the bush and don’t flop the way some others like ‘Annabelle’ do when rained on.
Unlike lilacs and forsythia, hydrangeas are late-season bloomers so you do not lose any blossoms next year if you prune now. They bloom on stems that grow in the spring. I like to leave some blossoms on all winter to remind me that summer will get here eventually.
Grasses and grains are blooming now, and can look good in a dry vase, too. I grew an annual grain this year called black millet and I recently picked some stems and put them in a dry vase. Millet produces small seeds on narrow “cobs” much like corn, but without the outer leaves. It is found in bird seed mixes, and I ate it as a gruel when serving in the Peace Corps in West Africa. This year I bought some plants at a nursery, but will start plenty from seed next year. ‘Purple Majesty’ is probably the name of the variety I planted.
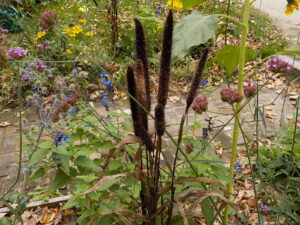
Black millet works well in a dry vase
I’ve been potting up annual plants I want to bring in before winter, rather than waiting until the afternoon before the first hard frost. I potted up some ‘Diamond Frost’ Euphorbia that I bought in small pots last spring and planted in the ground. This is a delightful plant that has tiny white blossoms all summer. As a “Proven Winner” plant, it is trademarked and is not sold by seed.
Diamond Frost makes a nice house plant that continues to bloom indoors all winter. It prefers a bright window sill, but will survive most anywhere so long as you remember to water it regularly. Then in the spring it can go outdoors again – and at no expense.
Each fall I dig up at least one rosemary plant and bring it indoors. I like to do this early in the fall so that it can get used to being in a pot while sitting in the garden in just the same place it was in the ground. This lets it have fewer changes in its environment at a time. Later I will wash it well with a hose in order to get off any aphids or other pests before bring it indoors.
Don’t use any fertilizer now for any houseplants coming inside. A plastic pot or an enameled one will keep moisture in better than an unglazed clay pot, if you are a lazy waterer, select them.
Raking the leaves can wait till later, after all the leaves have fallen. But go outside and start chipping away at the chores on nice days, even if it means playing hooky from work.
Henry is the author of 4
gardening books. Reach him at
henry.homeyer@comcast.net or by mail at PO Box 364, Cornish Flat, NH 03746.
Putting Away Veggies for Winter
Posted on Tuesday, October 5, 2021 · Leave a Comment
Like any industrious squirrel, I am getting food stored and ready for winter. Even if your vegetable garden is depleted, you can buy things in bulk from your local farm stand now to save for winter.
Each type of veggie has its own requirements. Some like a cool space with high humidity. Others want it cool and dry. Then there are a few, like sweet potatoes, that require a warm space and suffer in the cold. Let’s take a look.
Storing is the easiest and cheapest way of keeping veggies for a few months. Winter squash store well in a cool dry location such as under the bed in a spare, unheated bedroom. Drafty old farmhouses have plenty of good places to store them, along with cardboard boxes of onions and garlic. I’ve stored a blue Hubbard squash (which has a very thick skin) for up to a year without any problems. But they will rot in a high humidity area.
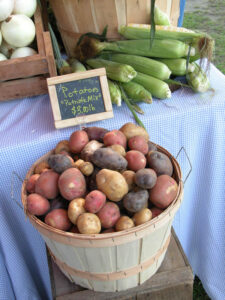
Buy potatoes now and save for a winter meal
Potatoes, carrots, kohlrabi, rutabagas, celeriac or celery root, turnips and parsnips will store for months at 35 to 50 degrees with high humidity. You can do that in a spare fridge, preferably in a drawer that keeps humidity in it. Or put them in zipper bags and punch a few breathing holes in the bags. You can put an inch of moist sand in a bucket, and store carrots in the garage if it stays cold, but not frigid. Keep a lid on the bucket, and check from time to time. Rodents love carrots and potatoes, so you can’t store them in an open container.
I built a “cold cellar” for storing potatoes in my cold basement that often has temperatures below freezing. I made a bin of cement blocks, two layers high, and covered it with an insulated plywood lid. I weighted the lid to be sure mice could not sneak in. I put a heat mat in the bottom to use if temperatures neared freezing in the box.
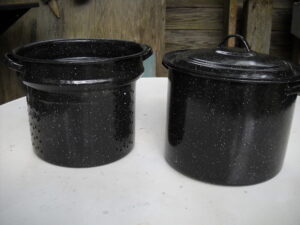
A blanching pot is useful if you plan on freezing veggies 004
A full-sized freezer is a good investment. Among other things, tomatoes, corn, broccoli, beans, peppers, kale and fruit store well in a freezer. I freeze them in freezer-grade zipper bags. You can suck the excess air out of the bag with a drinking straw by closing the seal up to the straw, then pulling it out quickly and snapping shut while still sucking on the straw.
Freezing is a time-honored process for storing food. Some veggies need to be blanched before freezing to keep them tasty. Blanching is a quick immersion in boiling water before freezing. It kills the aging enzymes in your vegetables, keeping them fresh-tasting longer. If you know you will eat your frozen things within 3 months, don’t bother with it. I recommend blanching beans, beets, broccoli, Brussels sprouts, carrots, cauliflower, corn, kale, peaches, squash and Swiss chard. I freeze apples, peppers and tomatoes without blanching.
If you blanch, just do it for 60 seconds, which is often even before the water has come back to a full boil. Use lots of water in a big pot, and not too many veggies. There are special pots sold for blanching. They have an inner pot with holes that help you lift the veggies out of the water quickly.
If you blanch veggies too long they will be mushy. Drop the blanched veggies in a sink of cold water, spin dry in a salad spinner, and blot with a cloth dish towel. Then bag and freeze.
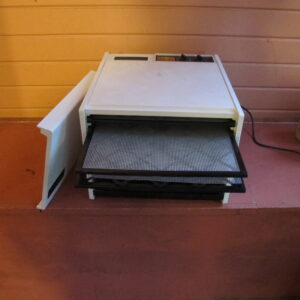
Excalibur dryer does a good job drying tomatoes, apples and hot peppers
I also dehydrate foods, notably tomatoes, hot peppers, apples and pears. You can buy a good dehydrator like the ones made by Nesco American Harvest for somewhere under $150. Or you can buy the Cadillac of dryers and get an Excalibur for $300 or more. Those use less energy and dry the food evenly without having to rotate the trays.
Dehydrating is great for hot peppers: I dry them until they are brittle, then grind them in my coffee bean grinder. That way I have a powder I can add to soups or stews a little at a time and that is well distributed. And I dry cherry tomatoes cut in half; I use them in soups and stews. They offer a bite of summer.
I also make tomato paste and freeze it in ice cube trays. I often do this with imperfect tomatoes: I cut out the bad parts and put the rest in a Cuisinart to blend them into a loose “soup” that I then cook down slowly in a big enameled cast iron pot. When I can literally stand a spoon up in the mix, it is done. Having a supply of tomato paste is essential for cooking, and I like that I don’t have to open a can when I need just a little.
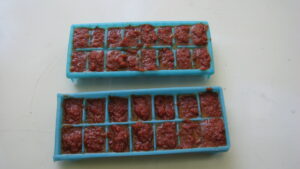
I freeze tomato paste for storage in ice cube trays.
If you have an apple tree, you probably have already made some apple sauce this year. It freezes well, and is always tasty. But have you made cider? You don’t need to buy a cider press. I bring apples to my local orchard, and ask them to press and bottle the juice. Be sure to tell your orchardist that you are freezing it, and to leave an inch of space for expansion. They will charge you a fee, but it is well worth it for the satisfaction of having your own cider in winter.
Lastly, have you thought of making sauerkraut? Cabbages are easy to grow – or inexpensive to buy at your local farm stand. If you want to learn the basics just Google my name and “sauerkraut”. I wrote a full article on it in 2015 and it is available on-line along with book recommendations for in-depth learning.
One last bit of advice: don’t freeze or store any veggies or fruit that are not perfect. Freezing rotten food does not make it better! And you will not want to eat it later if you don’t want to eat it now!
Henry is an organic
gardener. He tries to eat something that came from his
garden every day of the year! Reach him at
henry.homeyer@comcast.net or PO Box 364, Cornish Flat, NH 03746.
News of the Dreaded Asian Jumping Worm
Posted on Saturday, September 25, 2021 · Leave a Comment

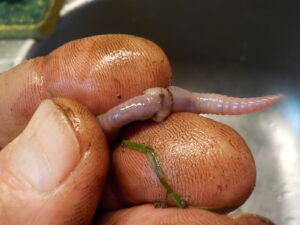
Jumping worms usually have a white clitellum, and move fast when disturbed
After decades of improving my garden soil, I have an infestation of Asian jumping worms. They can eat all the organic material in the soil, depleting it terribly. These foreign invaders multiply more quickly than our common worms, outcompeting them. Everything I have read about them says they are bad news for gardeners.
Scientists are working on organic solutions to the Asian jumping worm problem. I was able to phone Brad Herrick, a researcher at University of Wisconsin who has been studying them for years. He explained that although they came to the United States nearly a hundred years ago, the worms are spreading rapidly, now infesting 37 states. Their worst impact may be in the forest: they eat dead leaves and forest duff, potentially creating a soil devoid of the organic matter that nourishes native wildflowers and trees. The soil can become sterile.
Soil surface is covered with castings like coffee grounds where jumping worms are present
To see if you have them, start at a shady, mulched bed – that is where they like it best. Pull back leaves or mulch on your soil. The worms are surface feeders, living in the top inch or two of the soil, and readily seen on the soil surface. Touch one, and it moves fast, wiggling and moving – quite a contrast to our relatively sluggish ordinary worms. The soil in infested areas often looks like it has coffee grounds spilled on the soil – which are their castings or excrement.
The clitellum that produces the egg sacs or cocoons is a whitish band near the head end of the worm. This contrasts with our common worms which have a reddish-brown clitellum, and which is usually a bit raised.
Brad Herrick explained that unlike the earthworms we know and love, these guys can reproduce asexually, so even one worm can start an infestation. But they also spread when the cocoons, which sit on the soil surface, are washed away by rains. This allows them to expand their territory quickly, especially on hillsides.
How did I get them? I don’t know. They may have arrived when I bought plants for a new flower bed. I know my source of compost and know it has been heated sufficiently to kill all the weed seeds, so that would have killed any cocoons, too. And I see none of the worms in my purchased compost pile. But I had work done on my septic system, and soil was brought in.
According to Brad Herrick, freezing temperatures kill all the adult worms each winter. Unfortunately, it does not kill the eggs which over-winter and start the cycle again. The eggs hatch once the soil temperature reaches 50 degrees- perhaps in April or May. He said it takes 70 to 90 days to reach maturity, at which point they start producing eggs; they continue to produce eggs from late June until frost.
Ordinary earthworms have a raised clitellum that often incompletely encirlcles the worm, and is rreddish brown
So what can you do? If you have a new infestation you can try removing them by hand. Scientists often use a solution of yellow mustard powder in water to get worms to come to the surface. One third cup per gallon of water. But if you have a large area, that might not be practical. The best time to do this is in early summer before new worms have reached maturity.
Brad Herrick said you can heat the soil to kill the worms by solarizing it with clear plastic. Worms – and castings – will self-destruct at 104 degrees for 3 days, perhaps less. Unfortunately, that will not work in forests or shady beds- which is where I have them.
The worms can live in sunny beds if they are mulched. In fact, Herrick told me, the worms have an enzyme that allows them to eat wood mulch. I wonder if mulching with peastone or small gravel instead of bark mulch or leaves might help to reduce the problem. If they run out of food, they may well die out. That theory has not been tested, and you may not like the look of a stone mulch. If you do this, please let me know if it helps.
My worm problem so far exists only in one large shady. Here’s my plan: after frost I will rake off leaves and mulch (and collect and destroy any worms I see). Worms are usually within a inch or two of the surface.I will treat those leaves as toxic waste as they probably will have cocoons in them, which I don’t want to get into my compost pile.
Hopefully I can burn my rakings in the driveway to destroy the leaves and cocoons. Then I will cut back all my perennials and go over the area with a flame weeder. This is a torch attached to an 8-gallon propane tank that sends out a big flame. That should burn up the cocoons on the soil surface. Flame weeders are available from Johnny’s Selected Seeds or Fedco seeds.
Herrick told me of a product, BotaniGard, which contains a fungus that is listed for use to kill the worms. However, in a University of Vermont study I read, it is only about 70% effective in a lab setting. That is not good enough for me, especially since even a solitary worm can produce viable eggs. And it sells on-line for $90 a pound.
When buying nursery stock, look for coffee grounds on the surface of the pot, and when removing the root ball, looks for worms. If you see either, do not plant it, and report the problem to the seller. Check purchased compost for worms, too. Clean your tools and shoes if working in beds with worms – the egg cocoons are tiny and not visible to the naked eye.
We will get through this. Remember when we were told impatiens plants all carried a terrible fungus and we would never be able to grow them again? Didn’t happen. This is more serious, but I do believe we will be able to manage it.
Henry lives in Cornish Flat, NH and is a longtime Master
Gardener. He is the author or 4
gardening books. You may reach by e-mail at
henry.homeyer@comast.net.
Hedges and Fences
Posted on Monday, September 20, 2021 · Leave a Comment
While vacationing recently on the Maine coast I admired many nice gardens. Many of them had hedges or fences, more than I am used to seeing in rural New Hampshire.
When settlers first arrived in New England they dug out stones left by the glaciers some 10,000 years before. They piled them up to clear farm fields, and began making stone walls to define property borders and to contain animals – or to keep them out. Gradually dry stone wallers learned how to make them look good and last forever.
Building a stone wall or retaining wall is hard work, and expensive to have someone else build. If you want to build your own, remember 3 things: First, the soil moves in winter as it freezes and thaws. This can make walls tumble if not properly built. Wallers have learned to add drainage under and around a wall: at least a foot of one-inch crushed stone in a trench beneath the wall works well. Round pebbles will act as ball bearings would, allowing stones to move.
Each stone should touch 4 others, two below it, two above it. Stones should not be stacked one on top of another, much the way bricks are laid. This helps to tie it all together and prevent movement.
Lastly, use a long string to keep the wall straight and level. Or if you are creating a curved wall, define it carefully before starting. You can place a garden hose on the soil to help define the curve.
Early settlers also made wattle fences. I talked to Crow Boutin who makes his living making wattle fences in the Kennebunk area of Maine. These fences are simple: he cuts lengths of fresh yellow birch that are one- to two-inches in diameter. First he make “pencils” that he drives in the ground with a hammer after he cuts them to length and sharpens them with an ax. Then he weaves pieces of birch 8- to10-feet long between the vertical pencils that he spaces about 16 inches apart. The tension of the bent stems holds the fence in place. Simple? You bet, and something you could try.
But why do people need fences or hedges? Some are just for the looks, or to create a backdrop for flowers. Others are to keep others from looking into the yard, or to keep animals in (or out). Let’s take a look at a few I saw.
The nicest fences I saw were white picket fences. Maybe I like them because my grandfather had one, and I remember it from my youth. They show off flowers well, and allow climbers to climb on them. But generally you have to pay someone to install them, and, as Tom Sawyer knew, you must paint them from time to time. Now these fences come in a variety of materials including fiberglass or plastic that needs no painting.
Living fences – called hedges- come in a variety of species. Evergreen hedges like yew or arborvitae can look good summer and winter, but are often eaten by deer. Hemlock and pine are less likely to be predated by deer, but they will grow to 60 feet tall unless they are trimmed every year – and most somehow escape and do get tall.
Rugosa roses are commonly used as hedges on the Maine coast. They will grow in sandy soil and produce copious fragrant flowers and handsome red fruits in the fall. But they look bedraggled over time, and aren’t green in winter. Their thorns do keep people and pets from cutting corners through the yard.
Lilacs look great when blooming and have handsome green leaves 8 or 9 months of the year, but do little to block the view of your house and yard in winter. They do best in sweet soil, so add limestone every year or three to keep them blooming nicely. Lilacs, too, need trimming or they can get gangly.
The split rail fence is generally made of cedar, which lasts a long time – up to 20 years. It creates a rustic look, but neither keeps animals out nor blocks the nosy neighbor’s view. It will keep cars from parking on your lawn, and can support vines like roses or clematis.
Less common fences include stockade fences – tall wooden fences that block all view of the yard. What you need if you like to sunbathe nude in the garden and have a near neighbor. Definitely not a friendly signal to neighbors. Iron rail fences, wire fences and chain link fences all have their uses, but I can’t imagine having one installed.
Lastly, there is the deer fence. Many gardeners use them in order to grow vegetables, or to have tulips in the spring. Nowadays there are woven plastic fences that are inexpensive and come in 8-foot widths that work well to keep out deer. You can install them yourself on posts or stakes you cut in the forest. They work – unless you leave the gate open! Me? I have depended on having dogs to scare away the wildlife for many years. They did the job well, though I am now looking to adopt a dog as my corgi, Daphne passed away a year ago. And I love dogs, too, which I can’t say for fences.
What the Monarchs Need Now
Posted on Tuesday, September 14, 2021 · Leave a Comment
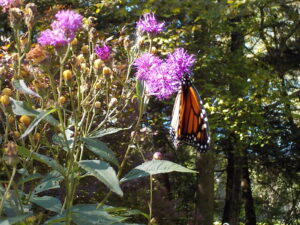
Monarch feeding on New York ironweed
Monarchs are on the move! It is time for their long trip to Mexico to spend the winter. And like marathon runners, they need to bulk up on calories before the event. You may have let a patch of milkweed grow on the edges of your property to support them. That is great, and many of us have done that. But the milkweed plants are for the caterpillars to munch on. Right now, they offer nothing to monarchs. Our monarchs need blooming flowers for nectar and pollen.
Of the monarchs I see floating around my gardens, three plants seem most attractive to them for feeding right now: Joe Pye weed, goldenrods and asters. Let’s look at these and their garden worthiness.
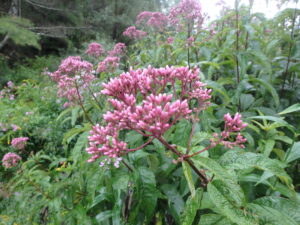
Joe Pye weed ‘Gateway’ blooms longer and better than the wild forms
Joe Pye weed (Eupatoreum maculatum) is a native wildflower that likes stream edges and places with good moisture, though it will grow almost anywhere it is planted. It is a big plant, often 5 or 6 feet tall in the wild. It is a clumping plant, with the clumps getting bigger every year.
It is readily found in plant nurseries, although most sold are a named cultivar, one called ‘Gateway’. I have found that Gateway blooms longer and does better in a vase than the truly wild ones that have popped up along my stream. There is now a smaller Joe Pye that is called ‘Little Joe’ that only gets to be three to four feet tall. It is a patented variety that does not breed true, and is actually a different species in the same genus, Eupatorium dubium. Then there is one called ‘Baby Joe’ but I have not yet tried either one.
The flowers of Joe Pye weed are a light purple and appear in large panicles at the top of the plant. The stems of Gateway are a deep purple, though the wild ones tend to be greener. Plant Joe Pye weed where you want it as the fibrous roots go deep into the soil, and when firmly established they are nearly impossible to dig out.
Goldenrods are a wonderful, though frequently maligned genus of plants. For many years they were prohibited in arrangements in the flower room at our county fair, as it was believed they caused hay fever. They do not. They have a heavy, sticky pollen that does not fly in the air but is transported by insects. There are at least 20 species of native goldenrods including some that prefer shade, while others demand full sun.
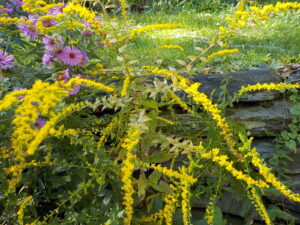
‘Fireworks’ goldenrod is commonly sold in nurseries now
Goldenrods are important not only for monarch butterflies, but also for many butterflies, moths, bees and other pollinators. And yes, some of the big, sun-loving species will expand their territory and send tenacious roots deep into the soil, even muscling out some dainty perennials.
Years ago I purchased some blue-stemmed goldenrod ( Solidago caesia) at The Garden in the Woods in Framingham, Massachusetts. I grow it in both dry shade and in rich soil in moist shade. It has never been a pest, or traveled around my garden beds, staying just where I planted it, blooming in September and into October. It is quite dainty.
My favorite goldenrod is a variety called ‘Fireworks’ of the species Solidago rugosa. It prefers full sun and moist soil, but I have also grown it in part sun and fairly dry soil. Its flowers are tiny, blooming first at the tips and working their way down the 3- to 4-foot stems. The stems arch gracefully like a fireworks display. They can be divided every 3 to 4 years to keep the clumps to a manageable size, and to increase (or share) them.
All the asters and aster-family flowers are great for monarchs and other butterflies. Scientists don’t call the genus aster any more, but Symphyotrichum, which is a shame as it is much less user-friendly.
There are at least 30 species of asters that grow wild in America, including many nice shade-loving ones that are certainly uprooted as weeds by tidy gardeners long before they bloom now, in the fall.
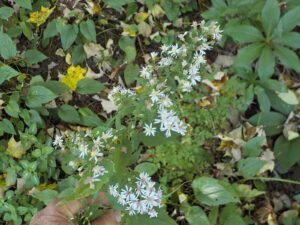
This woodland aster grows in shade as a wildflower
Asters have flowers with many rays and a bright yellow eye. They range from deep purple to white, along with pink and a light blue. All are quite tough, surviving any winter thrown at them.
Similar to asters, and a plant I just saw visited by a hungry monarch, is New York ironweed (Vernonia noveborancensis). It has smaller, deep purple blossoms in big clusters at the top of stems that can reach 9-feet tall.
According to Tracy DiSabato Aust, in her fabulous book, The Well-Tended Perennial Garden, shorter, later-blooming plants can be created by cutting back all the stems to the ground when they reach 2-feet tall. I shall certainly try that next spring. I moved mine from moist soil to dry soil in part shade partly because it got too tall in the full sun.
If you care about your monarchs, plant native plants. Native plants are much more useful to pollinators and wild animals than plants imported from other continents. Many of the native plants are just as beautiful and pleasing to me in the garden, and hopefully they are to you, too.
Make Your Own Compost to Build Better Soils
Posted on Tuesday, September 7, 2021 · Leave a Comment
Most gardeners do some composting. Some folks compost anything that once was part of a living plant, often mixing it with barnyard waste; they turn and aerate their piles and make terrific compost in record time. Others are lazy composters who just throw kitchen scraps or weeds in a pile and let it slowly decompose over time, allowing it to gradually decompose. I’m a lazy composter. I have do much to do in the garden to take the temperature of my compost pile (though I have, actually) or check it weekly for moisture content – let alone turning it regularly.
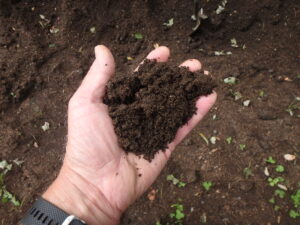
Good compost is worth its weight in gold
Let’s look at the basics: organic matter – leaves, weeds, moldy broccoli or cow manure – is digested by bacteria and fungi. These microorganisms exist in amazing numbers in biologically active soil or compost. But for them to multiply and breakdown organic matter they need a good supply of materials containing lots of carbon and a little bit of nitrogen. Both are needed to build cell walls of the little critters and the proteins and oils in their bodies.
Scientists tell us that by weight, your compost pile should be 25 or 30 pounds of material containing carbon for one pound of nitrogen. Carbon-containing materials include dry grass or leaves, straw – and in general, brown materials. Nitrogen-containing things are also referred to as “green” materials – fresh grass clippings, weeds and household kitchen waste. Just to confuse you, all manures – which are brown – are also full of nitrogen.
We keep a 55-gallon drum of dry leaves next to our compost bin. We fill it in the fall and pack down the leaves to get in as many as possible. Each time we empty our 5-gallon bucket of kitchen scraps into the bin, we take some leaves and add them on top. This adds carbon to the pile, and helps a little to keep flies from finding the goodies. These leaves are certainly is not in the ratio of carbon to nitrogen we need for the fastest composting, but it helps. We count on the kitchen scraps to have some carbon, too.
For weeds, we just pile them up and let them decompose over time. We suffer from an infestation of goutweed, a noxious invasive. We try to keep any goutweed out of piles that will eventually be used for compost as even a scrap of root can start a new place for it to grow. Other invasives we do not have – but would separate if we had them include Japanese knotweed and black swallow wort. In fact, anything invasive should not go in any compost pile you hope to use later.
What else should stay out of compost piles? Meat scraps, oils and fat, dog and cat feces. Shredded newspapers and office paper can be used in compost piles – they are carbon-based, and their inks now are made from soy products. Shiny color inserts and magazines I avoid using. If you add shredded paper to your compost pile, mix it in well – thick layers will not decompose easily.
What about weed seeds in compost causing problems when you use your homemade compost? Ideally, if you are doing everything right, your compost pile will heat up enough for a few days to kill the weed seeds. That means curing it for three days at 140 degrees F. I ‘ve done experiments using annual grass seed and a soil thermometer, and found that even day or two at 135 will kill those seeds. Weed seeds may be tougher, of course. And it is tough to get an entire compost pile hot at the same time.
So how do you get your compost to heat up? You need to layer green (Nitrogen-containing) and brown (Carbon-based) materials. The key is the nitrogen layer. Fresh grass cuttings are high in nitrogen and easily collected with a bagger. Mix them in your compost pile, and it will heat up. Poultry manure, or any manure is also high in nitrogen and will heat up your pile if mixed in. Compost thermometers look like meat thermometers with a longer probe, and are sold at garden centers or on-line.
Moisture level is important for making compost. The pile should be neither dry nor soggy. A handful should feel about as moist as a squeezed-out sponge. I place tree branches underneath a new compost pile to help with drainage. Never put a pile where a roof dumps water.
Your compost should be well aerated. You want aerobic decomposition. So some gardeners turn and fluff their compost regularly, which will help with that.
I add compost to the planting holes for my tomatoes and kale, and work some in for everything, in fact. Why? Because even though I have great soil, compost gets oxidized, breaks down, and gets used up. Plants extract minerals from it. Beneficial bacteria and fungi use it to build their bodies. I try to keep my soil fluffy – roots do better in soil that is loose and aerated – and compost helps me to create that most desirable of soils: a nice loam.
Even though I make compost, I also buy it by the truckload. It is available from farms, garden centers and others. Ask for hot-processed, aged compost to avoid weeds.
There are no poor gardeners, just poor soil. Add compost, and perhaps a little organic fertilizer and you will have a “green thumb.” It takes time to make compost and build soils, which is why you should start now!
You may reach Henry at
henry.homeyer@comcast.net or PO Box 364, Cornish Flat, NH 93746. He is the author of 4
gardening books.
Do You Deserve a Medal?
Posted on Wednesday, September 1, 2021 · Leave a Comment
As I walked around the garden recently with my wife, Cindy Heath, she turned to me and said, ”Anybody whose gardens looks great at this time of year deserves a medal.” I allowed that we did not deserve a medal. Wanna get the medal? Here are some tips I have come up with.
First, pull any tall weeds. By now a few vigorous weeds can tower over flowers in your garden if you let them. Pull them before company comes if you don’t want to be embarrassed by your sloth.
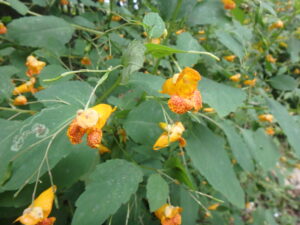
Pull tall weeds like touch-me-nots to make the garden look better
I have lots of jewel weed (Impatiens capensis) in partly sunny to shady flower beds that have rich, moist soil. It is a native plant, but one that can take over if you let it. I recently removed some that was well over six-feet tall. It was in a bed with tall perennials, and I guess it outgrew them to get more sunshine, In other places, where the completion is minimal, it might only get 3- or 4-feet tall.
According to the US Forest Service website, it is one of just a few native plants that can outcompete garlic mustard, a terrible invasive in our woodlands. So if you have it, and have garlic mustard, you might want to let it survive – and enjoy its bright orange and red flowers that I find cheery.
Next on my list, I’d recommend deadheading flowers that have gone by and are looking shabby. I have a huge bed of Shasta daisies in front of our house, but they were in their prime a couple of weeks ago. Cindy cleaned up the flowers with a pair of scissors in just 10 minutes. It made a huge difference to remove all those spent blossoms. There are still many flowers in that bed that look fine, so we didn’t need to cut it all down.
Bleeding heart is a favorite flower of mine. It’s a big plant that blooms in early summer in either pink or white. But by now the flowers are long gone, and the leaves have turned yellow. What to do? Cut back the foliage to the ground. Don’t wait until fall or frost to arrive, just cut it back now. Do the same throughout the garden.
Fall asters can be used to add color where you have cut back faded perennials
So what can you do with those empty spaces where you cut back flowers that have declined to the point that they needed to be cut back? Depending on the spacing, you might be able to fit in some chrysanthemums or fall asters. These are sold in bud or bloom in pots in grocery stores, farm stands and garden centers. They will bloom for weeks so long as you do not let them dry out. Fall asters are in the same category as the more common mums: inexpensive and lovely for filling in empty places.
Fall mums and short purple asters are often sold in compressed cardboard pots. Unfortunately, these dry out very quickly. If you leave the plant in them, you need to soak the pots and plants regularly, generally more than once a week. The solution? Plant them in the ground when you can, or put them into plastic, fiberglass or ceramic pots.
Chrysanthemums are nice fall annuals that will add color to your garden. They are readily available.
I can’t plant mums where I’ve cut back that big bleeding heart, for example as I would damage the roots if I dug there. But I can place them in a nice ceramic pot and set it gently in the same area as the bleeding heart, though perhaps a little forward or back from the stubs of the stems. Yes, it is work to do so, but it is worth the effort if you have it in a prominent spot that you (and your visiting friends and neighbors) will see.
In the vegetable garden many plants are suffering from a variety of fungal diseases. Mold and mildew are common and make leaves ugly. The solution? Cut off the leaves. There are usually newer, undamaged leaves, and new leaves on things like squash and pumpkins are still growing. Once a leaf has mildew, you can’t make it look good, so get rid of it.

Henry Eiler rudbeckia was tied up twice to keep it from flopping
Tall flowers are flopping over now, particularly if we get a heavy rain. I grow a black-eyed Susan, Rudbeckia ‘Henry Eiler’ that has gorgeous, unusual blossoms, but it grows to be over 6 feet tall. I surrounded the big clump with hardwood stakes a month ago and tied string from stake to stake to support it. Recently I tied another tier of string higher up on the 6-foot stakes to prevent flopping.
For some things I can avoid using string by pushing stakes into the soil at roughly a 45-degree angle, two of them in an “X” pattern. I push the flopper up then support it with the two stakes. For smaller things I use bamboo stakes, for larger, heavier things like New England asters that can by 5 feet tall, I use 5-foot one-inch hardwood stakes. Paint them green if you don’t want to notice them.
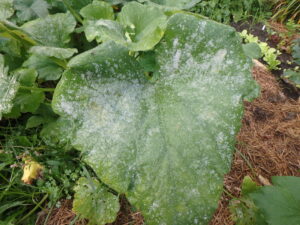
Squash leaves with disease should be cut off
What about the lawn? By Labor Day it may be looking pretty shabby. I don’t believe any of us should waste water on our lawns. If you have a sunny yard with sandy soil, your lawn may be looking yellowed and dry. Crab grass, an annual that fills in where the lawn is compacted by foot traffic, is declining or dead by now in most places. My solution? Hope for rain, and try to avoid looking at the dead spots. Enjoy looking at that medal-worthy garden of yours!


 Click Here to buy from Cobrahead