Creating a Winter Wreath
Posted on Thursday, December 9, 2021 · Leave a Comment
Winter is upon us and it may seem there is little for a gardener to do. No weeding, nothing to plant, no flowers to pick. But last year’s garden may still have some remnants that, with a little imagination, can create something pleasing to the eye. I went out to my garden in early winter to see what dry flowers still were standing after my garden clean up, and saw plenty to work with. I picked plenty and set them aside for making winter wreaths and arrangements.
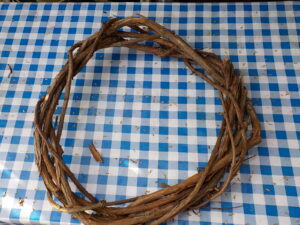
Wreath form made with grape vines
I like wreaths, and in the past I have made them to decorate an outdoor space such as a blank wall or door. Instead of using a wire wreath form, as many people do with evergreen wreaths, I used grapevines to make the basic form for my wreath. You can, too.
Go to a wooded area and look for vines climbing a tree. Grape vines are common in hardwood forests, but often strangle trees, so removing some grapevine is actually a good thing to do. Cut a 15-foot length of grapevine that is about as thick around as your ring finger. It is important to use living, not dead, vines; they are a greenish white inside and flexible. Dead vines are brittle, brown, and not suitable.
Begin by forming a vine circle 14 to 16 inches in diameter by overlapping (or twisting) one half of the vine over the other half – the same way you would start to tie your shoelaces. Then grasp one of the loose ends and weave it around the vine circle in loops, over and under, pulling it tight as you go. Then take the other end of the vine and weave it around the circle.
The great thing about this grapevine wreath is that you can just slide stems of dry flowers in between the vines and natural tension will hold them in place. In fact, I had to use a screwdriver to lift the vines at times in order to slide the stems in place. But I also use thin florists wire to tie together more delicate things like grasses and add them to the wreath.
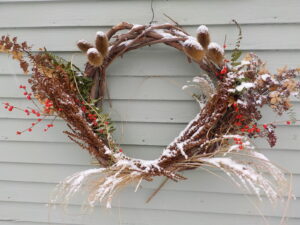
Winter wreath with a dusting of snow
Here are some of the plants I used in my winter wreath. Sedum ‘Autumn Joy’ is a deep brown and stands up well in the winter garden. Fountain grass (Miscanthus sinensis) ‘Morning Light’ provides a light grown, fluffy material, as the seed heads are still present. Mine got knocked over by ice earlier in the winter, and then after the ice melted, it stood back up again!
What else? Various hydrangeas have flower panicles that are dry and delicate but still attached at this time of year. I used some flowers from one called ‘Quick Fire’. I like it for wreaths because the panicles are not huge, the way many of the PeeGee hydrangeas are, or Annabelle. If your panicles are too big, you can prune parts off to make them more suitable for a wreath.
I wanted some greenery in the wreath and could have pruned off some twigs from either white pine on hemlock, but had some Christmas fern right near the house and used that instead. I’m not sure how long it will hold up in a wreath, but looks good now. Hemlocks tend to drop needles fairly quickly, but anything used as a Christmas tree would be fine – Balsam fir or blue spruce, or example. Or snip some stems off your Christmas tree when you take it down.
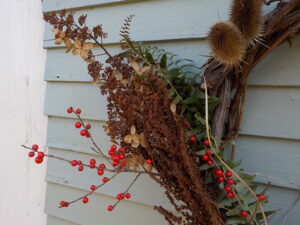
Close-up of winter wreath
For color I went to my brook and gathered some winterberry (Ilex verticillata) growing alongside it. This shrub has bright red berries in winter, and although it prefers a moist location, but it will grow in ordinary garden soil, too. In summer it is pretty ordinary looking, but is fabulous when covered with red berries in winter. You need both male and female plants to get berries. One male is fine for five females.
The last addition to my winter wreath were some stems of teasel, a biennial weed hated by mid-western corn farmers. It gets in their machinery and gums up the works – and it grows 6 feet tall. The flowers and seed heads are two-inch cylinders that are very prickly. The stems have thorns, but these can be rubbed off while wearing gloves, making them easier to work with.
Because teasel is a biennial, it is easy to control: I pull most of the first-year plants when they are small. I leave just a few to grow and produce flowers. Six plants or so are nice. They stand up all winter and contrast well with the snow.
If you are not interested in making a wreath, or don’t have the time, pick some stems of anything interesting still standing in the garden, and put them in a dry vase. I leave some flowers with seed heads for the goldfinches and juncos to munch. Things like black-eyed Susans and purple coneflower are nice for them. I always leave some snakeroot, too (Actea racemosa., formerly Cimicifuga racemosa), as it is a tall plant that stands above the snow.
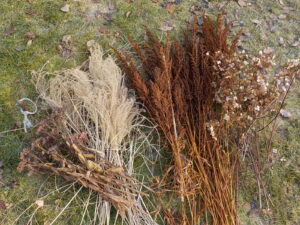
Dry plants cut for use in wreath
Lastly, if you are looking for dried flowers to decorate with, don’t forget the weeds. Walk through an un-mowed field and you will see plenty of dry flowers standing proud in the snow. Or take a walk along a country road and look for shrubby things with interesting branches or seed pods. With a little imagination, they can be used to create beauty.
Henry is the author of 4 gardening books and a long-time UNH Master Gardener. He lives in Cornish Flat, NH. Reach him by e-mail at
henry.homeyer@comcaset.net.
In Praise of Kale, the Misunderstood Vegetable Hero
Posted on Tuesday, December 7, 2021 · Leave a Comment
Like Rodney Dangerfield, kale doesn’t get enough respect. I’ve been told that it only became a commonly grown vegetable in the 1970’s when salad bars ordered it to use as the bed upon which other edibles like tomatoes, carrots and cukes slept on in nearly ordered arrangements. No one actually ate kale. But that has changed, at least with the Birkenstock crowd. Like me, for one.
Kale became the carpet for other veggies because it is a deep, rich green, and seemingly never wilts. It is the toupee of veggies, always looking neat and presentable. I often pick a few leaves and place the stems in a jar of water on the kitchen counter to remind me to include it in soups, stews, scrambled eggs and more. And to admire.
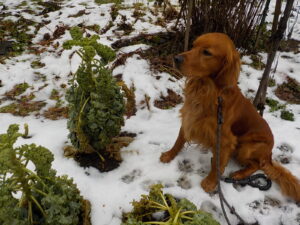
December kale with Rowan, our new dog
On a recent raw December morn I took our new dog out for a walk. Rowan is a year-old Irish setter/golden retriever mix we adopted just before Thanksgiving. As he zoomed around the property I stopped to see how our kale is doing. Still healthy, despite occasional temps down to 15 degrees, and now covered with wet snow. I picked a few leaves and brought them up to include in a soup or salad.
Kale is crunchy. In a salad I cut it finely, blending it in with lettuce, although my wife, Cindy, recently made a kale salad. She also used walnuts, crispy rice and dried cranberries – and it was delicious. She massaged the fine-cut leaves with olive oil for a couple of minutes first to help make it less crunchy.
It is one of the more nutritious greens. Compared to iceberg lettuce, it has two and a half times more fiber. It has more thiamin, riboflavin, niacin, pantothenic acid, Vitamin B6 and folate than iceberg lettuce. It is a great source of Vitamin A, Vitamin C, Vitamin K, calcium, and potassium. It has twice the calories of iceberg lettuce, but neither is a high-calorie food. You can eat all the kale you want and not gain an ounce of fat.
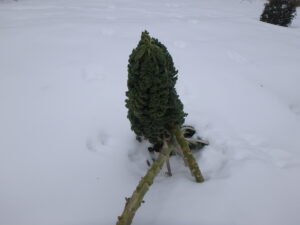
Kale in the garden in February
One of my favorite ways to eat kale is in a green smoothie for breakfast. I use about 2 cups of kale removed from the center rib, a banana, half an avocado (if I have one), half a cup of orange juice and a cup and a half of water. Oh, and I squeeze half a lime into the mix, and grate in some fresh ginger if I have it. I chop the kale very, very finely because my older blender doesn’t liquefy it, even though the dial says “Liquefy”. I don’t want to have to chew my smoothie.
Sometimes I add frozen blueberries or raspberries to the mix, or if I want a cold smoothie, I substitute ice cubes for some of the water. In summer when I have lots of greens I try to add 4 or more leaves of other greens – lettuce, Swiss chard, or whatever looks good. Spinach is good, and very nutritious. It freezes well after a brief blanching.
Growing kale is easy. I rarely find the leaves eaten by insects, though some readers have written me about flea beetles (or something) eating holes in the leaves. You can stymie most bugs by covering the plants with a layer of “row cover”. Row cover is a spun agricultural fabric that looks like those dryer sheets available to reduce static and add fragrance to laundry. But this stuff comes in long 60-inch wide pieces. Wires are sold to form hoops over small plants, but you can drape it right on bigger plants. It is great for keeping potato beetles away from you spuds, too.
Kale is a big plant. I grow it 18 inches apart in a wide, raised bed. It grows best in full sun, but if sun is at a premium in your garden, it will do fine in part shade. Hot afternoon sun and dry soil is not ideal for kale. I recommend adding plenty of compost in the planting hole, and some slow-release organic fertilizer.
Sometimes I start kale from seed indoors six weeks before planting it outside, but if too busy, I just buy some started plants from my favorite farm stand. If you start your own kale indoors, you may get tall, lanky plants – due to not enough light inside. No problem. Bury some of the stem. Just pinch off some lower leaves, and plant the kale deep in the soil so it is not flopping over when it goes in the ground.

A few ingredients for my soup – dry beans, kale, scallion, garlic
I make a great winter stew using kale and other garden vegetables that I have either stored or frozen. It can be either vegetarian or not. It is loosely based on a Portuguese stew I ate years ago on Cape Cod. I don’t think you need a step-by-step recipe, nor do I know the exact proportions, but I share with you my carnivore version and you can make your own according to your preferences – and what you have available.
I start by slicing a pound of Linguica Portuguese sausage into smallish cubes and browning in olive oil with onions and/or leeks (which I always have in the freezer). If you don’t find Linguica, substitute any spicy sausage like Andouille Cajun sausage.
Then I add water and tomatoes. I freeze tomatoes whole in September, so I use those, chopped up, but you could use a 28 oz can of diced tomatoes. Into the stew goes a couple of cups of chopped kale. Then I add herbs – parsley, fennel seed, oregano and marjoram. And carrots, for sweetness.
Lastly I add something to give the stew rib-sticking goodness: either potatoes, winter squash or cooked dry beans. I let the stew simmer until hunger overwhelms me, but I always make plenty as it is good warmed up for days.
So remember to plant plenty of kale next spring. It won’t disappoint you.
Henry’s book, “Organic
Gardening (not just) in the Northeast: A Hands-On, Month-by-Month Guide” is available from him, signed, for $19. Send a check to PO Box 364, Cornish Flat, NH 03746. Or, if you want to use PayPal, go to his website,
www.Gardening-Guy.com.
Brightening the Dark Days of Winter
Posted on Tuesday, November 30, 2021 · Leave a Comment
This is the darkest time of the year: not only are the days short, clouds obscure the sun much of the time. Many of us find the gloom oppressive, especially when there is neither enough snow to ski, nor ice to skate on. And for gardeners, there is little we can (or wish to) do outside. So what do I do?
First, I go to my local grocery store or florist and buy cut flowers or potted plants. For $10 or $15 I can brighten my outlook considerably. The most economical to buy are potted plants. They will, with a minimum of care and forethought, bloom for weeks – or even for months. Here are a few of my favorites:
Christmas cactus. It should be called a Thanksgiving cactus, really, because they usually bloom well before Christmas. Buy one in full bloom, or that has a mix of blossoms and buds. They need moderate light indoors, but not hot afternoon sun. Temperatures of 60 to 70 degrees are best for success. They should not be allowed to dry out completely, but neither do they want to be kept soggy. They like humidity, so place them in a saucer of small stones and add water. Never let the pot sit in water.
Cyclamen. Another low-light plant. This one suited for even less light than Christmas cactus. If you give it any direct sunshine, an hour or two of morning sun is plenty, but indirect light is better.

Cyclamen really are not fussy, and bloom for weeks
Water your cyclamen only when dry, which depends on the temperature and relative humidity. I find picking up the pot tells me a lot: if dry, it weighs very little, when moist, it is heavier. If you go too long, the flowers will flop as if to say, “Look at me, I’m dying of thirst!” But they recover quickly. Place your plant in a saucer of water and let it suck up water. But don’t let it sit in water for long.
My mother loved African violets, and did well with them. I remember doing an experiment with my new Chemistry Set for Young Scientists when I was in the fourth grade. I made a solution of tannic acid, and put a drop on a leaf. Overnight, it burned a perfect hole! Great experiment until my mother asked me if I had done something to her plant.
I have not had great luck with African violets here in New Hampshire (they may have heard about my experiment, way back when). I largely heat with a wood stove, and keep the house warm, but quite cool at night. I finally read an article that said one should never let the temperature in the room they are in drop below 70 degrees. So I no longer try, though I have recently read that temps down to 60 degrees are okay.
If you want to grow them, keep them consistently warm in a bright room but not in direct sunshine. They like high humidity (hence do not like woodstoves) but do not tolerate soggy roots. Water from the bottom, but water once a month from above (to flush out any fertilizer salts). Never let water get on the leaves. Pinch off spent blossoms or yellowed leaves.
My absolute favorite house plant is an orchid called Phalaenopsis or moth orchid. Buy them in bloom, and they will bloom for many weeks. Direct sunlight can scorch the leaves, but they need a bright room. These are tropical orchids so like warm temperatures. But cool nights are good – down to 55 degrees.
Moth orchids in their native environment grow in trees. So the soil mix they come in is generally a special orchid mix made of bark chips, and perhaps a little perlite or vermiculite. This mix allows water to run right through it. Be sure that if it comes with an inner pot and an outer pot, to pour out water after watering from the outer pot, which normally has no drainage. Or just lift the inner pot and run water through in your sink. Otherwise you will kill your orchid. Water once a week, or if exposed roots turn silvery white.
According to the experts, tree orchids such as these do best with good air circulation. Me? I find that in a room with people coming and going there is enough air movement to keep them healthy. I do grow them over a saucer of pebbles and water to increase humidity, and grow them in the bathroom where steam from the shower helps.
But if you have no patience with house plants, or believe you cannot grow them, buy flowers for a vase. Most cut flowers will last a week in a vase, many will last longer. Most stems cost between $1.50 and $3.00. Buy an odd number of stems – 3, 5, 7 or 11, depending on your budget.
The vase for displaying cut flowers should be about half as tall as the stems are long (or a little less). But that rule is not firm. If the arrangement looks good to your eye, it is fine. Use a clean glass or pottery vase for best results, but if you want to use Grandma’s silver vase, go ahead. Elegance is good.
Cut flowers generally come with a little packet of white powder. Use it. It helps to keep the water from getting full of bacteria or fungus that will clog the stem, keeping it from taking up water. Pull off any leaves that would otherwise go in the water. You can also use a teaspoon of Clorox in a quart of water. Never put cut flowers near a radiator or wood stove.
So buy something in bloom. It will help to dissipate the gloom of short, dark days. Oh, and about that African violet: I confessed, and did not get punished. But I never experimented with her houseplants again.
Henry’s book “
Organic Gardening (not just) in the Northeast” is available from him for $19. Mail a check to Henry Homeyer at PO Box 364, Cornish Flat, NH 03746, or order from his website,
www.Gardening-Guy.com.
Holiday Gifts for the Gardener
Posted on Tuesday, November 23, 2021 · Leave a Comment
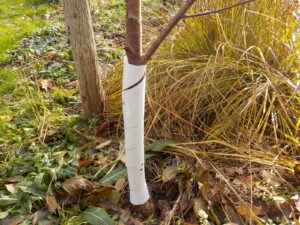
This tree guard keeps voles from damaging young trees
Ready to shop! Every time I turn on the radio or open a newspaper, there are articles about supply chain issues. Even the reliable old US Postal Service is saying deliveries may well be delayed. So share some garden produce this year or shop at a local, family-owned business when you can.
Food is a great gift. You don’t need fancy fruit shipped from Oregon if you made plenty of tomato sauce or quince jelly this year. Share the harvest. A quart of dried cherry tomatoes contains a lot of love and work. You had to grow, harvest, wash and dehydrate. Only people dear to my heart will rate such a gift.
My dream gift? A friend, loved one or reader sending me a nice card, along with a homemade certificate for four hours of weeding in my garden. Or two hours. Working in the garden with a friend or relative can be a great way to strengthen a friendship. Politics don’t matter in the garden. I might suspect my brother-in-law didn’t vote the way I did in the last election. But if he will bring his chain saw and help me take down and cut up a 12-inch diameter boxelder I want removed, send me the gift certificate!
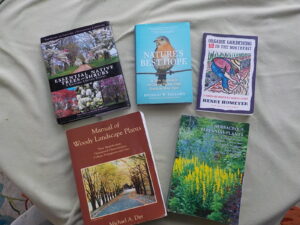
Gardening books make great presents
Books are great gifts, and books printed in the United States should be readily available at your local bookstore. My first choice for a book to give? Doug Tallamy’s book, Nature’s Best Hope: A New Approach to Conservation That Starts in Your Yard. It explains how what we plant can affect the planet, especially our pollinators and birds. And all of us, really.
I’ve re-printed my last
gardening book, and will be selling it at a discount directly to you, signed. It’s a collection of my best
articles organized around the calendar year. It’s titled
Organic Gardening (not just) in the Northeast: A Hands-On, Month-by-Month Guide. Signed and mailed to you for just $19. Send a check to Henry Homeyer at PO Box 364, Cornish Flat, NH 03746. I will try to figure out how to reduce the price on my website,
www.Gardening-Guy.com where it is currently for sale at $21 if you want to use PayPal.
What else at the bookstore? Essential Native Trees and Shrubs for the Eastern United States by Tony Dove and Ginger Woolridge is a great companion for Doug Tallamy’s book. Michael Dirr has written lots of great tree books. He is informative and opinionated. Allan Armitage is just as opinionated and thorough about flowers as Dirr is about trees. Or get a gift certificate and let your gardener pick her own books at the local bookstore.
Garlic clips work well for me to deter deer
If deer are a problem in the garden of your loved one, I find nothing better than “Fend Off Deer and Rabbit Repellent Odor Clips”. Available at Gardeners Supply and other retailers. A package of 25 sells for about $20. I use one or two per shrub to keep deer away all winter. They clip on with a clothes-pin style attachment. They contain just garlic and soy oil, no chemicals.
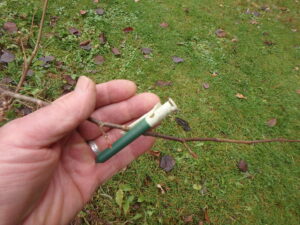
I recently wrote about using hardware cloth (wire screening) to keep voles from chewing off bark and killing young trees. Since then I have used plastic spiral tree guards that are easy to install and will protect against sun scald in winter, too. They are inexpensive and can be re-used (I will remove them in the spring). They are sold as Rainbow Professional LTD White Spiral Tree Guards at OESCOinc.com or by calling them at 413-469-4335. They sent my order out the very day I called.
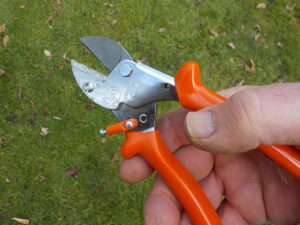
I like this Lowe anvil pruner
Also available from OESCO are some pruners that I like a lot. OESCO is a small company based in Conway MA catering to orchard professionals. The pruners are made by a German company, Lowe with 2 dots over the O, not to be confused with the American retailer Lowe’s. The pruners are of the anvil type, designed and manufactured well. They sell a size nice for small hands (Lowe 5.107) and a larger size, too. OESCO sells replacement blades and parts.
Of course every gardener needs a good weeding tool. My favorite is the CobraHead, and has been for years. They now have a mini-Cobrahead which is designed for smaller hands. Available from CobraHead.com or 866-962-6272 or at your local garden center. It has a single curved tine like a steel finger that will tease out roots from below while you tug a weed from above. I emailed the owner, Noel Valdes, who told me there are plenty in stock.
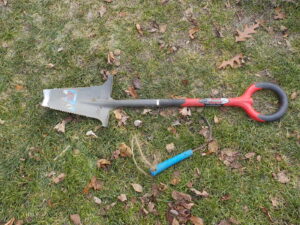
Root Slayer spade and CobraHead weeder are excellent tools
I found a wonderful shovel for digging in tough areas with lots of roots. It’s called the Root Slayer and is available from Gardeners Supply and a few other retailers. I’ve used mine all summer, and love it! Great for cutting though sod, too. It has a sharp blade and teeth along the sides for slicing roots.
Lastly, think about a gift certificate at your local nursery or garden center for plant purchases in the spring. Plants are always good.
Henry lives, writes and
gardens in Cornish Flat, NH. His e-mail is
henry.homeyer@comcast.net. He is the author of 4
gardening books.
Roasting Garden Produce
Posted on Tuesday, November 16, 2021 · Leave a Comment
One of the reasons I garden is that I love to cook and to create wonderful, flavorful dishes that I might not get elsewhere. I think many gardeners share that inclination. One of the techniques I have not used much is roasting vegetables, but I recently did some roasting, and will do some more. I find it sweetens and intensifies flavors.
It all started when I was baking some potatoes. I had the oven at 425 and decided to make some kale chips at the same time. I ran down to the garden and picked some leaves. I took four of them, sliced the leafy part off the stems, and chopped coarsely to one-to two-inch squares. Then I sprinkled them with olive oil, tossed them well and dusted them with salt. I put them on a cookie sheet and roasted until crisp – ten minutes seemed just right.
I’ve made kale chips before, but was never enamored of them. This kale had been hit by frost several times, which made the leaves sweeter. And I cooked them at a higher temperature than I’ve done before. I also made a small batch: Cindy and I ate them all before dinner. In the past I have stored kale chips in a well-sealed glass jar, but they got soggy anyway. Still got kale in the garden? Give it a try.
Baked potatoes are a classic dish, and easy to make. A few tips: grow some russets next year, they are best for baking. And brush them with as little melted butter or olive oil to help crisp up the skins. But plan ahead: it takes 45 to 65 minutes at 400 degrees to bake a potato. The bigger the spud, the longer it takes. You should be able to poke a fork or knife in easily when cooked. Oh, and don’t forget to poke some holes in the skin when you start – I’m told they can explode if you don’t.
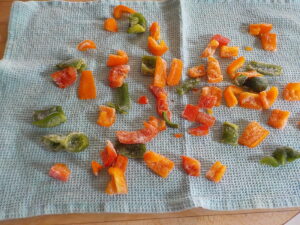
Frozen peppers thawing before roasting
I usually freeze fresh bell peppers in the fall. I find they are great for cooking, and can be tossed in a salad, too. No blanching: I just wash and wipe dry, then seed and slice them and freeze in a zipper bag. I decided to try roasting frozen peppers now to see how they would do.
I spread out a couple of cups of frozen sliced peppers on a clean cloth towel on the counter, while pre-heating the oven to 450. They thawed quickly, and I patted them dry. I put them in a bowl and tossed them with some olive oil. Then I removed one half and put on the cookie sheet for cooking; the other half I sprinkled with dried oregano flakes and a little salt before spreading on the pan. Put down parchment paper or aluminum foil to simplify clean up.
The peppers needed 25 to 30 minutes until they were soft and slightly charred. I did not remove the skins, though people who roast them whole tend to do that. If you are roasting peppers as a side dish, be aware that roasting them reduces the size considerably – a cup of sliced peppers doesn’t make much of a dish.
A few days later I got a nice pork roast and cooked it at 350 degrees for over an hour. This gave me a medium-hot oven just begging to roast veggies. I roasted beets, carrots, onions and tomatoes, and all were delicious!
The beets were medium sized – 2-inches in diameter or so, and took an hour or a little more to feel well cooked. I wrapped them loosely in aluminum foil after cutting off the leaves. I left the tails (roots) on the beets, and an inch or so of the stem and leaves. Cut beets tend to bleed, and I didn’t want that.
The carrots I just tossed into the roasting pan after a cleaned them well and cut off the stems and tips. If you have small carrots they don’t take as long as beets, so you can put them in later in the cooking process. Onions I peeled and roasted whole. While roasting they caramelized, turning sweeter. Good used cold in sandwiches!
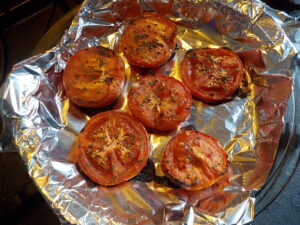
Roasted tomatoes with basil
I tried roasting my tomatoes by either cutting tomatoes into half-inch slices and also just cutting them in half. I found the halves were easier to serve – the sliced tomatoes tended to fall apart. Later, when roasting peppers, I also roasted three more fresh tomatoes at 450 degrees after sprinkling them with dry basil. Even at 450 it takes an hour or so to get them to collapse and brown up.
Roasting tomatoes does give them a very nice, intense tomato flavor. Years ago I roasted quite a few with the idea of storing the results in the freezer. It worked well. I roasted them longer than I did just now: I roasted them until almost all the moisture was out, probably at a lower temperature. Then I put them in zipper bags and froze them for use in winter sandwiches. I took the frozen tomato pieces and thawed them in a toaster oven.
Each year I grow some winter squash. My favorite is the Waltham butternut. It is a light-brown squash with a bulbous, seed-filled distal end, and a narrower section with no seeds that extends to the attachment point on the vine. Mostly I peel them, remove the seeds and chop into cubes to include in stews and stir fries.
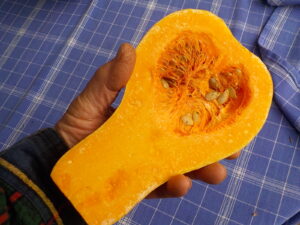
Waltham butternut squash are great when roasted
Recently I roasted a butternut squash and was delighted not only by the flavor, but also by the fact that I did not have to peel the skin. When serving (after an hour at 350 degrees) I scooped the cooked meat out of the skin. But later, I tried a bite of the skin, and it was soft and delicious. Vegetable skins generally are full of vitamins and minerals, so I shall plan on eating squash skins from now on (with the exception of Blue Hubbard skins which are so thick and leathery).
So as you plan your garden for next year, think about growing veggies you can roast. They are perfect comfort food for long winter nights.
Fall Color: It’s More than Maples
Posted on Tuesday, November 9, 2021 · Leave a Comment
New England is known worldwide for its fall color. People swarm here from all over, largely to see the color of our sugar maples. As I senior citizen I am legally entitled to drive around at 25 miles per hour, holding up traffic and enjoying every brilliant red tree I see. But I rarely do – I’m too busy in the garden, most of the time. But there is a lot more to see than maple trees.
For color I really enjoy the leaves of oaks and American beech. They hold on to their leaves much longer than the maples, often long into winter. Why is that? Probably because they have only migrated north after the last ice age, and where they came from – the American South – they did not have to drop leaves in the fall. That’s one theory I have read, anyway.
On sunny fall days the yellow leaves of beeches just glow. I enjoy them in the woods or alongside the road, but do not plant beeches or recommend them to others. There is a disease caused by the Neonectria fungus that is spread by scale insects. It mars their smooth gray bark and eventually kills the trees. So I advise enjoying them where you see them in the woods. Yes, there are systemic poisons you could apply to kill the scale insects and perhaps hold off the decline of an existing tree, but I don’t want poisons in my landscape.
Oaks vary considerably in their fall color. Deep reds, purples and browns are often mixed with reds depending on the locale, soil and species. Yellows and greens are often displayed on leaves, too.
One of the great features of oaks is their stamina: The “George Washington Oak” was only recently declared dead – at the age of 600 years. It grew in Bernards, NJ and grew to have a trunk circumference of 18 feet and reach 100 feet tall. Oaks routinely live to be 300 years old if not abused by soil compaction and urban smog. Yet they are relatively fast growing when young: the pin oak can grow12 to 15 feet in 5 to 7 years.
Although I am tremendously keen on promoting native trees and shrubs, I do believe we can have a few imports, and one of my favorites for fall color is a large shrub call disanthus (Disanthus cercidifolius). It is listed as a zone 5 plant, but I have had one in my Zone 4 garden for at least 10 years. Mine is now nearly 8 feet tall and wide. In the fall the leaves turn a brilliant purplish red, as good as or better than that dreaded invasive, burning bush (Euonymus alatus), that was so popular before it was listed as an invasive. In October some years (but not every year) my disanthus bush has tiny pink-purple blossoms that you will only notice if looking for them. They come right out of the bark, without stems.
Witchhazel (Hamamelis virginiana) is one of the few native trees that flower in the fall. It is an understory tree that will grow in shade, partial shade or full sun. It has yellow fall foliage which pretty much obscures the yellow blossoms until leaf drop in October or November. Then the blossoms become prominent. The blossoms have 4 strap-like, curly petals are less than an inch across. Witchhazel usually has many, many blossoms.
Scientists have only recently discovered what pollinates witchhazel. Bees and other pollinators are no longer buzzing around when they bloom. But witchhazel produces nectar and brightly colored flowers to attract insects. No one knew what pollinated them until naturalist Bernd Heinrich discovered that is the night-flying owlet moth. Apparently that moth can raise its temperature by 50 degrees by shivering. If only that would work for me!
The Seven-Sons Flower Tree (Heptacodium miconioides) is another fall bloomer. It was imported from China in 1907, but sales never took off. It was re-introduced in 1980 and immediately became popular for its fast growth (I have seen stems grow 6 feet in a year) and fabulous shaggy bark in winter. Its mature height is said to be 25 feet, but I keep mine to 15 feet with pruning. It will grow in full sun or partial shade.
This year mine was still blooming in late October. The blossoms are small, white, lightly fragrant and appear in clusters of seven at the end of branches. Later, if there is no frost, the sepals turn pink.
There is one other tree I grow that blooms in the fall each year, usually in September, and then only a few blossoms at a time. It is a magnolia, a hybrid called ‘Jane’, one of the “Little Girl’ series. It blooms first in late spring, and then re-blooms once a month or so with a few fabulous deep pink 4-inch blossoms, with a light pink interior.
Jane grows in six-hours of sun or more in moist, rich soils. The leaves are deep green and glossy, good enough to put in a vase. It is listed as a Zone 5 plant, but does well in Zone 4 for me. Because it blooms in late spring, frosts in April do not affect it. It is a small tree, perhaps 15 tall, with a nice rounded shape.
Spring and summer will always be the best seasons for flowering trees, but I like to extend the seasons with trees that flower and look good well into winter.
How to Prevent Tree Death by Bark Mulch or Rodents This Winter
Posted on Wednesday, November 3, 2021 · Leave a Comment
If you have cleaned up the vegetable garden and cut back your perennials, you might be feeling just a little smug – especially since this gardening guy admits he is behind you in completing those tasks. But there may still be tasks for you to do, and important ones for the trees on your property.
Are you one of those gardeners who has fallen in love with bark mulch? Do you use it not only in flower gardens, but also around trees planted in the lawn to keep down weeds, hold in moisture, and keep the deadly string trimmer at bay? If you do, take a few moments to walk around and check out your trees and shrubs.
Bark mulch should never touch the stems of woody plants. You need a donut hole around your trees: a 4-to 6-inch area bare of mulch on all sides of your beloved trees. Why? Tree barks protects the tree from rain and snow, but it will eventually rot if it is covered with soil or bark mulch. And if the rot extends into the cambium layer – the layer beneath the bark – it will, eventually, kill the tree. But mulch is not the only culprit. Many trees are planted too deeply and the flare is covered with soil, which is just as lethal.
If you look at a tree that Mother Nature planted – or perhaps it was a forgetful squirrel – you will see that tree flares or widens at its base. That part of the tree needs to be planted above ground at planting time. Unfortunately, trees sold in pots often have the trunk flare covered with soil and get planted just the way they were in the pot. I have seen trees in large pots with the trunk flare covered by 4 inches of soil or more.
Mulch or soil over the trunk flare does not kill your tree right away. It often takes from six to ten years to see signs of decline. Look at the tips of branches at the top of the tree. Leaf loss there is a definite sign of decline. Early color change in the fall is another sign. That maple that turns color before others on the property? It may be stressed by bark rot caused by damage to the trunk flare.
So examine your trees. If the trunk flare is covered with mulch or soil, you have work to do. If a tree is straight (like a telephone pole) at the soil surface, you need to pull the mulch away. And if you still don’t see a flared area, you need to re-grade the soil around your tree.
Use gloved hands or work gently with a hand tool to remove the soil around the tree until you see the trunk flare. You may notice fine roots in the soil or mulch as you remove it, but these roots can be cut away. You are looking for big roots headed away from the trunk. Keep your hand tool away from the trunk as the bark will be tender, and easily damaged. But the good news is that most trees will recover if you remove the soil or bark mulch and let the bark dry out.
If you have planted a tree on a hillside, I assume you planted it be vertical. But to do that you had to cut back into the uphill side of the planting area to create a flat spot. If, after planting, erosion has moved soil downhill to cover one side of the trunk, remove that. People with excavators working on your property presumably know not to pile soil against the bark of trees, but check anyway. Remove soil as needed.
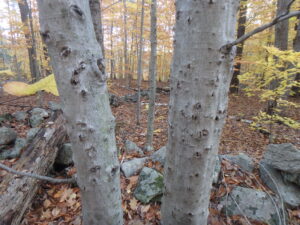
These beeches are infected with a fungus that will prove fatal in time
Another fall task involves protecting young trees from damage by rodents. The worst is the meadow vole. These are little rodents that look a lot like mice – but stockier, with short tails. Think of mice as a ballerinas and voles as hockey players. They often leave tunnels in the lawn grass during the winter.
Voles can reach sexual maturity in just 5 weeks after birth, so they can increase in numbers exponentially, given the right conditions. If hungry enough, they will chew the bark off young trees, killing them by damaging the tender cambium layer and eating the phloem all around a tree, girdling it.
Young fruit trees are the most susceptible to girdling. Older trees have thicker bark, and are generally less interesting to rodents. If you planted an apple tree within the last five years, you should protect the bark. Even though they did not damage the tree in the past, you cannot assume they will not this year. If there are high numbers of voles this year, and a deep snow cover to hide them from predators, they may attack.
The best way to protect trees against damage by voles is to surround the trunk with a ring of wire mesh called hardware cloth. Get some with quarter-inch spacing of the wires, and create a ring 24-inches tall. Make the ring of wire big enough to leave a couple of inches of space between the mesh and the trunk. That will allow the tree to get fatter without meeting the hardware cloth. If you have low branches (within 24 inches of the ground), you can prune them off to accommodate the wire mesh.
Hardware cloth comes in 24 inch rolls. You will need tin snips to cut it and leather gloves to protect your fingers. The stuff is like razor wire once cut. But, having seen what rodents can do, I recommend protecting new trees. There are plastic wraps and special cloth wraps that claim to protect against rodents, and may, but I have not tried them. They are definitely easier to use. So check out your trees, and get busy if need be.
Planting Bulbs for Forcing Indoors
Posted on Wednesday, October 27, 2021 · Leave a Comment
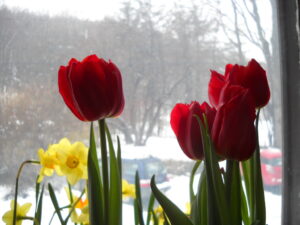
Forced tulips are my favorites
I love the winter, but by March I am ready for spring. I usually have some snowdrops blooming in March on a south-facing hillside, but they are subtle, not bodacious blooms. So I plant lots of bulbs indoors in the fall and keep them cool until it is time to bring them into the warmth of the house, and I get indoor tulips, daffodils and more in March. That’s what forcing bulbs is all about. It’s simple, really, but there are a few tips I can share since I do this every year.
Most bulbs are described on their packages as early, mid-season or late. Go to your local garden center and look for bulbs that are labeled as early bloomers – they are the best for forcing. Buy daffodils, some tulips and maybe some small bulbs like crocus or grape hyacinths. You can plant these bulbs in large pots or even in your window box if you bring it in.
You will also need some potting soil and compost. I make a mix that is half compost, half potting soil for forcing bulbs. I don’t use garden soil because it can be heavy and often stays wet. Bulbs can rot if they are left in wet soil for too long. I often reuse the potting mix that I used for growing annual plants outdoors in summer. I just pull up the summer’s plants, fluff up the soil, add some compost as needed, and make sure it is damp to start. If it is dry, I water it before I plant my bulbs.
Each year I plant about 25 daffodils in a window box that is about 30 inches long, 6 inches wide and deep. I prefer to get all of one kind so that they all bloom at once.

Tete a tete daffodils forced to bloom on a windowsill
I fill the window box a little more than half full with my mixture of compost and potting soil and place the bulbs, pointy end up, in the soil. Once I have them all in place I push them down more and fill up the box with more potting soil-compost mixture.
Be sure to label each pot with the date planted, and what is planted. Later, that will tell you when you can bring it into the warmth. Daffodils take about 12 weeks of dormancy before they should be brought into the warmth of the house, and tulips do better with 4 full months. Little things like crocus can be forced in 8 to 10 weeks.
Often bulbs will send roots out through the holes in the bottom of the pot or send up green shoots telling you they are ready. But don’t rush the process. Tulips brought up early will have nice green leaves, but no flowers.
Ideally temperatures for bulbs used for forcing will be between 32 and 50 degrees, though colder temperatures should not be a problem (my basement often goes below freezing for a few days). Left in a warm location, the bulbs will grow green tops – but not blossoms. Bulbs left in a cold basement or garage will do just fine. Inside the bulkhead to your cellar might be the right temperature, too.
You need to be aware that rodents like eating bulbs (indoors or out) – especially tulips. My basement has, most years, harbored mice and sometimes even a resident red squirrel. Unlike tulips, daffodils are not of interest to rodents as they are mildly poisonous. I keep my pots of tulips covered with hardware cloth (a fine-mesh metal screening available at hardware stores). But wear gloves if you cut hardware cloth to size – the edges are as sharp as razor wire.
You can double your production of blooms by planting two layers of bulbs in a container. Plant big bulbs deep in the pots, add soil, and then plant a layer of crocus or other small bulbs above them.
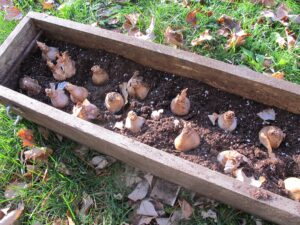
Daffodils being planted in a window box for forcing
It is important to check on the bulbs you are forcing at least once a month, particularly if you have put wire rodent-proofing over the containers. I’ve had shoots try to grow through the hardware cloth and get damaged. If the bulbs are sending up shoots, remove the wire mesh. I also don’t want the soil mix to get bone dry, so I check it and water a little if it’s dry. The bulbs will grow roots when first planted, and then go dormant if kept in a dark, cold location.
When it is time to bring up your potted bulbs into a warm place, let them wake up gently. My mudroom is good for starting them: there is some sunshine but it is cool. Then, once the shoots are up and green, I place the containers on my sunniest window sills – either east- or west-facing.
Most bulbs that have been forced are not likely to flower the following year, even if you keep the foliage alive until spring and plant them outside. I’ve done it, and some daffodils will build up the energy to blossom after a while, but tulips are not so cooperative.
I was a Peace Corps volunteer in Cameroon, West Africa many years ago. There I could have flowers blooming every day of the year. It spoiled me, perhaps, because I still want flowers every day. Forcing bulbs is one way to have lots of blossoms when there is snow on the ground. So don’t wait until mid-December to start your bulbs, get on this project now.
Henry is the author of 4 gardening books, and is a long time UNH Master Gardener. Reach him at PO Box 364, Cornish Flat, NH or
henry.homeyer@comcast.net.
It’s Time for Fall Plantings
Posted on Tuesday, October 19, 2021 · Leave a Comment
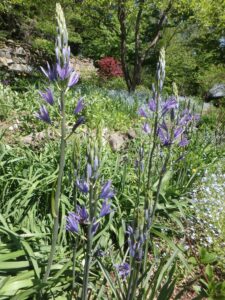
Camassia is a lesser known bulb plant that blooms in May for me
Spring is all about planting, but many gardeners overlook fall planting. Now is the time to plant garlic and spring-blooming flowers planted as bulbs. For me, fall planting is a joy: the thought of bulbs nestled into the ground just awaiting spring fills me with hope. And if you pick a good spot and plant them well, you are sure to succeed.
Let’s start with garlic. I like to say that garlic is, essentially, a no-work crop: plant it, mulch it to keep the weeds down, and then harvest it. Right now, the hardest part will be to find “seed garlic” – nice fat garlic bulbs that you can divide into cloves and plant. Many suppliers have sold out, but try your local garden center or feed and grain store. Don’t buy conventional garlic at the grocery store to plant. It is usually treated with a chemical to keep it from sprouting, and is the wrong kind for New England. Hard-neck garlic is what you want.
When should you plant garlic? Late October is when I plant, but it is fine to plant earlier or later. It’s best to plant after the soil has cooled down, but you will want the plants to establish roots before the soil freezes.
Pick a bed in your vegetable or flower garden that is in full sun, and that has nice, rich soil that retains water but does not stay soggy in rainy times. If you have heavy clay, work in plenty of good compost- either your own, or some you purchase in a bag.
I plant garlic cloves in rows about 8 inches apart. Each clove I plant three inches deep and three or four inches apart. I run my CobraHead weeder down the bed to create a furrow and to loosen the soil. I sprinkle some Pro-Gro or other organic bagged fertilizer into the furrow and run my hand tool through it again. Then I push in cloves, pointy end up, cover it with soil, and pat it lightly.
Finally, I take mulch hay or straw and cover the bed with about 12 inches of loose straw. I know that seems like a lot, but by winter’s end, it will be just 4 to 6 inches of cover. That should prevent most weeds from growing all summer – or until you harvest in late July. I always save my best bulbs of garlic for planting.

I will plant about 10 daffodils between these hostas that will hide the leaves of the daffies after blooming
This is also the time to plant daffodils, tulips and all the small bulbs that bloom early. If you have a fenced yard, that will keep the deer from eating tulip blossoms when in bud – a real treat for them. If you have a problem with deer, you might want to avoid tulips, or plant them in pots for forcing.
Tulips and daffodils are generally labeled as early-season, mid-season or late-season. Plant plenty of each. Early ones are generally shorter, and I plant some, but I love the tall ones best. ‘Maureen’ is my favorite tulip: she is 22 to 24 inches tall, and ivory to white. Fabulous in a vase. ‘Menton’ is another nice tall one, pink petals outside with orange and white inside.
Although I have daffodils that still bloom after more than 50 years, tulips are less perennial. My rule of thumb is that if I plant 50, all will bloom the first year, half of that the second year, and half again the third year. So I often plant them as annuals, and pull them or cut off the foliage when I plant annual flowers over them in June.
Bulb planting tools are sold that you can plunge into the soil and pull out a core of soil three inches wide. I don’t like them. Soil sticks to the tool, and I find it much more time-consuming to plant bulbs one at a time. I prefer to excavate a big hole in the ground and plant 25 or 50 at once. Soil augers for your cordless drill are sold for planting bulbs, but most drills are not strong enough to do the job.
Here’s what I do: I select a nice sunny spot that drains well and is not soggy in winter. Then I dig an oval hole about 3 feet long and 2 feet from front to back, which will serve well for 25 bulbs. For daffodils and tulips I want the hole at least six inches deep. I put the soil into a wheelbarrow or onto a blue tarp so it won’t make a mess of my lawn or garden bed.
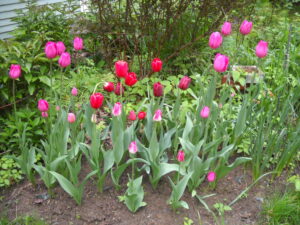
Tulips are ephemeral, but worth trying
Next I add some good compost and either “Bulb Booster” or slow-release organic fertilizer, and work it into the soil with my CobraHead weeder, a single-tined hand tool. Then I arrange the bulbs in the loosened soil in the bottom of the hole, with fat bottom down, and the pointy head up. I mix some compost into the soil I removed, and carefully fill the hole.
If space is at a premium, you can plant two layers of bulbs in the same hole. Plant the big bulbs in the bottom of your hole and add soil up to two or three inches below the soil line. Then plant small bulbs like crocus, snowdrops, glory-of-the-snow (Chionodaxa spp.) or squill ( Scilla siberica). The small, early bulbs will delight you, and then the daffodils or tulips will overwhelm you – particularly if you forget you double-planted the bed.
I’ve been planting bulbs around my 2-plus acres for decades because spring blossoms are the perfect antidote to a long New Hampshire winter. It is always a challenge to find a spot to squeeze bulbs in, but there is always someplace. This fall I am planting them between hostas I planted last year. The hosta foliage will hide the dying leaves of the daffodils after they bloom.
Henry lives, dreams of spring and gardens in Cornish Flat, NH. He is a long time UNH Master Gardener and the author of 4 gardening books. Reach him at
henry.homeyer@comcast.net.
Fall Chores: It’s Time to Get Started
Posted on Tuesday, October 12, 2021 · Leave a Comment
Those big yellow school buses have been lumbering along for well over a month now, so you know it is time to start getting your gardens ready for winter. This is a good time to work outside: the bugs are fewer and it’s not so cold that you’ll be miserable in an hour.
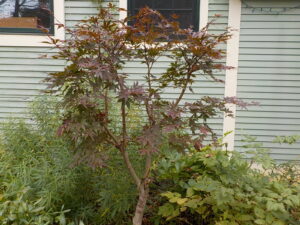
This Japanese red maple was full of clutter before pruning
I recently did some pruning on my Japanese red maple (Acer palmatum) trees. We all know that sugar maples pump sweet sap up from the ground in spring, but did you know that all maples send lots of liquid up in spring, even if not the sweet stuff? Because of that, spring is not a good time to prune. Now is a much better time.
I attended a pruning workshop in 2019 at Shin Boku Nursery in Wentworth, NH. Palmer Koelb has been growing, pruning and selling trees trained in the Japanese tradition for over 50 years. Some of his nursery stock is several decades old, and all of it is beautiful.
One of the things I learned at that workshop is that Japanese red maples are best trained over time. It is better to do a little pruning every year or two than to wait 10 years and need to cut big branches. I was told that I should never use a saw on a Japanese red maple, apparently they don’t react well to removing big branches. Hand pruners are best.
So what did I do? I reigned in the height of my trees. I like them to top out at around eight feet, so I looked for skyward-growing branches and cut each back to a lower fork, one hidden in the foliage. I also removed extraneous foliage and small branches in the interior of the trees, opening up the center of the tree so that the interesting branch shapes are visible. These trees, by their very nature, are not dominated by a single straight trunk, and I want to see the structure of a tree. I remove clutter, and rubbing branches.
This also a good time to shape all your hydrangeas, and prune them to keep them to the size you like. If you want to develop a new hydrangea to be upright, this is a good time to prune out downward-growing branches, and even to stake up a central branch to be the “leader” growing upwards.
I like to collect some flowers for drying indoors. Most of us cannot afford to buy flowers from a florist for the table each week, so picking blossoms now that look good in a dry vase is a good alternative. All the hydrangeas will provide lovely blossoms now, so long as you pick them before frost, which causes them to turn brown.
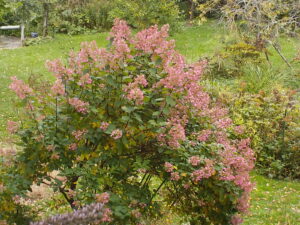
‘Pink Diamond’ hydrangea blooms each year in the fall.
My favorite hydrangea is one called ‘Pink Diamond’. It produces lots of big pointy flower panicles that start our white and turn to pink. In a dry vase the pink will fade a little, but stay quite pink all winter, as will other hydrangeas. The stems on Pink Diamond are stiff and upright on the bush and don’t flop the way some others like ‘Annabelle’ do when rained on.
Unlike lilacs and forsythia, hydrangeas are late-season bloomers so you do not lose any blossoms next year if you prune now. They bloom on stems that grow in the spring. I like to leave some blossoms on all winter to remind me that summer will get here eventually.
Grasses and grains are blooming now, and can look good in a dry vase, too. I grew an annual grain this year called black millet and I recently picked some stems and put them in a dry vase. Millet produces small seeds on narrow “cobs” much like corn, but without the outer leaves. It is found in bird seed mixes, and I ate it as a gruel when serving in the Peace Corps in West Africa. This year I bought some plants at a nursery, but will start plenty from seed next year. ‘Purple Majesty’ is probably the name of the variety I planted.
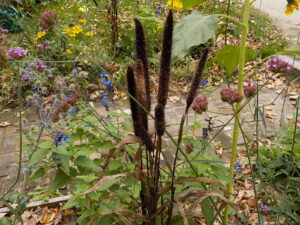
Black millet works well in a dry vase
I’ve been potting up annual plants I want to bring in before winter, rather than waiting until the afternoon before the first hard frost. I potted up some ‘Diamond Frost’ Euphorbia that I bought in small pots last spring and planted in the ground. This is a delightful plant that has tiny white blossoms all summer. As a “Proven Winner” plant, it is trademarked and is not sold by seed.
Diamond Frost makes a nice house plant that continues to bloom indoors all winter. It prefers a bright window sill, but will survive most anywhere so long as you remember to water it regularly. Then in the spring it can go outdoors again – and at no expense.
Each fall I dig up at least one rosemary plant and bring it indoors. I like to do this early in the fall so that it can get used to being in a pot while sitting in the garden in just the same place it was in the ground. This lets it have fewer changes in its environment at a time. Later I will wash it well with a hose in order to get off any aphids or other pests before bring it indoors.
Don’t use any fertilizer now for any houseplants coming inside. A plastic pot or an enameled one will keep moisture in better than an unglazed clay pot, if you are a lazy waterer, select them.
Raking the leaves can wait till later, after all the leaves have fallen. But go outside and start chipping away at the chores on nice days, even if it means playing hooky from work.
Henry is the author of 4
gardening books. Reach him at
henry.homeyer@comcast.net or by mail at PO Box 364, Cornish Flat, NH 03746.


 Click Here to buy from Cobrahead