Putting Away Veggies for Winter
Posted on Tuesday, October 5, 2021 · Leave a Comment
Like any industrious squirrel, I am getting food stored and ready for winter. Even if your vegetable garden is depleted, you can buy things in bulk from your local farm stand now to save for winter.
Each type of veggie has its own requirements. Some like a cool space with high humidity. Others want it cool and dry. Then there are a few, like sweet potatoes, that require a warm space and suffer in the cold. Let’s take a look.
Storing is the easiest and cheapest way of keeping veggies for a few months. Winter squash store well in a cool dry location such as under the bed in a spare, unheated bedroom. Drafty old farmhouses have plenty of good places to store them, along with cardboard boxes of onions and garlic. I’ve stored a blue Hubbard squash (which has a very thick skin) for up to a year without any problems. But they will rot in a high humidity area.
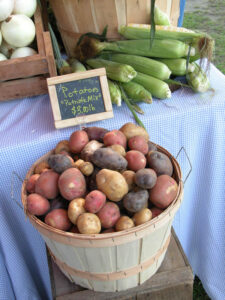
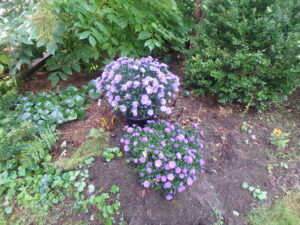
Buy potatoes now and save for a winter meal
Potatoes, carrots, kohlrabi, rutabagas, celeriac or celery root, turnips and parsnips will store for months at 35 to 50 degrees with high humidity. You can do that in a spare fridge, preferably in a drawer that keeps humidity in it. Or put them in zipper bags and punch a few breathing holes in the bags. You can put an inch of moist sand in a bucket, and store carrots in the garage if it stays cold, but not frigid. Keep a lid on the bucket, and check from time to time. Rodents love carrots and potatoes, so you can’t store them in an open container.
I built a “cold cellar” for storing potatoes in my cold basement that often has temperatures below freezing. I made a bin of cement blocks, two layers high, and covered it with an insulated plywood lid. I weighted the lid to be sure mice could not sneak in. I put a heat mat in the bottom to use if temperatures neared freezing in the box.
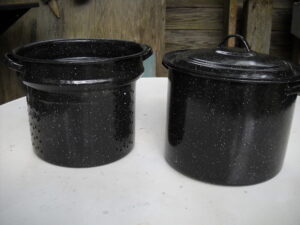
A blanching pot is useful if you plan on freezing veggies 004
A full-sized freezer is a good investment. Among other things, tomatoes, corn, broccoli, beans, peppers, kale and fruit store well in a freezer. I freeze them in freezer-grade zipper bags. You can suck the excess air out of the bag with a drinking straw by closing the seal up to the straw, then pulling it out quickly and snapping shut while still sucking on the straw.
Freezing is a time-honored process for storing food. Some veggies need to be blanched before freezing to keep them tasty. Blanching is a quick immersion in boiling water before freezing. It kills the aging enzymes in your vegetables, keeping them fresh-tasting longer. If you know you will eat your frozen things within 3 months, don’t bother with it. I recommend blanching beans, beets, broccoli, Brussels sprouts, carrots, cauliflower, corn, kale, peaches, squash and Swiss chard. I freeze apples, peppers and tomatoes without blanching.
If you blanch, just do it for 60 seconds, which is often even before the water has come back to a full boil. Use lots of water in a big pot, and not too many veggies. There are special pots sold for blanching. They have an inner pot with holes that help you lift the veggies out of the water quickly.
If you blanch veggies too long they will be mushy. Drop the blanched veggies in a sink of cold water, spin dry in a salad spinner, and blot with a cloth dish towel. Then bag and freeze.
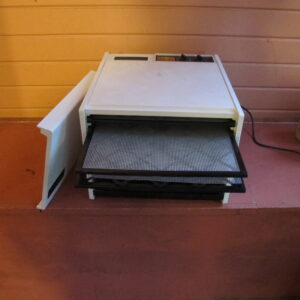
Excalibur dryer does a good job drying tomatoes, apples and hot peppers
I also dehydrate foods, notably tomatoes, hot peppers, apples and pears. You can buy a good dehydrator like the ones made by Nesco American Harvest for somewhere under $150. Or you can buy the Cadillac of dryers and get an Excalibur for $300 or more. Those use less energy and dry the food evenly without having to rotate the trays.
Dehydrating is great for hot peppers: I dry them until they are brittle, then grind them in my coffee bean grinder. That way I have a powder I can add to soups or stews a little at a time and that is well distributed. And I dry cherry tomatoes cut in half; I use them in soups and stews. They offer a bite of summer.
I also make tomato paste and freeze it in ice cube trays. I often do this with imperfect tomatoes: I cut out the bad parts and put the rest in a Cuisinart to blend them into a loose “soup” that I then cook down slowly in a big enameled cast iron pot. When I can literally stand a spoon up in the mix, it is done. Having a supply of tomato paste is essential for cooking, and I like that I don’t have to open a can when I need just a little.
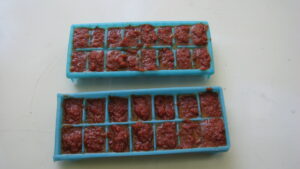
I freeze tomato paste for storage in ice cube trays.
If you have an apple tree, you probably have already made some apple sauce this year. It freezes well, and is always tasty. But have you made cider? You don’t need to buy a cider press. I bring apples to my local orchard, and ask them to press and bottle the juice. Be sure to tell your orchardist that you are freezing it, and to leave an inch of space for expansion. They will charge you a fee, but it is well worth it for the satisfaction of having your own cider in winter.
Lastly, have you thought of making sauerkraut? Cabbages are easy to grow – or inexpensive to buy at your local farm stand. If you want to learn the basics just Google my name and “sauerkraut”. I wrote a full article on it in 2015 and it is available on-line along with book recommendations for in-depth learning.
One last bit of advice: don’t freeze or store any veggies or fruit that are not perfect. Freezing rotten food does not make it better! And you will not want to eat it later if you don’t want to eat it now!
Henry is an organic
gardener. He tries to eat something that came from his
garden every day of the year! Reach him at
henry.homeyer@comcast.net or PO Box 364, Cornish Flat, NH 03746.
News of the Dreaded Asian Jumping Worm
Posted on Saturday, September 25, 2021 · Leave a Comment

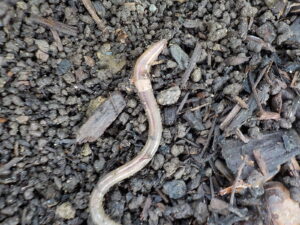
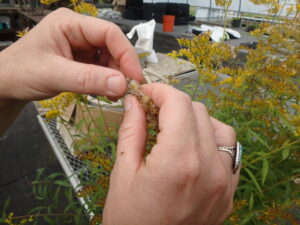
Jumping worms usually have a white clitellum, and move fast when disturbed
After decades of improving my garden soil, I have an infestation of Asian jumping worms. They can eat all the organic material in the soil, depleting it terribly. These foreign invaders multiply more quickly than our common worms, outcompeting them. Everything I have read about them says they are bad news for gardeners.
Scientists are working on organic solutions to the Asian jumping worm problem. I was able to phone Brad Herrick, a researcher at University of Wisconsin who has been studying them for years. He explained that although they came to the United States nearly a hundred years ago, the worms are spreading rapidly, now infesting 37 states. Their worst impact may be in the forest: they eat dead leaves and forest duff, potentially creating a soil devoid of the organic matter that nourishes native wildflowers and trees. The soil can become sterile.
Soil surface is covered with castings like coffee grounds where jumping worms are present
To see if you have them, start at a shady, mulched bed – that is where they like it best. Pull back leaves or mulch on your soil. The worms are surface feeders, living in the top inch or two of the soil, and readily seen on the soil surface. Touch one, and it moves fast, wiggling and moving – quite a contrast to our relatively sluggish ordinary worms. The soil in infested areas often looks like it has coffee grounds spilled on the soil – which are their castings or excrement.
The clitellum that produces the egg sacs or cocoons is a whitish band near the head end of the worm. This contrasts with our common worms which have a reddish-brown clitellum, and which is usually a bit raised.
Brad Herrick explained that unlike the earthworms we know and love, these guys can reproduce asexually, so even one worm can start an infestation. But they also spread when the cocoons, which sit on the soil surface, are washed away by rains. This allows them to expand their territory quickly, especially on hillsides.
How did I get them? I don’t know. They may have arrived when I bought plants for a new flower bed. I know my source of compost and know it has been heated sufficiently to kill all the weed seeds, so that would have killed any cocoons, too. And I see none of the worms in my purchased compost pile. But I had work done on my septic system, and soil was brought in.
According to Brad Herrick, freezing temperatures kill all the adult worms each winter. Unfortunately, it does not kill the eggs which over-winter and start the cycle again. The eggs hatch once the soil temperature reaches 50 degrees- perhaps in April or May. He said it takes 70 to 90 days to reach maturity, at which point they start producing eggs; they continue to produce eggs from late June until frost.
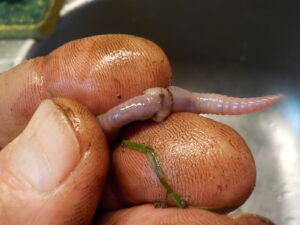
Ordinary earthworms have a raised clitellum that often incompletely encirlcles the worm, and is rreddish brown
So what can you do? If you have a new infestation you can try removing them by hand. Scientists often use a solution of yellow mustard powder in water to get worms to come to the surface. One third cup per gallon of water. But if you have a large area, that might not be practical. The best time to do this is in early summer before new worms have reached maturity.
Brad Herrick said you can heat the soil to kill the worms by solarizing it with clear plastic. Worms – and castings – will self-destruct at 104 degrees for 3 days, perhaps less. Unfortunately, that will not work in forests or shady beds- which is where I have them.
The worms can live in sunny beds if they are mulched. In fact, Herrick told me, the worms have an enzyme that allows them to eat wood mulch. I wonder if mulching with peastone or small gravel instead of bark mulch or leaves might help to reduce the problem. If they run out of food, they may well die out. That theory has not been tested, and you may not like the look of a stone mulch. If you do this, please let me know if it helps.
My worm problem so far exists only in one large shady. Here’s my plan: after frost I will rake off leaves and mulch (and collect and destroy any worms I see). Worms are usually within a inch or two of the surface.I will treat those leaves as toxic waste as they probably will have cocoons in them, which I don’t want to get into my compost pile.
Hopefully I can burn my rakings in the driveway to destroy the leaves and cocoons. Then I will cut back all my perennials and go over the area with a flame weeder. This is a torch attached to an 8-gallon propane tank that sends out a big flame. That should burn up the cocoons on the soil surface. Flame weeders are available from Johnny’s Selected Seeds or Fedco seeds.
Herrick told me of a product, BotaniGard, which contains a fungus that is listed for use to kill the worms. However, in a University of Vermont study I read, it is only about 70% effective in a lab setting. That is not good enough for me, especially since even a solitary worm can produce viable eggs. And it sells on-line for $90 a pound.
When buying nursery stock, look for coffee grounds on the surface of the pot, and when removing the root ball, looks for worms. If you see either, do not plant it, and report the problem to the seller. Check purchased compost for worms, too. Clean your tools and shoes if working in beds with worms – the egg cocoons are tiny and not visible to the naked eye.
We will get through this. Remember when we were told impatiens plants all carried a terrible fungus and we would never be able to grow them again? Didn’t happen. This is more serious, but I do believe we will be able to manage it.
Henry lives in Cornish Flat, NH and is a longtime Master
Gardener. He is the author or 4
gardening books. You may reach by e-mail at
henry.homeyer@comast.net.
Hedges and Fences
Posted on Monday, September 20, 2021 · Leave a Comment
While vacationing recently on the Maine coast I admired many nice gardens. Many of them had hedges or fences, more than I am used to seeing in rural New Hampshire.
When settlers first arrived in New England they dug out stones left by the glaciers some 10,000 years before. They piled them up to clear farm fields, and began making stone walls to define property borders and to contain animals – or to keep them out. Gradually dry stone wallers learned how to make them look good and last forever.
Building a stone wall or retaining wall is hard work, and expensive to have someone else build. If you want to build your own, remember 3 things: First, the soil moves in winter as it freezes and thaws. This can make walls tumble if not properly built. Wallers have learned to add drainage under and around a wall: at least a foot of one-inch crushed stone in a trench beneath the wall works well. Round pebbles will act as ball bearings would, allowing stones to move.
Each stone should touch 4 others, two below it, two above it. Stones should not be stacked one on top of another, much the way bricks are laid. This helps to tie it all together and prevent movement.
Lastly, use a long string to keep the wall straight and level. Or if you are creating a curved wall, define it carefully before starting. You can place a garden hose on the soil to help define the curve.
Early settlers also made wattle fences. I talked to Crow Boutin who makes his living making wattle fences in the Kennebunk area of Maine. These fences are simple: he cuts lengths of fresh yellow birch that are one- to two-inches in diameter. First he make “pencils” that he drives in the ground with a hammer after he cuts them to length and sharpens them with an ax. Then he weaves pieces of birch 8- to10-feet long between the vertical pencils that he spaces about 16 inches apart. The tension of the bent stems holds the fence in place. Simple? You bet, and something you could try.
But why do people need fences or hedges? Some are just for the looks, or to create a backdrop for flowers. Others are to keep others from looking into the yard, or to keep animals in (or out). Let’s take a look at a few I saw.
The nicest fences I saw were white picket fences. Maybe I like them because my grandfather had one, and I remember it from my youth. They show off flowers well, and allow climbers to climb on them. But generally you have to pay someone to install them, and, as Tom Sawyer knew, you must paint them from time to time. Now these fences come in a variety of materials including fiberglass or plastic that needs no painting.
Living fences – called hedges- come in a variety of species. Evergreen hedges like yew or arborvitae can look good summer and winter, but are often eaten by deer. Hemlock and pine are less likely to be predated by deer, but they will grow to 60 feet tall unless they are trimmed every year – and most somehow escape and do get tall.
Rugosa roses are commonly used as hedges on the Maine coast. They will grow in sandy soil and produce copious fragrant flowers and handsome red fruits in the fall. But they look bedraggled over time, and aren’t green in winter. Their thorns do keep people and pets from cutting corners through the yard.
Lilacs look great when blooming and have handsome green leaves 8 or 9 months of the year, but do little to block the view of your house and yard in winter. They do best in sweet soil, so add limestone every year or three to keep them blooming nicely. Lilacs, too, need trimming or they can get gangly.
The split rail fence is generally made of cedar, which lasts a long time – up to 20 years. It creates a rustic look, but neither keeps animals out nor blocks the nosy neighbor’s view. It will keep cars from parking on your lawn, and can support vines like roses or clematis.
Less common fences include stockade fences – tall wooden fences that block all view of the yard. What you need if you like to sunbathe nude in the garden and have a near neighbor. Definitely not a friendly signal to neighbors. Iron rail fences, wire fences and chain link fences all have their uses, but I can’t imagine having one installed.
Lastly, there is the deer fence. Many gardeners use them in order to grow vegetables, or to have tulips in the spring. Nowadays there are woven plastic fences that are inexpensive and come in 8-foot widths that work well to keep out deer. You can install them yourself on posts or stakes you cut in the forest. They work – unless you leave the gate open! Me? I have depended on having dogs to scare away the wildlife for many years. They did the job well, though I am now looking to adopt a dog as my corgi, Daphne passed away a year ago. And I love dogs, too, which I can’t say for fences.
What the Monarchs Need Now
Posted on Tuesday, September 14, 2021 · Leave a Comment
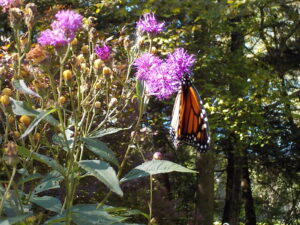
Monarch feeding on New York ironweed
Monarchs are on the move! It is time for their long trip to Mexico to spend the winter. And like marathon runners, they need to bulk up on calories before the event. You may have let a patch of milkweed grow on the edges of your property to support them. That is great, and many of us have done that. But the milkweed plants are for the caterpillars to munch on. Right now, they offer nothing to monarchs. Our monarchs need blooming flowers for nectar and pollen.
Of the monarchs I see floating around my gardens, three plants seem most attractive to them for feeding right now: Joe Pye weed, goldenrods and asters. Let’s look at these and their garden worthiness.
Joe Pye weed ‘Gateway’ blooms longer and better than the wild forms
Joe Pye weed (Eupatoreum maculatum) is a native wildflower that likes stream edges and places with good moisture, though it will grow almost anywhere it is planted. It is a big plant, often 5 or 6 feet tall in the wild. It is a clumping plant, with the clumps getting bigger every year.
It is readily found in plant nurseries, although most sold are a named cultivar, one called ‘Gateway’. I have found that Gateway blooms longer and does better in a vase than the truly wild ones that have popped up along my stream. There is now a smaller Joe Pye that is called ‘Little Joe’ that only gets to be three to four feet tall. It is a patented variety that does not breed true, and is actually a different species in the same genus, Eupatorium dubium. Then there is one called ‘Baby Joe’ but I have not yet tried either one.
The flowers of Joe Pye weed are a light purple and appear in large panicles at the top of the plant. The stems of Gateway are a deep purple, though the wild ones tend to be greener. Plant Joe Pye weed where you want it as the fibrous roots go deep into the soil, and when firmly established they are nearly impossible to dig out.
Goldenrods are a wonderful, though frequently maligned genus of plants. For many years they were prohibited in arrangements in the flower room at our county fair, as it was believed they caused hay fever. They do not. They have a heavy, sticky pollen that does not fly in the air but is transported by insects. There are at least 20 species of native goldenrods including some that prefer shade, while others demand full sun.
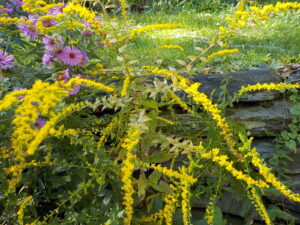
‘Fireworks’ goldenrod is commonly sold in nurseries now
Goldenrods are important not only for monarch butterflies, but also for many butterflies, moths, bees and other pollinators. And yes, some of the big, sun-loving species will expand their territory and send tenacious roots deep into the soil, even muscling out some dainty perennials.
Years ago I purchased some blue-stemmed goldenrod ( Solidago caesia) at The Garden in the Woods in Framingham, Massachusetts. I grow it in both dry shade and in rich soil in moist shade. It has never been a pest, or traveled around my garden beds, staying just where I planted it, blooming in September and into October. It is quite dainty.
My favorite goldenrod is a variety called ‘Fireworks’ of the species Solidago rugosa. It prefers full sun and moist soil, but I have also grown it in part sun and fairly dry soil. Its flowers are tiny, blooming first at the tips and working their way down the 3- to 4-foot stems. The stems arch gracefully like a fireworks display. They can be divided every 3 to 4 years to keep the clumps to a manageable size, and to increase (or share) them.
All the asters and aster-family flowers are great for monarchs and other butterflies. Scientists don’t call the genus aster any more, but Symphyotrichum, which is a shame as it is much less user-friendly.
There are at least 30 species of asters that grow wild in America, including many nice shade-loving ones that are certainly uprooted as weeds by tidy gardeners long before they bloom now, in the fall.
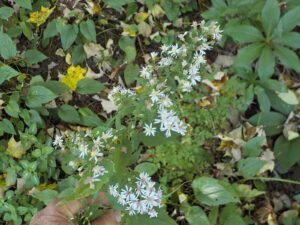
This woodland aster grows in shade as a wildflower
Asters have flowers with many rays and a bright yellow eye. They range from deep purple to white, along with pink and a light blue. All are quite tough, surviving any winter thrown at them.
Similar to asters, and a plant I just saw visited by a hungry monarch, is New York ironweed (Vernonia noveborancensis). It has smaller, deep purple blossoms in big clusters at the top of stems that can reach 9-feet tall.
According to Tracy DiSabato Aust, in her fabulous book, The Well-Tended Perennial Garden, shorter, later-blooming plants can be created by cutting back all the stems to the ground when they reach 2-feet tall. I shall certainly try that next spring. I moved mine from moist soil to dry soil in part shade partly because it got too tall in the full sun.
If you care about your monarchs, plant native plants. Native plants are much more useful to pollinators and wild animals than plants imported from other continents. Many of the native plants are just as beautiful and pleasing to me in the garden, and hopefully they are to you, too.
Make Your Own Compost to Build Better Soils
Posted on Tuesday, September 7, 2021 · Leave a Comment
Most gardeners do some composting. Some folks compost anything that once was part of a living plant, often mixing it with barnyard waste; they turn and aerate their piles and make terrific compost in record time. Others are lazy composters who just throw kitchen scraps or weeds in a pile and let it slowly decompose over time, allowing it to gradually decompose. I’m a lazy composter. I have do much to do in the garden to take the temperature of my compost pile (though I have, actually) or check it weekly for moisture content – let alone turning it regularly.
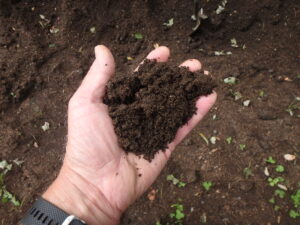
Good compost is worth its weight in gold
Let’s look at the basics: organic matter – leaves, weeds, moldy broccoli or cow manure – is digested by bacteria and fungi. These microorganisms exist in amazing numbers in biologically active soil or compost. But for them to multiply and breakdown organic matter they need a good supply of materials containing lots of carbon and a little bit of nitrogen. Both are needed to build cell walls of the little critters and the proteins and oils in their bodies.
Scientists tell us that by weight, your compost pile should be 25 or 30 pounds of material containing carbon for one pound of nitrogen. Carbon-containing materials include dry grass or leaves, straw – and in general, brown materials. Nitrogen-containing things are also referred to as “green” materials – fresh grass clippings, weeds and household kitchen waste. Just to confuse you, all manures – which are brown – are also full of nitrogen.
We keep a 55-gallon drum of dry leaves next to our compost bin. We fill it in the fall and pack down the leaves to get in as many as possible. Each time we empty our 5-gallon bucket of kitchen scraps into the bin, we take some leaves and add them on top. This adds carbon to the pile, and helps a little to keep flies from finding the goodies. These leaves are certainly is not in the ratio of carbon to nitrogen we need for the fastest composting, but it helps. We count on the kitchen scraps to have some carbon, too.
For weeds, we just pile them up and let them decompose over time. We suffer from an infestation of goutweed, a noxious invasive. We try to keep any goutweed out of piles that will eventually be used for compost as even a scrap of root can start a new place for it to grow. Other invasives we do not have – but would separate if we had them include Japanese knotweed and black swallow wort. In fact, anything invasive should not go in any compost pile you hope to use later.
What else should stay out of compost piles? Meat scraps, oils and fat, dog and cat feces. Shredded newspapers and office paper can be used in compost piles – they are carbon-based, and their inks now are made from soy products. Shiny color inserts and magazines I avoid using. If you add shredded paper to your compost pile, mix it in well – thick layers will not decompose easily.
What about weed seeds in compost causing problems when you use your homemade compost? Ideally, if you are doing everything right, your compost pile will heat up enough for a few days to kill the weed seeds. That means curing it for three days at 140 degrees F. I ‘ve done experiments using annual grass seed and a soil thermometer, and found that even day or two at 135 will kill those seeds. Weed seeds may be tougher, of course. And it is tough to get an entire compost pile hot at the same time.
So how do you get your compost to heat up? You need to layer green (Nitrogen-containing) and brown (Carbon-based) materials. The key is the nitrogen layer. Fresh grass cuttings are high in nitrogen and easily collected with a bagger. Mix them in your compost pile, and it will heat up. Poultry manure, or any manure is also high in nitrogen and will heat up your pile if mixed in. Compost thermometers look like meat thermometers with a longer probe, and are sold at garden centers or on-line.
Moisture level is important for making compost. The pile should be neither dry nor soggy. A handful should feel about as moist as a squeezed-out sponge. I place tree branches underneath a new compost pile to help with drainage. Never put a pile where a roof dumps water.
Your compost should be well aerated. You want aerobic decomposition. So some gardeners turn and fluff their compost regularly, which will help with that.
I add compost to the planting holes for my tomatoes and kale, and work some in for everything, in fact. Why? Because even though I have great soil, compost gets oxidized, breaks down, and gets used up. Plants extract minerals from it. Beneficial bacteria and fungi use it to build their bodies. I try to keep my soil fluffy – roots do better in soil that is loose and aerated – and compost helps me to create that most desirable of soils: a nice loam.
Even though I make compost, I also buy it by the truckload. It is available from farms, garden centers and others. Ask for hot-processed, aged compost to avoid weeds.
There are no poor gardeners, just poor soil. Add compost, and perhaps a little organic fertilizer and you will have a “green thumb.” It takes time to make compost and build soils, which is why you should start now!
You may reach Henry at
henry.homeyer@comcast.net or PO Box 364, Cornish Flat, NH 93746. He is the author of 4
gardening books.
Do You Deserve a Medal?
Posted on Wednesday, September 1, 2021 · Leave a Comment
As I walked around the garden recently with my wife, Cindy Heath, she turned to me and said, ”Anybody whose gardens looks great at this time of year deserves a medal.” I allowed that we did not deserve a medal. Wanna get the medal? Here are some tips I have come up with.
First, pull any tall weeds. By now a few vigorous weeds can tower over flowers in your garden if you let them. Pull them before company comes if you don’t want to be embarrassed by your sloth.
Pull tall weeds like touch-me-nots to make the garden look better
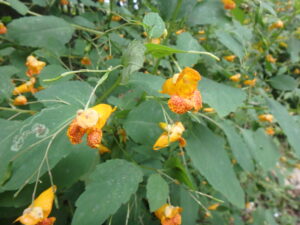
I have lots of jewel weed (Impatiens capensis) in partly sunny to shady flower beds that have rich, moist soil. It is a native plant, but one that can take over if you let it. I recently removed some that was well over six-feet tall. It was in a bed with tall perennials, and I guess it outgrew them to get more sunshine, In other places, where the completion is minimal, it might only get 3- or 4-feet tall.
According to the US Forest Service website, it is one of just a few native plants that can outcompete garlic mustard, a terrible invasive in our woodlands. So if you have it, and have garlic mustard, you might want to let it survive – and enjoy its bright orange and red flowers that I find cheery.
Next on my list, I’d recommend deadheading flowers that have gone by and are looking shabby. I have a huge bed of Shasta daisies in front of our house, but they were in their prime a couple of weeks ago. Cindy cleaned up the flowers with a pair of scissors in just 10 minutes. It made a huge difference to remove all those spent blossoms. There are still many flowers in that bed that look fine, so we didn’t need to cut it all down.
Bleeding heart is a favorite flower of mine. It’s a big plant that blooms in early summer in either pink or white. But by now the flowers are long gone, and the leaves have turned yellow. What to do? Cut back the foliage to the ground. Don’t wait until fall or frost to arrive, just cut it back now. Do the same throughout the garden.
Fall asters can be used to add color where you have cut back faded perennials
So what can you do with those empty spaces where you cut back flowers that have declined to the point that they needed to be cut back? Depending on the spacing, you might be able to fit in some chrysanthemums or fall asters. These are sold in bud or bloom in pots in grocery stores, farm stands and garden centers. They will bloom for weeks so long as you do not let them dry out. Fall asters are in the same category as the more common mums: inexpensive and lovely for filling in empty places.
Fall mums and short purple asters are often sold in compressed cardboard pots. Unfortunately, these dry out very quickly. If you leave the plant in them, you need to soak the pots and plants regularly, generally more than once a week. The solution? Plant them in the ground when you can, or put them into plastic, fiberglass or ceramic pots.
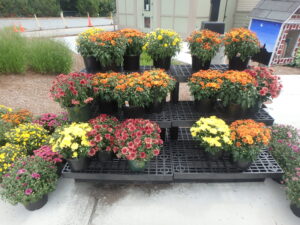
Chrysanthemums are nice fall annuals that will add color to your garden. They are readily available.
I can’t plant mums where I’ve cut back that big bleeding heart, for example as I would damage the roots if I dug there. But I can place them in a nice ceramic pot and set it gently in the same area as the bleeding heart, though perhaps a little forward or back from the stubs of the stems. Yes, it is work to do so, but it is worth the effort if you have it in a prominent spot that you (and your visiting friends and neighbors) will see.
In the vegetable garden many plants are suffering from a variety of fungal diseases. Mold and mildew are common and make leaves ugly. The solution? Cut off the leaves. There are usually newer, undamaged leaves, and new leaves on things like squash and pumpkins are still growing. Once a leaf has mildew, you can’t make it look good, so get rid of it.

Henry Eiler rudbeckia was tied up twice to keep it from flopping
Tall flowers are flopping over now, particularly if we get a heavy rain. I grow a black-eyed Susan, Rudbeckia ‘Henry Eiler’ that has gorgeous, unusual blossoms, but it grows to be over 6 feet tall. I surrounded the big clump with hardwood stakes a month ago and tied string from stake to stake to support it. Recently I tied another tier of string higher up on the 6-foot stakes to prevent flopping.
For some things I can avoid using string by pushing stakes into the soil at roughly a 45-degree angle, two of them in an “X” pattern. I push the flopper up then support it with the two stakes. For smaller things I use bamboo stakes, for larger, heavier things like New England asters that can by 5 feet tall, I use 5-foot one-inch hardwood stakes. Paint them green if you don’t want to notice them.
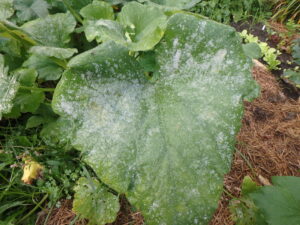
Squash leaves with disease should be cut off
What about the lawn? By Labor Day it may be looking pretty shabby. I don’t believe any of us should waste water on our lawns. If you have a sunny yard with sandy soil, your lawn may be looking yellowed and dry. Crab grass, an annual that fills in where the lawn is compacted by foot traffic, is declining or dead by now in most places. My solution? Hope for rain, and try to avoid looking at the dead spots. Enjoy looking at that medal-worthy garden of yours!
Starting Wildflowers from Seed
Posted on Tuesday, August 24, 2021 · Leave a Comment
I recently visited the Nasami Farm in Whately, MA. This is the plant production facility for the Native Plants Trust, formerly the New England Wildflower Society. I met with Alexis Doshas, their nursery manager. The 75–acre farm produces perennials, grasses and some woody plants – mainly from seed. The plants are sold at their headquarters in Framingham, MA, and at the Nasami Farm on weekends.
Nasami Farm produces many species of wildflower trees and shrubs from seeds
If you are interested in growing wildflowers, the least expensive way to get plenty is to start them from seed. This takes some effort, but it accomplishes a number of things: if you collect seed from the wild, you are getting plants in your garden without diminishing the wild population – the way you would if you dug plants (which is prohibited anyway in most places).
Starting plants from seed also encourages genetic diversity. Many purchased plants are propagated from cuttings or by division, which means they are all clones with the exact same genes. Seeds from any given plant produce seedlings with a wide range of characteristics, making some less susceptible to environmental challenges such as global warming.
Remove the fuzzy bits to separate seeds before planting
Starting wildflowers from seed can take patience. While some seeds will germinate and grow the same summer you collect them (Campanulas, for example), other things like lilies might take 4 or 5 years to bloom. Many require a cold period of 3 months, which is called cold stratification. Some planted now will grow underground next spring, but not send up any green growth until the following spring.
The Nasami Farm grows seedlings in big plastic hoop houses. These are not heated except in spring, or if temperatures go below zero in winter. The greenhouses allow the seedlings to be monitored and tended easily on long tables. You could set up a table in your barn, shed or garage for a few flats of seedlings. Some wildflowers will do fine in flats with good drainage in the outdoors – preferably in a shady place that won’t see too much of the hot, drying sun.
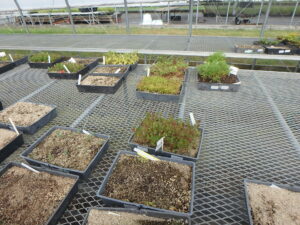
Flats of wildflowers at Nasami Farm
Lastly, you can plant seeds directly in the ground in a site where they will thrive as mature plants. The disadvantage to this is that you never know what percentage of seeds will germinate. If you plant 100 seeds in a flat indoors it will be easier to thin or transplant the seedlings than if you must do so on your hands and knees. And there should be no weed competition if you are using a germination mix in a flat. On the other hand, I plant things like golden seal directly in the ground as it takes 2 years to sprout, and I don’t want to have to water and tend them so long.
Alexis Doshas gave me some tips for success when starting wildflowers from seed. First, she said, collect seed when it is easy to pull off the plant, and remove any fluffy stuff attached to it. Generally seeds start light colored, and darken when fully ripe. If you want to store seed, make sure it doesn’t dry out. Store in a cool, dark place.
Buy a very fine seed germination mix, something made of finely ground peat and perlite. A coarse mix can let seeds wash down deeper than they should be. For small seeds (the size of a grain of sand or less) just sow seeds, pat them into the soil mix and water them in. No need to cover them. Alexis suggests germinating seeds at 60 to 80 degrees, but also cautioned that many wildflowers need a 90-day cold period before they will grow.
Alexis said you may need to provide rodent protection: metal hardware cloth over the flats to keep mice from eating the seeds. Rodents can be a problem as easily in your cold basement as in a barn or outdoors.
I asked Alexis to recommend some plants that would be easy to start from seed right now. She suggested blueberries, huckleberries and plums for fruits. Of the flowers, she listed these: milkweed, mountain mint, black-eyed Susans, wild bee balm, wild iris, asters, Joe Pye weed and all the goldenrods, which are great for pollinators.
Woodland wildflowers, she said, often have very specific needs and are not as easy to grow as the field flowers mentioned above. Soil pH and type are important. When I plant spring wildflowers I try to mimic the forest type of their native habitat: if they grow in a maple-beech-ash forest in the wild, I try to plant them in a similar environment.
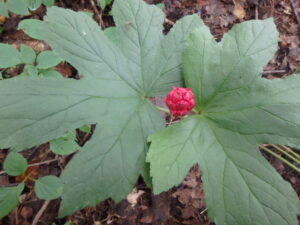
Golden seal fruits are ready for picking in my woods right now
Plants with large, fleshy fruits such as Jack-in-the pulpit or golden seal probably will require you to remove the fruit portion before planting. Gloves are suggested, as some have strong chemicals that may irritate your skin. You can soak seeds like that to allow fermentation to remove the skin and flesh.
A good reference text for anyone interested in starting wildflower seeds is by William Cullina, Growing and Propagating Wildflowers of the United States and Canada. Unfortunately, it is out of print, though I’ve heard it is in the process of being reprinted. It is worth its weight in gold as it gives specifics for each of hundreds of wildflowers.
So try collecting some seeds, and schedule a visit to Nasami Farm or the Garden in the Woods.
Henry is the author of 4
gardening books. He lives and writes in Cornish Flat, NH. His web site ids
www.Gardening-guy.com.
Bedrock Gardens in Lee, New Hampshire is Well Worth a Visit
Posted on Tuesday, August 17, 2021 · Leave a Comment
I recently visited Bedrock Garden in Lee, NH and came away feeling refreshed and enlightened. This 37-acre public garden was created on the premises of a 1700’s farm that was purchased in 1980 by artist and garden designer Jill Nooney and her husband, Bob Munger.
Gardens and sculpture go well together
Jill Nooney is a talented designer, who has won many awards at the Boston Flower Show. She is a welder who uses her skills to create metal sculptures from small to mammoth, as well as working with other media. Bob is a natural builder and fix-it guy who has enabled Jill to install her art in the landscape, along with water features, walls, paths and much more. They are a couple who really bring out the best in each other.
When I toured the gardens I was lucky to have had Jill as one of my guides. Also touring the gardens with me was John Forti, Executive Director and Horticulturist of the non-profit that manages the gardens. We spent nearly three hours together looking at the gardens and I learned about many plants I had never seen before.
Bedrock Garden is full of surprises that delight, enlighten and inspire visitors. I came away wishing I had a bigger garden space for my own efforts, and an appreciation for how much Jill and Bob have packed into their gardens.
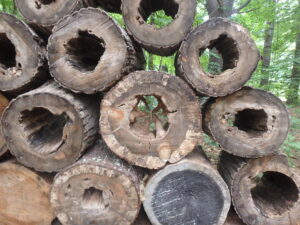
The Log Jam is something anyone could do
For years Bedrock Garden was open a few weekends each summer, but five years ago Jill and Bob decided that since they were approaching what some call “retirement age”, that they needed to look seriously at the future of the gardens. They created a non-profit, hired John Forti as the director, and figured out how to separate the public and private spaces.
During the pandemic they created a parking lot and visitors center that are accessed away from their home, the old farm house they have lived in for over 40 years. They have created a space that is family-friendly that delights children as much as their parents.
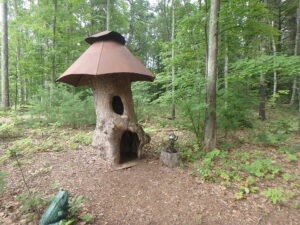
This gnome house near the parking area alerts children that they are welcome
Near the parking lot is a gnome house kids can enter made from a huge hollow sycamore log that Jill capped with a steel roof reminiscent of mushroom cap. She saw the wonderful hollow log alongside the road and hit her brakes immediately to ask for it. Luckily, she was the first to ask, and got it. (Five others stopped and asked for it that day, she told me, but she was the first).
I consider myself well exposed to the palette of plants available to gardeners in New Hampshire. Bedrock Garden is in Zone 5b, meaning that most years it does not get colder than minus 25 degrees Fahrenheit. But Jill has installed and grown many plants that I have never seen before, including many woody plants normally found in Japan or China.
Jill Nooney has used plants in ways that surprised me. So for example, she used ‘Bulls Blood’ heritage beets in a flower bed for their deep purple leaves. An annual effort, but very striking. When a hollow tree was cut down, she had Bob cut it in two-foot sections and stack the sections between two trees so viewers walking by could see through it like binoculars. One can see where branches had been swallowed by its growth. They call it “Log Jam.”
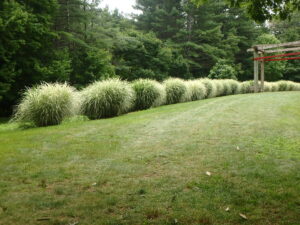
Decorative Miscanthus grass makes a statement in full sun
Jill has used decorative grasses well throughout the garden. Fountain grass (Miscanthus spp.) is a genus of grass that gets to be more than six feet tall and very bushy in full sun, where she grows it in an “allee” arrangement that is gorgeous. But she also uses it in shade. “It’s wispy in the shade”, she said,” I like that.”
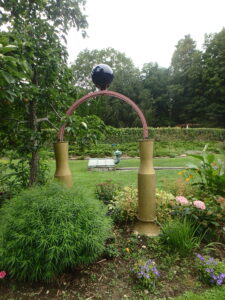
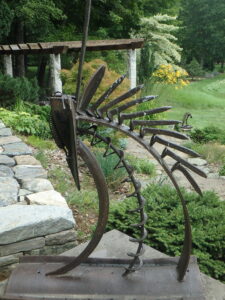
Metal sculpture is a key element throughout the garden. Early in our tour I admired a space made by forming ¾-inch steel rebar into a series of 11 arches 13-feet tall and spaced 7 feet apart. “I’m using the sky,” she said. She consciously mimicked the lines of a Gothic cathedral, bending each steel frame to a gracefully pointed Gothic arch. And she is growing European fastigate beeches to clothe the metal frame as part of the installation: one on each side of the archways and tied to the steel. They will eventually reach the sky – the apex of the arch.
A steel chiwara or stylized antelope mask in the garden
Also in the garden are two iron “Chiwaras” modeled after antelope masks made by the Bambara people of Mali. Many years ago I had told Jill the legend of the antelope in Mali, where I had worked with the Peace Corps. The Bambara people credit the antelope for teaching them to plant millet, their primary grain. The antelope pawed the ground, and dropped a little manure into the soil containing seeds. So they honored the antelope with their stylized masks, which Jill captured beautifully.
So plan a visit to Bedrock
Garden if you can. There is a guided tour each day, and two on weekend days. Or just wander around and study the design elements – see how Jill has used plants that awe and inspire, and how she has added whimsy and art that delights and amuses. This is a
garden worth visiting even if you don’t have a big space or the energy to develop it the way Jill and Bob have. Bring a lunch and plan on spending the day. You’ll be glad you did. And if you have children in your life, think about attending the Fairy Hobbit House Festival October 9 to 11. Learn more at
www.bedrockgardens.org.
You may write Henry at PO Box 364, Cornish Flat, NH 03746, or e-mail him at
henry.homeyer@comcast.net. Please include a SASE if you want a response by mail.
On Becoming a Plant Collector
Posted on Wednesday, August 4, 2021 · Leave a Comment
I’ve always been a gardener. –or at least as far back as I can remember. More recently, say the last 20 years or so, I’ve been a plant collector. What does that mean? If I fall in love with a plant, I want to grow other plants related to it.
Collector Bill Countryman started out with one peony and eventually collected about 600 varieties
One of the most obsessive collectors I ever met was the late Bill Countryman of Northfield, Vermont. When I interviewed him in the late nineteen nineties he told me that his sister sent him a peony, and although he was in his seventies at the time and not a gardener, he planted it. It bloomed magnificently and Bill fell in love with peonies He decided to grow every type there is.
Bill Countryman bought a chain saw so he could clear his land to plant peonies. He bought a bulldozer to remove the stumps and went to work. When I met him, he had already planted some 300 kinds of peonies, though he continued on, getting more varieties – perhaps as many as 600. He sold them, but mostly he just enjoyed them. He was quite the collector.
I’m not nearly so obsessive. What do I collect? Well peonies, I suppose. But Cindy and I have only 44 peonies. Primroses. Burnets. Persicarias. Wildlflowers. Willows. I have dozens of colors of daylilies, but don’t consider myself a collector of them – they are just nice, reliable plants, but I don’t need one of every kind. Thank goodness for that- there are many hundred.
The burnets are quite a diverse group in the scientific group or genus, Sanguisorba. First I got the one native to New England, Sanguisorba canadensis. It loves wetlands, so I planted it in a weedy, marshy place in part sun/part shade. It thrived, sending flower spikes with bottlebrush flowers 6-feet tall or more. It blooms in late summer or fall, and can still be pretty in late October.
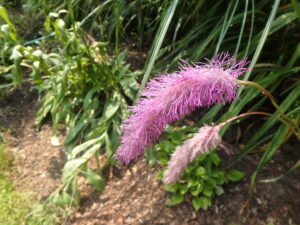
Lilac Squirrel Sanguisorba blossoms are delightful to touch and see
My absolute favorite of these flowers is one called Sanguisorba hakusenensis ‘Lilac Squirrel’. I saw it on-line, and asked all my local garden centers to no avail, so I finally ordered it from Digging Dog Nursery in California. I planted five small plants last year, they wintered over, and are blooming now. The flowers are like pink squirrel tails hanging down from 18-inch flower stems. They make me smile, especially with a name like that.
The littlest of the burnets I grow is one called S. officinalis ‘Little Angel’. It makes a tidy clump of diminutive green leaves edged in white. Each leaf is just half on inch long. The deep red catkin-like flowers are on 6-inch stems that lean or fall over. Now, five years since I bought it, the clump is about a foot across and just 3 inches tall.
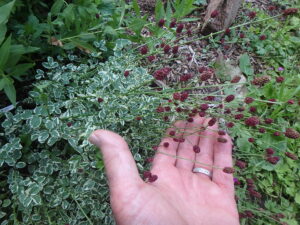
Little Angel is dwarfed by its larger relatives
Little Angel’s bigger cousin in the same genus is one called ‘Tanna’. This is called a miniature, but that is only relative to some of the bigger ones that get 4- to 6-feet tall. It has very tidy 18-inch leaf stems, each with 13 to 17 leaflets in dark green. It makes a tidy mound and has the same dark-red smallish flowers.
Of the large ones that are garden worthy, I have two: probably S. obtusa and S. tenuifolia. The literature, even on-line, is sketchy about identifying these plants and I lost the plant tags long ago. The first, which has reddish-pink tidy small catkin-like flowers needs to be tied up early in July. If not tied up, the flower stems, which get to be over 4-feet long and have 20 or so blossoms per stem, flop over. The other is standing tall and proud right now, but the flowers have not yet opened – and I haven’t staked them.
Why do I collect burnets? I just like them. They can be picked for flower arrangements, but I rarely do. I like seeing them in the garden.
I have dozens of daylilies but don’t consider myself a collector of them
Willows, of course, are more of a problem to collect because of their size, but I do grow at least half a dozen. My favorite is the Salix integra ‘Hakuro nishiki’. It has variegated foliage early in the summer – green and white, and then with pink mixed in for a few weeks. It is colorful and fast growing. Like all willows, it appreciates moist soils but will grow in ordinary garden soil.
‘Hakuro nishiki’ is not a large willow. It seems to top out at about 20 feet in 10 years. I planted three some 20 years ago, ten feet apart, and they created a dense grove. I was able to prune out branches growing into the center, creating a small room where I placed Adirondack chairs. It makes a cool space near my brook to eat lunch on a hot day.
Hakuro Nishiki willows have tri-colored leaves in early summer
The rosemary willow ( Salix eleagnos) is another favorite of mine. It is a small willow, only getting to be about 10 feet tall and wide in 10 years. I love that its leaves look somewhat like leaves of the herb rosemary: narrow and pointy leaves. They are dark green on the top side, gray or silvery on the bottom side. I’ve almost been able to fool people visiting my garden into believing it was really a rosemary plant on steroids– but for the lack of smell. Neither the rosemary or Hakuro nishiki produce any noticeable flowers.
So I encourage you to look for – and collect – plants related to the ones you love. Not every variety will tickle your fancy, but if you discover a few that do, they will make you happy for years to come.
Invasives and What to Do About Them
Posted on Tuesday, July 27, 2021 · Leave a Comment
Since ancient times, explorers have brought back seeds and plants from exotic lands. Some, like the apple, have been a boon to the citizens of their adoptive home. Others, like the notorious Japanese knotweed (a.k.a. “bamboo”) have been more headache than boon.
New England, with its cold climate, is blessed with a natural defense against some invasives: our winters. But many others have settled in and are taking over – or trying to. It is up to us, the gardeners, to be responsible: we need to learn what the problem plants are, and we need to get rid of any we have growing on our property.
Invasive plants are those that reproduce rapidly and take over wild habitats, out-competing the plants that Mother Nature provided, stealing light, water and nutrients from less aggressive plants. By definition, they are alien species, plants that have come here from other countries. These plants are often very good-looking plants, but thugs.
Most invasives produce large numbers of seeds that are distributed by birds, by the wind, or by water. In most cases, invasives are also difficult to remove or eradicate once established, and have extensive root systems that preclude simply pulling them up.
Back home, in their country of origin, most invasives have predators – insects or diseases – that keep their numbers in check. They may have come inadvertently or been brought by well-intentioned people who thought they were pretty or had some use for them. Some, like burning bush, barberry and Norway maple, have been introduced and sold because they are essentially indestructible – and pretty.
For starters, you can learn to identify the prohibited species in your state, and eliminate them on your own land. Check with your local University Extension service to obtain a list for your state.
Getting rid of invasives, however, may not be easy for two reasons: you may like the invasive species, and may have planted it before you knew better. Secondly, it may not be easy to eliminate – even with the use of herbicides (which you probably don’t want to use anyhow).
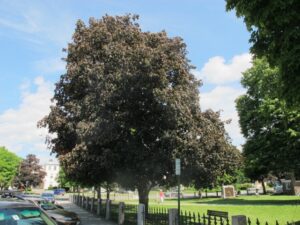
‘Crimson King’ Norway maple looks great, but out-competes our native maples in the forest
The Norway maple, for example, is a lovely-looking tree that grows fast and survives well even in urban areas. It will grow in sun or partial shade and is not bothered by road salt. If you have one that is shading your house, I can understand why you might be unwilling to cut it down.
If you are a city dweller, you may assume that since there are no forests nearby, it shouldn’t matter if you keep your Norway maple (or other invasive species). But it’s not just wind or birds that distribute seeds. Runoff can carry seeds to an outlet in a natural environment. Seed from your tree can end up in streams, rivers, ponds. Thus even city dwellers can make a difference, helping to control the propagation of this invasive tree by cutting down theirs.
To see if maple trees growing wild near you are Norway maples, do this simple test: snap off a leaf at its attachment point, and look at the stem. If it oozes a milky sap, it’s a Norway maple. The leaves also tend to be broader and larger than sugar or red maple leaves.
For organic gardeners, getting rid of invasives is not easy. For herbaceous weeds, think lawnmower. Once you have the stalks (and as much of the root mass as possible removed), plant grass seed. Mow it every week and the roots will not be get recharged. Stems will continue to grow for years, but if you mow it, you can win.
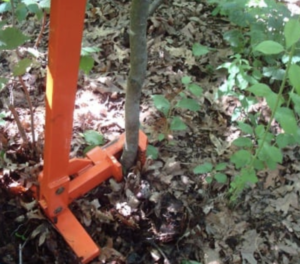
There are several brands of weed wrenches that can help to pull small trees and shrubs
Digging the stump of an invasive shrub like barberry, bush honeysuckle or burning bush is a pain in the neck, but you probably can do it. Digging the stump of a large Norway maple is not practical. But there are folks with back hoes and stump grinders, and the expertise to do it.
If your woods are full of small seedlings of invasive trees or shrubs, you may wish to get a tool for pulling saplings called a weed wrench. This tool has a gripping mouth-like part, and a long handle to provide the leverage. A weed wrench of the proper size allows a 150 pound office worker to pull out shrubs and small trees that otherwise would not be possible to yank.
Why bother digging out invasives? You may decide to do it for the sake of your grandchildren, or for the environment. Even in states with good laws prohibiting the sale of invasive plants, no one can force you to cut down or pull out your invasive plants. But being a little selfish is okay, too. Think of all the great plants you can buy and plant if you get rid of those invasives. And think how wonderful it would be if wildflowers and native plants started flourishing in your woods.
Henry Homeyer is an organic
gardener and longtime UNH Master
Gardener. Reach him at
henry.homeyer@comcast.net or PO Box 364, Cornish Flat, NH 03746.


 Click Here to buy from Cobrahead