A Time to Nestle in with a Good Book
Posted on Tuesday, December 31, 2019 · Leave a Comment
It’s cold outside, and nothing is happening in my garden. Well, I guess deep beneath the soil surface there are microbes and worms and moles alive and doing whatever they do in winter. But I am doing nothing in the garden, so this is a time to read about gardening.
At a gardener’s dinner I asked my friends to bring me good books to read about gardening. The first one I picked up is Gardens of the High Line: Elevating the Nature of Modern Landscapes by Piet Oudolf and Rick Darke (Timber Press, 2017). I have visited the High Line in New York: a mile and a half of gardens growing on what was an elevated railroad bed that fell into disuse until it was re-purposed as a fabulous outdoor space in the heart of the city.
The book if full of fabulous pictures of the gardens, along with ideas about how gardens can be designed. None of us can do what they did there, but we can get ideas from the designers. Piet Oudolf, a Dutch landscape architect, was one of the primary design forces for the garden. I interviewed him at his home in Holland back in 2007.
A quote I liked from Oudolf was this: “The one tool I can’t be without are my eyes. Sometimes you need a spade, sometimes pruners, but when you are gardening you really have to look.” It’s for that very reason that I can’t design a garden on paper. I have to have to be in a garden, and have plants to work with before I can figure out where they’re going to go.
Yes, I know some basic design principles. For example, create mystery or tension by obscuring part of the garden with plants (or hardscape), thus leading viewers into the next portion of the garden along a path. Or create waves of color, masses of color instead of sprinkling little bits of color in the garden. Enjoy seasonality. Let one portion of a garden be special in spring, another in fall. All this really becomes possible for me when I have plants in hand and I can see – and then imagine them in a year, in five years, in ten. Eyes are the key, along with the imagination.
Another design principle used heavily at the High Line is this: borrow a view. Create your garden in such a way that visitors see not only your plants, but the view of a mountain, a river, or in New York, buildings. The High Line is surrounded by, and towered over by, buildings. Interesting architecture, filigreed steel of the bridges over city streets, for example. The gardens encourage visitors to stop and view the surrounding cityscape, day or night.
The plant palette is an important part of the success of the gardens. According to the book there are nearly 400 species of plants at the High Line, about half natives, half from other continents. The important thing for a tough location like the High Line is to get plants that will survive, thrive, and move. Yes, the book explains that the gardens are dynamic: plants get to pick, to a certain degree, where they will grow. Garden staff and let “volunteers” (self-sown plants) to spread in the gardens.
Obviously the small trees growing there were planted in a location, and stay there. But some do spread by root, and do wander a bit. For example, the designers used sumac in some places for its interesting branching and splendid fall color, and it does spread by root.
I remember seeing a grove of sumac adjacent to a lawn in Wilder, Vermont years ago. The sumac had sent underground stolons (roots) to a sandbox in the middle of the lawn, and new shoots were popping up in the sandbox – the lawn mower had only controlled those that appeared in the lawn. Concrete walkways and old railroad ties and rails on the High Line do inhibit spread to a degree.
A book like this one is great if you want to expand your plant palette at home. It has common and Latin names of the plants in the photos, so you can make notes in your notebook with a wish list. I found myself seeing interesting plants in the photos and not being sure which was which, but in this day of Google, it is easy enough to find out.
Not all the plants are easily found, however. I saw mention in the book of Dale Hendricks, a fellow I interviewed a decade or so ago when he was running North Creek Nurseries in Pennsylvania, a wholesale nursery, which he has since sold to others. Dale built up a huge inventory of native species, including named cultivars of specialty goldenrods, for example. I gave him a call recently, and got some plants he likes for hot, tough places.
Dale Hendricks said he likes Hyssop-leaf thoroughwort (Eupatorium hyssopifolia), a late summer bloomer that is related to Joe-Pye weed and boneset, but that is quite diminutive. It has attractive white blossoms in meadows with good drainage and full sun. Growing with it often is little blue stem, a native grass. ‘The Blues’ is a named, non-patented variety he developed.
Other tough plants Dale likes? Poppy mallow (Callirhoe involucrata), bluestar ammsonia (Ammsonia hubrechtii), butterfly weed (Asclepias tuberosa), prickly pear cactus (Opuntia spp.) and a blazing star called Liatris microcephala.
So do some reading this winter, and make plans for new summer plantings. You may have to ask your local nursery to order in some of the less common plants I mentioned above, but they might be in stock.
Looking Back on 2019
Posted on Monday, December 23, 2019 · Leave a Comment
This past year was, overall, a good one in the garden. It started off cold and wet in early summer, but then turned hot and dry. Most vegetables and perennial flowers did fine for me. I finally splurged and got an Itoh hybrid peony, one called ‘Garden Treasure’ and it bloomed gloriously. It is a cross between a perennial peony and a tree peony.
Carrots and onions, however, were a bust for me this year. Granted I had them in a place where they got more shade than ideal. Still, my carrots were pathetic. Very small. I accept that each year something will under-perform. Fortunately there are good organic farmers who have anything I need. I bought half a bushel of organic onions at the Norwich Farmer’s Market, something I had never needed to do before. Oh well. And good carrots are always available.
My tomatoes did all right. I tried hard to pick off diseased leaves, which always helps. I regularly sprayed an anti-fungal solution called Serenade that contains a bacterium said to combat fungi. I didn’t spray a couple of plants to see if there was a difference, but didn’t notice much difference. It may have delayed the onset of disease, but basically the only way I can get enough tomatoes is to have lots of plants.
Last summer I wrote about a farmer in Pennsylvania who said that staking tomatoes was a waste of time and energy. I said that I would test his theory and report back to you. The results? Staked tomatoes did better for me.
During that dry time in August I installed some drip irrigation in a garden for a client, and found it very helpful for new installations. Gardeners Supply Company (
www.gardeners.com) sells a “Snip and Drip” system that installs easily and delivers water just to the places that need it. I encircled new trees and shrubs with sections of soaker hoses that “leak” when the water is turned on. I found an daily was fine, and used a timer to control it.
Magnolias in my part of the world bloomed deliciously this year. My ‘Merrill’ magnolia bloomed a little late this year, just barely blooming for my birthday in late April, but holding its blossoms well into May. I met a new (to me) magnolia this year, a yellow one called the cucumber tree magnolia (Magnolia acuminata). I am looking for a space to plant one, perhaps this year.
Two years ago I planted a catalpa tree, a 10-foot specimen, in the middle of a section of lawn. I had fallen in love with the blossoms on a neighbor’s tree. The blossoms are creamy white with purple-red stripes inside, and are fragrant. It bloomed after its first winter, but not this past year. But the tree showed no winter kill, and I imagine next summer it will blossom dramatically.
Not all trees bloom every year, and weather has a lot to do with that, I think. So as I nestle in here near the woodstove, I dream of catalpa blossoms in 2020. Maybe gardeners live longer, in part, because we so want to see our plants perform.
Grapes produced huge quantities for most everyone this year. I made over 5 gallons of juice and froze it in half-gallon plastic jugs. I used a NorPro brand “Steamer/Juicer” for this, and it was very easy. The grapes were purple Concord type, and produced juice with a very intense flavor.
Each year it gets harder for me to find space to plant more spring bulbs, but each year I find some. This year we planted 300 or more bulbs at our home here in Cornish Flat. I can’t wait to see them bloom, and to see the others I’ve been planting for decades.
What else happened in 2019? My life partner, Cindy Heath, finally moved in with me in Cornish Flat. We had lived 6 miles apart for the last 10 years, but this May we joined forces here. She is an avid gardener who loves to weed, which really helps a lot! Life is good.
In August I broke a bone in my ankle while pruning a tall apple tree when my ladder slipped off the branch it was on, and I hit the ladder with my ankle when I landed. The fracture was not serious, but it kept me from doing as much as I’d like. It is only now that I am fully healed.
Fortunately, I met and made friends with Jim Spinner, a retired fellow who wanted to learn to garden and who has lots of energy. He helped me a lot, as did Cindy, and by the end of October our gardens were in great shape. I managed to help them despite wearing a big plastic boot much of the time.
And in 2019 two of my good buddies, Jerry Cashion and Brian Steinwand, passed away. I had known them for a total of over 80 years, and miss them a lot. We had all worked in Africa together. But I find that gardening is a fix for almost any sadness. Get out, dig in the dirt, plant a flower or pick a tomato and life seems a little bit better.
I wish you all a wonderful 2020. I hope you will start thinking about the garden now: dream, read gardening books, make lists, and learn about trees or flowers you want to try this coming year. That’s how I make it through the winter.
Reflections on a Gardener’s Life
Posted on Tuesday, December 17, 2019 · Leave a Comment
During the holidays I try to take time from the humdrum of festivities to sit quietly and reflect on how happy and grateful I am for my life here in rural New England. Much of what I appreciate is linked to a life that allows me to spend time in my garden, raising some of the food I eat and growing flowers that bless me with their beauty.
The summer of 2020 will mark the fiftieth anniversary of buying a ramshackle old butter factory built in 1888, The Cornish Creamery. I still live in it today, though I have improved its condition considerably. I was just two years out of college when I bought it and had the energy and motivation to learn how to make most improvements myself.
When I bought the Creamery, it had little space for gardens. The building sat on just an acre of land, and most of that was dominated by trees, with just a little lawn surrounding the house. I cut down a few small trees to create my vegetable garden that first summer. If I recall correctly, I had just a couple of tomato plants, lettuce, perhaps some squash. I was busy fixing up the house and had little time to garden. The garden was too shady and not a big success.
Later I was able to buy an adjoining acre or more, a field behind the house that was dominated by brambles, alders and a small brook. I cleared the land by hand using a brush hook my father gave me. The tool, with a sharp curved blade on an ax handle, did well for clearing. Come to think of it, I’ve never seen one for sale in modern times.
After clearing the land and digging out many roots I used a second-hand rotary mower to discourage re-growth of golden rod and weeds. Eventually I hired a farmer to come with a plow to turn the soil for a huge vegetable garden. The land around it I mowed, and that eventually turned into lawn and flower gardens. It was in full sun with rich alluvial soil deposited by the brook. It produced fabulously, and I was hooked.
My grandfather, John Lenat (1885-1967) was an organic gardener. He subscribed to a little newsprint magazine called Organic Gardening and Farming, which was always on his kitchen table. He believed in using compost and feeding the soil with manure tea. Earthworms were plentiful in his soil and his tomatoes were perfect.
Although Grampy probably only had a grade school education in the old country, Germany, he spoke 5 languages and understood how to make plants grow. He knew he didn’t need chemicals to “fight” bugs or diseases. He handpicked beetles and encouraged birds to visit. He fed his family and shared food with his neighbors. Grampy rarely told me how to do things but I learned by watching him in his garden.
I am grateful that Grampy grew flowers, too. I learned to appreciate their beauty and to know that life is more than just producing food. In the 1980’s I started to get serious about flower gardening.
My boy Josh and I built an 80-foot stone retaining wall to create a terrace for fruit trees and flowers. The stone came from our own property, or from tumble-down stone walls that a neighbor let us pick through. It was back breaking work, but oh so satisfying. Thirty-plus years later the wall is still there, albeit somewhat decrepit. Still, it makes me happy when I reflect on that project.
In the late nineties I started gardening and designing gardens for others. At that time I was an electrician, and getting bored with it. But creating flower gardens and beautiful landscapes made me intensely happy. So I largely gardened in the summer and wired houses in the winter.
I am happy and grateful that I was able to start writing a gardening column over 21 years ago, and still have a group of newspapers and websites that use my weekly column. It also pushes me to keep trying new plants, new tools, and new approaches to gardening. I like sharing all that with you, my readers.
I started my professional life as an elementary school teacher after college. Now, more than 50 years later, I still enjoy teaching. Most of that is done right here in this column.
Gardening has been good to me. I believe it will help keep me healthy for another decade or two. And my thanks to all of you, too. Enjoy the holidays – and I hope you find time to count your blessings.
Now is the Time to Plant Acorns
Posted on Tuesday, December 10, 2019 · Leave a Comment
You may think that the planting season is over. Not for me. I recently planted 8 giant red oaks. Or, I should say, potentially giant oaks. I planted eight acorns. I’m hoping that at least one will begin growing next spring, and that it will eventually provide shade, food for wildlife, and beauty for all who happen by.
This is the season for planting acorns. They need an extended cold period in order to germinate, come spring. That cold requirement prevents them from germinating now, and being killed off before getting established. Most nut trees, including most oaks, have a tap root that grows deep into the soil. Red oak (Quercus rubra), I have read, has relatively shallow roots. Still, if you want an oak, plant your acorns where you want a tree. Don’t move them once they have started growing if you can avoid it.
Here is what I did: Before I planted the acorns I inspected them carefully to see if there were any signs of insects boring into them, but saw no holes. Then I put them in a bowl of water to see if any floated. Any that float should be discarded, as they are probably not viable. Of the 10 I put in water, two floated and went to the compost pile
Next I went outdoors to plant. I looked for a place where a young oak would get plenty of sunshine – six hours a day is adequate – and where a big tree would not be competing with other trees. According to my favorite tree expert, Michael Dirr, a mature red oak will grow to be 60 to 75 feet tall and nearly as wide at maturity. I did not have an area quite that wide to dedicate to an oak, but I found a spot where it will fit between two maples along my property line.
Oaks do well in well drained, acidic soil. Red oak, because it has a relatively shallow root system, can be prone to drying out when the trees are young, so I am prepared to water my seedling until it is well established if the summer is hot and dry.
I raked off leaves and snow and loosened the soil in a 2-foot wide circle with a hand tool. Then I pushed acorns into the soil and covered each with an inch or so of soil. Then I patted down the soil and covered the area with leaves. I placed a nice metal name plate in the middle of the planting zone with the date I planted the acorns.
If more than one of my acorns grows, I will have to choose the best to keep. Yes, I could keep more than one for a while, but brother and sister trees will compete for sun, water and nutrients, so the extras will need to be weeded out.
If digging in frozen ground doesn’t appeal to you or if the squirrels are watching your every move, acorns can be collected in winter, stratified in a refrigerator for a minimum of 30 to 60 days, and then planted in the spring. Store them in a paper bag in the vegetable drawer to keep them from drying out. By spring, the squirrels will have better fish to fry (like the tender shoots of my hostas).
Red oak nuts may need help opening their shells if they have been stratified, or preserved indoors, because they do not go through multiple freeze and thaw cycles. Simply score the acorn with a knife or rub it with 80-grit sandpaper until the kernel is exposed.
Not all acorns will germinate the first year, which makes sense from a Darwinian point of view: If a drought or a forest fire kills off some seedlings this year, others will be able to pop up the next.
One of the best oaks for suburban areas is the pin oak (Quercus palustris). It is smaller than many oaks (still, it grows to about 60 feet), with shallow fibrous roots that can thrive in the heavy clay often found in the disturbed soil of subdivisions. It prefers acidic soils, so it does well in the Northeast.
Pin oaks grow more quickly than many oaks, often adding two feet of height or more per year, and they have a profile that is handsome year-round. Like all the oaks discussed here, they are hardy in zones 4 to 8 or 9.
The white oak (Quercus alba), is majestic and can live 500 years or more, attaining heights of 100 feet. It does best in deep, moist, well-drained soils. It is susceptible to anthracnose and other diseases, but thrives in the wild from Maine to Florida and as far west as Minnesota and Texas. It is worth planting where space permits.
The chestnut oak (Quercus prinus) is handsome, with deeply furrowed bark and a nearly globe-shaped form that is striking in winter. It can survive in dry, rocky places that would be eschewed by other trees.
Being a gardener means, among other things, being optimistic. Having a long view. And being a little silly – after all, surely most people seeing me digging in the frozen soil would consider me a bit daft. I don’t care. Planting acorns in winter is more fun than sitting at a computer any day.
Living Christmas Trees: Good Idea or Bad?
Posted on Wednesday, December 4, 2019 · Leave a Comment
I know people who say we shouldn’t be cutting down trees just to brighten our homes for the holidays. Trees are, after all, sequestering carbon and making our environment cleaner, greener, and all that. I disagree and will cut a fresh tree from my neighborhood tree farmer. I say Christmas trees are a crop like corn: planted, then harvested and then more are planted the next year.
If you want to have a live tree inside the house and plant it outside afterward, you can. I’ve never done it, but I’ve talked to people who have. Here’s what I’ve learned.
First know that chances of survival are only 50-50 or thereabouts. Planting a tree in New England in January is not easy. For starters, the ground will probably be frozen. And keeping a tree hydrated and happy in the house is a challenge, even for an attentive tree steward. But let’s see how you can improve your odds
Want success? Think small. A six-foot tree will have a big, heavy root ball, and will be harder to move and harder to plant. Think three to four feet tall, maximum, and even smaller if you can. The best? A tabletop tree.
Buy a fir or spruce that has been grown in a plastic container, not one that is recently dug up or wrapped in burlap. Place the tree in the coolest part of the house – and never near a radiator or woodstove.
I suggest that you think where the tree will be planted after the holidays before you buy one. Too many times I’ve seen a huge blue spruce towering over a nice little ranch house, blocking out the sun from the big picture window. Why? Because the tree was small and cute when the owner of the house planted it, and he never thought about its ultimate size.
Balsam fir (Abies balsamea) is one of the classic Christmas trees. In the wild it will grow to be 45 to 75 feet tall with a spread of 20 to 25 feet. This is not the tree to place close to the house. There are a few cultivars that are supposed to stay small, but mostly such trees just grow slower than the standard varieties. In 40 years, a dwarf may no longer be a dwarf.
Blue spruce ( Picea pungens) is another good-sized tree in the wild, 30 to 60 feet tall with a spread of 20 to 30 feet. There are spruce that stay small, I have read. ‘Blue Kiss’ is one that, after 40 years growing in Ohio, is reported to be only 8 feet tall and 10 feet wideBut that’s still enough to block most windows. So choose the location well. ‘Fat Albert’ is one that is designed to stay low – and wide.
One thing you could do to keep the ground from freezing solid would be to buy a bale of hay or straw now and use it as insulation. Just spread a thick layer of it over the soil at the site where you will plant your tree. Between now and January it is likely we will have some very cold days. And unless we have a thick layer of snow, the top few inches of soil can be frozen solid by the time you want to plant your tree outdoors. Yes, you can break up frozen soil with a pick ax, but do you want to? Or you can dig the hole when you buy your tree.
I would also buy a few bags of topsoil now and store them in a warm basement. Then if the soil is frozen when it’s time to plant, and you hack out a hole, you can backfill the hole with soil that is not in frozen chunks. You will want some bark mulch or wood chips to spread over the soil once the tree is planted, too.
Instead of keeping a live tree in the house for a month, the way many of us do with cut trees, think about having it indoors for just a week or 10 days. That will reduce the stress on the tree considerably. Keep the soil lightly moist, but not soggy.
When the time comes to plant your tree, be sure that you dig the hole the appropriate depth. Never plant a tree in a hole that is deeper than necessary. Look for the trunk flare, that part of the tree that would be above ground if growing in the wild.
Keep the trunk flare above ground and do not cover it with bark mulch. To do so is to consign your tree to an early death. The bark will rot if covered with soil or mulch, and the tree will decline in 6 to 10 years. Many trees come in the pot with the trunk flare covered with soil, so you may have to expose it when you plant. And don’t forget to water your tree after you plant it, even if it is below freezing outdoors.
One nice thing about buying a cut tree that reaches the 10-foot ceiling in my house is this: after the holidays I will cut off all the branches and use them to provide some protection for less hardy plants that might be harmed by cold winter winds. I will layer them over perennials that are “iffy” in my climate, or use them to protect roses or other shrubs that might be damaged by the cold.
So go ahead and buy a live tree for the house if you wish, but please don’t hold your nurseryman responsible if your tree doesn’t survive the winter.
Holiday Gifts for the Gardener
Posted on Monday, November 25, 2019 · Leave a Comment
Bad news: I hear you can’t depend on Santa to deliver presents to your favorite gardener this year as he is vastly overworked – and pretty cranky. Last I heard, he is planning on give coal to almost everyone over the age of eight. But here are some of my recommendations that you could give to your favorite gardener.
Tools are always good. I recently bought a harvest knife, a Barnel BLK730. This is a lightweight curved blade on a wooden handle that is great for cutting back perennials and grasses by pulling it through a clump of vegetation. Best yet? The price. Only $7.10 from OESCOinc.com or 800-634-5557. This is a tool supplier in Conway, MA that has an amazing assortment of good tools.
Also from OESCO I borrowed two “anvil” type pruners to try out. I always thought that anvil pruners were just low-cost pruners sold in big box stores for $10 or so. But these pruners are made by a German company, Lowe (with 2 dots over the O, not to be confused with Lowe’s, the American retailer), and cut very well. Their blades are sharpened on both sides, and are thinner than the blades on by-pass pruners so they take noticeably less effort to cut.
For people with small hands, I like the Lowe mini-anvil, L5.127 for $40. It weighs just 6 ounces and cuts stems up to 5/8 inch in diameter. For bigger hands like mine, I like the Lowe Ergo Anvil L8.107 for $64. These weigh just 8 ounces and compare with my Felco 5 pruners that weigh 11 ounces.
Of course every gardener needs a good weeding tool. My favorite is the CobraHead, and has been for years. They now have a mini-Cobrahead which is designed for smaller hands. Available from CobraHead.com or 866-962-6272 or at your local garden center. It has a single curved tine like a steel finger that will tease out roots from below while you tug a weed from above.
Last summer I installed a garden during a dry time, and used a watering kit from Gardeners Supply called “Snip and Drip” (Item 8587044). I loved it. It comes with hose, soaker hose, and all the fittings needed for watering a small garden. I ran soaker hose around each shrub or cluster of perennials, then regular hose to the next planting. The fittings are easy to install and go together quickly. The basic kit costs $52.95 from Gardeners.com or 1-888-833-1412.
A good wheelbarrow is a nice present, though pricey. My favorite is the Smart Cart (
www.smartcarts.com or 207-591-4250). It is great for heavy and bulky loads. The axle is centered under the load so that it feels light to the touch and turns easily on its two wide 16-inch diameter wheels. It has a tubular aluminum frame and a big plastic bin (7 cubic feet).
You can easily remove the bin from the frame so that you can wash the dog in it, or carry compost in the back of your car. My model (with wide wheels) is rated for 600 lbs; the wire wheel version is rated for 400 lbs. At $299 with free shipping, it is a lifetime investment. I’ve had mine for about 20 years, and never had a problem.
If a wheelbarrow costs too much, you could get a small blue plastic tarp. My partner, Cindy Heath, loves hers to drag away weeds. Go to your local hardware store and get a six by eight foot tarp for under $10. Not perfect for everything, but very economical.
Books are great present, too. Go to your local family-owned bookstore and pull some gardening books off the shelf. Find a chair, sit down and have a look. It helps if you know what the recipient of your gift is focused on – shrubs, perennials, learning to compost, etc.
A book I liked this year is Mini Meadows: Grow a Little Patch of Colorful Flowers Anywhere around Your Yard by Vermont gardener Mike Lizotte. (Storey Publishing, paper, $16.95). It is full of practical easy ways to get more flowers to attract pollinators – and supply the table with bouquets.
A wonderful book by Vermont garden designer Julie Moir Messervy and architect Sarah Suskana is Outside the Not So big House: Creating the Landscape of Home (Taunton Press, $34.95). Wonderful photos, lots of good design ideas.
I start a lot of seeds each spring, and I’m tired of buying disposable plastic 6-packs. Gardeners Supply has an alternative: heavy-duty planting trays that can be washed in the dishwasher and re-used for years. Called the GrowEase system, there are two sizes: the 24-cell tray with 2-inch deep cells and a 15-cell tray with 3.5 inch deep cells. Both come with clear plastic domes and self-watering wicking systems.
As I get older I look for ways to save my knees, back, and energy levels. There are lots of kneelers on the market, and I’ve found one I like. Also by Gardeners Supply, it allows me to kneel just a few inches off the ground on a padded shelf, and has very sturdy side handles that allow me to use my arms to push myself up to a standing position. It weighs 9 pounds, and is very sturdy. Flipped over, you can sit on it. Item 40-009.
Santa may be cranky and unresponsive this year, but we don’t have to be. Send me your ideas, particularly for books you like – I need winter reading. Enjoy the holidays!
Tips for Extending the Life of Your Tools
Posted on Friday, November 22, 2019 · Leave a Comment
By now most of us have put our gardens to bed – or done as much as we will this season. The morning of the first snow storm I finished cutting back the perennials in my last two flower beds. Whew, just in time. The vegetable garden has long been cleaned up, weeded and mulched with fall leaves. Only the kale is still standing, and I will continue to pick and eat it.
What I have not done, and am betting you have not done either, is to get all my tools ready for winter. It’s always one of the last thing I do before my annual hibernation. This is a good time to work on your tools.
First, anything with a gas engine needs to have fuel stabilizer put into the gas tank to keep the engine from getting clogged up with gunk over the winter. And if you can buy gas without ethanol in it, that stuff is better than ordinary gas. But stabilizer really cuts down on the hassle of starting your mower or chain saw, come spring. The bottle will tell you how much to use. Run the engine for 5 minutes after you add it.
It’s time to clean off the dead grass that accumulates under the deck of your lawnmower. If possible, tip your mower on its side to clean off the gunk with a putty knife or gardening tool. Or just reach in through the place it shoots out the grass and scrape off as much as possible. What you don’t want is accumulated gunk that holds moisture, causing your mower to rust.
I know that some mowers also have ports where you can attach a hose to blast the grass off (my riding mower came with one) but I find they don’t really do the job – especially if you don’t do it every time you use the machine.
In the past I have had mice nest in the air filter of my riding mower. Now I put a handful of mothballs in an old sock, and place it over the air filter and that deters them.
As a man of certain age – past 70 that is – most of my tools have wooden handles. Yes, I have tried those new-fangled fiberglass-handled tools, but don’t like them. Some of my tools were used by my grandfather and/or my parents before me. I treasure them knowing that 3 generations of sweat has seeped into the wood, giving the tools a nice dark polished look. That patina is enhanced by an annual application of boiled linseed oil.
Late each fall I take some time to polish the wooden handles of my hand tools and sharpen the blades, where appropriate. Using medium to fine grit sandpaper I rub out any rough spots or potential splinters on the wooden handles. Then I polish the handles a little more with some fine steel wool and wipe them clean. Lastly, I use a paintbrush to apply several coats of hot linseed oil and let it soak in. That keeps the handles from drying out. A well-oiled handle rarely breaks or gives splinters.
My father always painted some red “Rustoleum” paint on the metal parts of garden tools to make them easier to find and to identify them as his. I found one of his old shovels in the back of the barn and saw that the handle was dry and cracked – I had not used it or maintained it in years. I sandpapered the many rough spots before polishing with steel wool and the applying 3 coats of linseed oil. I just kept reapplying the oil until it stopped soaking in.
A wire brush is a good tool for cleaning up the metal blades of tools – I use one to get off rust. After that, I use a rag with a little linseed oil on it to oil the metal. Something like WD-40 would work, too, and even get off some rust, but I don’t particularly want to introduce chemicals and petroleum products to my soil next spring – even in small quantities.
Hoes and shovels work best when kept sharp. You can sharpen them on a bench grinder or with a rough file or a whetstone. I have a grinder with a stone wheel, but rarely use it – it’s too easy to take off too much metal. Before sharpening a tool, study the angle of the blade – hoes and shovels are only sharpened on one side (the inside) and all you need to do is mimic the original angle, drawing the stone or file over the blade in consistent, even strokes.
What about hand tools? Now most have plastic handles that require no maintenance, and edges of steel so tough that sharpening is not required. But it makes sense to wipe off accumulated grime with a cloth and get any dirt off the blades before retiring them for winter.
Cleaning up my machines and tools is not very high on my list of fun things to do on a Saturday morning. But I recognize that doing so will extend their lives and, for wood-handled tools, add to my enjoyment of them next spring. So have at it. Your grandchildren may use some of your tools one day – if you keep them well maintained.
Henry lives and gardens in Cornish Flat, NH. Reach him at
henry.homeyer@comcast.net. He is available to talk to your garden club or other group.
A Late Fall Garden Chore: Pruning
Posted on Tuesday, November 12, 2019 · Leave a Comment
Fall is here, and winter is not far behind. I’ve seen some snow and scraped frost from my windshield. The sun is slow to get above the hills in the morning and quick to disappear in the afternoon. The sky is often gray and gloomy. These things take their toll on the spirits of gardeners like me. As an antidote, I plant bulbs and prune. Both lift my spirits. I’ve finished planting bulbs, but I’m still pruning.
First, what should you prune now, and what should wait until spring or summer to prune? Anything that blooms in spring or early summer has already formed the buds that will flower next year. Lilacs, forsythia, crabapples, magnolias, rhododendrons, viburnums and many more are ready to bloom when the weather and length of day dictate blooming.
Many gardeners refuse to prune spring blooming woody plants now. It’s true that if you prune then now you lose blossoms – but that does not stop me. Trees and shrubs get messy fast. Ignore them for a few years and they are as untidy as an unmade bed.
In my opinion, it’s better to lose a few blossoms than put off a job that needs to be done. When the lilacs are blooming I am planting veggies and flowers and fixing the mess moles made of my lawn. I have no time to prune them then.
On the other hand, I do not prune evergreens now. Pines, hemlocks and spruce I prune right after they finish their new growth in July. If you remove it each year, you can keep evergreens roughly the same size, if you wish.
I like to be sure that the lowest branches of a tree are high enough off the ground so that mowing is easy. That said, I have a huge Merrill magnolia that blooms with a thousand huge white blossom each year in late April. It has two low branches that make it difficult to mow there, and I have been considering removing them for at least 5 years.
Finally I have decided to remove those two low culprits, but I will wait until after blooming next spring. And who knows, I may change my mind before I get out the saw.
I like to prune when trees are bare of leaves because I can see the bones of the tree. I can see branches that reach through the middle of the tree to grab some sunshine on the other side. I can see branches rubbing up against other branches, or branches that have died and have not yet fallen. All those I will take out.
My late sister, Ruth Anne Mitchell, loved to prune. Her trademark move was to sit down under a tree or shrub and look up through the branches, preferably when they were bare of leaves. She claimed she could see the clutter in the middle of the tree that way, and decide what to take out. Me? I like to circle a tree or shrub several times, looking at it from every direction.
Where you cut a branch is very important. There is a swollen area at the base of each branch called the branch collar. The bark there is often wrinkled. Cut the branch just past the branch collar, leaving the collar on the tree.
Why is that important? The collar is where the tree naturally heals itself. If you leave a long stub past the collar, the tree will have to wait for the wood to rot back to the branch collar before healing, potentially leaving an open wound for years. Conversely, if you remove the branch collar and cut the branch flush to the tree, you leave a much bigger wound than if you do it properly.
A properly pruned tree gets sunshine on each one of its leaves every day. Pruning opens up the canopy to sunshine and allows breezes to dry the leaves of dew or rain. For trees like lilacs and apples that are susceptible to fungal diseases, it’s important that leaves dry out quickly before fungal hyphae (root-like structures) penetrate the leaves.
One last chore: if you planted a new tree this year, you may wish to protect the bark from rodents that chew the bark under the snow. Meadow voles living under the snow can girdle a tree and kill it. Surround the tree with metal mesh called “hardware cloth”. Get the kind with just quarter-inch spaces, not chicken wire. Surround the trunk from the ground to 24 inches.
Many gardeners avoid pruning the way children avoid the dentist. The way your dog views visiting the vet. But instead, think of pruning as going to a really, really good hair stylist. You are giving your tree or shrub a fancy haircut, not performing surgery – even though there are such things as “tree surgeons”.
Tips for Forcing Bulbs for Indoor Blooms in Spring
Posted on Tuesday, November 5, 2019 · Leave a Comment
It might be nice to take a week in February or March and travel to the Caribbean. By then most of us are tired of snow and cold. But if that is not in your budget, perhaps you need to plant some bulbs in pots for spring forcing. I do it every year, and it brings joy to my heart just when I need it.
First, the basic concept: bulbs need a certain time in a cold, dark space to get ready to bloom in spring. But you can create that in a pot, and trick them into blooming earlier than they would outdoors in the ground. When you bring your pots into the warmth of the house, those foolish bulbs think it is spring – in February or March.
Each type of bulb needs a different length of rest in a chilly place in order to bloom. Small bulbs need about 8 weeks, daffodils 12 weeks, and most tulips do best with 15 weeks. Tulips should never be brought up into the warmth of the house before February or they might just produce foliage, but no blossoms.
The hardest part of forcing bulbs is finding the correct spot to place the pots. Ideally, you will have a place that is 35 to 45 degrees. A place that is usually below 50 degrees and above 32 degrees works best. If you have a garage that is usually above freezing, that will work fine.
A few days of sub-freezing temperatures are not a problem. What you want is for the bulbs to send out roots in the pot, which they will do in November and December in your garage or on the steps out of your cellar through the bulkhead. I suppose you can also put a blanket (or a trash bag full of dry fall leaves) over the pots to keep them warmer in the coldest part of January.
Each fall I fill up a wheelbarrow with potting soil and compost, a 50-50 mix. I generally use the potting soil that I used in summer for annuals on the deck. The mix should be fluffy, contain no roots, and be lightly moist to start the process. I fill the pot one third full, place my bulbs, and then fill to within an inch of the top of the pot.
When buying bulbs to force, look for packages that say “Good for Forcing” or “Early Season Bloomers”. “Darwin” tulips are generally good forcing, and are for sale at garden centers and grocery stores. Early daffodils force better than late season varieties.
One year I ignored my bulbs for forcing until it was time to take them out of my cold basement. I had very few blooms. Why? Because they dried out. I should have checked the soil once a month, and watered lightly. Bulbs don’t want to sit in soggy soil, but they can’t grow roots and get ready to bloom if the soil gets bone dry. It’s a balancing act. The soil should be lightly moist.
Outdoors mice and squirrels can be a problem, as they consider bulbs good high-protein, high-calorie meals. I’ve read that during World War II, some Dutch farmers ate their tulips to keep from starving. Rodents think along similar lines. Daffodils and alliums are not of interest to rodents.
I live in a home built in 1888 and despite my best efforts, a few rodents sneak in and out at will. So I have to protect my indoor bulbs from them. I do this by placing a plate over the top of a round pot, or cutting a piece of wood to put over rectangular ones. This keeps the mice at bay.
Come spring, bulbs will start to grow and push up out of the soil. Still, I label each pot with the date it was planted and what is in the pot. That will allow me to bring up early bulbs before the tulips.
You can plant 2 layers of bulbs in larger pots. Set your large bulbs, the daffodils, tulips and alliums, near the bottom of the pot, but be sure to have 2 inches of soil below the bulbs. Add soil mix and then plant a layer of crocus or glory-of-the-snow ( Chionodaxa luciliae) so that they are near the top of the pot. Bring out the pot into the warmth of the house when it is time for the larger bulbs. The little bulbs will bloom right away, followed by the bigger ones which can take 3 to 4 weeks to bloom.
Can you re-use forced blooms? Sure. Keep them in a sunny windowsill and water as needed until the soil has thawed outdoors. Plant them in the spring just as you would in the fall. They might need a year or more to recover from their indoor adventure.
Paper whites, a type of daffodil commonly sold for forcing in pots of gravel and water, don’t need the long chilling period of other bulbs. They are not hardy in our climate, however, so don’t bother planting them outside in the spring. They can go right in the compost pile.
There is something very satisfying to me about being able to have tulips and daffodils blooming in my house while snow is still on the ground. I know I will have hundreds blooming in May, but having a few early ones indoors helps me through the gray days of mud season.
Think about joining Henry on a Viking River Cruise from Paris to Normandy and back next June. E-mail him at
henry.homeyer@comcast.net for details.
Fifteen Flowers That Bloomed in October in My Garden
Posted on Tuesday, October 29, 2019 · Leave a Comment
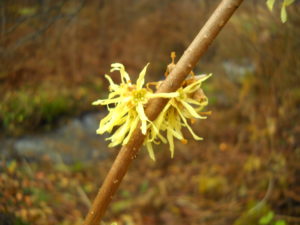
Witch hazel November
Despite frost and short days, my garden produced plenty of flowers in October. I look for plants that will perform in the shoulder seasons – March, April, October and even November. Here are some I love that are blooming still, or that bloomed earlier in October.
- My ‘Knockout’ roses were still blooming in late October. This trademarked variety has me completely loyal to them. They start blooming in June, and continue until Halloween or later. Not every bush blooms every day, but some do. Most are not fragrant, though that has its advantage: they don’t attract Japanese beetles or rose chafers.
- Seven Sons Flower tree (Heptacodium micinoides). The small white flowers on this tree are delicate, and slightly fragrant. It’s fast growing, small tree that needs annual pruning – it can grow stems up to 7 feet long in one season, though it shouldn’t get taller than 25 feet or so. Hard frost damages the flowers.
- Witchhazel (Hamamelis virginiana). This understory tree has small curly yellow blossoms that really aren’t obvious until late October when the yellow foliage falls off. The branches of mine are loaded with blossoms now, and will look good well into November. Not a showy plant, but a welcome treat at this time of year.
- Disanthus (Disanthus cercidifolius). This large shrub has spectacular purple foliage, more dramatic than the reds of burning bush (Euonymus alatus). And if you get up close for a look, it has little half-inch red blossoms in October. Quite a worthy shrub, but not well known. Even though I’m in a cold zone 4, and this shrub is said to be only hard to Zone 5 (minus 20), I’ve had it for several years.
- Autumn crocus (Colchicum speciosum). This is my one

Colchicum
bulb plant for October. It is similar to spring crocus, but many times larger. I was given a dozen bulbs 20 years ago, and now I have just one left – the others seem to have disappeared. It displays its foliage in spring which then disappears. In October large pink (or white or lavender) blossoms appear. Floppy, but wonderful. I shall buy some more next summer.
- Fall monkshood (Aconitum carmichaelii ‘Arendsii’). You may know the June-blooming monkshood (Aconitum napellus), but this late bloomer is a treat that blooms in late October. It grows to be 4 to 5 feet tall, and has an intense blue-purple hooded flower. Also called wolf’s bane because the sap was used allegedly used to poison wolves in Russia by spreading it on meat that was left out for wolves.
- Blooming with my monkshood is a pink-magenta phlox. Unlike the other phlox I have, this one starts late and just keeps on blooming. I wish I knew the cultivar name, as it has little mold or mildew, too. A good cut flower.
- Rudbeckia I have 2 varieties that bloom well into October. ‘Henry Eiler’ is just finishing up. A 5-foot tall plant with petals with gaps between them give it a distinctive look. And then there is ‘Prairie Sun’ which blooms from late June until now. It has a green eye, instead of a brown one.
- Globe flower (Trollius europaeus). The bright yellow flowers are a complete surprise, as it should bloom in early summer. But this year it is in full, glorious bloom in the last week of October. Go figure.
- New York ironweed (Vernonia noveboracnesis). This is a tall purple flower that looks a lot like a New England aster. It can reach 5 to 6 feet tall in moist rich soil, which it likes best. I now grow it in dry soil, as it got too big in moist soil. It bloomed well though mid-October for me.
- New England Aster (Aster novae-angliae). Another tall fall bloomer, I have pink and purple varieties that often reach 5 to 6 feet tall. Monarch butterflies love to get some nectar from the flowers before heading south.
- Canadian burnet (Sanguisorba canadensis). A native plant of the wetlands, this tall flower appears as a dozen thin bottle-brush flowers on each stem, in clusters. I have 3 or 4 other species in this genus that bloom earlier in summer.
- Sneezeweed (Helenium autumnale). This flower was named after Helen of Troy, a woman so beautiful that it said she launched 1,000 ships. I have it in various colors: yellow, yellow and rust, orange and brown. It can be 5 feet tall, or as short as 2 feet, depending on where it is grown and the cultivar. It does fine in ordinary garden soil, but thrives best in moist soils. Sneezeweed does not make you sneeze – it was used as snuff in earlier times.
- Pink Turtlehead (Chelone lyonii). This tall pink flower blooms for 6 to 8 weeks with multiple hooded pink flowers on tall stems. Bumblebees love this flower, though it is a challenge for them to crawl inside for pollen. It finished blooming in mid-to-late-October.
- Fountain grass (Miscanthus sinensis ‘Morning Light’).
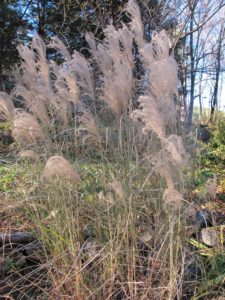
Miscanthus sinensis ‘Morning Light’ looks good much of the winter
Most of us do not think of grasses as having flowers, but they do, of course. This 6- to 8-foot tall grass has wonderful fluffy panicles a foot long or so. They move well in the breeze, and many stay erect through much of the winter.
So if you think that flowers finish blooming in September with the last of your daylilies, think again! Buy some of the plants I mentioned next spring and plant them. October flowers can be spectacular.
Henry is available to speak to your garden club or library. Reach him at
henry.homeyere@comcast.net or P.O. Box 364, Cornish Flat, NH 03746.


 Click Here to buy from Cobrahead