Learning How to Identify 8 Common Ferns
Posted on Wednesday, August 21, 2019 · Leave a Comment

Sensitive Fern
Ferns are under-rated and largely ignored by gardeners, but should not be. They can add much to a garden. I recently went to Walpole, NH where I met with Michael Nerrie of Distant Hill Gardens and Nature Trail. He introduced me to many ferns and also sold me a copy of a wonderful book, Identifying Ferns the Easy Way: A Pocket Guide to Common Ferns of the Northeast by Lynn Levine. It’s published by Heartwood Press.
Unlike other books I have seen that identify ferns, this one doesn’t require you to learn a whole new vocabulary. And the illustrations and layout make learning ferns easy. There are just 28 common ferns in the book, and there are silhouettes of each at the beginning of the book. The silhouettes are divided into 6 groups based on how the leaves are “cut”. So a quick look will identify most ferns, and the straightforward descriptions quickly confirm which fern you are looking at.
Christmas Fern
Imagine a frond of a fern that is all one big blade or leaf. Then imagine taking scissors and cutting that blade into leaflets. That is Group 1, once-cut ferns. Group 2 includes ferns that are twice-cut, and then divided into 2 groups based on how the fronds (stems) are arranged, either in a vase shape or in a random arrangement. And so on. There are five thrice-cut ferns, five ferns with 3 parts instead of one long blade, and one unique fern, the maidenhair fern which is unlike all the others. Pretty straightforward. Here are 8 common ferns you can easily learn to identify. Quotations below are from Ms Levine’s book.
Group 1: Once-cut
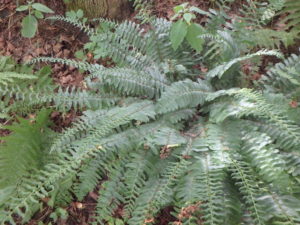
- Christmas fern (Polystichum acrostichoides). Unlike nearly all others, this fern stays green all winter, and has very dark green leaves. It grows in free-form clusters, and has simple leaves. The leaflets have “a little bump (ear) near the stalk” and are 1 to 3 feet long.
- Sensitive Fern (Onoclea sensibilis): Light green leaves. “Leaflet pairs are opposite each other (like a bow tie).” Topmost leaflets are smooth, others have wavy edges. It is very frost-sensitive, hence the name. Often grows in big colonies, either in sun or shade. Can be a pest in the garden as it spreads by root.
Group 2A: Twice-cut, Vase-like clusters
- Interrupted Fern (Osmunda claytoniana). A big fern with fronds up to 5 feet, this will grow in wet or dry shade. When spores are produced, they interrupt the arrangement of leaflets with smaller spore-producing leaflets that are not like the other leaflets. But not all plants will have an interrupted section, so look at a colony to find some that do (to confirm I.D.). The little leaflets that produce spores get dry and turn brown in mid-summer.
- Ostrich fern (Matteuccia struthiopteris). This is the fern that produces edible fiddleheads in early spring. It has a deep groove up the middle of the stem, like celery. Other ferns may have small grooves, but nothing like this. It is big: up to 5 to 7 feet tall, and shaped like a badminton birdy (vase-shaped). It is most common in moist shade, commonly along stream banks, but will grow in shady places in the garden. Can be very dramatic as an accent plant, but does spread.
Group 2-B: Twice-cut, Random placement of stems
- Silvery glade fern (Deparia achrostichoides): Frond is “very delicate for such a tall fern”. Can grow 2 to 3 feet tall. Lowest pair of leaflets point down. But for me, the identifying characteristics is that the spore cases of the leaflets are “arranged in a herringbone pattern on their undersides”.
Group 3: Thrice-cut
- Hay-scented fern (Dennstaedtia punctilobula). If you have crushed this fern and sniffed it, it smells like fresh-cut hay. It is finely cut and stays just 1 to 3 feet tall. It is one of the few that will grow in a hot, sunny location such as a west-facing, sandy hillside, though it will grow in partial shade or rocky slopes. It spreads, and will fill in an area, making a large colony. Sold in nurseries as a ground cover.
Group 4: Leafy parts in 3 distinct sections
- Bracken fern (Pteridium aquilinum). This grows in poor or barren soil in sun or shade. May form large colonies. Grows up to 3 feet tall. The blade (leafy part) is roughly horizontal to ground in 3 triangular leaflets, each with its own stem.
Group 5: Unique
- Maidenhair fern (Adiantum pedatum). This is often sold in garden centers as it is delicate-looking but sturdy and hardy on thin black stems that look like wires. In the wild it indicates good rich soil. The blade (the leafy part) is almost horizontal and is fan-shaped.
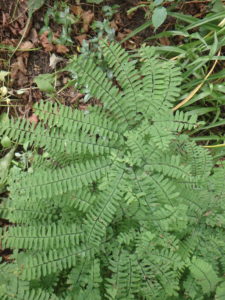
Maidenhair Fern
I found Lynn Levine’s guide easy to use – and it fits in the back pocket of my jeans. At $10.95, it’s a bargain. Distant Hill Gardens is full of wonderful plants to view and buy (including ferns), so pay them a visit. Open select weekends May to October, or by appointment (www.distanthill.org). Lynn Levine’s next fern workshop will be September 29 from 1 to 3:30 at Distant Hill Garden.
Henry can be reached at henry.homeyer@comcast.net.
Tips on How to Plant a Tree Properly
Posted on Monday, August 12, 2019 · Leave a Comment
I recently planted a couple of blue spruce trees on a nice cloudy day, and want to share with you what I did. First, and most important, I checked the position of the trunk of the tree in the pot. In the wild you will notice that trees bulge out at the base, creating what is termed the “trunk flare”. This must be visible above ground after planting.
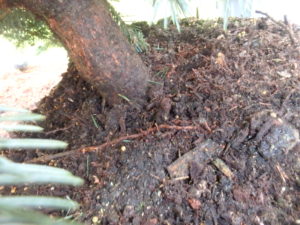
If the trunk shows not flare, you must remove some of the soil
Too often trees purchased at a nursery have the trunk flare covered with soil in the pot. Little seedlings are plucked from the ground and popped into pots without paying attention to the trunk flare. But, if the trunk flare and the bottom of the trunk itself is buried, the tree will not thrive or survive.
Why is this so important? Because unlike the roots, the trunk is not resistant to soil microorganisms that cause rot. Within 6 to 10 years, just when a tree should be well established, the vital cambium layer in the trunk rots and the tree sickens and slowly dies.
If you planted a tree in the past and wonder if you did it right, look at the top of the tree. Trees suffering from trunk flare rot will have few leaves at the top of the tree – what is called tip dieback. And deciduous trees will turn color well before others of the same species in the fall.
If you see tip dieback you may still save the tree. Get a hand tool and gently loosen the soil around the base of the tree. Pull away the soil until you see the trunk flare. The bark may already be rotted, but exposing it and letting it dry out may save the next layer, the cambium. You may need to re-grade the soil around your tree.
Mulch “volcanoes” can be just as deadly as burying the trunk flare. Bark mulch can be full of microorganisms that rot the bark, too. So leave a donut hole around the tree when you mulch – a space three inches or so bare of mulch.
The two spruce I planted came in big plastic pots – 7 gallons each. I tipped the trees over and tugged on the containers. They slid off, but I was prepared to slice them with a sharp knife if need be.

Loosen the roots before planting
Next I examined the roots carefully. Sometimes plants in pots with vigorous roots encircle the pot, and get so tangled up that they don’t easily grow out into the soil. So use my fingers or my CobraHead weeding tool to loosen the roots, especially any bigger ones that circle the root ball. And if I break some roots? I don’t worry much, as it will stimulate new growth.
I always dig a hole that is at least 3 times as wide as the root ball. The hole should be tapered so that it is deepest in the middle, and angles up to the edges. The bottom has to be flat, of course, and the size of the pot. I measure the root ball, and only dig the hole as deep as the root ball. I want the root ball on un-excavated soil so it will not compress and sink down later.
When the hole appears to be the right depth, I place the tree into the hole. I use a rake handle to go across the hole and over the root ball. The top of the root ball should be even with the sides of the hole.
I do not give trees fertilizer, not even slow-release fertilizer. I don’t want to push them to grow fast, as that is not healthy. I do add rock phosphate, which promotes good root growth, and Azomite, a commercial mix of minerals containing micronutrients missing in many soils, but no nitrogen (which promotes green growth).
It is important to have the “good side” of the tree facing the house or wherever you are going to see it from, so I rotate the tree until it is just right. I also look at the tree from the front and from the sides to see if it is vertical. If a tree has a kink in the trunk, that can be difficult to determine.
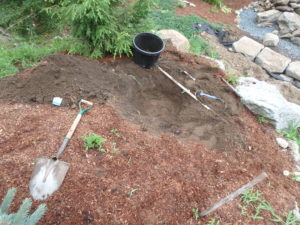
Dig a hole that is wider but not deeper than the rootball
When filling the hole around the tree, I use my fingers to poke soil down into the space around the tree. You do not want to leave air pockets, as the roots could dry out and be damaged. Some people like to fill the planting hole with water before planting a tree, but I don’t like to do that. I’m afraid of causing compaction if the soil is muddy.
Once the tree is planted, I like to build a ridge of soil in a ring around the tree to hold water. This is particularly important if you are planting on a hillside. Before planting on a hillside you need to create a small terrace, of sorts, on the hillside. Do this by digging out some soil on the uphill side of the site and moving it to the downhill side.
Once the planting is complete, I put 2 or 3 inches of bark mulch around the tree to discourage weeds and to reduce water loss by evaporation.
Planting trees at this time of year is fine, so long as you are willing to check the soil regularly to make sure it is not drying out. And hope for rain to make your trees extra happy.
Henry is a UNH Master Gardener, and the author of 4 gardening books. He can be reached by snail mail at P.O. Box 364, Cornish Flat, NH 03746, or by e-mail at henry.homeyer@comcast.net.
How to Grow Kangaroo Paws and Other Less Common Flowers in Containers
Posted on Monday, August 5, 2019 · Leave a Comment
Each summer I fill a big window box with annual flowers and vines to welcome all who approach the house. Some years it is bodacious, other years it verges on ho-hum. This year it is a delight: in the center is a black-leafed sweet potato vine that is surrounded with blue flowers of scavelola and chartreuse vines of licorice plant ( Helichrysum petiolare). All survive in hot and dry locations, and recover from getting dry.
I like to give each plant enough root space, but tend to crowd things a little. A six-inch cube of soil is what I’ve been told is best for potted plants, but plants in my window box don’t get that much space. The key, I’ve decided is to make a blend of potting mix with good compost in equal amounts, and to add a slow-release fertilizer. Straight potting mix has little nutrition for plants, so as the summer progresses it disappears. Of course liquid fertilizer can help with that.
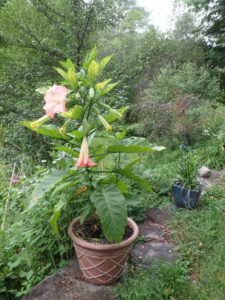
Brugmansia produces masses of huge flowers
This year Cindy splurged and bought a Brugmansia, a large tropical plant that we hope to winter-over in a large pot indoors. It has been displaying an amazing sequence of 12-inch bell-shaped blossoms in a delicate peach color. Other varieties have yellow blossoms. Some varieties of Brugmansia are deliciously fragrant, but ours is not. The plant is in a 20-inch pot and stands 4-feet tall with a main stem, and now two shorter stems. The stems will become woody with time. It is in full sun and needs a drink at sundown after each hot day.
Also in a big pot is a plant I have never before grown: kangaroo paws ( Anigozanthos hybrid ). This is a plant from Australia and does best in a hot, dry location. I have occasionally purchased stems of kangaroo paws from my local florist to add to flower arrangements, so I decided to give it a try. It is doing very well.
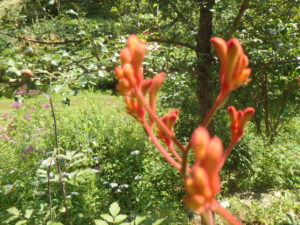
Close up of Kangaroo Paws, the buds
Although they come in a variety of colors, the blossoms on mine are orange and really do not look much like flowers. They are fuzzy, and look, well, a bit like kangaroo paws. Eventually the “toes” (buds) produce small flowers. The foliage is similar to Siberian iris, and the flower stems stand up well above it. My flower stems now are nearly 4 feet tall and covered with flower buds. Mine has 2 stems, and a third one developing. It will come inside this winter.
Some years ago many of us suffered the loss of our shade-loving impatiens plants due to a terrible fungal disease. The “Chicken Little” people predicted that although the sky had not yet fallen, we were doomed when it came to growing impatiens. Fortunately, they were wrong. I see it thriving in many places, and I grow it each year in pots to decorate my shady deck. It does not like to be too dry, so I water it frequently in these hot times.
A few years ago I experimented with growing ferns in pots. I dug up two kinds from shady places in my garden: Ostrich fern ( Matteuccia struthiopteris) and maidenhair fern
(Adiantum pedatum). Both did very well on my north-facing deck that gets some morning sunshine, but no afternoon sunshine. I dug them in the spring, which is what I recommend, particularly for the ostrich fern, as the fronds are often 4 to 5 feet long and somewhat fragile.
In the fall, after hard frost, I cut back the fronds and brought the pots indoors. I kept them in a basement that stays around 32 degrees. I made sure they did not dry out too much, but did not want the roots to sit in soggy soil. They both survived nicely and grew again the following spring. Around the ostrich fern I grew some miniature hosta, which also over-wintered.
My mom and grandmother both loved growing red geraniums in pots, and I keep up the family tradition. Now days there are many colors of geraniums, and some with green and white leaves, but I go for the old fashioned ones. Of course you probably know that geraniums are not geraniums at all, but of the genus Pelargonium. Geranium is a genus of perennial flowers that are quite different. That’s why scientific names are all in Latin, so there will be no confusion.
Geraniums like full sun, and do not need to be watered every day, even in full, hot sun and fast-draining soil mix. If your geraniums don’t get enough sun, they will develop long, leggy stems and fail to flower well. But don’t give geraniums lots of fertilizer, as that will inhibit flowering, and promote long stems, too. I bring them in each fall and keep them as houseplants in a sunny, west-facing window. Even so, they get leggy and I cut them back hard in the spring.
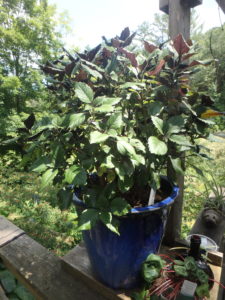
Swedish Ivy is not a trailing vine but an upright plant
Last year a friend gave me a nice big potted plant with green leaves that are a deep purple, almost a black, on the underneath side. In the late summer it produced stems loaded with small lavender flowers. Its tag gave its name as Plectranthus ‘Mona Lavender’.
I looked it up for a common name and was surprised to see it is called Swedish Ivy. But it is not an ivy at all, but a robust vertical plant almost 2 feet tall and wide. I place it on the railing of my deck, as it is important to be able to see the underneath side of the leaves, which contrast so well with the dark green top sides. It gets morning sun and requires moderate watering. I overwintered it as a houseplant, cutting it back in the spring.
Each year I resolve to have fewer houseplants, but each year I get more as I try new things for my deck. I guess I’ll just have to build a sun room!
Henry Homeyer is a garden consultant, coach, and author of 4 gardening books. He can be reached at
henry.homeyer@comcast.net.
July Beauties in the Flower Garden
Posted on Thursday, July 25, 2019 · Leave a Comment
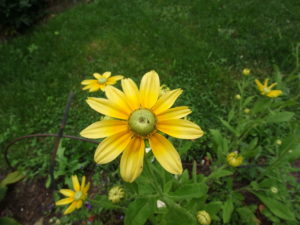
Prairie Sun
Every day in the warm months I take time to wander through my garden, often with camera in hand. I am always greeted by flowers in bloom that make my heart sing. Here are some blooming for me now, including a few you might not grow – or not yet. I include the Latin names of plants, as common names vary from region to region.
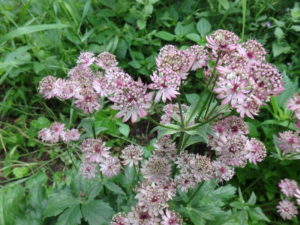
Astrantia does fine in partial shade
Great masterwort (Astrantia major) comes with flowers ranging in color from white to lavender to reddish-purple. Its flowers are dome-shaped umbels (shaped like the stays of an umbrella). In ordinary garden soil it needs some shade, but in moist soil it will thrive in full sun. The leaves are tidy and stay in a nice clump a foot tall and 18 inches across; blossom stems can reach 2-feet tall, It is a good cut flower.
I have planted 4 species of milkweed to attract pollinators and to support our monarch butterflies. The monarchs (or their mimic, the Viceroy) were out recently and swooping around as singles or in pairs, perhaps in a mating dance. The swamp milkweed (Asclepias incarnata) is in full bloom now and the 5 plants I planted last year make a handsome 4-foot tall hedge topped with white flowers. I have it in full sun with moist soil, though it will thrive in ordinary garden soil.
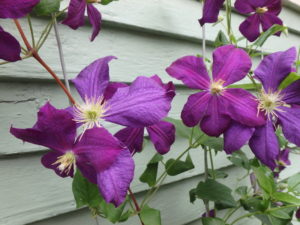
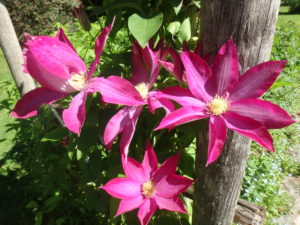
Clematis jackmanni
On the front of the house I have a vine climbing up 10 feet or more on wires I installed for it. Currently it has 50 or 60 deep purple blossoms, each three to five inches across. It is a clematis, a species called Clematis jackmanii. Like all clematis, it does best with plenty of hot sun, but needs shade on its roots. I have tall perennials growing in front of it to accomplish that. Jackman’s clematis, as Latin-name-adverse gardeners call it, is one of the hardiest of all – easily surviving winter temperatures to 40 below.
You probably have grown that lovely purple-pink biennial foxglove that blooms in its second year, and then dies (Digitalis purpurea). I love it and spread the seeds after it blooms to get a few new babies the following spring. Mine are just now coming into bloom. But there are also a couple of perennial foxgloves, including a nice yellow one that is just finishing up its bloom period for me now. It is simply called yellow foxglove or Digitalis grandiflora. It does well in partial shade in rich, well-drained soil. It may re-bloom if you cut off the flower stalks after blooming. On the other hand, if you leave the stalks and seed pods, you may get more plants next spring. The other perennial foxglove I have grown is the small yellow foxglove, D. lutea, though it has been less long-lived than the larger one.
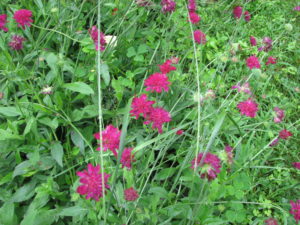
Knautia
One of my favorite perennials is called knautia (Knautia macedonica). I love the wine-red, domed, one-inch flowers on thin stems that seem to float above its foliage, or the foliage of nearby plants. It drops seeds and volunteers show up, which is a good thing as it is not as long-lived plant. It does fine in full sun and ordinary soil. It is not common in garden centers, but if you see it, buy it!
Everyone has some black-eyed Susans (Rudbeckia spp.), either those you planted or as wildflowers along your fence line. They are tough and cheery. But I also have a named variety that is my favorite, ‘Prairie Sun’. Prairie Sun is not black-eyed, but green-eyed. It blooms prolifically from now until mid-October or even later. Although it is sold as a perennial, my experience is that it usually dies during the winter, though some plants do last 2 or 3 years. I grow it in full sun, a hot and dry location. It is hard to find as a plant, so you may want to start some from seed next spring.
Another great plant that I have only had in recent years is betony (Stachys monieri ‘Humelo’). Unlike the well-known lamb’s ears (Stachys byzantina), this does not flop, and the flowers are fabulous. The flowers are a pinkish-purple in a bottlebrush arrangement on nice stiff stems – perfect for cutting and using indoors in a vase. The leaves are a deep green and look good all summer in a nice tidy clump. Flower stalks stand up about 18 inches tall.
Annual poppies are blooming right now, and all of mine are self-seeded. I have planted them on either side of my brick front walkway in the past, but this year I just let them show up. I have the common orange one, the yellow California poppy, a double red one and one called ‘Ladybird’ that I bought as a six pack last year. Ladybird is a light purple with some large dark purple spots inside.
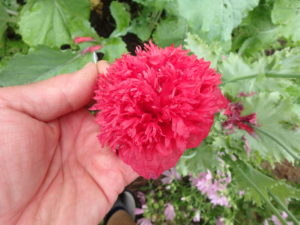
Double poppy
A few poppies seeded themselves between bricks in the walkway and bloomed! Save seeds this year if you have them, and sprinkle them on loose soil in the fall after cleanup, or in the spring. I have even sprinkled them on the snow in winter and gotten them to grow in spring.
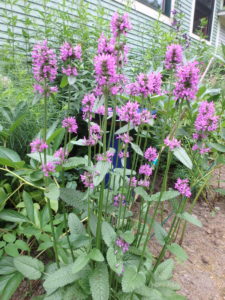
Betony is a good cut flower
And speaking of sowing annuals, I got a great mix of wildflowers from Renee’s Garden Seeds this year. I made a bed perhaps 5 feet by 2 feet and sprinkled the entire seed packet on the soil in the spring, just lightly covering the seeds and patting down. I now have a mass of color, mainly annual blue campanula and yellow calendula, with a few annual poppies. I like broadcasting annual flowers, letting them pop up in a random pattern, and have done it with zinnias and cosmos to great success. And if I save seeds, I can make my own mix.
Henry is a UNH Master Gardener and the author of 4 gardening books.
Weeds? Why Worry?: One Farmer’s Perspective
Posted on Thursday, July 18, 2019 · Leave a Comment
I recently went to Cochranville, Pennsylvania to visit relatives, and they brought me to visit a successful farm-to-table farmer. I learned some new and interesting ways of looking at gardening, and I think they are worth sharing with you.

Glenn Brendle farms organically and tries many unusual techniques
For the past 40 years or so Glenn Brendle has expanded his operation until now it encompasses about 40 acres of veggies. He grows everything from herbs, tomatoes and squash to dent corn, celery root (celeriac) and parsnips. He pays his 9 employees a living wage and does well for himself.
This spring the weather has been challenging for farmers in his part of Pennsylvania. The rain has been above average, sometimes falling 8 inches in a week. That is good for weeds, but not so good for farmers who want to have “clean” fields that look good from the road. “”Generally you don’t have to keep your fields as clean as people think. A lot is cosmetic,” Glenn told me.
Wet soils mean that he cannot use a tractor to control weeds, and some days even farm workers cannot trudge through the mud to hand-pull them. Fortunately, Glenn is not hung up about looks – he is more interested in growing high quality vegetables that he can sell to high-end restaurants.
Since Glenn grows organic vegetables, he cannot use pesticides to control weeds, or use genetically modified seeds. He depends on using a tractor or tiller to cultivate the space between rows to chew up the weeds, or hand pulling them.

Carrots compete well with weeds and grasses here
He explained to me that if a row of carrots, for example, is clear of weeds on two sides, it is not too important if there are weeds in the bed with the carrots. This goes against everything most of us have been taught. But he pulled a few carrots to show me that they can compete with the weeds, and assured me that at harvest time they would be long and handsome.
In some fields we visited the weeds were taller than the vegetables. Glenn explained that the important thing is to prevent weeds from making seeds and dropping them in the soil. As soon as the fields dry out enough he will run a tractor with an attachment to mow over them with the blades set at a height that will top the weeds, but miss the vegetables. He suggested that home gardeners could accomplish that with a string trimmer.
Part of the reason his carrots and other crops can compete with weeds is that Glenn has worked hard at improving his soil every year. Among other things, he is a firm believer in the use of biochar.
Biochar is soil amendment from the partial burning of organic waste matter including branches or wood chips, leaf litter and dead plants. It is burned in a reduced-oxygen environment in a controlled process called pyrolosis, and results in a substance that resembles charcoal. It is available on-line, and from some garden centers.
Biochar is very stable – it can sequester carbon and store it for hundreds of years, or even longer. It is very porous with the innumerable small spaces available to hold bits of compost and microorganisms. Glenn mixes biochar that he makes himself with biologically active compost in water, allowing microbes to settle into the pores of the biochar. He spreads the mixture on the soil before planting. He believes that when a disease-causing microbe comes along, there is usually has a microbe that will inhibit its growth. And a healthy plant can compete with weeds better than a struggling plant.
What else did I learn? I have always insisted on keeping tomato plants off the ground, and most commercial farmers do so, even though that is a very labor-intensive and expensive to do. I use cages (54-inch, 4-legged heavy wire supports) for my tomatoes, or I tie them to wood stakes. But Glenn does not support his tomatoes. He lets them sprawl on the ground, sometimes smothering the weeds beneath them. Huh. He says his tomatoes do just fine.
Glenn grows lots of potatoes and says the best one he grows is a Dutch variety called ‘Bintje’. It is an early- to mid-season potato with yellow skin and flesh. It is resistant to some potato diseases, notably potato virus A and leaf-roll virus. It is susceptible to scab, however. Apparently it is the most commonly grown potato in France and Belgium, and was introduced for sale in 1910. He says it is the absolute best potato for making fries.
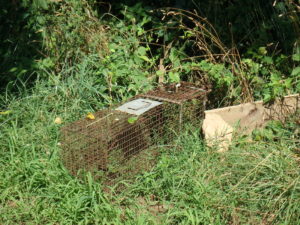
Boards guide woodchucks to the trap
Woodchucks can do a lot of damage but Glenn has figured out how to trap them. He places a large Hav-a-Hart near a woodchuck’s hole and uses 2 wide boards about 5 feet long and 10 inches wide to create a V-shaped chute leading to the open mouth of the trap. He doesn’t bother with bait. He said that they don’t see well, but will approach the trap and enter it as a way to proceed to the field. Clunk. The cage closes.
The old saying goes, “There is more than one way to skin a cat.” So I will try a little of Glenn’s methodology. I will remove the cages from 3 of my tomatoes and stop weeding around them and see how they do. I’ll experiment with biochar, but I hope I won’t have to try his woodchuck trick. I’ll report back at the end of the season, so stay tuned.
Henry is the author of 4 gardening books. He lives in Cornish Flat, NH.
Garden Thugs to Love or Hate
Posted on Thursday, July 11, 2019 · Leave a Comment
I’ve never subscribed to the old saying that “Children should be seen and not heard.” So it shouldn’t surprise you that I don’t insist that all the flowers in my garden stay in place each year, and that those that
do wander are not necessarily disciplined with a weeding tool. No, I recognize that rambunctious plants have a place in my garden, even if they wander from their assigned seats. Let’s take a look at a few.
Just coming in to bloom for me right now is pink or hollyhock mallow (Malva alcea). Each plant presents lots of bright pink blossoms over several weeks that are about 1½ inches wide. She is generous, offering babies that mysteriously pop up all over my garden. There is a big clump blooming in my vegetable garden right now that I definitely did not plant.
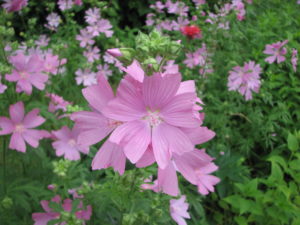
Pink mallow
Pink mallow grows to be 3 to 4 feet tall and 18 inches wide when grown in full sun. It is drought tolerant and not fussy about soil. It does tend to flop, however, so it often needs to be staked. It has a fleshy root and hates to be moved except when very young.
Beebalm (Monarda didyma) is one of my favorites, despite the fact that it spreads by root and cannot be contained. The blossoms are large and fragrant, and it is an excellent cut flower.
Beebalm is a tall plant (mine are 3 to 5 feet tall) on square stems. I have it planted up against a rock wall and fronted by a lawn, so it is contained on 2 sides. A lawnmower is a very effective tool against the spread of any flower. The good news is this: it is very easy to pull out volunteers.
Many gardening books list beebalm as a “full-sun” plant. My books do not. I recommend planting it where it gets morning sun only. I have found that full sun dries it out too quickly and reduces its bloom time and beauty. Hot afternoon sun is often too strong for this plant, particularly in sandy soils. For me it grows and blooms in quite shady places, and loves moist soil.
The “common” orange daylily (Hemerocallis fulva) is frequently disparaged by gardeners, but not by me. It really will grow anywhere, in any soil and is not deterred by bugs, slugs or predatory herbivores. Or at least not in my experience. I once dug out a clump from a flower bed at the end of the day and dropped it on the lawn. At the time I was an electrician working long hours all week and gardening only on weekends. By the next weekend it had dug its fingers into the soil (Okay, its roots) and I left it there. Now 20 years later it is still there and beautiful when it blooms.
The fancy varieties of daylilies stay in a nice clump that get bigger each year, but don’t really spread. The orange one does spread by root, and can be difficult to contain. But I have some growing right by the road in shade and truly awful soil, and they will be blooming shortly. I also have a double orange that spreads by root, but is a bit flashier.
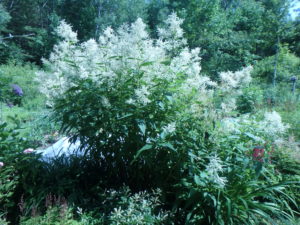
Giant fleeceflower
A plant you might not know is giant fleeceflower (Persicaria polymorpha). It is quite wonderful – it can get to be 8 to 10 feet tall with white fleecy flowers that persist much of the summer . It thrives in full sun and moist soil, but will grow almost anywhere.
Why might some consider it a thug? It gets bigger and the clump gets wider every year. And if you do not discipline it, it may well steam-roller favorite plants nearby. It has an amazing root system that will challenge most gardeners. So be sure you have a 6- to 8-foot wide space for it to dominate.
You probably know lobelia as a short annual plant (Lobelia erinus) that has intense blue or purple flowers and will bloom even in shade. Or perhaps you grow cardinal flower (L. cardinalis), a tall bright red, late-summer bloomer in wet places. But it has a cousin in the same genus that is a perennial with a wanderlust. Great blue lobelia (Lobelia siphilitica) is a great plant that moves around my garden at will. And I let it grow wherever it shows up.
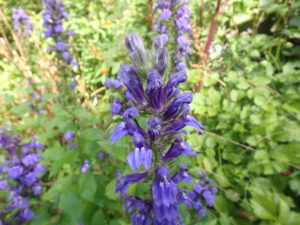
Great blue lobelia
Like cardinal flower, great blue lobelia is a vertical plant with blossoms along its stem. It stands about 2 to 3 feet tall and blooms in August. It does well in moist soil, but I also find it in hot, dry places. It pulls easily if it grows where you don’t want it. There is also a white form, but it is not a clean white.
I know that many gardeners love lily-of-the-valley (Convallaria majalis) for its sweet fragrance. I consider it a thug as it spreads by root and is hard to remove. I was recently given one with striped green and white leaves, and have planted it in a raised wood-sided bed so I can see if it tries to take over. The foliage is very attractive, and generally plants with white in their leaves are less aggressive. If it behaves well, it will earn a spot in my garden.
Each of us has a different level of acceptance for flowers that spread or move around. I love the spontaneity of many of the flowers I mentioned here.
Henry can be reached at henry.homeyer@comcast.net. He is the author of 4 gardening books.
A Dozen Sweet-Smelling Shrubs
Posted on Tuesday, July 2, 2019 · Leave a Comment
Lilac season is about over. For the lasts two weeks I have been enjoying the amazing fragrance of ‘Miss Kim’, a species lilac (Syringa patula) with light purple blossoms. It was sold to me some 25 years ago as a dwarf lilac, but it is not. It’s just slow-growing. Mine is now 10 feet tall and wide. It was loaded with many hundreds of blossoms, and I was able to smell its fragrance from across the garden.
I have a gardening friend, Nelia Sargent of Claremont, NH, who specializes in fragrant plants. She is blind, so she cannot see their blossoms; she grows them, in part, because she loves their scent.
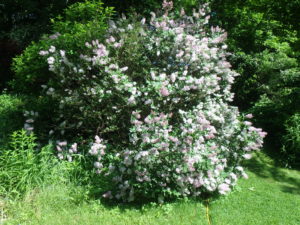
Miss Kim lilac
I called Nelia and asked for her list of fragrant shrubs. She told me that her goal is to have fragrance in her house and garden from spring until fall. “And I don’t want to have to put my nose in the flowers,” she said. “I want to smell them from 5 or 10 feet away, or even further.”
So she and I put together a list, roughly in sequence of bloom times. We agreed that even a shrub that should be fragrant, isn’t always sweet-smelling. So we recommend buying for fragrance when the plant is in bloom.
The earliest on Nelia’s list is a spring-blooming witchhazel (Hamamalis vernalis), one called ‘Arnold’s Promise’. It is hardy to Zone 4, but I have never grown it, but will. She has it and says it blooms in late winter. The frilly yellow blossoms are infused with red, and it is highly fragrant. She cuts blossoms and brings them in the house when snow is still on the ground, and they last in a vase for up to 2 weeks.
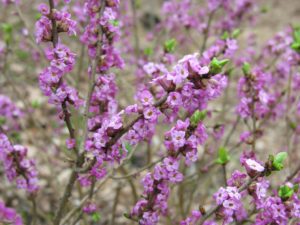
Close-up of February Daphne
Next comes February daphne (Daphne mezereum). I’ve had this for over 15 years, and like it so much I named my little corgi after it. It has nice sweet pink blossoms that bloom in April. Mine rarely needs pruning and is still not 5 feet tall and wide. Mine was winter damaged this year for the first time ever. I like to cut stems in March and bring them in to bloom indoors.
Then come the Viburnums. Many are fragrant, some very fragrant. Three that Nelia likes are Viburnum judii, V. carlessii, and V. burkwoodii. Many viburnums are susceptible to the viburnum leaf beetle, which can defoliate a shrub in a week or less. Nelia told me she has not had a problem with those three. Birds love the berries viburnums produce.
A nice fragrant understory shrub that I grew up with in Connecticut is spicebush (Lindera benzoin). Its flowers are negligible, but its leaves are fragrant. I learned this as a boy, pulling off a leaf and noticing the strong scent. As a teenager I chewed on the twigs, using them as a breath freshener! I was able to find one for sale and have been growing it in dry shade for 3 years now.
Nelia mentioned fothergilla (Fothergilla major) as a fragrant shrub with a pleasing subtle scent. I’ve grown it for 20 years or so, and love it for the white, bottlebrush flowers in May and fabulous fall leaf color; but I have never noticed the fragrance. Mine might be the exception, and once again proves it important to buy things in bloom if you want fragrance.
All lilacs have nice fragrance in bloom, I think. Nelia was once asked to judge their scent for the Arnold Arboretum at Harvard. She determined that there are at least 20 different lilac fragrances in their collection. If you select early, mid-season and late-blooming lilacs, you can have 5 weeks of fragrance and blossoms, she said.
Nelia Sargent noted that the Japanese tree lilac (Syringa reticulata) is very fragrant, but that it should probably be considered an invasive and not planted. Seeds are spread by birds, and this stranger from a foreign land can out-compete many of our native understory plants. The gardeners at Saint Gaudens National Park have observed this, and actively remove them whenever they see them.
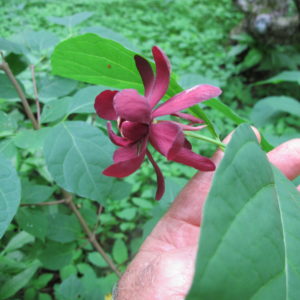 Carolina allspice or common sweetshrub (Calycanthus floridus) has been blooming for me since mid-June and has lovely deep wine-red flowers; it prefers a shady spot with rich moist soil. Although Nelia considers it fragrant, mine is not, or just barely. Still, a shrub that blooms in shade is always welcome in my gardens.
In August there is summersweet clethra (Clethra alnifolia). Nelia says a pink variety called ‘Ruby Spice’ is very fragrant. I have the wild white one, and it is fragrant, but not very.
In late August or early September the seven-son flower tree (Heptacodium miconioides) tree blooms. It is a very fast-growing tree – branches can grow 5 to 7 feet in a single season, but it slows down some when it reaches its full size of 25 feet tall or so. Mine has a pleasant, but not overpowering scent.It has wonderful exfoliating bark that is splendid in winter.
This list of fragrant shrubs cannot include them all. Mock orange, for one, is very strong smelling. Some rhododendrons are fragrant, particularly the native swamp azalea (Rhododendron viscosum). Please write me if you have a favorite I have neglected to mention. Perhaps I need to grow it!
Write Henry at henry.homeyer@comcast.net or P.O. Box 364, Cornish Flat, NH 03746. Please include a SASE if you wish a response by snail mail. Henry is the author of 4 gardening books.
Flowers in Bloom That Make Me Want to Swoon
Posted on Friday, June 28, 2019 · Leave a Comment
My earliest memory of a flower dates back to spring, 1948, when I was just 2 years old and living in Hingham, Massachusetts (we moved away that fall, so I know the year). My mother, sister and I were walking through a pine woods when we encountered a cluster of pink ladyslipper orchids. I was enchanted. I wanted to pick it. My mom restrained me, saying it was a rare and special flower. I am still overwhelmed by their beauty, and feel lucky I can grow 2 kinds of ladyslippers.
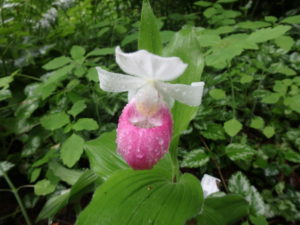
Pink showy ladyslipper
There are 3 main types of ladyslippers that grow in the Northeast. A yellow ladyslipper (Cypripedium parviflorum), the pink one that I saw when young (Cypripedium acaule), and a bigger pink one called the showy ladyslipper (Cypripedium reginae). I grow the yellow and the showy.
The pink ladyslipper is tough to grow – it requires very acidic soil and is nearly impossible to transplant. In the wild I have only seen them in sandy soil under white pines.
The yellow and showy ladyslippers do fine in moist, rich soil and moderate shade. It is now possible to buy them at specialty nurseries. Some nurseries grow them and divide big clumps to sell individual plants. Starting any ladyslipper by seed is generally considered nearly impossible.

Primula japonica
What other flowers now in bloom make my heart go Ka-Boom? My Japanese primroses, also called candelabra primroses (Primula japonica). I’ve grown these in the shade of some wild apple trees where the soil is rich, black and moist. Starting with just 7 plants, these have dropped seeds and self-planted so that I now have hundreds after 20 years. They are finishing up their bloom cycle now.
Candelabra primroses range in color from a deep magenta to medium pink to nearly white. They bloom up their stalks, presenting a ring of florets, then a second, third and sometimes even a fourth or fifth set of blossoms. Because they don’t all bloom at once, they flower for up to a month, depending on the heat.
Then there are the peonies. I have one, a division of my grandmother’s favorite, called ‘Festiva Maxima’. Grandmother died in 1953, and my mother dug it up and brought it to my childhood home. Then in the 1980’s I dug it up, divided it and brought some of it to New Hampshire. It is a double white with a speck of red in the middle. What makes it so special is the fragrance. It is enough to make the weak-hearted swoon.
If you don’t have a peony, or don’t have several, go buy one now when you can see the blossoms and judge the fragrance. Not all peonies have fragrance. Be sure not to plant it too deep. The ‘eyes’ or growing points need to be within an inch of the soil line. Otherwise they will grow and look healthy, but fail to bloom. Plant them with plenty of compost and some organic fertilizer added to a large planting hole.
I love roses. For ages roses bloomed mostly in June and suffered from black spot, Japanese beetles and other difficulties. No more. You can get roses that require no chemicals to stay healthy and bloom much of the summer. The only problem is that most of these modern hybrids have little or no scent.
Of the modern hybrids my favorite is the “Knockout” series. I have had singles and doubles, and find most are as hardy as a shovel (though much prettier). And I’ve had them bloom all summer and past Halloween.
But what I really love are the old fashioned roses. Many of them send up side shoots from the ground that can be dug and passed on. I have two of these, and I don’t know their varieties. I have a double white and a double pink, both with lovely scent. And despite the fact that I am an organic gardener who doesn’t spray them, they seem to stay free of pests and diseases.
Clematis
I grow 5 kinds of clematis, and all are wonderful. Most clematis die back to the ground each winter, and start up in spring, though a few have hardy vines. Most grow 6 to 10 feet in length and need something tall to climb up. They have big, bodacious blossoms. Most are not particularly fragrant. They bloom in shades of pink and purple, along with white. The two I have in bloom right now have flat 6-petaled blossoms 4 to 5 inches in diameter. The most durable and vigorous is a purple one called Clematis jackmanii.
The trick to succeeding with clematis is to remember the old adage, they like “hot tops and cool bottoms.” The vines need to be in full sun, or full afternoon sun, and the roots need to be shaded. Plant something right in front of the clematis to help keep the roots cool.
June really is the best month for flowering plants. All those I mentioned above – and dozens of others – grace us with their presence. Go to a good family-run nursery where the staff really knows the habits of the plants and can tell you about each one. Most really enjoy educating you about the flowers, so ask questions. Of course, the best teacher is experience. So go get some new perennials and enjoy them.
Henry is a UNH Master Gardener, and the author of 4 gardening books. He lives in Cornish Flat, NH.
7 Things to Do to Improve Your Garden – and Your Life!
Posted on Tuesday, June 18, 2019 · Leave a Comment
If you’re like me, by now you have your garden planted, both vegetables and flowers. It seems like a good time to take a deep breath, pour a cold glass of your favorite beverage and watch the flowers perform. I have set up chairs by my Japanese primroses for viewing, and have invited friends to come see them and relax. But wait! There is still a lot to do, and you can make your life easier with some work now. Here are 7 garden activities I recommend.
- Weeds in the vegetable garden are little now, and easy to pull. Take 20 minutes a day – or twice a day – and just weed. All my weed-free beds are sprouting weeds, but the roots are small. It’s important to loosen the soil a little before pulling weeds. If you don’t do that and you hear a snap, you have broken a root. I like a CobraHead weeder for loosening the soil because it has a single tine, and is very precise.
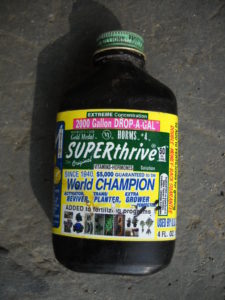
Superthrive is great for reducing transplant stress
If you are weeding in a bed with small seedlings – lettuce, for example – you may end up pulling up seedlings, too. Re-plant immediately, and water. I use an anti-stress liquid called Super Thrive, just a quarter teaspoon in a gallon of water, after weeding. It helps plants recover from having their roots disturbed. It has plant hormones and seaweed extracts, and I find it very effective.
- I like to mulch after weeding, and after the soil is nice and warm. If the soil is still cool and wet, wait for a few days of hot sun before mulching. Roots like to be warm.
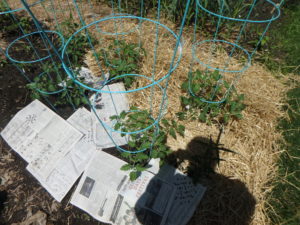
Mulching tomatoes with newspaper and straw
My preferred method of mulching is to put down several layers of newspapers around big plants like tomatoes, and in walkways. Then I cover it with straw, leaves I saved last fall, or even mulch hay. Mulch hay has seeds, but the newspaper keeps the seeds out of the soil pretty well. Leaves are the best, but always in short supply.
- Protect your tomatoes. Put tomato cages around them. They need to be kept upright, but will flop if you don’t support them. Get the 54-inch cages with 4 legs, not 3 legs. Tomato diseases are generally soil borne, so mulch the soil with grass clippings, leaves or straw to prevent splash-up.
This year I am trying an experiment with a biological control for blight on tomatoes. There is a bacterium, Bacterium subtilis, that feeds on fungi. It is now available as a commercial spray called Serenade. I have sprayed half my tomato plants with Serenade and marked them with labels. According to the directions, I will need to spray once a week. I will report back if I see a marked difference.
- Find and utilize unused spaces, both in the vegetable garden and flower beds. If you planted a few nice perennials this year, you probably left space for them when they get big. Instead of depending on mulch to fill the space, plant some annuals.

This newly plant raspberry patch has plenty of room for lettuce
The same works in the vegetable garden: Tomato plants won’t be big for another 4 to 6 weeks. Grow lettuce around them, and eat the lettuce before they get shaded out. Spinach and radishes are good candidates for those spaces, too.
- Think about cutting off branches of trees that are now shading out your gardens. Or remove trees altogether. I love my trees, but find they are interfering with my flowers and veggies that like full sun. I removed several large branches from a pear tree this winter because it was shading my peonies. You can do that now, too.
Weed trees like box elder and poplars should be the first to be removed. They pop up and get big before you know it. Elms will grow for 25 years or so, then die from Dutch elm disease, so I cut or yank those any time I find them on the property.
- Thin root crops like carrots, beets, rutabagas and parsnips. By the Fourth of July all those should be 1 to 2 inches apart. Carrots will compete with their brothers and sisters just like they do with weeds – and suffer.
- I don’t want to sound like Anne Landers, but get a gardening partner to help in the garden. It works for me! My life partner and sweetie, Cindy Heath, has lived 6 miles away for the past 10 years. But now she has moved in so we garden together here, instead of having 2 gardens.
If you already have a husband or wife, some re-training may be needed. Pavlov had it right: Make brownies or give back rubs as a reward for help in the garden. Soon there will be no more weeds!
Henry lives and gardens in Cornish Flat, NH. He is the author of 4 gardening books.
Weeds to Worry About, and What to Do About Them
Posted on Tuesday, June 11, 2019 · Leave a Comment
There are weeds to worry about. There is even one that I fear. But most weeds are just a nuisance and can be managed relatively easily. Dandelions, for example, are bright and cheerful. If they were named daffodil instead of dandelion, we would pay good money to have them in our lawn, returning each year and re-blooming after being mowed.
Yes, dandelions spread seeds willy-nilly on the wind. But if you pull them from your vegetable plot or flower beds when they are young, and after a good rain, you can keep them under control.
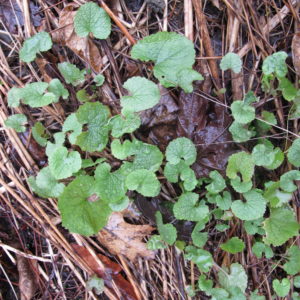
First year garlic mustard leaves
Let’s start with the worst weed: garlic mustard (Alliaria petiolata). I fear its arrival in my garden. This weed is a biennial, flowering in its second year and then dying. It is relatively easy to pull. So why worry? This plant exudes a chemical that kills the beneficial fungi that coat the roots of our maples, oaks and other hardwoods. Our trees depend on these mycorrhizal fungi to get minerals from the soil. Without the fungi they decline, and eventually die. This is not a quick death, but our forests are in danger if this invasive weed is allowed to spread. Garlic mustard also inhibits the seeds of many native wildflowers from germinating. I don’t have it, but fear it.
So what can you do? Learn to identify it, and then work hard at pulling it. In the first year it produces a low rosette of rounded leaves with scalloped edges an an indentation at the stem. The second year it sends up 18- to 36-inch flower spikes with pointy, heart-shaped leaves with jagged edges. The small white flowers have 4 petals and bloom in clusters about an inch or more in diameter. One plant can produce about 4,000 seeds. And although about 70% of the seeds will germinate the next year, some will remain viable in the soil for up to 10 years.
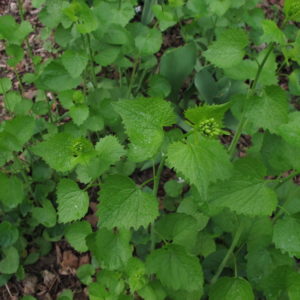
Garlic mustard leaves
Pulling garlic mustard is easy – and satisfying. Do it now, before the flowers produce seeds. I find a CobraHead weeder is good for loosening the soil and helping me get the roots. But you will have to keep on doing this every year for 7 to 10 years. That’s why the weeds so often win the battle with us – we give up. And do not throw the plants into your compost! Bag and send to the landfill or incinerator.
Another nasty weed is called goutweed (Aegopodium podagraria). There are 2 forms: an all green variety and a green and white variety often called ‘Snow on the Mountain’, which is sometimes sold by garden centers (though it should not be). The green and white one is possible to control, but the all green one is almost impossible to eradicate. I got goutweed when a friend gave me some iris with roots of it mixed in. The long white roots are insidious –they break easily and a scrap will generate a new plant.
Again, know the plant and recognize the roots. If you buy plants at plant sales, I recommend you bare-root the plants before planting. Look for thick white roots that are not from the plant you bought. Bare-root by removing all soil with a hose and carefully inspecting the roots. Do that in your driveway, not in the garden as scraps of root can start a disaster, so clean up the scraps carefully.
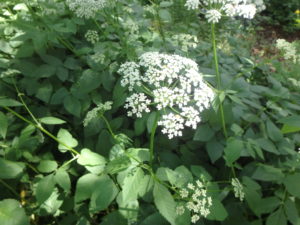
Cutting off goutweed blossoms prevents seed germination
Goutweed grows 12 to 24 inches tall and sends up stems with compound leaves: At the tip of each stem are 3 leaflets; two pairs of leaflets grow below that. Soon it will send up white flowers a bit like Queen Anne’s Lace. The roots spread fast and far. You can try to smother it with black plastic and mulch, but in my experience it just runs out from under the plastic before long.
Horsetail or Equisetum is a beautiful weed: very fine leaves arranged in whorls around a central stem. It has been growing for about 100 million years – perhaps it was fodder for dinosaurs. Instead of seeds, it produces spores. It can be quite persistent and difficult to eradicate.
Digging it and removing horsetail roots helps, but changing the soil type can be a big help. It tends to grow in compacted acidic clay soil. But according to one farmer I discussed it with, adding compost and limestone will make it less of a problem and other plants will compete with it better.
There are good weeds, too. Plantain (Plantago major) may use its broad leaves to smother grass in the lawn, but if you are stung by a bee you can reduce the pain by rubbing a leaf on the sting. It has been used as a medicinal for hundreds of years for a variety of ailments.
Chickweed (Stellaria media) blooms early when lady bugs need food before aphids appear. They survive on the pollen. It is shallow-rooted and easy to pull up.
Purslane (Portulaca oleracea) is a fleshy-leafed weed that prefers sandy fertile soil but will grow most anywhere. Like some other weeds, the flowers can produce seeds in the compost pile – or in a pathway after being yanked out. It’s virtue? It is edible. It can be used in salads, sautéed, or boiled. Every part of the plant is edible.
The bottom line? You can mow the weeds to reduce their vigor and their ability to produce seeds. You can smother them with a barrier and mulch. Or you can do it the old fashioned way: digging them out with a fork and a good weeding tool.
Henry lives and weeds in Cornish Flat, NH. Contact him at henry.homeyer@comcast.net. He is a UNH Extension Service Master Gardener and the author of 4 gardening books.


 Click Here to buy from Cobrahead