Tomatoes: Getting the Best from Your Harvest
Posted on Tuesday, August 21, 2018 · Leave a Comment
This is my favorite time of the year. Tomato time. Tomato sandwiches for breakfast and lunch, Tomato, basil and cucumber salads with dinner. Tomatoes in stir fries. Tomatoes going in the freezer, dehydrator and jars of sauce. Oh my, I do love my tomatoes. I grew 35 plants this year, as I usually do.
Many gardeners complain that blights are reducing their harvests. It’s true that 30 years ago we had little blight. We covered our plants against the frost, and they kept on producing until October. Now tomato leaves turn yellow and brown in July, and by August many plants are pretty much bare of leaves. Why, people ask, do the early blossoms produce fruits, but then the plants just stop producing?
I don’t know all the reasons. I do know that most common tomato diseases are caused by soil-borne fungi that winter-over, coming back year after year. You can minimize the problems by rotating your tomato patch each year, or by planting in a new garden space that was lawn. Usually a new garden in full sun will have few problems, but in the following years, the blight will find your tomatoes.
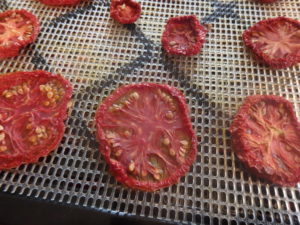
Dehydrated Tomatoes
I have had a good, but not perfect tomato season. I spaced my plants farther apart than I have done in the past, centering them 30 inches or more apart. I planted in the sunniest part of the garden. I cut off diseased branches early and often. And Mother Nature cooperated: June and July were relatively hot and sunny, with low humidity. I had to water early on, but diseases were inhibited by the weather. But now, in August, humidity is high and rain is common. Sigh. My tomatoes are getting blight.
So what do I do with the fruit from 35 plants? For starters I should explain that the trees around my garden have gotten bigger every year, and now my garden only gets sunshine from around 10am to 5pm. That’s considered full sun, but 12 hours is a lot better for production.
The easiest, quickest way to save tomatoes is to freeze them whole for winter. Wash them, make sure they are dry, and put them in gallon freezer-rated zipper bags. I suck the air out of the bags with an ordinary drinking straw. The frozen tomatoes can be used in soups and stews just like canned tomatoes. If you wish to remove the skins, just run the frozen tomato under a stream of hot water and rub off the skin.

Excalibur dryer
Tomatoes also store well if you dry them in a dehydrator. I plant 6 or more Sun Gold cherry tomatoes each year that produce a lot of fruit. I cut them in half and place them on the racks of a dehydrator and dry them at 130 degrees for 18 hours or so. When they are dry I stuff them into quart zipper bags and keep them in the freezer, though freezing is not really needed. I use the dried nuggets of summer in soups, stews and stir fries. I have even put them in winter sandwiches.
You can also dry full-sized tomatoes. Slice them about 3/8 of an inch thick and place them in a dehydrator. I have two kinds of dryer: the Excalibur, a $300 deluxe model that blows warm air sideways equally over all 8 trays, and the NESCO American Harvester, a serviceable machine that pushes air up or down through a stack of trays.
The downside to the NESCO model is that you must rotate the trays to get equal drying. And it uses 1000 watts of energy per hour, and the Excalibur uses only 660 watts. Still, at about $125 for the basic machine, it is more affordable.
A sandwich is not really a sandwich, for me, without slices of tomato. One way to save slices of tomato for winter use is to roast them. I do so in the oven at low heat until they are caramelized and soft, not tough and dry. Then I place them in zipper bags and freeze them – but just one layer of tomatoes per bag. When I crave a tomato in my sandwich, I pull out a few slices and heat in my toaster oven until warm. Not a fresh tomato, but better than most sold in the grocery store in January.
I also make tomato paste. Lots of paste. I store it by freezing it in ice cube trays, and then putting it in zipper bags when frozen. No more half-used cans of purchased paste going fuzzy in the fridge for me.
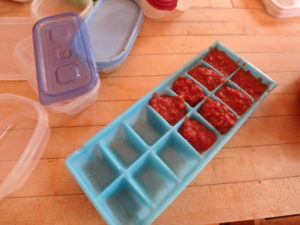
Freeze tomato paste in ice cube trays
To make paste I use imperfect tomatoes, of which I have plenty. I cut out the bad spots, then core them. I squeeze the cored tomatoes in the sink, which gets rid of most seeds and lots of juice. Then I quarter them and place in a food processor. I puree them, then add to a large enameled iron pot and cook them slowly for hours. I know they are done when I can literally stand up a spoon in the pot. I let it sit all night, uncovered, to cool and lose some more water. In the morning I spoon the paste in the ice cube trays.
Canning tomatoes is the old fashioned way. I still put up a few jars of sauce each year, but it’s a lot of work and must be done just right in order to avoid getting sick. Mostly now I make a big batch of sauce and freeze it in plastic freezer containers. But I like seeing jars of canned sauce lined up on a shelf in the pantry- and it connects me to my mom and grandmother.
Henry is the author of 4 gardening books. E-mail him at henry.homeyer@comcast.net. Read his blog posts at https://dailyuv.com/henryhomeyer
Creating a Pollinator Garden
Posted on Tuesday, August 14, 2018 · Leave a Comment
I recently helped prepare and plant a pollinator garden. Bees, butterflies and other insects need pollen and nectar for food, and suitable native plants on which to rest and lay their eggs. Unfortunately, many landscape plants have been introduced from foreign shores, and the plants may be less interesting to our native pollinators, or have less food value. A good pollinator garden is stocked with native plants for best results.
There certainly are plenty of seed mixes available to plant a “Meadow BURSTING WITH COLOR all summer long!” Unfortunately, seed mixes are not as easy to use as you might think. I know people who have rototilled or plowed a space, spread seed and been disappointed after year one.
After the first year, a few plants will dominate, and some of your favorites will disappear – because you often get a lot of annual flower seeds in a mix that will bloom in year one, but depend on self-sowing to come back in later years, and that doesn’t always happen.
So if you wish to have a healthy pollinator garden with plants that come back year after year, buy perennial plants from a knowledgeable source of native pollinator plants. This can be expensive, but doesn’t have to be. Most perennials at a garden center cost $8 to $15 a pot – and true natives are often hard to find.
We bought a mix of first-year perennial wildflowers in flats, each plant in a peat pot that is about 4 inches deep and 3 inches wide – for less than $5 a plant. We got ours from Northeast Pollinator Plants (NEPP) in Fairfax, Vermont. (www.northeastpollinator.com). They also sell individual plants, including common milkweed for monarch butterflies.
Why pick true natives? They co-evolved with our native insects. A named perennial cultivar often has brighter colors or more petals than a native of the same species – which may affect how our insects are attracted to it, or what they get from it. Timing is important to pollinators, too, and cultivated plants may bloom earlier or later than true natives.
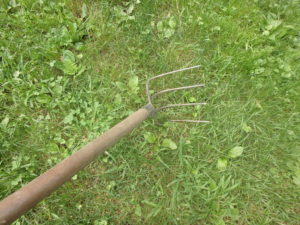
A potato rake is good for pulling turf and weeds
I don’t recommend trying to rip out all your lawn and turning it into a pollinator garden all at once. That’s too much work. Four hundred square feet is a good size to start with – roughly 20 by 20 feet. We didn’t want a square, so we used 80 feet of garden hose (which would enclose a 20 foot square) and created an irregular, curvy shape with the hose. Then, using an edging tool, we cut the border of the space.
We removed all the grasses and weeds in that 400 foot garden space. It took 4 of us about 4 or 5 hours. We sliced through the grass and weeds with shovels, tipping the shovels back and loosening the soil. Then we used either a CobraHead hand weeder, or an old fashioned potato rake to pull out the chunks of sod. For big tap-rooted weeds, we used a garden fork to loosen the roots before pulling. Because the soil was sandy, weeds pulled relatively easily.
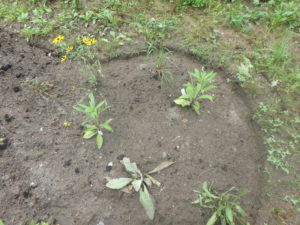
Spacing wildflowers 2 feet apart is about right
Then came the fun part: planting. I spoke recently with Jane Sorensen of Northeast Pollinator Plants and River Berry Farm. Jane is co-owner of NEPP and a professor at UVM. According to Jane, it is important to resist the temptation to add compost, manure and especially fertilizer, even if the soil is very lean – devoid of the dark organic material that our veggies and cultivated flowers are given for best results. The wildflowers in our selection from NEPP do well in poor soil and get too tall and flop if given fertilizer or much compost.
We got 84 plants for the 400 square foot garden – roughly one plant for each 2 foot-by-2 foot space. I cut 2-foot sticks to remind us how far apart to space our plants. These little plants were mostly just a foot tall, but some will end up being 4 to 6 feet tall, and creating large clumps in the future.
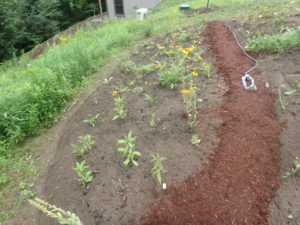
Watering is important for the first 2 weeks
We planted 10 species of perennials and one grass. Early plants included penstemon, purple cone flower and baptisia. Mid-season plants were anise hyssop, wild bergamot (Monarda fistulosa, a relative of the beebalm we all know), boneset (Eupatorium perfoliatum) and blazing star (Liatris spicata). For late blooming flowers we used NY Ironweed (Vernonia noveborancensis), sneezeweed (Helenium autumnale) and New England aster. We planted little bluestem, a grass beloved by pollinators. Most all of those are good for full sun to part shade.
Jane suggested planting wildflowers in groups of 3 to 5 plants. Many native bees, she said, like to work one species of flower before moving on, so don’t spread them out too far.
Although we love to clean up our gardens in the fall, Jane said it is best to let the wildflower stems stand all winter, then clean up in the spring. That allows native pollinators, or their eggs, to overwinter in the plant stems. She credited that idea to Annie White in a talk for the New England Wildflower Society. She also said to save the stalks, setting them aside after clean up – so that eggs can hatch. Wait until you have had at least 3 consecutive days over 50 degrees in the spring before cleaning up.
Think about adding native wildflowers to your property, even if you don’t dedicate a huge swath to it. Plants used for pollinators may not be as showy as peonies and roses, but the bumblebees and butterflies they attract will be the icing on your cake.
Read Henry’s blog at https://dailyuv.com/henryhomeyer Henry is the author of 4 gardening books.
Growing Lesser-Grown Vegetables
Posted on Tuesday, August 7, 2018 · Leave a Comment
Each year I try to grow some new things in my vegetable garden, varieties that I’ve never tried before. Sometimes my efforts are a bust, and I never grow them again. Then sometimes something new becomes an instant favorite, as happened this year.
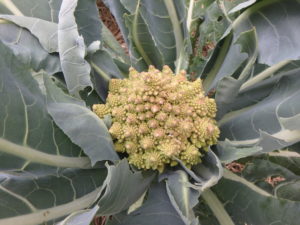
Romanesco Cauliflower
This year I grew Romanesco cauliflower, a plant that I absolutely love! This is something like a pointy cauliflower, but with a different taste: it has overtones of broccoli. In fact, some call it a Romanesco broccoli or just plain Romanesco. Some say it has a nutty flavor.
The tiny florets spiral around in something described by a mathematical relationship called a Fibonacci sequence. That sequence is 0, 1, 2, 3, 5, 8, 13, 21, 42…. Do you see the relationship between the numbers? Each number is the sum of the two previous numbers. It is a gorgeous, spiraling pointy vegetable. When I picked my first one it was 5 inches across and weighed 9 ounces. Perhaps I could have let it get bigger, but I was afraid it might spoil if I waited too long.
I cooked my Romanesco by slicing it in half and steaming it for 6 minutes. At that point I could poke a fork into it without difficulty. I served it with butter, though a little Parmigiana cheese might be good on it, too.
Unlike broccoli, most cauliflowers don’t usually produce any more food after the first head is picked – though some purple ones will produce small florets as an afterthought. Will my Romanesco produce anything else? I don’t know. If you know, please e-mail me (henry.homeyer@comcast.net). If it shows no side shoots in 2 weeks, I shall pull the plants.
Rutabagas were once an experiment for me, but now I grow them almost every year. They are mild-flavored and store for months in the fridge or a cool basement. I’ve never had trouble with diseases or pests – and they are a good substitute for potatoes, which are sometimes plagued by beetles and fungal diseases. Flea beetles can bother them, I’m told, but I’ve never had the problem.
Kohlrabi is another lesser known vegetable that I grow. It looks like a root crop, but grows above the soil line as a big, fat round ball. The leaves come off the top of the ball, and some people say it looks like a space alien.
This year I grew purple kohlrabi only. These are best eaten soon after being picked, though there are some green ones, most notably Kossak, an F-1 hybrid that will store for 4 months or more with no loss of flavor or texture. And they get to be 8 inches in diameter!
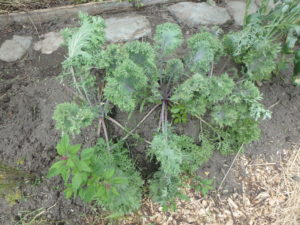
Bear Necessities Kale
Of the leafy greens, I tried a new variety of kale that I love. I got seeds from Fruition Seeds in Naples, NY for a kale called Bear Necessities Kale. That’s right, bear, not bare. It is a frilly kale and very tender. What it has to do with bears is a mystery to me, but Petra Page-Mann, the founder of the company, is a young woman with a good sense of humor, so I guess it’s just a pun. I use the leaves in my breakfast green smoothies, and they’re delicious. Fruition Seeds offers many unusual and organic seeds including heirlooms.
Magenta spreen is another unusual leafy vegetable that I tried some years ago, and it shows up like a weed every year. I let some grow, and pull some out. It is in the scientific genus Chenopodium which includes quinoa and a weed known as lamb’s quarters. What I love about it is that it has top leaves that are, indeed, magenta – one of my favorite colors. It can be steamed as a green, added to a salad or added to a smoothie. Seeds are available from Johnny’s Selected Seeds.
This year I had some extra space, having reduced my potato plantings, so I planted watermelons, cantaloupe and luffa (or loofa). All spread like crazy, and like hot weather. They were slow getting going, but now, with the current heat wave, they are growing so fast I have to step back to avoid being run over when I visit them.

Magenta Spreen
Unlike tomatoes or beans, it’s not obvious when your watermelons or cantaloupe are ready to pick. Melons require one to use all senses, including hearing. Yes, I thump on watermelons and listen for a hollow sound to see if they are ready to pick. Watermelons that are white where they sit on the ground are probably not ready – they should be yellowish. Size counts, too. Bigger is riper.
Cantaloupes are sometimes a little soft at the attachment point when fully ripe, and should smell slightly sweet at the flower end (opposite the attachment point) when dead ripe.
I have never grown luffa before, but it’s not an edible, so I imagine I’ll just let it grow until it stops growing. I’ve read that when it gets lighter in weight and color, it’s ready to pick. Peel off the skin, which should be loose by the time you pick it, and knock the seeds out. Dry until it’s ready to use as a scrubby. Some people smash the gourds against the ground, and then peel off the skin.
Let me know if you have grown something weird and wonderful. I’m always looking for new garden adventures.
Read my blog posts at https://dailyuv.com/gardeningguy. E-mail me, or write me the old fashioned way at P.O. Box 364, Cornish Flat, NH 03746. Send a SASE if you want a reply.
Getting Ready for Guests in the Garden
Posted on Tuesday, July 31, 2018 · Leave a Comment
Summer is the time for spending time in the garden – and for sharing your love of the garden with others. If you want to invite friends – your mother-in-law or perhaps the entire bowling team – to see you garden, here are a few tips.
First, cut the lawn. I know that doesn’t sound like a gardening tip, but your outdoor space looks neater and tidier if the lawn is kempt. I like to cut the lawn on the day of the visit, or the night before. Lawn is the background of the garden, and helps flowers stand out.

Mowing the lawn makes everything look better
And if there are lumps of grass because the lawn was long when you cut it, rake them up. It really only takes a few minutes. You wouldn’t leave towels on the bathroom floor when company was coming, so do the equivalent for your lawn.
If you have as much garden as I do, you can’t make every bed totally weed-free. So here’s what I do: first, I get the tall weeds. Anything taller than the flowers or veggies is going to stand out. And by late summer, tall weeds are present.
Next, get weeds at the front of beds. Try to establish sharp lines for your beds. This can be done with a weeding tool, or even better, with an edging tool. Edging is tedious for me, so I only edge beds at prominent places, such as those in front of the house.

An edging tool helps create clean lines
An edging tool is a steel half-moon on a 5-foot handle. You step on it to slice through the lawn, then tip it back, away from the bed. That lifts up a little soil (and weeds, if they are present) and creates a little moat once you lift out the soil that you just loosened with your edger. This moat or trench prevents grass roots from extending into your bed. The weeds sense a precipice, which could be the Grand Canyon, and the roots stop growing in that direction.
After weeding there may be some big holes in the flower beds. You have a few options. You could put in a piece of garden art or whimsy, or a pot of annual flowers. Most garden centers and nurseries are sold out of annual flowers by now, so you may have to move something from your deck or steps to the garden.
I’ve been growing impatiens in pots on my deck ever since the scientists told us in 2012 that impatiens was subject to impatiens downy mildew, and we could never grow it again. I fear that warning was a “Chicken Little” warning. I did see impatiens devastated by the fungal disease that summer, but I’ve been growing it without trouble since. I can move a pot or two into a shady place that needs color.
Brightly colored geraniums are wonderful for a punch of color for sunny locations. A friend recently gave me 3 pots of geraniums when she moved, and I love them. I set one in my front walkway garden, right in the pot. It picks up a temporarily tepid bed.
Staking flowers that flop is another tough task, but one that makes a big difference in the garden. Bamboo garden stakes and string help, but for tall heavy plants I end up using hardwood grade stakes. I run green plastic tie-up tape around the perimeter of a big plant to contain it. I put the tape about two-thirds of the way up the plant. It is good to tie up plants a week or more before a garden party, as floppy things need time to look good after straightening up.
Mulch. There will always be spaces in the flower and vegetable beds, and mulch will fill in and prevent weeds from coming along. And it looks good, so long as you don’t have bare oceans of it. For flower beds I buy finely ground hemlock mulch by the pick-up truck load. An inch or two of this will keep many seeds from germinating, though it will not exclude grass shoots coming up from roots that escaped my weeding tool.
If you adhere to organic techniques in the garden, be advised that some bagged mulches have been chemically altered. Look for the words “Color Enhanced” on the bag, and avoid those bags. Who knows what they used to color the mulch, and I have seen some leach color in the rain.
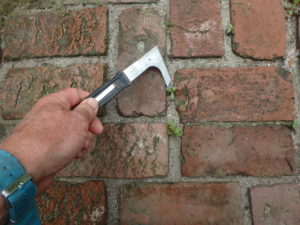
Patio weeder
Clean up walkways. Sweep them, and if needed, weed them. I have a 10-foot brick walkway to my front door. The bricks are set in sand, and ambitious weeds try to sneak in. Some gardeners take the easy route, and spray the weeds with herbicide. But then the brown weeds look awful, and they have to pull them anyway.
I don’t use chemicals, so instead of spraying I use a “patio weeder” to get between bricks. It is an L-shaped tool, thin and flat. It’s great for getting between bricks and generally very inexpensive.
Trimming around rocks and posts with a string trimmer really tidies things up. I now have a battery-powered one. It is so much easier to use than a gas-powered one, so I use it more. It’s a nice way to finish off cleaning up a garden. Then it’s just get out the snacks and drinks – which always improve your guests’ opinion of your garden!
See Henry’s numerous blog posts and photos at https://dailyuv.com/henryhomeyer. You can sign up for an e-mail alert and link to them. His e-mail is henry.homeyer@comcast.net.
Mid-Summer Tasks in the Garden
Posted on Wednesday, July 25, 2018 · Leave a Comment
Oh I how I love the sunny weather we’ve had this summer! It reminds me of the years I spent as a young man working with the Peace Corps in West Africa. There were often 7 or 8 months of sunshine between rainy seasons. And, like there, we need to do some watering if we want to keep our tomatoes happy and healthy.
The best judge of plant water-needs are your eyes. Yes, a finger in the soil will tell a lot, but learning to judge a thirsty plant by the looks of the leaves is an important skill. A thirsty plant has leaves that are dull looking and a little limp. By the time lettuce or leafy greens collapse they are in deep trouble, so pay attention.
I like watering with a watering wand. It is a 30-inch aluminum extension to my hose, with a “rose” or nozzle at the end. By regulating a valve on it you can adjust how much water flows. I walk down the rows of my vegetable garden giving drinks to the tomatoes and lettuce, but not watering the leaves or walkways. Much more efficient than using an overhead sprinkler that waters everything. And it’s very gentle.
It’s not too late to plant seeds. Even if you plant in early August, you have all of August, September and half of October to grow things like lettuce, beans, broccoli and even some annual flowers.
It’s true, for example, that most carrots are 75 days, but some are just 55 to 60. Same for broccoli. Dig out an old seed catalog and look carefully at how many days are needed to reach maturity. We still have at least 75 days of frost-free weather, under normal conditions.
Seeds germinate more quickly now than in the spring because the soil is warm. Just be sure to water every day until they are of a size that can survive a little dryness. Mulching is good to help hold water in the soil.
This year I planted my tomatoes, or most of them, farther apart than I usually do. That, along with the dry weather, has contributed to the nearly disease-free leaves on my tomatoes. Early blight, which turns leaves yellow, brown, then black, has not been much of a problem for me.

Tomato in need of pruning
If you see tomato leaves yellowing up, cut them off. Open up the bushes by cutting off any branches that are growing in a downward direction, or into the middle of the plant. Those never produce fruit anyway. By cutting them off, you reduce chances of disease spreading and open the middle of the bush to more sunshine. And when a plant gets tall enough, cut off the tips of growing branches to keep it a manageable size- even if it means cutting off a few flower buds.
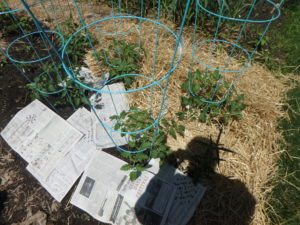
I contain my tomatoes in cages. I get the 54-inch tall ones, with 4 legs. They are expensive – $7 or $8 each, but worth the money as they last 20 years or so. Of course it’s too late now to cage your plants. But branches of tomatoes laying on the ground are very susceptible to diseases, even if you put down hay for them to lie on.
If your tomatoes are growing out of control and are outside their cages, you have get to work: tie the recalcitrant branches to the outside of the cages. I like strips of old bed sheets, as they are very soft, and much better than twine. I also use green plastic tie-up material sold on rolls. The strips come in half- and three quarter-inch wide rolls.

Tomato after pruning
You can also tie tomato stems to grade stakes. These are hardwood stakes that come as 4-to 6-foot stakes. Push them into your soil, then smack them a few times with a sledge or ordinary hammer. These are good, too, to keep cages from tipping over if you have a heavy load of tomatoes. One word of caution: if you want to work on your tomatoes, only do so when the leaves are dry. Fungal diseases spread more easily when wet.
Many of us get lackadaisical in late summer. August is a hot month, and often humid. Plants are established, and less likely to get elbowed out by weeds, so we don’t always pay attention to weeds. But we should. We never want to let weeds go to seed.
Around the edges of my garden I recently notice lots of 3- to 5-foot tall weeds loaded with seeds. I dug many, using a garden fork to loosen the soil. But when I’m in a hurry, sometimes I just cut off the tall stalks and their seed heads. I always do that with purple loosestrife near my brook, as the roots systems on a mature plant are impossible to pull out. Cutting off the stems helps to prevent the spread of that invasive weed. Don’t put stems with seeds in the compost pile.
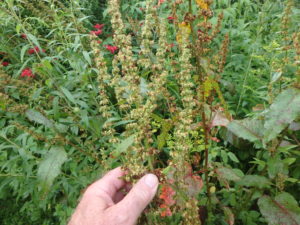
Curled dock is a tall weed that shows up along the edges of my garden
On those days when my list of tasks in the garden seems to get longer, not shorter, I like to pause and remember that gardening is supposed to be fun, not a chore. If I don’t get those weeds pulled today, or my tomatoes pruned, I can do it tomorrow. It’s okay to sit in an Adirondack chair and admire the scenery – even if there are chores to do.
Read Henry’s blog posts at https://dailyuv.com/henryhomeyer. You can get an e-mail alert each time he posts something if you sign up. Henry is the author of 4 gardening books. Reach him at henry.homeyer@comcast.net.
Tips for Building a Stone Retaining Wall
Posted on Tuesday, July 17, 2018 · Leave a Comment
Many years ago, when I was young and foolish, I decided to build an 80-foot long terrace for fruit trees, and to edge it with a nice fieldstone retaining wall using stones I could find on my property or on the nearby property of a friend. It was a lot of work, a lot of fun, and I made a lot of mistakes. That wall still stands 30 years later, but I’ve had to fix it many times.
If you want to build a retaining wall, do your homework! Read up on the process before you start. This article will give you a few basics, but taking a workshop, or working with an expert waller, or reading a book or two will help a lot.
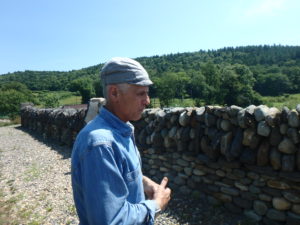
Dan Snow
I recently went to Dummerston, Vermont to talk to master dry stone waller Dan Snow. He is one of the founding members of The Stone Trust on the Scott Farm in Dummerston. Here are a few of his suggestions.
Building a wall that withstands the test of time, it is important to start the wall on a good base that drains well. He recommends digging out a trench and filling it with half- to three quarter-inch diameter crushed stone. This is not gravel, which contains “fines”, meaning sand and clay particles, which is not what you want.
The taller the wall, the deeper the base of crushed stone should be. The general rule he suggested is that the depth of crushed stone should be one half the height of the wall. Building a 3-foot retaining wall? An 18-inch ditch filled with crushed stone is a good start.

Retaining Wall
The exception to the rule of starting with a footing of crushed stone is if you are placing the wall on a heavy clay base. Clay can insinuate itself into the spaces between stones, and clogging the drainage. Sand, however, won’t do that, and can be used as the base. If the wall sits on a base that floods in spring, you may have to install drains to carry away the water.
Dan Snow suggested the 1-2-3 rule for retaining walls. These numbers refer to the proportions of the wall: top width to bottom width to height. A 3-foot tall wall should be roughly 2 feet wide at the base, and one foot wide at the top.
When building any wall, free standing or retaining, it is important to have each course of stone level. And a gentle slope or pitch to the outside of the wall is needed, too. Many wallers use strings and a wooden framework to establish the batter, or pitch of the wall. In general, for every 12 inches of wall height, 2 inches of tip backwards is good.

Free Standing Wall
Another basic principle of building walls, as explained on the website of The Stone Trust (www.thestonetrust.org) is to turn long stones into the wall instead of placing them along the length of the wall. That was a mistake I made many times when building my retaining wall. A nice 30-inch stone placed lengthwise along with wall gives you a nice look, but it is not holding the wall in place the way it would if inserted from front to back in the wall.
Dan Snow also reminded me of the old saying, “Two stones over one, one stone over two.” Which means, never stack similar sized stones over each other. You want each stone to be in contact with more than one stone above and below.
I asked Dan about using landscape fabric behind a retaining wall. I thought that this was a good practice, as it can keep soil from washing into the wall, filling spaces and clogging drainage. If a wall holds water behind it, and it freezes, he explained, the frost can push a wall forward. But Dan is not big on landscape fabric; he would rather just establish very good drainage so that it is not an issue.
Many gardeners who have a hilly site want stone steps to facilitate going up or down hills without slipping on wet grass. We looked at steps at The Stone Trust, and Dan explained the basics: Start at the bottom, and build upwards. Be sure that each subsequent stone sits on the back of the stone below it. The weight of the upper stone will hold the lower stone in place. Finally, be sure that the front of each riser is either vertical, or hangs over any stones supporting it. He said that it is important, when you step down, that your heel not hit a piece of stone that is forward of the lip of the step.
For the past 9 years The Stone Trust has offered classes and multi-day workshops for home gardeners and dry stone wallers to learn the skills needed to work with stone. I wish I had taken a workshop before I ever tried building a wall.
Dan Snow has two excellent books on stone work: Listening to Stone: Hardy Structures, Perilous Follies and Other Tangles with Nature, and In the Company of Stone: The Art of the Stone Wall. Much of what he builds is art or whimsy, and the photos by Peter Mauss are remarkable. Dan’s web site is https://www.dansnowstoneworks.com
Another excellent resource for working with stone is by Gordon Hayward, who is a neighbor and friend of Dan’s, an excellent garden designer, and the author of many fabulous books. His book Stone in the Garden: Inspiring Designs and Practical Projects is full of great photos and very specific, useful advice. I highly recommend it.
Don’t be daunted by stone. Learn to use it well and it will please you every time you go to your garden – even if your walls are not perfect.
You may reach Henry at henry.homeyer@comcast.net or P.O. Box 364, Cornish Flat, NH 03746. He is the author of 4 gardening books, and loves good stone work.
Five Tips for Building a Garden Arbor
Posted on Tuesday, July 10, 2018 · Leave a Comment
When I was a beginning gardener, I just planted vegetables in one place, flowers in another, and never spent 2 minutes thinking about the overall design. I was growing veggies to eat, flowers to admire or to cut and arrange in bouquets. But reading gardening books and and visiting fine gardens made I realize that overall design is important.
One feature of an alluring garden is a dramatic entrance. For the past 20 years or more I‘ve had a series of garden arbors that invite visitors to pass through to see what lies on the other side. I’ve made bentwood arbors of saplings and, more recently, simple Japanese-style arbors of cedar or striped maple (Acer pennsylvanicum).
You can build a nice entrance to your garden, or a garden room, for virtually no cost. If you have a supply of 2-inch diameter hardwood saplings, you can build one for the cost of a few wood screws and a scrap of plywood. But it will only last a couple of years. I built one recently for a wedding using saplings, as it only needed to be perfect for a day.

This cedar arbor supports wisteria and clematis vines and is over 10 years old.
Alternatively you can buy cedar posts and build something that will last for 10 years or more. I’ve done both, and favor the investment in cedar, particularly if you are going to grow perennial woody vines over this arbor/trellis.
The type of cedar posts I’ve used have been made round with some sort of big machine, and have narrower cylindrical tips on each end designed to fit into vertical posts. I cut off the tips, making them about 8 feet long. Unlike rustic cedar posts used for attaching fencing, these have the bark removed, which is good. Bark promotes rot.

Plywood establishes the size and insures the angles are all 90 degrees
Tip #1: Decide on the size you need, and cut a piece of scrap plywood to that size. The plywood guarantees that the finished product will have the vertical posts arranged in a rectangle or square, and not a diamond or a rhombus. If you are making a permanent structure and it is surrounded by lawn, be sure it is wide enough for your lawnmower to pass through, with a little extra space for plants.
Tip #2: Get a post hole digger. This is a dandy 2-handed device that allows you to scoop out soil relatively easily. It makes a 6- or 8-inch diameter hole, which you could not do with a shovel. Dig holes a foot deep to give a nice sturdy feel to your arbor. I put a few small stones (the size of golf balls) in each hole alongside the posts and jam them in with a hand tool.

A post hole digger is a necessary tool for building an arbor
You can build an arbor with 4 or 6 upright posts. For smaller diameter posts (using saplings), I prefer using 6 posts. The more substantial cedar posts only need 4 posts, one on each corner. Something 4 to 5 feet wide and 4 feet from front to back is a nice size.
Tip # 3: You are not building a violin. It is easy to get obsessed with making every post absolutely vertical, and every horizontal precisely level. But, especially for arbors made of saplings, each piece is slightly different. Some have little curves, others have lumps and bumps. Work with a helper so one of you can adjust your posts to look good – standing straight up, with roughly level cross pieces. So long as it looks good to your eye, it is fine.
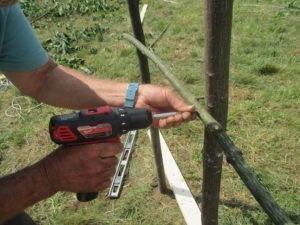
Cordless drill is used for screwing pieces together
Tip #4: Pre-drill where you want to screw 2 pieces together. Borrow a second cordless drill, so you have one with a drill bit, one with a driver bit for Phillips screws. Use screws long enough to go through one piece, and at least an inch into the other. Have a variety of lengths available.
Each side needs 3 horizontal braces that are held in place with screws or lag bolts. Install one a couple of inches below the top, to hold the rafters; one at waist height, say 36 inches off the ground; one 8 to 10 inches off the ground. I usually add a few pieces running vertically from the middle to the lower cross pieces.
If you can’t get smaller-sized cedar posts for the rafters and cross pieces, you can use 2 by 2 inch rough-sawn lumber, either cedar or hemlock. Once vines are growing on them, you will never notice that they’re not round. The alternative, using maple branches, looks great, but the wood will fall apart in a much shorter time, probably 3 years.
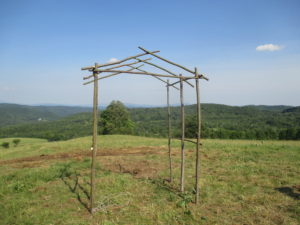
A low angle for the roof line is good
Tip # 5: To build the top, where I have 3 pairs of rafters, join 2 rafters together with an 8-inch overlap. Hold 2 pieces in place to see how long your rafters need to be. Then screw through the two pieces 8 inches from the top. With a helper on one side and you on the other, hold the rafters in place. I like a “tail” that hangs over the top cross piece- anywhere from 8 to 16 inches. Then screw down through the rafter on one side, measure the tail to be the same on the other, and screw it down. I like a nice low “roof angle” for a Japanese look.
This all may sound difficult, but it really isn’t, and it will please you for years to come. If you build one, please send me a photo. Depending on your skills, you can build an arbor like this in a day – or perhaps a weekend.
Two workers certainly make sense, though I have built one by myself. I love building things, and this type of arbor is elegant and pleasing to the eye.
You may reach Henry at henry.homeyer@comcast.net or P.O. Box 364, Cornish Flat, NH 03746. He is the author of 4 gardening books and is happy to coach new and experienced gardeners.
Three Trees You May Have, But Probably Shouldn’t
Posted on Tuesday, July 3, 2018 · Leave a Comment
Tree-huggers to the contrary, not all trees are good. Yes, they all take carbon dioxide out of the atmosphere, reducing global warming. Yes, they provide shade, keeping us cooler during hot stretches in summer. Most trees are great.
But some are invasive, crowding out others and sucking up water and nutrients other plants need to survive. Some have no chance to live to maturity because of pests or disease – so you eventually have to have them removed. Others are weak-wooded and attract insect pests that plague us. Let’s look at three culprits.
A maroon-colored variety of Norway maple (Acer platanoides) known as ‘Crimson King’ was introduced from Belgium in 1948, largely to replace the elms that were dying from Dutch elm disease. It will grow in sun or shade, wet or dry in almost any kind of soil. It is big, fast-growing tree that can grow 2 feet per year. Sounds good.
Here’s the problem: Norway maples produce large numbers of seedlings and can out-compete our native maples and most other trees. They have wide-ranging and aggressive root systems that can suck the water and nutrients out of the soil far beyond their canopy. And they can shade out native species with their broad-reaching branches and large leaves.
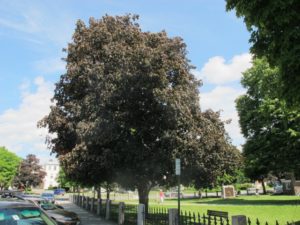
Crimson King Norway maple
Crimson King is a hybrid, and the numerous seedlings it produces are mostly green-leaved – which means that most gardeners just assume that the maple seedlings they see in their woods are native maples, even if there is a Crimson King on the property, or at a neighbor’s house. In general, Norway maple leaves are broader and larger than those of sugar maples.
There is a simple way to test a maple to see if it is a Norway: snap off a leaf and look at the base of the petiole (leaf stem). If it oozes white sap, it’s a Norway maple.
For most of the 20th century the American elm was the most prominent street tree in the United States. It was tall, tough and stately. But Dutch elm disease, which ironically is not from Holland but Asia, was first identified here in 1921. By the end of the century most elms were dead, infected or dying.
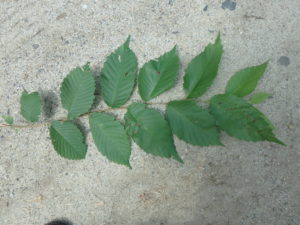
Branch of an elm with lots of leaves
Elms continue to pop up everywhere. Learn to identify their toothed leaves with prominent ribs, and their rough bark. You may as well pull them out or cut them down when they are small. They will not survive, succumbing at the age of 25 or 30 years – big enough that only the most intrepid of chainsaw-wielding gardeners will want to remove them. It’s “Call the tree guy!” for most elm removals.
There are hybrid elms and “resistant” elms that are said to survive despite the prevalence of the disease. I have seen some, and interviewed a home owner who had one – for a while. My thought? The replacements are not nearly so stately as the originals, and not worth the investment.
Boxelder (Acer negundo) is another “No!” on my list of trees. It is weak-wooded, meaning that branches break easily in storms. It produces hundreds of seedlings each year, and they pop up everywhere.
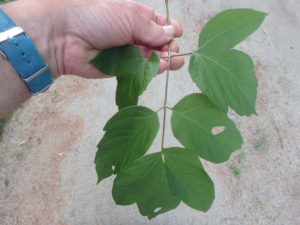
One boxelder leaf with 5 leaflets
It is in the maple family, but the leaves don’t look much like the common maples we know. The leaves are composed of 3 to 9 leaflets, mostly commonly long and light green. My favorite tree expert, Michael Dirr, writes it may “appear as an unkempt shrub, a gaunt tree, or a biological fright.” I agree. But he notes that it will grow in places where nothing else wants to grow.
The worst part of having boxelders is the Eastern Boxelder Bug (Boisea trivittata), which are attracted by boxelders. These half-inch long bugs are dark brown to black with red or orange decorations. The nymphs are all red.
In some places thousands of these pests climb all over the outside of houses, even crawling inside to spend the winter. They can emit a nasty odor if provoked, and may leave stains and smells behind. Birds leave them alone, given their nasty smells. They mainly subsist on seeds of boxelder, maple and ash, but suck juices out of the leaves, most notably maples. They don’t seem to take enough to damage the plants. The nymphs are currently all over many kinds of plant leaves, and seem to be feeding on them.
I’ve read on-line that making a solution of 1 to 2 tablespoons of dish soap in a quart spray bottle will make an effective boxelder bug killer. I’ve never had the problem, so haven’t tried it.
So how can one get rid of these less desirable trees? Learn to recognize them and uproot them when they are small. I have elm suckers that have been coming up from a stump of a tree I cut down more than 10 years ago. I need to keep it from producing green leaves as they are the source of energy that feeds the roots and starts new shoots. But it’s never at the top of the list of things to do in the garden … so the weed tree wins!
Read Henry’s blog at https://dailyuv.com/henryhomeyer. E-mail him at henry.homeyer@comcast.net. Henry is the author of 4 gardening books.
How to Have a Better Lawn
Posted on Tuesday, June 26, 2018 · Leave a Comment
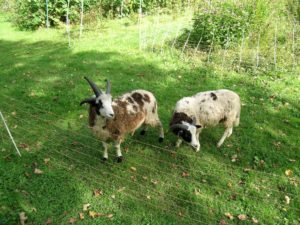
Sheep as Lawnmowers
Believe it or not, I once ate my lawnmower. No, not the Briggs and Stratton kind. I had purchased a pair of Jacobs sheep to keep my lawn trim for a season. At the end of the season they were off to the butcher, and came home freezer wrapped. It was an interesting experience, but not one I would recommend.
These rascals didn’t do an even job of cutting the lawn, and loved to butt me when I entered their pen.
To keep sheep as lawnmowers, I used a portable electric fence. It worked, but the sheep were always looking for trouble – they were teenage boy sheep, after all. They tried to (and did) reach through the fence to eat my flowers, get out of their enclosure, and trick me into thinking they were not interested in my trees and shrubs – only to attack them when I least expected it.
What is it with our fascination with lawns? Historically, lawns were maintained largely by the landed gentry. Peasants had neither the time nor the land for cultivating lawns. Maybe we all, deep down, want to be part of the nobility. But I think we like lawns because they promote tranquility and they are, with the advent of mowers, the easiest part of our landscape to maintain.
I am a minimalist when it comes to lawns. I don’t want a chemical-dependent lawn to fuss over. No fertilizers, fungicides, insecticides or moss killers for me. That said, there are things you can do to improve your lawn without too much trouble, and I think I have tried them all.
Over-seeding is one way to help your lawn. If you have places where the lawn is thin, first put down half an inch of fine compost or top soil. You will have to purchase this, I suspect, as homemade compost usually contains lumps like egg shells and undigested orange peels. Many garden centers have nice compost for sale by the tractor scoop ready for your pick-up truck, and all have bagged compost.
Fling compost over the lawn with a shovel, and spread it out with a lawn rake. Then apply lawn seed, and drag the lawn rake over the seed and compost – with the rake tines up, not down. The tines will mix the seeds and compost or soil.Where you have shady lawn, buy lawn seed for shady places.
Watering is key. Seeds need moisture to germinate, and a hot sunny day will dry out seeds quickly. Some people like to spread a thin layer of straw over the seeded area to shade the seeds and minimize drying. At this time of year it will take about a week for grass to start growing (but much longer in the spring when the soil is cold.) Water every day unless it rains. I generally plant when 3 days of rainy weather is forecast.
What about fertilizer? Most states prohibit using phosphorous-containing fertilizers on lawns (to protect streams and ponds). ) On a bag of 5-10-5 fertilizer, for example, it’s the middle number (10). There are now special fertilizers for lawns, but if you are adding compost, it will help provide adequate nutrition for your lawn.
Grass grows best when the soil is around neutral.
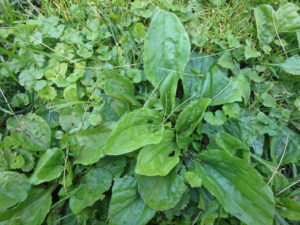
Plaintain has broad leaves and is common in lawns
For about $5 you can buy a soil pH test kit to see if yours is in the range of 6.0 to 7.0, which is ideal. The kits are easy to use: put some soil into a glass vial, add their magic powder, then add water. Shake, and the water will change color. You just decide which of the pictures on the kit best matches the color of your solution. They say to use distilled water, as it won’t affect the results. It’s available at the pharmacy.
If your soil is acidic (technically below 7.0), you may want to add some limestone to the lawn. But don’t bother unless the soil is quite acidic, say in the 4.5 to 5.9 range. Read the directions on the bag, and add the appropriate amount. I just use a can and sprinkle it over small areas.
Height of the grass is important to a lawn, too. I once got to interview Joe Mooney, the head groundskeeper at Fenway Park, home of my beloved Red Sox. He maintained the infield at a height of three quarters of an inch! Lawn that short stresses the plants, so he also had a dungeon under the stands full of chemical fertilizers and fungicides.
The longer you keep the lawn, the more food a grass plant can make, so the healthier it will be. Cutting grass at three inches is good. Yes, shorter looks neater, perhaps, but taller grass will also help shade out annual weeds and crabgrass.
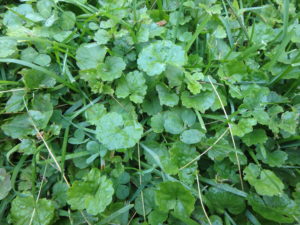
Creeping Charlie is a pest but not awful
What about those weeds? Does it really matter that you have some? People write to me all the time complaining about Creeping Charlie (Glechoma hederacea) in their lawns. Charlie is like death and taxes, you can’t avoid him without killing everything else, including your lawn grasses. So ignore Creeping Charlie. I also ignore plantain, dandelions and other weeds.
Accept weeds, and your blood pressure will go down, and your summer will be better. “If it is green and I can mow it, it’s a lawn.” That’s my motto. The only weeds I dig out are thistles, as they hurt bare feet! Chemicals? I don’t want my grandkids and pets absorbing them as they walk barefoot across the lawn.
Read Henry’s blog athttps://dailyuv.com/henryhomeyer. Signup and you will get an e-mail with a link to it each time he posts.
Thinning, Weeding and Watering Made Easy
Posted on Tuesday, June 19, 2018 · Leave a Comment
With the advent of summer, it is time to buckle down and get a few tedious jobs done in the garden. But there are ways to lighten your load.
First, it is time to thin out extra plants that are crowding each other. Carrots and beets are two common culprits of crowding, and if you want sizable root crops, you need to thin them.
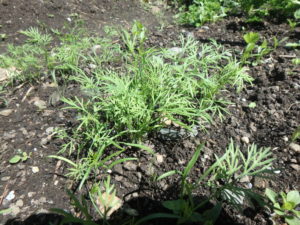
These small carrots need thinning
Carrot seeds are tiny, so we don’t often plant them one-by-one. Instead we tend to sprinkle them and –by gum- most of them grow. I maintain that thinning carrots needs to happen by the Fourth of July, so get to work. If they are real close together, you may want to use scissors to cut off the extras at the soil line to avoid pulling up carrots you are trying to save.
One way to minimize the need to thin carrots is to buy pelleted seeds next time. These are seeds that come coated with a thin layer of clay. Each is the size of a BB and can be individually planted. Plant them an inch apart and you can skip the July 4th job. As they get bigger, you can eat the carrots you thin, giving them a 2-inch spacing by mid-summer.
Beet seeds are large and easy to plant. So why are there clumps of beets that need to be thinned out? It’s not that you forgot your reading glasses when planting. The answer is that those “seeds” are not really seeds. They are clusters of seeds wrapped in a package like an apple, or a pear. Johnny’s Selected Seed Company, and a few others sell ‘Moneta’ beet seeds, which have just one embryo per seed. Those, if you space them well at planting time, need not be thinned.
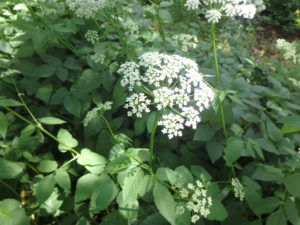
Cutting off goutweed blossoms prevents seed formation
I like to be efficient at whatever I do, and that includes keeping a relatively weed-free garden. Many weeds quickly mature, flower, and produce seeds. Your job is to keep them from producing seeds. Right now goutweed – my nemesis – is blooming in various pockets around my garden, and I don’t have time to dig it all out. But I have a 16-year old helper who uses scissors to cut off all the flowers and bag them. We send them to the dump in black plastic bags.
Other weed control methods? Keep weeds from getting the sunlight they need to grow. You can do this by mulching. In the vegetable garden I spread out newspapers over the soil and cover them with straw, hay or leaves. Four to six pages of newspaper keeps out light, inhibiting weeds. Earthworms eat the paper over the summer, and newsprint is done with soy-based inks, so you are not adding heavy metals to your soil (which was the case years ago).
This method works well on walkways and around big plants, but is more problematical for onions and carrots which are small and closer together. I use grass clippings or chopped leaves, without the newspaper, around small plants.
Mulching tomatoes with newspaper and straw
Mulching in the flower garden is good, too. It keeps down weeds and holds in moisture. But beware: too much mulch can keep rain from reaching the roots of your perennials. An inch or two of ground bark helps a lot, but 3 or 4 inches will keep light showers from getting to the soil.
Some gardeners use landscape fabric under bark mulch, but I do not. I find pernicious weeds eventually send roots through the fabric and this makes weeding very difficult. Landscape fabric can also constrict perennials as they expand over time, choking them.
What about plain old black plastic? I don’t use it. Sunshine breaks it down over time, and makes a mess. It also keeps air and water from getting to the soil, which must affect soil microorganisms. But it will keep weeds down in a pumpkin patch for a single season. Still, the plastic ends up in the waste stream, which I want to avoid.
If we have a dry summer, you may need to water. Established perennials should not need added water, but your vegetable garden might. I don’t favor overhead sprinklers because they water everything: plants, walkways and weeds. I prefer a watering wand, which is a device I attach to my hose. It is a 30 inch aluminum wand with a sprinkler head and a valve. I can direct the water exactly where I want it. I like a brand called Dramm because the sprinkler head allows fast, gentle watering.
Watering cans are good, too. They allow you to see just how much water you are applying. This is important for new trees, which need 5 gallons a week or so. A sprinkler hose might seem like it is delivering a lot of water, but may not be.
A good timer will deliver water while you are away on vacation. They attach to your spigot and allow you to use an overhead sprinkler or a soaker hose. I have a soaker hose I like made by Water Right and available from Gardeners Supply Company (www.gardeners.com). It’s a round polyurethane hose, and much easier to use than the old fashioned flat ones I had tried previously.
So don’t let your garden dictate your vacation schedule. With mulch and a watering system you can come back from vacation with nothing worse than a lawn that needs cutting!
You may reach Henry at henry.homeyer@comcast.net or P.O. Box 364, Cornish Flat, NH 03746. Please include a SASE if you wish a reply by mail. Read Henry’s blog at https://dailyuv.com/gardeningguy


 Click Here to buy from Cobrahead