Cold Frames and Hot Boxes
Posted on Thursday, May 4, 2017 · Leave a Comment
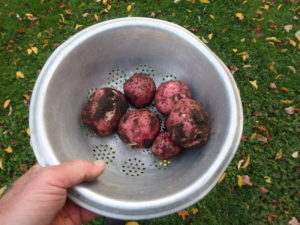
I’m ready for spring. I’m ready to start growing – and eating – fresh veggies. Most years I wait until the soil warms up, but this year I planted lettuce, cabbage and spinach in April. I did it in a cold frame, and so far my plants are doing fine – despite some nights in the thirties.

A cold frame heats up nicely on a sunny day.
A cold frame is a simple box with a clear slanted top that allow sunshine to come in and warm the soil and plants. The clear top on mine consists of two plexiglass panels on hinges that allow me to open the box on hot sunny days. You can build your own or buy one – mine came from Gardeners Supply (www.gardeners.com) and I was able to assemble it in less than an hour.
My cold frame is eight feet long and two feet wide. The opening lids are lightweight and easy to open. My grandfather had one and he used old wood and glass storm windows. They worked fine, but the glass was susceptible to breakage.
A cold frame should face south or east for maximum solar gain. The cedar panel at the front of mine is 8 inches tall, the back is 15 inches tall. That allows morning sun to get in through the slanted top.
Seeds are designed by Mother Nature to succeed. That means they have safeguards against starting to grow during the January thaw or too early in the spring. Pumpkin seeds in the compost pile, for example, seem to “know” that they shouldn’t start growing until after the danger of frost has passed. They know this because they have a temperature “switch” that prevents germination until the soil warms up so much that frost is unlikely.
So one of the things a cold frame does is warm up the soil. Prior to planting I kept the lids of mine closed, even on hot, sunny days. It is easy to get the air temperature up in the nineties. Once my seeds started growing, I open the lids to allow air to circulate and the temperatures to moderate.
I keep a thermometer in my cold frame that sends a radio signal to a device I keep on the kitchen counter that tells me the current temperature. If I see the temperature approaching 90 degrees, I open the lids. It’s possible to cook tender seedlings if it gets too hot.
Plants grow through series of complex chemical reactions involving energy from the sun, carbon dioxide, oxygen and water. In school you learned that this is called photosynthesis. Other reactions combine amino acids and soil minerals to build proteins and complex carbohydrates.
All these reactions are accelerated by increasing the temperature. Think of a box of tennis balls. The harder you shake the box, the more often they bump into each other. Likewise, warming up molecules makes them move faster and react more quickly – allowing a plant to grow faster.
On a cool, cloudy day my cold frame will heat up 10 or 15 degrees above the ambient temperature outside it. On a chilly night at 40, the temperature inside the box will be close to the temperature outside by morning. If I were to leave the cold frame closed up on a sunny day, it might get 30 or more degrees warmer inside.
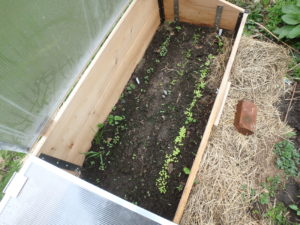
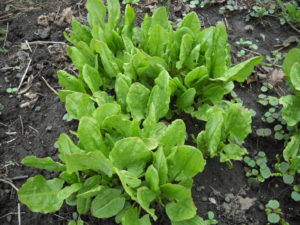
Lettuce and cabbage seedlings are growing well in my cold frame.
One of the uses of my cold frame is as a place to start seeds. My cabbage is up and growing inside mine, but I will move most of them outside before they get too large. Cabbage is relatively cold hardy, even surviving frost. But they need to be 12 to 18 inches apart as they mature. I sprinkled seed in a row inside the box and will thin them to 2 to 3 inches apart now. When they are 2 to 3 inches tall I will move all but one or two outside the box. I’ll have plenty – enough to give some away.
Another protection against cold nights is a layer of Reemay or row cover placed over the seedlings. Reemay and Agribon are trade names of agricultural cloth that breathes and allows sun and moisture to pass through. They can prevent frost from forming on plants down to temperatures of 25 or so – inside the box. It can also be used to keep striped cucumber beetles or other pests off plants.
Last year, my first with this cold frame, used it as a “hot box.” I dug a pit 18 inches deep the size of my cold frame and put a 12-inch layer of fermenting horse manure in the bottom. Then I placed a 6-inch layer of top soil. As the manure fermented it generated heat, warming the soil and keeping the cold frame warm, even on cold nights.
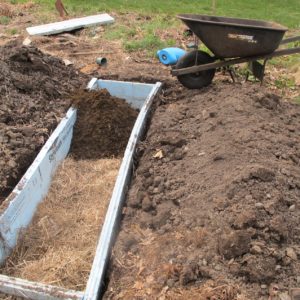
A hot box generates its heat from fermenting horse manure.
I also lined the hot box pit with 2-inch thick pieces of Styrofoam insulation. That keep the cold soil from cooling down the manure so much that it stops fermenting. That happened to me decade ago with an earlier version, and I had to dig out the manure and start over. It is important to get horse manure that is from a pile that is already hot and fermenting. Too much sawdust or straw will inhibit fermenting.
So I go about my garden, looking for ways to grow things. In another month, I’ll be nibbling on lettuce and other greens. Anything that helps accelerate the process is good!
Read Henry’s twice-weekly blog and see lots of photos at https://dailyuv.com/gardeningguy You can reach Henry at henry.homeyer@comcast.net or at PO Box 364, Cornish Flat, NH 03746.
A Taste of Spring!
Posted on Monday, April 24, 2017 · Leave a Comment
I’m already eating a few of my own fresh vegetables: ramps, dandelion greens and sorrel are ready, and soon will come those perennial delicacies, asparagus and rhubarb.
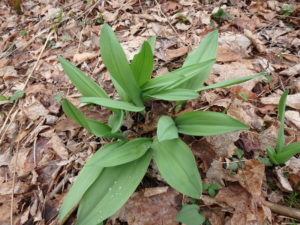
Ramps are up and ready to harvest
It took me nearly 10 years, but I now have a patch of ramps that produces enough of these wild members of the onion family that I don’t have to go hiking to dig up the ramps I need. I sauté both the bulb and the leaves, and find them a great spring treat in eggs or a stir fry.
Ramps are often found in areas with moist soil and filtered sun and shade. They are slow-growing, but I have added 50 or so plants most years for 10 years and the older clumps are ready for harvesting.
Ramps often are found in patches of a million or more, but that does not mean you can be careless about harvesting them – a patch that sizes takes a lifetime or more to develop. Dig a few in one spot, move to another – and never take all from any one location. If I dig out 25 from one spot, I am sure to leave half a dozen in the ground.
If you want to start your own patch, first learn to identify the plant. They have leaves that are 6 to 12 inches long and 1 to 3 inches wide with a pointy end. There is a groove down the middle of the leaf, and the lower stem may have some maroon coloring. And the scent is distinct, similar to garlic and leeks. The bulbs are half an inch wide or so, and two inches long or less, depending when you pull them. There is an outer sheath over the bulb which you should slide off when you cut off the roots.
To grow your own, carefully observe where you find them in the wild. Look at the trees: often maples and beech, sometimes ash or poplar form the canopy. Wildflowers that grow along with ramps include spring beauty, Dutchman’s breeches and trout lily.
The soil for growing ramps should be rich and dark. If you want some near the house and kitchen, dig some up and try to match the environment where you find them in the wild. Be sure to ask the landowner if you want to take some from a neighbor. These are spring ephemerals, so the leaves will die and disappear before mid-summer.
I know that many gardeners think of dandelions as pests, and they can be. But they are also tasty if you dig some before they bloom; after blooming they tend to get bitter.
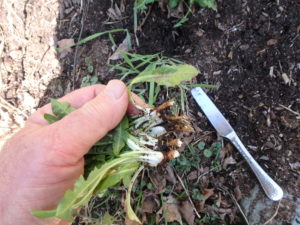
A kitchen knife is good for slicing dandelions
To harvest dandelions, bring a table knife with you to a patch of lawn or garden that has not been treated with chemicals – no herbicides, no chemical fertilizers, no pesticides. Slice the roots an inch beneath the soil surface and lift the dandelion carefully as you don’t want to sprinkle any soil onto the greens. The white portion just beneath the soil is delicious, but you can toss the brown-skinned tap root.
I wash the dandelions with the sprayer in my kitchen sink, and then leave the roots in a bowl of water to loosen any more soil. Then I return and rinse them after soaking. I like to steam them lightly, then serve with cider vinegar or a little butter. Although I eat them the same day I pick them, my late friend Rev Wightman used to freeze them and eat them throughout the year.
Sorrel is a perennial green with a lemony flavor
Sorrel is a great favorite of French cooks who make a soup with it. Although I grow it, I am not wild about it. It is a bright leafy green that comes back, year after year. It has a sharp lemony flavor, a bit like wood sorrel. My problem with it is that when you cook it, it practically disappears. It has little substance. But it’s easy to grow, and adds a unique flavor if added to a salad or even a sandwich. Plants are often sold at garden centers in the herb section.
My rhubarb is up! I love rhubarb for its sharp flavor, one that I have been told is among the last to disappear for the elderly when they lose their ability to sense flavors.
Rhubarb is easy to grow. It does best in full sun with rich moist soil. I have grown it in dry soil and although it grows in dry places, it is not as vigorous. It has a deep fleshy root. If you have a friend with a rhubarb patch, it is easy to dig some out and bring it home. Just plunge a spade into the middle of a plant, and then around it, and lift out a section of root. Add plenty of compost and organic fertilizer to the soil when you plant it.
Rhubarb comes in green-stemmed and red-stemmed varieties. I like the red, though I doubt there is a difference in taste. The leaves are a little toxic – they contain oxalic acid – but are not going to kill you if you eat some.
For a spring drink, chop a pound of stems, add water, and boil until soft. Drain off the mush, add some sugar and more water for a tasty pink drink that has got to be healthier for you than soda!
Eating seasonally is good for you – and I like having treats now that I only get once a year. Soon fiddleheads will be up – but more on that another day.
Henry’s blog appears twice a week at https://dailyuv.com/gardeningguy His e-mail is henry.homeyer@comcast.net
How to Prune Your Blueberries
Posted on Monday, April 17, 2017 · Leave a Comment
I recently spent half a day helping a friend prune her blueberries. Some rows hadn’t been tended too in a couple of years or more, and had gotten very bushy and overgrown. It is very satisfying work, knowing that bushes will produce better and be easier to pick once they have been pruned.
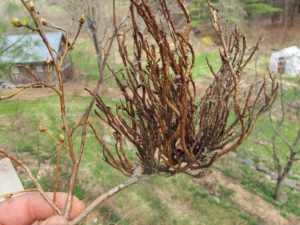
Witches brooms should be removed and destroyed
The first thing I did was cut out branches that had flopped over and were spread out in the walkways. It is important for both pickers and mowers to be able to go up and down the rows easily. I didn’t just cut off the ends of the intruding branches, I cut them back to their points of origin near the center of the bushes, just above the soil line. To do that, I used some nice geared loppers made by Fiskars to cut back the thick stems that were in the way. These geared loppers are 32 inches long and have a mechanical advantage built in which facilitates cutting stems up to an inch and a half without straining. The long handles meant I didn’t have to crawl into the bush to get to the base of a stem.
One note about spacing of blueberry bushes: gardeners often try to pack as many plants into a space as possible. Don’t. Crowding blueberries makes working in them more difficult. Space rows 10 feet apart at planting time. That might seem excessive, but it will be a big help later. The minimum space between plants should be 6 feet, and 8 feet is even better.
After clearing out walking space, I went down the rows with my hand pruners. I removed all dead branches. These have no fruit buds and are gray and flakey. Follow the branch back to its point of origin and cut back there. Some branches that appear dead have live side branches on them that you may want to keep.

Leaf buds are smaller and pointy
It’s important to be able to quickly differentiate between fruit buds and leaf buds. A fruit bud is fat and somewhat round. A leaf bud is smaller, and is narrow and pointy. A branch that is dominated by leaf buds is less valuable to you than one that has lots of fruit buds, though the fruit buds also produce leaves – and a cluster of berries. If you see no fruit buds on a stem, prune it out.
What else? When deciding between two competing branches, remove the older, less vigorous branch and leave younger stems, which on blueberries often have a green or reddish color. Prune away branches that are damaged or rubbing against another branch. In general, branches should be grow out, away from the center of the bush. Branches that aim into the middle will eventually cause problems.
Blueberries sometimes develop a viral infection that causes “witches brooms.” These are masses of fine twigs growing on one branch. Remove the entire thing and put it in the trash, or burn it.

Fruit buds are round and plump
Blueberries really are easy to grow. They need full sun, which means a minimum of six hours per day. But most importantly, they need very acidic soil. Now would be a good time to collect a soil sample and send it off for testing at your state Cooperative Extension laboratory. You can download the form on-line, just Google “soil testing” and your state.
If your soil is not acidic enough, you can add elemental sulfur. This is fine for organic gardeners, too, as it is mined from the earth, not manufactured in a chemical plant. You can add sulfur anytime, just follow the directions on the package. If you use an acidic fertilizer described as good for acid-loving plants, spread that right after the bushes bloom in June.
Changing the soil pH may take you a number of years. It is better to add some this year, and again next year (and in later years) than to dump too much on at once. Your ultimate goal is a pH in the range of 4.0 to 5.0. The scale is logarithmic, meaning that 4.0 is ten times more acidic than 5.0, and a hundred times more acidic than 6.0. Seven on the scale is neutral.
Many gardeners dread pruning, perhaps because they imagine cutting off branches as like removing limbs of a person or animal. Pruning is not. It’s more like getting a haircut. It is an essential part of maintaining a good-looking, productive plant. There is no deadline for when you must stop pruning, though the later you wait, the more buds will fall off as you work on the bushes – so get started soon!
Get used to pruning, and you will have more and better fruit. And for me, spending time outdoors in early spring is much more fun than being indoors on a computer.
Henry Homeyer is the author of four gardening books and a children’s chapter book, Wobar. Check out his website at https://gardening-guy.com.
Planting for the Unique Umami Flavor
Posted on Monday, April 10, 2017 · Leave a Comment
Umami is the fifth flavor we humans can detect, along with sweet, sour, bitter and salty. It is much more difficult to describe or quantify than the 4 standard flavors because we haven’t been raised to recognize it. I call it the flavor of contentment. The Japanese translate it, roughly, as “deliciousness.”
 Scientists have determined that there are receptors in our taste buds that are stimulated by umami, just as there are for salty or sweet. They send signals to our brain that says, “Oh boy, something really good is here!” The orbitofrontal cortex (right above the eyes) registers a highly pleasant sensation. Yum, it says.
The umami flavor is created when certain amino acids that contribute to protein formation are present, notably glutamate, inosinate and guanylate. Seaweeds are highest in these components, but seafood, meats and certain vegetables contain them, too. Oh, and it is found in breast milk. Maybe that’s why we like it.
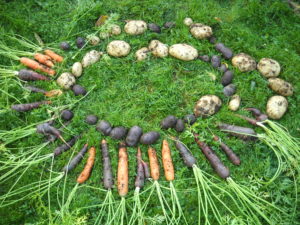
So what vegetables contain natural glutamate? Ripe tomatoes are highest of ordinary vegetables, which does not surprise me at all. Actually, dried tomatoes are even better because most of the water is gone. What else? Garlic, green peas and corn are excellent, as are beans, potatoes and carrots. Does that sound like a list of comfort foods? It does to me.
Mushrooms and fermented foods like soy sauce are good umami producers, as is cheese. Parmigiano-Reggiano cheese is particularly high, but cheddar is good, too.
If you want the highest level of flavor in your foods, grow it yourself. Pick your tomatoes dead ripe. That’s when the levels of umami-producing amino acids are at their highest.
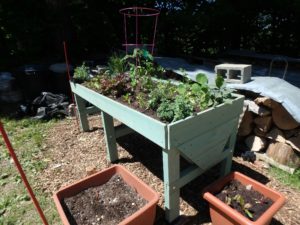
VegTrug with self-watering containers
Busy people say they have no time for a vegetable garden. Perhaps. But if you know that you can grow food that is super tasty, maybe you’d find some time. Here are 5 ways to get your umami-rich foods without dedicating your life to them.
- Get a big self-watering pot and plant one “patio tomato” in it. This pot should be roughly the size of a 5-gallon pail and have a water reservoir so it won’t dry out if you forget to water for a few days. Or go to the beach for the weekend. Fill it with a 50-50 mix of compost and potting soil. Put it in full sun in the middle of your lawn or along the driveway.
- Shiitake mushrooms are very high in umami. I have inoculated hardwood logs with spore plugs that eventually produce shiitakes. But it’s sort of like fishing, you never know when your logs will produce, or for how many years. But now companies are producing mushroom kits that come ready to go. Most of those are one-time kits that produce just one flush of mushrooms, but they’re easy.
- Potatoes are some of the easiest veggies to grow, and are good umami producers. If you want to tear up a 10-foot by 12-foot patch of lawn, you can become potato self-sufficient – for a year! You can build wide raised beds with a walkway down the middle and a little free space around the edges. Plant seed potatoes 18 inches apart and you can grow a lot of food.
- Then there is the Veg Trug. I had one last summer and loved it. About 6 feet long and 2.5 feet wide, it is a nice cedar planting trough on legs that is V-shaped in cross-section, so it is deep enough for tomatoes or potatoes. And you don’t have to bend over to pull weeds or harvest herbs. I grew lots of lettuce, herbs and one tomato. I got mine from Gardener’s Supply (gardeners.com or 888-833-1412).
- Visit your local farm stand, farmers market or, better yet, sign up now for a CSA. You don’t actually have to grow your own food just to get fresh produce at the peak of its flavor and ripeness.
Fresh potatoes from one plant
The fact that we have receptors that are just for umami tells me that umami is something that is good for us. After all, our mouth also tells us when something is not good for us. We have evolved to recognize foods that are healthy. We respond well to sweets and fats because eons ago we needed calories to stay alive. Now, of course, we need to stay away from too much of those.
All this says you could and should grow your own food, and then cook it from scratch. I have written more than once that “Tomatoes are the queen of the garden.” In August I eat ripe tomatoes for breakfast, lunch and dinner. Why? I guess all this time I thought it was free will. Now I know it is an addiction to – or an affinity for – umami. Now is the time to plan your garden for the summer.
Read my twice-weekly blog at https://dailyuv.com/gardeningguy You may e-mail me at henry.homeyer@comcast.net.
How to Make a Spring Wreath
Posted on Monday, April 3, 2017 · Leave a Comment
Mud season for many gardeners is bleak. Raw days of gray and rain mean it’s not fun to spend time outdoors, so we wither on the vine. Thankfully, I start lots of seedlings indoors, and early April is the right time to start most vegetables and flowers. But even that doesn’t keep me very busy – and I tend to get squirrelly.
I recently went outside to harvest materials for making a spring wreath, and then made one on the kitchen counter. It perked up my spirits considerably, so I am sharing my technique here – along with some tips about growing what you need for making spring wreathes in years to come.
Here is what you need: several lengths of freshly cut grape vines, each piece 5 to 15 feet long and a quarter to a half an inch in diameter; 25 stems of pussy willows, 25 stems of red-twigged dogwood, and a dozen or so stems of alder with fresh catkins. The stems are all found in moist places alongside the road, or at the edge of a stream or swamp.
Wild grapes are a pest vine for many of us, climbing up trees and strangling them, so pulling some down and using them for a wreath is a good thing to do. Of course this is the time to prune eating and wine grapes, and you may be able to gather enough vines on your domestic plants to make a wreath base.
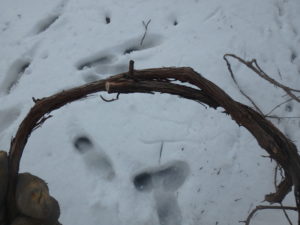
Starting a wreath
I went to the woods and cut a 15-foot length of grapevine that was about as thick around as my ring finger. It is important to use living, not dead, vines; the one I cut was a greenish white inside and flexible, so I knew it was alive when I cut it. Dead vines are brittle and not suitable.
To make the wreath form a vine circle 14 to 16 inches in diameter by overlapping (or twisting) one half of the vine over the other half – the same way you would start to tie your shoelaces. Then grasp one of the loose ends and weave it around the vine circle in loops, over and under, pulling it tight as you go. After each piece of vine is in place squeeze the circle to make it regular in shape.
When you run out of vine, tuck the end into the circle and repeat the maneuver with the other end of the vine. Then use shorter, thinner pieces of vine – say 6 to 8 feet long and pencil-thick – and weave them around the wreath base until you have a circle 2 inches or more thick. It’s hard to make a nice round circle of vine, and mine was a little lopsided.
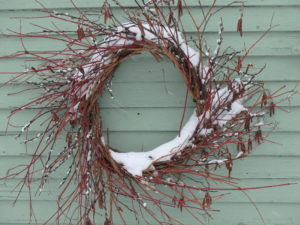
Spring wreath with spring snow
The great thing about this grapevine wreath is that you can just slide stems of pussy willows in between the vines and natural tension will hold them in place. In fact, I had to use a screwdriver to lift the vines at times in order to slide the stems in place.
I went around first with pussy willows stems, poking them into the grape vine base every 4 inches of so. Then I added stems of alders with their nice catkins, and finally I slid in clusters of the red-twigged dogwoods. I hung the wreath up where I could work on it and was better able to see where there were spaces that needed twigs, and added a few more.
A few notes on growing these plants. Pussy willows love to grow in wet places and require no care. You can start them as soon as the ground thaws and the bushes leaf out. Just cut 12-inch branches, strip off the leaves, and push them 8 inches into the soil. They will root where there are leaf nodes.
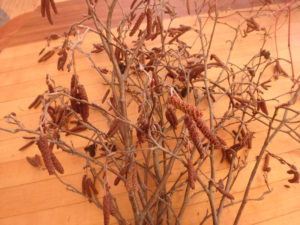
Alders with catkins
In addition to growing in the wild, red-twigged dogwood is a nice landscape plant available at any garden center. Stems can grow up to 3 feet in a year, and some gardeners cut the plant right to the ground each spring (once it is a few years old and has well established root systems.) They do that as the stems are most brilliantly colored in their first year of growth. Or you can remove a third of the stems each year, which is what I do.
Alders? They grow wild by my stream and I have to admit I have never seen plants for sale. They are messy plants that tend to flop over and root in. But they are nitrogen-fixing shrubs that will improve the soil in wastelands or alongside the road. I imagine you can root them in the spring just like willows. But they’re not for urban gardeners or small lots.
My wreath is not a professional job, but it pleases me every time I see it. That’s important in mudseason. And after I made mine, we got another foot of snow! March went out like a lion here where I live.
Read Henry’s twice a week blog at www.dailyUV.com. His e-mail is henry.homeyer@comcast.net and you may reach him at PO Box 364, Cornish Flat, NH 03746. Henry’s personal website is www.Gardening-Guy.com.
Books by Sydney Eddison
Posted on Monday, March 27, 2017 · Leave a Comment
Photos: K Day Designs

Sydney & Phoebe
I’m a fairly simple person. I like dogs and flowers and good food. Having friends is important. I like to grow vegetables from seed, and I revere trees that have survived longer than I have. And when it comes to poetry, I like it simple and direct, poetry that evokes images of nature and emotions I can understand. So it was a great pleasure when my friend the garden writer Sydney Eddison sent me her new book of poetry, Fragments of Time: Poems of gratitude for everyday miracles (Pomperaug Valley Press, 2016).
Fragments of Time is a lovely book of poems, many that focus on Ms. Eddison’s gardens and her love for the outdoors. But a few are love poems about her late husband, one is a sad reminder of the Newtown School shooting which occurred in her town. Others are happy memories of children, dogs, squirrels and seasons changing. These are poems I have enjoyed reading out loud to loved ones.
You might relate to this fragment of a poem:
Dandelions, bold and unapologetic,
seize empty spaces between perennials
and drive down taproots.
The lines are drawn.
Let the battle begin!
I know Sydney Eddison best as a gardener and garden writer. I first visited her in 2000 after I read her book, The Self-Taught Gardener: Lessons from a Country Garden (Viking/Penguin, 1997) and knew she was someone I wanted to meet. The book taught me much – even though I was at the time already writing a gardening column and considered myself a fairly accomplished gardener.
Thumbing through it now, I see I can learn from it even now – and should re-read it. For example, she points out that most silver-leafed plants do best in dry soil. I never thought of it that way.
Eddison garden.
When I first visited Sydney in her garden in Connecticut it was in the middle of a ferocious drought. There was a ban on watering plants and washing cars, and had been for six weeks. Yet the soil in her flower beds was fluffy and lightly moist. Oaks in the woods were showing signs of stress, but her gardens were not. Had she been cheating, I asked?
“Not a bit,” she replied. She explained that for decades her husband, Martin, had been chopping up fall leaves with the lawn mower and storing them in the barn in bags until spring when she used them as mulch. The 3-inch layer held in moisture and protected the soil from the summer sun. Earthworms love them, too, she said. Like all her advice, this was given out in the spirit of a friendly auntie who wanted the best for you. I’ve been mulching with chopped leaves ever since.
Her book The Gardener’s Palette (Contemporary Books, 2003) taught me the basics of color theory. Among other things, it explains the importance of the color wheel and understanding the principles of contrast and harmony. It has color photos on nearly every page to illustrate her points. I agree with her final synopsis:
“With nature providing an abundance of soft, neutral tones and peace-keeping green leaves, no gardener with keen eyes can go that far wrong. And at the risk of oversimplifying a complex subject, I still maintain that color for gardeners isn’t so complicated after all.”
Then in 2005 Sydney came out with Gardens to Go: Creating and Designing a Container Garden (Bulfinch Press, 2005). As she explained in the beginning, “In terms of design, a container garden should have boundaries, bone structure, and geometry, just like any other garden.” She added, “As you will soon see, a container garden is the real thing, a living three-dimensional picture, rich in plant material every bit as exciting as an in-the-ground garden.”
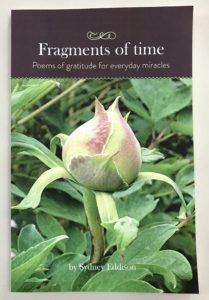
Cover Fragments of Time
Sydney’s most recent gardening book, Gardening for a Lifetime: How to Garden Wiser as You Grow Older (Viking Press, 2010) is, perhaps, her final gardening book. Written as she approached the age of 80, she recognized that she was no longer strong as on ox and able to wrestle boulders out of the ground. That a paid helper in the garden is good, if you can afford one; that it is all right to accept imperfections and to use lower-maintenance plants – even if it means giving up some old favorites.
I feel honored that I have been included in Sydney Eddison’s group of gardening friends. Her books, some of which are (or should be) in your library, are all worth reading. What a delight to see a friend develop a new skill, publishing poetry now, in her ninth decade of living joyfully on this earth – with fabulous gardens and always with a Jack Russell terrier at her side – or zooming ahead.
Read my twice-weekly blog at www.dailyUV.com/gardeningguy
An Alternative Way to Start Seedlings
Posted on Monday, March 20, 2017 · Leave a Comment
A good gardener can start tomato seedlings in old yogurt tins – or anything else that will hold some soil mix. But most commonly gardeners buy plastic containers designed for starting seeds: each unit or “6-pack” has 6 little compartments that hold a few tablespoons of soil and has holes in the bottom for drainage. They fit inside trays that keep them from peeing on the table top. But there is an alternative, the handmade soil block, and it has several advantages.
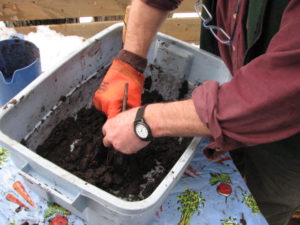
Making Soil blocks
I’ve been making soil blocks for at least 10 years, and like them. They are more work to make than using standard flats, so I use both – depending on the plants and the time I have to prepare them. Here’s what I do:
In a large plastic wheelbarrow I mix up the dry ingredients as described below. Then I mix up smaller quantities with water and press a special metal tool into a bin of the moistened mix. I squeeze the spring-loaded handle and 4 blocks pop out, ready to use.
Soil Block Recipe
Mix 10 quarts dry peat moss, 3 quarts sand and ¼ cup agricultural limestone (powdered, not pelletized is preferred, but either is OK)
Add ¼ cup each of and mix in :
Dried blood
Rock phosphate
Green Sand
Granite dust or Azomite (optional)
OR 1 cup Pro-Gro (or other) organic fertilizer
Add and mix in: 10 quarts Peat humus
10 quarts fine compost (your own or purchased)
10 quarts top soil (your own is preferred, but purchased is OK)
Place 4 quarts dry mix in a plastic basin or flat-bottomed container, and add about 1 quart water. Mix until gooey but firm, not watery.
I use a 2-quart plastic juice container for measuring out the dry ingredients. I mix the wet ingredients in storage container, the kind people use for storing sweaters. The block maker produces cubes that are about an inch and a half on a side, and have a small divot on the top where you can place a seed. A standard plastic tray or flat used for 6-packs of plants. The flat will hold 32 cubes. I push down hard on a big pile of the wet mix to make a nice dense cube.
Why bother with all this? As you know, seedlings left in a 6-pack will develop roots that become tangled and encircle the space they are growing in. When planting, you need to tease the roots apart so they can grow into the soil. This disturbance breaks roots and causes a plant to stop growing and rest for a while. In extreme conditions – such as big marigolds already blooming in a six-pack – you can lose over a week before the plant recovers.

Soil blocks
In a soil block when the roots come to free air they stop growing. When you put the block in the ground, the roots can take off and start stretching on day one. Not only that, soil blocks are full of great organic nutrition. Most potting mixes are mostly peat moss, which has little nutritional value to a plant. In general, plants growing in soil blocks do better than the same seeds started in a sterile potting mix.
There is a popular myth that plants started indoors need a sterile potting mix. There is a fungal disease called “damping off” that is fatal to seedlings and that most gardeners know about – and fear. We learned not to use garden soil because of the possibility of damping off, but in years of using soil blocks that contain garden soil, I have never encountered it. I think having good rich growing medium promotes healthy plants, though I would never use pure soil as it compacts too much.
I planted celeriac (aka celery root) in mid-March. The seeds are tiny and hard to handle. I used a little plastic planting device I got from Johnnys Selected Seeds. They call it a hand seed sower and sell it for $4.25. It holds seeds, and allows one to jiggle and tap it to get seeds to drop off the tip of the device. I like it.
Whether using soil blocks or plastic six-packs, I plant 2 seeds per unit. That generally ensures me of getting at least one plant since most seeds germinate at a 90% rate or better, assuming that you don’t let them dry out. I use plastic covers over the top of the flats – they are clear domes sold for the purpose. I remove them once most of the seeds have germinated. And I snip off one of the two seedlings if both germinate.
I’ll plant my tomatoes this year on April 7 or 8. Both are “fruit days” on the Stella Natura calendar, which advises me on the proper phase of the moon and location of the stars and planets (www.stellanatura.com). Call me woo-woo, but it works! Planting seeds indoors is a lot of work, but it keeps me sane (I think) during the gray rainy days of spring.
Read Henry’s blog at https://dailyuv.com/gardeningguy and e-mail him at henry.homeyer@comcast.net.
Pruning Fruit Trees
Posted on Monday, March 13, 2017 · Leave a Comment
A well pruned apple tree in full bloom or loaded with fruit is a feast for the eyes. Now is a good time to work on your trees – though you can prune in any month without damaging your tree. Farmers of yesteryear pruned their fruit trees in March, probably because there was no planting and weeding to do. Most orchardists stop pruning when the flowers open in May because working in the tree then will knock off potential fruit.
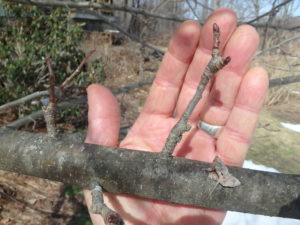
Fruit spur
Before pruning a tree I walk around it a few times, looking at it carefully to determine its basic nature. What shape is it genetically programmed to be? Some trees want to grow lean and tall (particularly pears), others want to develop a thick, dense canopy, and a few seem to like an open, somewhat sparse canopy. Some send up many vertical water sprouts every year, others few. But you can sculpt your tree to be almost anything you want – within reason.
I do insist on a clear trunk up at least 3 or 4 feet from the ground, or even more. This allows me to get to the trunk of the tree to pick fruit, to prune or to mow beneath it. Ideally, low branches are cut off when a tree is small. But if not, start there this year.
Remove lower branches
Where you make your pruning cut is important for tree health. Don’t cut branches flush to the trunk or a bigger branch. Don’t cut into the swollen area at the base of a branch, an area called the “branch collar”. You can often see a distinct edge to the collar where the wrinkles in the bark in the branch collar stop and smooth bark of the branch begins. But don’t cut off branches too far from the trunk, either. That creates stubs that will die and slowly rot away – leaving an open wound where disease can enter.
Cutting a large branch requires 3 cuts to avoid tearing the bark of the trunk: first, go out the branch a foot or more, and make an undercut. Cut a third of the way through the branch from below. Then move your saw a little farther out the branch and cut down, from the top. Cut right through.
A heavy branch will probably start to drop when you are about half way through the second cut, and the bark will begin to rip. But the undercut will stop the rip, and allow the heavy branch to fall to the ground. Then you can make your third cut near the branch collar.
Remove lower branches
Remember this: it’s always better to take a few larger branches than 50 smaller ones. And it’s less work, too. Don’t nibble away at your tree like a deer. Be decisive. In any given year you can remove up to 20% to 25% of the (potential) leaves on a tree. Take all dead branches, too, they don’t count. If you rub a branch with your fingernail and you expose a green layer, the branch is alive.
Pruning saws have changed and improved over the years. The bow saw I used as a Boy Scout is outmoded. Tri-cut saws, even relatively small folding saws, are sharp and able to go through wood like termites on speed. Never use a dull or rusty saw. The same goes for your pruners and loppers. Bypass pruners (which work like scissors) are better than anvil-type pruners, which crush branches.
Your goal in pruning is to open up the tree, allowing sunshine to reach every leaf and to allow breezes to promote drying of leaves after a rain or heavy dew. Most fungal diseases thrive when leaves and fruit are constantly wet.
So what to remove? If 2 branches are touching, remove one. If one branch is directly over another, shading it, remove one or the other. Your choice. I look for fruit spurs when deciding which to remove. Fruit spurs are from an inch to 5 inches long and terminate in one or more fat buds. They will open up to multiple flowers and leaves.
I also remove the “dumb branches” – those that instead of reaching out and grabbing sunshine are headed back into the interior of the tree. Not sure why they do that, but they’ve got to go. Darwin would approve.
Not sure if you should remove a branch? Ask yourself what the branch will be like in 5 years, or 10. If it’s going to crash into another branch in a few years, take it out now. And after you’ve removed a big branch, never have second thoughts. In no time others will grow to fill the gap.
For me, pruning is not just about getting the most flowers or fruit from a tree, it’s about creating a beautiful form. In winter, especially, I enjoy looking at a well-pruned tree as sculpture. I prune professionally and love to restore old apple trees. And even though I’m 70 years old, I love to climb to the top of old apple trees, communing with Mother Nature and taking time to enjoy the beauty she has created. I hope I get to keep on climbing trees until the very end of my days.
Read my twice-weekly blog at https://dailyuv.com/gardeningguy. You may e-mail me at henry.homeyer@comcast.net or send mail to PO Box 364, Cornish Flat, NH 03746.
Rambunctious Plants
Posted on Saturday, March 4, 2017 · Leave a Comment
“Some people are always grumbling because roses have thorns; I am thankful that thorns have roses.” That quote is from French journalist, novelist and critic Jean-Baptiste Alphonse Karr, who lived from 1808 to 1890.
He’s right of course, being thankful for the good attributes of flowers is important even though some also have some problematic traits. It would be easy to ban every flower that misbehaves. On this cold March day I can think of several problem-child flowers that I love.
Obedient Plant
Obedient Flower (Physostegia virginiana) certainly does not live up to its name: it is not at all well-behaved. I started growing it in a sunny spot with rich, moist soil. It grew to be 3 to 6 feet tall with square stems and lovely pink flowers in mid-July. But soon it wandered, taking over walkways and neighboring beds. It got into my rhubarb patch. It spread by root, and even a fragment left in the soil would come back.
Ultimately I hired a diligent young man who spent 10 hours or more just digging it out. “Take no prisoners,” I said. He did a good job by loosening the soil deeply with a garden fork, and then carefully teasing out the roots with a CobraHead weeder. The CobraHead is a single-tined hand tool that is fabulous for getting out roots.
Of course, given the beauty of the flowers and the fact that they have great vase-life, I had to re-plant a few of these non-obedient flowers. Where? Along the edges of a field that is partially shaded by willows, in an area with goldenrod and other tall, aggressive plants. I didn’t want to make life too easy for these beauties, and that worked. I can go pick stems for arrangements, and if the flowers want to spread I can mow them.
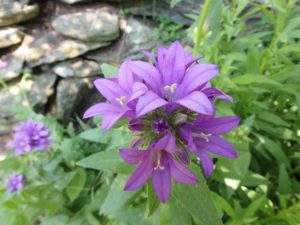
Campanula glomerata
Another vigorous spreader is the Clustered Bellflower (Campanula glomerata). This is a lovely globe-shaped cluster of blossoms that are a bluish-purple on stems about 18 inches tall. Like obedient plant, it spreads by root and can be invasive if planted in full sun with rich moist soil. It showed up in my garden without ever being purchased. Some scrap of root must have come in with another flower, perhaps a gift plant.
But Clustered Bellflower is much easier to control than Obedient Plant. It digs easily, and I found that by putting it in drier, shadier locations made it a very nice addition to the garden.
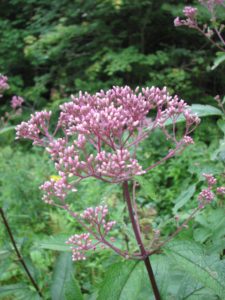
Joe Pye Weed
Joe Pye Weed (Eupatorium purpureum) is a native wildflower that grows alongside my brook, flowering in August. I like the flowers even though they don’t last long in a vase. It’s great food for bees and butterflies. It can reach 6 feet or more tall and has many small pink-purple flowers growing in clusters. A related species, E. maculatum, is said to be a bit shorter and tidier, especially a named cultivar, ‘Gateway’. I bought Gateway and liked it – for several years. Then, like many of us, it spread in middle age. A tidy 2-foot wide plant became a messy 5-foot wide plant, tall and floppy. It had to go.
Digging up my Joe Pye was a real test of my mettle. No helper available, I went at it with a shovel and fork. It didn’t even wiggle. So I cut off all stems and went at the roots with a pick-ax. Three hours later I had removed the roots. Later I learned about a cultivar called ‘Little Joe’ of a related species, E. dubium. This one, I read, is a really nice size, maybe two feet tall and wide. But elsewhere I see it listed as 3 to 4 feet tall. Hmm. I need to be wary about these flowers. But I bet if I see one for sale, I’ll try it. Silly me.
Once I decided to try planting a true bamboo plant. I had been warned that bamboo can take over a garden, spreading by root. So to prevent that, I planted the bamboo in a 50-gallon plastic drum. First I drilled drainage holes in the bottom and buried it, leaving a 3 inch lip above the soil line. I filled it with great soil and compost. Silly me. The bamboo barely survived the first winter, and eventually succumbed. But better safe than sorry.
There are many plants that have been introduced to the United States with good intentions (or by mistake), only to turn invasive. Purple loosestrife is one, Japanese Knotweed is another. Neither is controlled by any native American insect pests and they spread like wildfire. Both have root systems that are daunting, and a mature purple loosestrife plant, I have read, can produce a million seeds or more. And those seeds last for years.
Fortunately, purple loosestrife, which can take over marshes and wet areas, is now being controlled by a beetle imported from Europe where the loosestrife comes from. The beetle was tested before being released and it was found to be species specific: it won’t eat your peonies or your tomatoes.
So what have I learned from my experiences? Don’t give rambunctious plants what they want. Give them less sun, less water and poor soil. Those are better places for overly enthusiastic plants. But also enjoy what they have to offer – and don’t focus on the thorns.
Reach Henry at P.O. Box 364, Cornish Flat, NH 03746 or henry.homeyer@comcast.net. Read his twice-weekly blog with lots of photos at https://dailyuv.com/gardeningguy.
Forcing Flowers of Shrubs and Trees
Posted on Monday, February 27, 2017 · Leave a Comment
When I was in first grade we learned a song about pussy willows that still rings in my head when I walk past the fire pond in Cornish Flat. Or it did recently when I saw pussy willows starting to pop open in a marshy area. Spring is here.
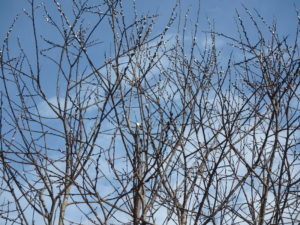
Merril magnolia
Pussy willows are actually the flowers of a wild shrub or small tree, the goat or pussy willow, also known by its scientific name, Salix caprea. This willow is a native to the United States and grows best in moist or soggy soils, or even in standing water. Full sun is best, but it can grow in part sun. It will grow up to 25 feet tall, but 15 feet is more common. The flowers grow on the top of the plant, so I use a pole pruner to get the branches I want.
Another willow, Salix discolor, is also a pussy willows but is “susceptible to a canker and is considered inferior for landscape use, though neither species is a plant of the first order.” That according to Michael Dirr in his book Manual of Woody Landscape Plants which I consider my bible of trees and shrubs.
He is right about pussy willows not being plants of the first order. Their time of glory is the spring, when the catkins or blossoms appear. The rest of the year it is a relatively unkempt, messy plant that spreads and is often too large to be considered a shrub, but not big enough to be considered a tree. The stems are weak, sometimes flopping over and easily breaking in ice storms. Still, if you have a wet area on your property, and like fat, fuzzy pussy willows in the spring, you should have some.
When I picked some pussy willow stems recently, I put them in a vase with water. This will encourage un-opened buds to open. Later, when all the blossoms are fully open, I will pour out the water and allow the stems to remain in a dry vase. This will prevent them from producing yellow pollen (which will fall on the table top) and allow me to have the fuzzies forever, or at as long as I want. One year, inadvertently, I kept a vase of pussy willows for a full year, and they still looked good!
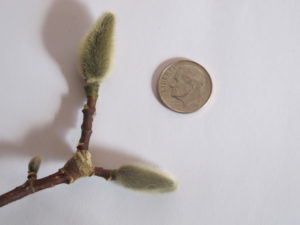
Magnolia bud (with dime for size comparison)
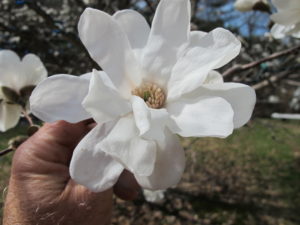
Another plant that can be forced to flower now looks similar to pussy willows at a quick look. I have a tree covered with fuzzy buds that are actually unopened flower buds that look like the pussy willow flowers. The hybrid magnolia ‘Merrill’ has these buds all winter, but when put in water now the buds will produce large white blossoms. Other magnolias have similar buds – like pussy willows on steroids.
The Merrill magnolia will generally bloom for me in late April. The closer to the date of outdoor blooming, the quicker buds will open in a vase indoors. I once did some pruning in December and forced magnolia buds indoors, but it took over a month for that to happen. Now it should happen in half that time (though pussy willow buds will open in just a few days).
Merril Magnolia
My Merrill magnolia is one of my favorite trees. Mine is about 20 or 25 years old, and is roughly 30 feet tall with a 20 foot spread. When it blooms the flowers are bountiful – a thousand, perhaps – and magnificent. Each blossom is about 3 inches across and lightly fragrant. I recommend them as specimen trees in the middle of a lawn or field in full sun.
Another classic early spring shrub is forsythia. Like the daffodil, this early bloomer is bright yellow, a color I have come to associate with spring. It can be used as a hedge, or pruned into a vase-shaped shrub that stays relatively small, say 8 feet tall and 6 feet wide.
To get forsythia to bloom, pick stems that are more than one year old. New stems are generally straight, with few side branches and even fewer buds. The buds on new branches tend to be leaf buds. Older branches will be branched, and loaded with flower buds. And for best results, don’t forget to change the water in the vase every 2 or 3 days.
Forsythia is a nice enough plant, but like pussy willows, it is not my favorite. It is rambunctious, for starters. It wants to take over the world, sending out roots that then send up new plants. My neighbor planted a forsythia hedge, and now I have forsythia that has encroached onto my land. Fortunately, it is easy enough to control if you pull out new shoots early on. Or failing that, cut them back every year.
As a child, however, I loved forsythia. My gardening grandfather planted a double row of them between the house and the vegetable garden. As the plants grew and spread they became a dense thicket perhaps 40 feet long, 10 feet wide and 10 feet tall. My sister Ruth Anne and I discovered that if we crawled into this thicket there was a hidden ”room” in the middle where we could hide from adults on hot summer days.
Apple blossoms are great for forcing, too. When I prune in March I take branches with short fruit spurs, put them in a vase, and get flowers. At this time of year, one can’t have too many blossoms!
Read Henry’s twice-weekly blog at https://dailyuv.com/gardeningguy . You may e-mail him at henry.homeyer@comcast.net.


 Click Here to buy from Cobrahead