How to Make a Spring Wreath
Posted on Monday, April 3, 2017 · Leave a Comment
Mud season for many gardeners is bleak. Raw days of gray and rain mean it’s not fun to spend time outdoors, so we wither on the vine. Thankfully, I start lots of seedlings indoors, and early April is the right time to start most vegetables and flowers. But even that doesn’t keep me very busy – and I tend to get squirrelly.
I recently went outside to harvest materials for making a spring wreath, and then made one on the kitchen counter. It perked up my spirits considerably, so I am sharing my technique here – along with some tips about growing what you need for making spring wreathes in years to come.
Here is what you need: several lengths of freshly cut grape vines, each piece 5 to 15 feet long and a quarter to a half an inch in diameter; 25 stems of pussy willows, 25 stems of red-twigged dogwood, and a dozen or so stems of alder with fresh catkins. The stems are all found in moist places alongside the road, or at the edge of a stream or swamp.
Wild grapes are a pest vine for many of us, climbing up trees and strangling them, so pulling some down and using them for a wreath is a good thing to do. Of course this is the time to prune eating and wine grapes, and you may be able to gather enough vines on your domestic plants to make a wreath base.
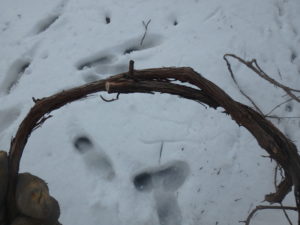
Starting a wreath
I went to the woods and cut a 15-foot length of grapevine that was about as thick around as my ring finger. It is important to use living, not dead, vines; the one I cut was a greenish white inside and flexible, so I knew it was alive when I cut it. Dead vines are brittle and not suitable.
To make the wreath form a vine circle 14 to 16 inches in diameter by overlapping (or twisting) one half of the vine over the other half – the same way you would start to tie your shoelaces. Then grasp one of the loose ends and weave it around the vine circle in loops, over and under, pulling it tight as you go. After each piece of vine is in place squeeze the circle to make it regular in shape.
When you run out of vine, tuck the end into the circle and repeat the maneuver with the other end of the vine. Then use shorter, thinner pieces of vine – say 6 to 8 feet long and pencil-thick – and weave them around the wreath base until you have a circle 2 inches or more thick. It’s hard to make a nice round circle of vine, and mine was a little lopsided.
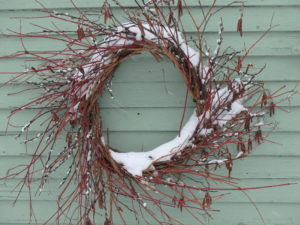
Spring wreath with spring snow
The great thing about this grapevine wreath is that you can just slide stems of pussy willows in between the vines and natural tension will hold them in place. In fact, I had to use a screwdriver to lift the vines at times in order to slide the stems in place.
I went around first with pussy willows stems, poking them into the grape vine base every 4 inches of so. Then I added stems of alders with their nice catkins, and finally I slid in clusters of the red-twigged dogwoods. I hung the wreath up where I could work on it and was better able to see where there were spaces that needed twigs, and added a few more.
A few notes on growing these plants. Pussy willows love to grow in wet places and require no care. You can start them as soon as the ground thaws and the bushes leaf out. Just cut 12-inch branches, strip off the leaves, and push them 8 inches into the soil. They will root where there are leaf nodes.
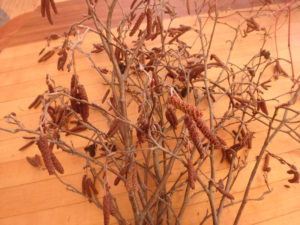
Alders with catkins
In addition to growing in the wild, red-twigged dogwood is a nice landscape plant available at any garden center. Stems can grow up to 3 feet in a year, and some gardeners cut the plant right to the ground each spring (once it is a few years old and has well established root systems.) They do that as the stems are most brilliantly colored in their first year of growth. Or you can remove a third of the stems each year, which is what I do.
Alders? They grow wild by my stream and I have to admit I have never seen plants for sale. They are messy plants that tend to flop over and root in. But they are nitrogen-fixing shrubs that will improve the soil in wastelands or alongside the road. I imagine you can root them in the spring just like willows. But they’re not for urban gardeners or small lots.
My wreath is not a professional job, but it pleases me every time I see it. That’s important in mudseason. And after I made mine, we got another foot of snow! March went out like a lion here where I live.
Read Henry’s twice a week blog at www.dailyUV.com. His e-mail is henry.homeyer@comcast.net and you may reach him at PO Box 364, Cornish Flat, NH 03746. Henry’s personal website is www.Gardening-Guy.com.
Books by Sydney Eddison
Posted on Monday, March 27, 2017 · Leave a Comment
Photos: K Day Designs

Sydney & Phoebe
I’m a fairly simple person. I like dogs and flowers and good food. Having friends is important. I like to grow vegetables from seed, and I revere trees that have survived longer than I have. And when it comes to poetry, I like it simple and direct, poetry that evokes images of nature and emotions I can understand. So it was a great pleasure when my friend the garden writer Sydney Eddison sent me her new book of poetry, Fragments of Time: Poems of gratitude for everyday miracles (Pomperaug Valley Press, 2016).
Fragments of Time is a lovely book of poems, many that focus on Ms. Eddison’s gardens and her love for the outdoors. But a few are love poems about her late husband, one is a sad reminder of the Newtown School shooting which occurred in her town. Others are happy memories of children, dogs, squirrels and seasons changing. These are poems I have enjoyed reading out loud to loved ones.
You might relate to this fragment of a poem:
Dandelions, bold and unapologetic,
seize empty spaces between perennials
and drive down taproots.
The lines are drawn.
Let the battle begin!
I know Sydney Eddison best as a gardener and garden writer. I first visited her in 2000 after I read her book, The Self-Taught Gardener: Lessons from a Country Garden (Viking/Penguin, 1997) and knew she was someone I wanted to meet. The book taught me much – even though I was at the time already writing a gardening column and considered myself a fairly accomplished gardener.
Thumbing through it now, I see I can learn from it even now – and should re-read it. For example, she points out that most silver-leafed plants do best in dry soil. I never thought of it that way.
Eddison garden.
When I first visited Sydney in her garden in Connecticut it was in the middle of a ferocious drought. There was a ban on watering plants and washing cars, and had been for six weeks. Yet the soil in her flower beds was fluffy and lightly moist. Oaks in the woods were showing signs of stress, but her gardens were not. Had she been cheating, I asked?
“Not a bit,” she replied. She explained that for decades her husband, Martin, had been chopping up fall leaves with the lawn mower and storing them in the barn in bags until spring when she used them as mulch. The 3-inch layer held in moisture and protected the soil from the summer sun. Earthworms love them, too, she said. Like all her advice, this was given out in the spirit of a friendly auntie who wanted the best for you. I’ve been mulching with chopped leaves ever since.
Her book The Gardener’s Palette (Contemporary Books, 2003) taught me the basics of color theory. Among other things, it explains the importance of the color wheel and understanding the principles of contrast and harmony. It has color photos on nearly every page to illustrate her points. I agree with her final synopsis:
“With nature providing an abundance of soft, neutral tones and peace-keeping green leaves, no gardener with keen eyes can go that far wrong. And at the risk of oversimplifying a complex subject, I still maintain that color for gardeners isn’t so complicated after all.”
Then in 2005 Sydney came out with Gardens to Go: Creating and Designing a Container Garden (Bulfinch Press, 2005). As she explained in the beginning, “In terms of design, a container garden should have boundaries, bone structure, and geometry, just like any other garden.” She added, “As you will soon see, a container garden is the real thing, a living three-dimensional picture, rich in plant material every bit as exciting as an in-the-ground garden.”
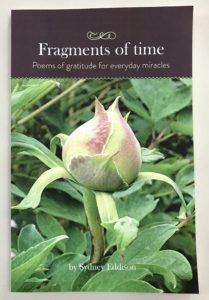
Cover Fragments of Time
Sydney’s most recent gardening book, Gardening for a Lifetime: How to Garden Wiser as You Grow Older (Viking Press, 2010) is, perhaps, her final gardening book. Written as she approached the age of 80, she recognized that she was no longer strong as on ox and able to wrestle boulders out of the ground. That a paid helper in the garden is good, if you can afford one; that it is all right to accept imperfections and to use lower-maintenance plants – even if it means giving up some old favorites.
I feel honored that I have been included in Sydney Eddison’s group of gardening friends. Her books, some of which are (or should be) in your library, are all worth reading. What a delight to see a friend develop a new skill, publishing poetry now, in her ninth decade of living joyfully on this earth – with fabulous gardens and always with a Jack Russell terrier at her side – or zooming ahead.
Read my twice-weekly blog at www.dailyUV.com/gardeningguy
An Alternative Way to Start Seedlings
Posted on Monday, March 20, 2017 · Leave a Comment
A good gardener can start tomato seedlings in old yogurt tins – or anything else that will hold some soil mix. But most commonly gardeners buy plastic containers designed for starting seeds: each unit or “6-pack” has 6 little compartments that hold a few tablespoons of soil and has holes in the bottom for drainage. They fit inside trays that keep them from peeing on the table top. But there is an alternative, the handmade soil block, and it has several advantages.
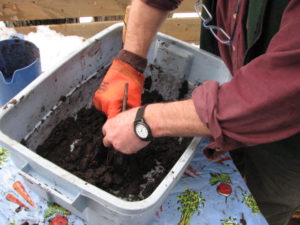
Making Soil blocks
I’ve been making soil blocks for at least 10 years, and like them. They are more work to make than using standard flats, so I use both – depending on the plants and the time I have to prepare them. Here’s what I do:
In a large plastic wheelbarrow I mix up the dry ingredients as described below. Then I mix up smaller quantities with water and press a special metal tool into a bin of the moistened mix. I squeeze the spring-loaded handle and 4 blocks pop out, ready to use.
Soil Block Recipe
Mix 10 quarts dry peat moss, 3 quarts sand and ¼ cup agricultural limestone (powdered, not pelletized is preferred, but either is OK)
Add ¼ cup each of and mix in :
Dried blood
Rock phosphate
Green Sand
Granite dust or Azomite (optional)
OR 1 cup Pro-Gro (or other) organic fertilizer
Add and mix in: 10 quarts Peat humus
10 quarts fine compost (your own or purchased)
10 quarts top soil (your own is preferred, but purchased is OK)
Place 4 quarts dry mix in a plastic basin or flat-bottomed container, and add about 1 quart water. Mix until gooey but firm, not watery.
I use a 2-quart plastic juice container for measuring out the dry ingredients. I mix the wet ingredients in storage container, the kind people use for storing sweaters. The block maker produces cubes that are about an inch and a half on a side, and have a small divot on the top where you can place a seed. A standard plastic tray or flat used for 6-packs of plants. The flat will hold 32 cubes. I push down hard on a big pile of the wet mix to make a nice dense cube.
Why bother with all this? As you know, seedlings left in a 6-pack will develop roots that become tangled and encircle the space they are growing in. When planting, you need to tease the roots apart so they can grow into the soil. This disturbance breaks roots and causes a plant to stop growing and rest for a while. In extreme conditions – such as big marigolds already blooming in a six-pack – you can lose over a week before the plant recovers.

Soil blocks
In a soil block when the roots come to free air they stop growing. When you put the block in the ground, the roots can take off and start stretching on day one. Not only that, soil blocks are full of great organic nutrition. Most potting mixes are mostly peat moss, which has little nutritional value to a plant. In general, plants growing in soil blocks do better than the same seeds started in a sterile potting mix.
There is a popular myth that plants started indoors need a sterile potting mix. There is a fungal disease called “damping off” that is fatal to seedlings and that most gardeners know about – and fear. We learned not to use garden soil because of the possibility of damping off, but in years of using soil blocks that contain garden soil, I have never encountered it. I think having good rich growing medium promotes healthy plants, though I would never use pure soil as it compacts too much.
I planted celeriac (aka celery root) in mid-March. The seeds are tiny and hard to handle. I used a little plastic planting device I got from Johnnys Selected Seeds. They call it a hand seed sower and sell it for $4.25. It holds seeds, and allows one to jiggle and tap it to get seeds to drop off the tip of the device. I like it.
Whether using soil blocks or plastic six-packs, I plant 2 seeds per unit. That generally ensures me of getting at least one plant since most seeds germinate at a 90% rate or better, assuming that you don’t let them dry out. I use plastic covers over the top of the flats – they are clear domes sold for the purpose. I remove them once most of the seeds have germinated. And I snip off one of the two seedlings if both germinate.
I’ll plant my tomatoes this year on April 7 or 8. Both are “fruit days” on the Stella Natura calendar, which advises me on the proper phase of the moon and location of the stars and planets (www.stellanatura.com). Call me woo-woo, but it works! Planting seeds indoors is a lot of work, but it keeps me sane (I think) during the gray rainy days of spring.
Read Henry’s blog at https://dailyuv.com/gardeningguy and e-mail him at henry.homeyer@comcast.net.
Pruning Fruit Trees
Posted on Monday, March 13, 2017 · Leave a Comment
A well pruned apple tree in full bloom or loaded with fruit is a feast for the eyes. Now is a good time to work on your trees – though you can prune in any month without damaging your tree. Farmers of yesteryear pruned their fruit trees in March, probably because there was no planting and weeding to do. Most orchardists stop pruning when the flowers open in May because working in the tree then will knock off potential fruit.
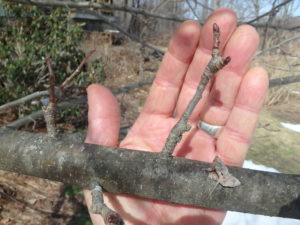
Fruit spur
Before pruning a tree I walk around it a few times, looking at it carefully to determine its basic nature. What shape is it genetically programmed to be? Some trees want to grow lean and tall (particularly pears), others want to develop a thick, dense canopy, and a few seem to like an open, somewhat sparse canopy. Some send up many vertical water sprouts every year, others few. But you can sculpt your tree to be almost anything you want – within reason.
I do insist on a clear trunk up at least 3 or 4 feet from the ground, or even more. This allows me to get to the trunk of the tree to pick fruit, to prune or to mow beneath it. Ideally, low branches are cut off when a tree is small. But if not, start there this year.
Remove lower branches
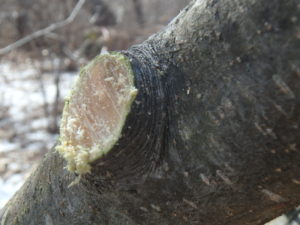
Where you make your pruning cut is important for tree health. Don’t cut branches flush to the trunk or a bigger branch. Don’t cut into the swollen area at the base of a branch, an area called the “branch collar”. You can often see a distinct edge to the collar where the wrinkles in the bark in the branch collar stop and smooth bark of the branch begins. But don’t cut off branches too far from the trunk, either. That creates stubs that will die and slowly rot away – leaving an open wound where disease can enter.
Cutting a large branch requires 3 cuts to avoid tearing the bark of the trunk: first, go out the branch a foot or more, and make an undercut. Cut a third of the way through the branch from below. Then move your saw a little farther out the branch and cut down, from the top. Cut right through.
A heavy branch will probably start to drop when you are about half way through the second cut, and the bark will begin to rip. But the undercut will stop the rip, and allow the heavy branch to fall to the ground. Then you can make your third cut near the branch collar.
Remove lower branches
Remember this: it’s always better to take a few larger branches than 50 smaller ones. And it’s less work, too. Don’t nibble away at your tree like a deer. Be decisive. In any given year you can remove up to 20% to 25% of the (potential) leaves on a tree. Take all dead branches, too, they don’t count. If you rub a branch with your fingernail and you expose a green layer, the branch is alive.
Pruning saws have changed and improved over the years. The bow saw I used as a Boy Scout is outmoded. Tri-cut saws, even relatively small folding saws, are sharp and able to go through wood like termites on speed. Never use a dull or rusty saw. The same goes for your pruners and loppers. Bypass pruners (which work like scissors) are better than anvil-type pruners, which crush branches.
Your goal in pruning is to open up the tree, allowing sunshine to reach every leaf and to allow breezes to promote drying of leaves after a rain or heavy dew. Most fungal diseases thrive when leaves and fruit are constantly wet.
So what to remove? If 2 branches are touching, remove one. If one branch is directly over another, shading it, remove one or the other. Your choice. I look for fruit spurs when deciding which to remove. Fruit spurs are from an inch to 5 inches long and terminate in one or more fat buds. They will open up to multiple flowers and leaves.
I also remove the “dumb branches” – those that instead of reaching out and grabbing sunshine are headed back into the interior of the tree. Not sure why they do that, but they’ve got to go. Darwin would approve.
Not sure if you should remove a branch? Ask yourself what the branch will be like in 5 years, or 10. If it’s going to crash into another branch in a few years, take it out now. And after you’ve removed a big branch, never have second thoughts. In no time others will grow to fill the gap.
For me, pruning is not just about getting the most flowers or fruit from a tree, it’s about creating a beautiful form. In winter, especially, I enjoy looking at a well-pruned tree as sculpture. I prune professionally and love to restore old apple trees. And even though I’m 70 years old, I love to climb to the top of old apple trees, communing with Mother Nature and taking time to enjoy the beauty she has created. I hope I get to keep on climbing trees until the very end of my days.
Read my twice-weekly blog at https://dailyuv.com/gardeningguy. You may e-mail me at henry.homeyer@comcast.net or send mail to PO Box 364, Cornish Flat, NH 03746.
Rambunctious Plants
Posted on Saturday, March 4, 2017 · Leave a Comment
“Some people are always grumbling because roses have thorns; I am thankful that thorns have roses.” That quote is from French journalist, novelist and critic Jean-Baptiste Alphonse Karr, who lived from 1808 to 1890.
He’s right of course, being thankful for the good attributes of flowers is important even though some also have some problematic traits. It would be easy to ban every flower that misbehaves. On this cold March day I can think of several problem-child flowers that I love.
Obedient Plant
Obedient Flower (Physostegia virginiana) certainly does not live up to its name: it is not at all well-behaved. I started growing it in a sunny spot with rich, moist soil. It grew to be 3 to 6 feet tall with square stems and lovely pink flowers in mid-July. But soon it wandered, taking over walkways and neighboring beds. It got into my rhubarb patch. It spread by root, and even a fragment left in the soil would come back.
Ultimately I hired a diligent young man who spent 10 hours or more just digging it out. “Take no prisoners,” I said. He did a good job by loosening the soil deeply with a garden fork, and then carefully teasing out the roots with a CobraHead weeder. The CobraHead is a single-tined hand tool that is fabulous for getting out roots.
Of course, given the beauty of the flowers and the fact that they have great vase-life, I had to re-plant a few of these non-obedient flowers. Where? Along the edges of a field that is partially shaded by willows, in an area with goldenrod and other tall, aggressive plants. I didn’t want to make life too easy for these beauties, and that worked. I can go pick stems for arrangements, and if the flowers want to spread I can mow them.
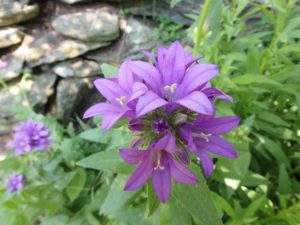
Campanula glomerata
Another vigorous spreader is the Clustered Bellflower (Campanula glomerata). This is a lovely globe-shaped cluster of blossoms that are a bluish-purple on stems about 18 inches tall. Like obedient plant, it spreads by root and can be invasive if planted in full sun with rich moist soil. It showed up in my garden without ever being purchased. Some scrap of root must have come in with another flower, perhaps a gift plant.
But Clustered Bellflower is much easier to control than Obedient Plant. It digs easily, and I found that by putting it in drier, shadier locations made it a very nice addition to the garden.
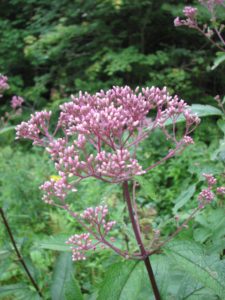
Joe Pye Weed
Joe Pye Weed (Eupatorium purpureum) is a native wildflower that grows alongside my brook, flowering in August. I like the flowers even though they don’t last long in a vase. It’s great food for bees and butterflies. It can reach 6 feet or more tall and has many small pink-purple flowers growing in clusters. A related species, E. maculatum, is said to be a bit shorter and tidier, especially a named cultivar, ‘Gateway’. I bought Gateway and liked it – for several years. Then, like many of us, it spread in middle age. A tidy 2-foot wide plant became a messy 5-foot wide plant, tall and floppy. It had to go.
Digging up my Joe Pye was a real test of my mettle. No helper available, I went at it with a shovel and fork. It didn’t even wiggle. So I cut off all stems and went at the roots with a pick-ax. Three hours later I had removed the roots. Later I learned about a cultivar called ‘Little Joe’ of a related species, E. dubium. This one, I read, is a really nice size, maybe two feet tall and wide. But elsewhere I see it listed as 3 to 4 feet tall. Hmm. I need to be wary about these flowers. But I bet if I see one for sale, I’ll try it. Silly me.
Once I decided to try planting a true bamboo plant. I had been warned that bamboo can take over a garden, spreading by root. So to prevent that, I planted the bamboo in a 50-gallon plastic drum. First I drilled drainage holes in the bottom and buried it, leaving a 3 inch lip above the soil line. I filled it with great soil and compost. Silly me. The bamboo barely survived the first winter, and eventually succumbed. But better safe than sorry.
There are many plants that have been introduced to the United States with good intentions (or by mistake), only to turn invasive. Purple loosestrife is one, Japanese Knotweed is another. Neither is controlled by any native American insect pests and they spread like wildfire. Both have root systems that are daunting, and a mature purple loosestrife plant, I have read, can produce a million seeds or more. And those seeds last for years.
Fortunately, purple loosestrife, which can take over marshes and wet areas, is now being controlled by a beetle imported from Europe where the loosestrife comes from. The beetle was tested before being released and it was found to be species specific: it won’t eat your peonies or your tomatoes.
So what have I learned from my experiences? Don’t give rambunctious plants what they want. Give them less sun, less water and poor soil. Those are better places for overly enthusiastic plants. But also enjoy what they have to offer – and don’t focus on the thorns.
Reach Henry at P.O. Box 364, Cornish Flat, NH 03746 or henry.homeyer@comcast.net. Read his twice-weekly blog with lots of photos at https://dailyuv.com/gardeningguy.
Forcing Flowers of Shrubs and Trees
Posted on Monday, February 27, 2017 · Leave a Comment
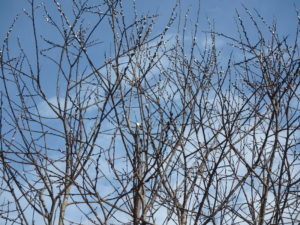
When I was in first grade we learned a song about pussy willows that still rings in my head when I walk past the fire pond in Cornish Flat. Or it did recently when I saw pussy willows starting to pop open in a marshy area. Spring is here.
Merril magnolia
Pussy willows are actually the flowers of a wild shrub or small tree, the goat or pussy willow, also known by its scientific name, Salix caprea. This willow is a native to the United States and grows best in moist or soggy soils, or even in standing water. Full sun is best, but it can grow in part sun. It will grow up to 25 feet tall, but 15 feet is more common. The flowers grow on the top of the plant, so I use a pole pruner to get the branches I want.
Another willow, Salix discolor, is also a pussy willows but is “susceptible to a canker and is considered inferior for landscape use, though neither species is a plant of the first order.” That according to Michael Dirr in his book Manual of Woody Landscape Plants which I consider my bible of trees and shrubs.
He is right about pussy willows not being plants of the first order. Their time of glory is the spring, when the catkins or blossoms appear. The rest of the year it is a relatively unkempt, messy plant that spreads and is often too large to be considered a shrub, but not big enough to be considered a tree. The stems are weak, sometimes flopping over and easily breaking in ice storms. Still, if you have a wet area on your property, and like fat, fuzzy pussy willows in the spring, you should have some.
When I picked some pussy willow stems recently, I put them in a vase with water. This will encourage un-opened buds to open. Later, when all the blossoms are fully open, I will pour out the water and allow the stems to remain in a dry vase. This will prevent them from producing yellow pollen (which will fall on the table top) and allow me to have the fuzzies forever, or at as long as I want. One year, inadvertently, I kept a vase of pussy willows for a full year, and they still looked good!
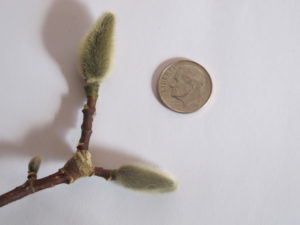
Magnolia bud (with dime for size comparison)
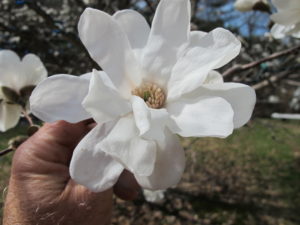
Another plant that can be forced to flower now looks similar to pussy willows at a quick look. I have a tree covered with fuzzy buds that are actually unopened flower buds that look like the pussy willow flowers. The hybrid magnolia ‘Merrill’ has these buds all winter, but when put in water now the buds will produce large white blossoms. Other magnolias have similar buds – like pussy willows on steroids.
The Merrill magnolia will generally bloom for me in late April. The closer to the date of outdoor blooming, the quicker buds will open in a vase indoors. I once did some pruning in December and forced magnolia buds indoors, but it took over a month for that to happen. Now it should happen in half that time (though pussy willow buds will open in just a few days).
Merril Magnolia
My Merrill magnolia is one of my favorite trees. Mine is about 20 or 25 years old, and is roughly 30 feet tall with a 20 foot spread. When it blooms the flowers are bountiful – a thousand, perhaps – and magnificent. Each blossom is about 3 inches across and lightly fragrant. I recommend them as specimen trees in the middle of a lawn or field in full sun.
Another classic early spring shrub is forsythia. Like the daffodil, this early bloomer is bright yellow, a color I have come to associate with spring. It can be used as a hedge, or pruned into a vase-shaped shrub that stays relatively small, say 8 feet tall and 6 feet wide.
To get forsythia to bloom, pick stems that are more than one year old. New stems are generally straight, with few side branches and even fewer buds. The buds on new branches tend to be leaf buds. Older branches will be branched, and loaded with flower buds. And for best results, don’t forget to change the water in the vase every 2 or 3 days.
Forsythia is a nice enough plant, but like pussy willows, it is not my favorite. It is rambunctious, for starters. It wants to take over the world, sending out roots that then send up new plants. My neighbor planted a forsythia hedge, and now I have forsythia that has encroached onto my land. Fortunately, it is easy enough to control if you pull out new shoots early on. Or failing that, cut them back every year.
As a child, however, I loved forsythia. My gardening grandfather planted a double row of them between the house and the vegetable garden. As the plants grew and spread they became a dense thicket perhaps 40 feet long, 10 feet wide and 10 feet tall. My sister Ruth Anne and I discovered that if we crawled into this thicket there was a hidden ”room” in the middle where we could hide from adults on hot summer days.
Apple blossoms are great for forcing, too. When I prune in March I take branches with short fruit spurs, put them in a vase, and get flowers. At this time of year, one can’t have too many blossoms!
Read Henry’s twice-weekly blog at https://dailyuv.com/gardeningguy . You may e-mail him at henry.homeyer@comcast.net.
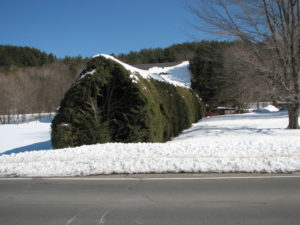
Hedges: Great Windbreaks for Winter
Posted on Monday, February 20, 2017 · Leave a Comment
Although I’ve never read a scientific paper on the value of hedges for garden plants, my personal theory is that they are beneficial, particularly in winter. They break the cold winter winds that damage flower buds on trees and shrubs in cold times and can help keep soil from drying out from hot, dry winds in summer. Easier to install and less expensive than wood fences or stone walls, this is a good time to think about planting a hedge, come summer.
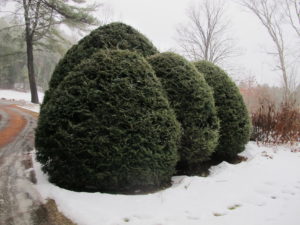
Carefully sculpted Hemlock hedge
Hedges can be grown using almost any plant material that survives our winters – or even those that die back to the ground each winter. For most of us, the important thing is that they look good, be affordable and grow relatively quickly.
If you want a tall hedge to screen an eyesore or provide privacy, you should select a woody evergreen hedge. Canadian hemlock if good for that – it grows fast and will grow close together. For a 6-foot hedge, plant hemlocks 6 feet apart. For an 8-foot hedge, 8 feet apart, and so on. Yew is also good, but generally is pruned to stay lower and deer love to eat it. Boxwood and privet are traditional hedges, but privet (a deciduous shrub) is now considered an invasive plant in many places and discouraged or prohibited.
In order to keep an evergreen hedge looking good, you need to taper it so that the bottom has longer branches than those on top. That allows the lower branches to get more sunlight.
When planting a shrub or tree for hedging you should start with small plants, plant them close together, prune early on, and prune hard. By pruning early and hard you encourage good branching down low, so you don’t end up with a gawky hedge with little greenery near the bottom.
It’s best to prune your hedge one to three times each summer, even when they are small – to encourage branching and maintain a thick hedge. If you don’t prune every year, your hedge will have thick, stubby branches when you cut it back instead of small, feathery branches. And it can get too tall.
Cost is an issue when selecting plants for hedges, as they require many plants. Ideally you can use plant material that you own and can divide and use for free. I’ve rooted willow twigs to create a small wall. Lilacs often send out root suckers that can be dug up and moved. According to what I’ve read, other good candidates for rooting include elder, flowering quince, forsythia, mock orange, rugosa rose, spirea, viburnums and witch hazel.
This hedge tapers to let lower branches get sunshine
Creative pruning of hedges can create dramatic results. There is no reason why a flat and “boring” hedge cannot be pruned to different heights to create a wave of green mimicking a distant view, or shaped to have a pointy top or be shaped like a dome. And you can trim a hedge to different heights at different places to open up a view – or hide the abandoned car on your neighbor’s property.
In addition to the usual hedge plants, edible hedges can be made using gooseberries, currants or blueberries. Decorative grasses can be used, or even golden rod (if you dare risk the scorn of your neighbors). I once divided and moved several large peonies for a client who was re-doing a garden. I divided them into 50 plants and spaced them so that, when mature, the foliage would mingle and create a single row of plants. By now it must be drop-dead gorgeous in June. It’s not a hedge that provides privacy, but it is wonderful in bloom and it sets off their lawn from the neighbor’s lawn.
Lastly, you can make a hedge by installing (or utilizing an existing fence) and growing vines on it. Evergreen euonymus (Euonymus fortunei) is an evergreen variegated-leafed vine that will grow in shade and is quite vigorous. And most vines will start easily from cuttings. English ivy, Virginia creeper, or even grapes can be used. When they mature, the fence disappears, and you have a wall of green. Climbing hydrangea will not attach to a wooden fence, but it can be attached to one, and will grow in full shade and flowers magnificently.
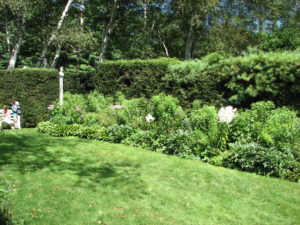
Hedge used as backdrop for flowers
A word of caution: if you are using a hedge as a separation of your property from a neighbor’s, remember that the neighbor should be consulted, as they will have to trim their side of the hedge. Or plant it far enough back from the property line that you can trim both sides, without stepping off your own property.
Your hedge probably won’t serve to keep out hungry animals. Deer are really the only ones you have to worry about in most neighborhoods, and anything less than 8 feet is just an easy leap for all but oldest, most arthritic deer. Still, it will keep out young neighborhood ruffians, particularly if the plants have thorns.
See Henry’s blog at https://dailyuv.com/gardeningguy. His website is www.Gardening-Guy.com.
Flower Shows
Posted on Monday, February 13, 2017 · Leave a Comment
Spring arrives every year, but never soon enough for most of us gardeners. The first real sign of spring for me is always the arrival of my snowdrops: those tiny white bulb flowers that come up, no matter what, by early March – and sometimes earlier. Even under a thick blanket of snow and sub-freezing temperatures, the snow drops pop up. I’ve been known to shovel off the snow to find them.
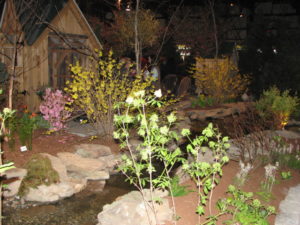
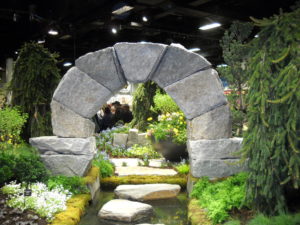
Vermont Flower Show
At the same time come the spring flower shows. These extravaganzas offer the blossoms and fragrances of spring – but months early. Intrepid nursery-people force trees to bloom, along with hundreds of tulips and daffodils. Seed companies are there, showing their wares, and garden experts spout knowledge to interested gardeners in dozens of workshops over the weekend-long events.
The Providence Flower Show was, for the last 20 years, one of the first each year. It was a great show and I attended often. Unfortunately, it saw declining revenues and has given up. Apparently the competition with the Connecticut Flower Show in Hartford and bad winter weather did it in. The Rhode Island Home Show, produced by the Rhode Island Builders Association will have a flower component in their annual show march 30 to April 2.
So this year the first weekend of flower shows is February 23 to 26 at the Hartford Convention Center – and the Connecticut Flower Show reigns by itself. The Hartford Show’s theme this year is “Woodland Enchantment”. There will be over 50 workshops over the course of the weekend, so there is much to learn from their speakers. And of course, there are flowers galore and much to buy if so inclined.
Next comes the Vermont Flower Show on March 3 and 4 at the Champlain Valley Fairgrounds. This is a nice small show. Instead of many small displays of flowers, members of the Vermont Nursery and Landscape Association work together to create one larger area that includes many blooming trees and forced bulbs that is always nice. There is a large model train area that appeals to kids, along with children’s craft opportunities to keep the little ones busy. The vendors of garden-related stuff are numerous.
The “grande dame” of American flower shows, the Philadelphia Flower Show comes next and lasts from March 11 to 19. It is truly huge, and worth visiting at least once. Held in the Pennsylvania Convention Center, it covers about 6 city blocks and will be attended by over a quarter of a million people over a nine-day period. The displays range from the grandiose and outrageously expensive to entries of African violets by little old ladies. It is best to go on a weekday when the crowds are smaller. This show has been annual since 1829, so they know what they are doing!
Boston Flower Show
Then comes the Boston Flower Show, another extravaganza. It will be held March 22 to 26 at the Seaport World Trade Center on the waterfront of Boston. Like the Philly show, it is a good idea to visit on a weekday. This year’s theme is “Superheroes of the Garden”. Their publicity touts it as “honoring the crusaders, innovative tools and legendary plants helping to make us all champions in the battle for garden supremacy!”
Want smaller crowds? Go to the Bangor, Maine Flower Show which will be held that same weekend, March 24 to 26. It will be held in the Cross Insurance Center and will include flower displays, speakers, food and more.
The Maine Flower Show at Thompson’s Point in Portland will be held March 29 to April 2. This is a new venue to me and will certainly be an improvement over the old warehouse that housed it when I last visited this show. According to their promotion, it will feature 16 display gardens and “will have 100 exhibits of plants, hardscape, arbor and garden supplies, and all things relative to outdoor yardscaping and living.”
Portland Flower Show
That same weekend is the New Hampshire Seacoast Home and Garden Show in Durham, NH. Held in the Whittemore Center Arena on April 1 and 2. As the show name indicates, this is not just about flowers, but includes displays and workshops on a variety of home improvement topics.
But for me, the flower show season will wrap up with the biggest and the best, from all I have heard. My partner, Cindy, and I have bought our plane tickets to London to attend the Chelsea Flower Show held this year May 23 to 27. This is a fund raiser for the Royal Hospital Chelsea.
The show is run by the Royal Horticultural Society, and the first 2 days of the show admission is restricted to members only. Membership costs $55 and a ticket for the first day costs $90. The second day the price drops a bit and by the Thursday, the first day open to the public, tickets are a mere $61. Prices go up after April 10. But airfare to London is down this year, which helps.
Unlike American flower shows, the Chelsea flower show includes much that is planted outdoors – which allows garden displays to be even more spectacular. I was told by a friend to take my umbrella! For me, this show is one more item to check off my “bucket list.”
You may reach Henry at henry.homeyer@comcast.net or at P.O. Box 364, Cornish Flat, NH 03746. His web site is www.Gardening-Guy.com.
Four Great Plants to Brighten Up Your House
Posted on Sunday, February 5, 2017 · Leave a Comment
Winter is tough on many gardeners, myself included. We need flowers blooming and plants to tend. But many of us are not enthralled with standard houseplants because they are often fussy and, if over-watered, too easy to kill. Let me suggest some nice easy, disposable flowers you can get at your local nursery or food coop.
I recently bought 3 blooming primroses for a total of $11.85. One is purple, the others shades of pink. They will bloom for a couple of weeks – or perhaps more. The tags only said ”Primula” (its scientific genus) and “Plant in part shade 8” apart”. The tag did not say, however, if these primroses would survive a New England winter. I suspect not, having babied other grocery store primroses along until the ground thawed and planted them outside. But I don’t care. These lovely plants will provide color and life indoors at a drab time of the year. And for less than $4 each, they don’t have to last forever.
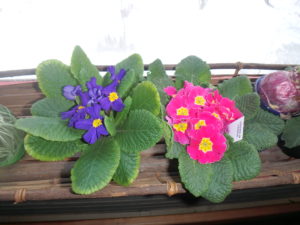
Primrose
What the tag should have said, however, is “Do not keep this primrose in a hot, sunny window unless you are willing to water regularly.” The soil they are in dries out fast, and you can cook a primrose – and most other grocery store plants – in just a day or two of inattention. I did that recently, but I placed the abused primrose in a deep dish and filled it with water, allowing it to suck up plenty. And it recovered in just a few hours.
I usually add a few drops of a product called “Superthrive” to the water when I have a plant that is suffering from neglect. This liquid contains plant hormones and seaweed extracts, and is very good for helping plants recover from environmental stress. It is expensive if calculated by the ounce, but so little is needed that it is not expensive. And it works. A 4 ounce bottle costs around $10-12.
I also bought a cyclamen in my effort to brighten up the house and do some attitude adjustment. Cyclamen definitely do not want to be in a sunny window. Bright indirect light is best. They come in a range of pinks, reds, magentas and white. I tell when they need watering by lifting the pot. If it feels very light, it’s time to give it water.
Cyclamen keep on blooming for much longer than primroses, and can last for years, getting bigger and better each year. If you want to learn about getting them to re-bloom, find a copy of Thalassa Cruso’s wonderful book, Making Things Grow: A Practical Guide for the Indoor Gardener. It’s out of print, but readily available. Every used bookstore has copies, and it’s a gem. Ms. Cruso was a TV personality, I gather, and her books read the way she must have presented herself – as a friendly, knowledgeable auntie.

Cyclamen
Thalassa Cruso was, of course, a plant fanatic. I’m not sure that following every bit of her advice is worth the trouble. She notes that cyclamen come originally from Iran where they bloom in winter. She claimed to move hers every evening to a cool spot such as a mudroom where the temperature is below 60 degrees. My goodness, it’s enough for me to turn off all the lights, feed the woodstove and the cat, take out the dog and brush my teeth before going to bed. Now I learn I should be moving the cyclamen, too!
Cineria is another gem available at this time of year. It has the added advantage of a lovely fragrance, too. It appears as a mound of daisy-like flowers that stand up a good 10 inches. It wants bright light, but no direct sunshine (they will finish up too quickly in the sun). Its soil needs to be kept moist, but not soggy.
Cineria are true annuals. That means that once the 6-weeks of blooming is over, the plant is done. You cannot get it to survive, year after year, returning to bloom again. That’s a blessing. You can feel fine about throwing it in the compost. It’s a no-guilt plant.
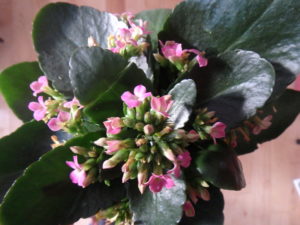
Kalanchoe
The last of my recent investments was a kalanchoe. This is a succulent and does will in warm, dry conditions. It comes in a variety of colors. In Thalassa Cruso’s book it was described in the chapter “Neglectable Plants”. That means, I suppose, it is hard to kill them. This one will, apparently, re-bloom if you cut it back after blooming, and reduce the light for a month, and don’t water it then, either.
So go get some plants in bloom for the house. No matter what you do, they should last longer than the same money invested in cut flowers, so they are a good investment. Just don’t think of them as a lifetime investment and you’ll be happy. Let them bloom, and toss them if you wish. I often do.
Read Henry’s blog twice a week at https://dailyuv.com/gardeningguy His email is henry.homeyer@comcast.net, and he can be reached my snail mail at P.O. Box 364, Cornish Flat, NH 03746.
Two Trees Your Birds Need
Posted on Monday, January 30, 2017 · Leave a Comment
Recently a blue jay turned to me and said, “Thanks, Henry, for planting those hemlocks and pine trees back in 1972!” Well, perhaps I’m presenting alternative facts here, but I know that the birds really do appreciate those trees. Particularly now, in the cold of winter.
Most of us feed the birds– not only to help them, but also to enjoy watching them all winter. The food we provide is helpful, but most would survive just fine without out it. But helping birds by providing shelter out of the wind and safety (away from cats and other predators), and nesting places is equally important. Forty-five years ago I planted a row of evergreens as screening for my back yard and it has been a real haven for birds.
According to a wonderful book called, Trees, Shrubs and Vines for Attracting Birds by Richard M. DeGraaf (University Press of New England, $24.95 in paper), 46 species of birds use the eastern white pine for either food, cover or nesting – and is one of the most beneficial trees for birds.
I dug up half a dozen small evergreens including a 5-foot tall white pine seedling in the summer of 1972. All were “volunteers” growing in a meadow near my house. They have done well, growing to mature size and blocking the view of my back yard from the road.
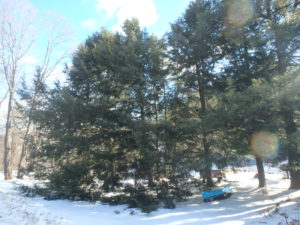
Hemlock and Pine Screening
According to the list of birds using white pine, the seeds are the favorite food of the northern bobwhite, red-bellied woodpecker, and spruce grouse – none of which I have seen in it. But it is also a favorite for some of my good bird buddies – black-capped chickadee, nuthatches, northern cardinal and juncoes. They go from the bird feeder on my deck to the pine and back, and enjoy resting out of the wind and away from Winnie and Sammy, my two resident cats.
Here are a few tips for growing white pines. First, don’t plant them near a paved road, as road salt is very injurious for them. I’d guess that if you are 20 feet or more back from the road with your planting, you should be all right, though even farther away would be better, especially if downhill from the road.
Next, remember that white pine trees get to be big, particularly if they are planted away from competing trees. They will grow 10 feet in 10 years, though under ideal conditions they will grow twice that or more. A mature white pine can reach 100 feet in size, though mine are about half that; their width can reach 20 to 40 feet. They have long needles, 5 to a cluster.
In recent years I’ve had many questions about white pine trees with needles that brown and drop off. It is normal for the trees to replace some needles every year, and every 4 to 6 years to lose quite a few in the autumn. But if you are seeing widespread needle browning at other times of the year, you may have a problem.
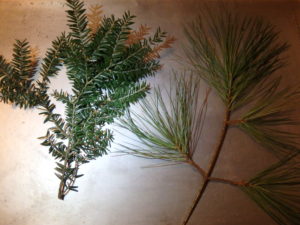
Hemlock (left) Whitepine (right)
Pines grow best in rich soil that drains well and is not generally soggy. Soils that are compacted by cars parked near them will suffer root damage. White pines prefer acidic soils with a pH of around 5.2. So you may be able to help your pine trees by applying some agricultural sulfur around them, just as you do your blueberries.
Leaving the dropped needles under the trees will help, too. The needles will serve as a mulch, preventing the soil from drying out too much in dry times and will help to acidify the soil as they decompose.
Eastern hemlock is another great plant for birds. De Graf lists 26 birds that use hemlock on a regular basis. It is an easy tree to grow as it will do so in full sun or full shade, and everything in between. It is fast growing, in most conditions other than heavy clay. It can grow a foot or more per year. It is easy to identify as it has soft, short needles –just half an inch long.
One worry I’d have about buying a Canadian hemlock is an insect pest that can devastate them: the wooly adelgid. This mite is an aphid-like insect that can kill a mature hemlock in 4 to 10 years. A native of Asia, it has no native controls. It covers itself with waxy filaments, the wool, which tends to keep off predatory insects. They are being monitored closely throughout New England, and few outbreaks have been recorded in Vermont, New Hampshire and Maine – though it is working its way north.
If planting hemlocks, choose well-drained acid soils. It is susceptible to drought, particularly in the first few years after planting. But generally it is an easy tree to grow.
Obviously now is not the time to plant trees, but it’s a good time to imagine what they might add to your landscape after 10 or 20 years. Don’t make the mistake of planting either of these trees too close to the house – 25 feet from the house would be a minimum for either. And if you want a hedge, hemlocks can be pruned into a hedge quite nicely – though if you miss a few years of pruning they will get too tall. And that almost always happens!
You can read Henry’s blog at https://dailyuv.com/gardeningguy or write him at P.O. Box 364, Cornish Flat, NH 03746.


 Click Here to buy from Cobrahead