Vegetable Gardening
Posted on Wednesday, June 4, 2014 · Leave a Comment
I planted much of my vegetable garden early this year. Living in a cold spot, I usually wait until June 10 to plant frost and cold-sensitive plants. But lured by perfect warm weather I planted most of my tomatoes on Memorial Day weekend. The soil was 60 degrees and sun strong. Then the weather turned chilly and wet. My tomatoes will survive this, and I can always cover them if there is threat of frost. Still, after all these decades, I should have more patience. Tomatoes, peppers, eggplants, cukes, squash: all these like hot weather.
I did not plant my vine crops early, however. I like to start cukes, squash and pumpkins indoors in May in 4-inch pots, growing them under lights until they have vines a foot long with several leaves. Or sometimes I will buy a few nice big plants. I do this because of the dreaded striped cucumber beetle, a pest that can – and will – eat up a plant’s first 2 leaves in one night. But a bigger plant can survive a few beetle bites without trouble.
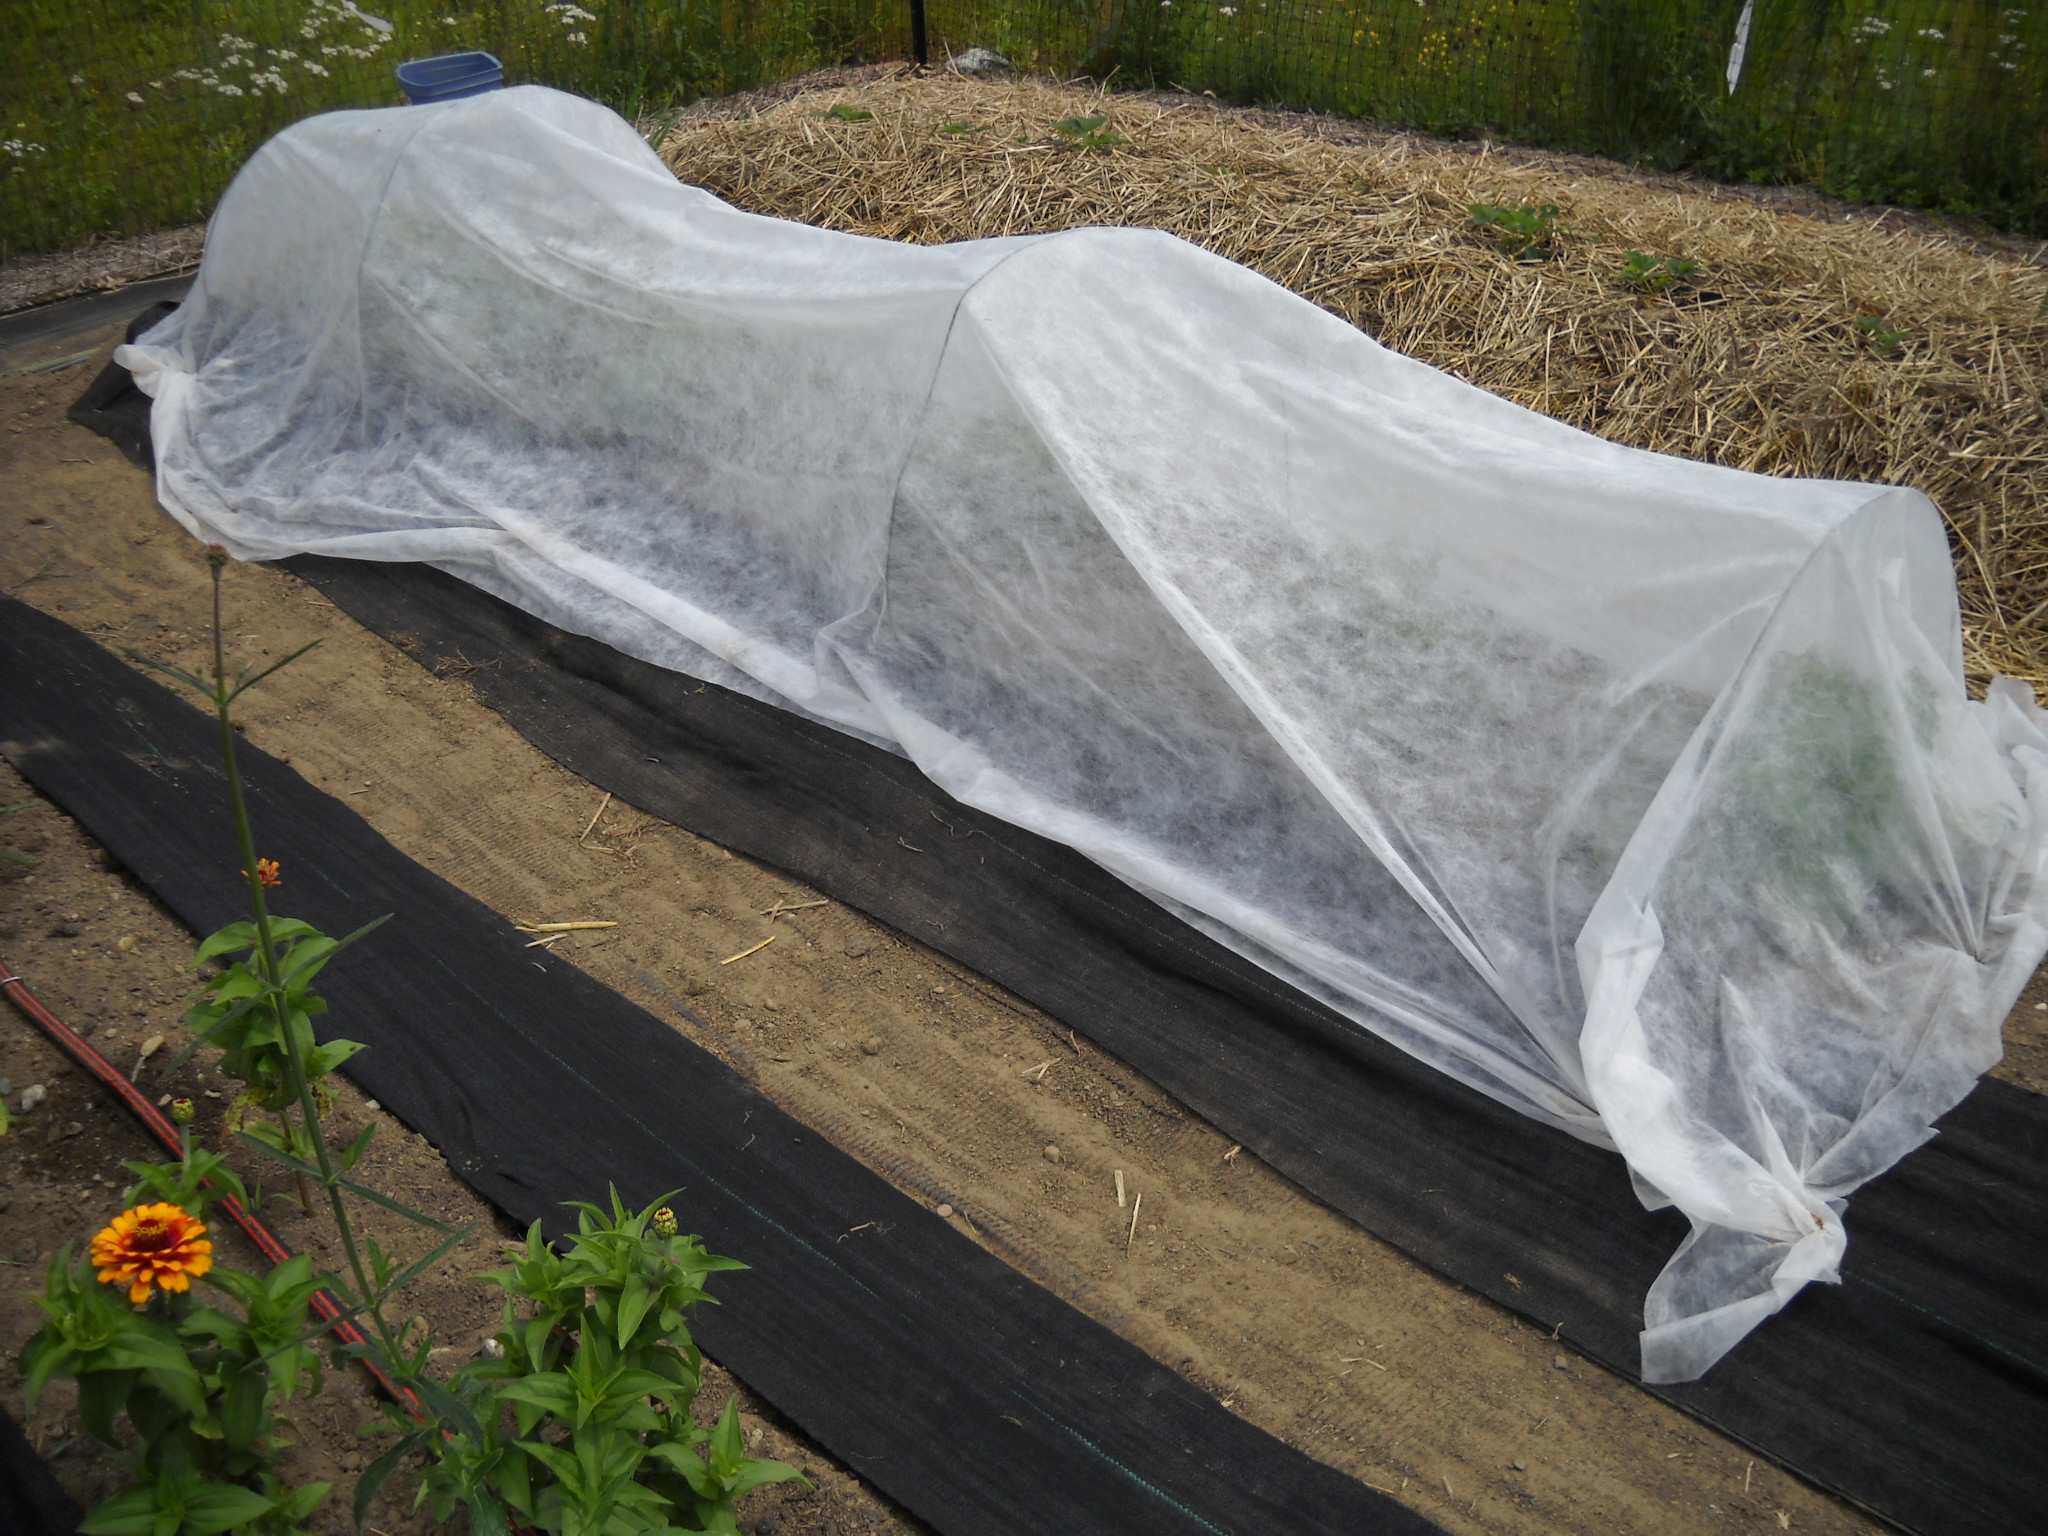
Another way to minimize beetle damage on any crop is to cover it with row cover, also called Reemay or Agribon (both are trade names). Row cover is a thin woven fabric that breathes and allows more than 90% of the sun’s light to pass through – without burning your plants the way clear plastic would. Got trouble with little green caterpillars on your broccoli? Cover it up. Rain will pass through it, too.
Although you can just lay row cover on your plants, I like to stretch it over wire hoops that are sold for the purpose. It gives the plants room to grow. In either case, you must seal the edges or some critters will crawl under for a free lunch. You can use earth staples sold for the purpose, or just use those stones that Mother Nature pushes up out of the soil every winter.
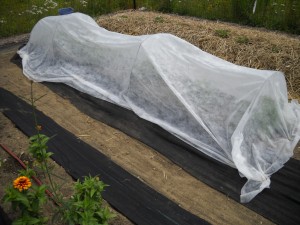
Row cover with hoops
Row cover holds in some heat, which is good at this time of year. But if you need insect pollination – all the vine crops need it – you must take off the covers when they flower or hand pollinate, which is time consuming. I sometimes leave row cover on eggplants all summer as they are wind pollinated.
Thinning plants started outdoors by seed must be the most tedious of all garden tasks. Carrots, lettuce, rutabagas, beets? All need to be thinned for best results. Beets and carrot babies are good to eat if you wait until the end of the month of June. I try to have them thinned to one inch apart by the Fourth of July, with a wider spacing a month later.
Beet greens are a classic early summer dish that I like served with a sprinkling of gourmet rice wine vinegar instead of the calorie-packing butter that I use on my asparagus. And just a reminder, don’t keep picking asparagus for more than 3 weeks. Oh, it’s tempting to keep picking the spears that pop up to replace those you’ve eaten. But the greens are needed to feed the roots, and picking for too long will cause the patch to run down.
My asparagus patch produced well this year, its third, and I am rewarding it with regular weeding, a light top-dressing of organic fertilizer and a little compost. Then I will cover the compost with a layer of wood chips to minimize the need for weeding later on this summer.
Last fall I covered up my wide raised (mounded) vegetable garden beds with hay, straw or fallen leaves after cleaning out most of the weeds. This really minimized my work this spring. I pushed off the winter cover of mulch into the walkways in early May, which kept weeds from starting up there. The sun warmed the soil, spawning some weeds. But I pulled them out or sliced them off before they got established, and then planted without rototilling.
I know some gardeners who love their rototillers as much as they love their spouses. They do create a lovely-looking bed, and they make all the weeds “disappear”. But if you chop up witch grass or perennial weeds, each piece may well produce a new plant in a few weeks.
Many weeds have what I call ‘photo-triggers’. This means that they need some light to know it is time to wake up and grow. Buried down 4 inches, the seeds can sleep for years. Turn them up with a rototiller and they germinate. So at planting time I try to minimize how much I disturb the soil. I use an ancient 4-tined potato hoe and my CobraHead weeder (www.CobraHead.com) to do most of the soil work.
We’ve all heard of the “runner’s high” – a feeling of well being from running. Sometimes I get a “gardener’s high” instead. Planting a garden will do it for me. I just wish I got the same feeling after an afternoon of weeding – instead of a tired back.
Henry Homeyer’s Web site is www.Gardening-Guy.com. He is the author of 4 gardening books, and a children’s fantasy-adventure, Wobar and the Quest for the Magic Calumet.
Spring Flowers
Posted on Wednesday, May 28, 2014 · Leave a Comment
Each year I anticipate spring with great enthusiasm not because I don’t like winter – which I do – but because almost every day there are new flowers blooming in my garden. I’m keeping a list as they bloom this year, and so far, near the end of May, I have almost 50 species and countless varieties that either have bloomed, or are blooming in my garden.
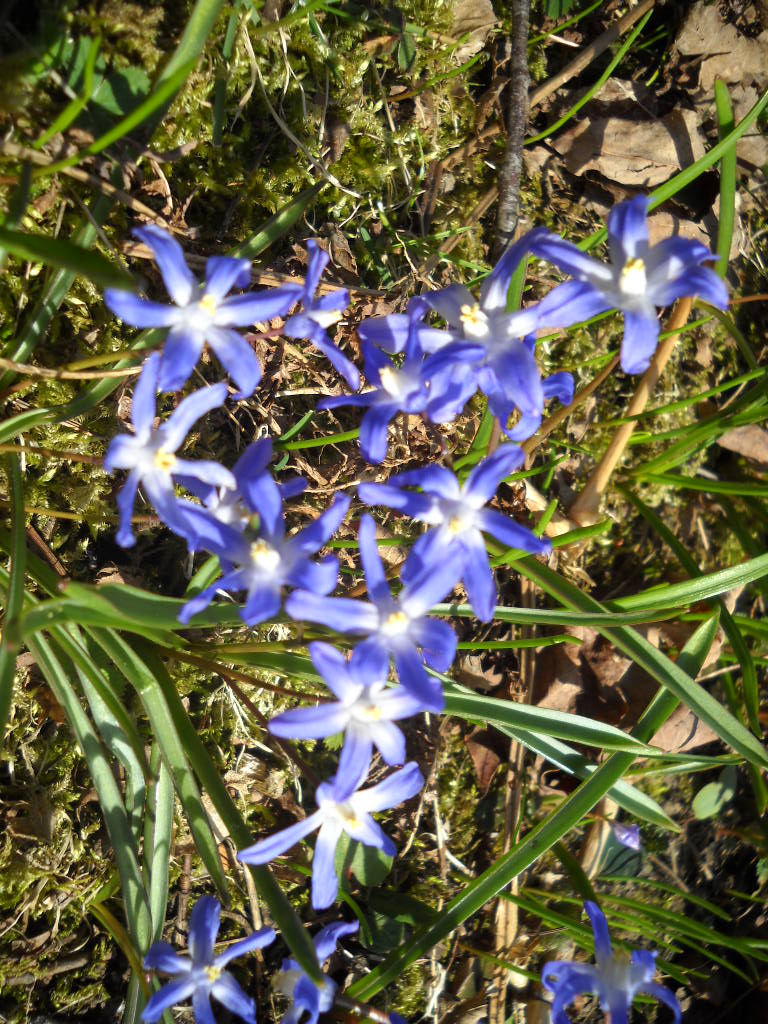
First to bloom each spring are the small bulb plants: snowdrops, winter aconite, scilla and glory of the snow. Then come the daffodils and tulips – many of which are still blooming nicely. My late tulips are still in bud.
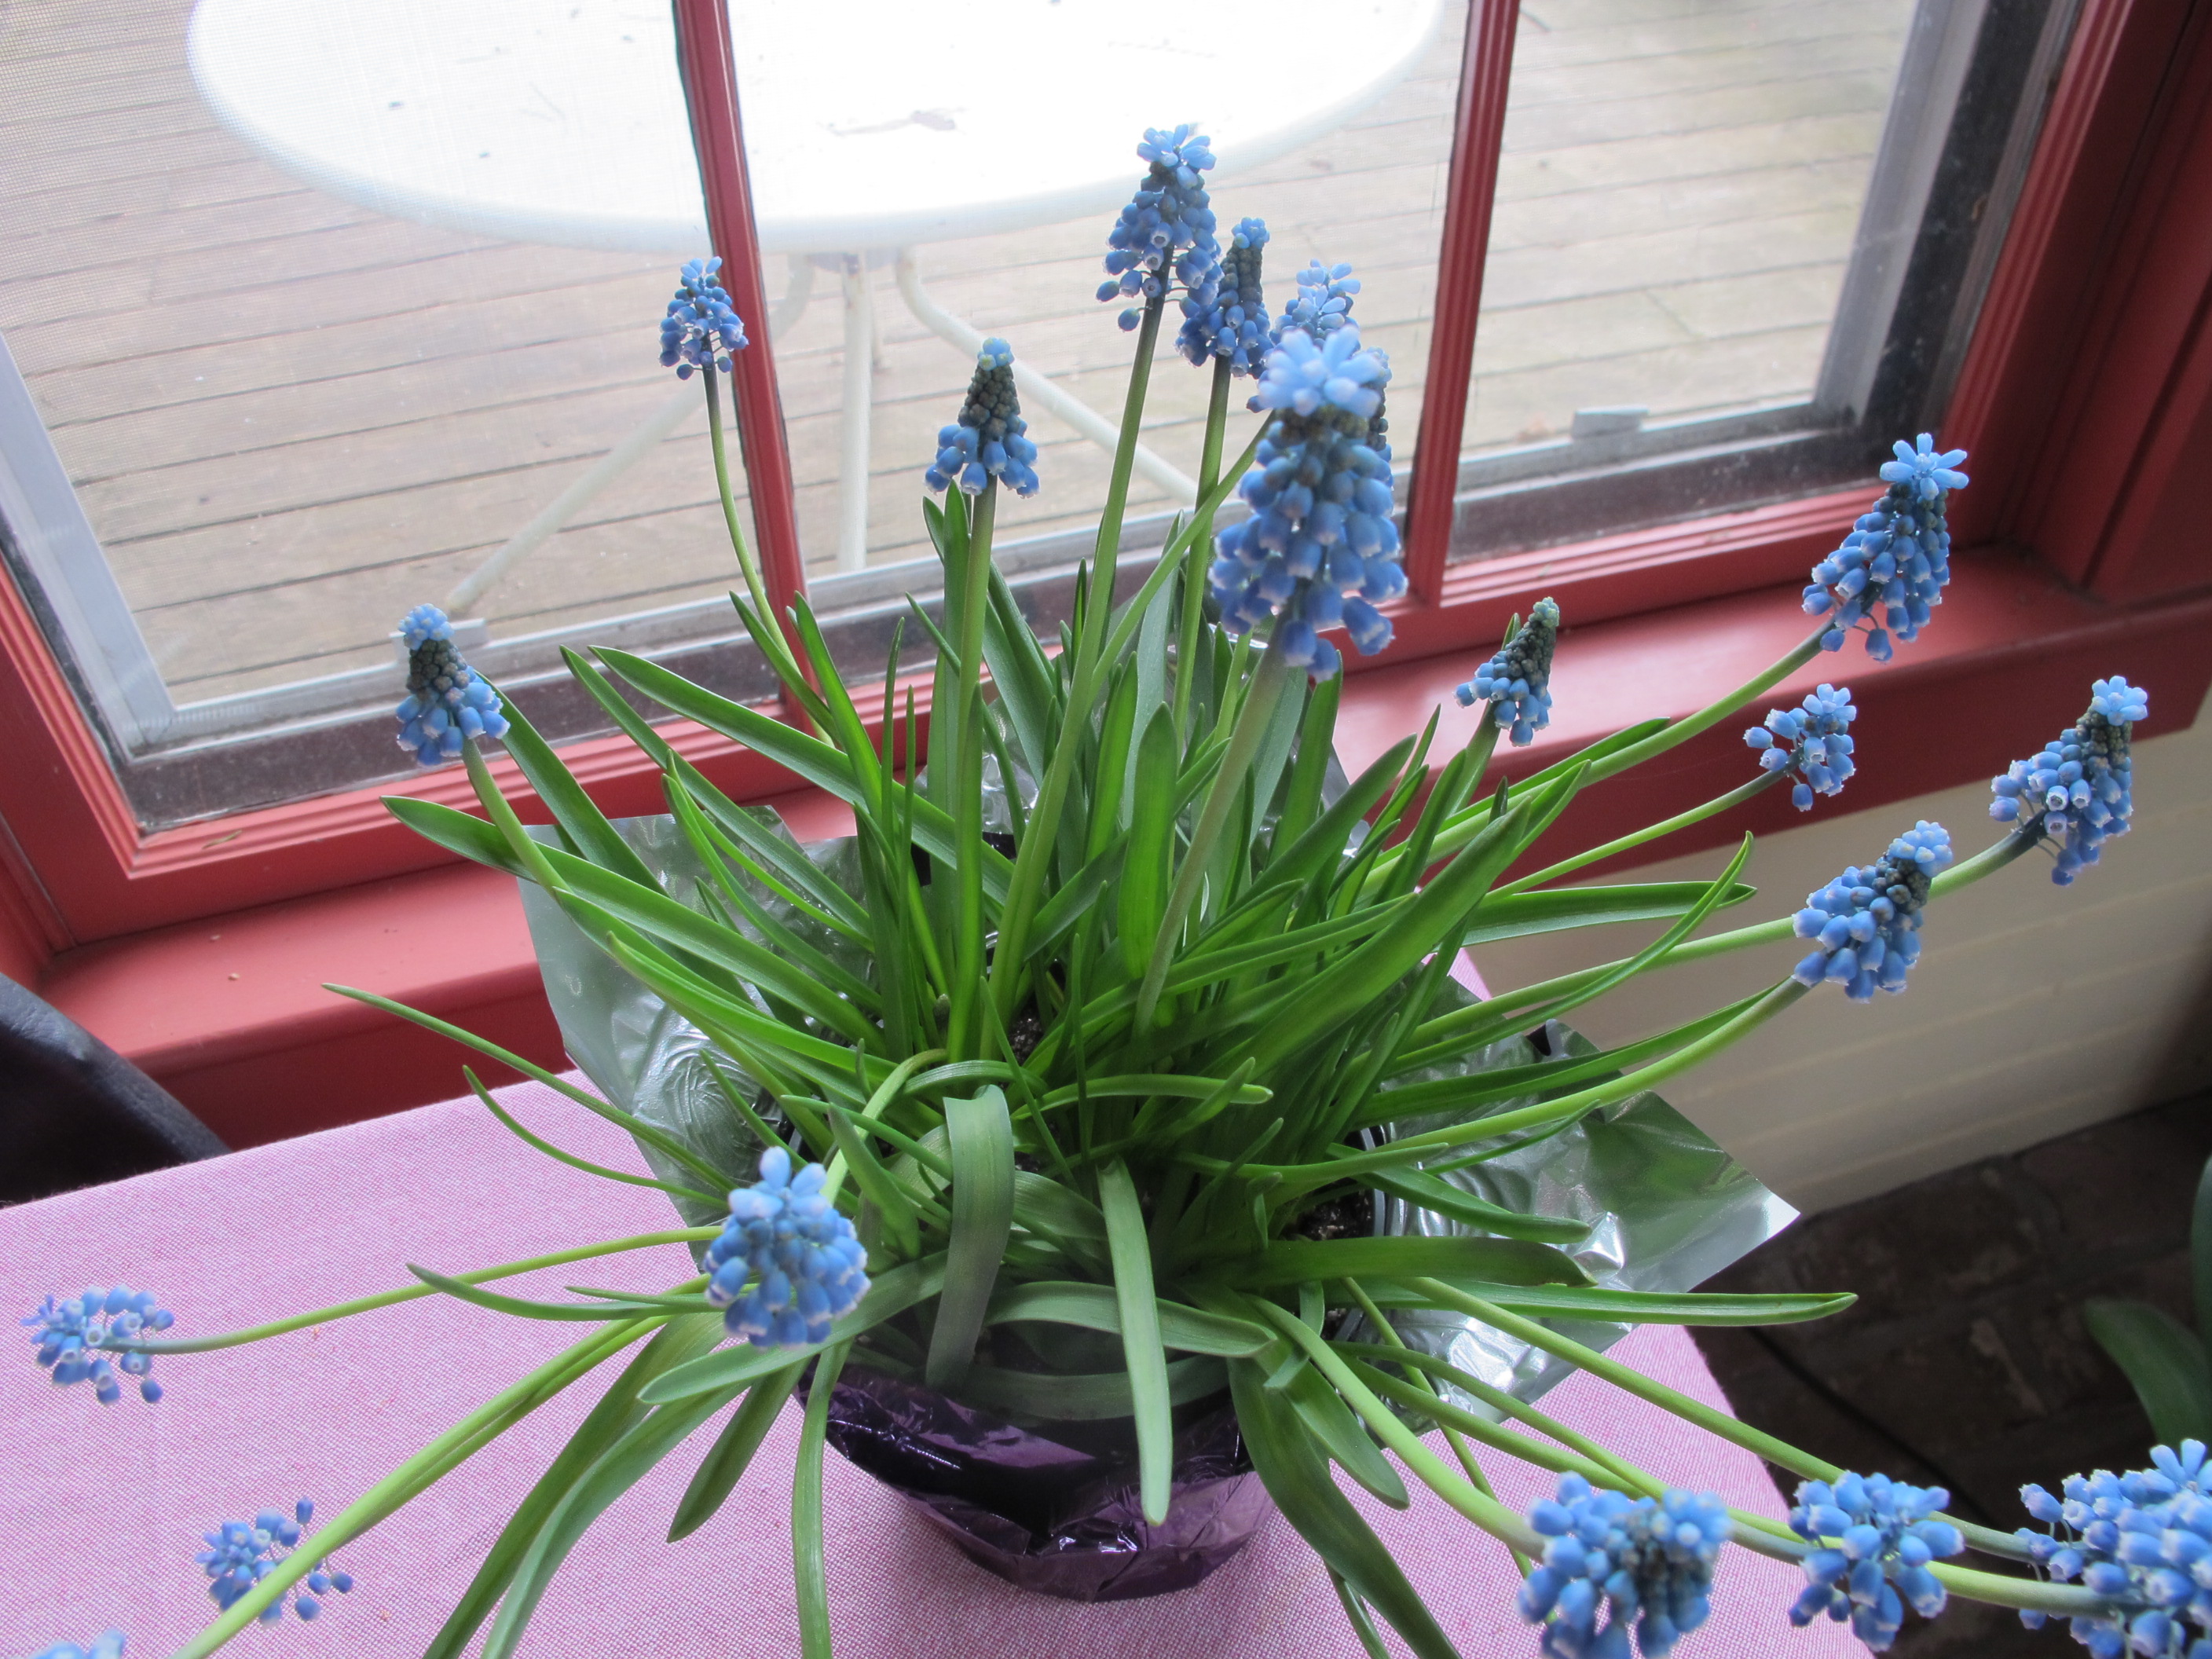
This year I have some lovely grape hyacinths (Muscari spp.) including one called ‘Christmas Pearl” that I got from Brent and Becky’s bulbs last fall. I especially like it because each little bulb seems to send up 2 blossom stems, one large blossom and then a second smaller blossom a while later.
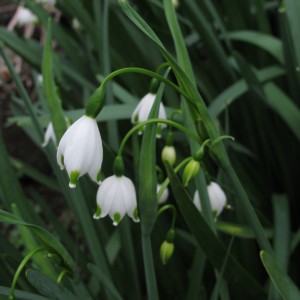
Spring snowflake close-up
Now I have spring snowflake (Leucojum vernum) in bloom.Or maybe it is summer snowflake (L. aestivum). They both look a bit like snowdrops on steroids. The white blossoms look down like snowdrops, but are atop 16 inch stems, and have little green decorations at the tip of each petal. This is a bulb plant that I got as a gift over 20 years ago and the clump just gets a little bigger every year. It’s supposed to be a zone 5 plant, and I have had colder winters by far, but it keeps coming back. It’s in full sun with lightly moist soil.
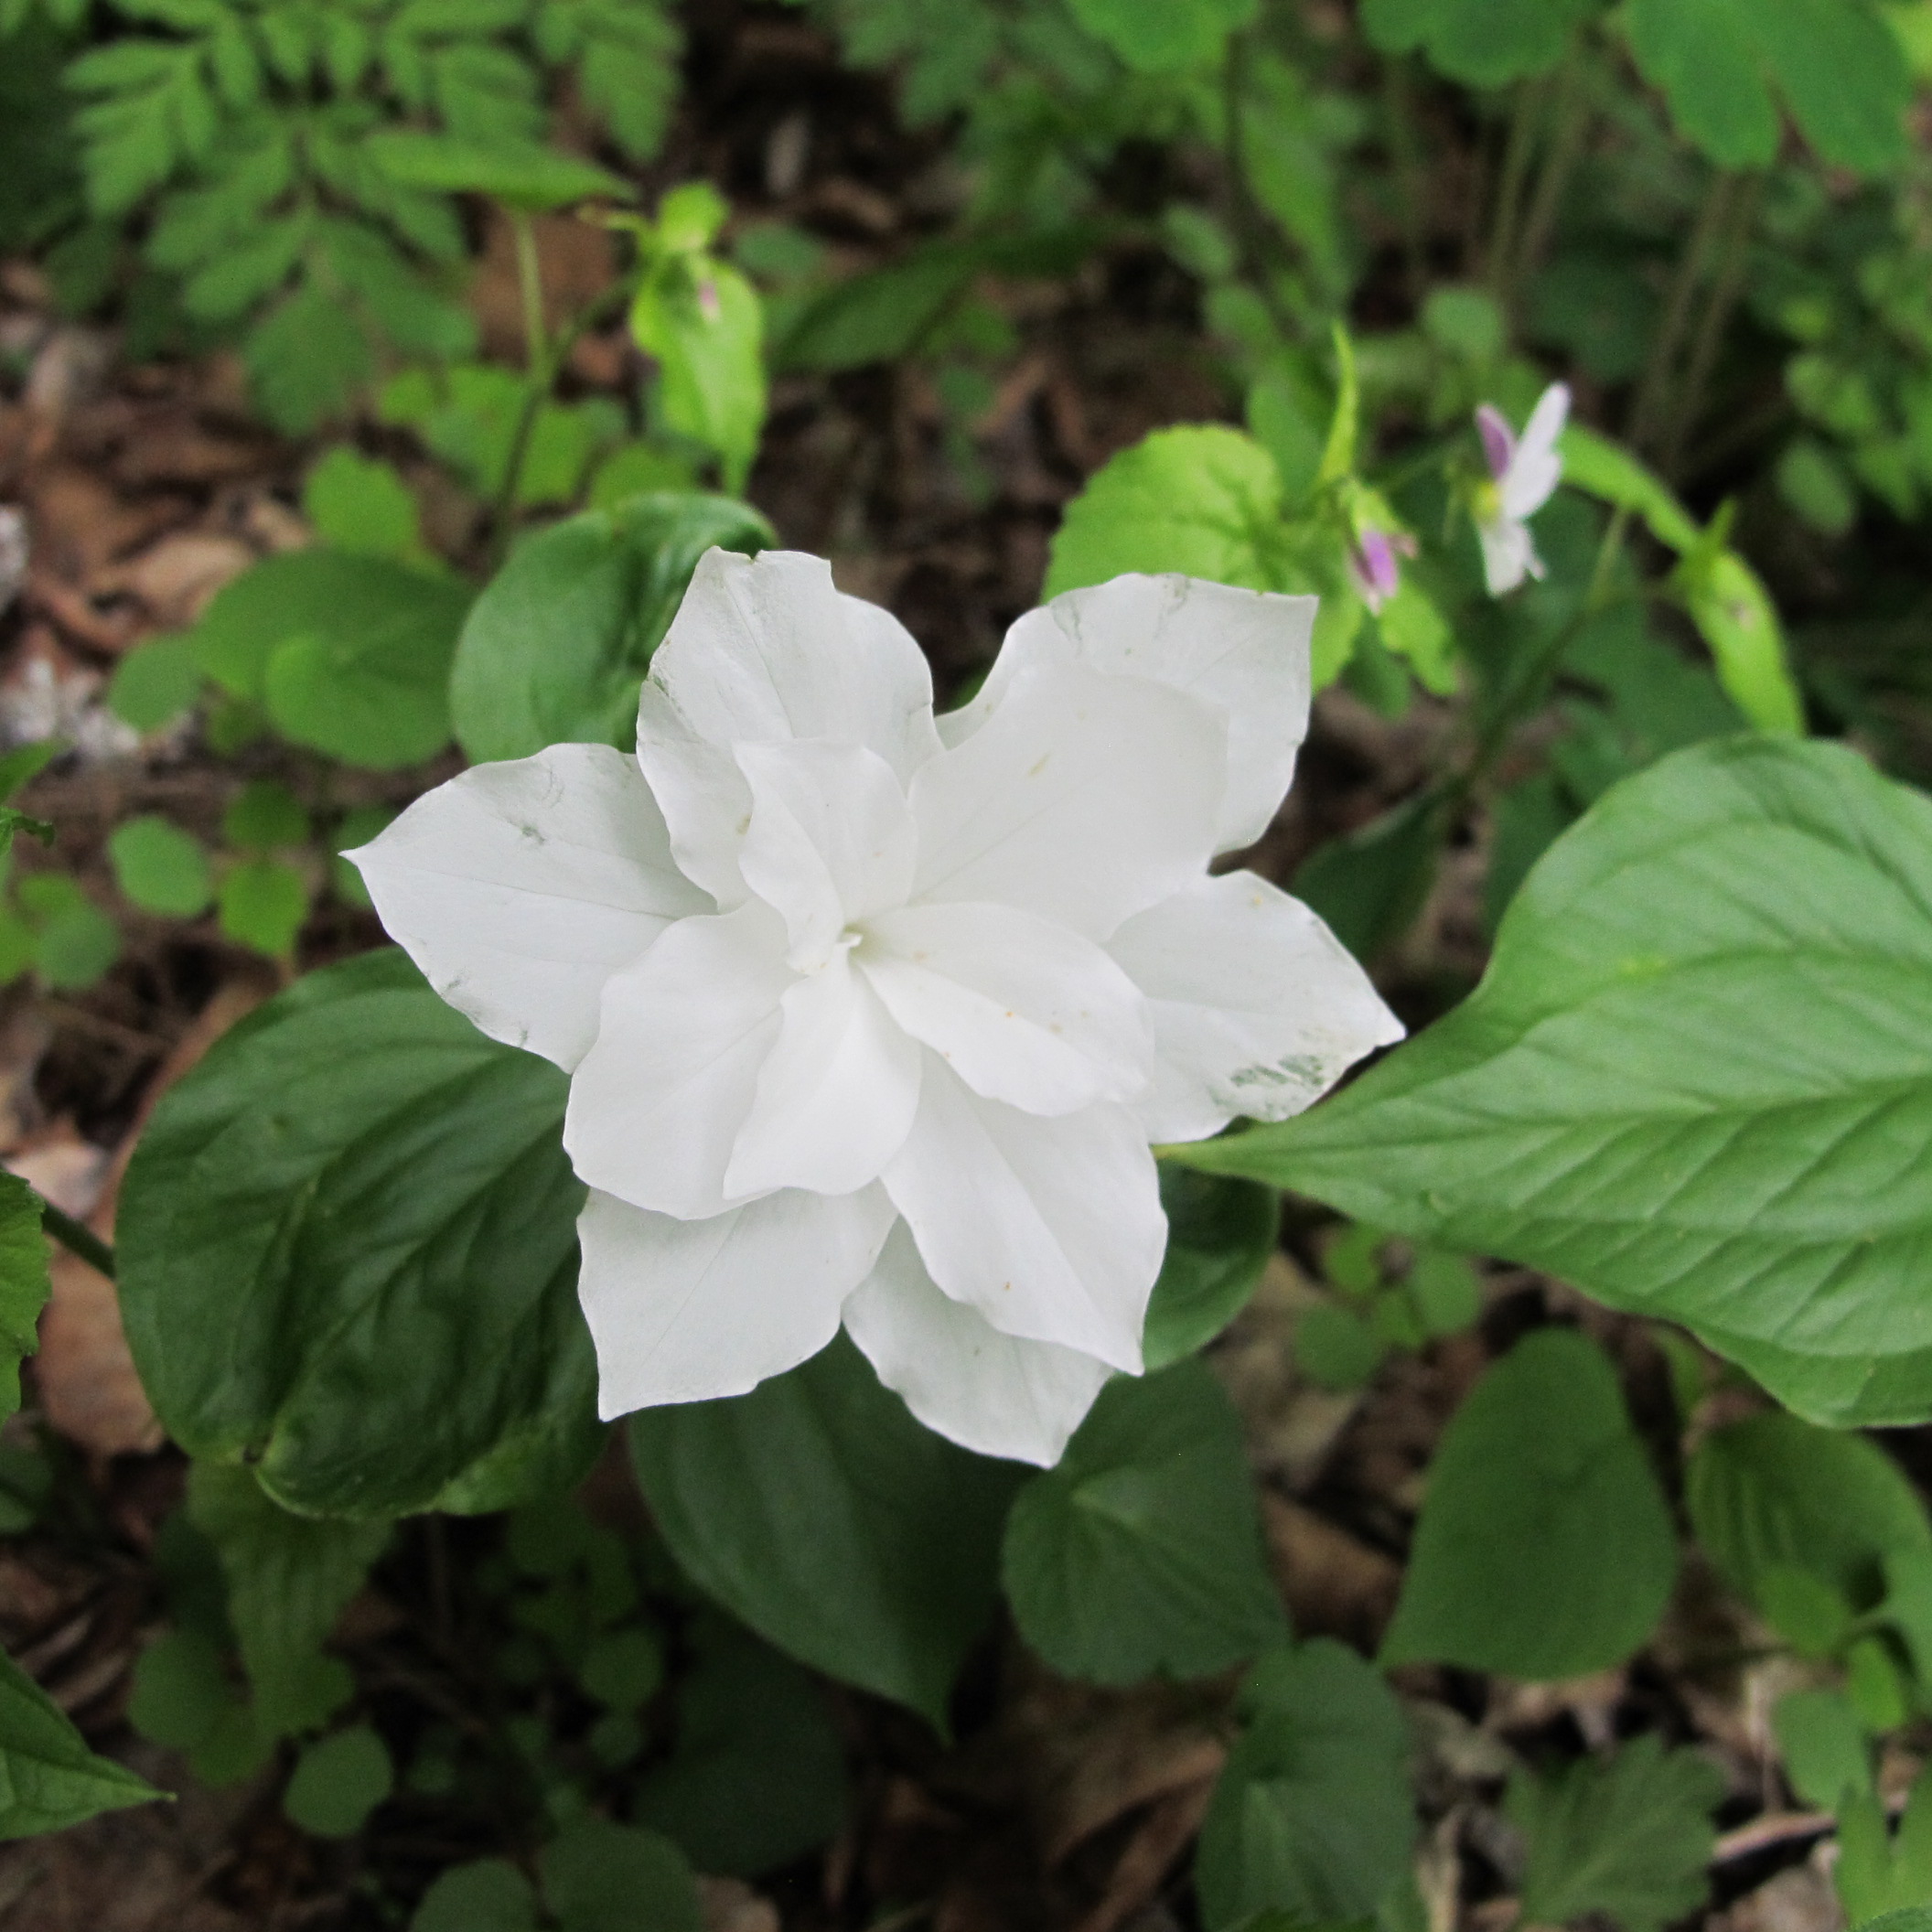
Trillium is technically a wildflower, but I have 4 kinds that bloom for me in shade gardens. The common one is called wake-robin or stinking Benjamin (Trillium erectum). Like all trilliums, it has 3 leaves and 3 petals. The flowers are a deep maroon. Then there is the white-flowered one (Trillium grandiflorum) which generally blooms for a longer time than the common one, and often fades to pink. I also have a double white, which is very rare, and has extra petals. Lastly I have a yellow trillium (Trillium lutea) that I bought at the New England Wild Flower Society’s garden in Framingham, MA. Its native home is in the southern Appalachians, and is less hardy than the others. I have seen painted trillium (T. undulatum) in the woods. It is a native here, but I don’t have any. If I see one for sale, I will surely buy it.
Umbrella Plant
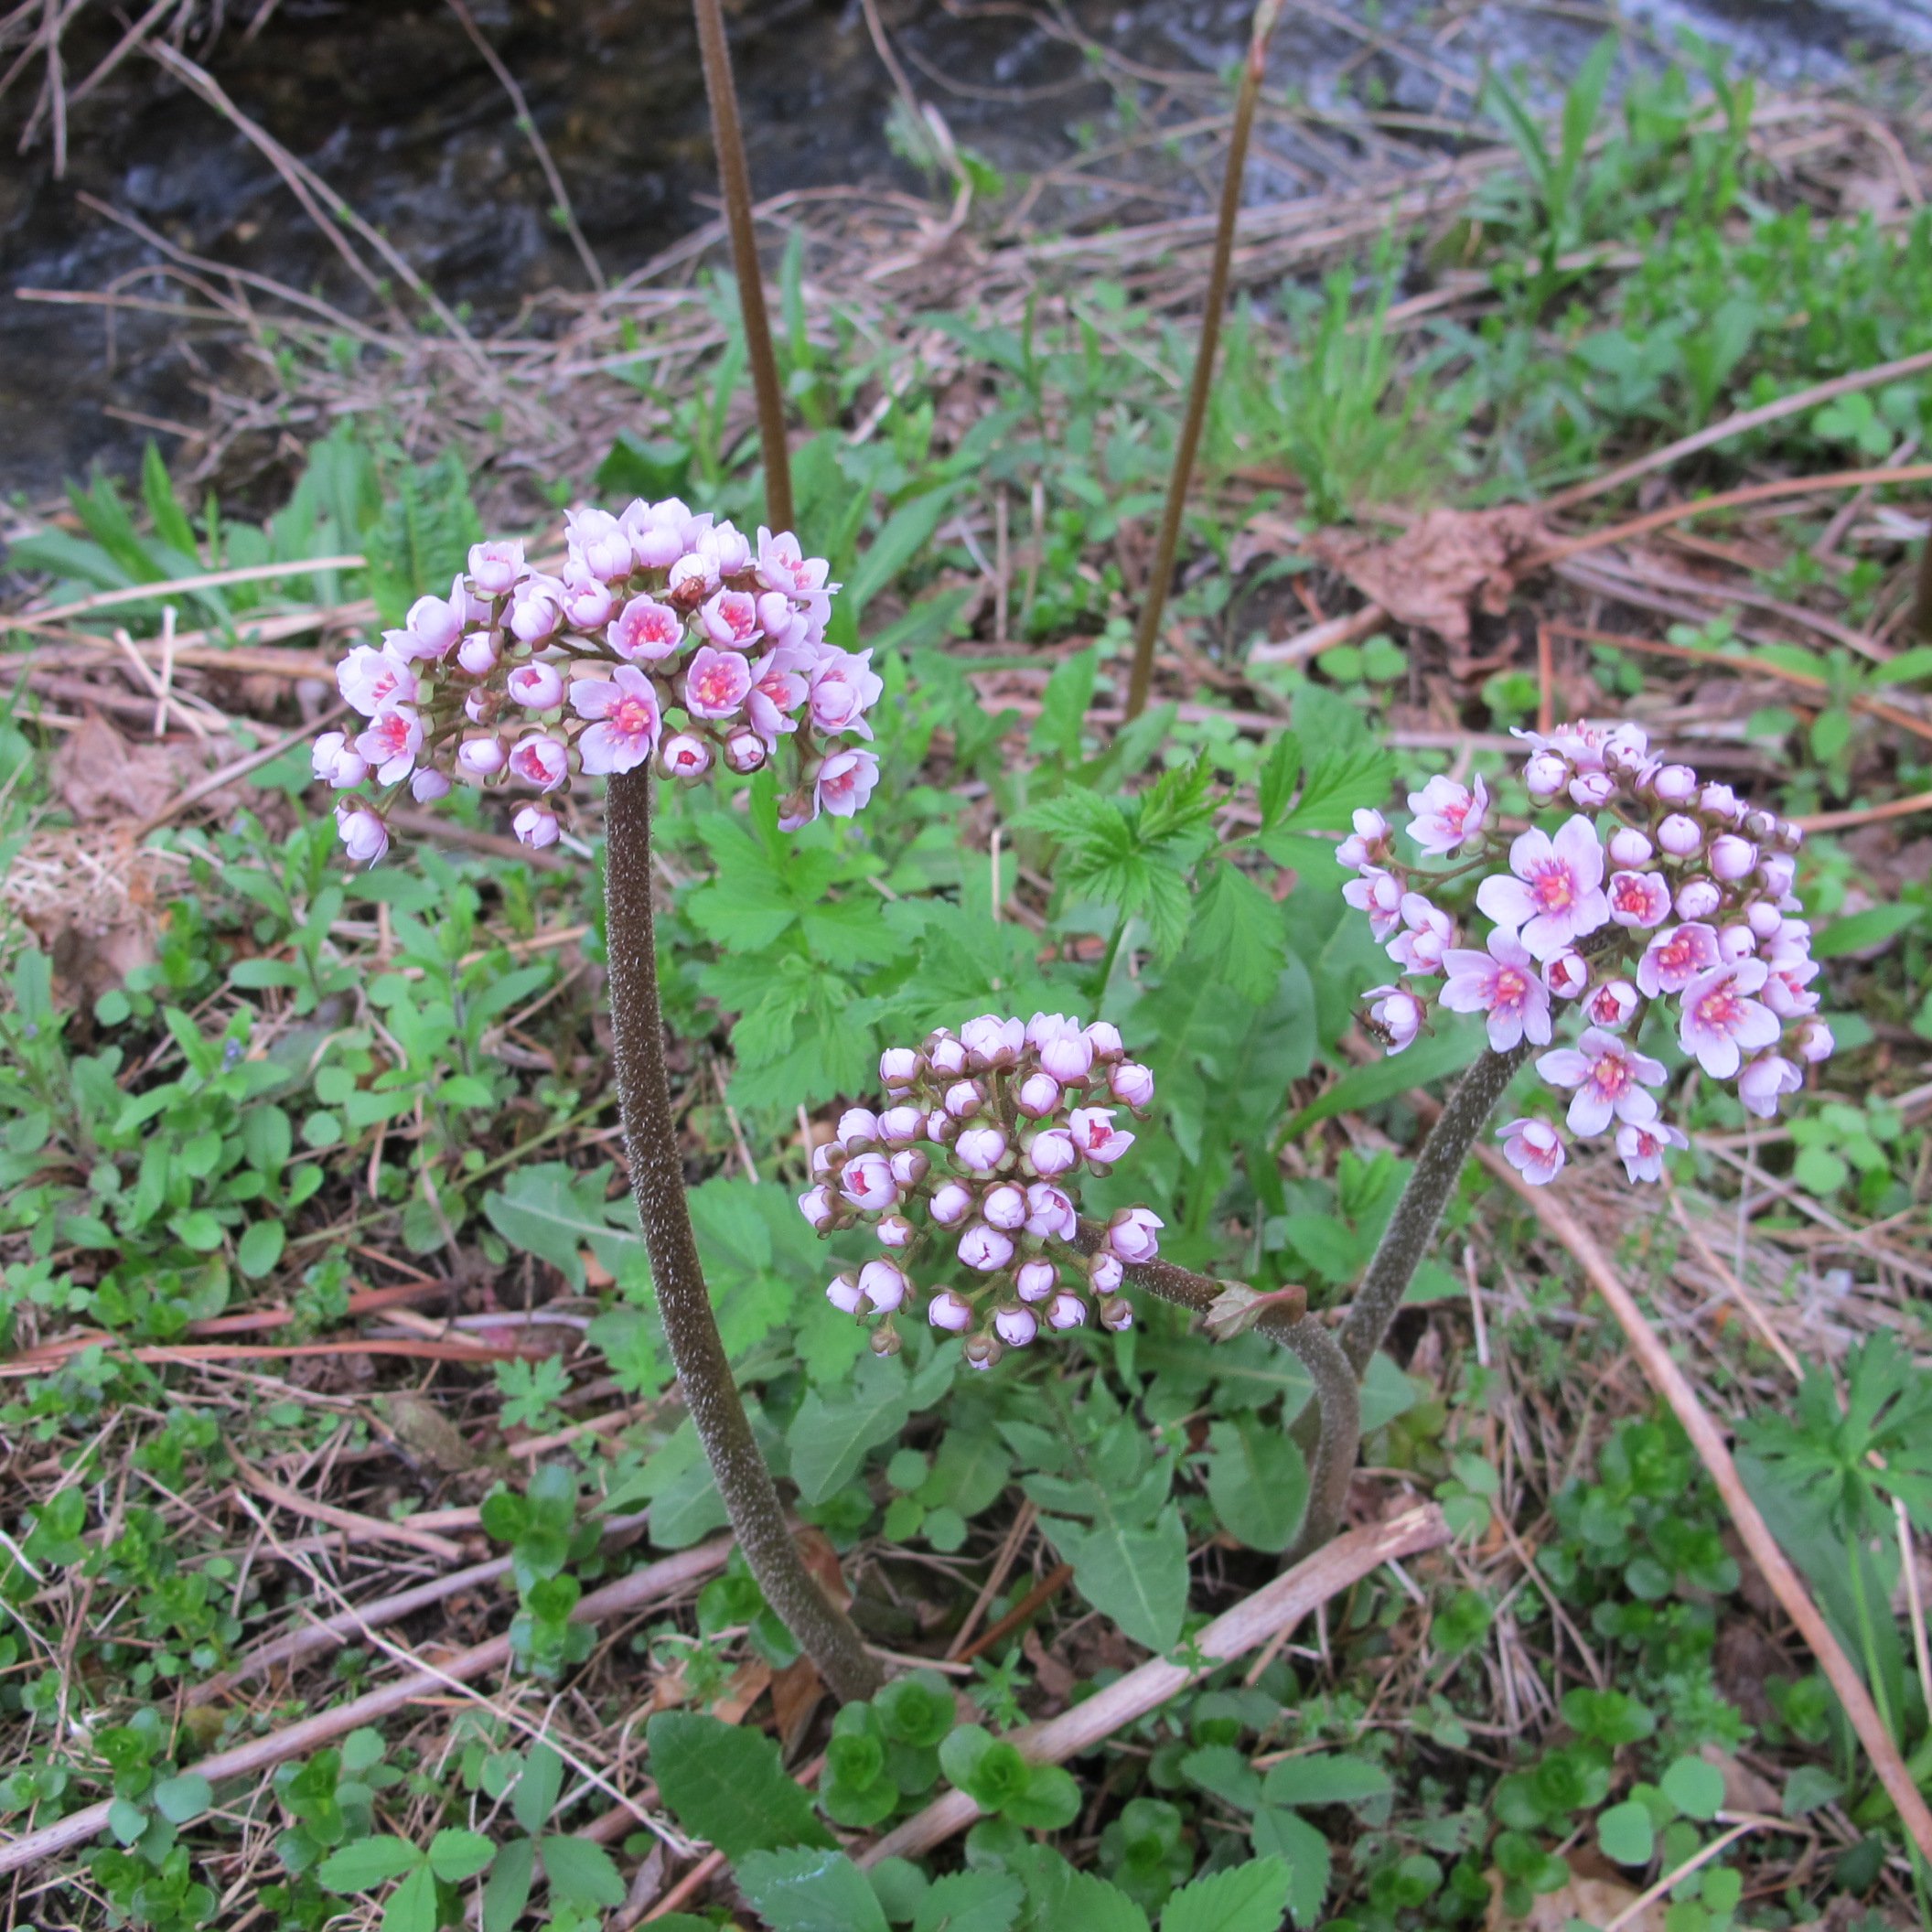
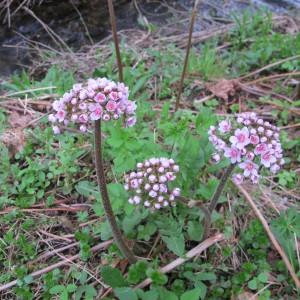
Right now down by my stream is a favorite, a dramatic big-leafed plant, the umbrella plant (Darmera peltata). I planted it over some of the ashes I was given after my sister, Ruth Anne, died in 2009. The flowers are big clusters of small pink flowers that stand two feet above the ground. This year I have 9 stems, each topped with a cluster or cyme, 3 to 6 inches across. Later, the 2-foot wide leaves will grow big enough to serve as umbrellas for gnomes. I placed a marble bench next to these flowers – a good place to reflect on the ephemeral nature of life, while listening to the burble of the stream.
Under my wild apple trees I have what I call my primrose garden. It is dominated by candelabra primroses (Primula japonica) but has several other species as well. The “japonicas” as I call them, have 3 tiers of flowers that blossom in sequence, each a whorl of color- from magenta to pink to white. They throw seeds and spread like crazy for me. I have hundreds. They are in dappled shade and a fairly wet, rich soil.

Double white trillium
Also in that primrose garden are some with no common name, though I call them “kissing primroses” because the Latin name, Primula kisoana, sounds a little like kiss (I pronounce it Kiss-O-Anna). These are low-growing and spreading primroses that are a deep pink, and are in bloom now. They spread by root, but do not overpower nearby plants, which is nice. There is a white one, which is less vigorous. Everyone should have the kissing primrose. I got mine from Cider Hill Gardens in Windsor, VT.
Also in bloom now is bleeding heart (Dicentra spectabalis). Listed in most books as needing full sun, I recommend just morning sun or dappled shade. In full sun the foliage dies back by mid-summer, while less sun allows it to look good until fall. It likes good, rich soil and some moisture, but I also have them growing out of a sheer rock wall where there is little or no soil at all. Go figure.
There is also a pure white variety (D. spectabalis alba), and pink and white varieties of its cousin, the fringed or wild bleeding heart (D. exemia). The fringed bleeding heart is a native woodland plant, though not common in the woods. I have those in pink and white varieties. They tend to bloom off and on all summer, and will grow in dry shade.
So go enjoy the spring and keep on buying new things and trying them out. We deserve spring flowers after the winter we had!
Henry Homeyer is a gardening consultant and the author of 4 gardening books. His web site is www.Gardening-Guy.com.
Garlic Mustard
Posted on Wednesday, May 21, 2014 · Leave a Comment
As a garden writer I get a lot of email from people warning me about pending catastrophes: blights, bugs, invasive plants. Some are accurate, some are not. In 2012 we were told that a disease kills Impatiens (a lovely annual flower for shade) would make growing it impossible – ever again. But last year it did fine for many gardeners. Late blight on tomatoes is predicted every year, but my tomatoes have only been affected once. But I recently learned some disturbing news about an invasive weed, garlic mustard (Alliaria petiolata), that we should all pay attention to.
Invasive plants generally out-compete our native plants because they grow anywhere, often putting out leaves earlier in the spring than our natives, and holding them longer in the fall. Some, like the Norway maple, have roots that suck up water and nutrients far from the mother plant. Others, like barberry or honeysuckle, shade out natives in the understory of the forest. But garlic mustard, a seemingly innocuous little weed with a root system that is not hard to pull, goes one step beyond the others: it produces a toxin that kills necessary root-coating fungi on our maples, oaks and beeches. Where it grows, some of our favorite trees are in danger.
You may know that mycorrhizal fungi are beneficial fungi that coat the fine root hairs of many trees and perennial plants. They get sugars from the green plants and, as payback, share minerals that the green plants need but can’t extract from the minerals in their natural state. The mycorrhizal fungi produce acids that dissolve minerals in the soil and make them into a form that is readily taken up by the green plants. It’s a perfect symbiotic relationship: you scratch my back, I’ll scratch yours.
Here’s the bad news: Garlic mustard kills mycorrhizal fungi by producing chemicals and releasing them into the soil. Maples, oaks and white ash are all trees that depend on mycorrhizal fungi to succeed. Not only that, garlic mustard inhibits the germination of seeds of many species of native plants, including many spring wildflowers. And it has no natural predators here in the United States where it has invaded from Europe. In Europe it has at least 69 insect predators. Garlic mustard produces chemicals that make it uninteresting as food to herbivores like deer, as well as to insect predators.

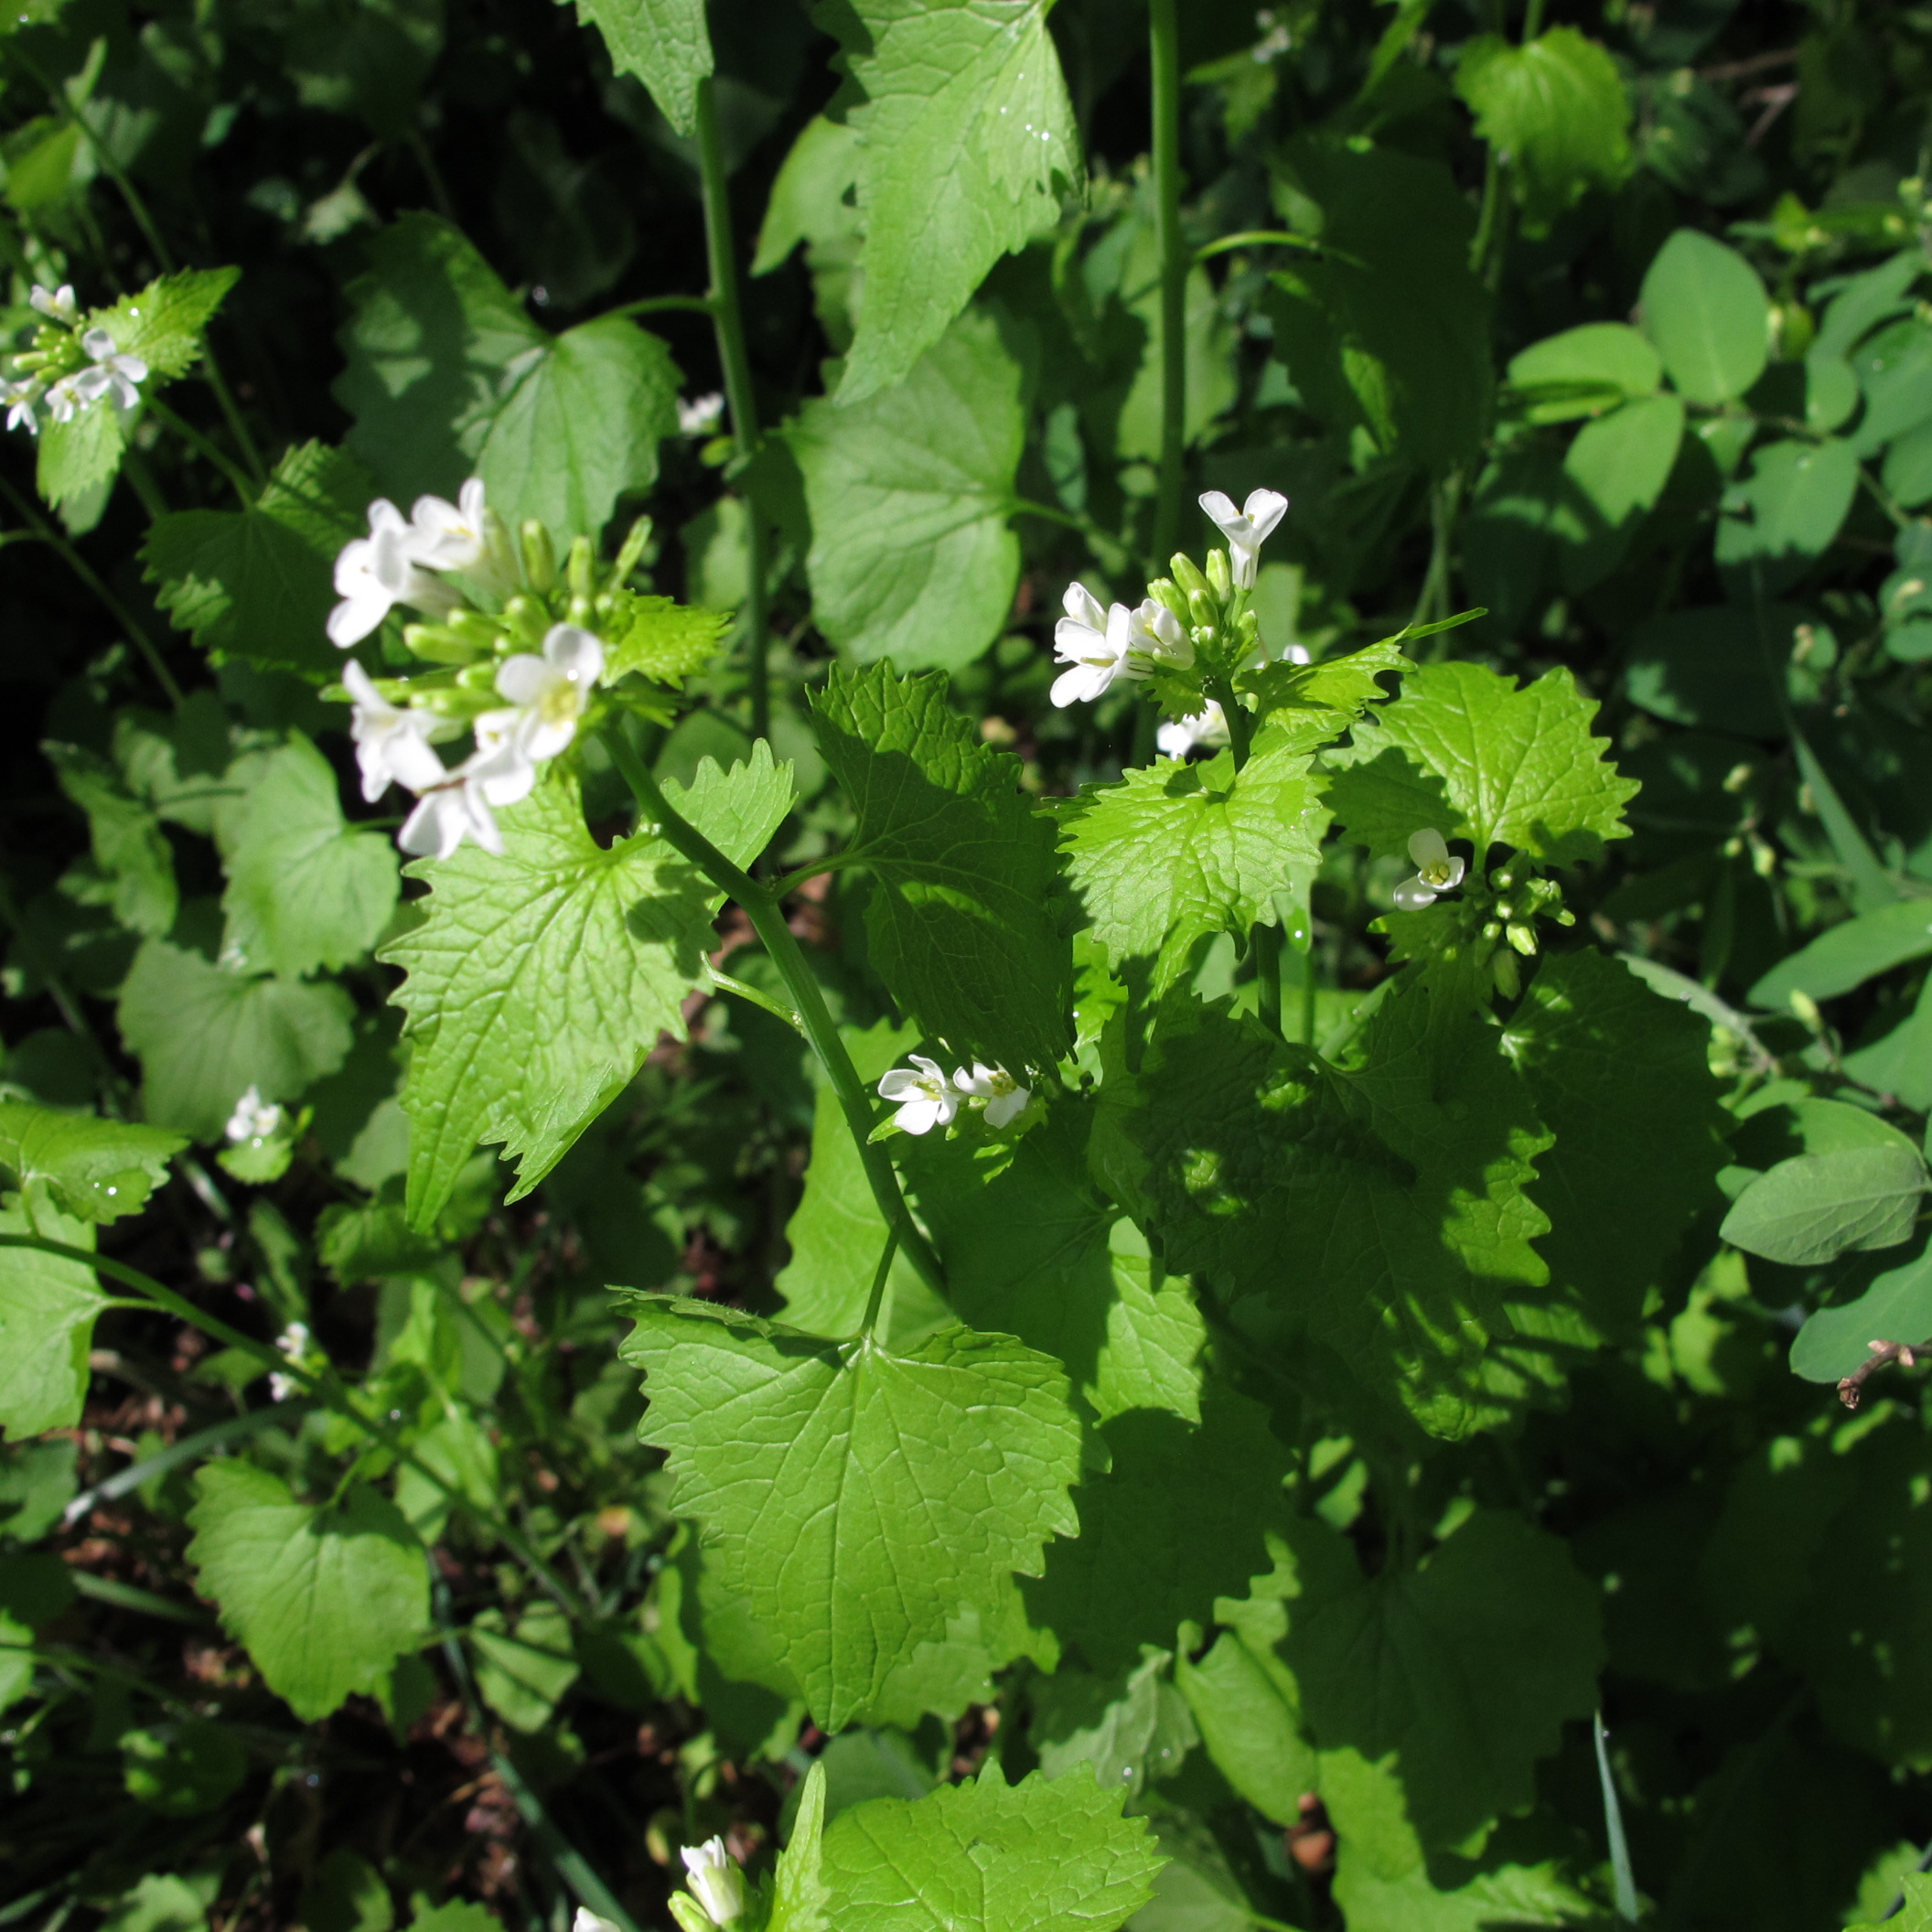
Garlic mustard flowers
So what can we do? First, understand its life cycle and learn to identify it. Garlic mustard is a biennial, meaning that it has a 2-year life cycle. In the first year it produces a low rosette of rounded leaves. The second year it sends up 18- to 36-inch flower spikes with pointy, heart-shaped leaves with jagged edges. The small white flowers have 4 petals and bloom in clusters about an inch or more in diameter. One plant can produce about 4,000 seeds. And although about 70% of the seeds will germinate the next year, some will remain viable in the soil for up to 10 years. A Web site full of good information is http://www.invasivespeciesinfo.gov/plants/garlicmustard.shtml.
Garlic mustard leaves when crushed smell a bit like garlic. Not as strong, but it has a distinct odor. The Europeans that brought it here in the 1860’s often grew it as an herb or a garlic substitute, and I have tasted pesto made from the leaves. But since it produces cyanide at a level much higher than other plants, I choose not to consume it. I figure that if the deer won’t eat it, I won’t either.
Here’s the good news: pulling up garlic mustard is easy. It has a white tap root that comes right out if you give it a tug. It is not like many pest weeds – it doesn’t spread by roots that easily break off and start new plants. Goutweed, Japanese knotweed and witch grass all spread by root, but garlic mustard does not. After pulling it, place garlic mustard in the household trash, not the compost pile. Or if you must, seal it in black plastic bags and let it rot in the sun until full decomposed.
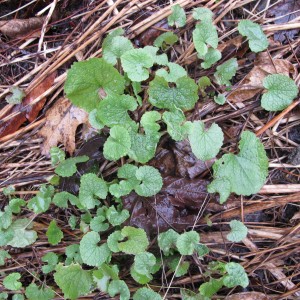
First year garlic mustard leaves
How can you help to prevent its spread? Pull it if you see it. Watch for first year plants – it sometimes arrives in hay used for erosion control – it will grow in full sun or full shade. A good close mowing of plants will help, though one report I read said that garlic mustard cut at 10 cm (roughly 4 inches) would survive 29% of the time.
Garlic mustard is blooming right now! So go look for it. Organize a neighborhood group for a “pulling party”. It behooves us all to look out for it, and to do our best to reduce its numbers and prevent its spread.
Henry Homeyer can be reached at henry.homeyer@comcast.net. He is the author of 4 gardening books and a children’s chapter book about a boy and a cougar. His website is www.Gardening-guy.com.
Tomatoes
Posted on Wednesday, May 14, 2014 · Leave a Comment
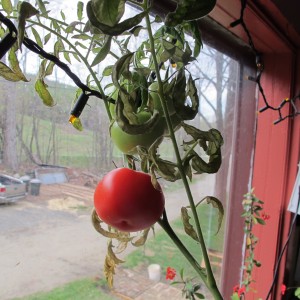
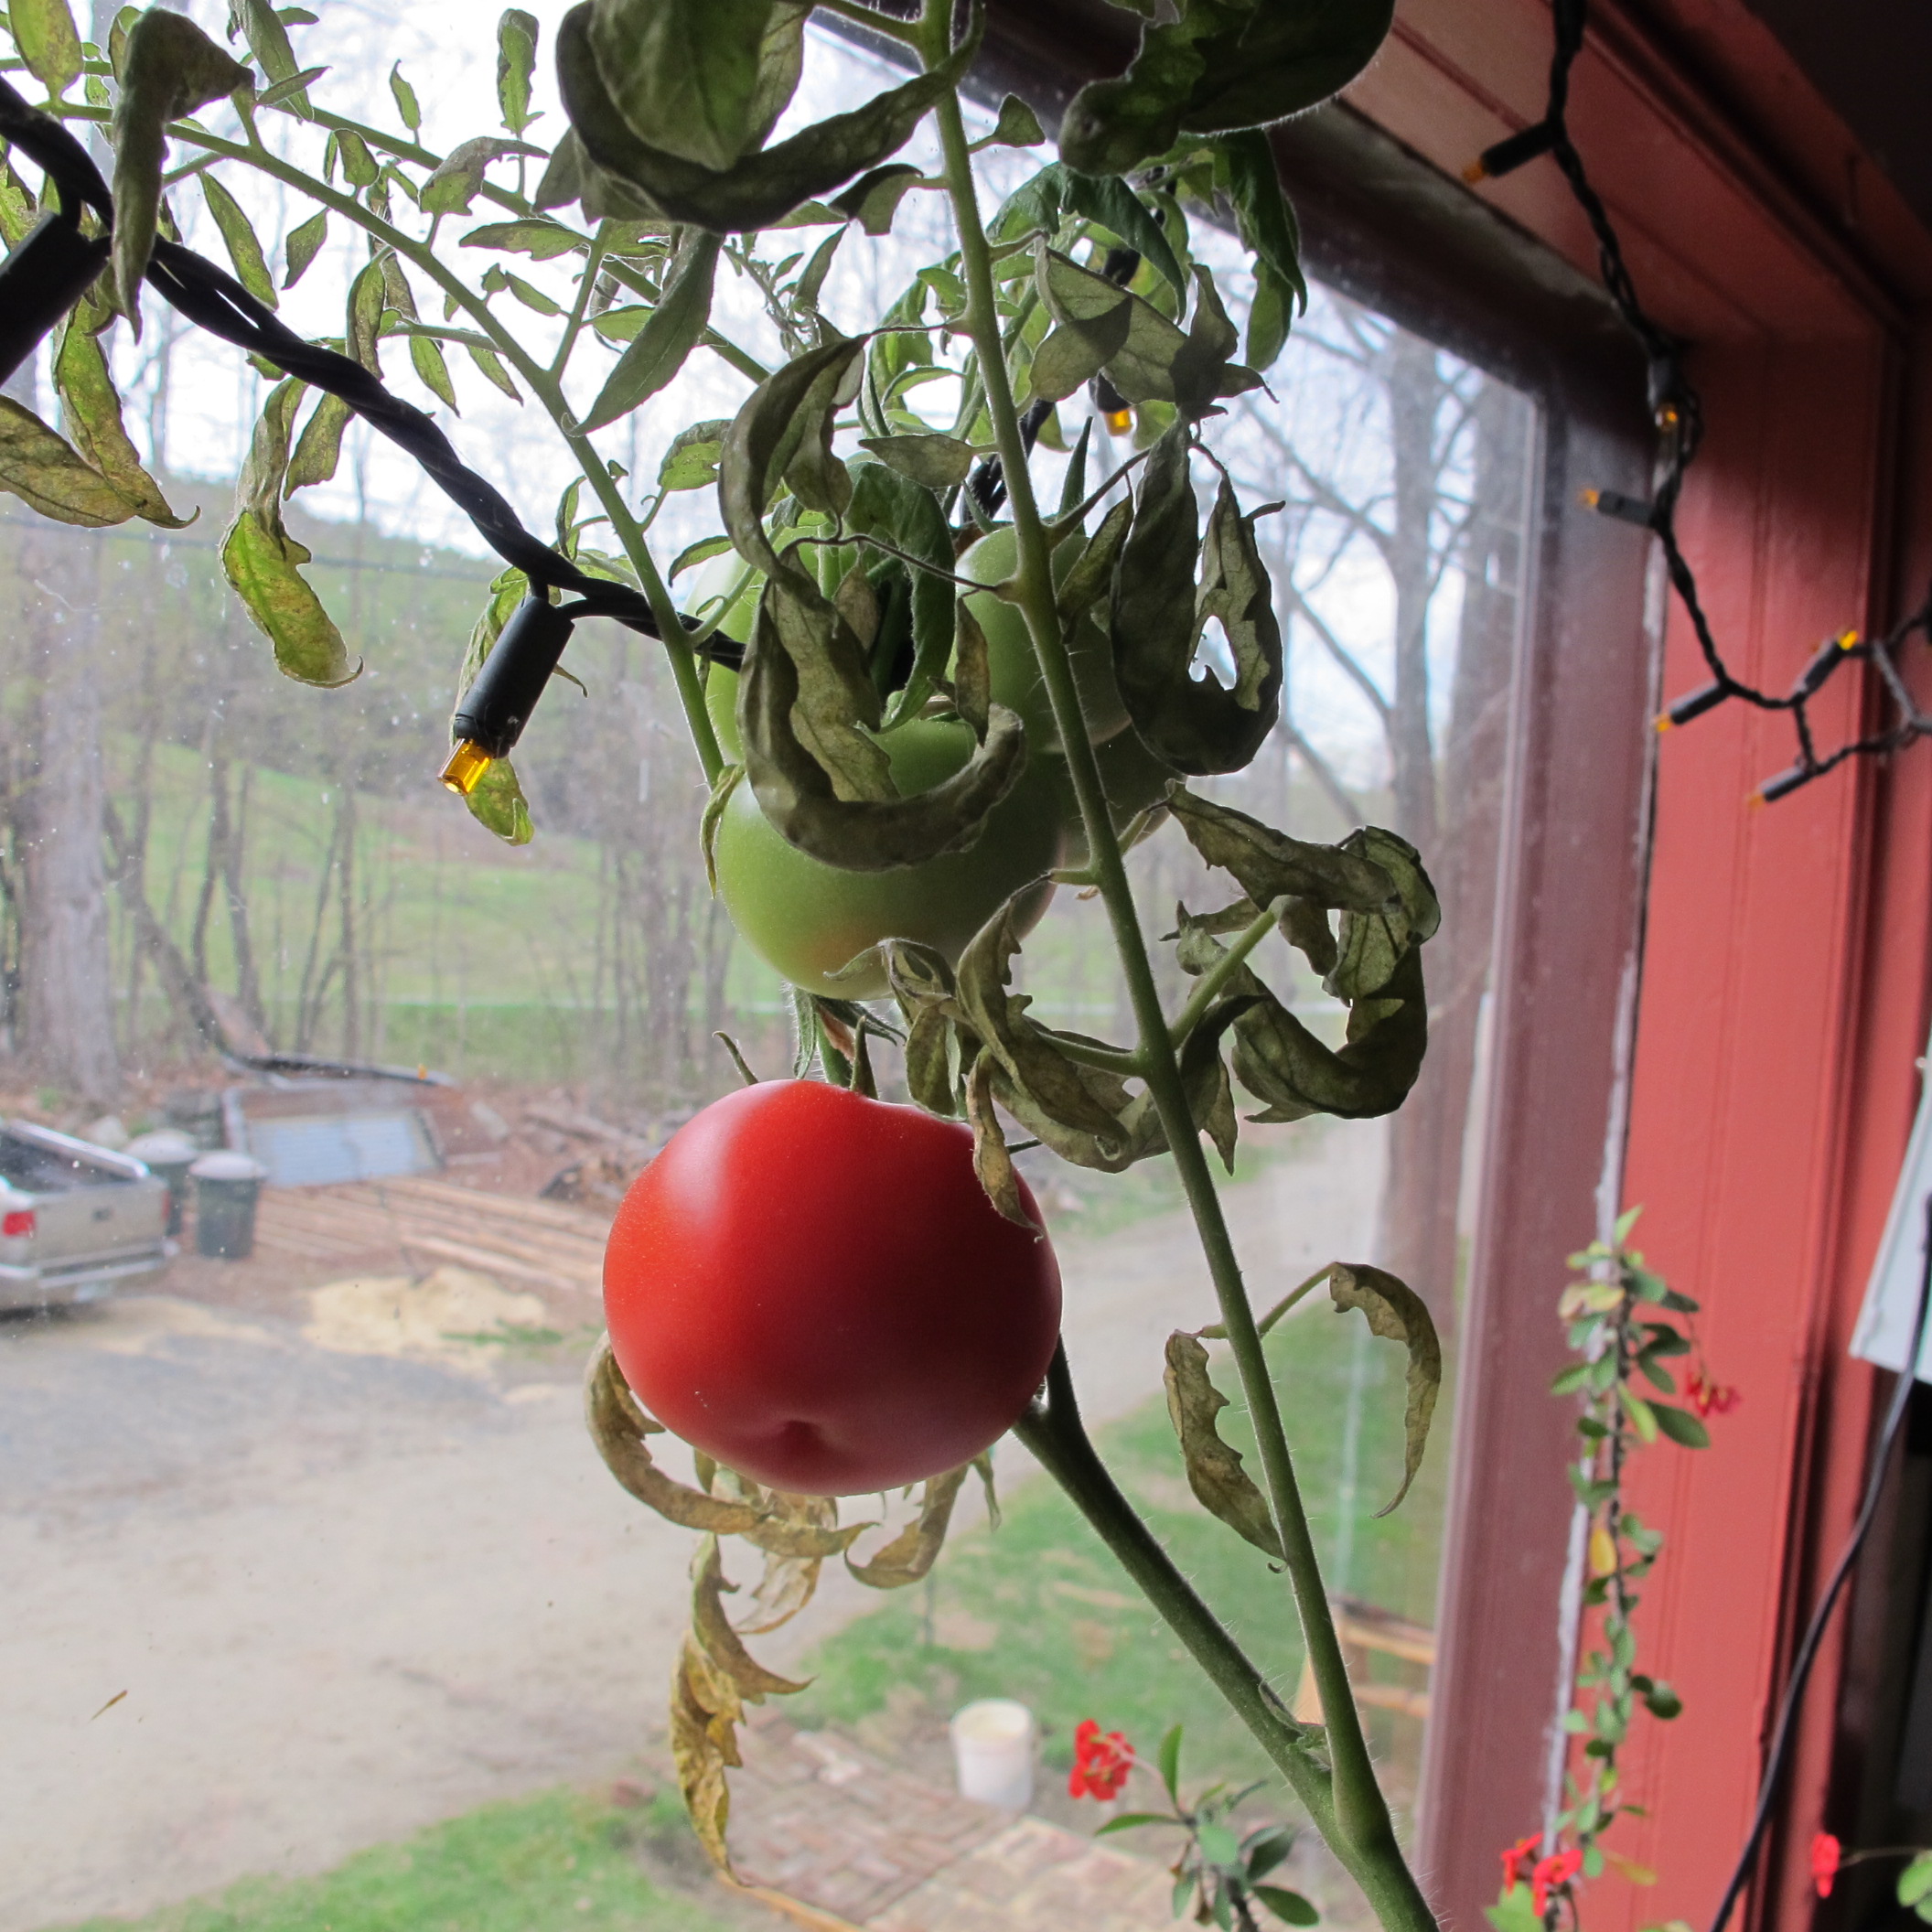
Windowsill-grown tomato
This year I met a lifelong goal of growing an edible tomato in the house, though I have I have to admit that it was quite by accident. Last fall I dug up an avocado plant that had started itself in the compost pile. Mixed in with the soil were seeds that germinated, including a tomato, a pepper and of course, weeds. I let the tomato grow and harvested a ripe tomato on May 10.
The plant has been in a west facing window and, although I did provide some supplemental lighting, that was only for a month or so. I don’t know what kind of tomato it is, but the flavor was excellent – a combination of sweet and tangy.
A few words about “volunteer” tomatoes: I get some in my garden each year, but never let them develop because many are not particularly tasty. Most modern tomatoes are hybrids (Big Boy, Jet Star, Sun Gold are all hybrids). That means that someone figured out that specific crosses of the parents would produce a tomato with desirable characteristics. But seeds from these hybrids will not breed true. Seeds saved from a Big Boy will most likely revert to one of the parents of the fruit, which may not be especially nice. So as you clean up your garden this spring, I recommend that you yank the babies.
What we call heirloom tomatoes do breed true. Tomatoes, unless manipulated for growing seed, are self pollinating. Heirlooms such as Brandywine, Purple Cherokee and Ox Heart will produce seeds that you can save each year and get just what you had the generation before. Heirlooms are not often sold at the grocery store because they are often of irregular size and shape (hard to package) and don’t have the tough skins needed for shipping and handling. But they have amazing flavors.
I grow both heirlooms and hybrids each year – a total, usually of about 30 plants. So why do I grow hybrids if heirlooms are so wonderful to eat? The modern hybrids have been bred for disease resistance, which is important. There are a variety of fungal diseases that can kill the leaves – or even the entire plant, and old fashioned breeding programs have developed tomatoes that resist them.
The worst disease for tomatoes is late blight. If it hits your garden, your tomato plants may well turn into a soggy, blackened mess of inedible fruit and dead plants in just a few days. Late blight also affects potatoes, and was the cause of the Irish potato famine. One hybrid tomato , the Defiant F-1, which was developed by the plant breeders working for Johnny’s Selected Seeds, is listed as “highly resistant” to late blight with “intermediate resistance” to early blight, another pest. I’ve grown it and like it. It has nice medium sized fruit, good flavor, and matures early.
There is much talk about GMO labeling in Vermont right now – they just passed a law that will require processed foods to indicate if there are genetically modified ingredients. As far as I know, there are no GMO tomatoes or other garden vegetables on the market. One GMO tomato was developed in 1994, but the public objected and the market for them was nil.
This year I started my tomato seeds indoors on March 24, three weeks earlier than usual. I transplanted them into bigger pots in early May and they are growing like crazy. But the plants are getting huge, which is a problem: they are too big to fit on my plant stand. I’ve had to remove a shelf so the plants can continue to grow.

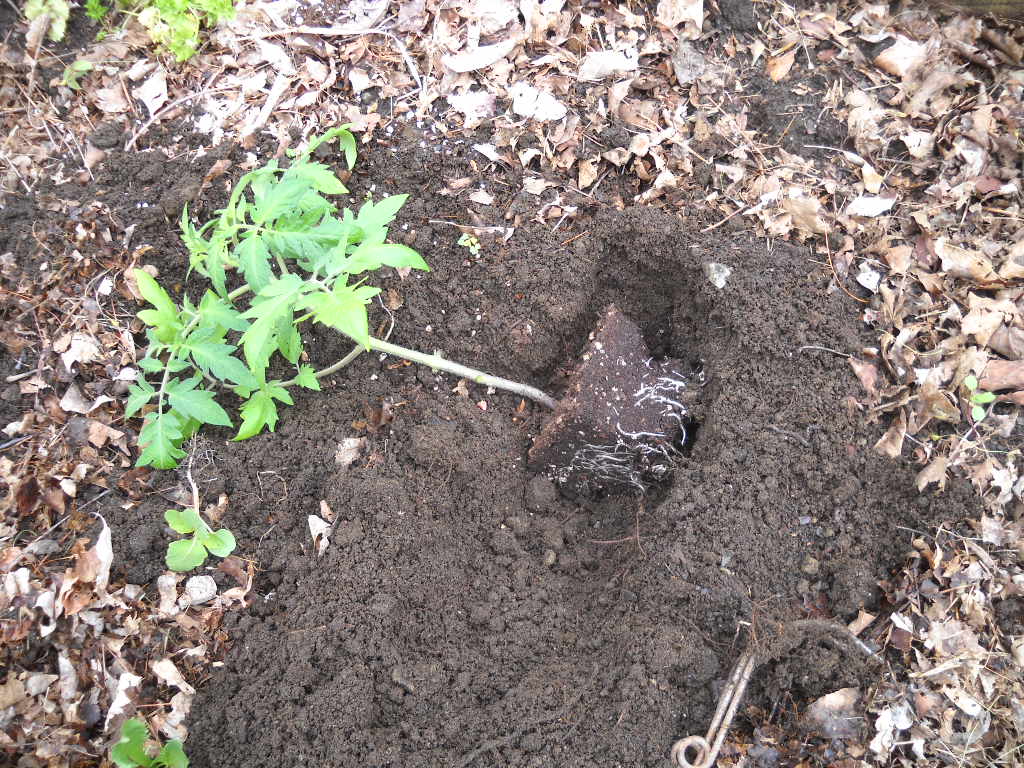
Planting tomatoes sideways
If you have long, leggy plants like mine, you’ll need to plant them sideways when the time comes. I will dig a hole for the root ball and then a trench for the long stem. I’ll pinch off all the lower leaves, then cover the root ball and the stem except for the very top cluster of leaves. I‘ll bend the tip of the stem up so that the leaf cluster is above ground level. The plant will straighten itself up in a few days. The long stem will turn into roots. Alternatively, you could plant the rootball deep, burying part of the stem.
Whether you grew your tomatoes from seeds or bought plants at the garden center, it is important to harden-off the plants before they go in the garden. That means introducing them to the sun’s powerful rays and the wind’s drying effects a little each day until the plants are ready to go out in full sun. Put them near the house on the north side so that they get just a few hours of morning sun, then gradually give them more sun. Just like a fair-skinned toddler, plants can burn if they get too much sun. Greenhouses provide a lot of protection. And bring them in on cold nights.
A soil thermometer is a useful item at this time of year. Cold, wet soil is not good for most plants, and tomatoes in particular. Sixty degrees is a good minimum soil temperature to attain before planting.
I don’t plant frost-sensitive plants until well after the last frost, though a few warm days always tempt me. But lettuce, peas and other frost hardy things are going in now. I’m ready for summer!
Henry’s Web site is www.Gardening-guy.com. Contact info is there, along with previous articles and information about his gardening books.
Lessons from an Asparagus Patch
Posted on Wednesday, May 7, 2014 · Leave a Comment
On a recent cold, gray Sunday I was looking for a good project to do in my garden. I decided to clean up my asparagus bed and get rid of last summer’s dead stalks and those sneaky weeds that had avoided my lethal grip. I had planted a new asparagus patch in 2012, so this is the first year that I can harvest a few stalks – and I can’t wait. I want to give my asparagus every advantage.
First, some basic information about asparagus. It is a perennial vegetable that, well tended, can produce for 25 years or more. It often grows in the wild, especially along roadsides where it competes with grasses and weeds. But in the garden it’s a fussbudget and won’t do well unless kept well weeded. In the wild it is known to grow in marshy places, too, but domesticated asparagus prefers well drained soil – but not dry soil. And full sun is best.
Asparagus roots radiate out from the center of the plant, and can be quite near the surface. When weeding it’s important not to disturb the roots, and to recognize them and cover them up if you expose them. The roots are brown and can be the diameter of a pencil lead near the tips, to the diameter of a pencil itself near the center of the plant.
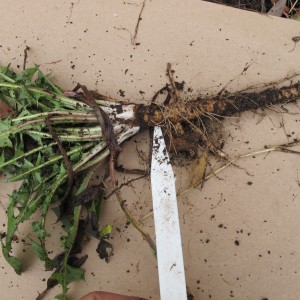
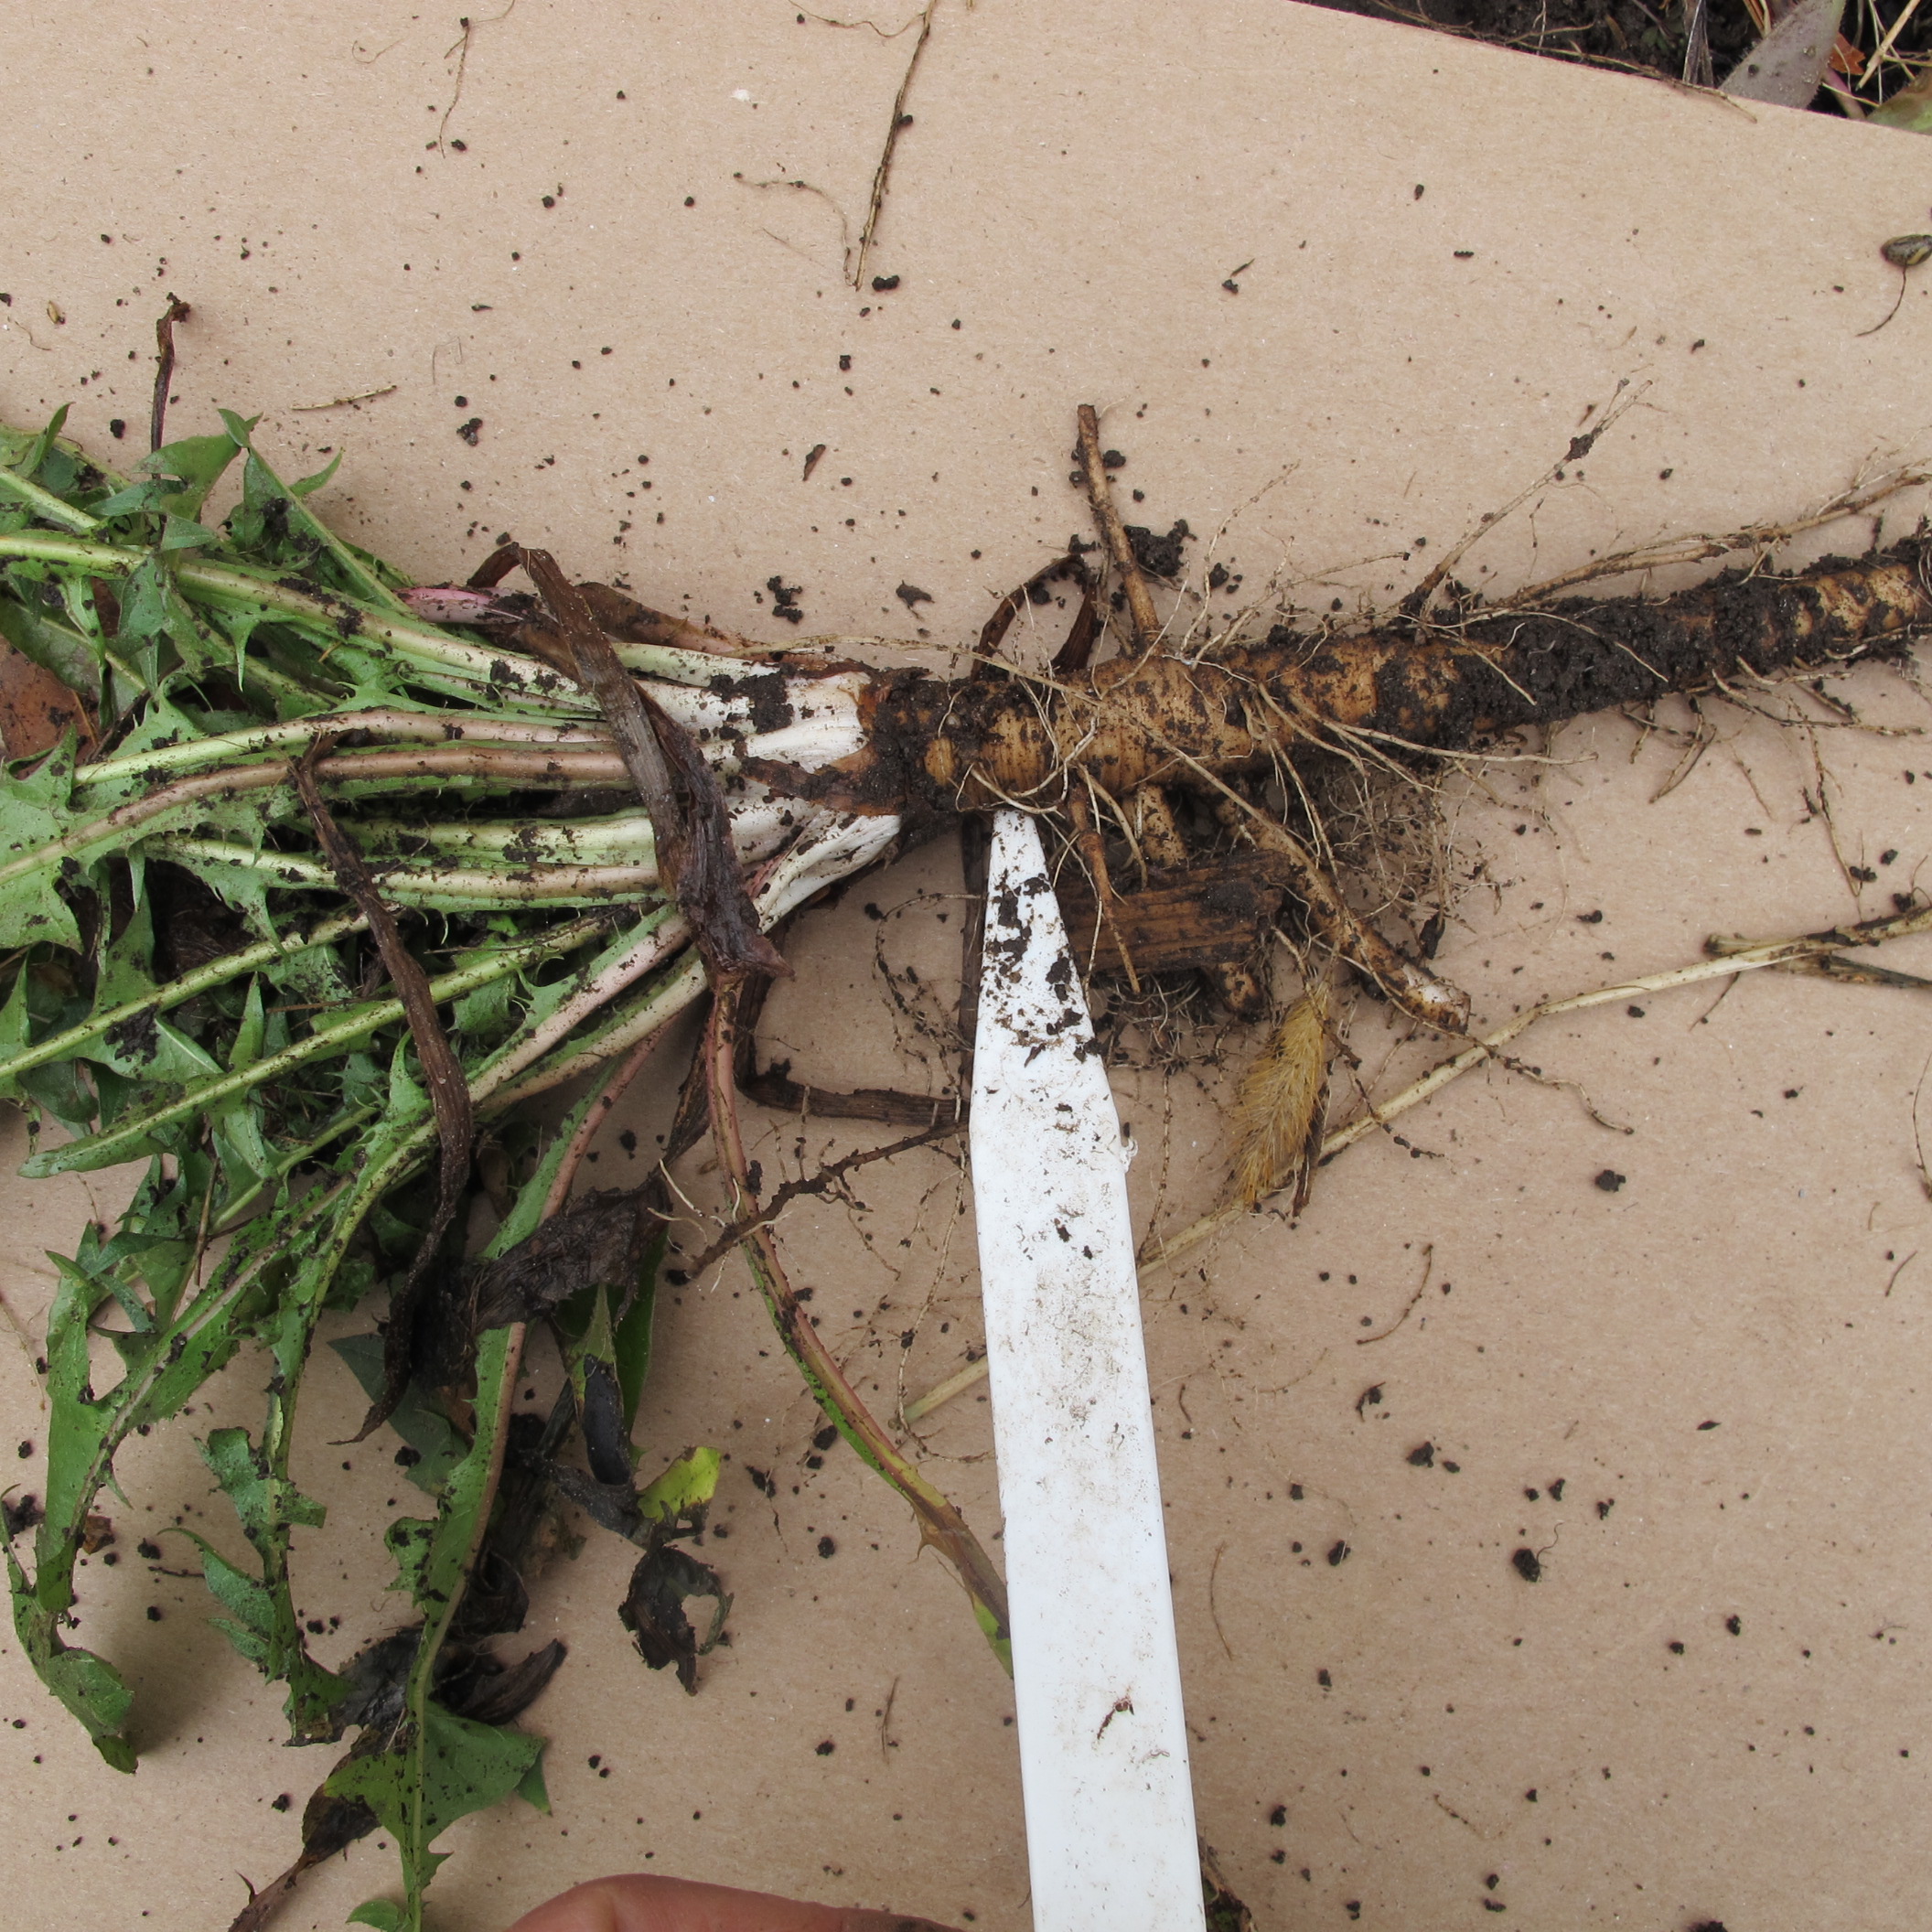
Dandelion. pointer shows where to grab it to pull out
I use a CobraHead Weeder which I like a lot. It is a single-tined weeder that works like a curved steel finger. It allows me to get at weed roots without disturbing the asparagus roots. In my bed I had a fair number of dandelions. I pushed my weeder into the soil about 4 to 6 inches, and then dragged it toward me on one side of the dandelion and then on the other side. That loosened up the soil without breaking off its deep tap root which resembles a scrawny carrot.
Next I grabbed the dandelion below the crown and applied gentle upward pressure so that I would not snap off the root. As with most perennial weeds, a morsel of the root left in the ground will grow and start over again. Most every time I got the entire root system.
Grasses, particularly witch grass, can be a real problem in the garden, and I had a little in my asparagus patch, though not a lot. Witch grass spreads by rhizomes, or roots that extend laterally. I get under the grass with my curved tool, apply some pressure from below at the same time lifting from above. Gently, so as to avoid breaking the white roots. Then, as the grass comes out, I am able to see where the roots are going, and tease them out, loosening the soil with my CobraHead and lifting. I often got roots that were 18 inches long or more. The roots have nodules where more grass leaves grow, so if you break off a root at a nodule, the plant continues to grow.
The ground was still quite wet when I was weeding my asparagus patch, so I stayed out of the bed itself as stepping in it would compress the soil and might damage roots. I brought along a kneeling pad – a simple foam pad – that kept my knees dry and protected them from sharp rocks. Some gardeners like kneepads for that function, but I’ve never found them terribly comfortable.
I plan to add 3 to 4 inches of compost over my asparagus bed, but first I want any weed seeds or broken bits of root to send up their new growth. I will remove those weeds, and then apply compost and a layer of mulch. We need some warm sun to get the weeds growing.
For mulch I use wood chips that I get from a local arborist by the truckload. They are free and easy to spread. I’ll wait until the soil has dried out and the tender asparagus shoots are poking up. I leave a little ring around the location of each plant to make life easier for my asparagus.
I know a fellow who bought a nice house with a mature asparagus patch. He loved asparagus and delighted in his free daily dose of it. But he wouldn’t stop picking, despite my warnings. For a young patch, pick for a month. For a healthy mature patch, six weeks is good. But never pick for more than 8 weeks. Asparagus needs plenty of time to re-charge its batteries, if you will. The fronds are actually leaves, and they need time to produce the food necessary for the roots to thrive. But he kept on picking long past the 8 weeks, and the next year he barely got a crop.
One last thought: if you are buying asparagus roots to plant, pick a variety that produces all male plants. The ‘Jersey’ series is all male, but the ‘Martha Washington’ roots are not – they will produce seeds, which is a waste of energy, and will produce lots of babies that will crowd your mature plants.
Henry Homeyer can be reached at henry.homeyer@comcast.net. His Web site is www.Gardening-Guy.com. He is the author of 4 gardening books and Wobar and the Quest for the Magic Calumet, a children’s fantasy adventure.
Transplanting Tomato Starts
Posted on Wednesday, April 30, 2014 · Leave a Comment
This year I started my tomatoes indoors much earlier than I usually do. Normally I start them on April 10 at 10:14. Only kidding. I start them, most years, during the second week of April. That way they are well established by the time they are planted outdoors 8 weeks later – but not crowding the root space provided by a standard flat.
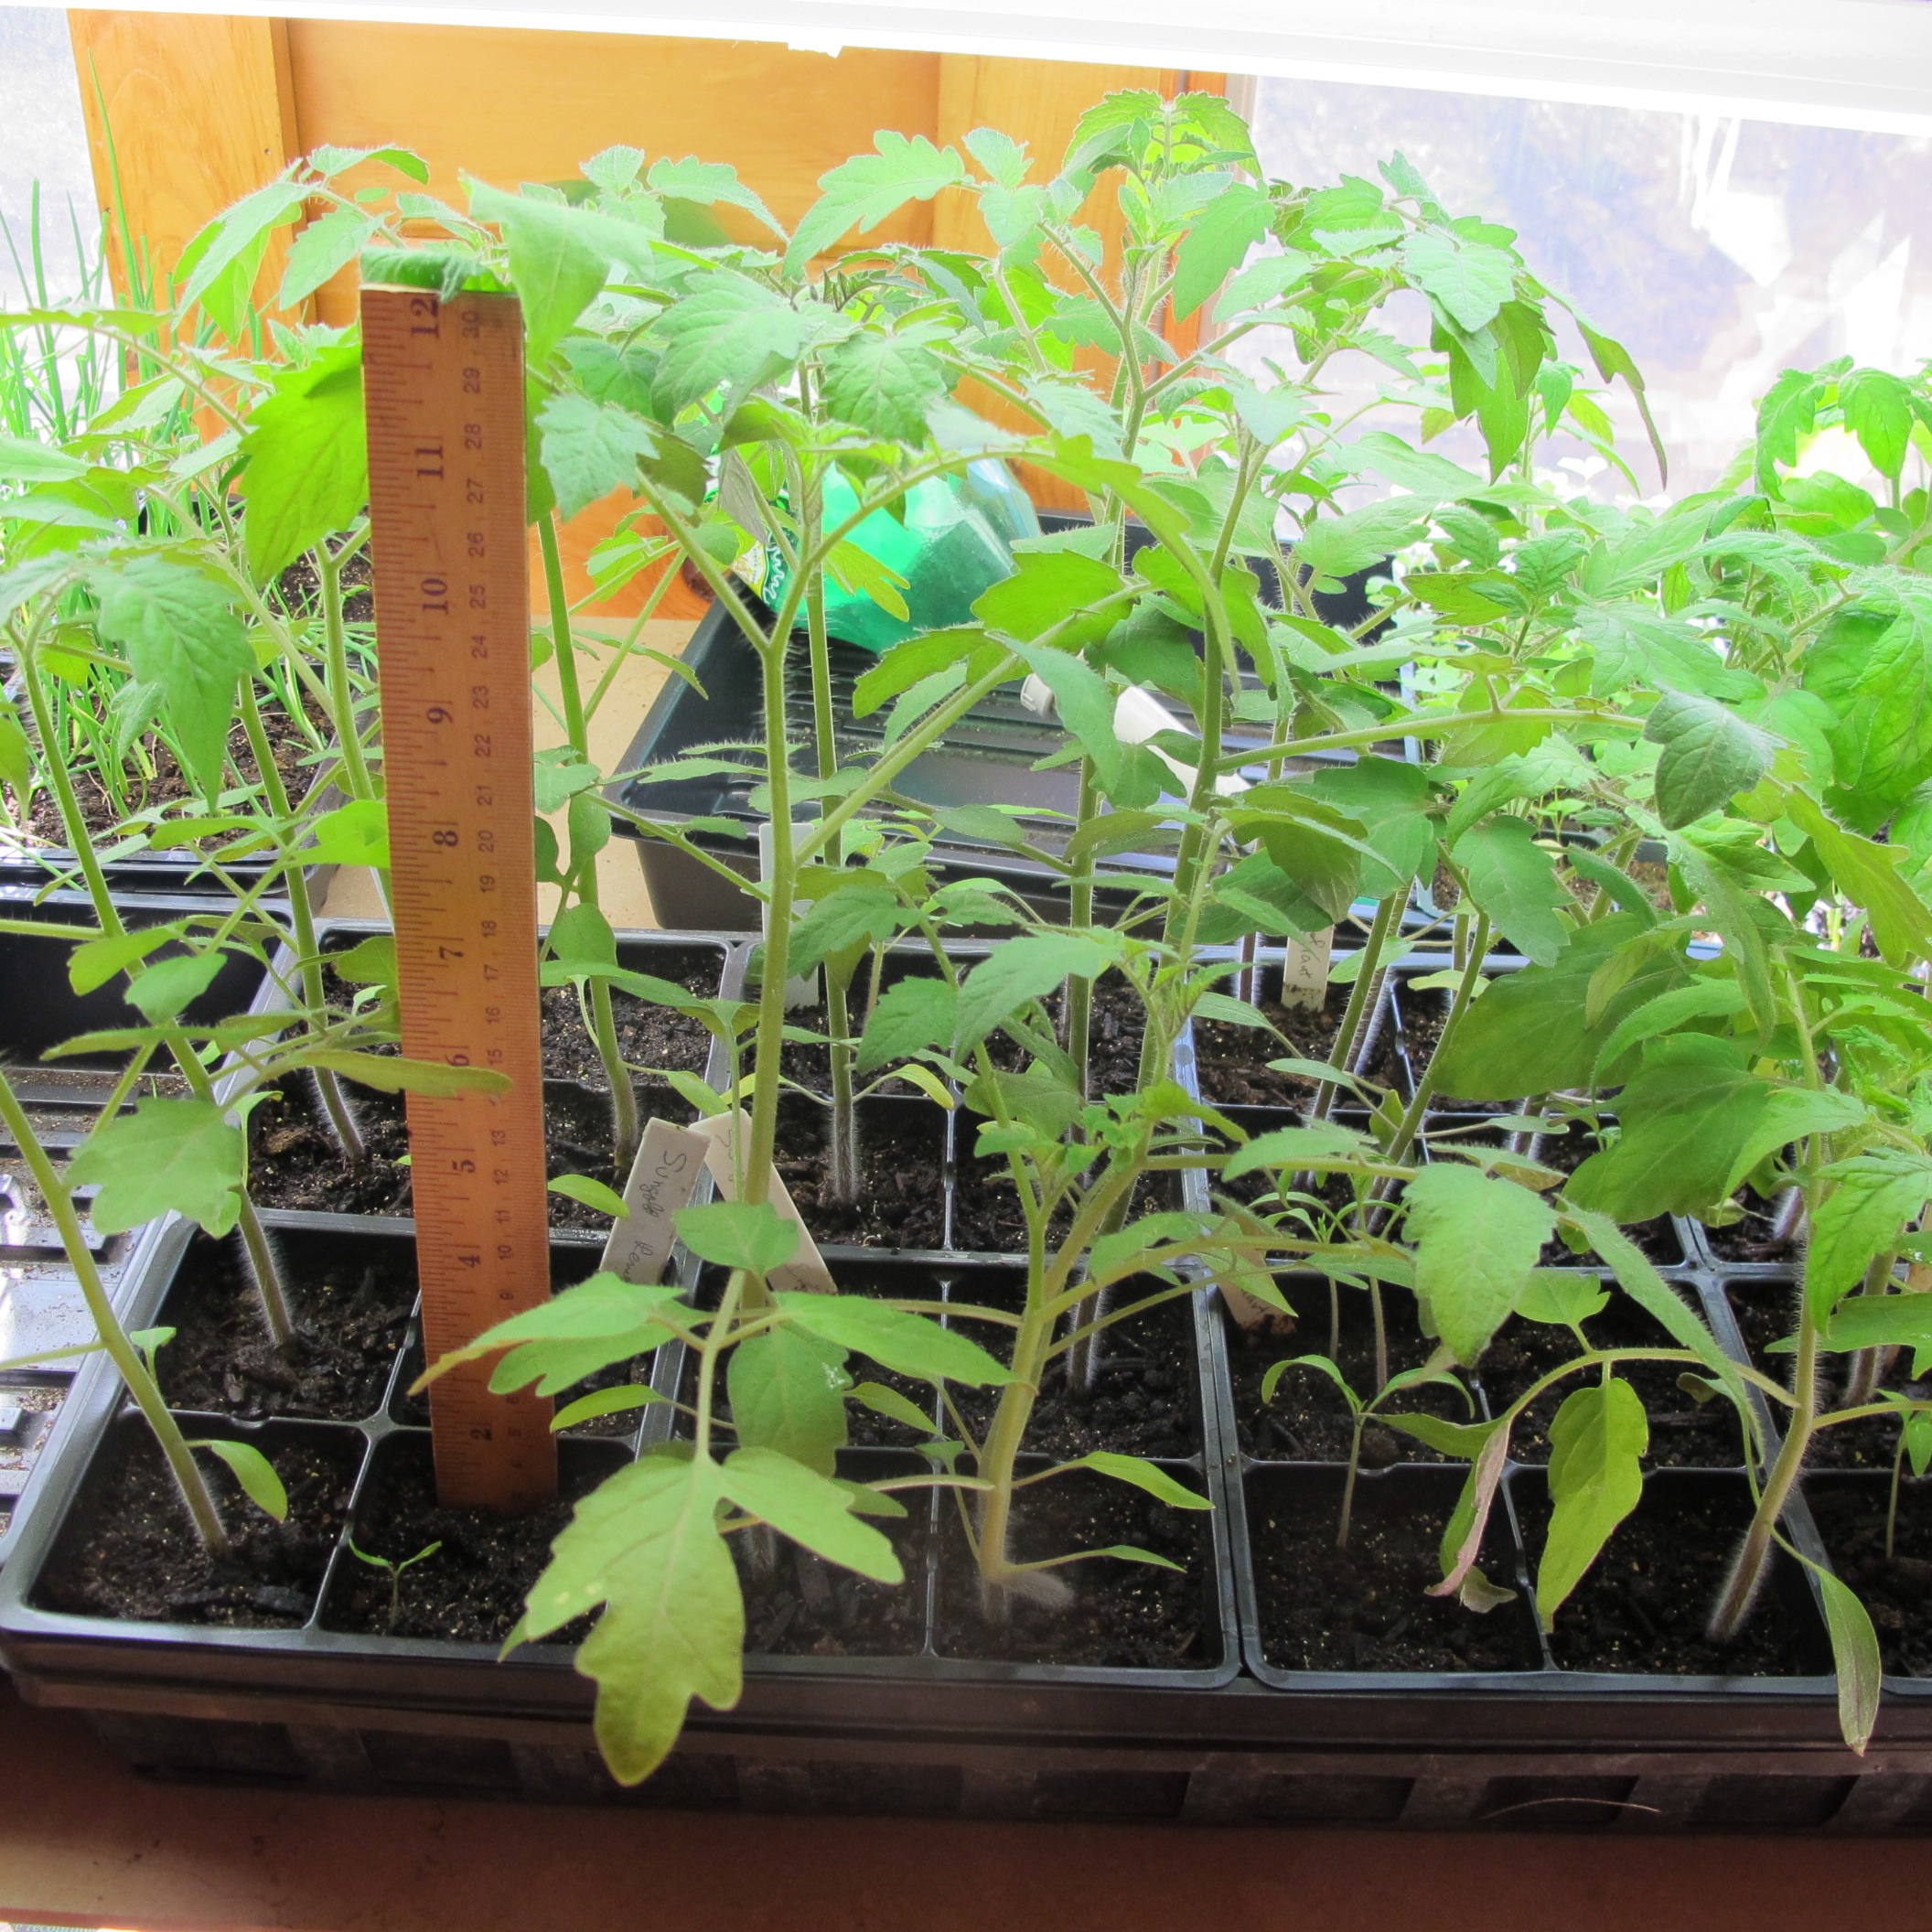
But this year I started most on March 24, 3 weeks earlier. Why? Because the winter was so long and harsh I was ready to see little green things growing under lights – and was willing to take on the responsibilities of nurturing them. But this year I will have to transplant my seedlings into 3-inch pots in May to avoid root crowding.
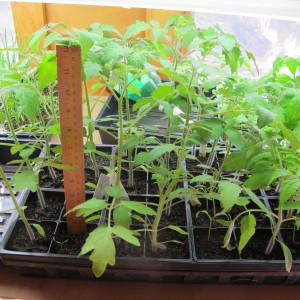
Tomato seedlings ready for bigger pots
I will pick a date for transplanting according to the Stella Natura calendar (www.stellanatura.com). This is a biodynamic planting calendar that is “supported by lunar and planetary rhythms”. For each day of the year, and every hour, the calendar designates one of 5 categories: good for working with or planting flowers, fruit, roots, leafs, or none of those – a “black-out day”. I will pick a fruit day for my transplanting .
I’ve done just a little testing of the recommendations of the Stella Natura calendar, but enough so that I feel obliged to follow it. Probably you have had times when you planted seeds and got a bad germination rate. I have. I blamed the seeds – or my planting technique. But a few years ago I tried planting a 6-pack of lettuce on a leaf day, and then again the following day, which my biodynamic calendar indicated was a blackout day. The first lettuce germinated at close to 100%, while the second at considerably less than 50% and many of the plants that grew were stunted or died. Same soil mix, same temperatures, same watering. So now I follow the calendar – at least as far as avoiding the black out days.
According to the calendar, “scientific studies showing that plant metabolism, growth rate and water absorption tend to peak around full moon. …The full moon enhances germination. Sow seeds 2 or 3 days before the full moon to receive its optimal drawing power”.
It’s important, when transplanting seedlings to bigger containers, to use a planting mix that is warmed indoors for a day or so. Potting mix coming right from the barn might be chilly enough to shock tender little roots. I use a 2 quart juice pitcher and measure out 10 quarts of commercial seed-starting or potting mix and 10 quarts of compost in a plastic recycling bin.
I stir in a cup of Pro-Gro or other organic fertilizer and a cup of Azomite or other rock powder, then moisten the mixture enough so that the dryness of the commercial potting mix, which contains peat moss or coir, is overcome. Then I let it sit for a day or more to warm up indoors.
Azomite is a rock powder mined in Utah that contains 70 naturally occurring minerals and trace elements harvested from a layer of volcanic ash that was later inundated with sea water. Although I do not have scientific proof of its ability to improve growth and vigor of plants, I have done some informal experiments with rock powders, and believe that they help.
If you use the same plot every year for decades, as I have, trace minerals of the soil may well get used up, so adding a wide variety of minerals makes sense to me. I add Azomite or finely ground granite powder to increase mineral diversity in my planting mix and also in my soil.
I re-use plastic pots each year, and believe it is a good practice to clean them before re-using. I wash them in the sink with soapy water, or sometimes fill the top shelf of the dishwasher to clean them. This helps to eliminate any bacterial residues that might not be good for my seedlings.
Also key to success with indoor seedlings is a good light source. I use ordinary fluorescent lights that I hang over my seedlings. I keep them about 6 inches above the seedlings, Light intensity diminishes exponentially with distance. My lights hang on chains, and I raise the lights as the seedlings grow. I have the lights on a timer so they are on just 14 hours a day. Little plants need rest, too.
Don’t keep your seedlings too warm. Sixty-five degrees is good for the day time, but leave a window ajar at night to let temperatures drop to 55 degrees – though I admit that don’t do that most nights.
Growing seedlings from seed requires some work, but I do it every year because I love tending my seedlings. I save money doing it, and can grow plants I would never find for sale at a garden center, too.
Henry Homeyer can be reached at P.O. Box 364, Cornish Flat, NH 03746. Please include a self-addressed, stamped envelope if you want a question answered by mail. Henry’s e-mail address is henry.homeyer@comcast.net. His website is www.Gardening-Guy.com.
Pussy Willows
Posted on Wednesday, April 30, 2014 · Leave a Comment
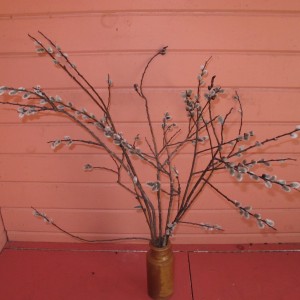
In general, I don’t sing. I can’t carry a tune, and words to even the simplest of songs seem to disappear from my brain in about 20 minutes. Always have. So it was a surprise to me when, walking by a clump of pussy willows, I remembered a simple childhood tune about them and was inspired to sing it – and to ponder the joys of pussy willows. They are cheerful flowers that appear just when we need something lovely in the garden. To me they are pure fun, and not just for little children. We should all have some.

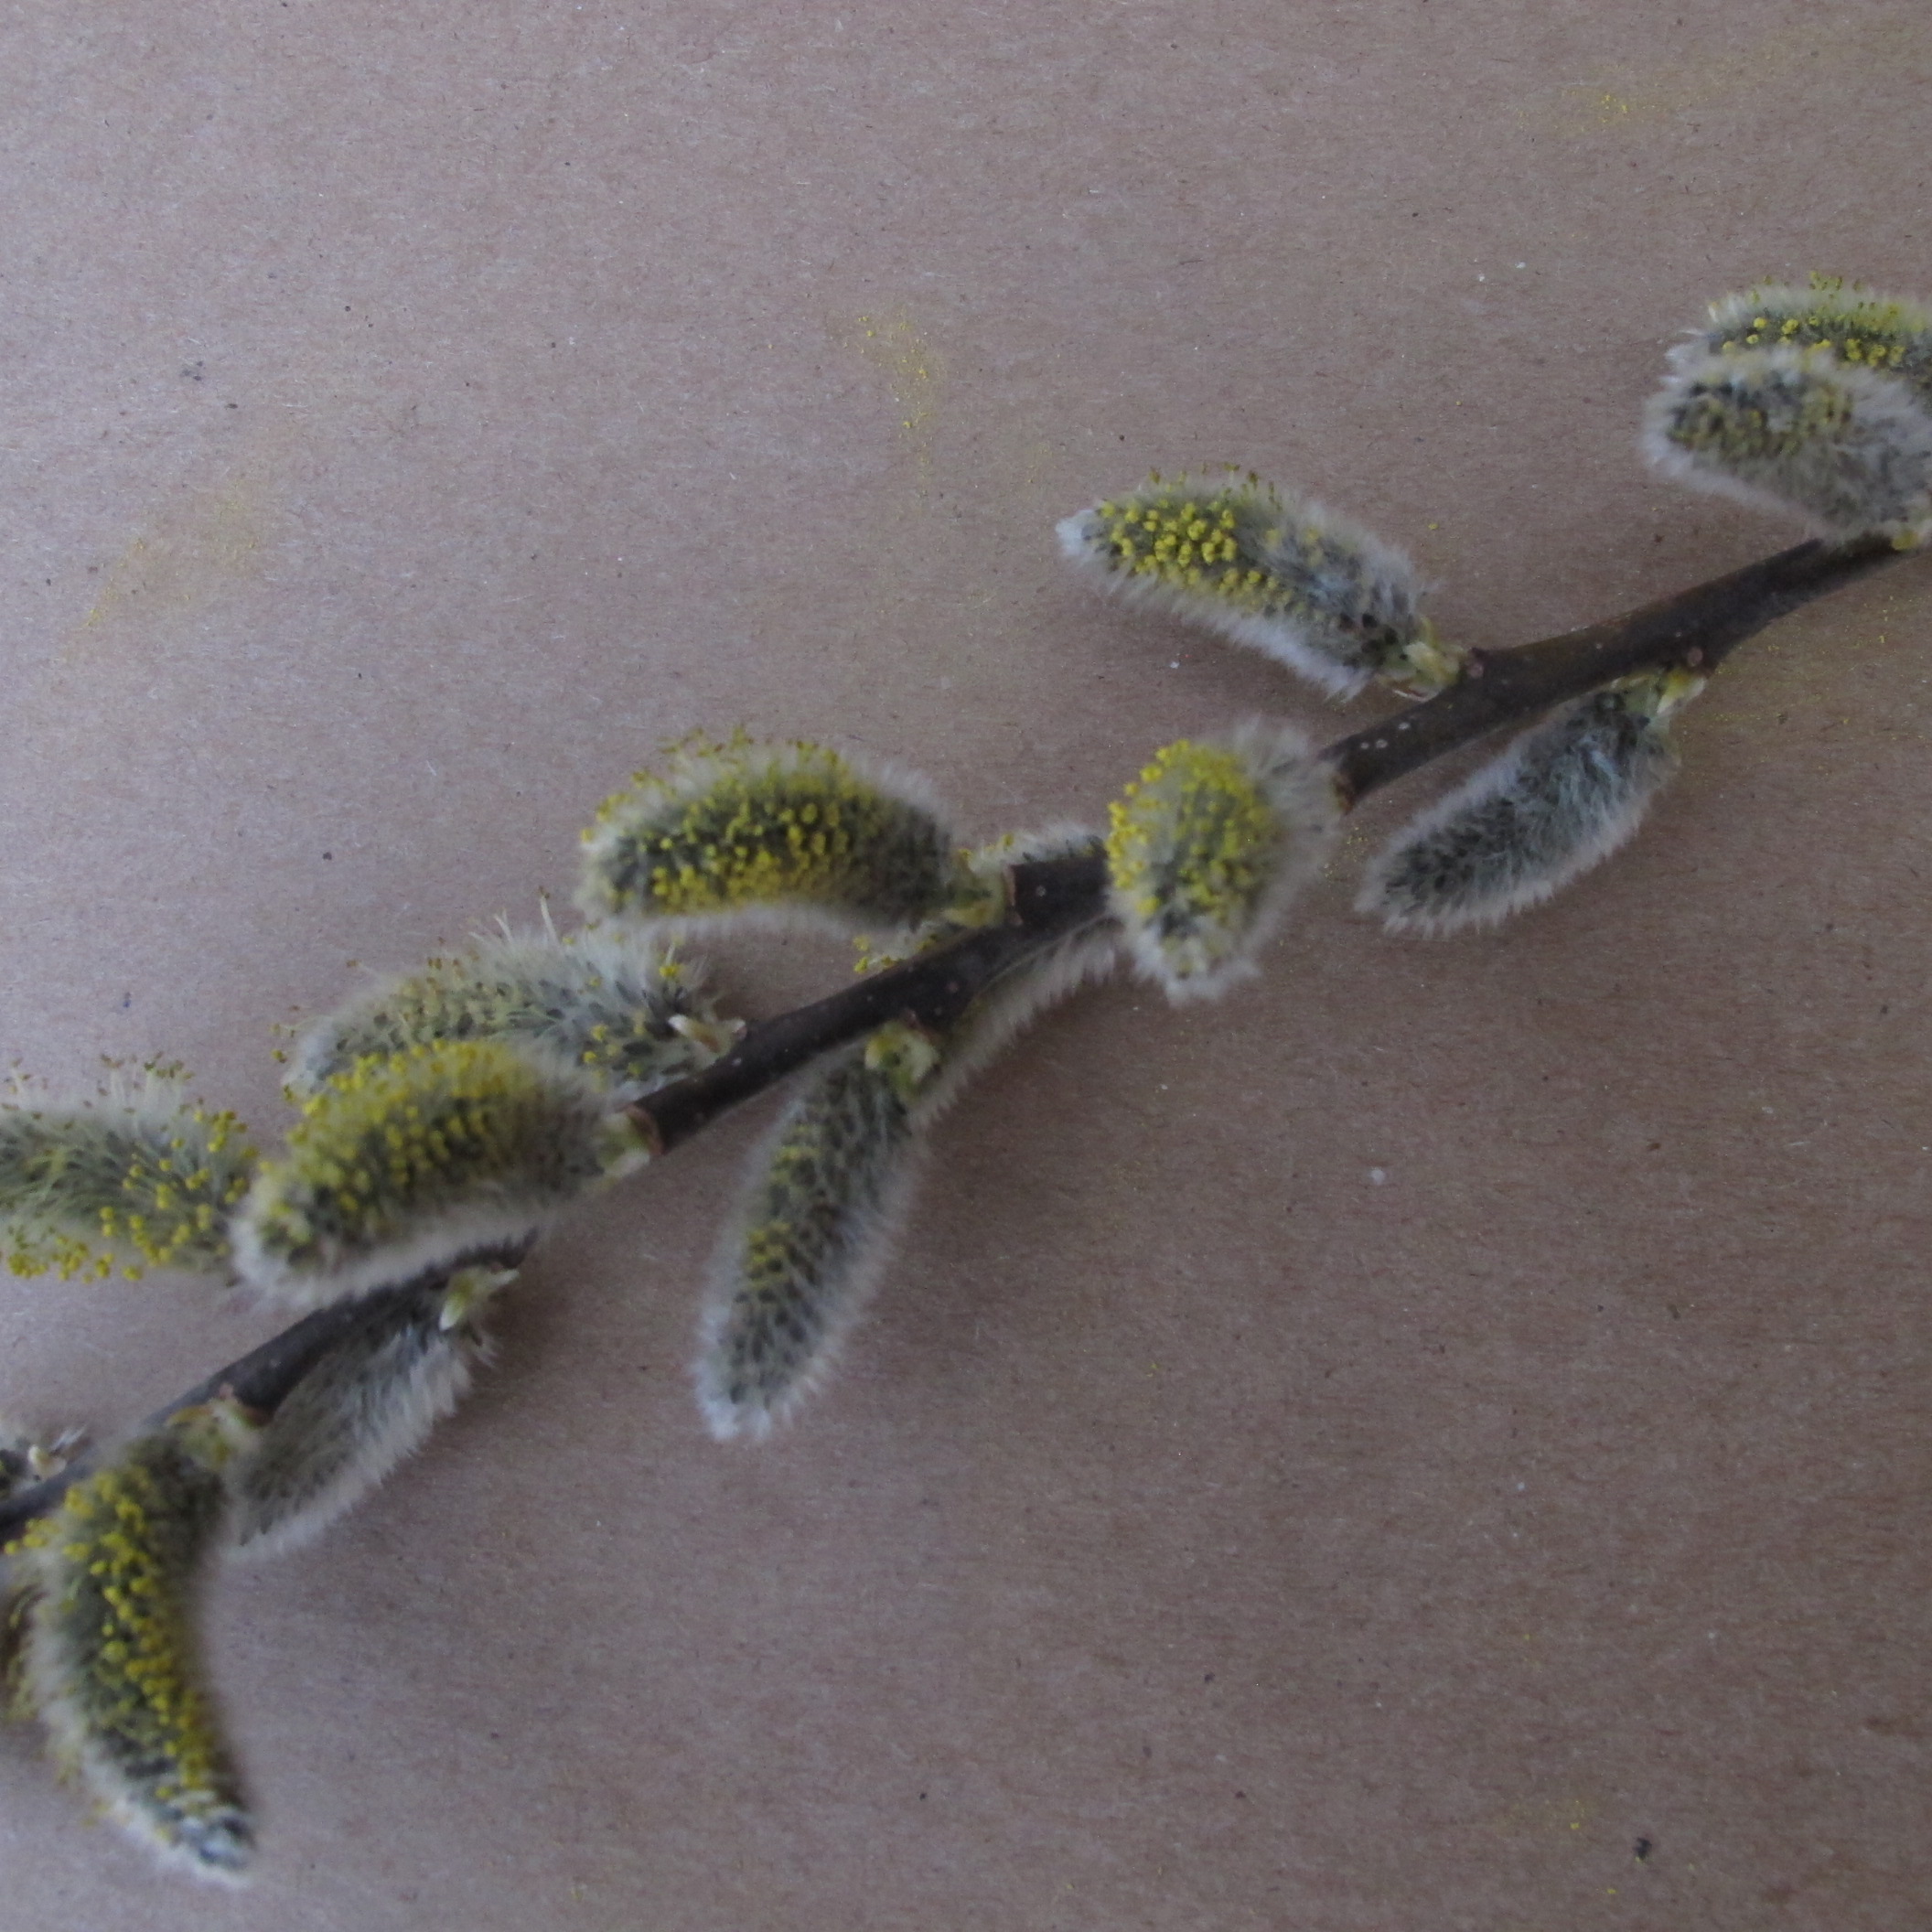
Pussy willow showing pollen
What we call pussy willows are actually the male catkins – pollen-producing parts – of two species of willows (Salix caprea and Salix discolor). Both grow wild, and are available at nurseries. Pussy willows, like all willows, like wet, swampy areas. They will grow up to be small trees, but can be kept to a manageable size with yearly pruning – and now is a good time to do so.
Fortunately for those of us who depend on pussy willow bouquets to chase away the mud season blues, the more you trim your pussy willows, the more vigorous and productive they will be. Left un-pruned, pussy willows can easily reach 20 feet tall. Since they bloom on their upper branches, picking good-looking stems can be next to impossible if the bushes are allowed to get too tall.
When harvesting pussy willows in the wild I bring along a pole pruner. Any type will work, but I like mine best: it’s an ARS brand, model 180L 1.8. Unlike other pole pruners I’ve tried, this has a handle to squeeze, just like regular pruners (not a string or handle to pull). That feature allows me to have great control. With it I can reach up and nip off pussy willows that are 12 feet or more above ground.
The pole pruner in question is made by a Japanese company, ARS, and is available from OESCO, a tool dealer in Massachusetts (www.oescoinc or 800-634-5557). Not only that, it weighs less than 2 pounds, so it is easy to maneuver with one hand. It is not designed for use on anything thicker than about three quarters of an inch in diameter. Cost? About $95 plus shipping and worth every penny. I also use it to cut the dead stems in my blackberry patch. I can reach in with it to cut ta cane, then grab it and pull it out.
In addition to bringing spring into the house, pussy willows are great for honeybees. According to beekeeper Margot Maddock of Lyme, NH, pollen from pussywillows is one of the first sources of food for honeybees in the spring. It is even earlier than that nuisance in the garden, chickweed, which is also good for the bees.
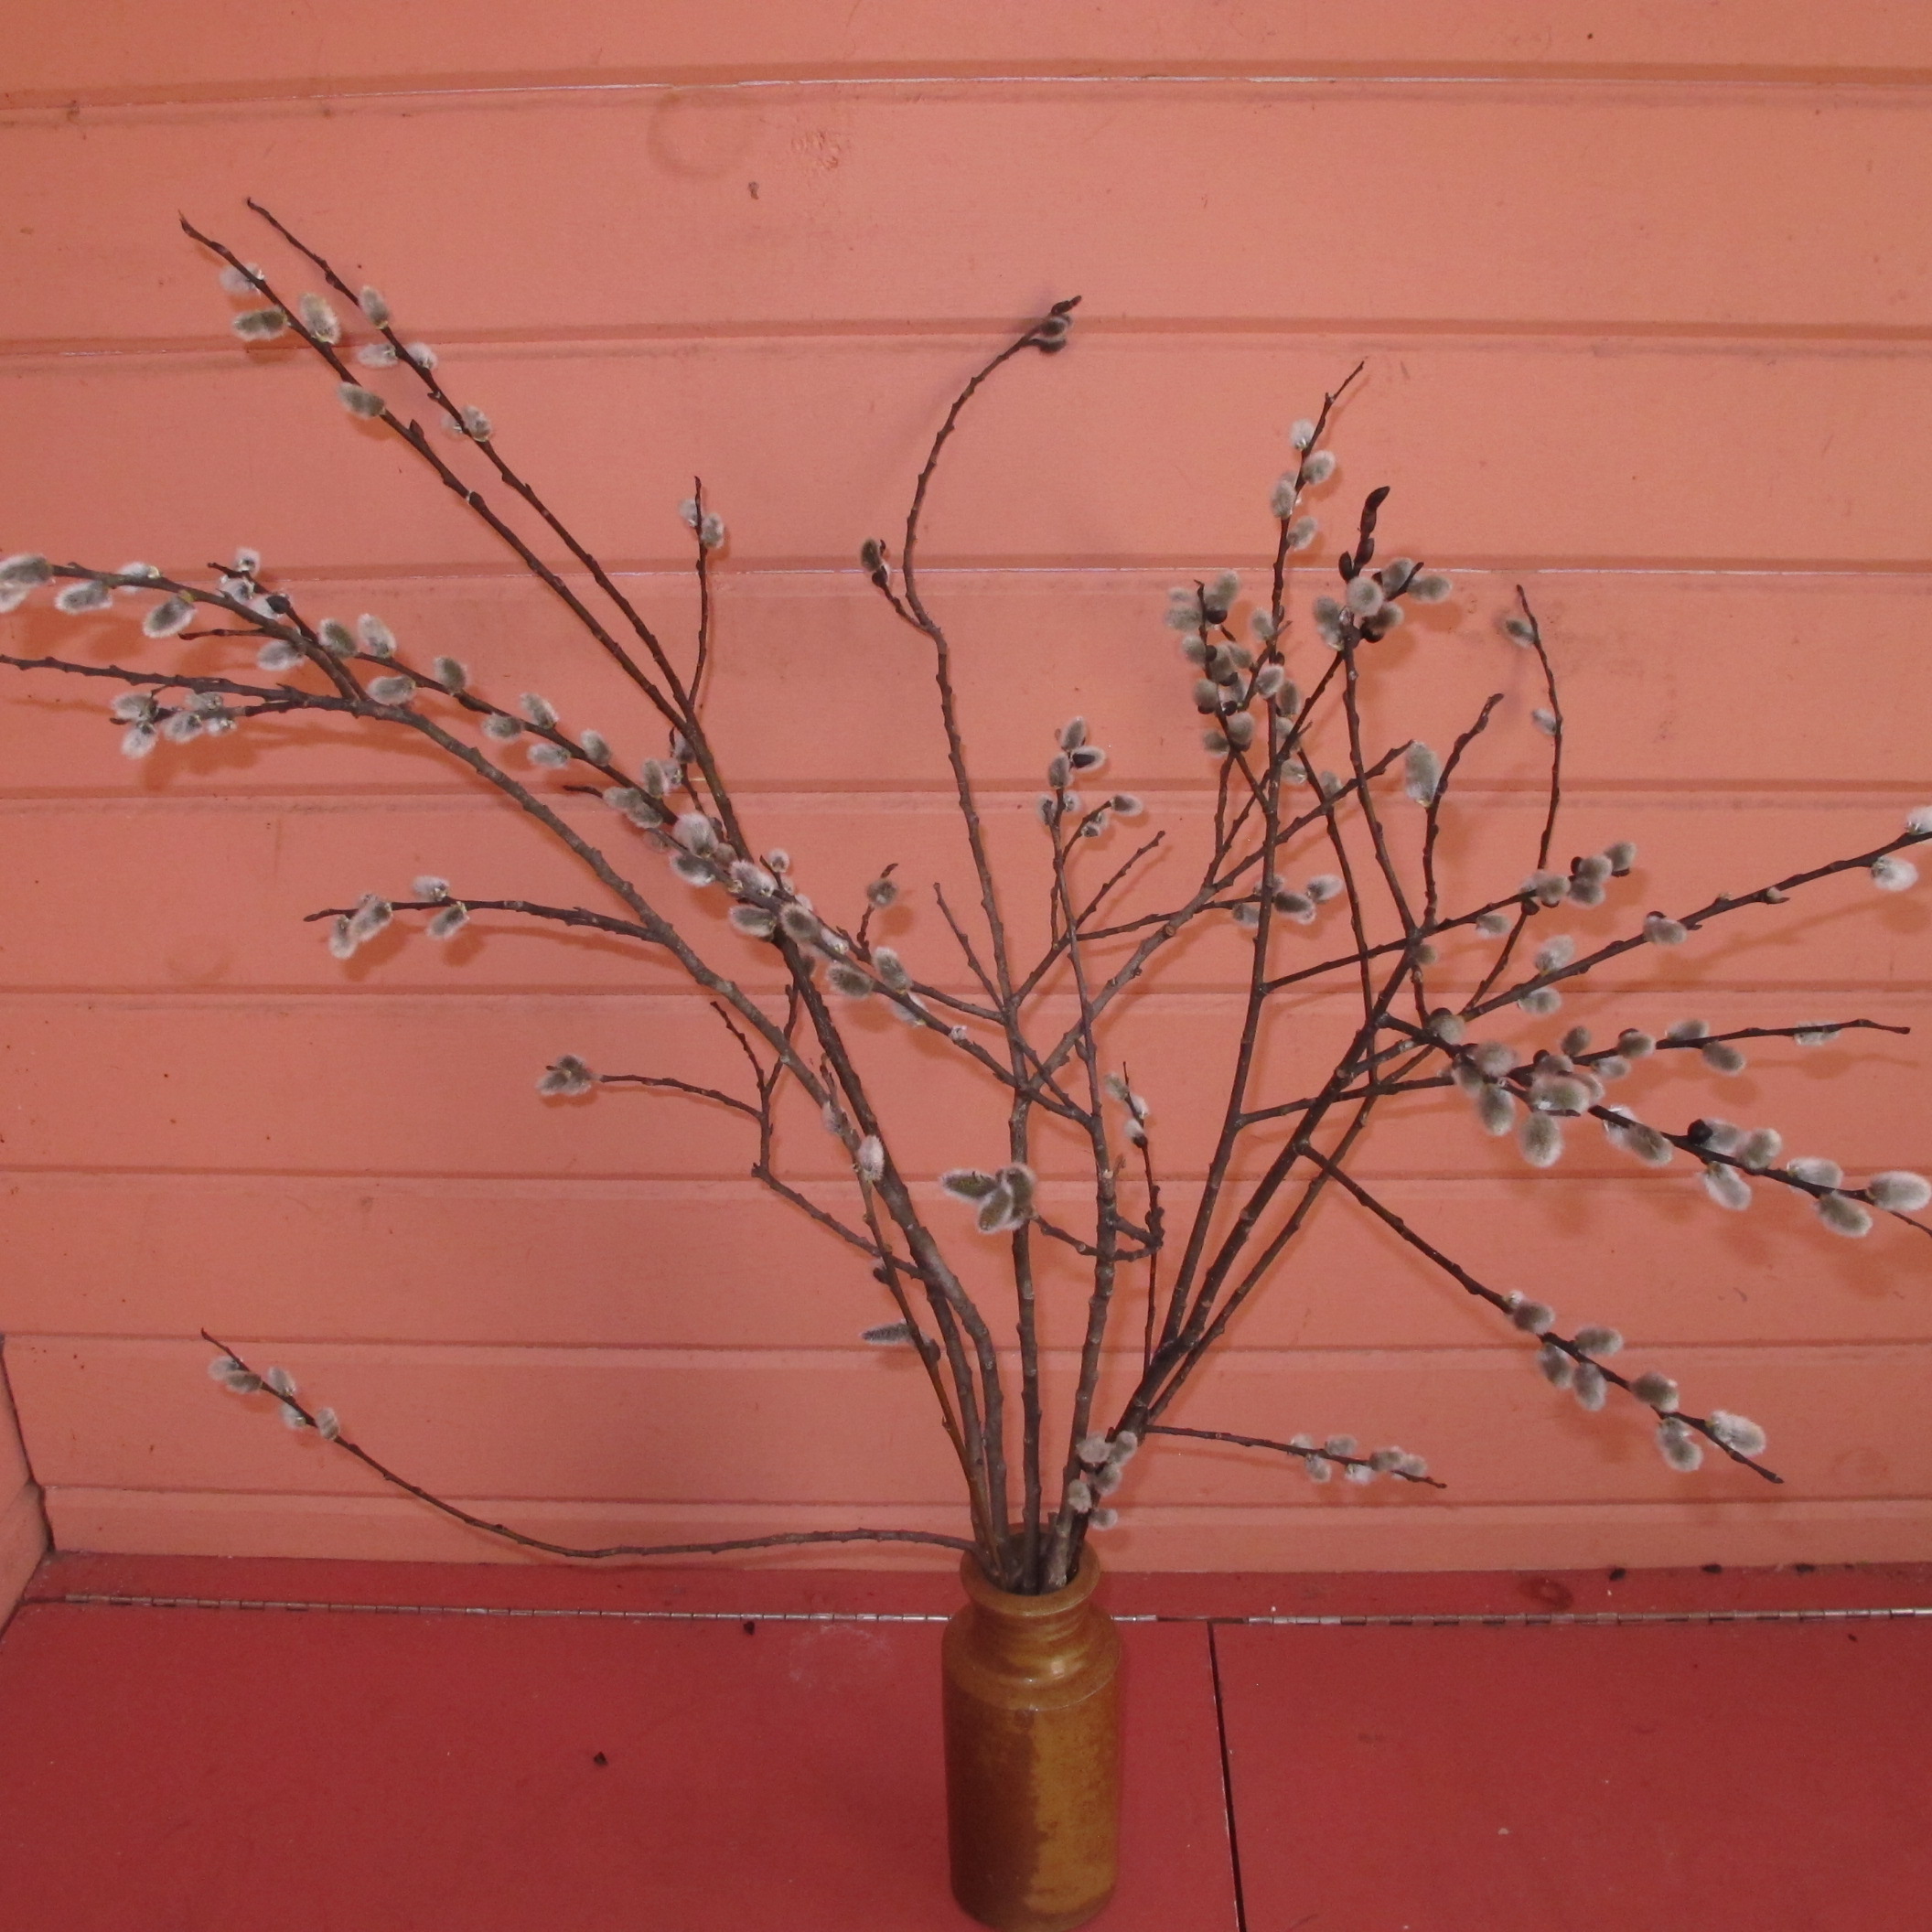
Pussy willows in a dry vase
If you put your cut stems of pussywillows in a vase and add water, they will continue to mature and produce a yellow pollen that will eventually fall on your tablecloth. But if you put them in a dry vase, they will stay frozen in time. I’ve been known to keep pussy willows looking good on my desk for months that way.
Rooting pussywillows is easy. Cut a stem about a foot long and push most of it into the soil where you would like to have pussy willow growing. But be sure that you keep track of which end is up, and leave a couple of inches sticking out of the ground. If leaves or side shoots have started to grow by the time you do this, rub them off before you push the stem into the ground. Although pussywillows grow best in moist soil, they will grow in ordinary garden soil, too. You will just need to be sure the soil does not dry out until the stem is well rooted.
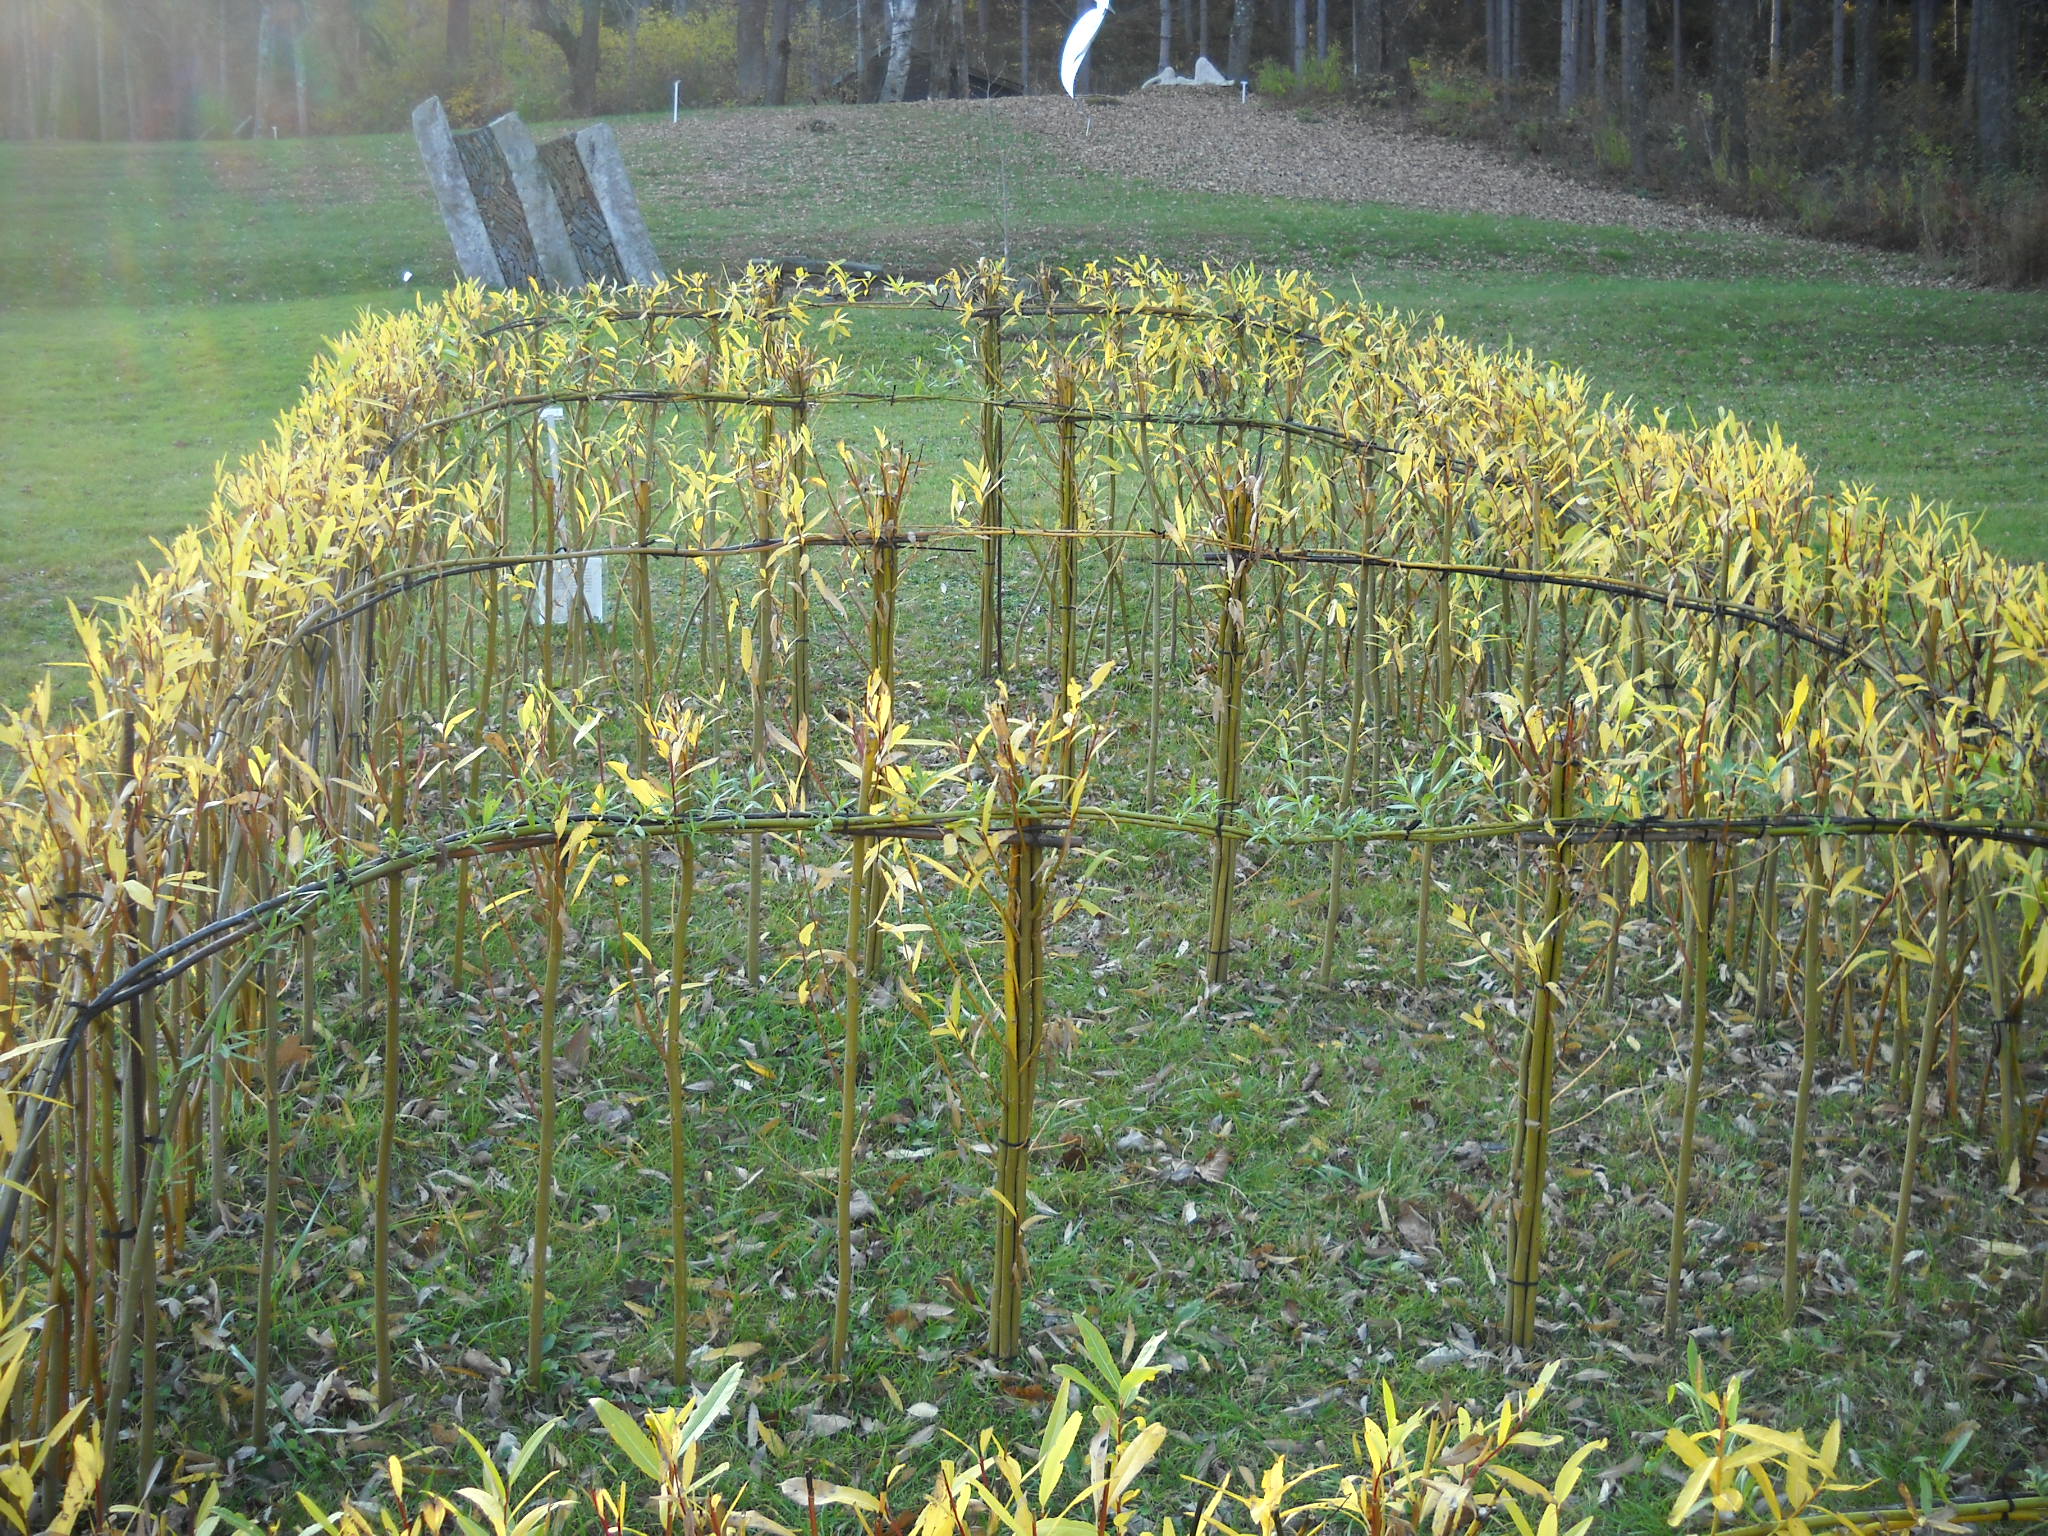
Because pussy willow is so easy to root, you can easily make a living wall or windbreak. I worked on a willow farm in France a few years ago. The farmers grew willow for basket making, but also created living sculpture. Young willows – two to 3 years old – are so flexible you can braid or weave them if they are planted close enough together. You can also tie stems together to create a tunnel for kids to play in.

Living willow sculpture at SculptureFest 2012
Charlet Davenport of Woodstock, Vermont, commissioned a work of art using living willow for her Sculpturefest that is held each year in August (www.sculpturefest.org). Early spring is best time to root willows, but the artist who made the sculpture for Sculpturefest keeps willow stems in big coolers so that she always has dormant willows to root for art projects.
You don’t have to depend on nurseries and greenhouses for all your plants. If you want to pick some willow stems and plant them, they will probably grow – for free. You just need a little patience for them to reach full size.
Henry Homeyer can be reached by e-mail at henry.homeyer@comcast.net or by mail at P.O. Box 364, Cornish Flat, NH 03746. He is a UNH master Gardener and the author of 4 gardening books. His Web site is www.Gardening-Guy.com.
The Spring Bulb Flowers
Posted on Wednesday, April 16, 2014 · Leave a Comment
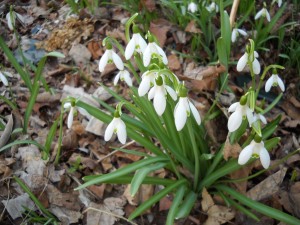
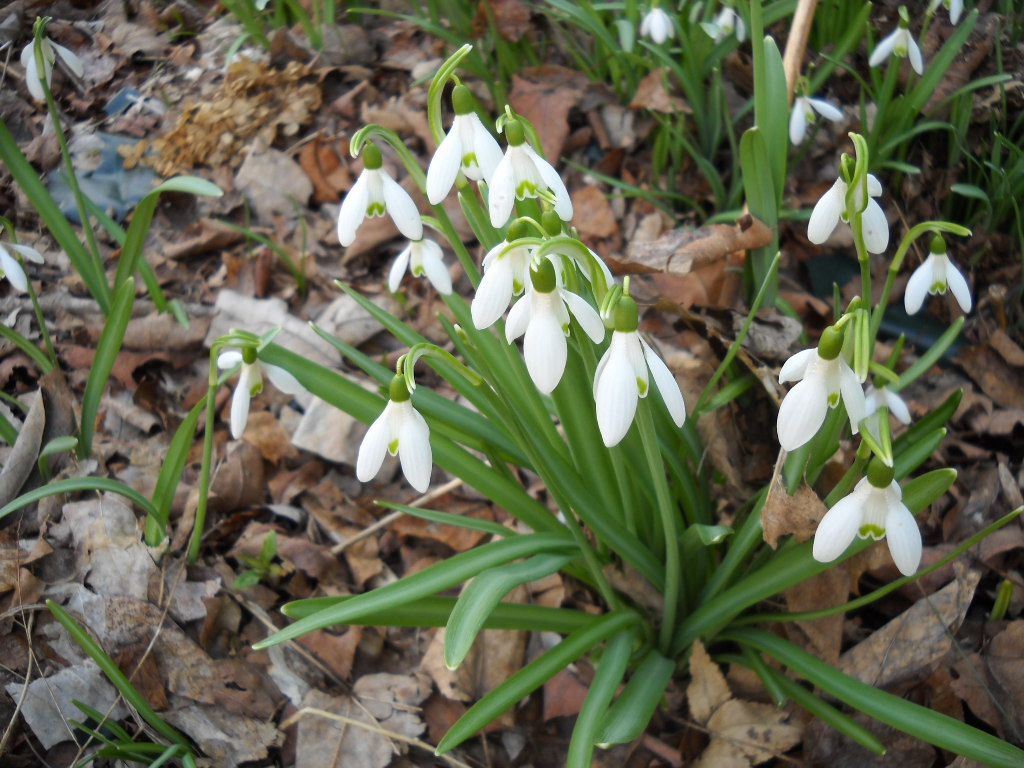
Snow drops in April
I’ve been paying attention to snowdrops and crocus since I was 9 years old – I recently found entries in my diary that tell me so. My entry for March 7, 1956, in its entirety was this: “Spring is getting here at last the snow drops are in bud + will bloom in a few days.” Then on April 5 I wrote,” Today our first crocus was in bloom it is very pretty.” I still pay attention to them, and generally note when they come into bloom. Now is the time to decide where you should plant bulbs next fall.
Here’s what I do. I wander around my property each year in the spring to see what spots are bare of bulb flowers. I bring along those white plastic markers used for labeling, and write “add crocus here”, for example. Then in the fall, when it’s time to plant more bulbs I don’t have to rely on my memory.
Early crocus
When planting bulbs, I label what I‘ve planted. That way I’ll see what has performed well, and be able to buy more of the same. For example, I’m always eager to get color in the garden at the same time that the snowdrops bloom. Glory –of-the-snow is one plant that overlaps with snowdrops, but is a bit later, as is scilla. This spring I saw that a crocus I planted last fall, ‘Blue Pearl, is blooming with my snowdrops – and before those other two. So I’ll buy 100 of those for fall planting. I bought them at Brent and Becky’s Bulbs– I know because they include tags with each bag of bulbs.
Writing this in early April, I haven’t seen any of my winter aconite appear, though I would have thought they would be up by now. It is a very early bright yellow flower that has one-inch wide, six-petaled flowers. I’ve grown it before but lost it to cold or rodents or poor drainage. I’m still optimistic that it will show up.
I tend to blame bulb failure on drainage problems even though I mix in lots of compost at planting time and favor hillsides. South facing hillsides are great for early bulbs as the snow melts off weeks earlier than north-facing plots. But rodents might be the culprits, too.
Glory of the Snow early April 005
A bulb plant that I’ve considered fussy is a low-growing iris, Iris reticulata. It is a lovely iris that blooms near the ground level and has medium-sized blue, purple or (sometimes) yellow flowers. Doing some research I found out why I thought they are fussy: after they bloom, the bulbs divide, producing several little bulblets. These won’t bloom for a few years. So I need to plant some every year until I have a mature colony of them. I also read that they like soil that dries out well in summer, such as in a rock garden or sandy hillside.
My lawn is full of snowdrops that have planted themselves. I assume that they produce seeds that wash into the lawn with early summer rains. The bulk of my snowdrops are planted on a hillside above the lawn. But you can plant early spring bulbs in the lawn, too. Just don’t plant daffodils or anything with large leaves because you won’t be able to mow the lawn where they are growing until the leaves yellow and dry off – around July 4th. Bulb plants need to re-charge their batteries, if you will, by getting sunshine and storing energy.
Little bulbs like snowdrops, crocus and grape hyacinths have short leaves that disappear early and won’t disrupt your early mowing. You can always set the lawn mower blades high to protect the leaves if they are still green when you need to cut the lawn.
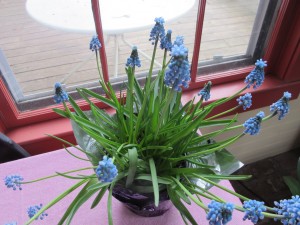
Grape hyacinths
Grape hyacinths (Muscari spp.) are great little flowers that come in many different shades of blue and purple. I’ve planted many dozens in my day, but find they tend to lose vigor and disappear with time. So I plant them again. This spring I bought a pot of them at a garden center and have been enjoying them immensely in the house. Later, when the soil is thawed, I’ll plant them outside. I keep the pot in a cool space indoors, as if they get too warm, they flop over.
Tulips I treat like annuals. I plant 100 most years in a bed that I reserve for them – and later zinnias. If I had depended on bulbs planted in 2012 for this year, the number of blooms might be just 50, and maybe 25 the following spring. So I don’t bother to coddle them. In fact, I often pull the flower stem instead of cutting it, as I can get an extra 2-3 inches of stem for my vase, and I love tall tulips. I compost the spent bulbs. I find that adding a few pennies to the water in the vase helps the tulips to last longer before losing their petals, or opening if picked in bud.
Daffodils are slightly poisonous to deer and rodents, so they aren’t eaten – and can bloom for years. You can plant them in open woodlands and they will do fine. I grew up with daffodils planted along paths in our woods, and I still delight in the memory of them. By the way, if you forced paperwhites this winter, don’t bother planting them outdoors – they’re not hardy here.
Bulbs are a great investment. Most come back year after year, bringing me pleasure each year before the garden gets going.
Henry Homeyer is a gardening coach living in Cornish Flat, NH. His Web site is www.Gardening-Guy.com.
Early Spring Chores
Posted on Wednesday, April 9, 2014 · Leave a Comment
Spring finally seems to be coming to Cornish Flat – about a month late, this year. My snowdrops are just starting to bloom and large patches of snow are still on the lawn and garden – though there are bare spots. I really want to get outside and start cleaning up the yard and garden beds, but will try to hold myself back until things have dried out.
Why is it important to wait before doing much gardening? It’s all about soil structure. Soil is made up of ground rock, organic matter and air spaces. The mineral component is about 45%, organic matter can be from 1% to 10% or more, and the rest consists of air spaces. That last component is as important as the first two.
Plant roots that we can see when we dig up a weed or plant a shrub are only a part of the entire root. The parts of the root that absorbs water, oxygen and minerals are so fine that we cannot see them. They are called root hairs, but they are even finer than human hair, microscopically fine. And there are lots of them. Most plants have branch roots that spread out and branch again and again. Root hairs are short protuberances attached to those branching roots. But fine roots cannot push through packed soil as easily as through fluffy soil. The total length of root tissues in a single rye plant is around 380 miles.
As you know, if you walk on soggy lawn you leave foot prints. That means that you have squeezed air out of the soil and compacted it – making it all the harder for roots and root hairs to extend and thrive. Not only that, green plants get their oxygen from the soil via their roots. If the oxygen is squeezed out, plants can’t get it.
So what can a gardener do? Wait. Don’t walk on your lawn if you see footprints or hear a squish. Don’t rake winter debris from the lawn while the lawn is still dormant. If you do, you risk pulling up the grass, roots and all. And stay out of flower beds even later into the spring – they are more susceptible to compaction than your lawn.
So what can you do in early April? Clean and sharpen your tools, including the handles. I have a potato hoe, a 5-tined rake-like tool that has been in my family for over 50 years. It has its original wood handle, which is still in perfect condition – even though I use it for weeding and soil prep every week, often every day, all summer. How is that possible? I try to oil the handle every year either in the fall or the early spring. And I don’t leave the tool outside in the sun or rain. No matter how tired I am at the end of the day I walk the potato hoe back to the barn before I go to the house.
To clean up a wooden handle, first I use fine steel wool (or a green scrubbie) to polish up the handle and remove any rough spots. Then I apply a coat of boiled linseed oil with a brush or rag. I let it soak in for a few hours, then rub off any excess. Or if the oil soaks right in, I might even apply a second coat. The steel tines I clean with steel wool and apply a light coat of sewing machine oil.
This year I need to oil the wood on my wooden wheel barrow and tighten up all the bolts. One of my first memories in my life is of my Grampy picking me up, plunking me down in his wooden wheelbarrow on a pile of weeds, and racing us back to the barn ahead of a fast-approaching thunderstorm. I might have been just two years old. The ride was bumpy – there was a steel-rimmed wooden wheel – but it was exciting!
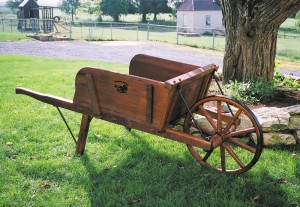
Wooden wheelbarrow
Photo Credit: Spring Valley Woodworking
Unfortunately that wooden wheelbarrow disappeared after Grampy went off to the great garden in the sky. But many years later I tracked down an Amish woodworker in Pennsylvania, Ike Lapp, who still makes wooden wheelbarrows and got myself one. It’s pretty much the same wheelbarrow I remember my grandfather using. When I finished assembling it I pushed it across the lawn for a test drive and it made the same squeak that my grandfather’s wheelbarrow did.
I called Ike Lapp at his home in Gordonville, PA recently. He is old order Amish, so does not have a phone in his house or workshop. Instead he has a phone and answering machine in a separate 4-foot square building in a field. (He checks messages once a day and calls customers back. He’s at 717-355-9366 717-355-9366). He told me he is still making the wheelbarrows and in addition to mine, a large premium grade wheelbarrow for around $300, he has smaller ones, and some in “rustic grade”. He does not have a web site, but you can see his wheelbarrows at www.lehmans.com.
Later, when your ground has dried out and you are raking and weeding flower beds, try to reach in with your rake, keeping your feet out of the beds. If you must walk in flower beds, bring along a couple of short planks. Place them in the flower bed and step on the boards to distribute your weight. Or if you are not worried about what the neighbors will say, you could wear your snowshoes. After the winter we’ve had, that seems appropriate!
Henry Homeyer is a gardening consultant and the author of 4 gardening books. His web site is www.Gardening-Guy.com.
Spring Pruning
Posted on Wednesday, April 2, 2014 · Leave a Comment
Conventional wisdom has it that fruit trees should be pruned in March, but don’t worry if you haven’t even started yet. I haven’t. There’s no harm in pruning in April, or anytime, really. After the buds on fruit trees open, they are more prone to being knocked off while we work on the trees. But you probably don’t care if you get a few less apples or pears. The snow has been so deep this year that it has been difficult to move ladders around, keeping most of us from starting early.
Pruning is best done with clean, sharp equipment. You’ll need a pair of by-pass hand pruners and a sharp tri-cut pruning saw. Bow saws, once popular, are tough to get in tight places, so the folding saw has taken over. A nice pair of loppers will save time sawing medium-sized branches.
Before beginning, check your pruners to see if they are sharp. I do that with the backside of a fingernail, which I drag lightly across the cutting blade. It should shave off a little of the nail. (If yours are not sharp, read my description of how to sharpen pruners in my book, Organic Gardening (not just) in the Northeast: A Hands-On, Week-by Week Guide. Your library should have it).
Next I clean off any gunk on the blades. I use a special solution called Sap-X with an old green scrubby, but you could use a little sewing machine oil or even kerosene. The blades should open and close easily.
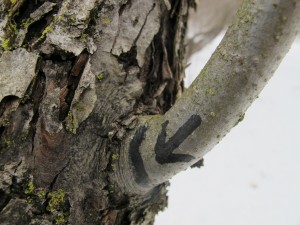
Branch collar and line to show where to cut
Start working on a tree by studying it for a few minutes. Apples do best with a single leader in the middle and the longest branches near the base, getting shorter going up the trunk. If you have two competing leaders, it would be good to remove one, though in an old tree that might not be practical due to the size.
As you look at the tree, ask yourself which larger branches should be removed. Are there any dead branches? They must be removed, so start by taking them out. Are there branches that are rubbing others, or crossing through the middle of the tree? They can go next. Lastly, remove any watersprouts – those smaller branches shooting straight up.
Healed cut and new water sprout
Some fruit trees produce dozens – or even hundreds – of water sprouts each year. Although some varieties seem more prone to producing them than others, you can minimize their presence by pruning to create a well-balanced tree that allows sunshine to get to each leaf of the tree. Watersprouts are the tree’s effort to produce more leaves to create more food.
Even though it might seem scary, it is better to remove large branches than to nip away at a tree, taking tiny branches. It is more efficient, and makes for a better looking, healthier tree. In any given year you can remove up to a quarter of the tree. That means a quarter of the branches that produce leaves – and hence food for the tree. Taking out a big dead branch doesn’t count at all. A healthy tree allows each leaf to get sunshine. If there are too many branches, they will shade each other out.

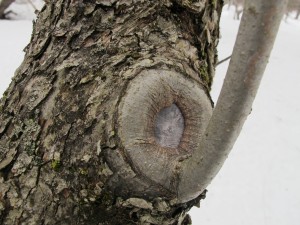
Stub healing back to branch collar
Where you make your cuts is important, too. Don’t cut off branches flush with the trunk, nor leave long stubs. Branches should be pruned just outside (away from) the wrinkly flare that starts at the trunk or a larger branch. That area you should leave is called the trunk collar. It is the site where healing takes places fastest. Years ago arborists recommended painting tar over a cut, but that is no longer thought to be a good practice.
If you have an empty place in your tree and wish you had a branch there, sometimes you can bend down a branch and keep it in place until it will stay put – generally around July 4th. But don’t do that until after the leaves appear. You can attach a weight to a small branch. A plastic soda bottle is good: you can add water until it is just the right weight. Or you can tie a bigger branch down to a stake in the ground.
Apples generally are produced on short spurs that occur on scaffold branches that are at a 45 degree angle from the main trunk (or even more horizontal). Branches going straight up are less likely to produce fruit. But don’t be impatient with young trees: they won’t produce fruit until they are good and ready.
Pruning on a warm spring day is great fun, and a good excuse to be outside. And remember, trees are not like people: they benefit by having their limbs removed.
Henry Homeyer lives in Cornish Flat, NH. His Web site is www.Gardening-Guy.com.


 Click Here to buy from Cobrahead