A Winter Meal from the Garden
Posted on Wednesday, March 26, 2014 · Leave a Comment
Technically, spring arrived on March 20. Most years I have snowdrops blooming on a south-facing hillside by early March, and some Glory-of-the-Snow in blossom by now. Not this year. Snow is still deep on my property, and nights with temperatures near zero have been common. Sigh. But I have a few plants started by seed growing under lights, to keep me chipper.
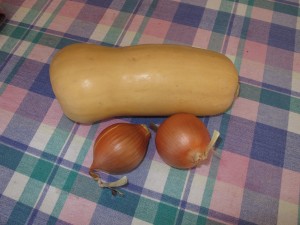
Butternut Squash
I also continue to eat from my garden. Yes, all those frozen and stored veggies keep me well fed and looking forward to this year’s vegetable garden. One of the best vegetables I grow is the butternut squash, specifically one called ‘Waltham’. It stores well in a cool, dry spot and is full of vitamins and energy. I recently made a butternut and apple soup with one, and it was fabulous. I got the idea from Anne Yates of Anne’s Country Store in Plainfield, NH, which has a great deli. She told me what she did (without any measurements), and I created my own version of it while also trying to use just home-grown veggies.
Usually I steam squash to cook it, but Anne said she roasted hers, so I tried that approach. I cut a large butternut in half lengthwise, cleaned out the seeds and lightly oiled the cut surface. I placed it face down on a cookie sheet and roasted at 350 degrees for an hour or more. This caramelized the sugars and made the squash even sweeter than it was. I scooped out the meat from the skin; it yielded about 3 cups of meat.
From my freezer I took out a jug of frozen apple cider. I bring apples to my local orchard in the fall, and have them press my apples (for a price) and put the cider in plastic half gallon jugs, which I freeze. I added cider (a quart in total) to the squash meat in my food processor and pureed it in a few batches.
Although I do grow fresh ginger in pots, and have some I could have harvested, I had some grocery store ginger that I peeled and chopped for this soup. I prepared a quarter cup of chopped ginger, which I then sautéed with 2 cups of chopped onions at low heat until the onions were clear and somewhat caramelized. After cooking the onions and ginger, I blended them in the processor, and added it to the squash and cider which was simmering on low heat.
Next, I cleaned up the last of my carrots from the garden that were starting to look wrinkly and bedraggled in my vegetable drawer. I had about 2 cups of carrots, so that is what I used. Of those, some I added to the soup as rounds, some I blended briefly in the processor. I added a cup of chicken broth at this time, though vegetarians could omit this.
Last fall was great for apples, so I froze lots of sliced apples. For this soup I used 4 cups of frozen apple slices with the skins on. I cooked them with a little water in a saucepan until soft, and then blended them into an applesauce-like mixture in the food processor. That produced about 2 cups of applesauce – which you could substitute here if you didn’t have fresh or frozen apples.
After I added the applesauce to the soup, I added a light sprinkle of nutmeg and some salt and pepper. And no, I don’t produce or collect the nutmeg, salt or pepper. There is just so much one can do to eat locally.
When it comes to growing butternut squash, I like to start seeds in the house a month before it is time to put them in the garden. I say a month because conventional wisdom is that squash family plants (including cukes, pumpkins, and melons) don’t like to have their roots disturbed. An 8-week old squash plant has a big root system and might be stunted or slowed in growth when transplanted into the garden. I plant in June after the soil is plenty warm.
The main reason I start squash indoors instead of planting seeds directly in the garden is this: there is a terrible insect pest, the striped cucumber beetle, that loves the tender first leaves of any squash-family plant. They are active at night, and will eat off the first 2 leaves of a young plant, killing it. But a 4-week old plant will have enough leaves to survive being chewed on by a few beetles.
You can also cover your seedlings with something called row cover or Reemay. It is a breathable fabric that physically keeps the beetles off the seedlings – unless they come up under it (they live in the soil). But I remove the row cover when the vines blossom – they need insects for pollination.
So try making this soup. The ginger gives it quite a kick, but next time I might add some of the hot pepper powder I make each year. And think about growing Waltham butternuts. They take some garden space (I allocate a 5-by 5-ft space for 3 plants) but are very productive – and tasty, too!
Henry’s Web site is www.Gardening-Guy.com. He is the author of 4 gardening books and a children’s fantasy-adventure about a boy with a mustache and his sidekick, a cougar.
Vegetables as Art
Posted on Wednesday, March 19, 2014 · Leave a Comment
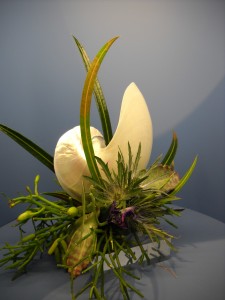
I would hazard a guess that if you toured an art museum, the artwork depicting flowers would outnumber the art showing vegetables by ten to one. Or maybe a hundred to one. Flowers? Georgia O’Keefe and her poppies spring to my mind, Monet had his famous paintings of Giverny with its water lilies. Van Gogh had his sunflowers. And so on. But few painters have focused on kohlrabi or lettuce. And why is that? Vegetables are as beautiful as flowers if properly grown and displayed.

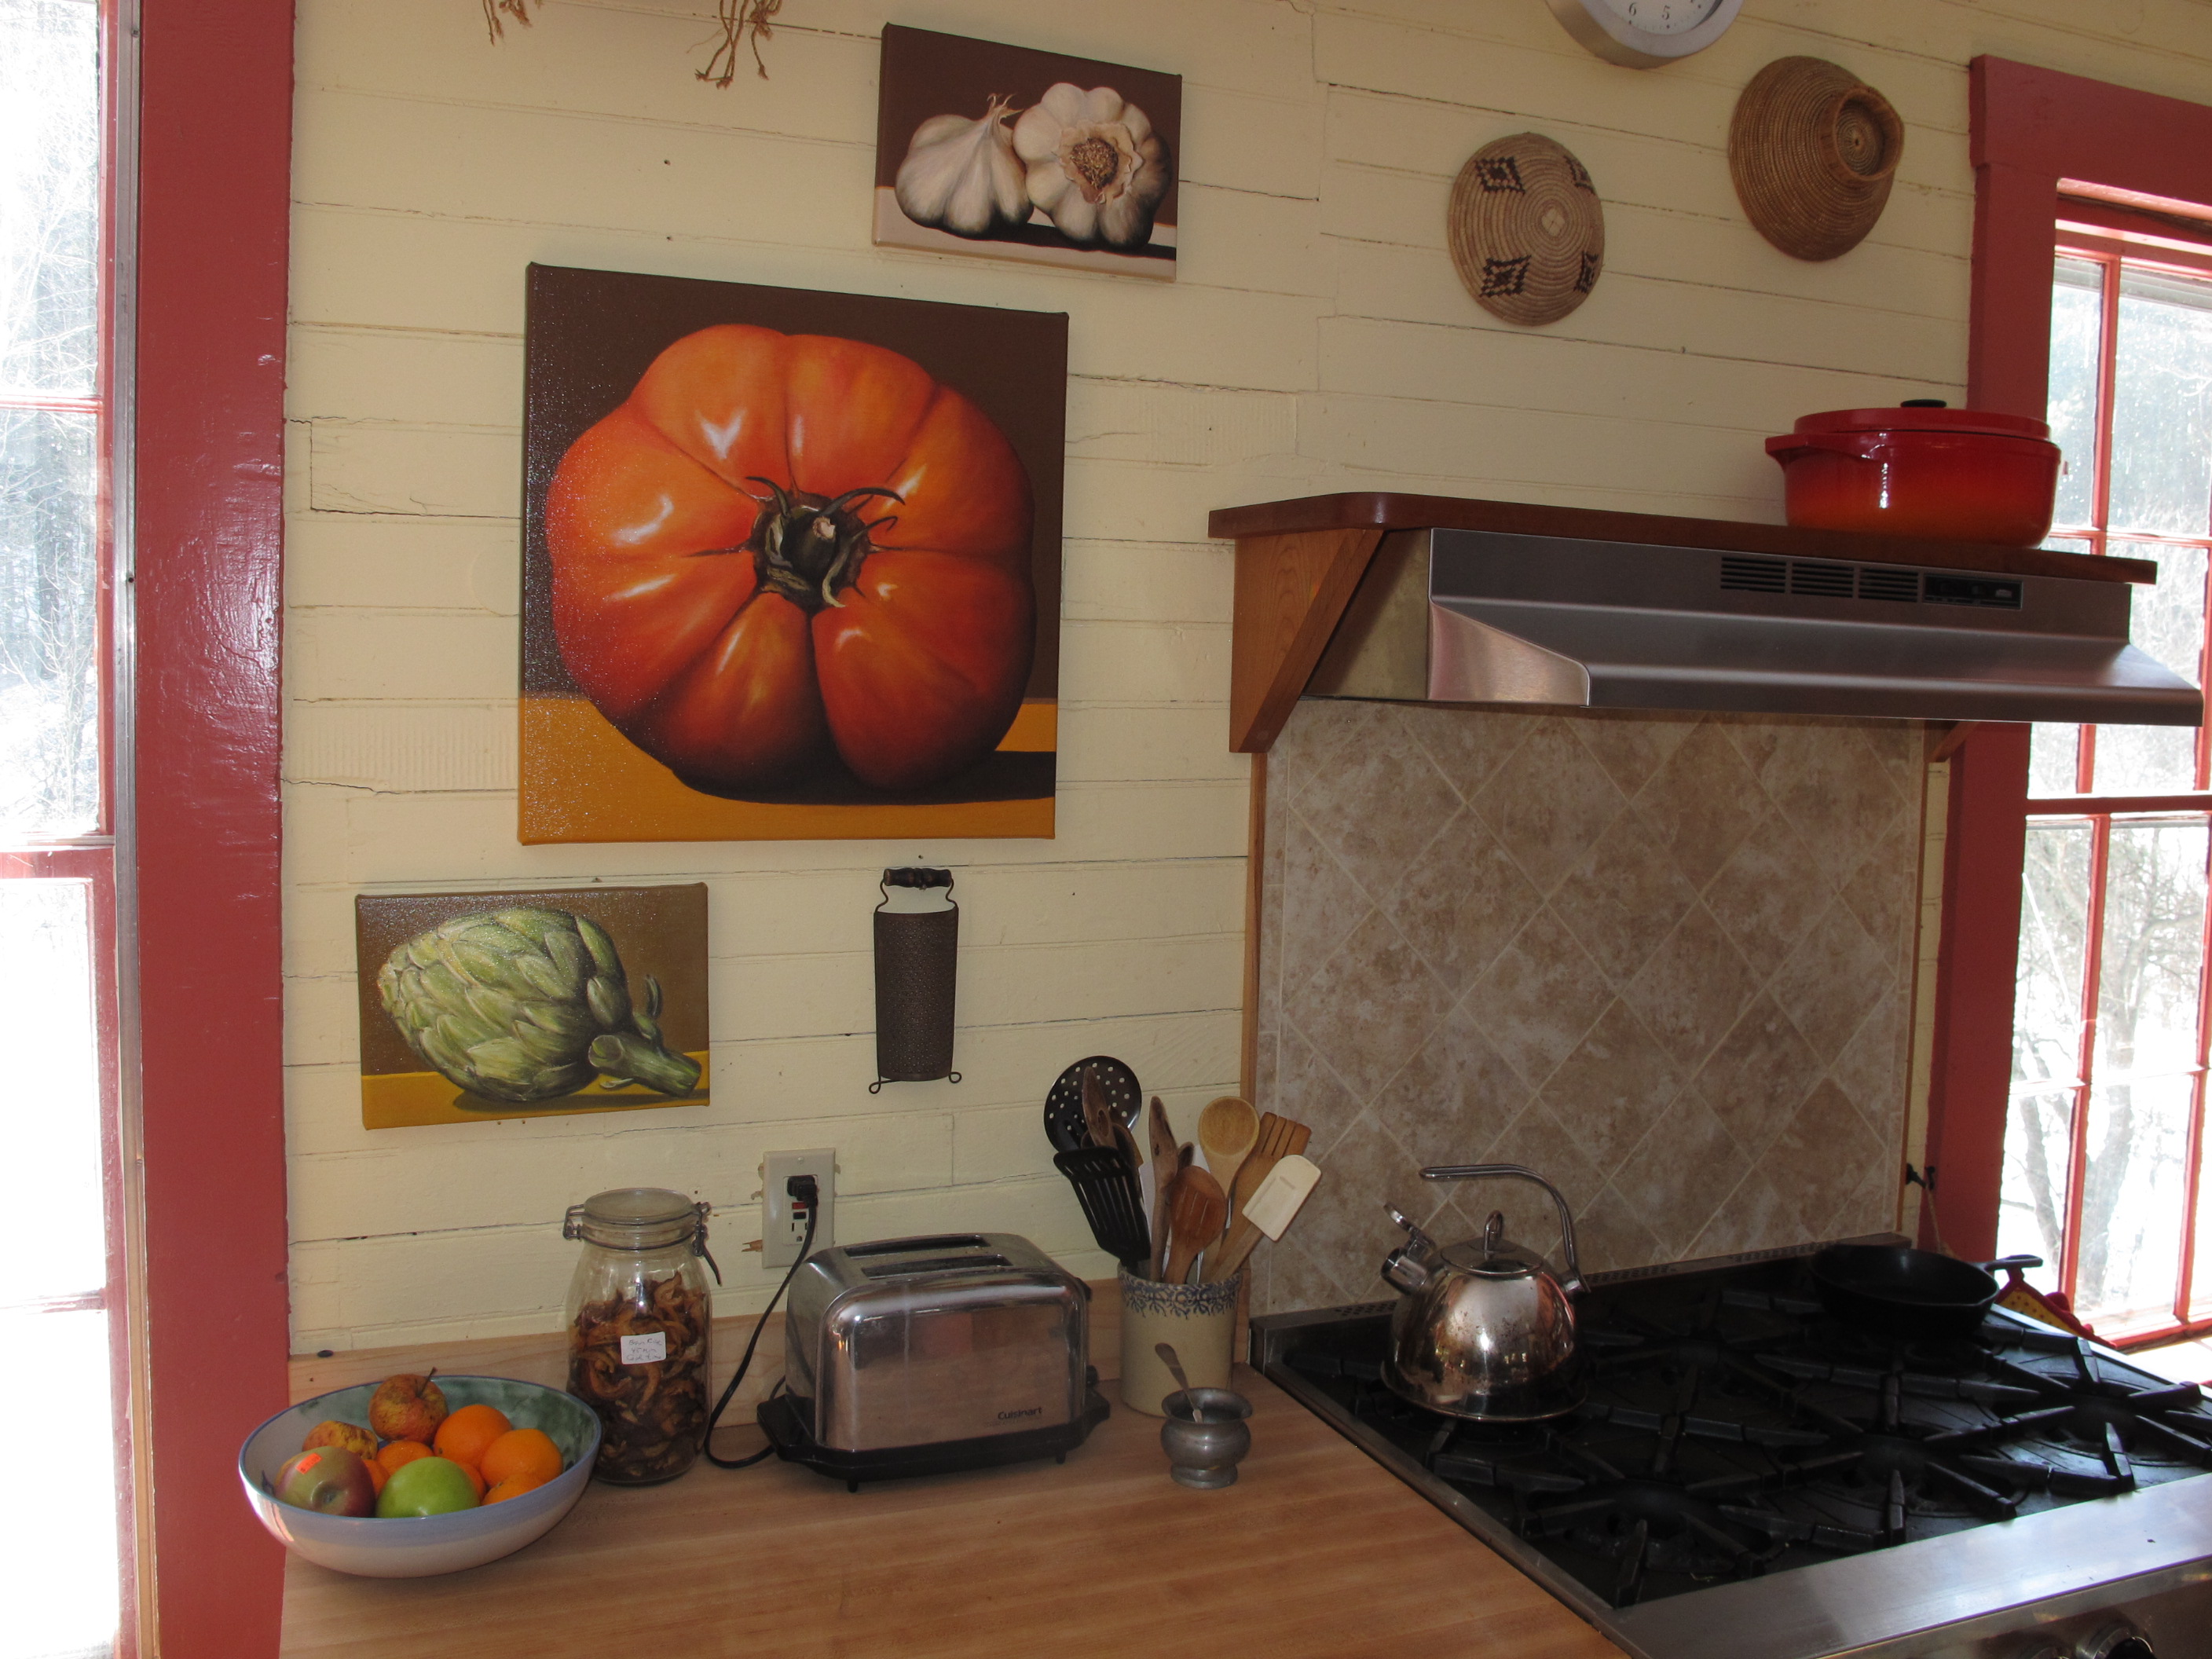
Bill Chisholm art
I was recently at the Rhode Island Flower Show and was struck by the artwork of Bill Chisholm of Somerville, Massachusetts (www.billchisholm.com). He had big, bold paintings for sale of vegetables and fruits. I bought a big tomato, a smaller artichoke and a delightful clove of garlic. I hung them in my kitchen, next to the stove. He paints in oil, and then has reproductions printed on canvas using a technique called giclée. The canvas is stretched on wood frames, just like an original, but at a small fraction of the price.
Much of my life is devoted to my vegetable gardens in the spring, summer and fall. I start seeds now, indoors. I baby the infants outdoors in May and June. I harvest and process the food much of the summer and all of the fall. So now, in winter, it’s nice to see veggies on the wall – in addition to those in the freezer. My new art got me thinking about the veggies we will plant this summer.
As you plan your garden this year, think about planting veggies in artistic ways. Choose cultivars for color and leaf texture, and plant them as you would if you were planting a flower garden – or creating a painting. Here are some of my favorites;
I love lettuces. They come in so many colors and leaf textures. I start lettuce in the house in April and May in 6-packs, each week starting a couple of different varieties. I plant green leaf lettuce, red lettuce, lettuce of multiple hues. In the garden I like to space lettuce six inches apart so that each head reaches full size, and is not crowded. But I like to interplant reds with greens, frilly lettuces with shiny leafed-lettuce. Arugula with Romaine or Oakleaf – and so forth.
I get seeds from numerous sources. Renee’s Seeds (www.reneesgarden.com) packages lettuces in pairs or trios of colors. This allows you to create a colorful array of leaf colors with just a package or two. Johnny’s Selected Seeds has an amazing array of lettuce seeds aimed not only at the homeowner, but also the CSA manager and farmer. In their catalog are a few pages showing the diversity of leafs you can work with.
Of the purple-leafed veggies, one of my favorites is orach. This is not a lettuce at all, but a relative of the amaranths, and is sometimes called “summer spinach”. It doesn’t bolt the way spinach does, and can get to be 3-4 feet tall. It will self sow if you let it – I allow a few plants to get big and make seeds, and it comes back each year in my garden. I use if in salads, but I’ve read that it is also good as a cooked green. Available from Johnny’s Seeds.
Other gorgeous vegetables include purple kohlrabi, eggplants, artichokes, and cauliflower. Visitors to my garden look at kohlrabi and seem to ask the same question: “What is that? A space alien?” The plant is fat globe that sits on the soil surface and sends up “arms” from the bulb, with leaves on top the arms.
For sheer production value, you can’t beat a variety of kohlrabi called ‘Kossak’ from Johnny’s Seeds, which produces globes bigger than softballs. But the purple-skinned ones, while smaller, are my favorites for their beauty. Renee’s Seeds sells a package of mixed purple and green varieties. I chop up kohlrabi and use it is salads and stir fries. It’s crisp and mild flavored, with a bit of a cabbage taste. They are fast-growing and should be started by seed in the garden.
Cauliflowers can be gorgeous, too. I have grown a purple cauliflower variety but have to admit that, like most cauliflowers, it is awfully fussy. If the soil is too wet or too dry, the plants get big but don’t produce anything but little buttons – not the big heads you see in the grocery store – or want to eat. And the purple color fades away on cooking.

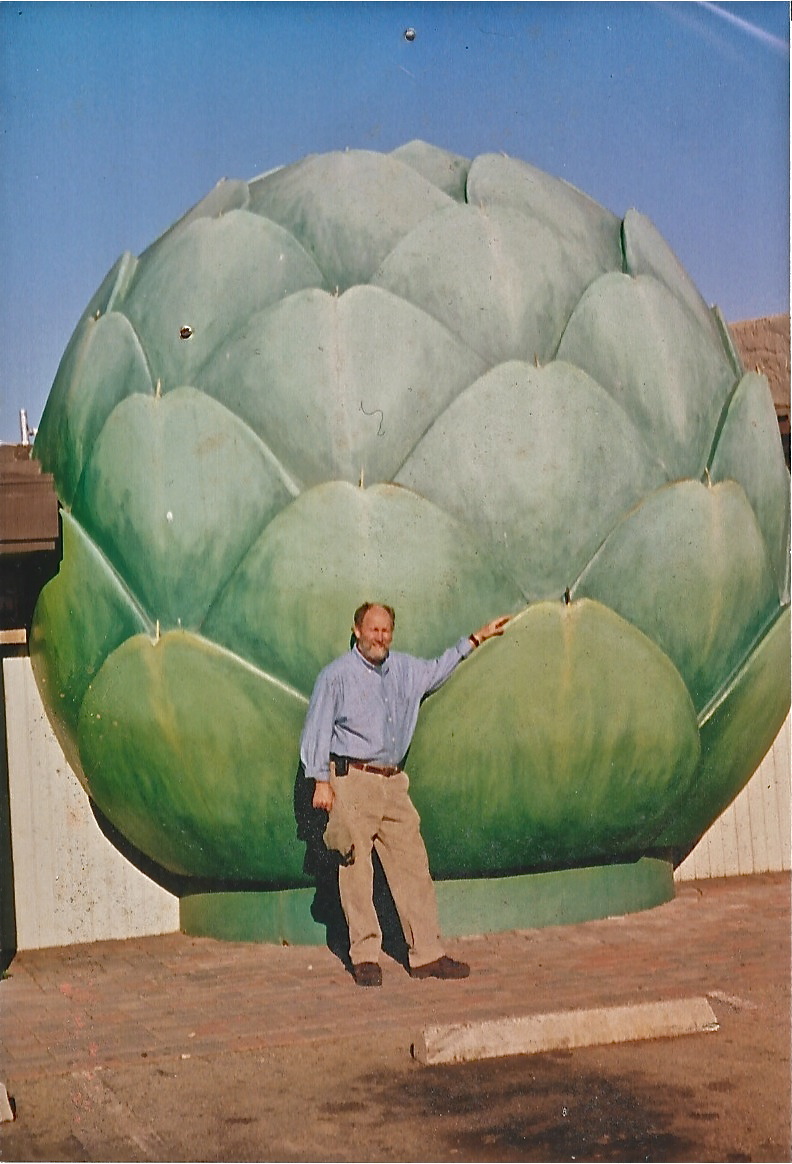
Artichoke Sculpture
Artichokes are beautiful plants, but take a long time to grow. In California they are perennials, but not here. This year I started a few seeds in January, but little plants are sometimes sold at good garden centers if you haven’t started any yet. I grow a couple of plants each year mainly for their looks and get a few artichokes to eat, but they are quite small. Some years ago I visited the Giant Artichoke Restaurant in Castroville, CA. It had a sculpture of an artichoke that towered over me that I remember fondly – too bad I can’t have one like it in my garden.
So as we move towards spring, think about the art value of your veggies and create your own living artwork. Tasty can be tasteful and pretty, too.
In addition to writing, Henry Homeyer teaches pruning to homeowners. He can be reached at henry.homeyer@comcast.net. He lives in Cornish Flat, NH.
The Irish Gardener
Posted on Wednesday, March 12, 2014 · Leave a Comment
My great-grandmother took the boat from Ireland to Boston in the latter part of the 1800’s. Dobbie, as we called her, got a job as a cook at Wellesley College. That was a bit ironic because she was, in my memory, a wonderful person but a horrible cook. She never made me anything that I can recall eating with pleasure. Even her boiled eggs – usually a favorite of mine- were runny and disgusting.
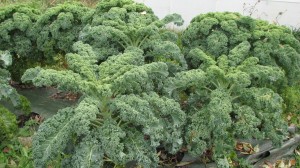
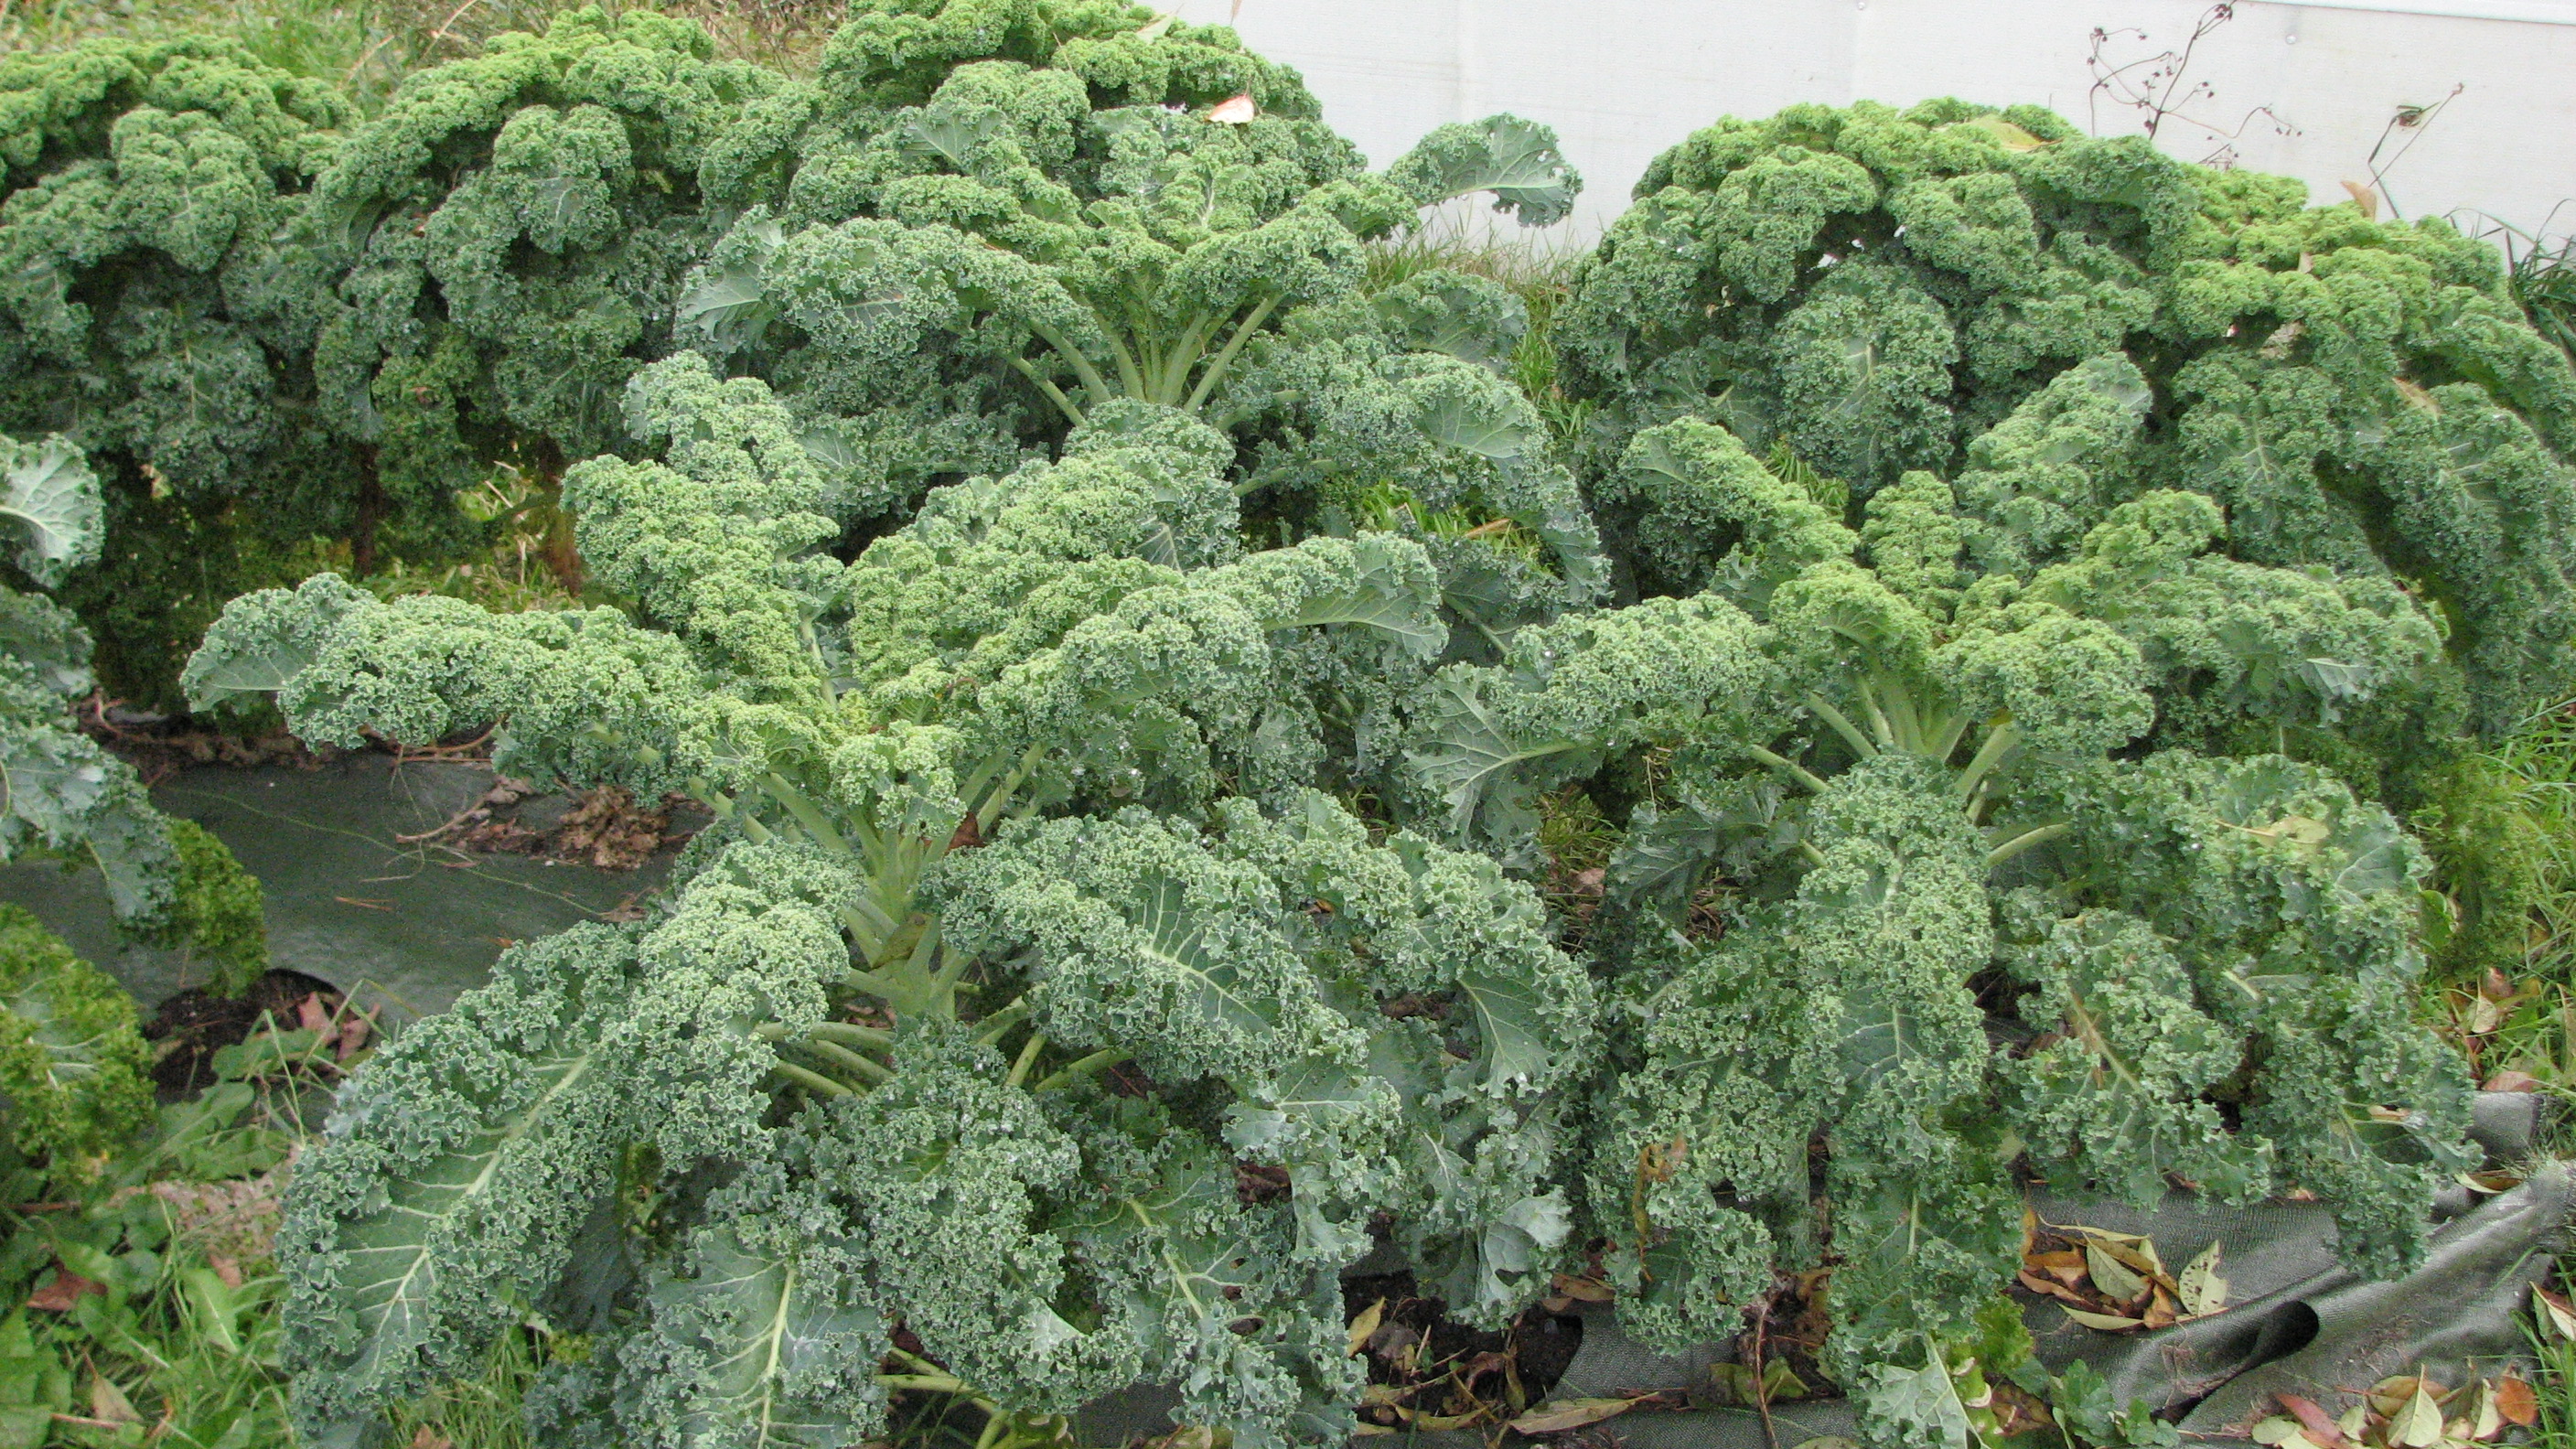
Kale
So, despite the fact that I am one quarter Irish, for a long time I never paid much attention to Irish food. Not so any more. With St Paddy’s day just around the corner, I will soon be cooking up a big pot of colcannon, one of the great comfort foods of all time. It’s a wonderful combination of potatoes and kale – foods that I still have from last summer’s garden.
As a gardener and a chef I appreciate the value of potatoes, especially potatoes from my own garden. Potatoes come in as many colors and flavors as tomatoes. I grow potatoes with flesh that is white, yellow, pink and purple. I store and save potatoes, and once I went about 20 years without buying a potato to eat or plant. I just started this year’s planting with last year’s potatoes and I stopped eating potatoes when I ran out – until the next crop came in.
But back to colcannon. It is a potato dish I always eat on St. Patrick’s Day. It is easy to make and tasty to eat. I generally use a white potato such as the Kennebec, which is also my most productive variety. One chunk of potato planted can yield up to 5 pounds of potatoes.! They grow big and are great for mashing. The other main vegetable in colcannon is kale, which I grow in quantity and freeze for winter use. I like a variety called Winterbor which is readily available by seed or as seedlings at your local garden center. Here’s how to make a nice Irish side dish:
Ingredients:
2-3lbs of white potatoes
5-6 Tablespoons butter
3 cups kale, fresh or frozen, chopped finely & lightly packed in a measuring cup
½ cup onion finely chopped, or 3 green onions (including the greens)
1 cup whole milk or light cream
Method:
- Peel and boil the potatoes until they will fall apart when poked with a fork.
Drain.
- Sauté onions and kale in the butter in a heavy pot on medium heat for 3 to 5 minutes.
- Add potatoes, stir.
- Add the milk (or cream for sheer decadence) and mash well using an old fashioned potato masher, not an electric mixer.
- Add salt and pepper as desired.
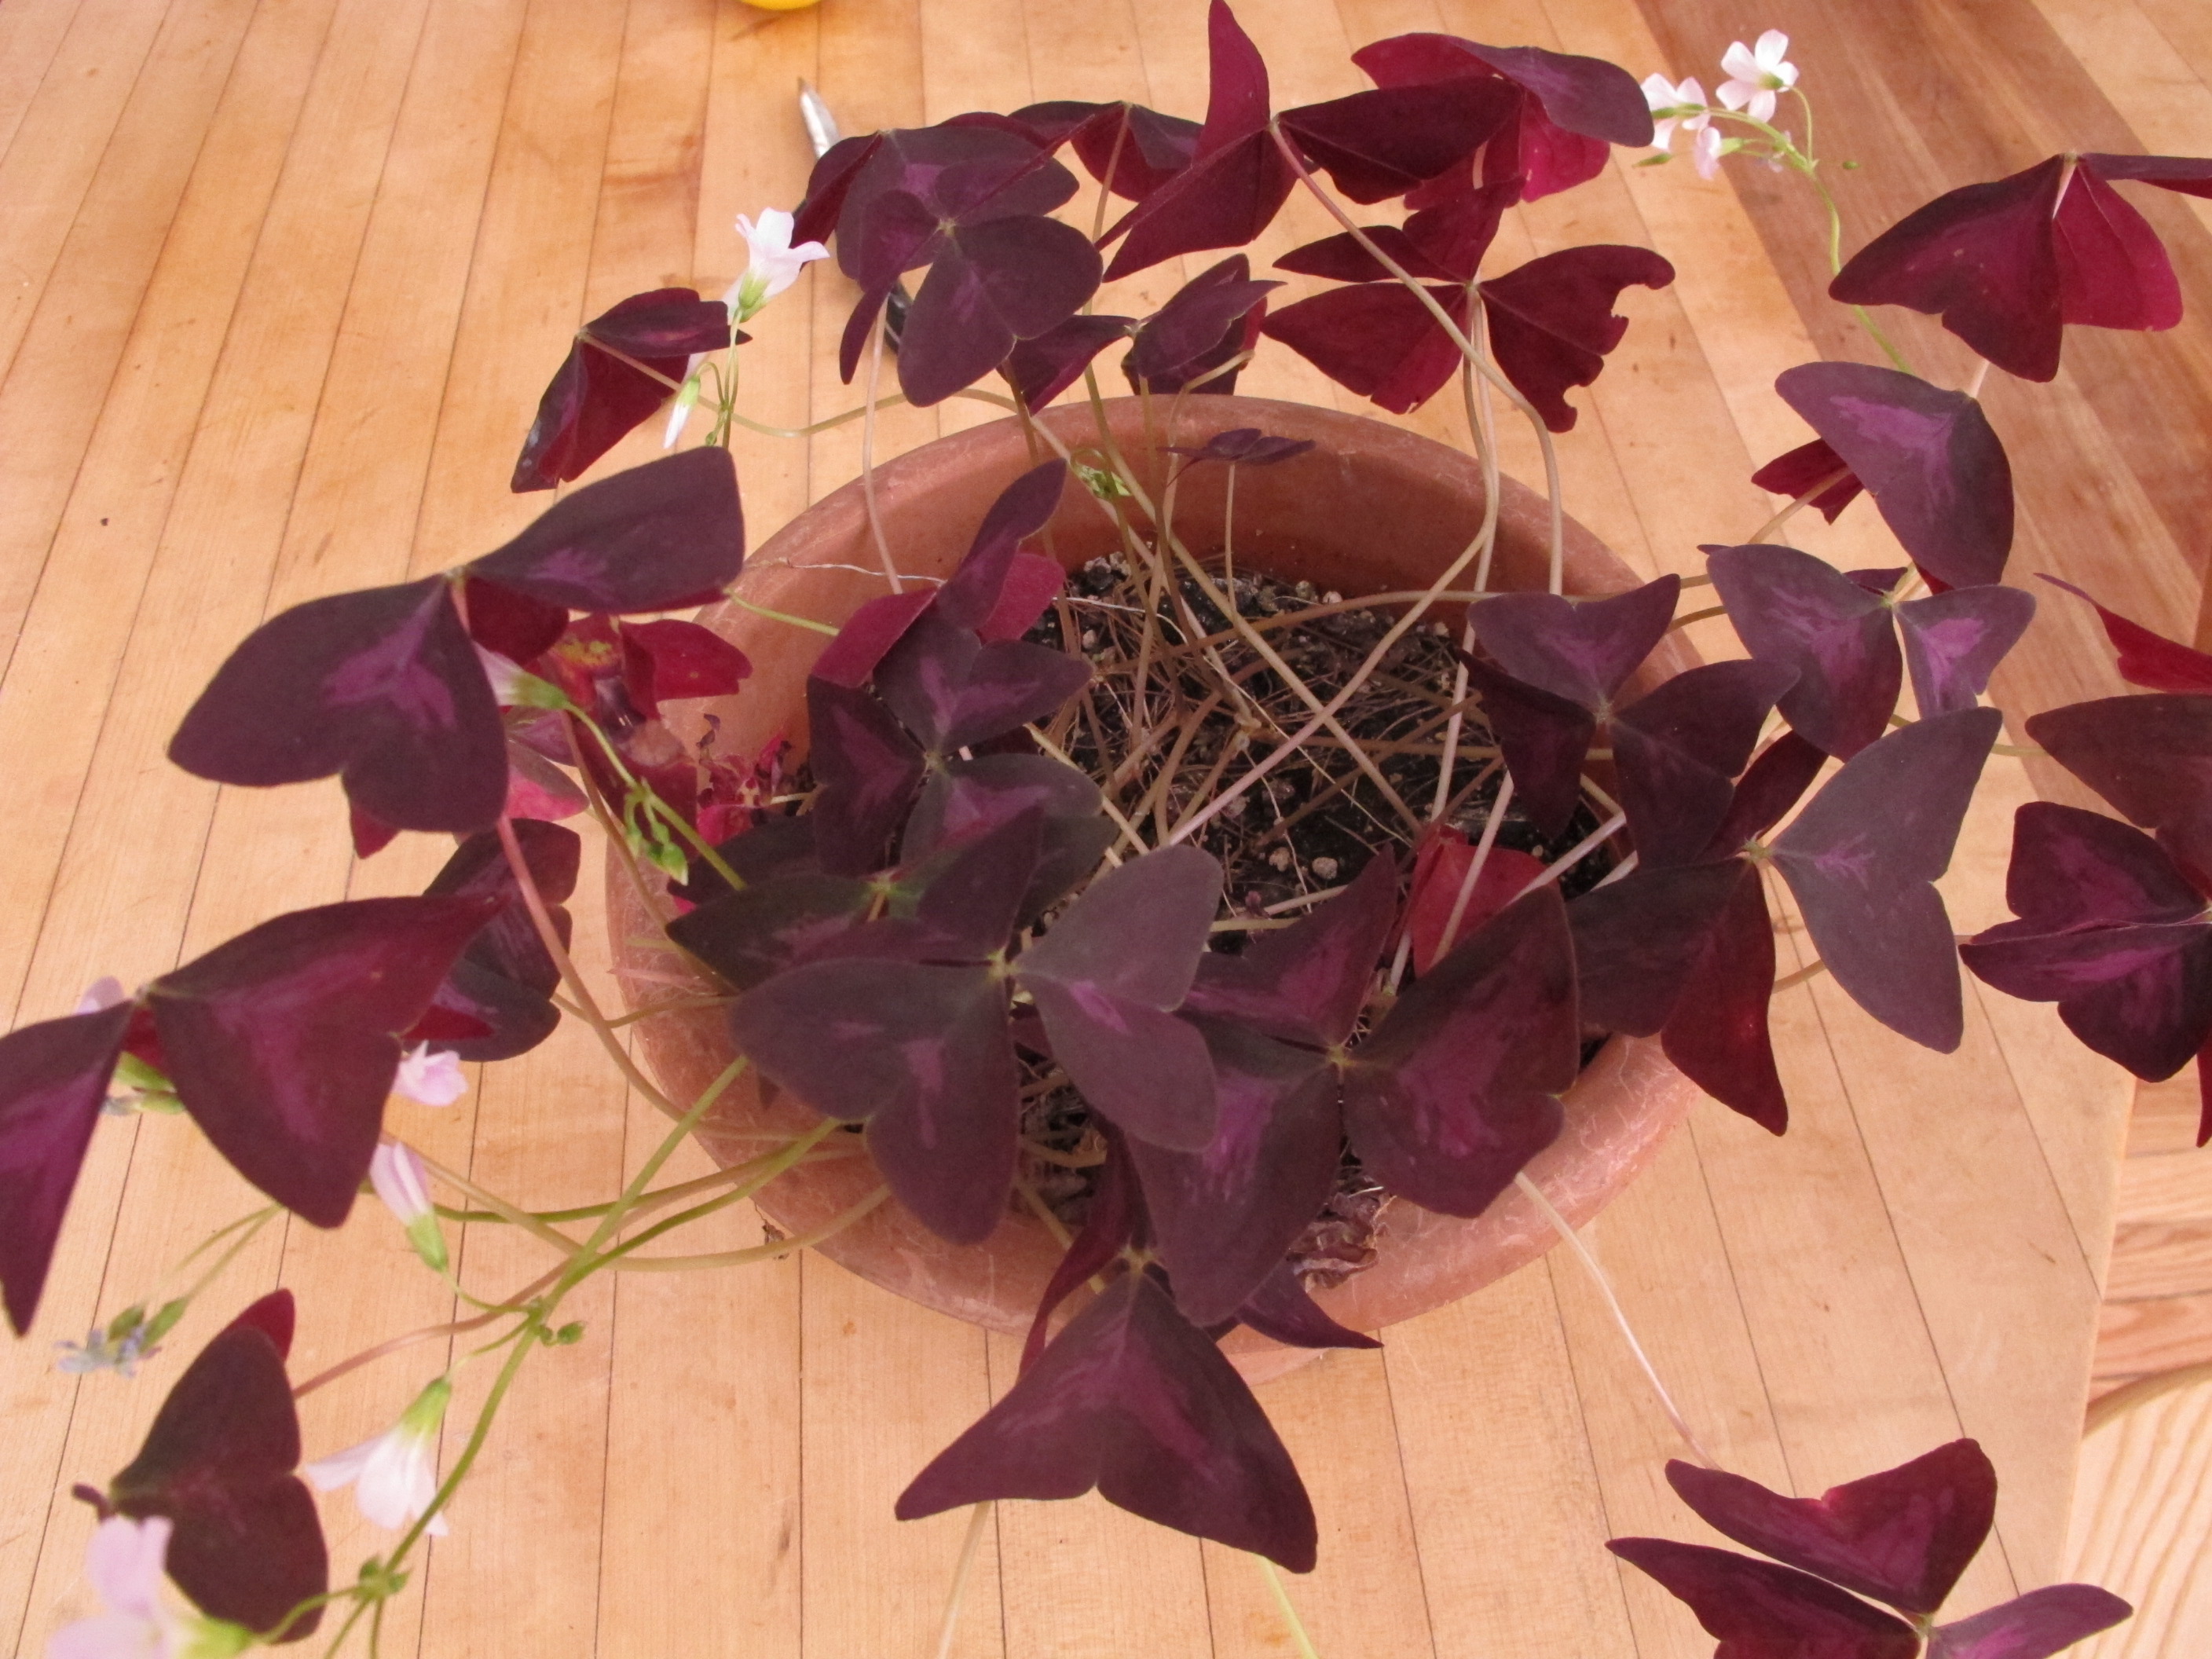
But on with the Irish theme. The rest of the meal should be Guinness stew, but that’s not from my garden, so you’re on your own for that. But as a centerpiece on St Patrick’s Day there should be a plant that screams “Irish”. The shamrock? The true Irish shamrock is a type of clover (Trifolium dubium) that is very hard to grow indoors and is rarely available even from florists and nurseries. What you can grow as a house plant is a type of wood sorrel commonly called oxalis. It looks like the Hallmark version of a shamrock.

Oxalis with flowers
Oxalis is a nice house plant that comes in green and maroon-leafed varieties – though for St Patrick’s Day green is the proper selection. There are some 300 species of oxalis. Mine do well in a bright window – I have 2 of the maroon-leafed ones in bloom right now. In the summer they thrive on my somewhat shady deck. The light pink flowers are small and reach up above the leaves on thin stems. The leaves fold up at night time.
One of the great things about oxalis is that it is nearly impossible to kill by under-watering it. The leaves may shrivel up and die off, but if this happens, just give it a rest –which I have read it likes – and it will bounce back when you start watering it a few weeks later.
If you have an oxalis, you can divide it easily by separating the corms (the thickened roots) and planting pieces of them in new pots with fresh planting medium. Like most houseplants, oxalis does not do well if the roots stay constantly wet. I have planted mine in potting soil enriched with compost. I find a 50-50 mix is good. I have learned to judge dryness of the soil by lifting the pot. The surface may look dry, but if the pot is heavy there is still plenty of moisture down below.
Whether you have some Irish in you or not, grow potatoes and kale this year. Both are supremely easy. But it’s too cold to think about that now – except as ingredients in colcannon. Bon appétit!
Henry Homeyer is the author of 4 gardening books and a children’s fantasy-adventure about a boy and a cougar. His Web site is www.Gardening-guy.com.
Growing Your Own Fruit
Posted on Wednesday, March 5, 2014 · Leave a Comment
Most mornings in winter I start my day with a bowl of oatmeal. That can get pretty dull, so I liven it up with a variety of fruits, most of which I grew myself and preserved either dried or frozen. Add some cinnamon or cardamom and a few nuts, and bland becomes bodacious. In my freezer I have blueberries, elderberries, blackberries, plums, apples, raspberries and a few peaches that I got by trading some apples with a friend. So if you’re bored with breakfast, do some studying now about the various fruits you might grow, and plant them this summer.
Much of what I know about gardening comes from practical experience: ask a good gardener, for example, what kind of peach tree she grows, plant one, and see how it does. Try again if the first one dies. But I also depend on reading good books on gardening, and now, while there is still snow on the ground, I spend considerable time reading.
I have two books on fruit growing that I like a lot. The first, written in 1992 by Lewis Hill of Greensboro, Vermont, is a classic: Fruits and Berries for the Home Garden. Lewis was a friend of mine (he passed away in 2008) and a Vermonter to the core: quick –witted, hardworking, and curious. He grew up on a dairy farm and only had a high school education, but with his wife Nancy, he wrote 16 excellent gardening books. His book on fruits and berries is full of good information but also entertaining. It has recently been updated, I just learned, by University of Vermont professor Len Perry as The Fruit Grower’s Bible.
The other fruit book I like is Lee Reich’s Grow Fruit Naturally: A Hands-On Guide to Luscious, Homegrown Fruit, which came out in 2012 and is full of color illustrations and good drawings. Like Hill, Lee Reich is opinionated, thorough, and has many years of experience. Lee has a PhD in horticulture and lives in upstate New York.
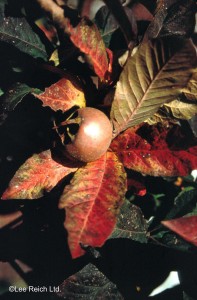
Medlar
Reich’s book introduced me to two fruits hardy for Zone 5 (possibly even Zone 4) that I have never grown or tasted: the medlar and the shipova. The medlar is a small tree that is self-fruitful, meaning that one tree is all that is needed for pollination. According to Reich’s book, the medlar blossoms open late enough to almost never be bothered by spring frosts. The fruit keeps well and is very tasty. So why have I never heard of one? Reich writes, “The flesh, when ready for eating, is brown and mushy and lacking visual appeal.” It also needs “bletting” or ripening on a shelf in a cool room, the cooler the better.

Shipova
The Shipova is actually a hybrid made from two different species, a type of mountain ash (Sorbus aria) and the European pear. Reich lists it as a Zone 4 plant, so it is hardier than the medlar and should survive my New Hampshire winters easily. It produces pear-like fruit on a tree that can grow to 20 feet, or if grafted on a suitable rootstock, only 8 feet tall. He says that are ready for harvest in mid-summer. Unlike the medlar, the fruit does not keep well – but it is attractive to the eye and tasty, too. I called Lee, and he said the fruit tastes similar to a pear.
Reich made it clear that fruits like the medlar and shipova are not often sold at our local nurseries, so I went on-line to see where they are available. Raintree Nursery in Morton, Washington (http://www.raintreenursery.com) had both for sale. In the back of Reich’s book there is a list of nurseries that sell fruit trees, including St Lawrence Nurseries in Potsdam, NY which has lots of cold hardy trees that can be ordered bare root until April 10.
Lee Reich’s book is just chockfull of tidbits that are useful. He explains, for example, labels on pesticides: ‘caution’ means the material is slightly toxic or relatively nontoxic. ‘Warning’ means moderate toxicity, and material marked ‘danger’ might kill you – even in small quantities. Lee is a proponent of organic techniques, but points out that even pesticides approved for organic growers can have severe side effects. He notes that nicotine sulfate is an extract of tobacco that is “organic” but has a danger label. It’s important to pay attention to warning labels whether you are using organic pesticides or not.
I also like the fact that Reich’s Grow Fruit Naturally has specific cultivars named for the fruits it describes, and offers useful tips such as whether a variety is self-fruitful or not. There is a nice section on pruning and another on proper planting techniques.
Call me a skeptic, but I like to buy trees from local nurseries as it means that the owners probably have grown what they are selling. Still … I love to experiment with new plants, and usually try something new every year. This just might be the year for a shipova or a medlar. I wonder how they are on breakfast cereal?
Henry Homeyer can be reached at henry.homeyer@comcast.net or by writing him at P.O. Box 364, Cornish Flat, NH 03746.
Enjoying the Winter Landscape
Posted on Wednesday, February 19, 2014 · Leave a Comment
I like winter. I like the special quality of winter light in the late afternoon, those purples and blues that were perfectly captured by artist Maxfield Parish. But most of all, I like passing through the woods on skis when the sun is bright. The snow sparkles the way diamonds might, if scattered on a Mediterranean beach.
I visit the woods in winter for the same reason that I go to museums: for the sheer beauty on display. There is something uplifting about great works of art – or great works of nature. I don’t need to go to the Grand Canyon to feel awe; I can enjoy the woods near home just as much. Part of the joy for me is going slowly enough to see what’s there, and taking time to appreciate the details.
As I approach my favorite woods, stolid maples wait patiently along the lane, old and venerable. They will share their sweet nectar in another month or two but for now they stand silently, motionless, waiting.
In the forest, young hemlocks bend under the weight of snow, their long arms reaching to the ground for stability, green fingers disappearing into the snow. Going through glades of mature hemlocks or pines, their branches reaching out high above me, is almost like visiting a great cathedral. I like the wisps of snow that blow off their branches – snow smoke I call it – even if some goes down my neck.
Teenage beeches are the glamour stars of the woods, their bark smooth, gray and unblemished. Young beeches often hold their dry brown leaves until May, and they rustle when I jostle them. But the old beeches seem somber, even sad, and somehow remind me of elephants. They are stolid, unmoving, their grey legs showing wrinkles and scars.
I don’t always have time or the energy to go for a long cross-country skiing adventure. Sometimes I just strap on my snowshoes and go to my garden to look at the silhouettes of trees and shrubs.

Magnolia Flower Bud
One of my favorites is my Merrill magnolia. I planted it some 15 or 20 years ago as a specimen tree in the middle of a mowed lawn. Now it is near maturity: 25 or 30 feet tall with a “wing span” of 20 feet. It has multiple stems, as many magnolia do, and smooth gray bark. The branches are loaded with large, fuzzy flower buds. These buds are bigger and better than pussy willow blossoms, and they bring joy not only for their looks now, but also for the image of what the blossoms will look like: 3-inch double white flowers that are lightly fragrant. The tree almost always blooms for me on April 23, my birthday.
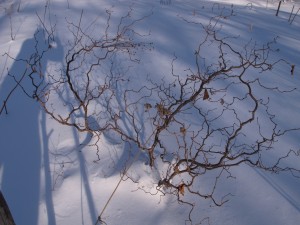
Twisted Hazelnut
I love the curlicue form of purple-leafed, twisted hazelnut (also called Harry Lauder’s walking stick). It is a very interesting silhouette against the snow, and come spring it will produce lovely, glossy purplish leaves. Later in the summer the leaves will lose some of their purple hue and appear more green.
My apple trees can be a joy to look at, too. Proper pruning of apple trees can turn them into works of art. The key is to get rid of the clutter that apple trees seem determined to grow. Annual pruning to get rid of those vertical twigs called “water sprouts” makes a big difference. I tell people that a bird should be able to fly through an apple tree and not get hurt. I once found the skeleton of a bird in an unpruned apple tree, but don’t know for sure how it met its demise. I’ll start pruning in March, once the snow has melted enough to move around the trees easily.
A native tree that has a great profile is the pagoda dogwood (Cornus alternifolia). It grows branches well separated, so they remind me of person doing Tai chi, holding arms in frozen poses. I have one that grew out of the face of a retaining wall as a ‘volunteer’. Although I snipped it off when young, the roots sent a new shoot, and I let it grow. Now it is a favorite of mine in winter.
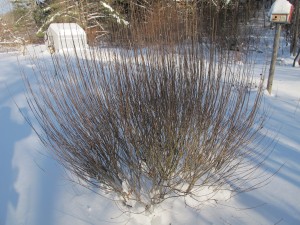
Arctic Blue Willow
My arctic blue willow looks great now, too. It is a ‘nana’ or small variety, and has hundreds of thin twigs growing vertically and very close together. Earlier in the winter it was severely bent over by an ice storm, but I shook the branches free of ice and snow, and now it is back in fine form. The 16 inches of fine snow we got recently sifted through the branches this time, giving it a great silhouette.
So go outside and really look at the “bones” of your garden on a snowy day. And if you don’t find much to look at, make plans to buy and plant some nice trees and shrubs, come spring.
Correction: A kindly soils professor e-mailed me about a recent article in which I said wood ashes could be used to substitute for limestone. He noted that trees can pick up lead and cadmium, particularly near roads, so wood ashes are not good to use in the garden. He also said they act so quickly that your soil may become too alkaline and inhospitable to soil microorganisms.
Henry Homeyer teaches pruning and general gardening. His web site is www.Gardening-Guy.com. He is the author of 4 gardening books.
No Green Thumbs!
Posted on Wednesday, February 12, 2014 · Leave a Comment
I’ve been accused of having a green thumb. I don’t. But I can understand why someone might think so. I have lots of successful flowers, shrubs, trees and vegetables growing on my property every year. But I’m willing to bet that I’ve killed more plants than that guy who claims to have a “brown thumb”. I take chances, buying and trying perennials that are outside their normal climatic zone. I try plants that are persnickety, and then try them again after I kill the first ones.
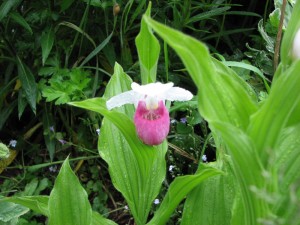
Showy Ladyslipper
The late author and illustrator Tasha Tudor, a great gardener who lived in southern Vermont, told me once that she buys at least three pots of any new perennial, and then tries them out in different places on her property to see where they do the best. Often she would buy seven or more pots of the same plant. She tried them in places that had more sun, or less. More natural moisture or less. Like me, I bet she tried different amounts of soil additives for the same kind of plant – more compost, more peat moss or limestone, or more sand, for example.
So what makes a successful gardener? Getting the right soil for each plant. Soil is the key to gardening success. This is a good time, in mid-winter, to pause and learn about soils and to think what you might do, come spring.
There are three basic types of soil; sandy soil, loam and heavy clay soils. Most plants prefer, according to the gardening literature, “Moist, rich, well drained soil.” So how do you get that? It takes time and effort.
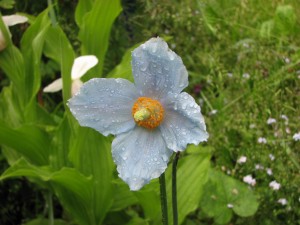
Himalayan Blue poppy
The soil most plants want has a mixture of particle sizes: small (clay), medium (loam) and large (sand). Very small particles pack together tightly and hold water with their electromagnetic charges. Clay soils do not drain well – they act like a bowl of baking flour. Sandy soils drain too well – like a wire basket full of golf balls. A good soil has some tiny particles, along with larger ones that provide good drainage.
If you have a clay soil, you cannot just add sand. Clay mixed with sand makes a soil that acts like like concrete. Similarly, if you have sandy soil that doesn’t easily hold water, you cannot just add lots of clay. The key ingredients for either soil are compost and other kinds of organic matter such as chopped leaves, peat moss or coir (coconut fiber). Adding compost is, in my opinion, always a good thing.
The great thing about compost is that it adds water-retention abilities (think of it as containing lots of little sponges) as well as living organisms that work well with your plants. But compost adds air spaces, too, so water can drain better in clay soils if you add lots of compost.
Plants thrive in soils that are biologically active: soils that are full of beneficial fungi, bacteria, protozoa. I read once that a teaspoon of healthy soil can contain 5 billion bacteria, 20 million filamentous fungi and a million protozoa. We tend to think of fungi and bacteria as bad: you may think of fungi as the mildews and molds on leaves. Our mothers told us often to wash our hands to keep bacteria out of our mouths. But in the soil there are many more good bacteria and fungi than bad ones.
Chemicals added to your lawn or garden may inhibit the growth and viability of those beneficial microorganisms. Most chemical fertilizers are composed of salts of nitrogen, phosphorus and potassium. Salts dry out living tissue and can easily kill microorganisms. Too much fertilizer can dry out and kill root hairs of your precious plants, too. Farmers talk of fertilizer “burning” the roots of young transplants. That means drying out the root hairs, killing them.
What else can you add to your soil to help it along? Here in the Northeast our rain is somewhat acidic, and that acid dissolves some minerals and washes them away. Plants need calcium and magnesium, both of which wash away in spring rains. You can buy a 50-pound bag of limestone and apply it in small quantities to your lawn and garden. If you get your soil tested, it should give a recommendation for how many pounds of limestone are needed for every hundred square feet of garden.
Please note: there are two kinds of limestone – dolmitic which contains magnesium, and calcitic, which does not. A soil test will tell you which kind to buy. Or, if you are on a budget and have a woodstove, you use wood ashes instead of limestone. Wood ashes are finer than limestone in a bag, so it is incorporated into the soil more quickly. Use wood ashes at the same rate as you would limestone that you purchased.
When the snow goes and the soil thaws, get a soil sample and send it off to your State Extension testing service. It can tell you what might be missing from your soil, the soil acidity, soil type and amount of organic matter. The more you know, the better your plants will grow!
Henry Homeyer is a gardening educator and lecturer with a specialty in organic gardening. His web site is www.Gardening-Guy.com.
Spring Flower Shows
Posted on Wednesday, February 5, 2014 · Leave a Comment
I’m not a big fan of the movies, but I remember a film from the 1960’s that opened with people trudging across a snow-swept plain somewhere in Russia wearing large fur hats and cumbersome boots. Doctor Zhivago, perhaps? Sometimes it seems that we’re all in that movie. If you’re finding winter dreary, you need to go to one of the many Spring Flower Shows – or maybe all of them.
The first flower show each year is the New Hampshire Orchid Society, this year on February 14-16. It is just orchids. Orchids of all kinds, and paraphernalia for orchid growers. Adults are $10, seniors $6, kids under 12 are free. It’s at the Radisson Hotel in Nashua. For info: www.nhorchids.org.
Rhode Island Flower Show
The first big shows are the weekend of February 20-23 with shows in Providence, RI and Hartford, CT. They are both excellent, and worth a visit. They’ll have flowering trees and luscious flowers, a multitude of vendors selling everything from bulbs and cut flowers to books and vases, and of course, educational lectures. The Providence Show has always been one of my favorites. (Full disclosure: I am lecturing Friday and Saturday at the Show in Providence).
This year the Providence Show is including vintage cars in the garden displays. I phoned Chuck Carberry, one of the show’s organizers, who told me that each major exhibit will include an antique or vintage car – from a Model A Ford in a Great Gatsby-themed garden to a ‘70’s Ferrari in an Italian grotto garden. Not only that, the show will feature an old time drive-in theater!

Rhode Island Flower SHow
Each year at Providence I love the sand sculpture – castles big enough for children or gnomes – and this year, given the car theme, they are going to have an old fashioned “woodie” made of sand. The sculptors work on their creations during much of the show, so you can see how they do what they do. The same is true of the designers of the various flower exhibits – they are there to answer questions, which is nice. For info go to: www.flowershow.com
The Hartford show is held at the Connecticut Convention Center, which is a great space for such a big show – handy to the interstate, plenty of parking. They pride themselves on their seminars – 12 per day, Friday to Sunday. The Federated Garden Clubs have a big space on the show floor, allowing individual exhibitors to show off their house plants, cactus and arrangements. Tickets are $16, and unlike most shows, they accept cash only! So fill your wallet before you go. Info: www.ctflowershow.com.
The Philadelphia Flower Show is March 1-9. It is the original flower show (having started in 1829) and certainly the biggest and most expensive. Daily tickets are $27 and they sell a VIP all access ticket for $125! But you have to attend at least once in your life. Go during the week when crowds are less, if you can. For info: http://theflowershow.com/ I love this show for its sheer size and diversity. And there are lots of exhibits by ordinary gardeners, which I like.
The Portland, Maine Flower Show is March 6-9 at the Portland Company Complex on Fore St, downtown. Tickets cost $13 in advance. Info: http://portlandcompany.com. This year’s theme is Storybook Gardens.
The Boston Flower Show is another extravaganza. This year, designers have been asked to. “create a small freestanding garden inspired by a scene of romance or seduction from a specific, named piece of literature, a movie or a popular song”. It’s being held March 12-16 at the Seaport World Trade Center. Tickets are $20 – and worth it! For info: www.bostonflowershow.com. Get there at opening time (10am during the week, 9am on the weekend) before the crowds get too big.
After Boston comes The Seacoast Home and Garden Show in Durham, NH on March 29-30. A nice small show with 220 vendors and a reasonable fee to get in – tickets are only $8. Info: www.NewEnglandExpos.com.
Winter Reading
Posted on Wednesday, January 29, 2014 · Leave a Comment
Going cross country skiing is generally my way of keeping cheery during long, cold winters. We started off the winter with plenty of snow, but lost most of it in January rains, and recently we’ve just had cold weather. It would be pretty easy for me to get the blues under these conditions, so I’ve been looking for ways to keep myself cheerful. One of the ways I do that is by learning about new plants, and dreaming of growing them once winter has ebbed.
Even though it came out in 2011, I only recently got my own copy of Dirr’s Encyclopedia of Trees & Shrubs. It’s 950 pages of information about 3700 species of woody plants – with more than 3500 good color photos. I have decided to read it cover to cover by April, though I am skimming the parts about plants for Zones 7 to 9. And since I own it, I am underlining and highlighting relevant info about plants that I want to try. I’d like to share a few of my ideas for purchases with you.
I’ve filled up most of my sunny places, so things that do well and bloom in shade are of interest to me. In the back of the book are lists of plants that do well in various conditions. It lists 225 plants that do well in shade (though some are outside our climatic zone).

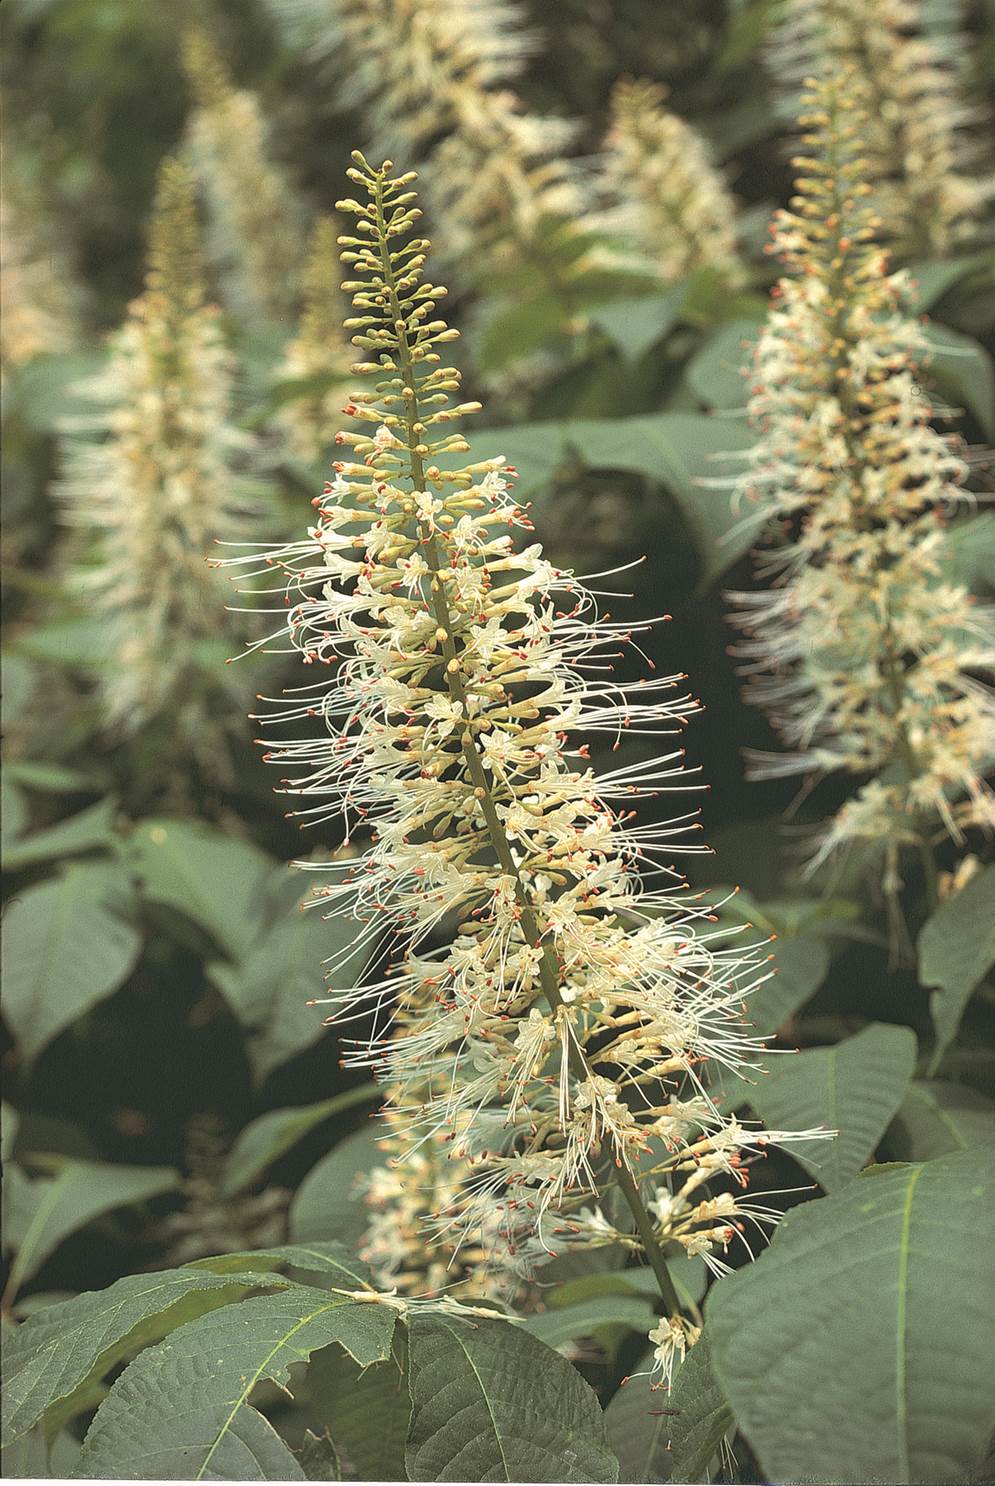
Bottlebrush buckeye, photo by Michael Dirr
First on my list of shade lovers to buy is bottlebrush buckeye (Aesculus parviflora). Dirr calls it “truly one of the best native shrubs for late-spring and early summer”. It is hardy to Zone 4 and “flowers almost as prolifically in shade as in sun.” The blossoms are 8 to 12 inch long, bottlebrush-shaped white inflorescences similar to those on horse chestnut trees– they are ‘cousins’ in the same genus. But it is an understory plant, growing to be just 8 to 12 feet high and 8 to 15 feet wide. And although it likes moist, well-drained soils best, it will grow almost anywhere.
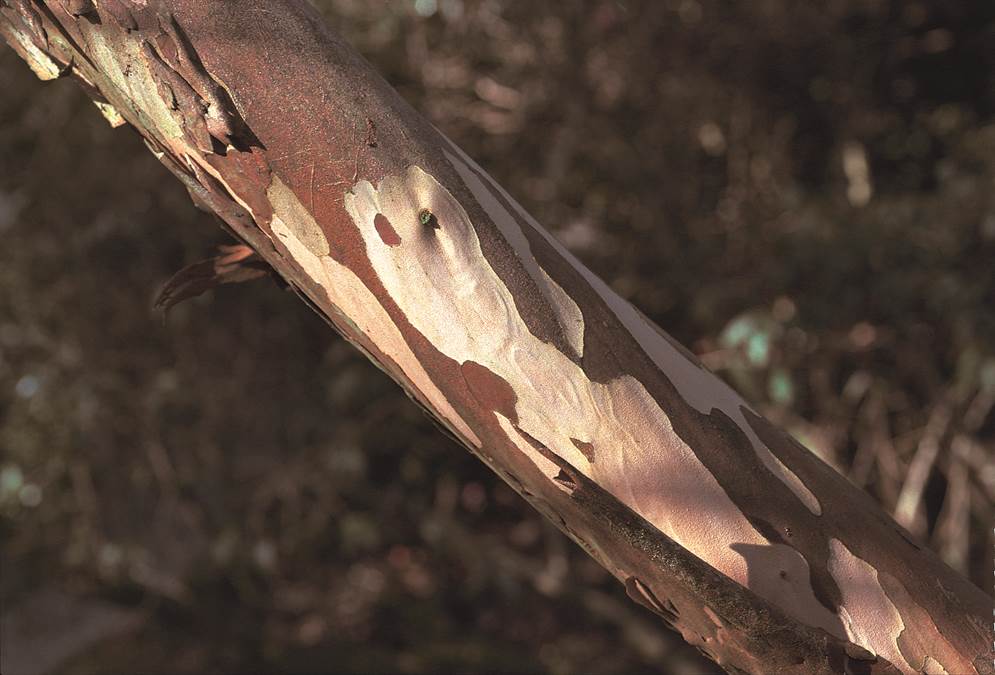
Next, for both the bark and the blooms, I want to buy a Japanese clethra (Clethra barbinervis). It is a Zone 5 plant (good to minus 20) that requires shade and moisture-retentive soil for success. I have plenty of moist, shady areas near my stream that would easily harbor a 10 to 20 foot-tall shrub or small tree. The small blossoms are displayed in hanging panicles in July and August – a time when few other shrubs are blooming. The bark is exfoliating (it peels, exposing different colors of bark), which means it will be interesting to look at in winter.

Japanese clethera, photo by Michael Dirr
I’ve always Franklinia (Franklinia alatamaha) for its bark which has interesting vertical fissures and for its 3-inch fragrant white blossoms in July and August. It will grow in shade and likes moist, well-drained soils. But Dirr warns that poorly drained soils generally prove fatal. It is a shrub or small tree, 10 to 20 feet high and 6 to 15 feet wide.
Franklinia was originally found in 1770 in Georgia, named after Ben Franklin, and disappeared from the wild by 1790. It is, according to Dirr, “a somewhat persnickety landscape plant.” Does that deter me? Well it has so far, but now that USDA has reclassified my area as Zone 5, and Dirr says this is a Zone 5 plant, maybe I should try it. I have not seen it succeed in New Hampshire or Vermont, which should warn me not to spend too much on my experiment. If you have grown it, please let me know how it did, and where you grew it.
Another tree that interests me is paw-paw (Asimina triloba). This is a small understory tree that produces edible fruit with a somewhat tropical flavor – a bit like bananas. I have only seen – and tasted – it in the Athens, Ohio area but Dirr says it is hardy to Zone 5. It does well in moist, well-drained soils in shade to full sun. Dirr says it will sucker (send out roots from the mother plant) so that it creates colonies. I have never seen the flowers, but he describes them as “lurid purple flowers that creep out of hairy brown buds before the leaves come out in April or May”.
Why is it that we see so few of these more unusual shrubs and trees? It may be that nurseries are unwilling to try things that no one has ever heard of. Or it may be that some growers have tried them, and the plants did not do well. Soil type (sandy, loam or clay) and soil pH (level of acidity) are important, but so are microorganisms. It may be that the bacteria and fungi in the soil along a stream bank in Ohio are very different than along my own stream.
My grandfather, John Lenat (1885 to 1967), was not an educated man, but a wise one who was an organic gardener long before it was fashionable. He told my sister once, “When you transplant something, bring along enough soil so that it will remember where it came from.” What he was saying, I think, is that you should bring along enough soil to inoculate your soil with the microorganisms from the site where it thrived.
Professor Dirr’s book is fun reading, too. He is opinionated and comes out with occasional wild statements – “with the right amount of imagination they (the flowers of Colutea arborescens) conjure visions of Yosemite Sam”, for example. So get your library to order a copy – or order your own.
Henry’s website is www.Gardening-Guy.com. He is the author of 4 gardening books.
Starting from Seeds
Posted on Wednesday, January 22, 2014 · Leave a Comment
The seed catalogs have been arriving in my post office box for weeks now, and I‘ve been reading them and dreaming of fat, juicy tomatoes and sweet crunchy cucumbers. It’s too early to plant seeds indoors, but I’m getting ready now.
The first step in starting plants from seed is always to sort out what seeds I have, and to throw out the seeds that are past their “best used by” date. As a general rule I use three years as limit for keeping and using seeds. There are a few things that will last longer, and a few that are best bought each year. But 3 years is a good rule of thumb. You might want to test a few seeds you have left in the closet now to see if they will germinate.
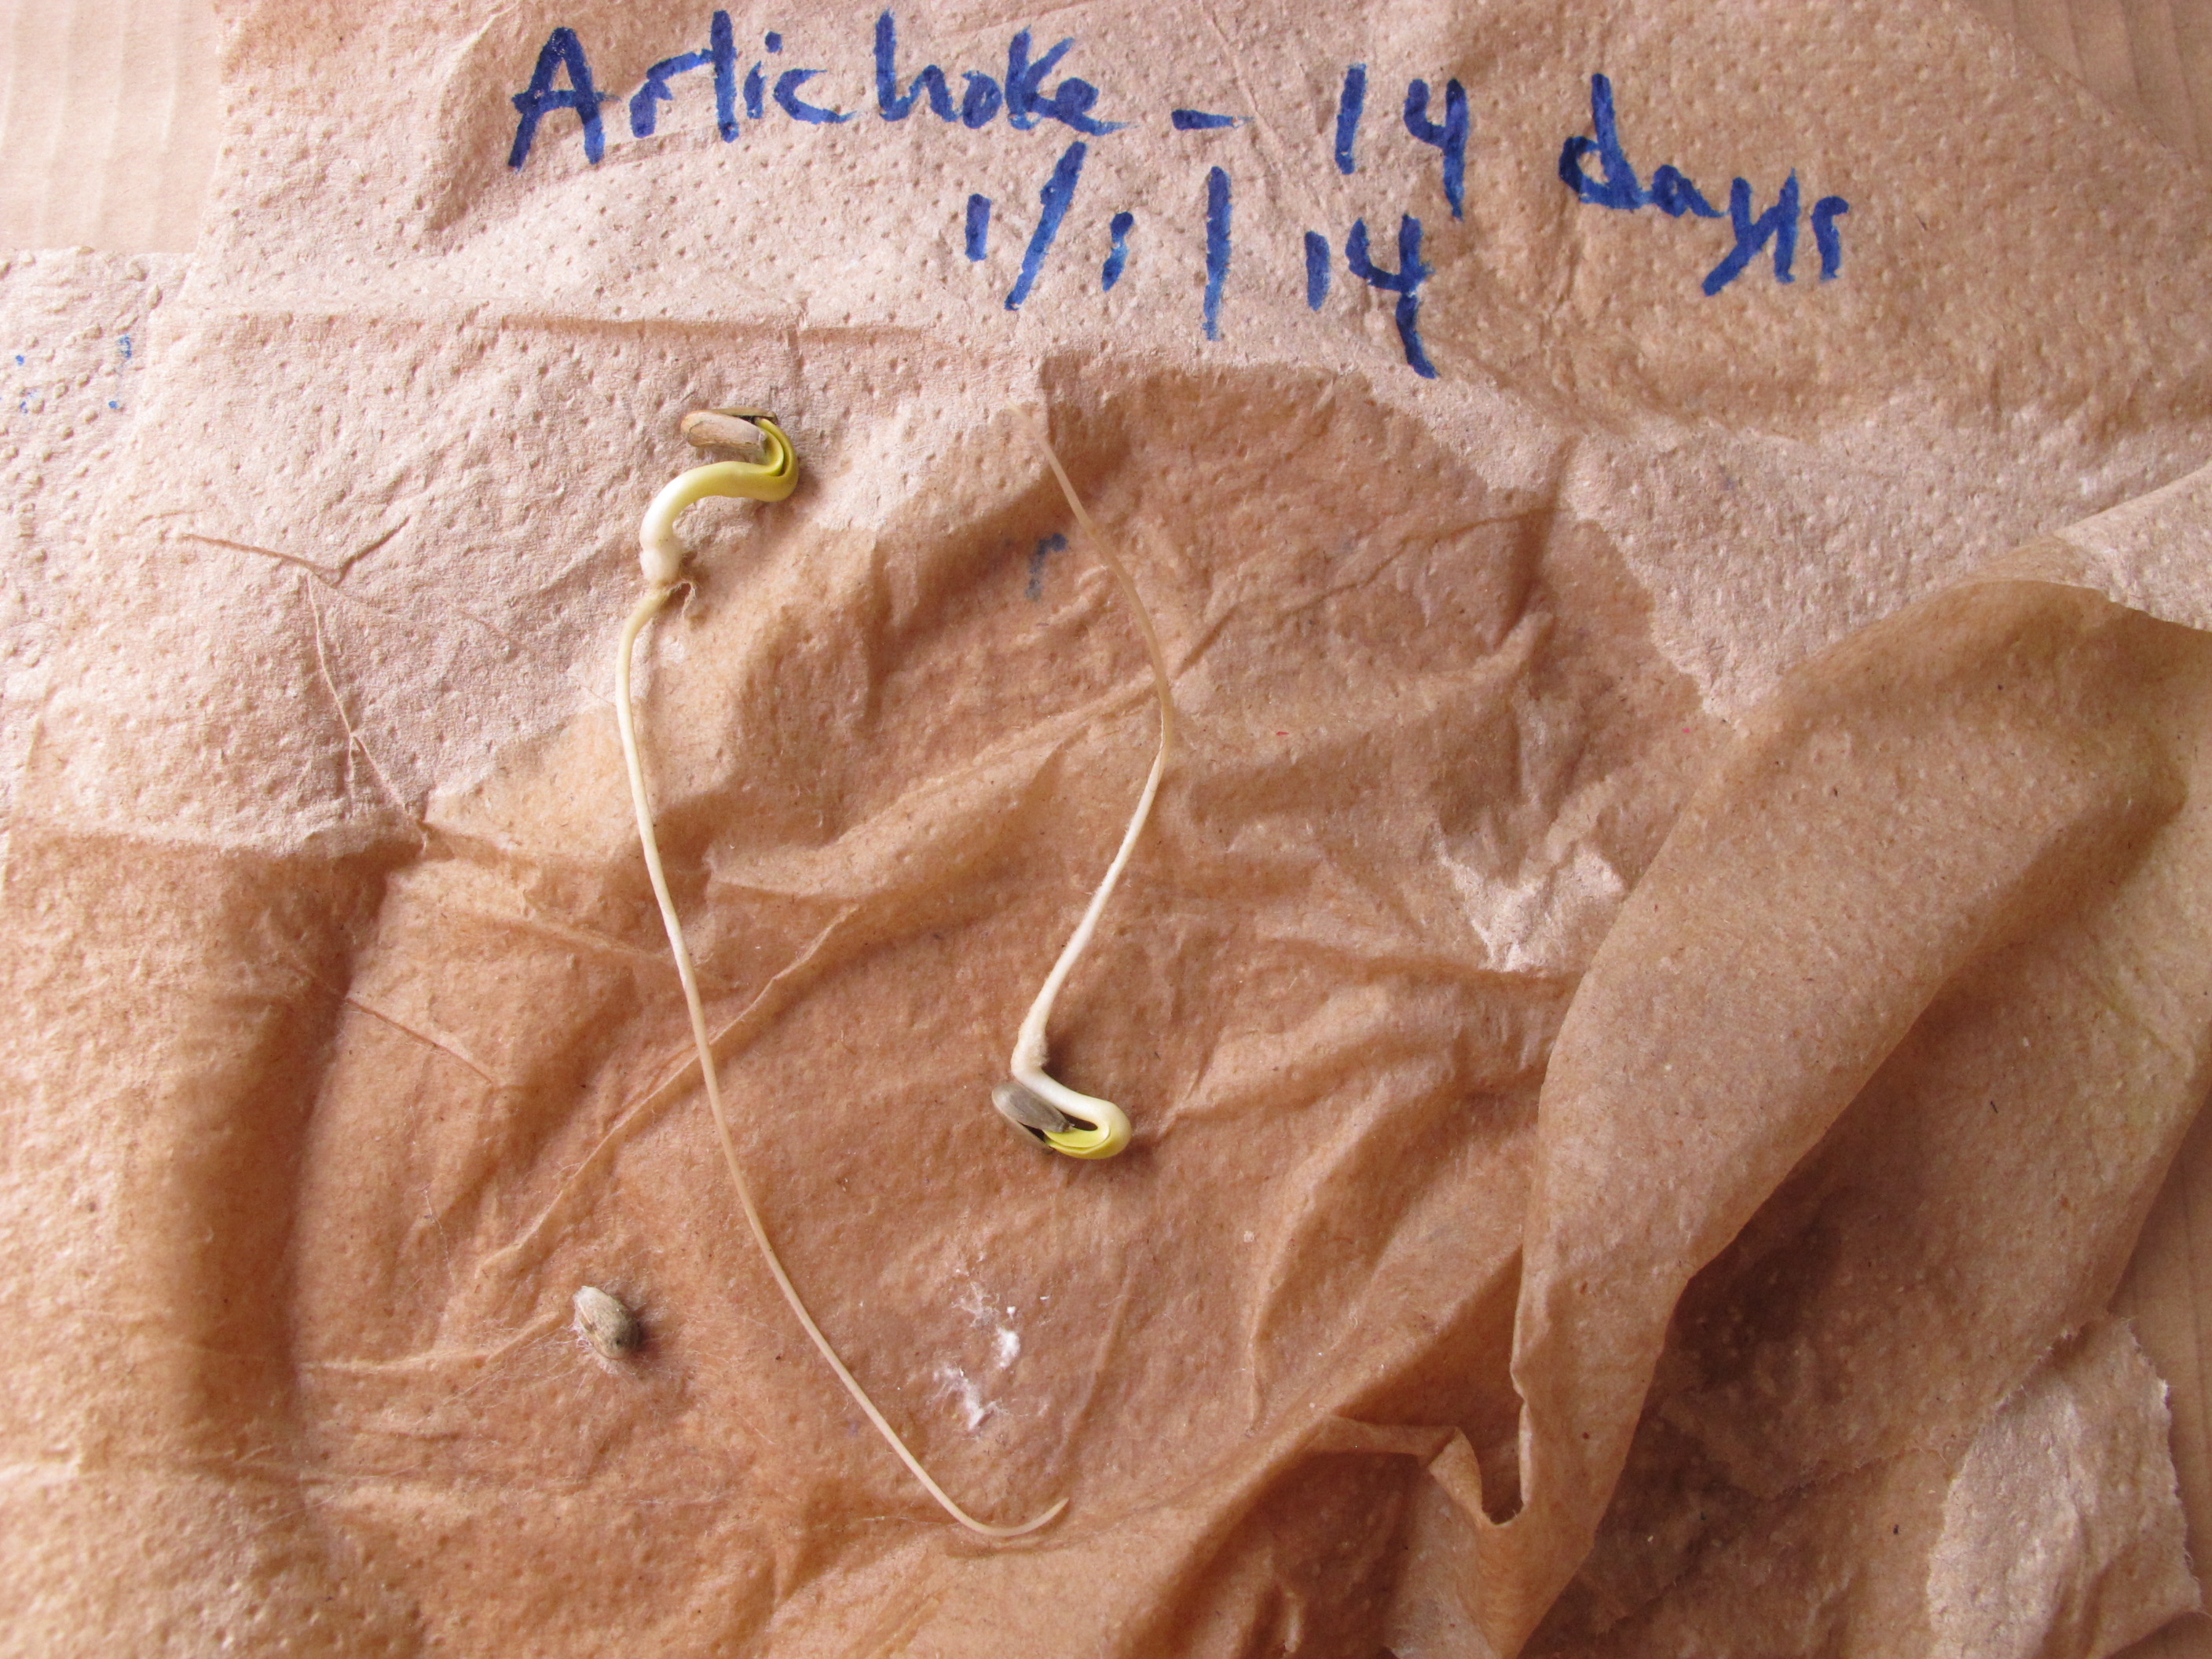
Testing artichoke seeds
Here is how to test for seed viability: count out 10 seeds and place them on a good tough paper towel, and label the towel with a waterproof marker or pencil. Dampen the towel, fold it over a few times and place it in a zipper bag. I left the bags open, thinking that a sealed bag might promote rotting of the seeds, but in one case, the paper towel dried out in places – which is sure death to seeds just starting. I checked the seeds after 1 week (nothing) and after 2 weeks. Some seeds may require even longer.
There are a few seeds that are worth buying every year as they do not germinate well, even on their second year. Among those are corn, onions, parsnips and parsley. And you can do a test germination if you wish for seeds that are 3 years old or more. This year I tried 2 kinds of onions (to test the 1-year rule), artichokes and celeriac (supposedly good for 5 years).
The onions germinated poorly, as forecast. 30% of one variety germinated, none of another. The artichokes germinated poorly, but the paper had gotten a bit dry. I only tried 5 seeds, and 2 of them germinated in the second week, sending out 3 inch roots and incipient leaves. I then planted those two seedlings in a large, deep pot – because I have a hard time killing plants. And artichokes take a long time to develop big plants, so I thought I’d let a few get an early start.
How you store your seeds makes a difference in viability, too. I store half-used seed packets in open zipper bags on a shelf in a closet. It gets neither excessively hot nor cold in the closet, and the humidity is neither high nor low, in general. Remember that seeds have living tissue inside, so overheating or drying out completely would be bad – though some seeds seem to have outer coverings as tough as any plastic. And freezing seeds does not seem to harm them, and that is the way most seed banks store their seeds.
Also at this time of year you can begin to assemble all the supplies and equipment needed for growing seedlings indoors. That means cleaning out all of lsat year’s pots and 6-packs for starting seedlings, and buying new ones as needed. As a general rule, the deeper the containers, the better. When buying 6-packs for your seeds, always get the biggest, deepest that you can. Instead of economizing and getting packs that are 72 to a tray, look for those that are just 36 to tray instead.
I also need to find (and clean up) any of the plastic domes I use to cover the trays of started seeds. These are reusable clear plastic covers that fit nicely over a tray and hold in moisture and heat. Seeds that dry out when just germinating do not survive, and these lids are great at containing moisture. I remove them once most seeds in a tray have started to grow.
Heat mats are also useful in starting seeds. I place seed trays on them to give a little bottom heat. Seeds germinate better and sooner with bottom heat, which makes sense. Seeds in the wild (without my help and supervision) shouldn’t germinate in winter – the seedlings would freeze. But warm soil tells the seeds that summer has arrived – hence the heat mats (to trick them). Available at garden centers.
Over the eons, plants have developed triggers for germination including temperature, presence of moisture, and, for some, sunshine. The photo-trigger means that seeds rototilled deeply won’t germinate – which is why I don’t rototill: weed seeds will germinate if brought to the surface.
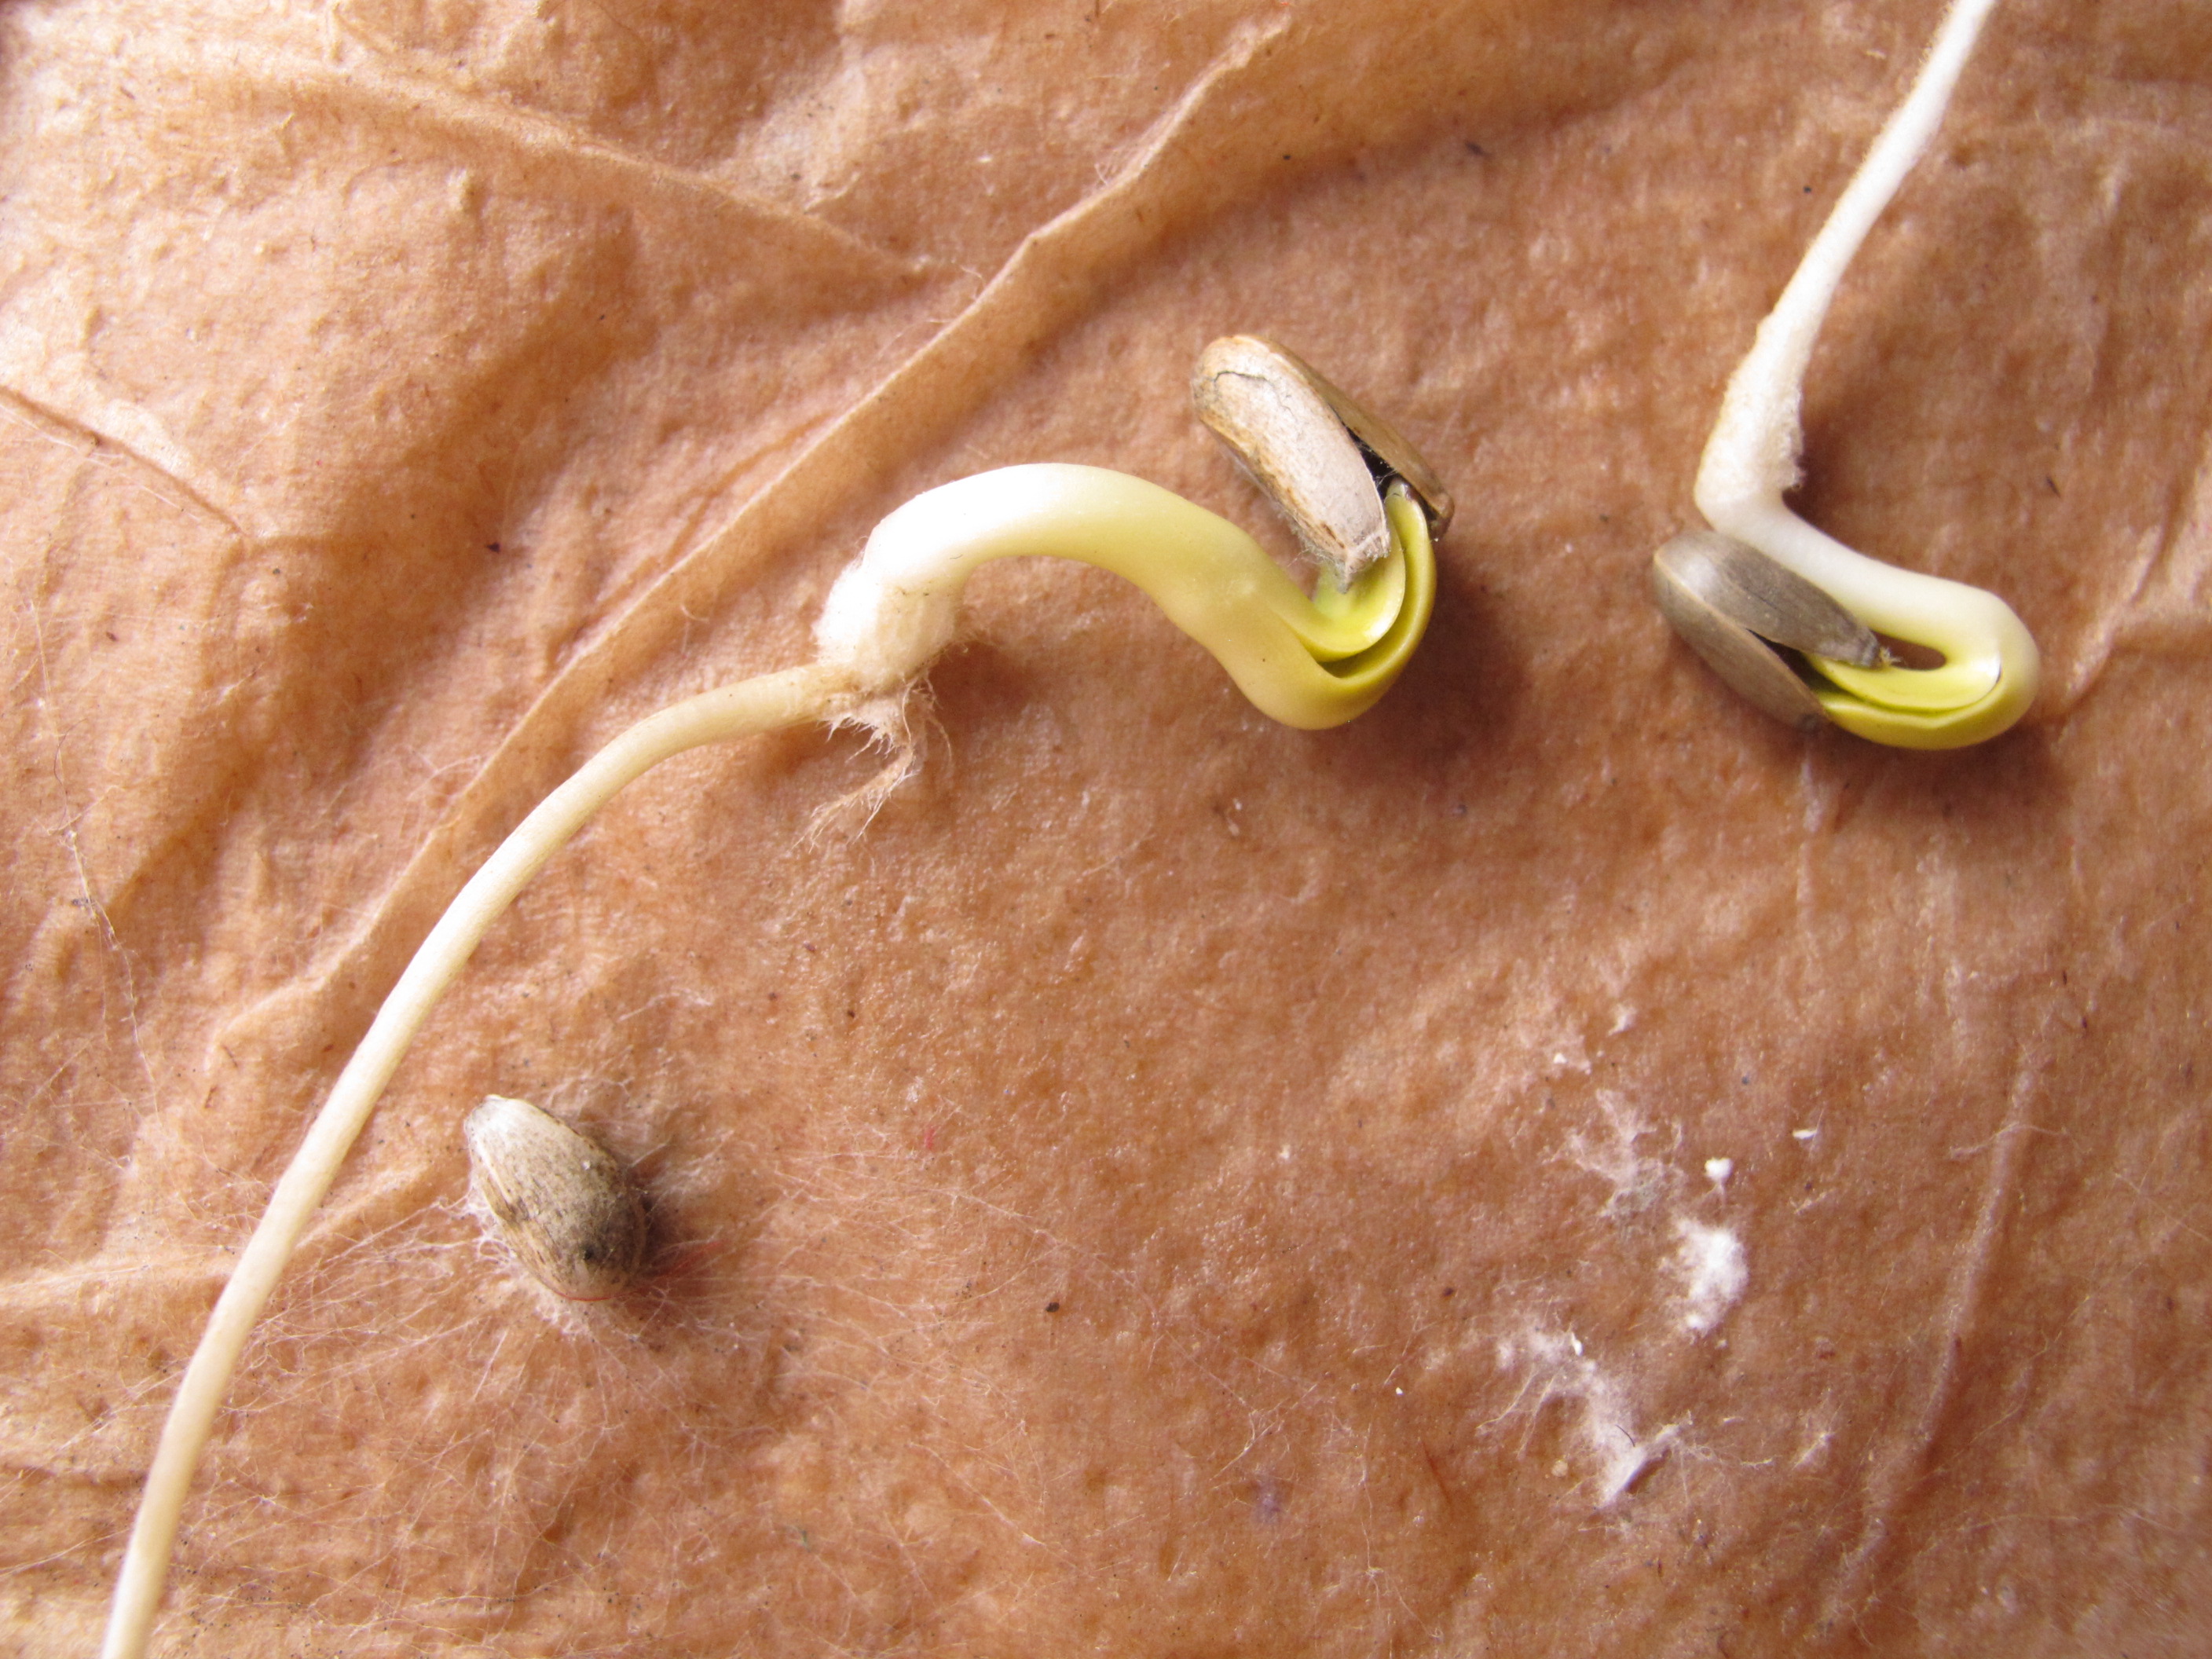
Artichoke seeds
Seedlings often do not do well if planted in garden soil indoors. There is no breeze and no direct sunshine in doors, so they may develop a fungal disease known as “damping off”. Outdoors it is not generally a problem. But it is best to buy “potting mix” or “seed starting mix”. This fluffy stuff is generally peat-based and sterile. I like to mix it 50-50 with compost, either my own or out of a bag. If you have it in your barn, be sure you thaw it out well in advance.
It’s still too early to plant most things. Onions and artichokes can be started in February, and sometimes I start hot peppers then. In general I like to start tomatoes and other annuals in early April so that they don’t get too big indoors. But it’s never too early to get organized and ready.
Henry Homeyer is a gardener, gardening teacher and consultant. His Web site is www.Gardening-Guy.com. he is the author of 4 gardening books and lives in Cornish Flat, NH
Getting through the Doldrums
Posted on Wednesday, January 15, 2014 · Leave a Comment
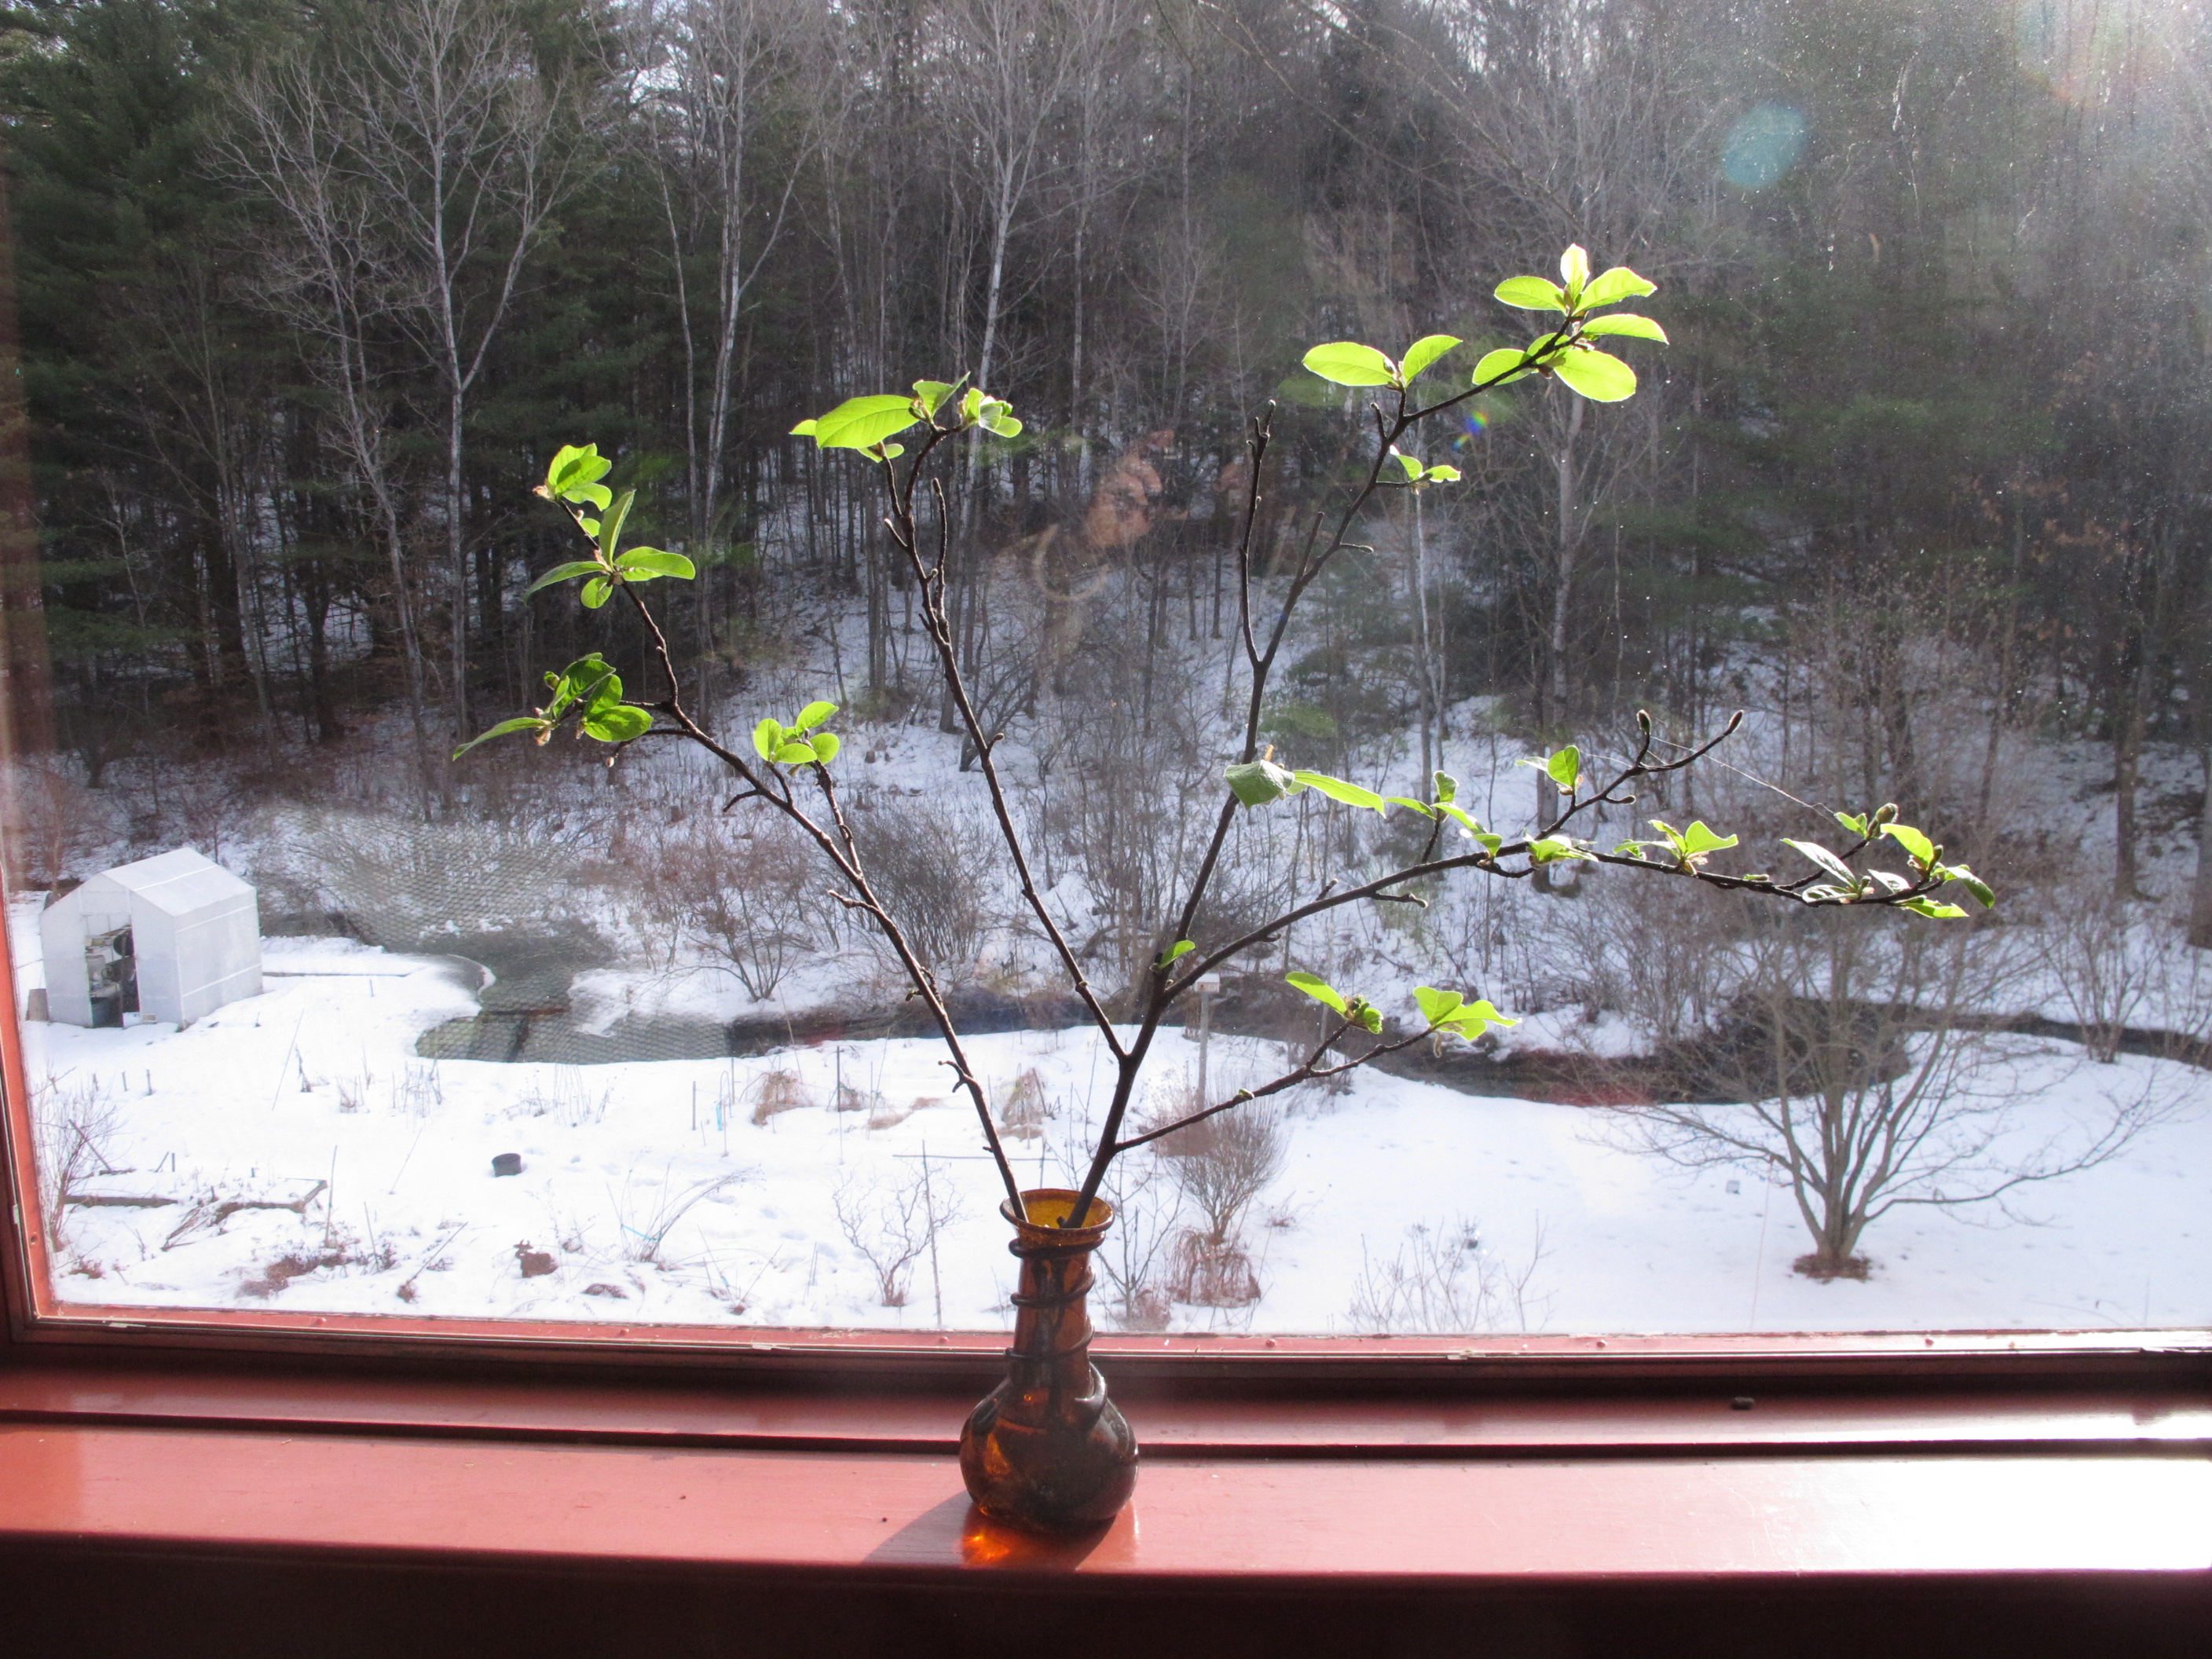
When pruning a Merrill magnolia last November, I brought home a few stems that had nice fat flower buds and put them in a vase of water. I put them in a south-facing window and pretty much forgot about them. From time to time I admired the smooth gray bark and handsome branching patterns. But then in the first week of January, those stems developed lovely green leaves! And the flower buds are swelling and look as if they might bloom, too – but even if they don’t, my spirits are lifted by seeing some green leaves.

Forced magnolia leaves
Forcing blossoms of tree branches (making them bloom early indoors) is normally something I do in March, when I am pruning apple trees. I always bring in some branches and enjoy both the leaves and flowers of stems I have cut. At that time of year the trees are already “thinking” about opening up their buds, and it only takes a week or two for them to open up on a sunny windowsill.
But this year, I am going to cut apples, forsythia, lilacs and other spring-blooming trees and shrubs starting now. Each week I shall snip a few branches and experiment with forcing. I have never tried forcing lilacs, for example, and since they are mid-to late-spring bloomers, I would normally hold off until nearer the time that they normally break dormancy –perhaps in April. But why not try now? I have read that one can encourage branches to break dormancy by submerging them entirely in a bathtub of water and will give that a try.
When you select branches for forcing, be sure to pick some that have flower buds. Flower buds are generally fatter than leaf buds. On apple trees, flowers are generally found on fruit spurs. These are 2- or 3-inch long stems that end in fat buds. The buds contain both leaf and flower buds. For many varieties, fruit spurs must be more than a year old in order to produce flowers (and hence fruit). Last year’s water sprouts (vertical whips) on apples will produce leaves but not flowers.
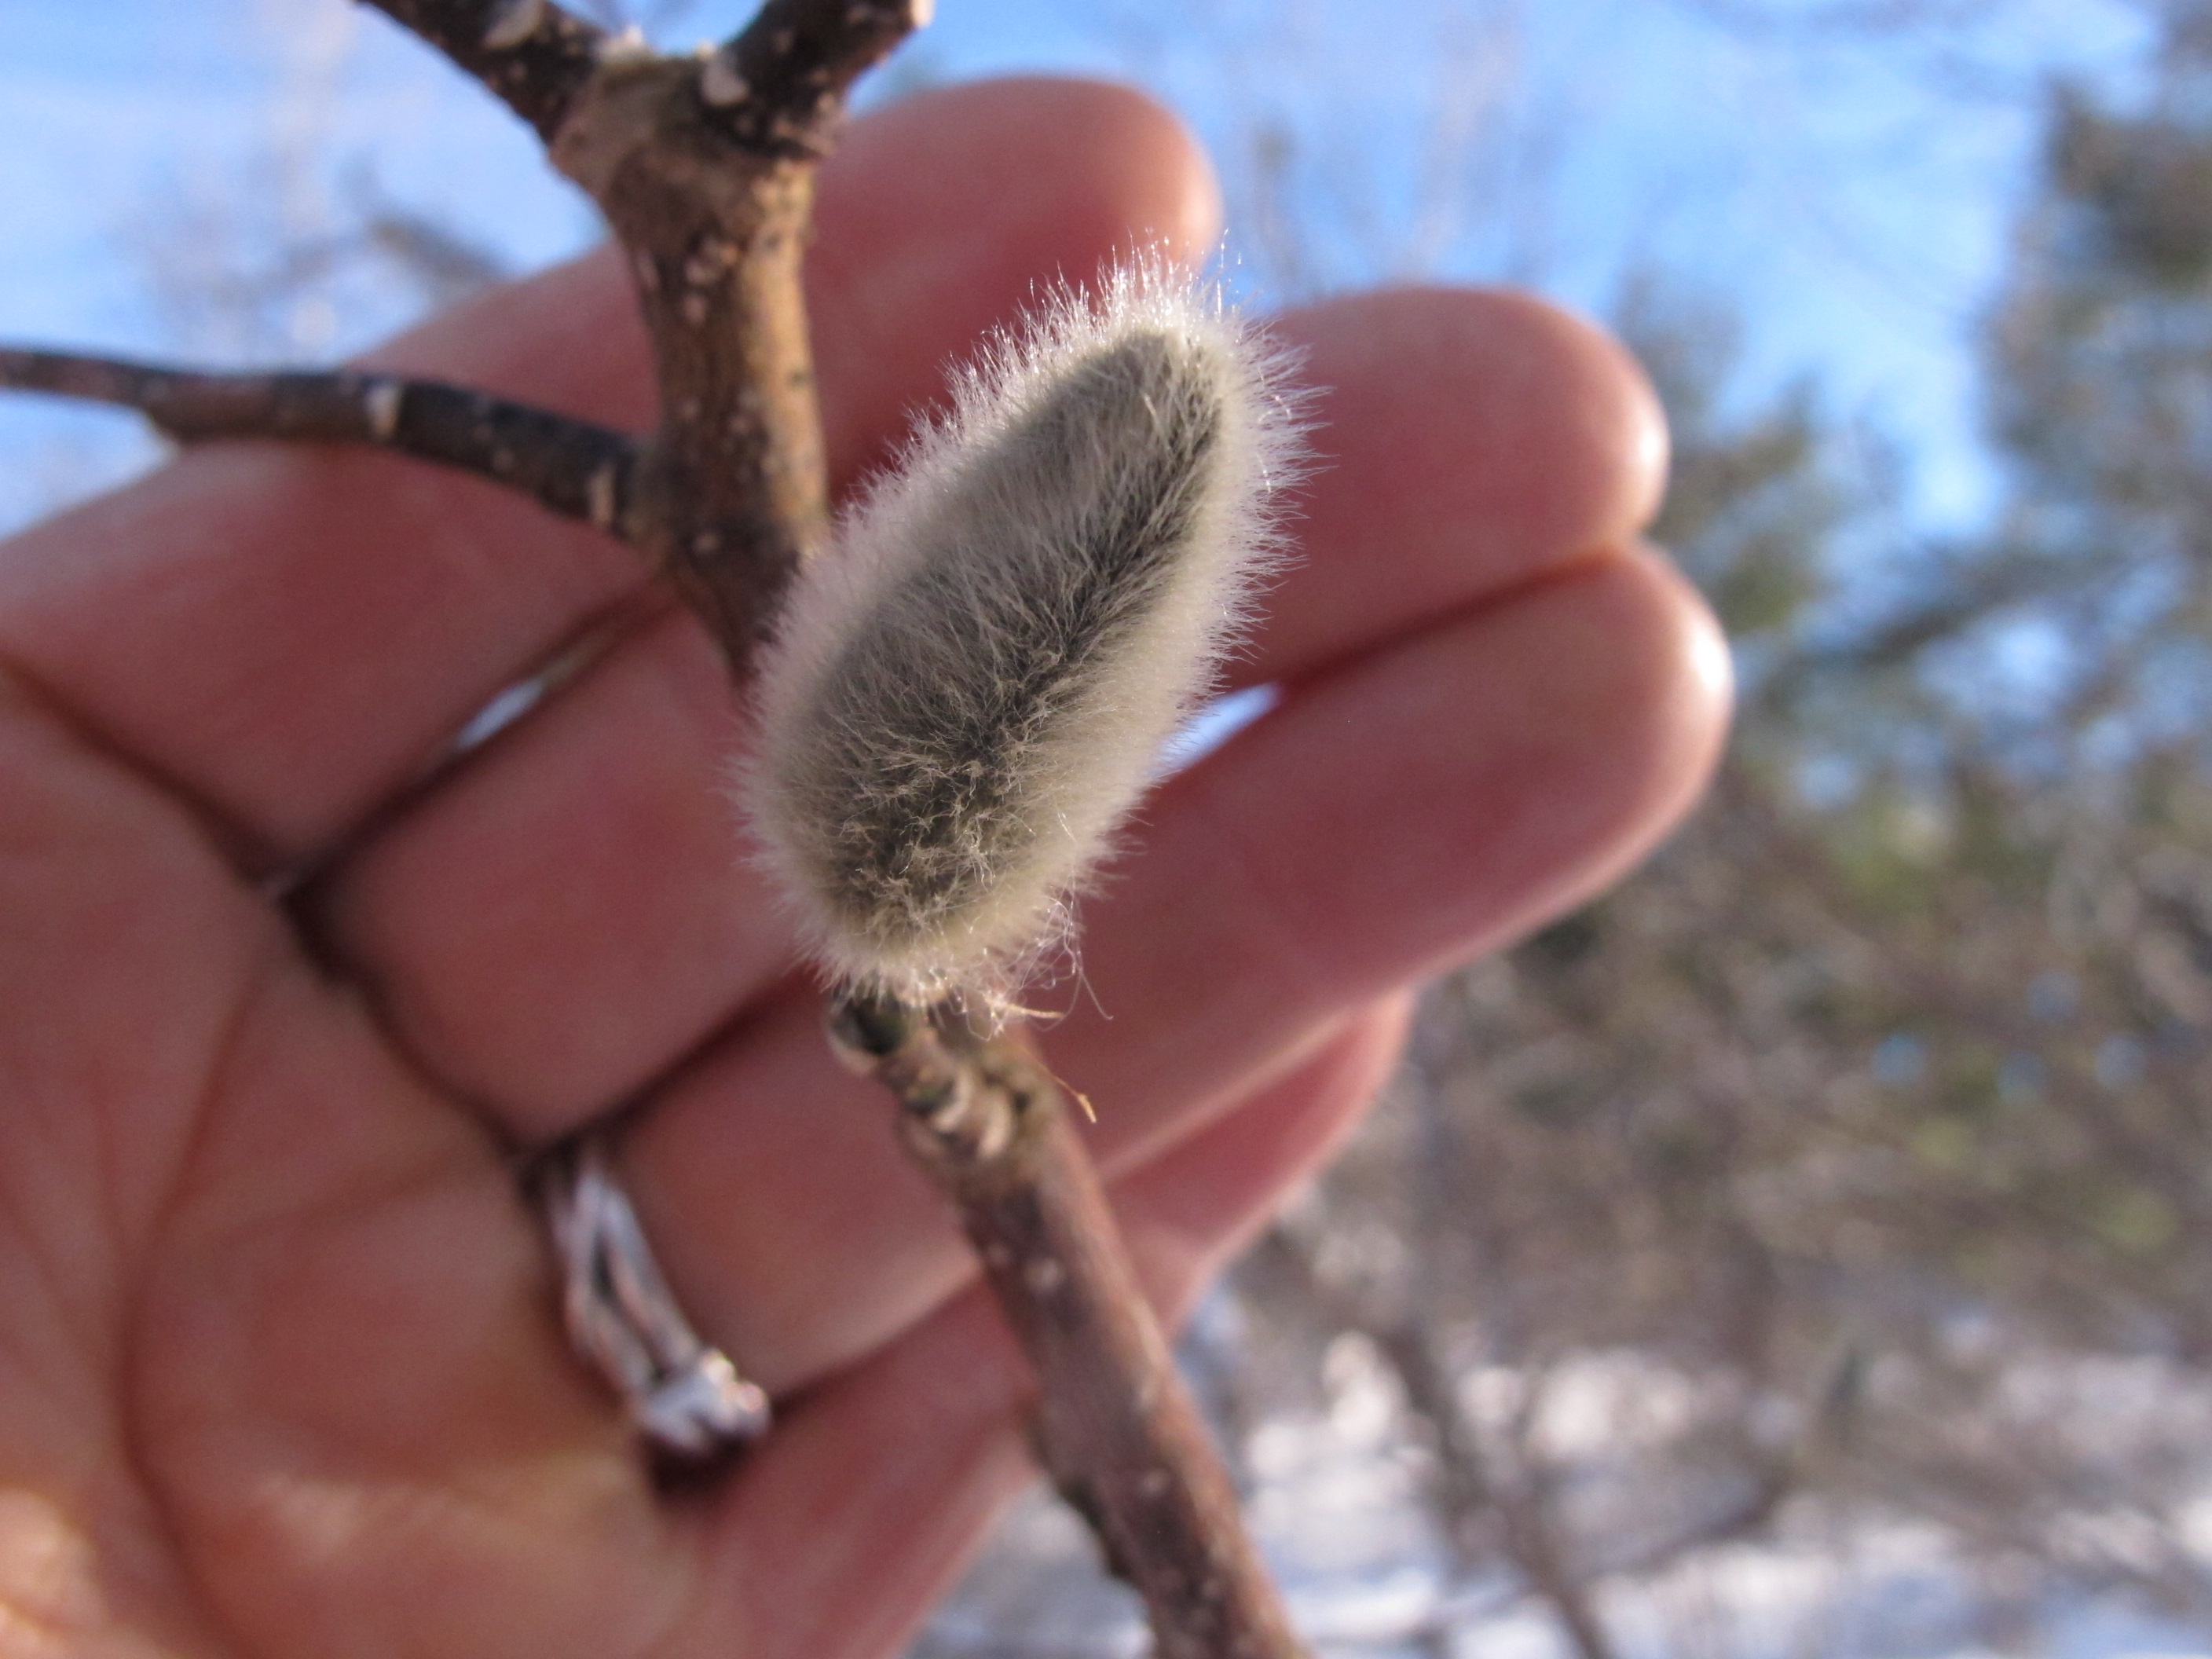
Almost any tree can be forced, but many do not have flowers that are colorful, so we often ignore them. Do you know what a maple or poplar blossom looks like? Their small green flowers are not much appreciated – and I have never cut them to put in a vase. You certainly recognize pussy willows as signs of spring, but do you think of those furry fellows as flowers? They are flowers, and can give me as much pleasure in February as my roses will later on.
For best results, cut stems of trees according to their natural schedule. That means picking early bloomers now, and later bloomers in February and March. Here is a rough schedule: In January cut forsythia , willows and poplars. In early February cut red maples, alder, quince, birch and cherries. Later in February try rhododendrons, azaleas and pussy willows. Then in March try cutting branches of hawthorns, shrub honeysuckles, apples, crabapples, mockorange, lilacs, and spirea.

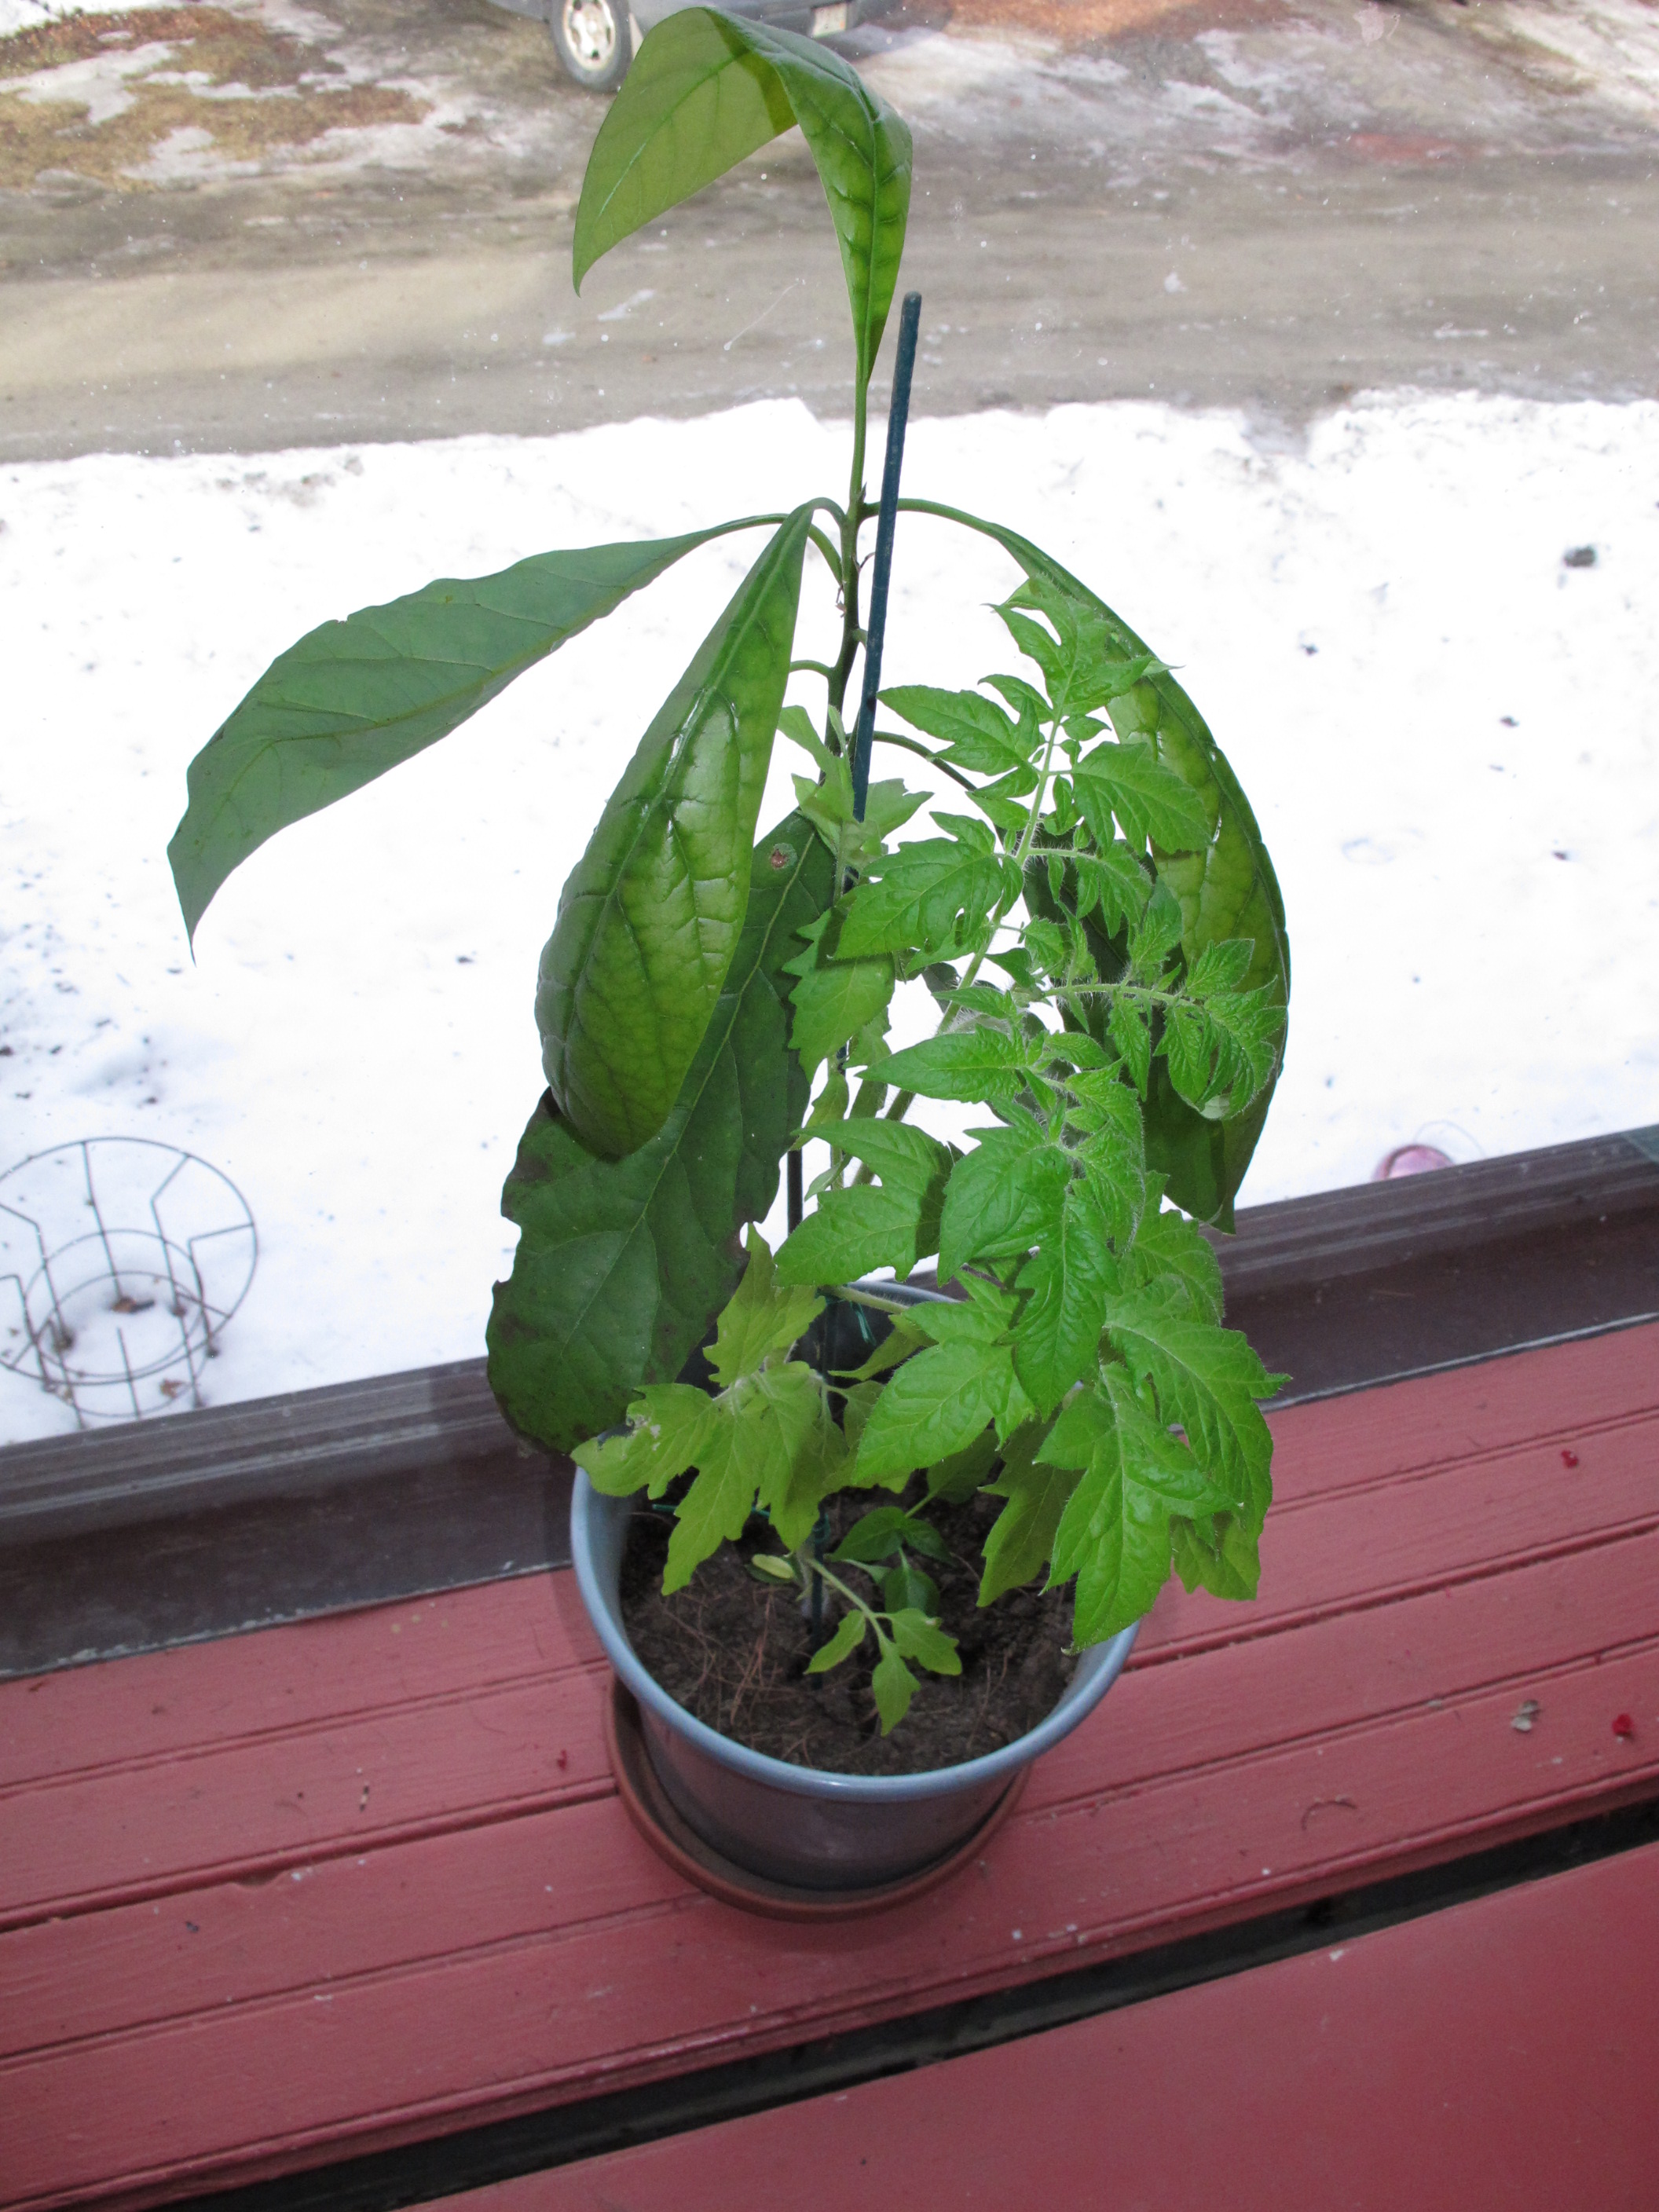
Tomato and avocado growing together
Elsewhere in the house I was recently surprised by a tomato plant that appeared in a pot where I have an avocado growing. The avocado was one that I dug out of the compost pile last fall – along with a tomato seed, apparently. Most grocery store avocados do not have viable seeds, as the seeds need to be fresh (picked within 3 weeks of planting) in order to grow.
I remember as a boy suspending an avocado seed in a glass of water by toothpicks. It sent roots down into the glass, and then sent up a stem. I planted the seedling in a pot, creating a nice houseplant with glossy green leaves. But since the avocado industry now stores and sells avocados all year, the seeds are usually too old to grow. But I guess last summer I threw a few fresh avocado seeds into the compost because three seeds grew!
But what about that orphan tomato growing with my avocado? I am going to give it every benefit. I have heard about people who have gotten tomatoes to bloom and produce fruit indoors in winter, though I have never done it. To help mine along I have hung a light over it in the window where it is growing. I am using an LED light that uses very little energy and produces a lot of light from its 45 little LED bulbs. It’s produced by Sunshine Systems (www.sunshine-systems.com) and uses just 28 watts of power while providing the light of a 250 watt hps lamp.
I realize that my tomato might not produce tasty fruit even if I get some. It all depends on the seed: it will be fine if it came from an heirloom tomato (which is mostly what I grow), but if it’s from a hybrid tomato plant, it might produce an undesirable fruit. Hybrids most often revert to the parent types, which may not be tasty. Still … it’s winter, and I’m game to try almost anything to feel like a gardener.
Henry Homeyer is the author of 4 gardening books and lectures on gardening throughout New England. He can be reached at henry.homeyer@comcast.net.
Filed under Article · Tagged with alder, apples, azaleas, birch trees, cherry trees, crabapples, forcing branches in winter, forcing forsythia, forcing willows, lilacs, magnolias, maples, mockorange, poplars, pussy willows, quince, shrub honeysuckles, spirea


 Click Here to buy from Cobrahead