End of Year Review
Posted on Monday, January 2, 2012 · Leave a Comment
Recently I sent out an e-mail to a hundred or more readers of this column who had e-mailed me a question at some point. I wanted to see how people had done in 2012, and got lots of responses. I asked gardeners to respond to one or more of these prompts: In 2012 I was pleased to see that ….? I was surprised to see …? I was disappointed to see …?
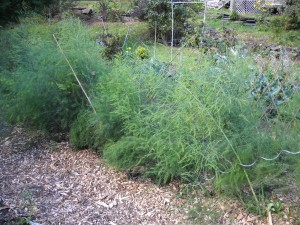 I’ll go first. I was pleased to see my new asparagus patch grew like crazy! I gave it lots of compost, some Pro-Gro organic fertilizer and a healthy dose of green sand. By fall I had 5 or more stems from each root, and most grew 3feet tall! My parsnips grew like crazy, as did onions … and all root crops.
I was surprised to see how deeply my scorzonera (a first year for it) grew into the ground: 8-12 inches, even though each root was less than an inch in diameter. And each was a nearly perfect cylinder. It’s a lesser-known root crop, one that is cooked and eaten, not munched raw like carrots. It tasted good in the turkey stuffing or sautéed with other root vegetables. I was surprised that my beets grew so perfectly, even the ones that I had not thinned enough.
I was disappointed to see, once again, that various blights terminated my tomato harvest early. In the “old days” tomatoes kept on growing and producing fruit through September and into October. We covered them with blankets to keep the frost off them. But not anymore. Late blight finished them off by Labor Day. And of course, there was the impatiens downy mildew that killed impatiens off.

Root Crops
But many readers had great a great summer, due in part, to the sunny weather. Peg Sullivan wrote saying, “In 2012, I was pleased to see that everything I planted (and many things I didn’t!) grew beautifully. My gardens were full of color, flavor, and diversity and I didn’t have one crop failure or disappointment. I was pleasant surprised at the number of bees, butterflies and birds that visited my flower and herb gardens, and with a minor “high security” fence in my vegetable garden this year, I was able to fend off the pesky, but oh so comical woodchuck who hid under my zucchini leaves the prior year and demolished my kale crop. It was an incredible gardening season for me, and more of them like 2012 would be great!
Gary Milek of Cider Hill Gardens in Windsor, VT was surprised to see that he could eat fresh garden tomatoes in December. Last fall his wife, Sarah, pulled some ‘Juliet’ tomato plants that were loaded with green fruit and hung them upside in the garage, where they slowly ripened.
But many readers were disappointed by their losses to animals. Rebecca Tucker on the Black River in Springfield, VT wrote that “In 2012 I was disappointed in that, though I caught one woodchuck early in June in a hav-a-hart trap and delivered it to my neighbor for a stew, I spent the next two months trying to stay ahead of the second. … NEXT year, I’m building a chicken wire fence with a base of PT lumber buried 6 inches down all around the garden.” Many readers complained of the large numbers of mice and squirrels this year, probably due to the relatively snowless winter.
Reader Jan Polex noted that she was “Disappointed by the number of rabbits and what I needed to do to keep them out and also by my poor aim of my sling shot (was better last year)”.
Ruth Winkler of Cuttingsville, VT, among others, wrote that she “was disappointed in the fact that our apple trees this year did not provide us with any. The year before I had so many we were giving them away and I made lots of pies.” I think they will be back next summer – most of us had an unseasonably warm spell in April, followed by a hard frost that killed those buds that were already opening.
Brian Steinwand , recently retired, wrote that he was surprised by “how well some crops do in containers. I can grow a lot in a small amount of space, and even move some of those containers to follow the sun during the day.” I chuckle, thinking of Brian walking his tomatoes like a puppy on a leash! But more power to him! I’m not sure I will ever be able to do that – retire, that is.
Reader Daniel Duffy wrote, “In 2012 I was pleased to see that you were available when I had questions. I am a beginning gardener, just completing my second year. I have your book, Organic Gardening (Not Just) in the Northeast: A Hands-On Month-to-Month Guide, and it guided me Spring thru Fall, with tips, suggestions, guidelines which I was grateful to have. It was particularly useful because of its concentration on the Northeast. You also were kind enough to reply to my many E-mails sent to you. “ Thanks, Daniel. I don’t have the time to answer all questions, but I do try. My best wishes to all of you for the New Year. Let’s hope that next year will be even better than this year!
Wobar and the Quest for the Magic Calumet, Henry’s new children’s book, is available at his web site, www.henryhomeyer.com or your local bookstore. You may write Henry at P.O. Box 364, Cornish Flat, NH 03746 or e-mail him at henry.homeyer@comcast.net.
Protecting Plants for Winter
Posted on Wednesday, December 28, 2011 · Leave a Comment
I know people who take down their Christmas trees right after Christmas. I am not one of them. I think of my tree as a holiday tree, or even a winter tree. I like to keep it up at least until Ground Hog’s Day, and once, when I had a really fresh one, I kept it up until St Patrick’s Day. I like trees outdoors, but having lights and green branches indoors helps dispel the gloom of winter.
Because I keep my tree up longer than most, I keep my eyes peeled for trees set by the side of the road – discarded or unsold. I consider the branches of evergreens to be gold, and bring home unwanted trees. Why? I use the branches to protect delicate plants. You can, too, so don’t throw yours out when it comes down.
Snow is a great insulator, and in recent years we‘ve had lots of snow most of the winter, starting in early December or even earlier. Not this year. It’s been warm and we’ve mostly had rain, not snow through November and December. Or we’ve had cold or snowy periods followed by warm days – a recipe for trouble. Plants do best if their roots don’t go though freeze-thaw cycles, especially plants in their first winter when the roots have not yet extended far and wide.
Freezing and thawing of soil can push plants up out of the soil, or crack the frozen soil open, exposing roots to air – which is generally lethal. Which brings me back to those Christmas trees: I cut off branches and use them as mulch around or over new or tender plants.

Protecting Perennials
This year I planted 3 Himalayan blue poppy plants (Mecanopsis betonicifolia) to replace a clump that died in the winter of 2010-11. My ground is frozen now, and I want it to stay frozen, so I cut some evergreen boughs and placed them over those poppies. A 6-8 inch layer of evergreen branches will do much to keep the soil frozen if we have a few warm days. Of course a week of warm rain will penetrate even that, but there is only so much a gardening guy can do.
I have used Christmas tree boughs to protect tender shrubs by covering their branches, too. I lean the branches up against a tender rose, for example, creating a teepee that protects the above ground portion of the plant as well as its roots. Strong cold winds can kill flower buds – or entire branches of plants that really would rather be growing in Virginia, for example. I have occasionally piled straw or mulch hay over the branches for added protection.
Deer are not a problem for me: Daphne, my able-bodied, full throated corgi of great intelligence, is able to scare them away, even at night. I’m not sure how she does it, since she sleeps in her padded basket near the stove at night, not out protecting my shrubs. But deer rarely come – only passing to pick up fallen apples from time to time. (And once on Christmas Eve, before Daphne, they ate all my Brussels sprouts – though some think that damage might have been done by reindeer).

Protecting Shrubs in Winter
Deer repellents don’t work for long, and tall fencing for deer (8-feet is generally recommended to keep them out) is expensive. So what to do? Small shrubs like the yews favored as a front-of-the-house muffin-like decorations are easily wrapped in burlap, which will thwart even the most determined deer. Garden centers sell burlap by the yard, or in rolls. Wrap your shrub, and then keep it in place with some garden twine. This will also protect tender shrubs from winter winds.
Burlap is also good for protecting sections of the lawn. If your snowplow driver pushes sand and gravel up with the snow in a big pile at the end of the driveway, on your lawn, you will have lots of spring cleanup. If you lay down burlap (or black landscape fabric), you can catch all that messy detritus, making spring cleanup easier.
Don’t spread out a 20-foot section of material, however, as that would be impossible to move, come spring. Cut 6-foot sections and overlap them a little. If your ground is not frozen when you do this, I recommend pinning down the fabric with landscape staples.
One last idea for protecting plants in winter: you can spray your rhododendrons and azaleas with Wilt Pruf . It puts a clear waxy coating on the leaves to keep them from losing moisture and drying out once the ground has frozen and the plants cannot replace moisture lost on warm, sunny days. I’ve used this, and it does make a difference. According to their web site (www.wiltpruf.com) , the product is suitable for use by organic gardeners.
Basically I believe that plants should be able to survive on their own – without any special help from me. But I don’t always follow that rule, and protect plants, particularly young ones, from our cold winters.
Henry Homeyer is the author of 4 gardening books. His Web site is www.Gardening-Guy.com.
Tending Your Soils, Now!
Posted on Wednesday, December 14, 2011 · Leave a Comment
I have a confession to make: I added soil amendments last week without first getting my soil tested. I teach gardening, and the first thing I say about soil is it to get it tested before you do anything. But winter is coming, and I have a good idea what a soil test would tell me. So I added some limestone to my lawn around an aging maple tree, and I added sulfur around my blueberries.
Here’s what my thoughts were: I know that the acid rain we have leaches out calcium from the soil. Maple trees, in particular, suffer if they don’t have enough calcium, so I added some. I used a 28-oz can, spreading 6 containers of agricultural limestone in a circle with a radius of 25 feet around the tree.

Garden Sulfur
I know that blueberries like very acid soil, and that adding some sulfur is a good thing, especially since I haven’t done so in a couple of years. Blueberries perform best when the soil is between pH 4.5 and 5.5, and my soil is probably about pH 6.0. In a 6-foot diameter circle around each bush I sprinkled 1 pound of garden sulfur, which should help.
I recently spoke to soil scientist Dr. Wendy-Sue Harper of Monkton, Vermont to see what she recommended we do at this time of year. Her strongest recommendation was to make sure we cover up any bare soil with leaves, straw or mulch hay. She said that if you have cleaned up the vegetable garden and bare soil is exposed, it’s likely that some of your all-important top soil will wash or blow away before next spring. Gardens on any slope are especially vulnerable to erosion.
Some gardeners take soils for granted. They spread some 10-10-10 fertilizer on the soil in the spring or water with a liquid chemical fertilizer in summer, and they get tomatoes and carrots. But I recommend compost and organic fertilizers because they nourish the beneficial organisms in the soil. In preparing for this article I read a book on soils called, Teaming with Microbes: The Organic Gardener’s Guide to the Soil food Web by Jeff Lowenfels and Wayne Lewis. The book, which is highly technical, makes the point that good soil is chock-full of living organisms, millions in a teaspoon, and that any chemical, including chemical fertilizers, reduce the numbers of living organisms in the soil.
The authors explain that chemical fertilizers are salts. You probably know what happens if you sprinkle salt on a slug. It dies. The same happens to your beneficial microbes when you add chemical fertilizers.
Lowenfels and Lewis explain that the microbes in your soil contain not only nitrogen, phosphorus, potassium (the contents of chemical fertilizer) but also all the micronutrients needed by plants but not found in chemical fertilizer. Bacteria, fungi and other microbes hold onto nutrients in their bodies, only releasing them when they die or are eaten by other organisms. The chemical nutrients in these microbes are in a form that can be absorbed easily by roots of plants when released in the soil.
The area right around the roots of your plants is especially full of microbes. Why? Because plants roots give off excess sugars. Plants produce extra sugars by photosynthesis during the day, and exude sugars at night. That may sound crazy, but it isn’t: plants and microbes in a healthy organic soil share nutrients, helping each other. Plants benefit by having fungi surrounding their roots because fungi hold water and minerals that they share with the plants; fungi benefit by getting food from the plants. It’s a win-win situation.
Fungi produce acids and enzymes that can dissolve minerals that plants cannot ingest. The tip of a fungal hypha (rootlet, if you will) can also breakdown cellulose and lignin, tough materials that contain useful ingredients for plant growth – recycling the nutrients.
As I explained in my book, The Vermont Gardener’s Companion, sandy soils have large particles and don’t hold onto water and minerals easily. Think of sandy soil as golf balls in a wire basket. Water flows right through. Add compost – like adding sponges to the basket of golf balls- and water and nutrients are retained.
Clay soils are more like a bowl of baker’s flour: fine particles that don’t let water pass through easily, and are sticky when wet. Loam is what we want: a mixture of particle sizes that allows water through, but retains water and minerals. Whether you have a clay soil or a sandy soil, the easiest way to get that fluffy, loose loam is to add compost.
Compost adds organic matter to feed the microbes in your soil, attracts beneficial earthworms, and improves drainage. You don’t want to be digging in your garden at this time of year, but you can spread some compost on the soil surface around perennials, shrubs, on the lawn and in the vegetable garden. Don’t walk in your beds now; they are wet and easily compacted, injuring soil structure.
So get your soil tested now, before the ground freezes solid. Come spring it takes 3 weeks or more to get test results from a soil test, as that’s when everyone else wants a test done, too. I recommend getting multiple soil tests: one for the vegetable garden, one for the flower beds, and from specialty locations like the lawn or blueberry patch. Contact your local University Extension Service, or go online.
Henry Homeyer is the author of 4 gardening books. He can be reached at henry.homeyer@comcast.net. His Web site is www.Gardening-Guy.com.
Holiday Gifts for the Gardener
Posted on Wednesday, December 7, 2011 · Leave a Comment
Gardeners are easy to shop for. We all need the practical (rubber-palmed stretchy garden gloves, watering wands, garden scissors, plant labels) and appreciate the whimsical (a nice garden gnome to surprise the grandkids). Gardening books keep us occupied during the long winter nights, and garden tools keep us dreaming of perfect peonies. Here are some suggestions for the gardener you love.
This year I discovered Tubtrugs. They are multipurpose, brightly colored, somewhat flexible containers made of food grade plastic that I like to fill up with weeds. I also use them when harvesting veggies or carrying hand tools; you can fill one with water to soak a dry potted plant or wash a small dog. They are easy to carry – handholds are built in. They come in 4 sizes from about 4 gallons to about 20 gallons. I have the 2 smaller sizes, which cost $11-14. Available at your local garden center or from www.tubtrugs.com.
As much as I don’t like plastic, I found another plastic product that is very handy: an Oxo brand watering can. As with other Oxo products, I find it not only functional, but handsome – and these come in a variety of colors. I like that the spout lets you see the water level inside when filling it up, and it rotates for storage (snuggling up, sort of, against the reservoir). The rose, which breaks the stream of water into a spray, is very fine for watering delicate plants, but I often just pull that off and water directly from the slender spout. They come in 2 sizes: 2 gallon ($28) and an indoor model that is just 3 quarts ($18). Available locally or on line.
Each year I have to tout my favorite weeding tool, the CobraHead Weeder, as it works so darn well, and I have met so many gardeners that just love it. It is a single piece of steel with a small, eye-shapede head and a curved handle. It has a nice bright blue, recycled plastic handle. It gets under weeds to pull from below while I tug on the topside; I use it when planting, too, stirring up the soil and teasing out grass roots. I like that it serves lefties as well as righties, and is light enough to please elderly weeders as well as big lunks like me. Cost? About $25. Available locally or at www.cobrahead.com or 1-866-962-6272.

Holiday Gifts for the Gardener
Books help get gardeners through the winter. We read and plan when we can’t weed and plant. I recently got a very handsome, glossy-photo book by Jeremy and Emily Gettle, co-owners of Baker Creek Heirloom Seeds. He is quite a character – he started at age 3 and was growing 2 acres of vegetables by age 18. He started his own seed company when he was just 22 years old and now 33, he has quite a large operation – and a book.
The book, The Heirloom Life Gardener: the Baker Creek Way of Growing Your Own Food Easily and Naturally, is interesting and full of personal stories and anecdotes by Jeremy. He is opinionated, which I like, too. Best of all, it has a directory of garden vegetables that not only tells you how he grows them, but guides you to save your own seeds. It’s $30 in hardcover.
Another book I like is Ancestral Plants: A Primitive Skills Guide to Important Edible, Medicinal and Useful Plants of the Northeast by Arthur Haines. This is a fascinating technical book for survivalists, among others. It tells you not only about edible and medicinal plants, but which ones to use for making your own rope or are useful when starting a fire without matches. Haines is young (forty-one), and a serious scholar, having just written a 1,000 page taxonomy of plants.
Haine’s book gives information available in no other book I have found. So, for example, he tells you to eat eastern prickly gooseberries one at a time so that the crushing of the berry is done with teeth, not the palate (to avoid the prickles), and that it is high in Vitamin C, antioxidants and pectin so it can easily be made into jam. Each plant has at least 2 excellent color photos and 2 pages of text. $23 in paper available locally, or from www.anaskimin.org.
Each year I find some nice products from Gardeners Supply Company in Burlington, VT (www.gardeners.com or 888-833-1412). This year I like their pesto storage cubes for freezing pesto or tomato paste. They have attached lids, and fit into trays for storage. At $7.95 for 8 cubes they are a good gift. I also like their Root Storage Bin which costs $34.95. It is a sturdy wire bin lined with jute fabric designed to hold carrots, beets etc. in a cool dark cellar. It allows you to layer moist sand in it, keeping the veggies from drying out. It fits in a fridge I use for storing veggies. They also sell the Tubtrugs mentioned above. Since Gardeners Supply is an employee-owned company that supports lots of good causes, I enjoy supporting them, too.
I’ve been using LED lights this fall to pamper my houseplants, and I find my plants are much healthier this year. Best of all, for 42 watts of electricity I am getting the equivalent of 250 watts of light, and the spectrum of light, the company says, is just right for making plants happy. I got mine from Sunshine Systems (www.sunshine-systems.com or 866-576-5868). Each unit costs about $150 and is suitable for illuminating 5 square feet of plant space. The lights are designed to let you connect several together, which is handy.
Lastly, as an author I would be remiss if I didn’t mention my own new book: Organic Gardening (Not Just) in the Northeast: A Hands-On, Month-by-Month Guide (Bunker Hill Publishing). It’s a collection of my best writings from the past 10 years, organized around the calendar year. It’s $17.50 from your local bookstore or from my website (www.Gardening-guy.com).
So give Santa a hand. Go get something nice for the gardener in your family. And remember to try buying local first: local bookstores, local garden centers – only buy on the Web as a last resort! And Happy Holidays to you all.
Henry Homeyer is the author of 4 gardening books. His Web site is www.Gardening-guy.com.
Protect Your Shrubs from Winter Breakage
Posted on Tuesday, December 6, 2011 · Leave a Comment
I’ve had a nice little dwarf willow for 15 years or more, and this summer I noticed it was getting to be bigger than I wanted it to be. But summers are busy and I didn’t prune it. Fall came along; I did some traveling, and still didn’t prune it. But last week I went outside on a nice sunny day and gave it a serious haircut.

Arctic Blue Willow Loaded With Snow
The arctic blue willow is very slow growing – it’s a variety with the final word ‘nana’ attached to its Latin name (Salix purpurea ‘nana’) , indicating that it is a shrub or tree that stays small. I had only pruned it once or twice in its lifetime, and it had gotten to be 6 feet tall. The branches had branched and re-branched so many times that they held snow like a woven basket. When we got an inch or two of snow the branches were doubled over and looked ready to break. I knew I had to take action before the heavy snows of winter came.
The first thing I did was to give the branches a good shake to rid them of snow, and lifted them back into their proper shape. It rebounded immediately. Then I looked for any broken or dead branches but saw none. This is a good healthy little tree.

Arctic Blue Willow Before Pruning
Each pruning job is different. The Arctic blue willow tends, by its nature, to stay very compact. It has lots of handsome small leaves with a slightly bluish caste. The branches fork and divide, creating lots of very fine twigs near the tips of the branches. What I needed to do – in order to protect it from winter breakage – was to remove the finest branches, those near the tip of each branch.
Instead of just removing the tips of the branches, however, I followed fine branches back to bigger branches, and removed some of those bigger branches – thus taking off several fine branches with each cut. I staggered my cuts, much as a hair stylist might create a layered look with your hair. Some branches lost just a few inches, others were cut back by 2 feet.
Overall, I reduced the height of the plant from 6 feet to about 4 feet and made the interior of it open and airy. Come spring, the willow will grow new shoots at most places where it was cut. It may send out two to three shoots where one was cut off. So I will have my pruners ready to tune it up next fall if I need to.

Arctic Blue Willow After Pruning
Before you prune a tree or shrub in winter it’s good to know when its season of bloom occurs. I grow that willow for its shape and foliage, not blossoms– there are small catkins in the spring, but those are barely noticeable. By pruning it hard, as I did, there will be no blooms next spring because I removed most or all of the buds. But the lack of blooms is of no importance to me.
If you have a tree or shrub that blooms nicely in the spring (such as forsythia, lilac or common ninebark) you may want to consider putting off pruning until after bloom time. However, if you notice that early ice and snow is bending the branches and weighting them down, some judicious pruning now can help the plant. If snow or ice does your pruning for you, the bark will tear, opening up sites where disease or insects can enter.
Late summer blooming shrubs can be pruned now with no loss of flowers next year. Plants like the common ‘peegee’ hydrangeas set flower buds on new growth, not growth that occurred the summer before. In fact, if you have not cut off this year’s flower panicles (and some of their stems yet) from your peegee hydrangea, you should do so now. They will be weighted down by snow and may break.

Branches Removed From Arctic Blue Willow
Whenever you prune a tree or shrub you should remove any dead branches first. You can tell a dead branch from a live one in winter by using your thumbnail to scratch the surface of the bark. If you see green, it is alive; if it’s brown, it’s dead. With a little practice, you’ll recognize dead branches on sight.
If you see two branches that are crossing or rubbing, get out your pruners. Rubbing branches wear off bark, opening wounds – so get rid of one (or both, if they are already damaged). Crossing branches may not be rubbing now, but they will as they get bigger or covered with snow.
Good questions to ask yourself when pruning are these: what is the potential of this branch? What will it be like in 5 years? A branch that travels through the center of a shrub has no potential – it will soon be rubbing against other branches. And it’s always better to clean out messy branches when they are small.
Pruning can be functional: it minimizes damage and keeps trees and shrubs to manageable size. But pruning is also an art. You can sculpt your trees and shrubs so that they are works of art as you look out over your winter landscape. Have at it!
Henry Homeyer’s Web site is www.Gardening-guy.com. He is the author of 4 gardening books.
Using Found Plant Material to Decorate the Holiday Home
Posted on Thursday, December 1, 2011 · Leave a Comment
Once again, my garden is just about out of steam. Winter is upon us – not by the calendar – but with temperatures dropping into the low 20’s recently, I say it’s winter. It’s no longer possible to step outside and fill a vase with my own flowers. The only flowers still blooming are my intrepid Johnny Jumps-Ups (Viola tricolor). At one time or another they have bloomed for me every month of the year. That’s right, if we have a January or February thaw, the Johnny’s may well bloom. But still, I long for more variety.
As a freelance writer, I don’t have a big budget for cut flowers. But I do believe in buying a few stems to brighten the table on a regular basis. Recently I bought 3 stems of what are called “spider mums’ for a total of just $4.50. I then went outside to see what I might add to these flowers to fill up the vase. There is a remarkable amount of useable material outside, both in the garden and in the wild.

Winter Arrangement With Mums
The general rule of thumb is that an arrangement should be two to three times the height of the vase. I selected an 8-inch vase, and cut the mums down to about 20”. The mums are white, so to add color I cut some stems of winterberry (Ilex verticillata). Winterberry is our native deciduous holly plant that flaunts bright red berries at this time of year. They are commonly sold landscape plants but also grow wild in wet places along the road. They grow 4-12 feet tall; the stems I cut were about 3 feet long, and branched.
I decided to cut off 12-inch side shoots and use them to form the lower portion of the arrangement. I put the tall mums in the center of the vase and their green leaves added a contrasting color and filled out the space between the blossoms and the berries. I also added a section of a clematis vine for more greenery.
At this time of year I crave greenery, so I was delighted to notice nice glossy leaves on my fall-blooming clematis (Clematis paniculata), a vine that I grow on a trellis. I had never before picked a vine to use in a vase, but it worked well. Vines, I just discovered, are wonderful in an arrangement: they are flexible and can be woven through stalks of tall stiff flowers or shrubs.

Winter Arrangement Using Found Plants
Next I went outside to collect things that are totally free for a second arrangement. I grow Lenten Rose (Helleborus orientalis), an early spring-blooming plant with glossy, evergreen leaves. Each leaf consists of 5-9 oval leaflets attached to a central point; each group of leaflets is a foot or so in diameter. By spring this year’s leaves will be ratty looking, but now they still looked good. I selected 4 leaves to establish a visual base for the arrangement. They looked good in the vase for about 5 days.
Lacking Lenten rose, I could have used white pine branches for some greenery, or balsam fir or spruce branches. I know better than to use Canadian hemlock in a vase, even though I have plenty of it, because it drops its short, soft needles after just a few days.
Next I cut six 24-inch stems of redosier dogwood (Cornus sericea) and added them to the 10-inch tall, wide-mouthed vase. I grow this shrub mainly for its look in winter. The first-year stems turn bright red in winter, standing out proudly above the snow. Second-year stems (and older) turn a darker, brownish color, so cutting some stems each year keeps the shrub looking at its best. Redosier dogwoods prefer moist soil, but will grow almost anywhere – including alongside the road.
Lastly, I cut stems of a tall decorative fountain grass (Miscanthus sinensis) and added them to the arrangement. Decorative grasses have become very popular in the landscape design business, but not all perform well after year one. They generally like lean, well-drained soil and my soils tend to be rich and moist, but some years I have some very dramatic 6-foot tall plants that look good for most of the winter. I have plenty right now.
If you don’t have a decorative grass with seed heads to use in an arrangement, you might be tempted to pick some stems of the common reed whose Latin name is Phragmites australis. It is commonly seen alongside the road in wet places. It can grow to 10 feet tall, and is very dramatic. The pretty part of the plant consists of big fluffy seed heads (on tall stems). But if you do use it, don’t throw the seeds in your compost pile because the plant can be invasive. Burn the seed heads when done with the arrangement – even though I’ve read that that the plants spread mainly by root.
So don’t despair if your flowers have all gone away. Just go outside with your scissors and a pair of pruners. There are plenty of other interesting stems that are free for the taking.
Henry Homeyer’s new book is called Organic Gardening (not just) in the Northeast: A Hands-On, Mo nth-by-Month Guide. His Web site is www.Gardening-Guy.com. Reach him by e-mail at henry.homeyer@comcast.net
Forcing Bulbs – Now is the Time to Prepare for Early Spring Blooms
Posted on Thursday, November 17, 2011 · Leave a Comment
Winter came early to Cornish Flat this year with a heavy snow in late October. I love the snow and cold, but don’t need six months of it – which could happen this year if we have snow from October till April. I am, after all, a gardening guy. I love flowers and fresh vegetables from the garden. One of the things I do to keep my spirits up is to plan for those late winter blues, the time when winter seems endless. I plant bulbs in pots each November, forcing them to bloom indoors before Mother Nature would tell them to bloom outside. I recommend it.

Forcing bulbs for winter
Forcing bulbs is easier, by far, than planting spring bulbs outdoors (there is no digging required), and you are almost certain to succeed – they are safe from predation by deer, and can easily be protected from any rodents that might be looking for a winter snack. I store my pots with bulbs for forcing in a cold cellar, one that has, on occasion, harbored mice and even red squirrels. In fact, I have learned the hard way that indoor rodents can – and will – dig up and eat bulbs – indoors or out. So now I keep my pots covered with hardware cloth (a fine-mesh metal screening available at hardware stores). But wear gloves if you cut hardware cloth to size – the edges are as sharp as razor wire.
Your first job, if you wish to force bulbs to bloom indoors next spring, is to select those that are early bloomers. Each bulb contains the information needed to decide when to bloom. You can affect that timing, but choose packets of bulbs that say “early bloomer” rather than late. I need blossoms in March, not May.
Next, select containers that will accommodate ten or more bulbs. I have some nice Italian terra cotta containers that are about 14 inches long, 7 inches wide and 6 inches deep. For daffodils or tulips, they are right for about a dozen bulbs because I plant the bulbs pretty much shoulder-to-shoulder. I don’t leave much space between bulbs the way I would if planting outside. My favorite container for forcing, however, is my cedar window box that is 3 feet long and 9 inches wide. I fill it with 30 or more daffodils each fall, and come spring it is glorious.
For the planting medium, I use a 50-50 mix of commercial potting soil and my own compost. Garden soil generally is not a good choice – it can hold too much water , which can lead to bulb rot. I put a couple of inches of planting mix in the bottom of my container, and then arrange the bulbs. I cover the bulbs with more mix, pat the surface with a hand, and if the soil mix is dry, I water lightly.
You can double your production of blooms by planting two layers of bulbs in a container. Plant big bulbs deep in the pots, add soil, and then plant a layer of crocus or other small bulbs above them. To avoid planting the little guys right over the big boys, you can mark the location of the deeper bulbs with straw from a broom. That way they won’t get pushed over as the daffodils come up.
Planted now, bulbs will extend their roots and get them well established, and then they should go dormant. To achieve dormancy, you need a cold, dark location for the container. But not too cold. You can’t leave them outside or the bulbs will be ruined. Bulbs planted in the ground never get extremely cold – they are insulated against the cold by soil and snow (unlike those put on your deck, for example). One winter, as an experiment, I shoveled the snow off a section of my vegetable garden and dug into the soil. Using a temperature probe I learned that in a winter with plenty of snow, the soil was about 35 degrees just three inches down.
I recently received several e-mail inquiries about where to store containers of bulbs for forcing. If you don’t have a cold basement, do you have an unheated mudroom or a cold attic? An attached, unheated garage might do – basically any space that gets below freezing, but not much below is good. If you have a bulkhead that is closed off to the basement it probably stays cold enough. If temperatures get much colder than 20 degrees you risk damage to some bulbs.
The time a bulb needs to be dormant varies. Tulips need at least 12 weeks, though early daffodils and most small early bulbs – crocus, snowdrops, scilla – only need 8 weeks. Years when I plant bulbs for forcing early in the fall I often leave them for sixteen weeks. If you bring your bulbs up into the warmth of the house too early they will send up greenery, but may not bloom.
To get your bulbs to bloom, bring them into the warmth of the house and water lightly. Once their little green noses appear, put the containers in a sunny window and they will perform. I rotate the containers every few days, as the stems may lean toward the sun.
Winter can be oppressive for gardeners. Getting bulbs ready for indoor blooming in mud-season is cheaper than flying to the tropics – though I’ve been known to do that, too!
Henry Homeyer can be reached at P.O. Box 364, Cornish Flat, NH 03746 or henry.homeyer@comcast.net. His Web site is www.Gardening-Guy.com
Pollarding Trees
Posted on Wednesday, November 9, 2011 · Leave a Comment
On a recent trip to southern France I was fascinated by what some people might term “tree abuse”. The French love to turn certain trees into sculpted forms by removing all new growth each year – or most, depending on the age of the tree. The English term for this type of pruning is “pollarding”. I have decided I shall give it a try.
The English plane tree (Platanus x. acerifolia) is the most commonly pollarded tree in southern France, though I have seen other fast-growing trees treated the same way, notably lindens (Tilia spp). Plane trees are reminiscent of our sycamores (Platanus occidentalis), with bark that looks a bit like the patterns and colors of camouflage clothing. They are commonly used to line city streets and rural lanes.

Plane Trees Along the Canal du Midi, France
The plane tree is fast growing and survives in most places – even along the Canal du Midi, the seventeenth-century canal that connects the Mediterranean to the Atlantic. I spent a day biking the canal and was amazed to see plane tree roots cross the towpath and reach into the water – like pythons slithering out of the earth and into the canal. But I noticed that the plane tree sheds branches freely, dropping small branches onto my path. I gather it is a somewhat weak-wooded tree, though perhaps not as weak as our willows (Salix spp.) or box elder (Acer negundo).
Driving through the town of Puisserguier, in the Languedoc, I admired the ‘allees’ or rows of plane trees that lined their streets. Then one day I came back and saw that all new growth had been cut off, creating an eerie, Edward Gorey-like atmosphere. Workers with a boom truck were just finishing up a major task, clearing out the clutter by cutting off all the upper branches.

Pollarded Trees, France
These big trees showed huge knobs, scars where this had been done many times. I spoke to a tree specialist, who explained that plane tree branches can grow 6-9 feet per year, so they cut off all new growth on mature trees every other year. By cutting back the smaller branches to the trunk or a major branch, much weak wood is eliminated and weight taken off the major branches. It keeps trees from getting too tall. And it creates wonderful sculpture.
Another benefit of pollarding a tree is that it creates dense shade. Cutting back the trees encourages them to send out multiple shoots. From the scarred knobs created in previous years, a half dozen branches will erupt. That creates dense foliage. The Mediterranean sun is hot in summer, and town squares are generally shaded from its intensity by pollarded plane trees, much as our American elms once shaded Main Street.
When I return from France I will experiment with my seven-sons flower tree (Heptacodium micinioides). This is a fast-growing tree that blooms in the fall; the blossoms are small, white and lightly fragrant. It is originally from China, and has only started to become popular in the nursery trade in the last 20 years. I got mine about 10 years ago at EC Brown Nursery in Thetford, Vermont (www.ecbrownsnursery.com).
It is a medium-sized tree – the largest specimen I’ve seen is about 30 feet tall. But it can send up shoots 6 feet in a year, and I have struggled to keep mine the size and shape I want. It is near the house and several times it has attempted to send shoots indoors through a second-floor window. So I have pruned it hard, but never removed enough branches to create a pollarded look. The main trunk is now about 4-inches or more in diameter and 10 feet tall. It has one major bifurcation – where the trunk branches into 2 major branches. So I will cut off all the branches back to those two branches. Later, I may let a single new stem continue to grow and thicken, creating a higher point for pollarding.
So what else have I learned in France? I think I pamper some of my plants too much. I know that thyme, rosemary and lavender thrive in lean soil that is low in fertility. But it is hard for me to deny them some compost at planting time. Off-road biking here I have found them growing wild – thriving – in sandy dry soil, which should be a lesson to me.
Similarly, grapes here do fabulously in dry, rocky soil. One vintner, an organic grower at Domaine Bordes (A.O.C. Saint Chinian) told me that he uses no fertilizer. He said that his grapes do just fine, producing great flavor – but in smaller quantities than conventional growers who use chemical fertilizers. Grape growers often mulch with gravel in France, a technique I haven’t yet tried.
Lastly, I saw sheep’s wool used as mulch around trees. There is not much market for raw wool in France – or in the States. If you have a friend with sheep or llamas, you might be able to get some wool. It will keep down weeds, hold in moisture, and slowly break down, providing some nitrogen. Still, I’m not sure I like the look – perhaps it would be good in my blackberry patch, or around apple trees that are not in view every day.
So if you travel, observe. And send me your observations – we can all learn new techniques from each other, and from different cultures.
Contact Henry at henry.homeyer@comcast.net or P.O. Box 364, Cornish Flat, NH 03746.
Sakonett Garden and Wildmeadow
Posted on Wednesday, November 2, 2011 · Leave a Comment
Now that I’ve put my garden to bed, I have time to think back about gardens I visited during the summer – and decide what I should try next summer. This year I had the great good fortune to spend 3 hours at Sakonnet Garden and Wildmeadow, the gardens of John Gwynne and Mike Folcarelli in Little Compton, Rhode Island. For the past 30 years they have been making and re-making gardens on about an acre of what started as a cornfield surrounding an early 1900’s Cape. They prove the point that a garden is never done: there is always something new to try.
I asked John what his garden passions have been. He said he loves playing with light in the garden: creating spaces – garden rooms – that are either bright and colorful or dark and shady. He creates special effects with plants – enclosing silver-foliaged plants with dark green hedges, for example. He enjoys showcasing dramatic plants, placing them in full sun at the end of a long dark path. He is also passionate about restoring meadows so that birds like bobolinks and meadowlarks can breed and succeed.
Like me, John is a plant collector, and one who tests plants to find which ones grow and look the best. At one point he and Mike had 500 rhododendrons, for example. They have thinned that collection down to “just” 100 or so.

Shovel handle used as a hose guard
As I walked through the gardens I made notes of things I might like to try, both plants and planting techniques. One of the first things I noted was their capricious use of unusual items as hose guards. Hose guards allow you to drag a 100-foot hose through the garden and go around corners without knocking over or damaging plants. They used baseball bats half buried in the soil and antique croquet wickets. I really liked their use of tool handles – old shovel handles that had snapped off – as hose guards. It is recycling at its best.
The gardens are divided up into rooms with walls, generally at least 6 feet tall. Some were made of living material –hedges or vines on trellises – and others were made from a variety of non-living materials, including stone.

John Gwynne & his log wall
One wall that caught my attention was made of logs. Logs – suitable as firewood – were simply stacked up, each piece about 2 feet long. The wall was a good 8-feet tall and made of logs that varied in diameter from an inch to six inches or more. There is a door that leads out of the room – with a gate. An iron frame that supports logs over the door; the door itself was made of flat welded iron with metal screening attached.
Training vines can be tricky, especially if you want them to travel laterally through the air. The solution they found was to roll out 25 feet or more of chicken wire, then shape it into a long roll. A three-foot width of chicken wire, when rolled up tightly, makes a form that is structurally strong enough to be suspended between trees or walls and support vines. They intermingled 2 plants: winter creeper ( Euonymus fortunei) and Japanese holly (Ilex crenata), training them to flow through the air.
John and Mike grow a number of plants that are generally considered invasive pests – things like giant hogweed (Heracleum mantegazzianum) and a variegated-leafed form of Japanese knotweed (Polygonum cuspidatum). And although I do not recommend using such plants, they have figured out ways to do so – and to contain them responsibly.
Giant hogweed grows to be 6-10 feet high and has flowers that can exceed 2-feet in diameter. They are careful to pick the flowers before they go to seed, thus preventing them from spreading. Me? I grew it before I knew better, and was able to eradicate it when I learned it can be invasive. It will grow in sun or shade, wet or dry, and has roots that go down 3 feet or more into the soil. I still watch for it, and occasionally an old seed will germinate and create another plant.
Well pipe containing Japanese Knotweed
Japanese knotweed (seen along roadsides and streams and commonly called ‘bamboo’) spreads by root, so they contain it in sections of concrete well pipe – the kind that is used to contain shallow hand-dug wells. Each piece of the pipe is 30 inches in diameter and 3-4 feet long. The pipe makes a terrific planter – it is simple, sturdy, and creates a root zone deep enough for most plants, but also deep enough to contain wandering invasives.
Their garden also uses snow fence as walls for rooms. Most snow fence is 4-feet tall, but they special order 6-foot snow fence made by Griffin Fence Company in Griffin, Georgia and have it shipped to them. They support the fencing with 4-inch square posts and grow vines or hedges to make the fencing disappear, especially since they paint it black. It works well for them as deer proofing.
If you’d like to see these phenomenal gardens, John and Mike will be holding a series of open days next summer, and possibly a day of workshops next spring. Their Web site, www.sakonnetgarden.com will list the dates of their upcoming events – though the Web address may change by spring.
I will never have the time and energy to build gardens as fine as those of Mike and John, but next summer I hope try to try some of their ideas.
Henry’s Web site is www.Gardening-Guy.com.
Making Houseplants Happy In Winter
Posted on Wednesday, October 26, 2011 · Leave a Comment
Making Houseplants Happy in Winter
I’m sure you’ve had the same problem I do now: aphids on your houseplants. We’ve had them outside all summer, and they never showed signs of any aphids. But bring them inside and we have those little bugs sucking their juices out (because there are no good bugs inside eating those pesky aphids). Aphids are less than a quarter of an inch long, often clear or light brown, and leave stickiness all over the leaves. What’s a person to do?
First, you should wash the plants before they move indoors. I put them on the lawn and spray them with a vigorous stream of water from the hose. Not enough to rip leaves, but a good strong spray. It is important to get both sides of the leaves washed, the stems, and the soil surface. That’s right, turn the plant on its side and spray the soil to wash off eggs or aphids lurking there.

Inspect Houseplants Carefully
If you have already brought in your plants, inspect them daily for signs of aphids. I know the plants that, year after year, are most susceptible to aphids. I keep them in isolation, even if I have washed them off. I love my potted Impatiens that I have on the north-facing deck all summer, and want to keep them over from one year to the next – but I know I will have aphids on them. And someone gave me a potted Meyer lemon tree – in part because it is a magnet for aphids.
Another technique to minimize aphids only works on things like rosemary, which is somewhat frost hardy: leave them outside to go through a few frosts before bringing them in. That will allow Mother Nature to kill off the aphids for you. But be careful – it’s easy to kill off plants if it gets too cold.
Then there is the “let-it-go-dormant” approach to tender plants. Many houseplants were originally from Africa or other tropical places. If they go dormant in their native country during the dry season, you can probably let them go dormant for you here. I have let my oxalis and ginger plants get completely dry for months at a time, and they come back to life when watered in the spring. They should not be kept in a warm room, however, so try to keep them at about 50 degrees, and preferably in a dark room – or in a brown paper bag.
Plants that have been outside all summer get cranky when brought inside, but you can help their attitude by providing the right amount of light and water. Too much water is a common cause of root rot and plant death or decline. Outdoors there are nice breezes to evaporate excess water in the soil, summer temperatures are warmer, and sunshine is stronger. So water only when the soil is dry to the touch an inch down. If you know your plants and pots, you can tell if water is needed just by hefting the pot.
If you have city water, it has chlorine in it, and many plants do not like chlorine. But that’s easy to fix: plan ahead. Fill a pitcher of water in the evening, and most of the chlorine will evaporate by the next night. Or you can use brook water, rain water – or heck, Perrier, if you want!
Light is another issue. The glass of your windows absorbs a lot of energy of the sun – it’s why you cannot get a tan indoors, even lying in the sun room all day with the Sunday New York Times. Sun-loving plants are the hardest to please. This year I have set up some LED lights over three of my large plants. These lights use much less energy than fluorescent lamps (28 watts to get the equivalent of 250 watts of standard incandescent light), and are sold specifically for growing plants. Mine are from Sunshine Systems (www.sunshine-systems.com or 866-576-586), their Glow Panel 45. Each panel has 112 little red or blue LED lights. I put mine on a timer so they will turn on and off automatically. They are not inexpensive, but should last for 50,000 hours. I shall see this year if that supplemental light will make a big difference to my plants.
South facing windows are best for sun-loving plants. Get your plants as close to the glass as you can, I put several pots in a big window in a rubber boot tray that I got from Gardeners Supply Company (www.gardeners.com or 888-833-1412). The tray keeps spills from getting onto the floor.
Humidity is a problem for some plants in winter, especially orchids. You can increase the moisture around your plant by putting the pot in a saucer filled with gravel. Keep water in the saucer and it will evaporate, while avoiding the problem of roots sitting in standing water, which is almost universally bad for plants.
Knowing your houseplants and what their needs are is half the battle of having nice ones. The best book I have encountered on caring for houseplants, and the specifics on individual plants is no longer in print, but is readily available in used bookstores. It’s called Making Things Grow: A Practical Guide for the Indoor Gardener by Thalassa Cruso.
If do get aphids, even after washing them outdoors, spray them with Safer Soap, a product that is safe and easy to use – or or take them with you the next time you shower!
Henry’s new book is Organic Gardening (not just) in the Northeast: A Hands-On, Month-by-Month Guide. His Web site is www.Gardening-guy.com.


 Click Here to buy from Cobrahead


