Forcing Bulbs for Early Spring Blossoms Indoors
Posted on Tuesday, October 25, 2022 · Leave a Comment
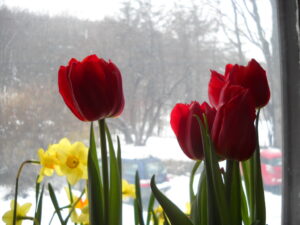
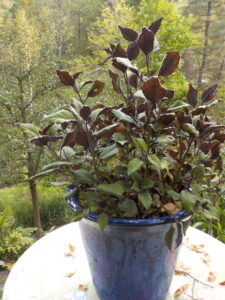
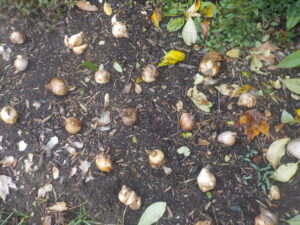
Forced tulips are my favorites.
I love tulips. Fortunately, our dog Rowan keeps the deer away, so I can grow them in our garden. But if you have a deer problem and can’t grow tulips (deer think you’ve planted treats for them) – I have a solution. Plant some in pots now so they will bloom for you indoors in March or April.
Almost any spring blooming bulb can be “forced” to bloom indoors, but tulips take the longest: 4 months. If you were to pot them up in early November, they won’t be ready to start growing leaves and buds until March. But let’s back up a bit and see what they need to thrive and bloom.
First, they need a cool or cold place to rest for four months of dormancy. I am lucky: I have a cold basement that I keep just above freezing, which is ideal. Anything over 50 degrees will encourage them to send up green shoots too early. If they do that, they probably won’t bloom.
A garage attached to the house might be suitable for forcing bulbs. Or maybe you can put them in an unheated mudroom, or spare fridge. If the growing medium freezes it won’t kill the bulbs, but they won’t progress towards the hoped-for bloom time. They need to be growing roots and getting ready to bloom.
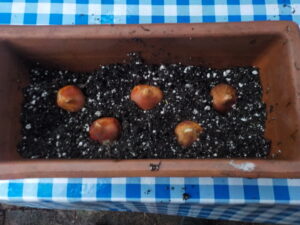
Five to seven tulip bulbs fit nicely in this pot.
You need a suitable container for forcing bulbs. I use an Italian-made red clay container that is 16 inches long, 5 inches wide, and 5 inches deep. It is handsome, and will look good on my windowsill when I bring it up from the cold basement to blossom. You can, of course, use a plastic pot or a handsome ceramic pot. I have even used my window box for a bigger splash of color. But anything you use should have a drainage hole and something to catch the water that may leak out of it.
Next, you need a good growing medium. You can buy potting soil, or you can reuse potting soil from last summer’s annuals that were in pots on the deck or steps. A robust annual grows lots of roots which you need to separate from the soil by shaking or banging the soil loose. The soil can then be used, but you should mix it with fresh potting soil, too.
Fill the container you plan to use about half way with the growing medium. If the soil mix is dry, moisten it well before placing the bulbs in the pot. Then push the bulbs into the soil mix, cover the bulbs with more mix and pat it down firmly. You can place them closer together in the pot than you would if planting them outside in the soil. In fact, I plant some bulbs shoulder to shoulder.
You will need to check on the pots once a month to be sure the potting mix has not dried out. If it has, water lightly, but never get the growing medium soggy. But if it is too dry, nothing will happen, either.
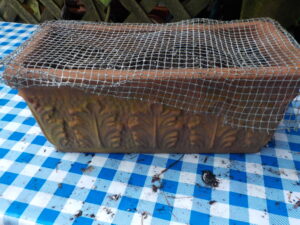
Hardware cloth on top of the pot will keep out hungry mice
Rodents are a problem outdoors – they love to eat tulips bulbs. But if you live in an old house you may also have mice or squirrels in your basement that will eat the bulbs. So I cover each pot with hardware cloth (a wire mesh) or a small piece of board. They won’t eat daffodil bulbs, but I have had rodents dig them up and throw them on the floor in disgust!
When selecting bulbs for forcing, always choose early or mid-season bloomers. I want early blossoms while snow is still on the ground. This is true whether selecting tulip varieties or daffodils. Daffodils generally only need 3 months of dormancy. Crocus and other small bulbs only need 2 months of cold storage.
My favorite daffodils for forcing is the Tete-a-Tete. These little gems are short and early, and produce lots of flower – two or three flowers per stem. This year I potted up a dozen 4-inch pots with 3 bulbs each. These should be ready to come up into the warmth of the house in about 10 weeks, and ready to gift to friends a couple of weeks later while in bud. There is nothing like a blooming daffodil to pick up a person’s spirits in late winter.
Another blooming treat is the paperwhite. This is a type of daffodil that comes ready to grow. Most people like to set them in a bowl filled part way with stones and add water until it just “kisses” their bottoms. Put on a sunny windowsill, these bulbs will blossom in four to six weeks. Just keep on adding water as it evaporates or is sucked up by the paperwhites.
Paperwhites in bowls of pebbles sometimes get too tall and tip over. Some people add just a soupcon of gin to the water when they start to grow, stunting their growth. Me? I just try to rearrange the stones to prevent tipping. Another way to do it is to grow them in potting soil. But you should not bury the paperwhite bulbs if you do that. Leave half the bulb above the soil line.
A nice project for your garden club would be to pot up some Tete-a-Tete or other bulbs now for later use as gifts to the ill or elderly – or anyone who needs them. I know one club that is planning on doing so this year.
You may reach Henry at PO Box 364, Cornish Flat, NH 03746. Please include a SASE if you wish a response, or e-mail him at
henry.homeyer@comcast.net. He is a life-long organic gardener and the author of 4 gardening books.
Putting the Garden to Bed
Posted on Thursday, October 20, 2022 · Leave a Comment
Frost has already lightly brushed my garden, and hard frost is not far behind. Even in warmer spots it is good to start getting ready for winter. Let’s look at some of the key activities for all of us.
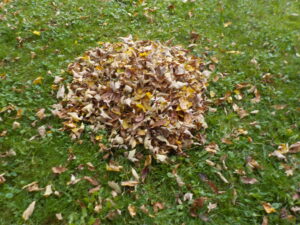
Save your fall leaves for use as mulch
First, remember to visit and support your local garden center. They want to unload as many plants now as they can – perennials, shrubs and trees. So they are discounting plants, often 25% or more. I recently got some big burr oaks at a 50% discount– a considerable saving. And it is not too late to plant.
I have read that woody plants store up food all summer when the sun is bright, and use some of it now to extend their roots out away from the main stem. So I like to plant trees in the fall especially since it is cooler and more rain is falling now than in mid-summer. Planting in spring and summer is good, too, since a tree has longer to get established before winter, and some gardeners insist that fall planting is risky. If you plant a tree, be sure to spread 2 inches of mulch around the tree to keep the roots warm as late into the fall as possible.
You may have already done so, but let me remind you anyhow to bring in your houseplants that have summered outside. Do it now, not after frost even for plants like rosemary that can sustain a temperature down to 25 degrees or so. Aphids are the biggest pest on houseplants. Outdoors they are eaten up by other insects or washed off by heavy rains, but indoors a plant that is already sulking is ripe for an infestation.
Wash houseplants with hose before bringing them inside to get rid of aphids
Use your hose to wash not only the tops of leaves, but the underside as well. And wash the surface of soil in the pot – do this by laying the plant on its side. This will help you to get rid of eggs and adult aphids, though a few elude me every year. Watch for aphids or their sticky droppings on leaves. If you see some, spray with Safer Soap to dehydrate the aphids and knock them dead. Repeat as necessary.
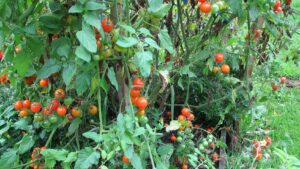
Your least favorite fall activity may be weeding and plant cleanup, though I kind of enjoy it. It is very important to remove rotten fruit, stems and leaves of tomatoes, potatoes, and vine crops as they often have mildew or fungus by now. Be sure to get them out of the garden ASAP. And if you have had bugs on any plants, put them in the household trash or on a burn pile. You don’t want them wintering over in the garden or the compost pile. You don’t have to wash tomato cages, their diseases won’t winter over on them.
Getting rid of weeds now is important, but so is covering the soil with leaves or mulch so those seeds blowing in the wind don’t land on bare earth and settle in, ready to grow in early spring – even before you have thought about planting next year’s veggies.
Fallen leaves are the best mulch available, and free. You can compact them and make them easier to move to the garden by running them over with the lawnmower. Or you can just rake them up and onto a tarp. They will settle in and not blow around if you do this just before a nice rain. But you can use grass clippings now, before leaves have all fallen. And if you use a mowing service, ask them to leave the leaves and grass clippings for you to use. But do that only if they do not use any chemicals on the lawn. You don’t want any chemicals in your garden.
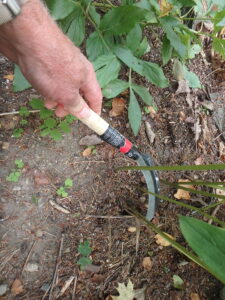
This harvest sickle will slice through stems quickly and is easily rotated
Cutting back the flower gardens is hard work and time consuming if you have extensive flower beds as I do. Many gardeners use their hand pruners and clip away, stem by stem. Not me. That is very hard on your paws. I like to use a curved serrated knife or small “harvest sickle” to do so. I grab a handful of stems with my left hand, then slice them off with my right. One motion, and no work for my fingers the way pruners would do.
You might also consider using a string trimmer to cut back big beds. I’ve done it, but don’t usually do so. It’s fast, but less precise. And I like to leave some flower stalks standing, things with seed for winter birds like chickadees and finches. I leave black-eyed Susans, purple cone flowers, sunflowers and anything else that looks tasty from a bird’s eye view.
The most radical way of cutting back flower beds is to use a lawnmower. I have one long, wide bed that is full of aster, Joe-Pye weed, goldenrod, giant foam flower and turtle head. In late fall I used to put the blade of my riding lawnmower up as high as possible and ride over it, mowing it all down. Now I no longer have a riding mower, and I doubt my battery mower would chomp through it. I will have to use the string trimmer, I guess. It’s a bed about 75 feet by 10 feet, so a motorized tool helps.
If you have dahlias and other tropicals growing in the ground and want to save the tubers for next year, only dig them up after a frost or two. Bring them into the basement or barn after you have shaken off most of the soil. I don’t wash the tubers, as a little soil will help keep them from drying out too much.
I store my dahlia tubers in a cold basement that doesn’t freeze. I put them in a box or tub with some sphagnum moss that is lightly moistened, and spray some moisture on in February. You can also store them in a plastic bag with holes punched in it and some bedding sold for gerbils in it, lightly moistened.
I love winter, but I’m always sad the morning after the first hard frost. Most of my annuals will have fallen, like wounded soldiers. But I also know that at my age, a season of rest from the garden will be good, too.
Planting Spring Bulbs
Posted on Wednesday, October 19, 2022 · Leave a Comment
As a boy I was surrounded by hundreds of spring daffodils every year. We lived in rural Connecticut, and the people we bought our house from had planted daffodils by the hundreds in our woods. The woods consisted of sugar maples, huge ones, with a sprinkling of ash trees, providing dappled sunshine We had wide raked paths and all along the paths were daffodils in April and May. We would pick 50 or more at a time and bring them into the house and put them in vases everywhere.
So when I bought my house here in Cornish Flat in 1970, I started planting bulbs, too. Except for my years in Africa with the Peace Corps, I have probably planted some every year for over 50 years. It is now getting tough to find places to plant more, but somehow I manage. One trick I use is to put those little white plant tags pushed almost all the way into the ground (so I see less of them) each time I plant a new batch. That way I don’t inadvertently dig up some while trying to find a blank palette.
The first step is to buy bulbs. My local feed-and-grain store has them, as do garden centers and most grocery stores. You can order bulbs on-line if you want things beyond the common ones. But I like to try first to buy locally.
Next, find an appropriate place to plant them. If you are planting small, early-spring bulbs like snowdrops or glory of the snow, you can plant them in the lawn. Just poke holes in the sod for them. Their foliage dies back early. But if you plant daffodils or tulips in the lawn, you won’t be able to mow the lawn until their foliage has replenished the energy in the bulbs, which for daffodils is July 4th – or thereabouts.
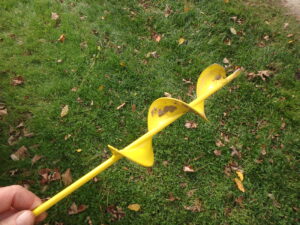
Augers are sold to plant bulbs but most cordless drills are not powerful enough to work well scaled
I like to plant a big splash of color in one place. Rather than dig small holes with a trowel or auger, I like to plant a minimum of 25 daffodils or tulips in a wide single hole. To do this, I lay out the bulbs on the ground where I want them, spacing them three inches or so apart. I like a planting of bulbs to be an oval or tear drop shape as opposed to a rectangle. That seems more natural, but do whatever pleases you.
Then I take a hand tool and draw a line around the space designated for the bulbs. I remove the bulbs, and dig out the soil. I don’t dump it on the lawn – I put it in a wheelbarrow or on a tarp so I don’t make a mess on the lawn. I discard any stones as I dig.
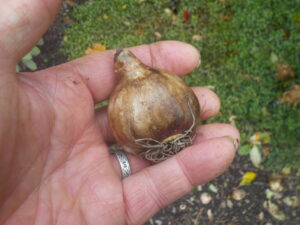
Plant with the pointy end up
For depth, follow the directions on the package. Big bulbs like daffodils and tulips generally should be planted at least six inches deep. Little things like crocus only need to be three inches deep. If I dig down six inches, I then add some bulb booster or organic fertilizer in the hole and then loosen the soil for another two inches with my CobraHead weeder (or a three-pronged scratcher). If the soil is heavy clay or very sandy, I add a couple of inches of compost and stir that in.
Next I place the bulbs in the hole in a somewhat random pattern, not straight lines. I wiggle the bulbs around so that the base of each bulb is near the bottom of the loosened and enriched soil. Finally, I shovel the soil from the wheelbarrow back into the soil, being careful not to dislodge my bulbs. If the soil is really crummy, I throw some away and mix in compost to replace it. Bulbs need good drainage.
Lay out bulbs on the soil to determine the size of the hole you need to plant
What about hungry animals that want to eat your flowers before you can enjoy them? Squirrels and chipmunks love tulip bulbs, and have been known to watch from a distance as gardeners plant them – and dig them up almost right away. Some sources claim that adding sharp crushed oyster shells on top of the soil, or near the top, will deter them. I doubt that. Oyster shells won’t deter a tulip-hungry gray squirrel.
Wire mesh buried in the soil above the bulbs will deter squirrels, however. The problem is that when you cut it to size, the edges are razor sharp. When I interviewed the White House gardener at the end of the Clinton years, he reported that they kept squirrels away from their bulbs by feeding them all the corn they could eat. A well fed squirrel won’t bother to dig for tulips, he said. That’s not a good plan, in my view, it will attract more squirrels. I say, if you want tulips, plant them and hope for the best. Having a dog helps, too.
Deer are another problem. Deer love tulip buds and flowers, and will often eat them just before they open. Although there are deer repellent sprays, I think the best solution there is to temporarily surround beds of tulips with wire fencing. Chicken wire comes in three-foot wide rolls that can easily be supported with thin stakes and will keep deer away from your tulips.
Lastly, if you want tulips on your table, you might consider buying them. Local greenhouses near me grow them by the thousand and sell them through my local food coop at a fair price in season. Then you can focus your bulb efforts on things that deer and squirrels won’t eat.
The best bulb in deer country is the daffodil. They are mildly poisonous, so squirrels won’t eat the bulbs and deer won’t eat the flowers. There are over a dozen different named categories of daffodils, and a wide range of colors beyond yellow: white, orange, and even some with a green eye, or center. They will bloom early, mid-season or late in the spring. So buy plenty and enjoy a pest-free spring.
Garlic Is As Good as 10 Mothers
Posted on Tuesday, October 11, 2022 · Leave a Comment
Back in the 1980’s the Dartmouth Film Department showed a film by Les Blanc called, “Garlic Is as Good as 10 Mothers”. It was shown in “Smell-o-Rama”. Cooking garlic smells were mysteriously introduced to the air system, filling the 900-seat auditorium with the delicious odor of roasted garlic. I attended, and loved it all. Just for the record, my one mother WAS better than garlic – but I love garlic, too, and plant plenty of it.
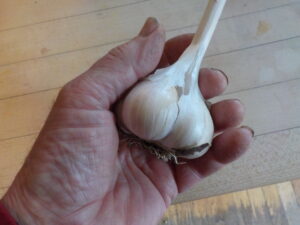
This big bulb of hard necked garlic has just 5 cloves
One of my favorite fall appetizers is take whole heads of garlic and roast them in oven-safe ramekins or small dishes at 375 degrees for 45 minutes or so. First, I peel off outer layers of the head of garlic, cut off the tips of the head and drizzle it with olive oil. When done the cloves of garlic are soft and easily squeezed out of their skins after cooling. I like to serve this on crackers or a baguette spread with goat cheese.
In order to have enough garlic for treats like the one described above I plant a lot of garlic each October. Usually I plant about 50 cloves but have planted up to 100 – always enough to eat daily and some to share. It really is a virtually work-free, pest-free crop. All you need is “seed” garlic sold for planting, or failing that, some organic garlic purchased at your local farmers market or food coop. Regular grocery store garlic is often treated with chemicals so it won’t sprout.
In addition to seed garlic you need a sunny place with decent soil, or even crummy soil you can improve with compost. To plant 50 cloves of garlic the space you need is minimal: a spot perhaps four-feet long and about three-feet wide. You could even find the space in a flower bed for a few – or on the front lawn around the light pole.
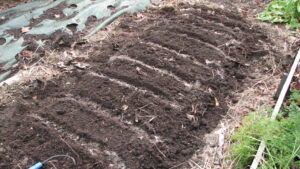
A garlic bed ready for planting
I plant garlic in a wide raised bed. I loosen the soil with a garden fork or my CobraHead weeder down to a depth of six inches. Then I add some good quality compost, either homemade or purchased, and stir it in. I make furrows eight inches apart and add some organic fertilizer like Pro-Gro into the furrow. I work it in with my single-tined CobraHead weeder. Or you can sneak cloves into a flower bed individually using a hand trowel.
Each clove needs to be planted the way it grew- the fat part down, the pointy end up. I plant cloves about three inches deep and a hand’s width apart in the row. After pushing the clove into the loose soil I pat it down and when all are planted I cover the bed with about a foot of loose hay or straw. This will keep the garlic warm longer in the fall, allowing it to establish a good root system before the ground freezes.
Next spring the shoots will push right through the hay, but most weeds will not. If we have a warm fall, you might even see green shoots pushing through the hay now. Don’t worry. That won’t be a problem, come spring.
There are two kinds of garlic; hard-neck and soft neck. Here in New England we do best growing hard neck garlic. It has a stiff stem in the middle of each head where the scape grew last summer, while soft neck garlic does not. Soft neck garlic is sometimes seen in Italian restaurants hanging on the wall with the tops braided together.
Just as there are sweet onions and pungent onions that make you cry when you chop them, not all garlic tastes the same. If you are ordering garlic from a seed company, read the descriptions carefully. Be sure you are ordering hard neck garlic.They should tell you about the flavor of each, and I recommend getting three different kinds for your first trial. Since seed garlic is relatively expensive, you will want to save some garlic each year for planting the next year.
If you use a lot of garlic in your recipes, pay attention to how many cloves are in each head. It is less work to peel one big clove than three small ones. I grow mainly large heads, and I often have to cut one clove into two or three pieces to fit it into my garlic press. The product description should tell you not only size of the bulb, but also the number of cloves per head.
You can store garlic best in a cool, dry place. Ideally 50 degrees with moderate humidity. I’ve read that you can also freeze garlic instead of storing it at room temperature, but I’ve never tried that. For freezing, separate the cloves but don’t peel them. You can freeze them in a zipper bag or jar for a year or more. Don’t store garlic at room temperature in oil, as it can produce deadly botulism.
Garlic that is near ready to pull
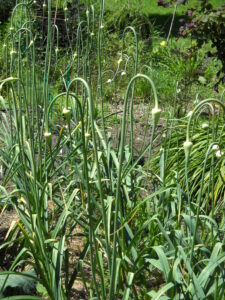
Garlic plants are handsome, especially in July when they send up tall flower scapes that twist and turn in great shapes. Think creatively, you can find a space to plant some. I often cut the scapes and use them in flower arrangements, and they are also good sliced and sautéed in a stir fry.
In a recent article about putting the garden to bed, I failed to mention that it is a good plan to leave some flowers standing. Why? Because some beneficial insects lay eggs in or on the stalks to overwinter. Birds will also eat the seeds of things like black-eyed Susans and cone flowers. So you have an excuse now not to clean up the gardens completely. You can finish in the spring.
Growing Good Apples Without Chemicals is Possible
Posted on Tuesday, September 27, 2022 · Leave a Comment
I love the saying that something is “As American as apple pie.” I love apple pie and would have some for breakfast every day if I could. But oddly enough, apples are not native to the United States. They came from Kazakhstan, in central Asia east of the Caspian Sea. According to a Google search, The capital of Kazakhstan, Alma Ata, means “full of apples” and by 1500 BC apple seeds had been carried throughout Europe – and eventually here. Apple breeders have been selecting and propagating apples ever since.
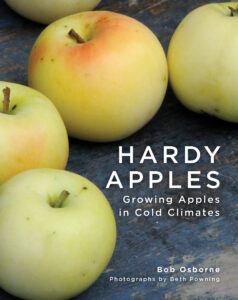
Hardy Apples Cover
I recently received a review copy of a great book about apples, “Hardy Apples: Growing Apples in Cold Climates:” by Bob Osborne with lots of fabulous photos by Beth Powning and published by Firefly Books (hardback, $35.00). It covers not only how to grow apples, but also has 140 pages of photos and descriptions of the best apples we can grow.
I spoke to Bob Osborne by phone at his home in New Brunswick, Canada. Bob has been planting apples trees in his orchard for over 40 years, mainly for scions (shoots) used for grafting by other orchardists. That required him to grow many, many different cultivars (varieties) of apples.
Bob is an organic grower, and has paid attention to his soil as the key to healthy growth. In his book he does a fine explanation of the soils that best support healthy apple trees. He recommends doing a soil test before planting apples.
A soil pH lower than 6.3, he notes, will not allow a tree to access the nutrients necessary for optimal growth and fruit quality. Calcium, magnesium and phosphorus can be bound up and unavailable even if present in the soil. He writes that in areas with naturally acidic soils, it is good to add lime every six years to keep the soil pH in the correct range.
Chemical fertilizer, he writes, provides nitrogen that when dissolved in water is highly acidic and can destroy much of the soil life that provides nitrogen naturally. Instead he recommends adding compost, blood meal, feather meal, fish meal or bone meal. He explains that you should not use fresh manures even though they are good sources of nitrogen. They can carry disease-carrying bacteria that can sicken you if you pick up dropped apples.
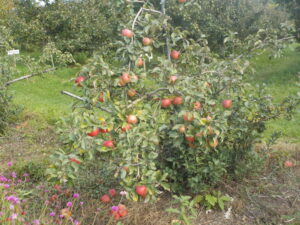
Commercial orchardists are using dwarf cultivars like this, but they need to staked
Potassium is important for good quality fruit. Low potassium “may result in small fruit size, low sugar content and poor storability. A soil test from your local state extension service or a commercial lab will tell you if you have adequate potassium, but if your fruit size is small, you may need to add some. Wood ash, he writes, is a good source of potassium, having about six percent potassium. I have read elsewhere that ash from charcoal grills should not be used in the garden.
Choosing a good site for your apple trees is important. For the home orchardist, apples will grow most anywhere, but full sun is best. Late spring frosts can damage blossoms and reduce fruit yields, so planting on a hillside is best. Cold air flows downhill and settles in low spots, which should be avoided. A hillside generally drains water better, which promotes healthy roots which can rot in areas with year-round soggy soils.
As a commercial grower, Bob Osborne has planted most of his trees from bare root stock. The prices are much lower than buying bigger trees in pots or balled and burlapped. For the home gardener only buying a few trees, potted trees are often the most convenient. Bare root trees are usually only sold in early spring when the stems are dormant, but potted trees are available in three seasons. On the other hand, there is a much greater variety of trees available for planting bare root.
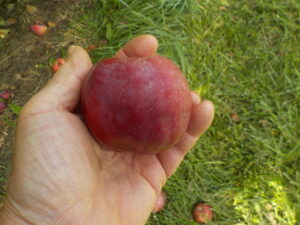
McIntosh apples are parents to many disease resistant cultivars, but are not resistant to common diseases
In most cases, apple seeds do not grow into trees that are the same as the mother tree. As Bob explains in the book, McIntosh apples are all genetic clones created by taking scions and grafting them to rootstock. The original “Mac” was discovered in the early 1800’s by John McIntosh in Ontario as a seed-started plant that he subsequently used for grafting.
Apple tree size is determined by the rootstock a scion is grafted to. There are four basic sizes: dwarf, semi-dwarf, semi-standard and standard. A few apples come on their own roots, and tend to be full-sized trees. Bob recommends semi-dwarf or semi-standard for the home gardener. Dwarf trees, he told me, need support all their lives as the root systems are not adequate to hold them up in a storm.
I asked Bob for his recommendations for the best apples to grow in a home garden. The best, he said, is Liberty. It is resistant to many common diseases, tastes great and stores well. But he warned, you need to pick it when it is ready – not too early or too late. He picks his on October 6, but father south, picking would be earlier.
Next he recommended Novamac. It is resistant to scab, fireblight and cedar apple rust; it does not attract codling moths. It is tasty, keeps well, and its form is open and easy to prune. It can be picked early if you like a tart apple. Other apples he like include Sandow, Greensleeves and Pristine. See his book for more details on them, and many others.
It’s not too late to plant an apple tree this year if you find one in a pot that you like. Or you can start planting next spring. In any case, having Bob Osborne’s book will guide you through the process.
Henry is the author of 4 gardening books and is a lifetime organic gardener. He is available for talks to your local library or gardening group. Reach him at
henry.homeyer@comcasts.net.
Fall Flowers to Know and Love
Posted on Sunday, September 18, 2022 · Leave a Comment
Many gardeners go to the plant nurseries in June, and buy things in bloom for their gardens – and rarely go back until the next year. But that means that now, as summer winds down, they have few flowers in bloom. Not me. I buy perennials in all seasons. Fall flowers are important not only for me, but for those monarch butterflies that need to have plenty of hefty meals before taking off for Mexico.
Many of the flowers that bloom in fall are tall wild flowers that have been tamed, and made into garden flowers: many of the fall asters, Joe Pye weed and Rudbeckias (black-eyed Susans) sold in nurseries were just selected and bred to be more “garden worthy”.
According to entomologists in the know, the best plant for pollinators in fall is the goldenrod (Solidago spp.). This tall beauty has a bad reputation in some circles as a few species of goldenrod are a bit aggressive, arriving uninvited and spreading like crazy by root. And since they have massive root systems, they are not easy to remove. But not all are like that, and some are being sold in nurseries.
One of my favorite goldenrods is ‘Fireworks’. I’ve had it about 10 years and it is not at all a thug. The original plant has gotten bigger every year, but never to the point of causing problems. It blooms in September with sprays of dainty yellow flowers in a vase-like arrangement. It is readily available in nurseries. It stands three-to four-feet tall.
I also grow one called blue-stemmed goldenrod (Solidago caesia) that is a shade- loving, diminutive goldenrod that I bought at the Garden in the Woods in Framingham, MA many years ago. It is perfectly well behaved: it stays in a tidy clump and blooms late in the fall. It’s only about 16 inches tall.
New York ironweed (Vernonia noveboracensis) is a great pollinator plant that stands 4- to 6- feet tall or more with purple aster-like blossoms in big clusters. It does best in full sun and moist soil. Because it is such a tall plant once established, it is recommended that you cut it back to the ground when it is two feet tall in early summer to get a more manageable size. I wouldn’t do that until year two or three. And don’t give it fertilizer at planting time, or it may flop. Monarchs just love this plant, as do a myriad of bees.
New England asters (now no longer with the scientific genus name of aster, but Symphyotrichum) come in many sizes and a few colors. The wild ones are great. I have them alongside my stream in a light lavender. But commercially available ones come in pink and purple, too. They vary in height from quite short (often sold in bloom with the chrysanthemums) to over five-feet tall. The mum-sized ones get taller in year two and after, as they are cut back repeatedly to increase the number of blossoms and to keep them short. Full sun is best for these; they will grow in ordinary garden soil.
Joe Pye weed ‘Gateway’ blooms longer and better than the wild forms.
Joe Pye weed (Eutrochium spp., formerly Eupatorium) is also beloved by monarchs and pollinators of all kinds. The native Joe Pye grows wild along my stream, but I also have it growing in a garden bed I call the “Darwin bed”. The Darwin bed never gets weeded, and tall flowers fight for space. That bed contains Joe Pye, turtle head, asters, goldenrod, and giant fleece flower, among others.
The variety in the Darwin bed is one called ‘Gateway’. Instead of greenish stems, it has dark purple-black stems, and grows even taller than the native species. Mine is nearly 8 feet tall growing in moist, rich soil. All kinds have pink-to-purple flowers in large panicles at the tops of stems, sometimes a foot or more across.
There is a smaller version of Joe Pye weed, one called ‘Baby Joe’ that has been bred to be smaller, allegedly 2- to 3- feet tall. But I hear it is more like 3- to 4- feet tall if pleased with where it is situated. All have very tenacious root systems, so plant it where you want it.
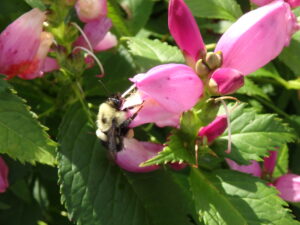
Turtlehead is loved by bumblebees.
Of my favorites is loved by bumblebees but the nectar and pollen is unavailable to monarchs because the blossoms are tightly closed. Turtlehead (Chelone lyonii) has clusters of delightful pink blossoms atop 4-foot stems. The flowers are unlike anything else I grow. They resemble the head of a turtle, and bumblebees force their way in through the ”mouth” of the turtle. If you listen, sometimes you can hear the bees inside – almost growling. Or are they purring? I don’t know.
Turtlehead has a long bloom time and is a great cut flower. They start blooming in August and bloom though much of September. They do best with rich, moist soil but I have them in full sun as well as full shade. There is another turtlehead that is white, but much less vigorous for me. Its Latin name is C. glabra and I have rarely seen it for sale in a nursery.
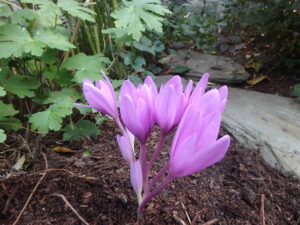
Autumn crocus or Colchicum often sends several blossoms from one bulb.
A real delight for me is to have a few bulb plants that bloom in the fall. Fall crocus is actually not a crocus at all, but a species known as Colchicum autumnale. It has leaves in the spring which disappear in summer, then it surprises us with big crocus-like blossoms on 4-inch stems. The flowers come in singles and doubles in colors from white to pink to purple. Expensive, but worth it. Most reliable in Zone 5 or warmer, though I have it in Zone 4. The flowers are on dainty stems, and often flop over unless planted in a ground cover like Vinca that helps hold the flowers up.
So go to your plant nursery now and see what you can get that blooms in the fall. Our pollinators need food now, too.
Notes from the Garden is supported by donations. If you wish to donate, please go to my website,
www.Gardening-Guy.com and go to store/donations and follow the prompts. Or do it the old fashioned way, and mail a check to Henry Homeyer, PO Box 364, Cornish Flat, NH
Are Your Plants Suffering from a Drought?
Posted on Monday, September 5, 2022 · Leave a Comment
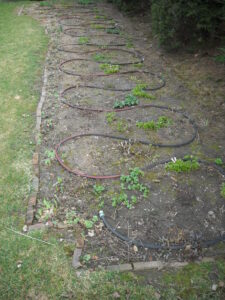
Soaker hoses provide a slow, deep watering. This hose put in place in early spring.
Many of my readers are suffering from a serious drought, enough so that plants are losing leaves and going dormant long before they should. Most well established plants will recover from the effects of drought, even if they lose their leaves now. And new things? If you have not been giving them water weekly or more often, some may die.
Added to the problem is the fact that many places have enacted watering bans or limitations. And wells may not have enough to water everything. And of course, watering takes time – time away from family, dogs, and recreation.
If you have not been thinking about the drought, you should. Start by looking at your plants. Are leaves limp, withered, or turning brown? If so, you need to water them well – today! They need a good deep watering.
Deep watering is not easy. If you take your hose and spray the base of the tree for a minute, you are not actually giving it much water. Wait 10 minutes after watering and go back to the new tree or shrub that you planted last spring. Use your finger or a tool like the CobraHead weeder (a weeding tool with a single tine) to dig down four inches or more. Is the soil moist? It should be. Most roots are in the top foot of soil. Add more water as needed.
If your soil is like powder, it is not easy to get water to penetrate the soil. If your tree is on a hillside, water you apply will run away almost immediately and not soak in at all. Even a gentle slope will allow water to run off. You will need to make a ring of soil or mulch around the tree or shrub to contain water.
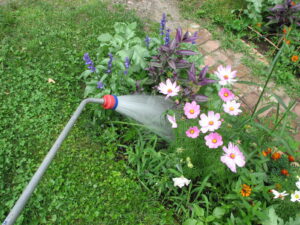
Watering Wand
If you are using a hose, use a watering wand to apply water rather than a spray nozzle held in your hand. These wands are usually 24 inches long with a nice “rose” on the end that makes the water flow in a gentle spray and have a valve to turn the water on, off, or part way on. Since the tip of the wand is near the ground, it is less likely to wash away the soil. And it allows you to direct the water just where you want it. Soaker hoses on timers are good if you travel a lot, or vacation when it’s hot and dry.
Before you start watering, learn now much water your hose delivers. Do this by timing how long it takes to fill up a 5-gallon pail. Two or three minutes is usually long enough, but it depends on the diameter of your hose and the water pressure. Half inch hoses are worthless. Five-eighths inch hoses are adequate, and three-quarter inch hoses are good for long distance runs. Five gallons is the minimum quantity of water needed by a thirsty shrub or newly-installed tree.
Most new woody plants need five gallons every week, but it does depend on the soil type. Sandy soil dries out the quickest, and needs the most water. Clay soil holds water, but is hard to get thoroughly moist. Even though I have good soil, I always add compost to the soil when I plant anything. Not only does it add biologically activity, it holds water in sandy soil and loosens up clay soils. I buy it by the truckload. Most garden centers sell it in bulk, which is cheaper than buying it by the bag. Of the bagged compost, I like Moo-Doo and Coast of Maine brands.
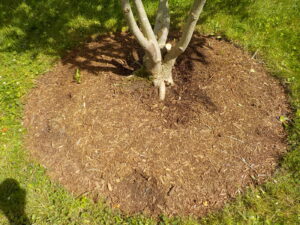
Mulch around a tree will hold in water and help keep weeds from stealing water.
Grasses and weeds suck moisture out of the soil, so dig them out around your trees. Weed a ring around new or struggling trees that is 3 to 4-feet wide. Then get some fine mulch (double-ground mulch, not wood chips). An inch and a half of mulch is about right, or two inches. Deeper than that and short rain showers will never get moisture to your plants’ roots.
Don’t buy bagged wood chips based on price – or if you do, buy the most expensive. Cheap mulch may be ground up and shredded construction debris and pallets. “Color enhanced” mulch is stained or dyed with something and may spread chemicals in the garden – and fade with time.
Never let the mulch touch the bark of your tree, or worse yet, make a faux-volcano of mulch. Mulch can harbor fungi that will rot the bark of your tree, killing it in 6- to 10-years. Once the cambium layer under the bark gets rotted, the tree will die. If you have mulch against any of your trees, please fix it right away.
Years ago I visited my friend Sydney Eddison at her home in Newtown, CT. Sydney is a garden designer, author of many fine gardening books and a poet with terrific gardens. They were in the midst of a terrible drought – so bad that mature oaks were losing their leaves in the forest by August. A water ban was in place, but her gardens looked great.
“Sydney,” I said, “You’ve been cheating and watering your plants.” No, she explained, “It’s all about the mulch”. Each fall her husband, Martin, mowed over all the leaves that fell on the lawns and bagged them. He stored them in the barn until spring, and after all her plants woke up in the spring, she added a layer of chopped leaves. Not only did they hold in moisture, as they broke down they added organic matter to the soil – making it better each year.
This fall, do the same. Collect your leaves, or have the lawn service collect them for you. I don’t bag them up, I just add them to a pile and use as mulch in the spring. It really works. A 2-inch layer is perfect.
Don’t be disheartened if some of your plants go dormant now. It is their way of protecting themselves. But do water if you can – and get it down deep. Your plants will bless you!
Saving the Harvest
Posted on Tuesday, August 30, 2022 · Leave a Comment
Now is the time when gardeners often have too much fresh produce. People joke about locking their cars to keep neighbors from placing unneeded zucchinis in them. Our mothers and grandmothers labored over hot stoves on hot days to put up tomatoes in jars for winter, or making jam. Now there are better, easier ways to preserve the harvest. Let’s have a look.
A straw used to remove air from a bag of cherry tomatoes
I keep tomato products for later use in a number of ways. First and easiest, I freeze tomatoes whole. I put clean tomatoes in zipper bags and freeze them whole. Later, when I want tomatoes for a soup or stew, I just run hot water from the tap into a big bowl and drop in a few tomatoes. That softens them up so I can easily chop them, but it also loosens the skins. I just rub the skins with my fingers, and skin comes off. A few minutes later I chop them and they are just like canned tomatoes.
Want tomatoes for winter sandwiches? Cut them in thick slices and roast them on a sheet pan at 350 degrees until most of the moisture has gone. Then cool and place in zipper bags for storage in the freezer. When you need a tasty tomato in your sandwich, take a few slices out, and cook slightly in a toaster oven to thaw it.
Sun Gold tomatoes are very prolific and dry well for storage.
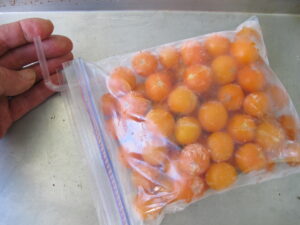
I grow many hundreds of cherry tomatoes each summer. I plant a dozen or more ‘Sun Gold’ cherry tomato plants each year, and each produces a bounty of rich, golden nuggets of flavor. What do I do with all those? I cut them in half and dry them in a food dehydrator, cut side up. When dry they will keep well in the pantry (or the freezer) in a wide-mouth quart jar. I toss a handful into every soup or stew I make.
Of course you can slice and dehydrate any kind of tomato. I have a friend who slices tomatoes, dries them until they are very crisp, and then grinds them in a food processor to make dried tomato flakes. She sprinkles the flakes into or on to a wide range of dishes. And she usually gives me a pint of them each year, which I treasure – I use it to add that mystical “umami” flavor to a dish.
A few words about food dehydrators. I have lots of experience with two good ones: NESCO American Harvest is a round dehydrator that will allow you to add many extra trays (up to 30, but with much increased drying time). NESCO dehydrators come with either top or bottom heat, so drying time is a bit uneven. The other is Excalibur, a square one with 9 trays. These blow air across the trays, and everything gets dry at once. They both have thermostats and timers that will turn them off when desired.
I use my dehydrators for drying apples and pears that are great for snacking. I cut slices about 3/8 inch thick and bag them up for snacking while they are still chewy. It looks like I will have a great grape harvest this year, and I may try making raisins. Set temperature at 125 to 135 degrees so you don’t break down vitamins.
I also use a dehydrator for drying hot peppers until they are brittle, then I grind them up in my coffee grinder to make hot pepper powder. That way I can sprinkle a little or a lot into a recipe, depending on who will be sharing dinner with me – I like food spicy.
I make tomato paste each summer, but that is more like the hard work my Grandmother did. I core the tomatoes and squeeze out excess juice and seeds, then cut them in half and drop into the Cuisinart. I run it until the tomatoes are a slurry. Then I pour the slurry into a heavy enameled cook pot. I heat it slowly, allowing the mixture to just slowly simmer (to avoid burning it).
It takes a couple of hours to fill the big kettle, and all evening for it to boil off the excess liquid. When I can literally stand up a soup spoon in the mix, I know it I thick enough. I leave the pot on the counter all night to let it cool and evaporate some more, and then in the morning I spoon the paste into ice cube trays and freeze. I put the cubes in bags or jars. It is nice to never need to remember to buy tomato paste – and to have a good use for damage tomatoes that might otherwise end up in the compost. I cut out the bad spots, and use every one.
I have never gotten excited about making jams or jellies. But if you have a dedicated freezer for storage, you can cook your raspberries or blueberries with sugar and spices, then freeze them. The canning process is lengthy and messy, so I generally avoid it. If you just want a little jam, make 3 or 4 jars and store in the fridge. It will be as tasty – and it gives you an excuse to spread some on ice cream, using it up before it get moldy.
Of course, storing food is the easiest, cheapest way to eat the harvest long after it. Winter squashes like butternut and blue Hubbard store for months in a cool, dry location. They store well for months under the bed in a guest bedroom with the radiators turned off.
Cure potatoes for a few days before storing.
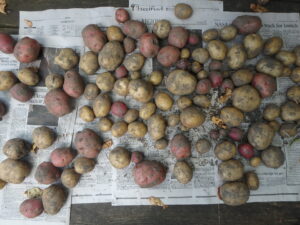
When digging potatoes or pulling onions, try to do it in a dry time (not hard this summer). Lower moisture levels are better for storage. Cure them for a few days in a breezy place out of the sun. Store potatoes, carrots, celeriac and rutabagas in a place between 35 and 50 degrees with high humidity. Garlic and onions like lower humidity with cool temperatures. Sweet potatoes should never go in the fridge – they need to be stored in a warm room like the kitchen.
I try to eat something I grew every day of the year, and mostly I do that. Dried herbs, garlic and frozen foods are always there for me to use, so I do.
Henry gardens and cooks in Cornish Flat, NH. Reach him at
henry.homeyer@comcast.net. He is a regular speaker at libraries and garden clubs, and the author of 4 gardening books.
Is It Time to Include Ferns in Your Garden?
Posted on Tuesday, August 23, 2022 · Leave a Comment
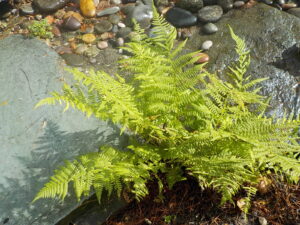
Many gardeners who focus on flowers and flowering shrubs are missing out on a beautiful and easy addition to their landscape: ferns. A few ferns are a bit aggressive and can elbow their way into flower beds uninvited, but most are polite and offer different textures and colors of foliage with little work. You probably like and use Hostas in shady places, and they are mainly used for their foliage, not their blossoms. So introducing ferns is the logical next step.
Telltale ridge on stem of Ostrich fern.
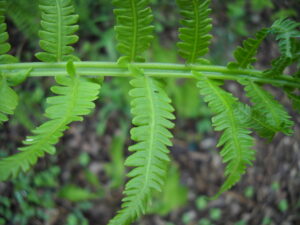
One of my favorite ferns is the ostrich fern (Matteuccia struthiopteris). This is a big fern, with fronds up to five feet tall. Each fern tapers at both ends, and arrange themselves like the feathers of a badminton birdie. Its most distinguishing characteristic is a groove like you see in a stalk of celery, up the middle of each frond on the topside. It also produces fronds that turn brown and produce the spores. It is the fern that produces edible fiddleheads in the spring.
In the wild it prefers moist, shady places but it will grow almost anywhere that is not bone dry or in full sun. It will tolerate some sun and ordinary garden soil, but rich, moist soil is where it thrives. Ostrich fern will spread by rhizomes, adding about a square foot of territory to each plant per year. They also produce spores that can fly in the wind to expand their territory.
Although you can buy Ostrich fern and the others in this article, you may be able to transplant some from your own property, moving them in from the woods or field to a garden bed. I have successfully transplanted ostrich ferns using a long, arrow shovel called a drain spade or transplant shovel. I push the spade into the soil on a 45 degree angle to cut roots and loosen the soil in 4 places around it, then push down on the spade to pop the plant, roots and all, from the ground. Best to do on a cool day after a rain– if we ever see one! Be sure to add compost to the planting hole and water weekly in dry times until it is well established.
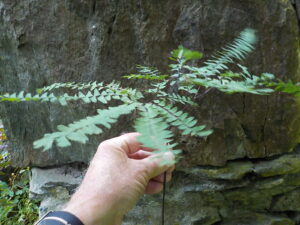
Maidenhair ferns are dainty, but tough.
Another great fern is the maidenhair fern (Adiantum pedatum). In the spring it comes up on what look like black wires, then produces almost horizontal fronds that are fan-shaped. In the wild it indicates good rich soil. Books say it does well in moist, shady soil but I’ve had it for over 20 years in dry shade. I think once established it is fine in dry shade, but I’d water it for the first year if in dry shade, or in drought times.
Maidenhair fern is commonly sold in nurseries, and I have rarely seen it in the wild. I have also grown it in a pot on our north-facing deck. In our garden, a plant (or three?) have created a clump that is eight feet by four feet in 20 years, so it is not a fast spreader.
Christmas fern (Polystichum acrostichoides): Unlike nearly all others, this fern stays green all winter, and has very dark green leaves. It grows in free-form clusters, and has simple leaves. The leaflets have a little bump (ear) near the base of each frond and are 1 to 3 feet long. In past times, it was commonly used by florists as a green to add to flower arrangements in winter, though that practice is no longer common as whole colonies were used up.
Sensitive fern is a bit of a thug.
Sensitive Fern (Onoclea sensibilis): This fern has light green leaves that are quite wide. Leaflet pairs are opposite each other (like a bow tie). Top-most leaflets are smooth, others have wavy edges. It is very frost-sensitive, hence the name. It often grows in big colonies, either in sun or shade. Can be a pest in the garden as it spreads by root. It is the only fern that I always pull out if it shows up in my garden as it spreads fast and is fairly coarse in looks.
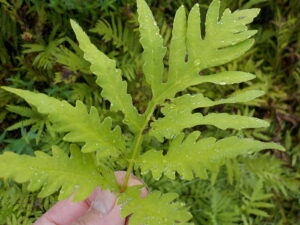
Interrupted Fern (Osmunda claytoniana): This is a big fern with fronds up to 5 feet long in a vase-like arrangement. It will grow in wet or dry shade. When spores are produced, they interrupt the arrangement of leaflets with smaller spore-producing sections that are not like the other leaflets. But not all plants will have an interrupted section, so look at a colony to find some that do to confirm the I.D. The little leaflets that produce spores get dry and turn brown in mid-summer. It is common in the wild.
This hay-scented fern planted itself right by my front door, surrounded by stones in hot afternoon sun.
Another fern I like is the hay-scented fern (Dennstaedtia punctilobula). If you have crushed this fern and sniffed it, it smells something like fresh-cut hay. It is finely cut and stays just 1 to 3 feet tall. It is one of the few that will grow in a hot, sunny location such as a west-facing, sandy hillside, though it will grow in shade or rocky slopes. It spreads quickly, and will fill in an area, making a large colony. Sold in nurseries as a ground cover. It will out-compete weeds and grasses in sunny locations.
If you are interested in learning about ferns, many guides use lots of technical language that only fern scientists underestand. One exception to this is “Identifying Ferns the Easy Way: A Pocket Guide to Common Ferns of the Northeast” by Lynn Levine. It’s published by Heartwood Press. There are just 28 common ferns in the book, and there are silhouettes of each at the beginning of the book. The silhouettes are divided into 6 groups based on how the leaves are “cut”. So a quick look will identify most ferns, and the straightforward descriptions quickly confirm which fern you are looking at.
Observe where ferns grow in your woodlands, and try digging up some to put in a shady garden in your cultivated areas. So stop discriminating against ferns and give some a try!
Henry has been
gardening in the same place since 1970. Reach him at PO Box 364, Cornish Flat, NH 03746 or
henry.homeyer@comcast.net. Please include a SASE if requesting a response by mail. He is a regular speaker at
garden clubs and libraries.
Biennials: Worth the Effort
Posted on Tuesday, August 16, 2022 · Leave a Comment
Biennials are some of the least planted flowers we can grow. Why? The year they are planted by seed, they generally do not flower. They only have a clump of low-growing leaves. The second year, the send up a flower spike, bloom, and then die. That’s right. They have done their job of producing seeds, and then die. Gardeners prefer quick-blooming annuals, or long-lived perennials. Biennials are the least favored puppies of the litter.
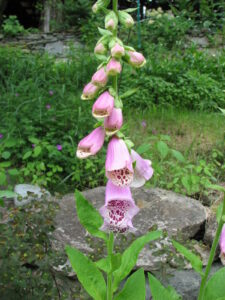
Purple Foxgloves bloom from bottom of the stem to the top.
On the other hand, some are worth the effort, or the wait. I love purple foxgloves (Digitalis purpurea). In the past, I was able to buy first year plants in 6-packs at a nursery, and planted them two years in a row. After they were finished blooming, I cut down the tall stems and shook out tiny black seeds over a flower bed that had been weeded, loosened and raked smooth. I patted down the seeds, but did not cover them with soil. The tiny seeds just fell into crevices and waited for spring, when they started the growing cycle again.
It is important to know what the leaves of a first-year biennial look like so that seedlings do not get weeded out before getting established. I do that by trying to remember the color, texture or shape of the leaves. Often, color is my cue. So, for example, the biennial rose campion (Lychnis coronaria) has a distinctive gray leaf. I recognize the first year plants – often growing in a cluster – and dig up some to divide and plant where I want them the following year, and to give them more space to grow.
Rose campion is a biennial that self-sows readily.
Rose campion flowers are deep magenta, a truly spectacular color. The blossoms are in inch wide and are very profusely produced. Well worth planting if you can find plants for sale, or buy some seeds and wait for second year blossoms.
Often biennial flowers are in the same genus as perennial plants. Closely related plants are grouped in the same genus (equivalent to your last name). The second name is the species (equivalent to your first name). So Lychnis is like “Jones” and coronaria is like “Susan.
So for example, our common purple and pink foxglove (Digitalis purpurea) has relatives in the Digitalis genus. I grow two kinds, D. grandiflora and D. lutea. Both are yellow and both often start new plants by seed, so I have plenty. The latter one has smaller blossoms than the former one.
A biennial wildflower I just love is Queen Anne’s lace (Daucus carota). As the species name, carota, implies, it is in the carrot family. The tap roots are not as big as carrots, but the fragrance is about the same. But root is white, while most carrots we eat are orange – though white, yellow, purple and red varieties are available. Anyhow, Queen Anne’s lace stands up tall (to three feet) and has an umbel or flat-topped cluster of tiny white blossoms, with purple ones in the center. It is a great cut flower in a vase. Young second-year plants are occasionally sold in 6-packs in garden centers, and some of those are pink or even dark purple. Lovely.
Another way to get Queen Anne’s lace is to dig up first year plants and transplant then on your property. They are commonly seen along the roadside and are free for the taking on rural roads. Mature Queen Anne’s lace has a tap root and is difficult to transplant.
Please note that poison hemlock is a related carrot-family plant. But unlike Queen Anne’s lace, it has smooth stems, not fuzzy ones, has no purple center to the flower. It has purple blotches on the stems. The sap of hemlock can cause rashes when exposed to sunlight.

Angelica is my favorite biennial.
Perhaps my favorite biennial is angelica. Again there are biennial and perennial forms, but the biennial is the best. Its scientific name is Angelica gigas. It has huge purple or burgundy globes of small flowers, each globe 4 to 8-inches across. The plant stands up 4- to 6-feet tall with strong stems and big leaves.
The best thing about the plant is this: it is an absolute gem of a pollinator plant. When I last grew it, it often had three or more bees on it at once. Unfortunately, it is hard to find in plant nurseries, and when I have found it, it was a big second-year plant in a 2 gallon pot that cost me at least $15. Yikes. I tried planting seeds after blooming, but did not save any for spring planting. I got no plants from my meagre efforts, but I will buy seeds now and try starting some plants next spring.
Most plant books list hollyhocks (Alcea rosea) as biennials, though some consider them half-hardy perennials. One plantsman told me that the plants with leaves the shape of fig leaves are more perennial than others. This is a tall plant, sometimes 6- to 8- feet tall, that has open-throated 2- to 3-inch blossoms that come in a variety of colors from white to pink, red, yellow and nearly black, often with a yellow center.
Hollyhocks do best in rich, moist soil in full sun. I’ve had one clump in my asparagus patch for perhaps 20 years. But they will also grow in part shade. They open their buds in sequence up the stem over a period of 4- to 6-weeks. When done blooming, cut them to the ground immediately. I believe that makes them wonder if they have produced seeds, and come back the next year to finish the job. They do show up uninvited in the garden, and I always welcome them.
Henry is a 20-year veteran of the UNH Master
Gardener program, and the author of 4
gardening books. Reach him by email at
henry.homeyer@comcast.net.


 Click Here to buy from Cobrahead