Tips on How to Plant a Tree Properly
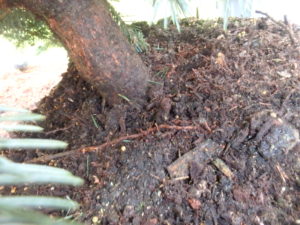
I recently planted a couple of blue spruce trees on a nice cloudy day, and want to share with you what I did. First, and most important, I checked the position of the trunk of the tree in the pot. In the wild you will notice that trees bulge out at the base, creating what is termed the “trunk flare”. This must be visible above ground after planting.
Too often trees purchased at a nursery have the trunk flare covered with soil in the pot. Little seedlings are plucked from the ground and popped into pots without paying attention to the trunk flare. But, if the trunk flare and the bottom of the trunk itself is buried, the tree will not thrive or survive.
Why is this so important? Because unlike the roots, the trunk is not resistant to soil microorganisms that cause rot. Within 6 to 10 years, just when a tree should be well established, the vital cambium layer in the trunk rots and the tree sickens and slowly dies.
If you planted a tree in the past and wonder if you did it right, look at the top of the tree. Trees suffering from trunk flare rot will have few leaves at the top of the tree – what is called tip dieback. And deciduous trees will turn color well before others of the same species in the fall.
If you see tip dieback you may still save the tree. Get a hand tool and gently loosen the soil around the base of the tree. Pull away the soil until you see the trunk flare. The bark may already be rotted, but exposing it and letting it dry out may save the next layer, the cambium. You may need to re-grade the soil around your tree.
Mulch “volcanoes” can be just as deadly as burying the trunk flare. Bark mulch can be full of microorganisms that rot the bark, too. So leave a donut hole around the tree when you mulch – a space three inches or so bare of mulch.
The two spruce I planted came in big plastic pots – 7 gallons each. I tipped the trees over and tugged on the containers. They slid off, but I was prepared to slice them with a sharp knife if need be.
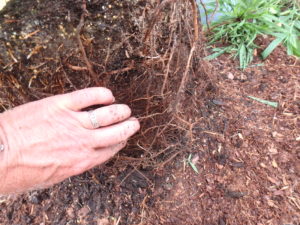
Next I examined the roots carefully. Sometimes plants in pots with vigorous roots encircle the pot, and get so tangled up that they don’t easily grow out into the soil. So use my fingers or my CobraHead weeding tool to loosen the roots, especially any bigger ones that circle the root ball. And if I break some roots? I don’t worry much, as it will stimulate new growth.
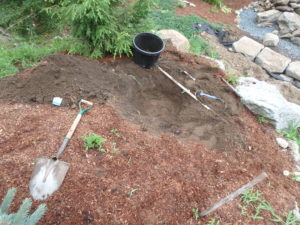
I always dig a hole that is at least 3 times as wide as the root ball. The hole should be tapered so that it is deepest in the middle, and angles up to the edges. The bottom has to be flat, of course, and the size of the pot. I measure the root ball, and only dig the hole as deep as the root ball. I want the root ball on un-excavated soil so it will not compress and sink down later.
When the hole appears to be the right depth, I place the tree into the hole. I use a rake handle to go across the hole and over the root ball. The top of the root ball should be even with the sides of the hole.
I do not give trees fertilizer, not even slow-release fertilizer. I don’t want to push them to grow fast, as that is not healthy. I do add rock phosphate, which promotes good root growth, and Azomite, a commercial mix of minerals containing micronutrients missing in many soils, but no nitrogen (which promotes green growth).
It is important to have the “good side” of the tree facing the house or wherever you are going to see it from, so I rotate the tree until it is just right. I also look at the tree from the front and from the sides to see if it is vertical. If a tree has a kink in the trunk, that can be difficult to determine.
When filling the hole around the tree, I use my fingers to poke soil down into the space around the tree. You do not want to leave air pockets, as the roots could dry out and be damaged. Some people like to fill the planting hole with water before planting a tree, but I don’t like to do that. I’m afraid of causing compaction if the soil is muddy.
Once the tree is planted, I like to build a ridge of soil in a ring around the tree to hold water. This is particularly important if you are planting on a hillside. Before planting on a hillside you need to create a small terrace, of sorts, on the hillside. Do this by digging out some soil on the uphill side of the site and moving it to the downhill side.
Once the planting is complete, I put 2 or 3 inches of bark mulch around the tree to discourage weeds and to reduce water loss by evaporation.
Planting trees at this time of year is fine, so long as you are willing to check the soil regularly to make sure it is not drying out. And hope for rain to make your trees extra happy.
Henry is a UNH Master Gardener, and the author of 4 gardening books. He can be reached by snail mail at P.O. Box 364, Cornish Flat, NH 03746, or by e-mail at henry.homeyer@comcast.net.


