Garden Wimsy
If you ask my grandchildren, they would probably tell you that “Silly” is my middle name. George may remember the time Grampy showed up at his house wearing one red high-top sneaker, one purple. Or Casey might tell you about the Superman cape on the scarecrow that is currently in my garden. So they were not surprised to see that, with some help, I have put together a full-sized representation of the story of the Three Little Pigs, complete with pigs and a wolf. I love garden whimsy, and encourage you to think about creating outdoor art for your own garden. It doesn’t take great skills to create something fun.
This particular whimsy is on public display in Woodstock, Vermont at the Vermont Land Trust offices on Hunt Farm Rd, off Rose Hill Rd. It is part of an event called Bookstock – a one day event that has already passed by. But the Poet’s Trail, which is under the auspices of Bookstock, will continue into the fall, overlapping with Sculpture Fest which is held nearby. It features poems by Mary Oliver selected by Woodstock High School students that are posted along the trail, and lots of fabulous sculpture along the trail, in the fields, and around the old farmhouse. There’s a little whimsy, too.
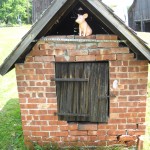
At the farm there is a tiny old brick building (just 5 feet square and 6 feet tall) built long ago to store ashes, presumably for making soap. Charlet Davenport, the organizer of the Poet’s Trail event, told me she thought the brick house would be great as part of the Three Pigs story, but needed someone to build a straw house and a stick house. I agreed to do so.
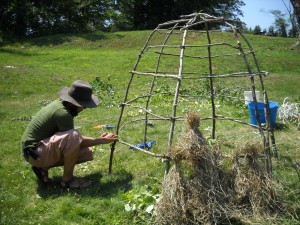
I built the houses with the help of my summer intern, Gordon Moore. They are circular and 6 feet in diameter at the base. The straw house has a rounded top and the stick house is built like a teepee.
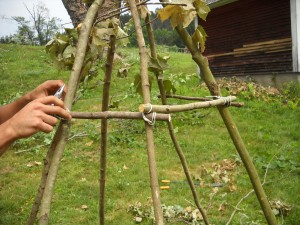
The houses are made with freshly cut saplings, each an inch or two in diameter and 8 feet long. We stripped off side branches and leaves, and then dug 6-inch deep holes for each sapling. After placing the sticks in the holes we tied them together at the top using copper wire that we stripped out of scrap #14 building wire that I had left over from the days when I was an electrician.
For the straw house we bent over opposing sticks, overlapping them and tying them together for a foot or more, creating a domed top. For the stick house we tied 3 together as if we were building a teepee, then added 3 more in between the first three. Once that was done, we filled the holes in the ground with soil and some gravel to firm it up and keep each stick in place – just in case a wolf wanted to huff and puff at our pig homes.
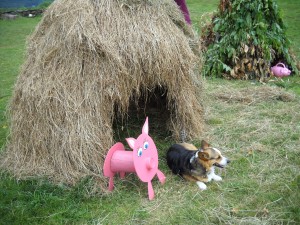
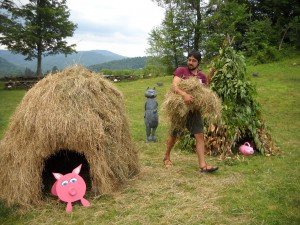
Then the real work began. We took small diameter sticks (half to quarter-inch) and tied them around the outside of the houses with wire. We did 5 or 6 concentric circles descending around the outside of our little pig houses. That provided stability and places for us to tie on bundles of straw (actually, we used hay, not straw, nearly 2 bales of it) or clumps of twigs with the leaves left on. We needed to create something that enclosed our structure but was not so solid as to deter the mythological wolf.
For the straw house we tied more than 150 clumps of hay. We used ordinary 3-stranded garden twine, which was strong enough to tie our bundles together without breaking when we cinched them together. For the stick house we made similar bundles, using the side branches, leaves and all, that we had cut off our saplings that we used for the framework. The stick house was easier – we could make 2-foot long bundles that quickly covered the exterior of the stick house. I found that using a knot I learned in Boy Scouts, a clove hitch, to tie the bundles together worked best.
I had a nice pig watering can (made of plastic) and a ceramic piggy bank, but needed a good-sized pig for the straw house. My partner, Cindy Heath, sketched out the face and front legs of a pig onto a piece of quarter-inch birch plywood, and I cut it out with a jig saw. Then we made the back end of the pig, and I screwed each end onto a short pine log about 6 inches in diameter. We painted it pink, Cindy painted on eyes, and I attached a tuna can for a snout. It looked great – and undoubtedly tasty to passing wolves.
I called the former mayor of Hanover, Marilyn “Willy” Black to ask if I might borrow a wolf. She is a chainsaw artist, and agreed to lend me the original wolf she made many years ago. She re-painted it, and I installed it in a menacing pose behind the houses. Beware, pigs!
All together Gordon and I spent about 15 hours each making the 2 houses, and Cindy and I spent another hour each on the pig.
One could look at this as a colossal waste of time, or perhaps as a worthy endeavor – given that this exhibit will create plenty of smiles and a few giggles from my grandkids. Think about creating something fun (or silly) for your own garden – especially if you have kids or grandchildren.
Henry’ Homeyer lives and works in Cornish Flat, NH. You may write him at P.O. Box 364, Cornish Flat, NH 03746 or henry.homeyer@comcast.net.
Attention Lazy Gardeners: Asparagus is a (Nearly) Free Ride
As I am sure you know, once upon a time there were three little pigs. One built his house of bricks, one of sticks, and the lazy one built a house of straw. I forget the details, but I think the lazy one got eaten by the wolf – a moral for all kids and gardeners. Work hard, survive. But one exception to that rule is the asparagus patch. Each year you can have delicious food relatively work-free.
Okay, I exaggerate. There is considerable work in starting an asparagus patch, and a certain amount of work in keeping it weed-free. But it should come back reliably, year after year. So plant it well and keep it mulched to hold down weeds, and you can garner rewards year after year.
Twenty-five plants is a reasonable number of plants for a family of four, or for two people with my appetite for those sumptuous green spears. Asparagus needs rich soil with lots of nutrients, so have a good supply of compost or aged manure and some slow release organic fertilizer at planting time.
Get a soil test done before you plant, or get at least get a kit that will tell you the pH. Asparagus does best with a near neutral pH, in the range of 6.5 to 7.5. If your pH is less than 6.5 you will need to add limestone to “sweeten” the soil. The test kit will tell you how much limestone you need.
Before planting, dig out all weeds and especially grasses. Rototilling does not kill weeds and grasses, it just hides them. And they will come back to plague you for years. So weed well.
Because asparagus lasts for many years, it is important to enrich the soil more than you would for annual veggies like tomatoes or lettuce. In the old days –back when I was a kid – asparagus beds were dug deep, and manure was worked into the soil down to a depth of 18 inches. Asparagus roots were planted in a trench with the crown (where the roots originate) planted a foot deep and 18 inches apart.
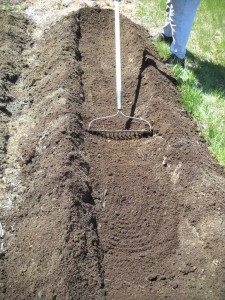
Current thinking is that asparagus still needs good loose soil, but that the crown only need be planted 6 inches below the soil line. Using a hoe or shovel, create a trench 9 to 12 inches deep and 12 to 18 inches wide. Then loosen the soil in the bottom of the trench with a spading fork. Space rows 2 feet or more apart.
Plan on working in 4-6 inches of aged compost into the soil down at the depth where the roots will be, and in the soil you will use for backfilling the trench. Don’t skimp, even if you have good soil. Work the compost in with a spading fork or shovel. A rototiller would also do the job, but can adversely affect soil tilth or texture if done when the soil is too moist. And rototilling disturbs microorganisms and earthworms in the soil.
I also like to broadcast a generous dose of Pro-Gro or other slow-release organic fertilizer everywhere in the planting trench and mix it in. A quart yogurt container of organic fertilizer is fine for a dozen plants. Azomite, a mineral mix that provides micronutrients is a good additive, too. Green sand is an organic source of potassium and micronutrients from the sea. All of the above should be available at your local feed-and-grain store or garden center.
Asparagus roots are now sold that are all male – generally anything that has the word ‘Jersey’ in the name is all male (Is New Jersey a macho state?). ‘Martha Washington’ is the classic asparagus variety, but it has male and female plants, so they produce seeds – and little seedlings. This is not good. You don’t want extra seedlings growing in your patch, as they will compete with your plants for water and nutrients, just like weeds. Of course, you can pull the seedlings growing under Martha, and re-plant them elsewhere, but that sounds like work to me.
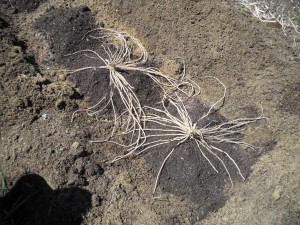
In the bottom of your trench build mounds of soil/compost mix. Drape the roots over the mounds with the crown sitting on top the mound. If the roots are longer than your trench is wide, swirl the roots around the mound a little. Then gently backfill your trench (or hole, if you did individual holes instead of a trench). Just an inch or two of soil is all that is required at the start. As the season progresses and the sprouts grow, add more soil/compost mix. By the end of the summer your plants should have 6 inches of soil over the crown.
A few recommendations: Have patience. Don’t pick any spears this year. Next year, just take one or two stalks per plant. Each year, take more – but never pick for more than 4 weeks. Taking too many spears will draw down their reserves and weaken the plants.
Keeping your asparagus patch well-weeded is important. Wood sides to an asparagus bed can help keep out creeping grasses, or you can dig a little moat around the bed to keep grasses from creeping in. Mulching with 6 pages of newspaper and 4 inches of straw will help keep down weeds and will hold in moisture.
Even if you are the quintessential third pig when it comes to gardening, don’t be lazy when planting asparagus. A little extra work now getting out weeds and working in healthy soil additives will pay you back many times over. Bon Appétit!
Henry Homeyer is a gardening consultant and author living in Cornish Flat, NH. His Web site is www.Gardening-guy.com.


