Growing Some Lesser Known Vegetables
This year as you plan your garden, why not choose some lesser known veggies to see how they do for you? You might just be surprised how easy it is to grow kohlrabi or rutabagas – and how tasty they are. I grow those, and several other kinds of vegetables that you might not have tried. Most are not terribly hard to grow. You could be the first on your block to grow artichokes!
Let’s start with sweet potatoes. Most New England gardeners don’t generally grow this vegetable, thinking that it’s a southern crop. It is, but you can grow it. The trick is to grow it under black plastic, which increases the heat. It needs good rich soil, liberally amended with compost or aged cow manure. Start plants from little plants called slips, available from catalogs such as Johnny’s Selected Seeds (www.johnnyseeds.com).
Adequate moisture is key for growing sweet potatoes. Even if you leave an opening in the plastic for the plant, rain water probably won’t soak the soil enough. Run a section of soaker hose under the plastic and give it some water any time the soil seems dry. Soaker hoses are available at garden centers and are basically special hoses that ooze water very slowly, soaking the soil.
Rutabagas, like Rodney Dangerfield, don’t get the respect they deserve. They are easy to grow, rarely bothered by pests or diseases, and can substitute for potatoes in the kitchen. They look a bit like turnips (which do have a strong flavor) but rutabagas are mild. I find they are great in stews- they don’t get mushy the way potatoes do when you re-heat the stew several times.
Plant rutabagas by seed in mid-June about 2 inches apart and thin to 6 inches apart for maximum production. Rutabagas can get big –a pound each or more, but do not get tough or less tasty even when they get big. They grow best in soil that is near neutral on the pH scale and is rich in compost.
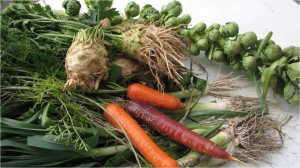
As far as I am concerned, growing celery is best left to the professionals. When I’ve tried growing it, the slugs loved it and the stalks were dry and stringy. But you can have that same celery flavor in your soups, stuffing and stews by growing celeriac, also known as celery root. I start celeriac by seed in the house in late March or early April, but some better garden centers will offer plants already started. Celeriac loves moisture, so add compost to the soil to hold water, and water during dry times. Plant about 6 inches apart.
Salsify and scorzonera are long, thin root crops with a somewhat nutty flavor. They need deep, loose soil as they can grow 8-12 inches long. But each is only an inch or less in diameter, so they don’t produce much food per plant (compared to carrots or rutabagas, for example). Plant directly in the garden, and wait. They are slow growing, so plant early and harvest late in the fall. Great in turkey stuffing.
Artichokes are beautiful plants that look good in a flower garden, too. In California they are perennials, producing year after year in deep black soil rich with moisture. I have started them from seed, but one must start them early in March for best results. But some garden centers sell them in small pots, so most years I buy them.
Allow a 2-foot by 2-foot space or more for each artichoke plant. You will get one artichoke (which is really a flower bud) at the top of the plant, then side shoots with smaller artichokes after that, up to 5 more. None will be as big as the grocery store version. Be sure to pick them before they turn dry and open up.
My favorite of the odd ducks of the vegetable world is kohlrabi, which looks a little like a space alien: a round fat “root crop” that sits in the soil surface and has stems popping out of it like arms –and then leaves, of course. The vegetable is almost perfectly round and is actually a thickened stem. It comes in purple and green varieties. Eaten fresh in salads it tastes something like a cucumber crossed with a radish. But they are good in stir fries or stews, too.
Plant kohlrabi seeds directly in the garden about 3 inches apart and thin to 6 inches. It is in the cabbage family (Brassica) and grows fast, ready for harvest in as little as 8 weeks. Last year I grew a variety called “Kossak’ that is an 80-day variety, but it gets to be huge (8” or more) and stores well – Johnny’s Selected Seeds, the developer of the seed – says it will store for 4 months! It needs plenty of moisture, and like most veggies, plenty of compost in the soil.
Of the salad/cooking greens, think of trying orach. Seeds are hard to find – Baker Creek Heirloom Seeds is the only place I’ve found that has them (www.rareseeds.com). This is a gorgeous purple-leafed plant that gets to be three feet tall, and is in the goosefoot family which includes many varieties of weeds – but also spinach, beets and quinoa. If you let a few plants flower and go to seed, you will always have some volunteer plants in the garden, year after year. It has no special growing needs; it’s almost a weed, after all.
Gardening is supposed to be fun. For me that means trying more than the usual veggies. So this year, get adventurous. Try kohlrabi, rutabagas or even an artichoke! You’ll be glad you did.
Henry Homeyer’s Web site is www.Gardening-Guy.com. You may reach him at henry.homeyer@comcast.net.
The Value of Gardening
The Value of Gardening
There is, I believe, great value in gardening. I am healthier for the exercise I get gardening and for the food from it. I believe that there is a spiritual component too. I can feel at one with the world when I garden, and a connection to the generations before and after me. I can feel my grandfather (some of whose tools I still use) with me in the garden at times. And in this day and age, it makes financial sense to have a garden.
I recently chatted with Alice Elliott of Richmond, Maine. Alice is by nature a record keeper, and for the past two years she has counted, weighed and measured the produce from her garden. Her garden is not large – just a space about 20 feet by 25 feet – but in 2010 she harvested 642 pounds of veggies, with a value of $2,102.48. Each week she gets the average market price for organic vegetables from MOFGA (the Maine Organic Farmers and Gardeners Association) and, using the state average price, figures out how much her garden has earned for her.
Alice also keeps track of her expenses – seeds, potting soil, row covers, fertilizer and mulch. She has, by her own admission, “A seed habit. I can’t pass by a pretty seed packet,” she told me. She likes to try new kinds of tomatoes every year – and grows a dozen different varieties. Last year she spent $317 dollars – including an amazing $176 in seeds. One could have a much bigger garden and spend just a fraction of her seeds costs – especially if you save seeds from open pollinated plants like tomatoes and beans.
So what does Alice do with all the veggies she grows? She and her husband eat from the garden every day of the year – which means that she preserves, stores or freezes vegetables now for use when the garden no longer is producing. She has a blog that shares her garden successes (and failures) and has recipes, photos of the garden, cost/benefit analysis of the garden and more. Go to www.henbogle.com to see her garden.
Here is an interesting recipe from Alice’s blog (see her “Yankee Pantry” dropdown for others), a good one for this time of year when our gardens are winding down for the summer, but sage and other herbs are still plentiful:
Sage Butter Sauce with Parmesan
- 4 Tablespoons butter
- 20 fresh sage leaves
- 4 Tablespoons stock, broth or wine
- 5 Tablespoons grated Parmesan cheese
- Fettuccine or linguine for 4, cooked
Over medium low heat, melt butter then add sage leaves and cook until edges curl and butter is dark amber (5-6 minutes). Drain crisped sage on paper towels. Add stock and bring to a boil. Remove from heat and stir in parmesan. Serve over pasta, fresh sautéed vegetables, or roasted butternut squash; garnish with crumbled sage leaves.
One of the most important steps you can take when preparing food for winter use is to develop systems that will save you time. Alice and I agreed that doing large batches of food at once is a time saver. Buy a big blanching pot instead of a small one if you want to freeze large quantities of kale, for example. (Kale and many other veggies need to be blanched by immersing briefly in boiling water before freezing).
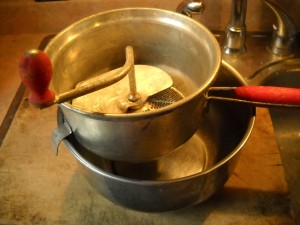
Alice makes lots of tomato sauce, and starts by roasting the tomatoes in a 400 degree oven for 30-50 minutes. That reduces the quantity of liquid and imparts a nice flavor, she said. She just cuts tomatoes into 2-4 chunks, and cooks them in Pyrex pans (oiled to keep the tomatoes from getting glued to the pans) until the skins turn dark and much of the moisture is gone. She then runs them through a tomato press to get rid of the seeds and skins. I found the one she uses at Gardeners Supply for about $70. I have an ancient Foley Food Mill, which does the same thing. Finally she freezes or cans the sauce – she uses a pressure cooker for canning to save time and reduce the chance of botulism. She suggests reading about botulism – a horrible illness that can be fatal – at the Web site for the National Center for Home Food Preservation at http://www.uga.edu/nchfp/how/can_home.html.
A tip I shared with Alice is that I use my grandmother’s wooden chopping board when cutting up tomatoes. It is long enough to span one of the two basins of my sink, allowing me to chop without making a mess. With a flick of the wrist I can push juice, seeds or waste into the basin of the sink, reducing mess. When making sauce, I core the tomatoes and squeeze out most of the seeds and juice before tossing them in the Cuisinart for pureeing. And I do that all right at the sink.
I’ll never be as organized as Alice. I will never count, weigh and calculate the value of the food I get from my garden, this I know. But there is great satisfaction in preparing dinner –as I did last night – using all my own ingredients. Now if I could just grow my own salt and pepper!
Henry’s new book is Organic Gardening (not just) in the Northeast: A Hands-On, Month-by-Month Guide. His Web site is www.Gardening-guy.com.


