Late Fall Chores in the Garden
Posted on Tuesday, October 31, 2023 · Leave a Comment
For many of us, November is a drab and dreary month: days are short, gray skies the norm. Flowers are largely gone, the soil is soggy and a drizzle or a downpour is common. Soon snow will not be unusual- we’ve already seen a wintry mix. But there are things you can do when the sun comes out – or with rain gear on.

Trunk flare is easy to see on big trees but harder on new plantings
If you planted trees in the past few years, you should look at them carefully. Most planting tags on purchased trees tell you to plant them at the depth they are in the pot. Unfortunately, many trees are grown on huge farms and slapped into pots without regard to the “trunk flare” – that part of the tree that should be above ground.
Look at a mature tree planted by mother nature – or a squirrel. You will see that the base of the tree widens out, and often roots are seen snaking across the soil near the tree for a while before diving down to seek nutrients and moisture. When planting a tree it is essential that the trunk flare be above ground. If not, soil fungi will rot the bark and eventually kill the cambium layer below it. This will kill the tree in six to ten years. Even if the bark looks flaky and damaged, it probably will recover if you take action now.
If the tree you planted comes straight out of the ground like a telephone pole, or if there is mulch piled up against the tree, you must remove the material that will cause problems.
Mulch is easy to fix – take your hand and pull it back, creating a doughnut hole for the trunk, at least 4-inches all around. Mulch has its place: it will keep down weeds and help prevent the soil from drying out in times of drought. But more than 4 inches of mulch can also prevent light rains from reaching the roots. Don’t overdo it. No mulch volcanoes. I’ve been seen removing mulch from trees in public spaces!
If there is soil over the trunk flare, use a hand tool to loosen the soil and pull it back, too. You may find little roots there, but cut them off. Re-grade the area for a foot or more around the tree in ll directions. For a larger tree that was sold in a burlap wrapping, it is not uncommon to find 3 to 6 inches of soil over the trunk flare. The burlap wrapping – now often made of plastic materials – should have been removed at planting time. If not, your tree is doomed. Plastic wrapping will never degrade, so need to dig up the tree and remove it now. Burlap will degrade in time, but often not for years.
What else is there to do in the garden now? This is a good time to move shrubs or small trees that are not doing well where they are. Roots do most of their growth between the time leaves drop and the ground freezes, ,which makes this a good time for moving them. Cool temperatures and rainy days help plants you move now, too. sd
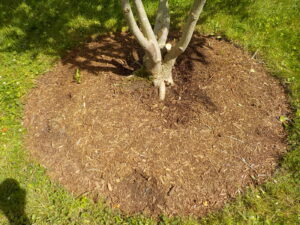
Mulch around a tree will hold in water and help keep weeds from stealing water.
I was visiting long-time friends in Ohio recently, and they had 3 Fothergilla shrubs that had been in the ground 5 years and done almost nothing. I took a garden fork, thrust it into the soil nearby and tipped it back. Out popped the root ball – as if it had been planted the day before. I picked it up and took a look. Clearly the shrub had been in a one-gallon pot for a long time before they planted it. The roots had grown around and around the pot, keeping them from extending out into neighboring soil for moisture and minerals.
After soaking the root ball in a pail of water, I used my fingers, a small folding saw and a CobraHead weeder to tease the roots apart. I broke or cut some, but it didn’t matter. The shrubs were doomed unless I could get the roots pointed out and away from the tangled mess they’d been in. I replanted them in places with more sunshine and less competition from big perennials in beds where they should grow and be happy. It may take a year or two before they really start to thrive.
It’s tough to know just where to plant a tree or shrub for optimal growth. I like to observe the same species in another garden or ask a friend if they’ve had luck with the same species. The internet can help if you consult a university or arboretum website. I like books, too, especially any written by Michael Dirr. He seems to know more than anyone else. So do your homework, and think about moving any unhappy woody plants.
By the way, it’s not too late to plant spring bulbs, garlic or bulbs for forcing in pots. I particularly like forcing spring bulbs (daffodils, tulips, crocus and more) by potting them up now and keeping them in a cold place where they won’t freeze. Then in February and March I bring them into the warmth of the house, and they bloom early. I pot up enough to give some away to ailing or aged friends.
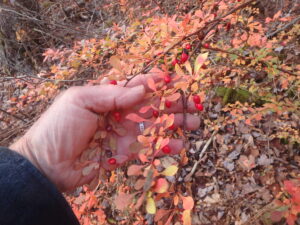
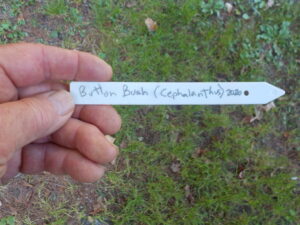
Barberry is easily identified by its red berries now
This is a good time to dig out invasive shrubs like burning bush or barberry that have been planted by birds. Their distinctive leaf color will help you find them now in your woods.
On the next to last day of October this year I plugged in my blue “fairy lights” in my Merrill magnolia and a nice pear tree. It was a gloomy, wet day, and the blue lights looked great against the yellow leaves. Some people call these Christmas or holiday lights, but I consider them just a cheerful boost to my spirits when gardening is nearly done and weather keeps me from doing my final chores.
Henry is UNH Master
Gardener, a regular speaker at
garden clubs and libraries, and the author of 4
gardening books. Reach him by e-mail at henry.homeyer@comcast.net.
Tips for Growing Great Garlic
Posted on Tuesday, October 10, 2023 · Leave a Comment
If you lean toward lazy (or have kids, dogs and a job), growing garlic may be just the ticket. It is the easiest of all vegetables to grow. Once planted and mulched, it requires little or no work until harvest. A good harvest is guaranteed if follow my instructions. Even with all the strange weather we’ve seen, I’ve never had a bad crop in the past 25 years or so of growing garlic.

Hard neck garlic cloves surround a stiff neck and are best for New England gardens
Now is the time to buy garlic for planting – unless you have some from your own garden saved for that purpose, as I do. You’ll want to get your garlic planted a month before the ground freezes, so depending on where you live, you may want to plant some soon. Garlic needs to establish roots now, and is not generally planted in the spring.
There are two categories of garlic: hard neck and soft neck. Both will grow in New England, but hard neck is the type grown by most farmers, and the most cold-hardy. It produces a stiff scape or stem each summer that is edible. Soft neck garden generally comes from California, and is good in the kitchen; it is also the type braided and hung from the ceiling in Italian restaurants as decoration. Hard neck garlic generally has more flavor; a wide variety of flavors is possible, depending on the type you grow.
Garlic does best in rich soil that drains well. If you have a heavy clay soil (one that is sticky when wet), you will need to add plenty of compost to your soil. Adding sand will not help, as sand added to heavy clay produces something like concrete that hardens up in dry times.
If you have poor soil, you may want to build a wood-sided raised bed, and add plenty of compost and topsoil that you purchase in bulk or in bags. I find Moo-Doo brand composted cow manure and topsoil are a good soil additives that are sold in bags in many garden centers. A 50-50 mix of your soil (or purchased topsoil) and compost should work well.
When making a wood-sided bed, I don’t recommend treated lumber. Even though most treated lumber is safe to handle and much less toxic than 20 years ago, I don’t want any chemicals leaching into my soil. I use rough-sawn lumber from a local sawmill, preferably hemlock. It generally lasts about 10 years. Eight-inch wide planks are wide enough to make a nice box.
Plain pine boards will work, too, and metal corners are readily available at garden centers or from catalogs like Gardeners Supply and Lee Valley Tools. The corners make constructing a garden box easy even for non-carpenters. All you need is a cordless drill to drive the screws. Carrots and other root crops do well in garden boxes, so you can alternate them with garlic in subsequent years if you build 2 or more boxes.
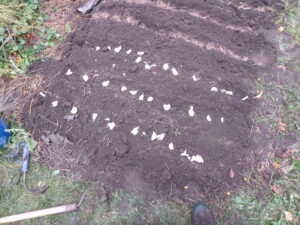
Place your garlic cloves on the soil to establish spacing before planting
I generally use my own garlic for planting, as it has adapted to my soil and climate over the years. But if I see big, fat bulbs of garlic at a farmers market, I sometimes buy some. I don’t recommend buying garlic for planting at the grocery store as most has been treated to prevent it from germinating, and so it will last longer.
Where can you get garlic for planting? If there is none at your local farmers market, you can get organic garlic from Johnny’s Selected Seeds in Maine (877-564-6697 or
www.johnnyseeds.com). But don’t wait too long – they sell out most years.
Once the soil is loose and weed-free, I plant. I take a CobraHead weeder, a nice single-tined weeder, and make furrows in the soil of my raised bed. I keep the furrows about 8 inches apart. I sprinkle some organic bagged fertilizer into each row, and stir it in.
I break the garlic bulbs apart, separating the cloves – there are usually 5 to 10 cloves per head. I push the cloves into the loose soil, pointy end up, about 3 inches deep, and 4 inches apart. I cover with soil, and then pat it gently.
The last step is key if you want a weed-free garlic bed: put a foot of fluffy mulch hay or straw over the planted garlic. The straw will pack down over the winter and make a nice mulch that will keep most weeds from growing, but the garlic will push through it. It will be ready to harvest next July.
D
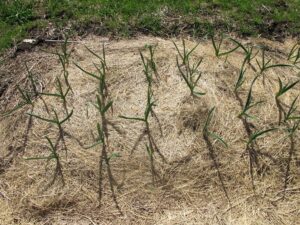
Garlic grows through th mulch, shown here in May
epending on when you plant, the soil temperature, and when real cold weather comes, your garlic may send up a few green shoots this fall. Don’t panic! It won’t hurt your garlic. When cold weather comes, it will go dormant and do just fine next spring.
I believe that garlic is a healthy and tasty addition to my diet. It may even be medicinal – it has been used that way for centuries. Some believe that if you crush your garlic and then wait 10 minutes before cooking, it will generate cancer-fighting compounds. Who knows? Certainly it can’t hurt.
And this winter if you chew on a clove of garlic before going to the store, you’ll never get a cold – because people will stand back from you in line!
Henry lives in Cornish Flat, NH. He is the author of 4
gardening books and is a UNH Master
Gardener. His e-mail is
henry.homeyer@comcast.net.
I am conscious of erosion when removing plants in the fall. I think it’s better to cut off the stems of big zinnias, for example, than yank them now. That way I am not opening up the soil, making it vulnerable to erosion or providing a nice resting spot for air-borne weed seeds. Many weed seeds are tiny and can blow in from your next-door neighbor’s garden. I can always dig out roots in the spring when I plant something else, and they may decay and add some organic matter to the soil in the meantime.
Weeding is easiest to do when the soil is moist. If you have big, deep-rooted weeds like burdock, you should use a garden fork to loosen the soil. Plunge the fork into the soil and tip it back, loosening the soil. Do that in a few places for a big weed. Then pull s-l-o-w-l-y. A quick yank will break off roots that will survive and grow next summer. Any weed that is loaded with seeds should go in a separate compost pile -otherwise the seeds could come back to haunt you, even years later. For smaller weeds, I like my CobraHead weeder.
And here’s a little mentioned fall task: getting rid of the flowers that have not done well in the past few years. That’s right, not everybody gets to ride the bus. This is a good time to say to plants that have not performed, “You’re off the bus. Go live in the compost pile.” A plant that is too aggressive – or one that just won’t bloom – should be exiled. Next spring, that gives you license to buy something nice – you have a gap to fill in the perennial border.
Outdoor flower pots need to be emptied, cleaned and put away after frost. Don’t wait until December to do this – if a pot full of wet soil freezes, it will crack. You may as well clean out the pots now – rather than in the spring. And save all that potting soil. You can invigorate it in the spring by adding compost and some organic fertilizer. So fill up a trash can or a few buckets with that potting soil and re-use it.
If you have an asparagus patch, look to see if your plants are loaded with those little red “berries”, their seeds. If you see seeds, cut down the stems right now. Some of those seeds will settle in and start more asparagus plants – and they will fight for moisture and minerals just as weeds do.
My last task is always to rake the leaves. I chop mine in a chipper-shredder, but you can also run over them with a lawnmower. Leaves are full of good nutrients for plants, and are much loved by night crawlers and microorganisms. Rake the leaves onto a tarp and drag them away – that’s much more efficient than packing them into a wheelbarrow. Once it has rained, the leaves will settle in and make your plants feel cozy and loved.


 Click Here to buy from Cobrahead