-

Now available for $24.95 including shipping. -

Now available for $21.00 including postage. Vendors I Like
 Click Here to buy from Cobrahead
Tips for Growing Great Garlic

Hard neck garlic cloves surround a stiff neck and are best for New England gardens
Now is the time to buy garlic for planting – unless you have some from your own garden saved for that purpose, as I do. You’ll want to get your garlic planted a month before the ground freezes, so depending on where you live, you may want to plant some soon. Garlic needs to establish roots now, and is not generally planted in the spring.
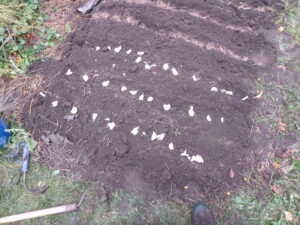
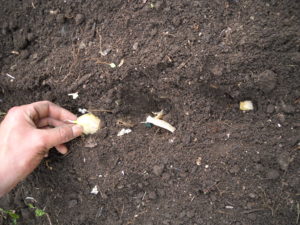
Place your garlic cloves on the soil to establish spacing before planting
I generally use my own garlic for planting, as it has adapted to my soil and climate over the years. But if I see big, fat bulbs of garlic at a farmers market, I sometimes buy some. I don’t recommend buying garlic for planting at the grocery store as most has been treated to prevent it from germinating, and so it will last longer.
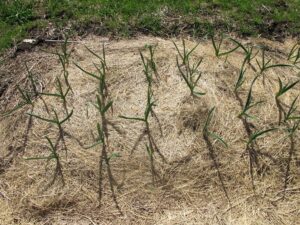
Garlic grows through th mulch, shown here in May
epending on when you plant, the soil temperature, and when real cold weather comes, your garlic may send up a few green shoots this fall. Don’t panic! It won’t hurt your garlic. When cold weather comes, it will go dormant and do just fine next spring.
Tips for Growing Great Garlic
Now is the time to buy garlic for planting – unless you have some from your own garden that you saved for that purpose, as I do. You’ll want to get your garlic planted a month before the ground freezes, so depending on where you live, you may want to plant some soon. Garlic needs to establish roots now, and is not generally planted in the spring.
Of all the veggies I plant, garlic is the easiest to grow, and a good harvest is guaranteed if follow my instructions. But please don’t sue me if something goes wrong with yours. I’ve never had a bad year in the past 25 years or so of growing garlic.
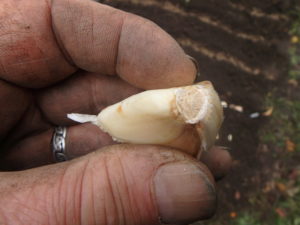
Garlic clove
There are two categories of garlic: hard neck and soft neck. Both will grow in New England, but hard neck is the type grown by most farmers, and the most cold-hardy. It produces a stiff scape or stem each summer that is edible. Soft neck garden generally comes from California, and is good in the kitchen; it is also the type braided and hung from the ceiling in Italian restaurants as decoration. Hard neck garlic generally has more flavor, and a wide variety of flavors are possible, depending on the type you grow.
Garlic does best in rich soil that drains well. If you have a heavy clay soil (one that is sticky when wet), you will want to add plenty of compost to your soil. Adding sand will not help, as sand added to heavy clay produces something like concrete that hardens up in dry times.
If you have poor soil, you may want to build a wood-sided raised bed, and add plenty of compost and topsoil that you purchase in bulk or in bags. I find Moo-Doo brand composted cow manure and topsoil are a good soil additives that are sold in bags in many garden centers.
When making a wood-sided bed, do not use treated lumber. Even though most treated lumber is safe to handle and much less toxic than 20 years ago, I don’t want any chemicals leaching into my soil. I use rough-sawn lumber from a local sawmill, preferably hemlock. It generally lasts about 10 years. Eight-inch wide planks are wide enough to make a nice box.
Plain pine boards will work, too, and metal corners are readily available at garden centers or from catalogs like Gardeners Supply and Lee Valley Tools. The corners make constructing a garden box easy even for non-carpenters. All you need is a cordless drill to drive the screws. Carrots and other root crops do well in garden boxes, so you can alternate them with garlic in subsequent years if you build 2 or more boxes.
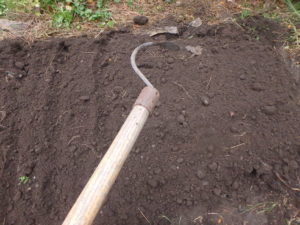
The long handled CobraHead weeder makes nice furrows without having to bend over
Once the soil is loose and weed-free, I plant. I take my long-handled CobraHead weeder, a nice single-tined weeder, and make furrows in the soil of my raised bed. I keep the furrows about 8 inches apart. I sprinkle some organic bagged fertilizer into each row, and stir it in.
I generally use my own garlic for planting, as it has adapted to my soil and climate over the years. But if I see big, fat bulbs of garlic at a farmers market, I sometimes buy some. I don’t recommend buying garlic for planting at the grocery store as most has been treated to prevent it from germinating, and so it will last longer.
Where can you get garlic for planting? If there is none at your local farmers market, you can get organic garlic from Johnny’s Selected Seeds in Maine (877-564-6697 or www.johnnyseeds.com). But don’t wait too long – they sell out most years.

Place your garlic cloves on the soil to establish spacing before planting
I break the garlic bulbs apart, separating the cloves – there are usually 5 to 10 cloves per head. I push the cloves into the loose soil, pointy end up, about 3 inches deep, and 4 inches apart. I cover with soil, and then pat it gently.
The last step is key if you want a weed-free garlic bed: put a foot of fluffy mulch hay or straw over the planted garlic. The straw will pack down over the winter and make a nice mulch that will keep most weeds from growing, but the garlic will push through it. It will be ready to harvest next July.
Depending on when you plant, the soil temperature, and when real cold weather comes, your garlic may send up a few green shoots this fall. Don’t panic! It won’t hurt your garlic. When cold weather comes, it will go dormant and do just fine next spring.
I believe that garlic is a healthy and tasty addition to my diet. It may even be medicinal – it has been used that way for centuries. Some believe that if you crush your garlic and then wait 10 minutes before cooking, it will generate cancer-fighting compounds. Who knows? Certainly it can’t hurt.
And this winter if you chew on a clove of garlic before going to the store, you’ll never get a cold – because people will stand back from you if they cough!
Henry lives in Cornish Flat, NH. He is the author of 4 gardening books and is a UNH Master Gardener. His e-mail is henry.homeyer@comcast.net.
Planting Garlic
Growing garlic involves less work than anything else I grow. There really are only 3 steps: plant it, mulch it, and harvest it. It’s also the least expensive, once you have an established bed of garlic. I will plant this year’s crop from last year’s crop, and that one I planted from the crop of the year before. You really only have to buy garlic once – so long as you save some each year for planting.
There are basically just two kinds of garlic: soft neck garlic, which is what you probably get at your grocery store, and the stuff we grow here in the Northeast called hard neck garlic. Most soft neck garlic comes from California and keeps nearly forever. Hardneck garlic has a stiff stem in the middle of each bulb, and has a much more complex flavor (in my opinion). It will keep in a cool place until spring, but not much longer. Then it either sprouts or dries up.
Planting Garlic
October is the time to plant garlic. If you don’t have any seed garlic, you might be able to get some at your farmers market. Don’t plant grocery store garlic, even if you can find hard neck garlic, because it is often treated so that it will not sprout. By now most catalog-sellers of garlic have sold out.
Take a bulb (or head) of garlic and separate it into the cloves that surround the hard “neck” or flower scape. Depending on the variety of garlic, you might have just five cloves, or as many as a dozen. I like big cloves, as they are easier to peel and use. So each year I select for big cloves and plant them. Over the years my crop has produced bigger bulbs and bigger cloves.
Garlic needs full sun (defined as 6 hours of sun) and rich soil. I always add compost to my garlic bed and some organic bagged fertilizer. I rake soil from the walkways into a raised bed that is perhaps 30 inches wide and six inches higher than my walkways. Ideally, by adding compost, your soil will be rich and fluffy.
To plant, I draw furrows about 8 inches apart with my CobraHead weeder, a single-tined tool that is curved like a bent finger. I loosen the soil about 6 inches deep withit, than push cloves into the soil so that they are 3 inches apart and about 3 inches deep. Always plant them with the pointy end up. Afterwards I pat the soil down with my hands to firm the soil.
The last step is to mulch your garlic. I use mulch hay or straw and put almost a foot of fluffy material over the bed. Fall rains and winter snows will cause the hay to settle – I end up with about 4 to 6 inches of material in the spring.
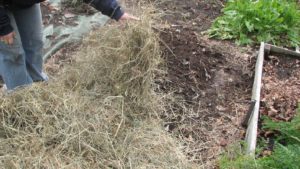
Garlic Mulch
The mulch keeps the soil from freezing until January, allowing roots to get well established before the garlic cloves go dormant. It also prevents most weeds from germinating and growing next year, though I weed the bed before planting. Garlic is tough stuff and will push right through my layer of mulch, though most weeds do not.
Depending on the weather and when you plant, your garlic may send up green stalks this fall. Don’t fret if it does. Those sprouts will die back in winter, but the garlic will send up new ones in the spring.
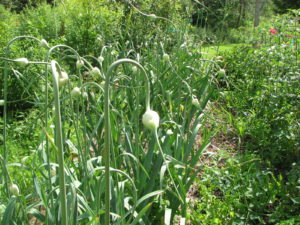
Garlic Scapes
In early summer the scape, or flower stalk, will perform for you, “dancing” to create loops, swoops and circles of green. I use these in flower arrangements. Each scape produces a flower on top of the scape that will, if left, produce seeds. Those seeds are not useful for the average gardener, as they will not produce edible garlic for 2 years. But the stems and flowers are great for early summer stir fries. Garlic scapes are a taste treat.
Some believe that cutting off the scapes early on will produce bigger cloves of garlic, but I have never been able to tell if that is true or not, though it makes sense. Producing flowers and seeds uses energy that might otherwise go to producing bigger bulbs.
Next July the garlic you planted this year will be ready to harvest. Each bulb grows about 7 long pointy leaves that also surround the cloves and protects them. When 3 or 4 leaves have turned brown and started to dry up, it’s time to harvest. If you wait too long, all the leaves will have dried up and the garlic will not store as well – it will dry out too soon.
I’ve been told that after harvesting that garlic should be cured in a cool shady place for a week or two before you cut off the tops. Why? Because nutrients in the leaves – some of which are allegedly good for preventing cancer – will migrate to the bulbs and be absorbed.
You can store garlic best in a cool, dry place. Ideally 50 degrees with moderate humidity. I recently read an article produced at the University of California at Davis that you can freeze garlic instead of storing it at room temperature. Separate the cloves, but don’t peel them. You can freeze them in a zipper bag or jar for a year or more. I shall try that. Don’t store garlic at room temperature in oil, as it can produce deadly botulism.
Garlic may or may not repel vampires and viruses. I do know it makes food taste better, and is full of vitamins and minerals. So I grow it, and you should, too.
You can reach Henry at henry.homeyer@comcast.net. Read his blogs at https://dailyuv.com/gardeningguy.
Planting Garlic
Garlic is one of those magical flavors that give foods depth of flavor and the richness of another world. Italian food, French food, Indian food – these all include liberal use of garlic. Why the English decided on fish and chips and boiled dinners as their staples is a mystery to me. Maybe they can’t grow garlic. But I’ve been growing garlic for my kitchen for decades. It’s easy to grow and now is the time to plant it for next year.

Hard neck garlic
Your first task is to find some garlic suitable for planting. You can’t just go the grocery store and buy some. Most commercial (non-organic) garlic has been treated with chemicals to keep it from sprouting. Instead, go to your garden center to buy some – or get a few heads of garlic from a farm stand or a friend who grows it.
Here in New England the recommended type of garlic is called ‘hard neck garlic’ and it survives our cold weather nicely. Soft neck garlic, commonly grown in California, is less cold tolerant. It is the type that can be braided and hung in the kitchen. Hard neck garlic sends up a stiff stalk, called a scape, which grows out of the middle of the bulb – a stiff neck, if you will.
Hard neck garlic generally has a stronger, richer flavor with more bite. It also comes in a wide range of flavors – just as different varieties of tomatoes and sweet corn have distinct flavors. Hardneck garlic is often classified as either rocambole, porcelain or purple stripe. Rocambole garlic has a tan outer covering and usually produces up to a dozen cloves per bulb. Porcelain garlic has a satiny white wrapper and tend to produce larger cloves with as few as four per bulb. Purple stripe garlic is one of my favorites – it is productive, tasty and generally a nice, plump size.
I like to say that everyone would be a gardener if growing all vegetables were as easy as growing garlic. There are just three steps to growing garlic: planting it, mulching it, and harvesting it. That’s right, if you mulch well it will grow well and you will never – or rarely – need to weed.
I grow garlic (and all my vegetables) in wide, mounded beds. Each bed is 30 to 36 inches wide, and mounded up 4 to 6 inches above the walkways. A short-tined garden rake or hoe is useful for shaping the beds, and to gather up loose soil from the walkways.
The first step when planting garlic is to remove any weeds from the soil. Then I enrich the soil by adding 3 or 4 inches of compost on top of the bed I am planting it in. I use a garden fork or my CobraHead hand weeder to loosen the soil and stir the compost into the top few inches of soil. Rototilling would mix the compost in deeper – good for drainage in a clay soil if you have it, but away from the roots of my garlic.
Rows of garlic need to be spaced 6 to 8 inches apart. Most years I plant short rows across my wide beds, but sometimes I will plant rows down the length of the beds – it really doesn’t matter which way you do it. I create furrows with a hand tool in the fluffy soil of my bed and sprinkle on some bagged organic fertilizer, then mix that in.
It is important to plant your garlic right side up. If you look at a bulb of garlic, you should be able to see roots, or where the roots have been cut off. The top of each clove has a slightly pointy tip, and the bottom has a small, flat scar. And of course, when looking at a bulb of hard neck garlic you can see where the scape grew. If you plant the cloves upside down, they use up a lot of energy trying to get started and grow toward the sun.
To plant, just push each clove into the prepared soil about 4 inches away from its nearest neighbor. The top of the clove should be 2 to 3 inches beneath the soil after you cover it up. Pat the soil with your hands to firm it up.
The last step is to mulch. I use mulch hay because it is inexpensive, but straw is fine, and should have fewer seeds. I put a thick, fluffy layer of hay over the entire bed – and about a foot deep. Fall rains and winter snows will compact the mulch to a 3 to 4 inch thick layer of mulch that should keep out all weeds – while allowing the garlic scapes to push through in the spring.
Garlic is ready to pick in July or August. The scapes will curl and dance as they grow, and are wonderful in a vase with flowers. The scapes are also tasty – you can chop them and add to stir fries or omelets. Store your garlic crop in a cool dark place for best storage. And don’t eat it all! Save some for planting your next crop.
I’ve been told that garlic has cancer-fighting compounds, and that it’s best to chop or press you garlic 10 minutes before cooking it to preserve the best effects. And it’s supposed to be good for keeping away vampires, not just cancer. Me? I find it necessary for a good spaghetti sauce!
Henry Homeyer is a garden designer, coach and the author of 4 gardening books. His web site is www.Gardening-Guy.com.