Gardening with Children
Posted on Thursday, May 20, 2021 · Leave a Comment
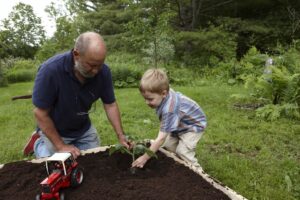
Okay, all you parents and grandparents, it’s time to garden with your beloved little ones. That’s right, start them young, make it fun, and they will garden forever. The key part is fun. Never make a child pull weeds. Digging in the dirt is fun. Playing with a hose or a watering can is fun. Picking flowers and eating cherry tomatoes warm from the sun is lots of fun.

Newspapers on the bottom of a raised bed help to smother the grass
When my grandchildren were small, I created little gardens at my house for them. I used boards to create distinct little beds, one for each. What size? I made them their height by their wingspan – the span of their arms – about three and a half feet square. I actually had them lie on the lawn with their arms out to set the dimensions. That’s good for a giggle.
The boards were just six inches wide, and were made of ordinary lumber – definitely not of pressure treated boards, which even now are full of chemicals, albeit not as toxic as those produced when pressure treated lumber first came out. But remember, they will not be that size long, so you don’t need the beds to last forever.
The simplest way is to build a sturdy bed is to cut pieces of two-by-four as long as your boards are wide. Put one in each corner, and use a cordless drill to screw the boards on to them in the corners. Screws that are two inches long are fine, and much easier to work with than nails if you are not accustomed to building things. Two screws are needed on each end of the boards to make it sturdy. Work on a flat surface such as your driveway, or inside the garage to make work easier. Metal brackets are also available to help make sturdy garden boxes.
Pick a spot for the garden in full sun. That means six hours of sunshine at a minimum, but preferably all day sun, from morning to late afternoon. Choose a site that is flat, or nearly so. If you are giving the kids garden beds in your garden, be prepared for it to be weedy and messy at times – unless you intend to weed it yourself. Some kids will want to weed, but most won’t. So you may want to place the little gardens somewhere on the back lawn.
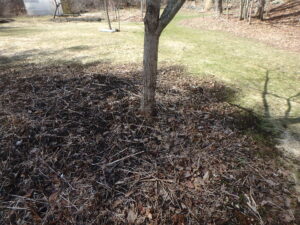
If you choose to place the garden box on the lawn, you don’t need to remove the sod. Just cut the grass as short as you can, then cover it with 6 pages of this newspaper, and fill it up. The soil will kill the lawn. The first year carrots may stop or bend when they hit the bottom of the bed, but after that the soil will loosen up with the action of the microorganisms, and you can grow deep-rooted things without a problem.
A child’s garden can accommodate planting and playin
What should you use for soil? I like to mix plenty of compost with ordinary garden soil, roughly a 50-50 mix. You can buy bags of compost and top soil, or raid your compost pile and your garden for soil – you don’t need but a couple of wheelbarrows of soil.
When the bed is first built, your kids may want to just play in the fresh earth. Soil smells good, is pleasant to touch, and is ideal for making little roads for trucks or mounds for castles, just as it’s fun to make sand castles at the beach. I suggest you don’t be too goal oriented, telling the kids they need to stop now and plant their carrot seeds. Let them see you planting things, both seeds and plants, and they will want to, too.
Ask your children about their favorite vegetables. Have they ever seen a purple or red carrot? Would they like to try growing some? Where do French fries come from? In my experience, planting potatoes is great for all kids – the seed potatoes are a size even the littlest ones can handle, and later on the harvesting is like going fishing and knowing they’ll catch fish. Very exciting.
Maybe take them with you to a garden center. Look at the marigolds, which are already blooming. Encourage them to smell flowers, and if they find something they like? Buy it. I like the idea of kids growing flowers with their veggies, and my grand kids did, too.
Remember, success is important. That means you will have to be attentive to their gardens. Weeding and watering will be your responsibility unless they live nearby and want to do these tasks.
By the way, it’s important to have a few child-sized tools and especially watering cans. Ours watering cans are too heavy for them, and a hose can easily blast a tomato seedling from here to Milwaukee.
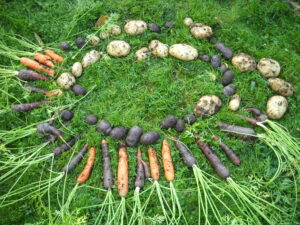
My grand kids grew these and arranged them to show off their harvest
What if your grandchildren want to grow pumpkins or watermelons? Those vines will quickly exit the mini-garden you have lovingly prepared. Are you willing to let the vines run, making it impossible to mow the lawn there? Perhaps you can convince them to grow something else, and together plant the pumpkins in your vegetable garden.
My maternal grandmother died when I was seven, and my parents sent me to stay with my grandfather that summer to keep him company. I took the train by myself from New Haven to Worcester, Massachusetts – complete with a change of trains in Springfield. It was a bit scary the first time, but I refused to let my mother put a name tag on me! Grampy and I had a lot of fun so I went every summer until he died when I was 21. I learned to garden by observing. He never lectured. That’s probably a good recipe for success.
Planning for Spring Flowers
Posted on Tuesday, May 18, 2021 · Leave a Comment
Spring puts a spring in my step, quite literally. I bounce out of the house in the morning to see what is blooming, and since early March I have never been disappointed. You know the regular cast of characters in early spring: first snowdrops with their tiny white blossoms, then glory-of the snow in blue, white or pink, and winter aconite in brilliant yellow – all blossoming near ground level. But there are lots of other plants to consider, especially now, in May.
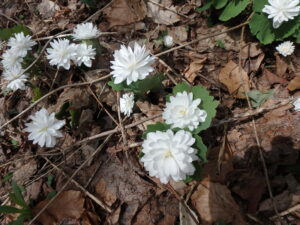
Double blood root is rare and not usually found in the wild but is sold in specialty nurseries
One of my favorites is a wildflower called bloodroot (named for its irritating red sap when the roots are disturbed). It has white blossoms that stay closed at night, or on cold, wet mornings. It has broad light green leaves that can curl around the blossoms like cigars when they first come up. The leaves can serve as a nice groundcover most of the summer.
I also have a double bloodroot. This was given to me by a friend, and it is quite rare. I found it for sale on line when writing this, but it is quite expensive. It does not produce viable seed because it is a tetraploid, meaning it has double the number of chromosomes that the ordinary one does. But mine has spread by root over the years, allowing me to dig plants to move to new spots. The blossoms look like miniature double peonies, and it stays in bloom longer than the common one.
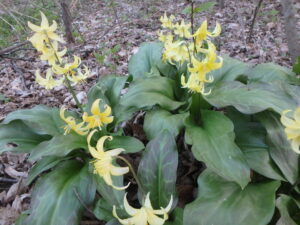
Pagoda trout lily
I grew up in Connecticut where we had masses of trout lilies (Erythronium americanum) blooming in our hardwood forest. The small yellow lily-like blossoms nod and look down. Here I see plenty of them, but few blossoming. I have learned that only once they have two leaves will they blossom, and mostly I see those with just one leaf.
A few years ago I ordered bulbs from K. Von Bourgondien bulb company for a hybrid Western trout lily that is much bigger than the wild ones. The hybrid Erythronium ‘Pagoda’ has been an amazing success! The leaves are large and each plant produces two to four flowers on each tall stalk. The blossoms are yellow, but much larger than the wild form I grew up with. They are blooming now, but bulbs are shipped in fall.
Lungwort (Pulmonaria spp.) is a perennial flowers that starts blooming very early in the season, and persists for many weeks. Not only that, the leaves are interesting all summer long: they are a nice green and most varieties are decorated with white spots. The flowers on any given plant may be blue, pink or peach. Often a patch will have flowers of all three colors – even appearing on a single plant. It spreads by root, and some gardeners avoid it, thinking it will take over the garden, but I love it.
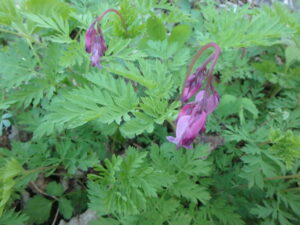
Corydalis
Corydalis or fumewort is a delicate flower that blooms for me in lavender or yellow, spreading by seed to serve as a groundcover. I have never heard anyone call it fumewort so I invite you to use its scientific name. It does well in shade or part shade, and tolerates moist soils well. The leaves are finely cut, almost fern-like, and each blossoms is small and downward looking. Some varieties will re-bloom later in the summer.
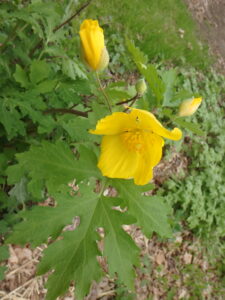
Celandine poppy
Our celandine poppies (Stylophorum diphyllum) are starting to bloom in shady areas now. These are not true poppies, but are in the poppy family. These are native to North America, and do well in shade or part shade, exhibiting bright yellow one- to two-inch wide 4-petaled flowers. The leaves stand up about 20 inches, and are handsome all summer. Celandine poppies do best in moist, humus-rich soil, but will perform even in dry shade, once established. There is a weedy relative that pops up all over in my garden. Celandine poppies will re-bloom if you cut off the stems after flowering.
One of my favorite early summer flowers is the Forget-Me-Not (Myosotis sylvatica). It is a rambunctious spreader, but pulls easily if it gets where you don’t want it. It stands 6 to 12-inches tall, and has lovely bright blue, upward-looking flowers less than half an inch across, with yellow and white eyes. It does best in rich, moist soil in either sun or shade, but will bloom in dry shade if it has to.
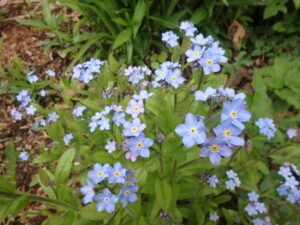
Forget-Me-Not
It is not clear to me if Forget-Me-Nots are annuals, biennials or perennials. They self-seed readily, and I generally treat them as annuals. They transplant easily and can serve as a ground cover. But I pull them often to plant other things, and more will show up in the general area the next summer. They even appear along the banks of my brook, where they bloom much of the summer.
I love primroses of all sorts, and my dramatic candelabra primroses (Primula japonica) have their own bed under old apple trees. But they will not bloom until June, so right now I make do with early yellow primroses (Primula eliator) that have been blooming for weeks and show no signs of finishing up their bloom cycle. They stay in tidy clumps.
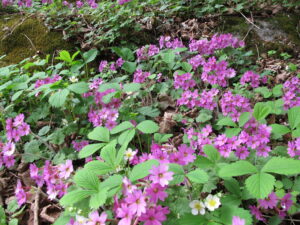
Primula kisoana
Now starting to bloom are my Primula kisoana, with lovely pink or magenta- colored flowers. They have no common name, unless you call them, as my wife does, “I wanna kiss-ya”, which is not found in books. The spread vigorously by root in shade, either moist or dry. Probably most vigorous in moist, rich soil, they are polite, going around other plants as they spread, not pushing them out of the way.
Visit your local nursery to see what is in bloom now, or ask your friends for divisions. There are lots of great flowers out there blooming now!
Henry is a UNH Master Gardener and the author of 4 gardening books. He can be reached at henry.homeyer@comcast.net.
Insects: Friends or Foes?
Posted on Thursday, May 13, 2021 · Leave a Comment
It’s spring, and insects are hatching, flying, and munching. Contrary to what you may think, most are not a problem for your garden. There are over a million named insect species and many – perhaps most – co-evolved with flowering plants. They pollinate our crops and do many wonderful things for us.
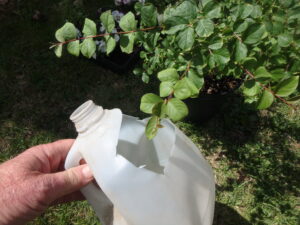
Catch Japanese beetles with a milk jug and soapy water
One of the most hated insects is the Japanese beetle. These beetles, as the name suggests, are originally from Japan, and were first observed in New Jersey in 1916. In just over 100 years they have become omnipresent in Eastern United States. Why? They have very few natural predators – even birds don’t want to eat them.
As larvae, these pests generally live in lawns, feeding on grass roots. They are whitish grubs of various sizes, but up to an inch long. If you cut open a square foot of lawn with a sharp shovel and peel back the sod, you are likely to see a grub or two. If you count 10 or more in that sample, you have an infestation that will be a problem.
The U.S. Department of Agriculture) developed a remedy in the 1940’s called milky spore, which is a bacterium that can be suspended in water and sprayed on lawns. It is not a miracle cure, and is quite expensive. Not all entomologists believe that milky spore is an effective cure, at least not in New England where cold winters can kill the bacterium.
Not only that, those darn Japanese beetles fly. So you can treat your lawn with milky spore only to have your neighbor’s beetles fly over the fence to attack your roses. I did talk to an enterprising gardener once who convinced her neighbors to treat, too, and she feels it made a significant reduction in beetle numbers.
What else can you do? There are beneficial nematodes (unsegmented worms) called Hb nematodes that will attack Japanese beetle larvae and are said to be 96% effective in eliminating Japanese beetle and rose chafer larvae if applied properly. The best time to apply these nematodes is July and August when the grubs are feeding in your lawn. If you buy them, follow the directions carefully: they need to be applied to moist lawn at dusk, and then watered in. These are live worms, and as such need to be used soon after purchasing them. They are not generally available at garden centers, but are available on line.

Hand pick Potato beetles and look for orange egg masses on underneath side of leaves
What about those Japanese beetle traps? Give them to neighbors you don’t like. They attract lots of beetles, but only capture some – so they attract more hungry beetles to your property if you use them. Really, just don’t buy them.
I am a firm believer that the best method of insect control for most bad bugs is hand-picking them and dropping in soapy water. Insects often have several life cycles in a summer, so try to reduce numbers before they reproduce.
Hand picking works for potato bugs, for example, if you check your plants early in the season, before large numbers have appeared. Look under the leaves: if you see orange egg masses, scrape them off and drown them in soapy water, along with the beetles and larvae. If you grow too many potatoes for hand picking bugs, try something called “Bt”, another beneficial bacterium. It is readily available at garden centers. It does not act as a contact poison, but sickens the larvae so they stop feeding and don’t reach adulthood.
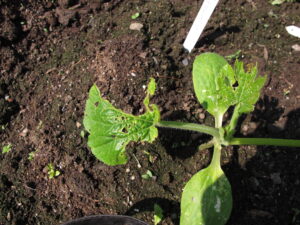 My insect nemesis is the striped cucumber beetle. It is a small striped beetle that can devour an entire small plant in one night. It eats not only cucumber leaves, but anything in that family including squashes and pumpkins. I do two things to help prevent their destruction: I grow my seedlings in pots until they have 3-4 leaves so the beetles can’t kill the plant in one night. And I cover my plants with row covers (breathable garden fabric) to physically keep those darn beetles off the leaves. Which is not to say that they can’t come up under the covers through the soil, but the method does help. And when the blossoms come, I’ll have to remove the row covers to allow pollination.
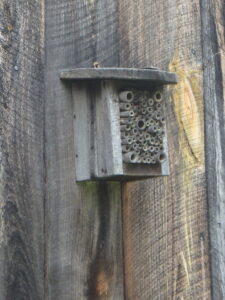
A simple house for solitary wasps made with bamboo pieces in a box hangs on my barn
Can you create habitat for beneficial insects? Sure. Don’t manicure every inch of your garden. Leave a few dead branches or decomposing flower stems in piles at the edge of your property. Allow fallen leaves to serve as mulch. Consider putting up a simple structure for solitary wasps (such as those that control those pesky tomato hornworms). They are sold next the birdhouses at the garden center.
I’m afraid that mosquitoes, black flies and deer ticks have given all insects a bad name, but most are beneficial. They pollinate, serve as food for baby birds, they help to keep vigorous plants and other insects from taking over. And please remember this: if you decide that spraying pesticides is easier than the organic methods described here, know that those same sprays will kill small beneficial insects that you probably never even notice.
It’s Time to Buy Your Strawberry Plants!
Posted on Tuesday, April 27, 2021 · Leave a Comment
Traditionally, June is the month for eating strawberries. I dream of big, fat, juicy local berries that melt in my mouth and swim in juice when cut and made into strawberry shortcake. But you can, in fact, grow varieties of strawberries that produce berries all summer, or that produce berries in June and again in the fall. In any case, now is the time to buy your strawberry plants before they are all sold out.
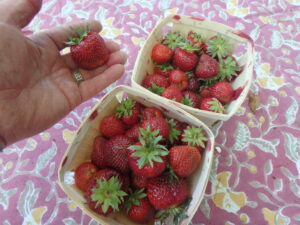
Day neutral strawberries first picking
First, some basics: there are three basic types of strawberries: June-bearing strawberries, so-called ever-bearing strawberries, and day-neutral strawberries. Plant June-bearing berries this summer, and you will need to wait until next summer for your first berries (pick off any blossoms this year so they develop good roots). Ever-bearing berries are not really ever-bearing: they will deliver a load of fruit this fall, and again in future years in June and the fall. Day-neutral berries are not affected by day length, and are truly ever bearing. The first year, however, you will not get any June berries from them.
Strawberries are sold in clumps of bare root plants, usually 25 per bundle. They should be planted when the soil is at least 50 degrees, and when risk of hard frost has passed. A hard frost is one that is colder than 28 degrees, and lasts for 12 hours or more.
You can buy plants starting in early May at your local garden center or feed-and-grain store. You can also go on-line and order from seed companies, but many varieties were already sold out at Fedco Seeds and Johnny’s Selected Seeds when I checked in late April. Nourse Farms in Massachusetts prefers that you order in the fall, but still had several varieties available when I checked.
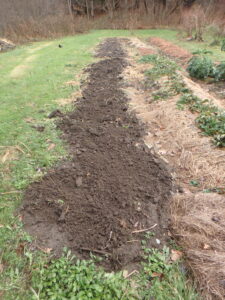
Strawberries in spring mulched with straw
All strawberries like rich, well-drained soil. If you have a heavy clay you will need to make raised beds and add lots of compost. Work the compost in with a fork or shovel to make the soil fluffier. Even average soil needs compost for best results, as does sandy soil. Sandy soil will hold moisture much better if you stir in plenty of compost.
You do not need to create wood-sided beds. Just mound up the soil to create a bed about three and a half feet wide that is four to six inches taller than your walkways. For 25 plants, a wide bed twenty feet long should do. For day-neutral berries, you can plant a two rows of plants 12 to 18 inches apart in a bed. June berries need more space, so plant just one row per bed, and space 18 to 24 inches. But always read the directions that come with the berries and space accordingly. Don’t crowd your plants or they will produce smaller berries.
I recommend the day-neutral berries. They do not require as much work as June bearing plants, which send out runners that need to be rooted in or pinched off. The day neutral plants stay in nice tidy clumps. And they produce berries all summer long, starting in the second year. Their berries are smaller than June berries, however.
Assuming you have just average soil, you should work in some minerals and fertilizer in addition to compost before planting the berries. Five pounds of an organic, slow-release fertilizer in a 20-foot wide row should be adequate. A good organic bagged fertilizer will add the three most necessary minerals – nitrogen for green growth, phosphate for strong roots and good flowering, and potassium for strong cell walls and resistance to drought and cold.
Organic fertilizers also add other nutrients that do not come in a bag of chemical fertilizer, things like calcium, magnesium, sulfur, manganese, chlorine and iron. Organic fertilizers are made from things like seaweed, chicken manure, peanuts hulls and cotton seed meal. These break down over time and supply nutrients to your plants.
There are a number of ways of planting your strawberries, but the main thing to focus on is getting good contact with the soil. To plant your berries, I smooth the soil surface, then dig shallow holes with small mounds of soil in the center of each. I spread out the roots over the mound, and then cover the roots with soil and pat it down. It’s important not cover the crown, (the growing point where the leaves begin).
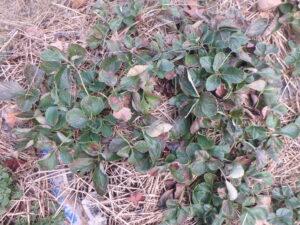
Strawberries mulched for winter
An alternative way is to just cut a slice in the soil with a putty knife and push the roots into that slice with the putty knife. The crown needs to be at the soil surface, and the soil well patted down. Nourse Farms ( www.noursefarms.com) has a video on how to use that method.
After planting, water well and then water two or three times a week until they are well established. All berries are high in water content, so don’t let the plants dry out if we have a drought again this summer.
Strawberries hate weeds, so always plant into a weed-free bed. Grasses will compete with your berries, reducing the size and number of your berries. One way to minimize the labor of weeding is to mulch well. I put down 4 to 6 sheets of newspaper over the soil between beds and cover it with straw, mulch hay or dry leaves.
Strawberries are a relatively easy crop to grow, and will reward you nicely. Most varieties will come back for a few years, but eventually they lose vigor. Still … strawberry shortcake anyone?
It’s Time to Reflect on Our Gardens
Posted on Tuesday, April 13, 2021 · Leave a Comment
This is a good time to look carefully at your garden, and to decide what you might do to make it better. Spring is upon us, trees and shrubs are waking up in my garden, but perennials are still mostly dormant and woody plants are just beginning to leaf out. It is a good time to look at “the bones” of the garden and decide what needs to be done.
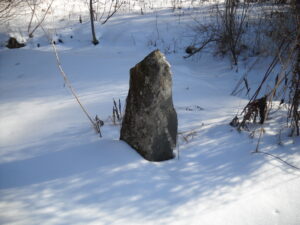
Standing stones are wonderful in winter
The bones of the garden are the trees, shrubs, stone walls, sculpture, water features and pathways. These are visible in winter, though often covered in snow. In summer they can become focal points, or almost disappear as flowering plants shout out for attention.
Each of us reacts to spaces a little differently. Some want an enclosed garden that is quiet and private. Others want a long view of the sea, a pond, or a distant mountain. If you are lucky, you might be able to divide your garden up so that you enjoy more than one type of garden: sunny, shaded, private or open to the view of passers-by. If you have just a city lot, you may have to choose just one kind of garden to focus on.
Making a garden private means creating visual barriers. You can do that overnight by hiring a company to put up a wooden 8-foot fence. Your neighbors may not like this and walls are generally monochromatic and boring. Of course you can then grow vines up them, or plant trees and shrubs in front of them, but plants take time to fill in and disguise the fence or wall. Still, if you have a new puppy or a bouncy four-year old child, you may opt for the immediate enclosure provided by fencing.
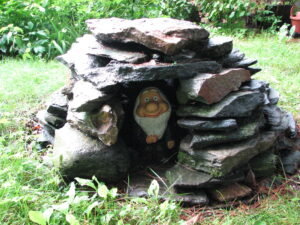
This garden gnome in his stone igloo that was sturdy and fun to build enhanced my garden for years
Alternatively, you can plant trees. There are advantages to this: trees get bigger and better every year. They provide habitat and food for birds, pollinators and all sorts of small animals. They reduce water runoff. And although some require occasional pruning, most of Mother Nature’s trees do just fine on their own. Some are fast growing, others will just inch along, holding place without shading the understory.
The street side of your house is important. What you show the world says something about you. If you plant a tall hedge, it can send a signal to others that you wish to remain undisturbed. If you have just lawn, it says you are not a gardener. If you plant beds and islands of color, you are saying, “Welcome, and enjoy!” Of course, lawns are the easiest to maintain, especially if you accept my mantra, “If it’s green and you can mow it, it’s a lawn.” I love a few dandelions, and love my clover which fixes atmospheric nitrogen into the soil – it’s free fertilizer.
Trees and shrubs are important on the front lawn as much as in the gardens behind the house. You can break up the straight lines of driveway and front walk. When thinking through your plans, take a garden hose and curve it around to define spaces. Create beds with bump-outs, and drive stakes to indicate where you might add trees, and use shorter stakes to indicate shrubs. And instead of lawn between the trees, imagine groundcovers. It will soften the look of your home, and invite birds and pollinators. You can keep some lawn, just reduce its footprint.
What other bones can you add to your property? Stone is wonderful in all its forms. The simplest stone additions are just boulders or tall, narrow standing stones. One and done. Stone walls are delightful, but expensive.
You can also build a cairn – a pile of stones similar to the markers seen on mountain trails above the tree line. The key, if piling up stones to create a pyramid or cairn, is to ensure that each stone is resting on two stones below it. And be careful that when you touch a stone it does not tumble. The earth does move a bit with the seasons, so building a sturdy structure is important.
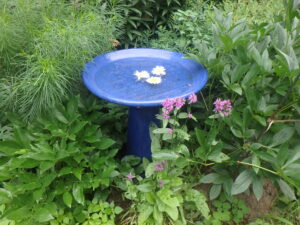
A simple bluebird bath can add color and interest
Water features are nice, too. A simple birdbath can add interest and provide water for insects and birds. I have a blue ceramic birdbath that adds color and height to a flower bed – even though the birds seem to ignore it. I was told to put a stone in the water for them to perch on, but even that has not lured them in. Of course, I have a brook nearby, so that is probably their choice instead.
I love sculpture in the garden. One of my favorite sculpture gardens is the deCordova Sculpture Park and Museum in Lincoln, Massachusetts. It’s 20 miles outside of Boston and has 30 acres of gardens chock full of delightful art, and it’s worthy of a visit. A place like that might inspire you to make or buy some art. So long as it gives you pleasure, it’s worth garden space. Found metal objects can be turned into art – if you think outside the box.
Sculpturefest in Woodstock, Vermont is an annual outdoor exhibition of sculpture made by local artists and is always worthy of a visit. See more at
https://www.sculpturefest.org/
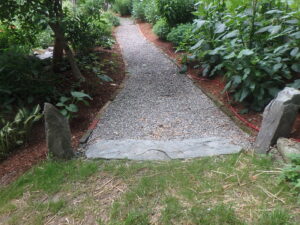
Our pea stone walkway keeps the garden neat
Pathways are important to gardens. They can keep your shoes out of mud and protect the soil from erosion. Flat stones are great, as are pea stone or small gravel. Chipped branches or bark mulch can be used for walkways, too. Pathways naturally lead one forward to other parts of the garden. Grassy paths are simple, and work well so long as they are not worn bare by too much foot traffic.
So go outside and do some planning – even if it is too early to do much now.
How What We Grow Helps Our Feathered Friends – and the Environment
Posted on Tuesday, April 6, 2021 · Leave a Comment
By now birds are finding their own food and have less need for that sunflower seed we have been providing during the cold days of winter. So what can we do to help our birds as they go into the season of having young? Growing native trees and shrubs on our property can be a huge help to our bird friends.
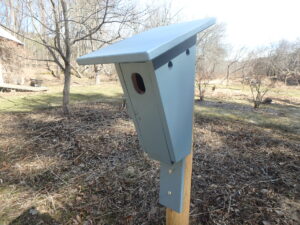
Bird houses are nice but we need to do more for our baby birds including growing native plants
Let me explain. It is not enough to put out birdhouses, we need to help birds find food for their chicks. The diet of baby birds is about 90% composed of caterpillars. Caterpillars – the larvae of Lepidoptera (moths and butterflies) – are high in fat and protein that developing birds need to grow and be healthy. One clutch of chickadees can, according to entomologist Doug Tallamy, a PhD researcher from the University of Delaware, consume 6,000 to 9,000 caterpillars in the 16 days from hatching to fledgling. And most parent birds continue to feed their chicks even after they have fledged.
In Tallamy’s new book, Nature’s Best Hope: A New Approach to Conservation That Starts in Your Yard, he explains that not all trees and shrubs are created equal. Those that evolved alongside the butterflies and moths are palatable to them. Those that were imported from Asia or Europe mostly are not of interest to them.
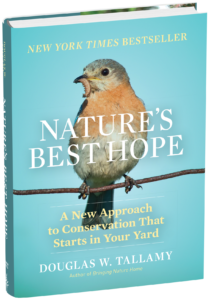
Nature’s Best Hope
Most woody plants create toxins or bad-tasting chemicals to keep all sorts of animals from eating them, but caterpillars have developed ways to eat most native tree leaves – they have adapted to eat what was available to them. It’s as if they learned to eat things, the way we learned to eat Brussels sprouts.
Although caterpillars eat the leaves of our native plants, they rarely damage or defoliate their host plants. Tent caterpillars and a few other imported species will defoliate trees, but that’s rare. It’s just that most of us never notice the little holes chewed in the leaves that are supporting the caterpillars.
In fact, I rarely notice caterpillars in the trees and shrubs at all – but our bird friends certainly do. They evolved along with the caterpillars and are genetically programmed to recognize them and bring them to their young, even birds that are seed eaters.
As Dr.Tallamy explains in the book, not all native plants are created equal. Some native species may only feed a few. Some, like our oaks, feed many hundreds of species of caterpillars. These “keystone species” are critical to supporting our wildlife. Five percent of the native species support over 70% of our Lepidoptera, according to Tallamy.
So what plants are best to feed the caterpillars that support our birds?
According to Tallamy’s research, native oaks, cherries, willows, birches, poplars and elms are best, and goldenrods, asters and perennial sunflowers “lead the herbaceous pack.” The National Wildlife Federation’s Plant Finder website (
https://www.nwf.org/NativePlantFinder) allows you to enter your zip code and see what plants are best for your zone, and how many pollinators are served by each.
Tallamy did a study in Portland, Oregon and found that of 1176 trees he identified on the streets there, 91.5% of them were from other continents or ecoregions, mainly Asia. What does that mean? Portland is a pretty city with lots of trees, but it is largely a wasteland for caterpillars that feed our baby birds. The birds need to nest where they can get food for their young.
Leaf litter and native plants are better under a tree than lawn
If you wish to improve your landscape and plant native species that will support wildlife, think about reducing lawn size. Tallamy explains that there are 40 million acres of lawn in America, an area the size of New England. Thirty percent of our water is used to water lawns, and 40 to 60% of all fertilizer ends up in our waterways and drinking water, he wrote.
Doug Tallamy proposes that we all join him in creating, a “Homegrown National Park”, by reducing our lawns by 50% and growing native plants. This will create wildlife corridors and improve our environment in many ways. The plants will sequester carbon in ways that lawn does not. It will help to save endangered species of insects and birds. It will reduce pollution of our air and water. Who could argue with such an idea?
According to one study, in newer housing developments lawn covers about 92% of space not covered with driveways and buildings. If we were all willing to reduce our lawns and add trees, shrubs and native perennials, that would make a big difference in helping to reduce species extinction of Lepidoptera, birds and small mammals. It does not require eliminating lawn, just reducing it. Think of lawn as area rugs, not wall-to-wall carpeting.
What else can you do to help our birds? Add a water feature. Even a small pool with a re-circulating pump will attract birds, especially migrating birds that need water and food for their long journey.
Instead of lawn, add native groundcovers. Lawns get compacted by lawnmowers, making it difficult for caterpillars and native bees to burrow in the ground. Most caterpillars pupate in the ground or in leaf litter, but lawns are not suitable. Other than honeybees, most bees burrow into the ground or into decaying wood to lay their eggs and hatch their young.
I love the idea of us all of linking our properties together to support our butterflies and bees. You can go to
www.homegrownnationalpark.org to register your property as part of this movement. Thanks!
Henry is the author of 4 gardening books and a UNH Master gardener. You may reach him at
henry.homeyer@comcast.net or PO Box 364, Cornish Flat, NH 03746.
Vegetables: When Is It Time to Plant?
Posted on Tuesday, March 30, 2021 · Leave a Comment
I know some gardeners that plant their potatoes or tomatoes in the garden on the same day every year. Not me. I think planting time is best based not only on the last frost date in your garden, but also the soil temperature and up-to-date weather predictions. And of course, late frosts do occur unexpectedly and can wipe out your tomato or pepper seedlings. So don’t jump the gun.
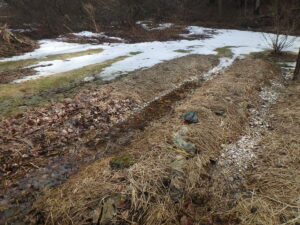
These raised beds are draining nicely but are still too cold and wet to plant
The internet has many guides and suggestions for when you should plant, but I think an experienced next door neighbor probably has a better sense of when to plant. So, for example, one internet source says the last frost for Cornish Flat, NH is May 15, while another internet sources says June 11 to 20. That’s over a month of difference! But perhaps an old timer in your town can advise you, depending on your exact location.
My vegetable garden is in a low spot, with hills on either side. Cold air slides downhill, so I am cautious about planting too early. Often there is a late frost in my garden, but not around my house which is 15 or 20 feet uphill. Rivers, lakes and the ocean can have a warming effect, too. The closer you are to the Connecticut River or the Atlantic Ocean, the sooner you can plant.
It is often thought that a full moon will cause late frosts. But a friend of mine used the frost data his mother had collected over decades and compared it to the phases of the moon. He observed that the moon does not seem to affect frost dates.
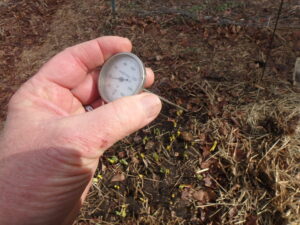
Soil thermometers are useful tools for deciding when to plant
Soil temperature is important, too. Seeds are genetically programmed not to germinate if the soil is too cold. That makes sense: seedlings are tender and many can be damaged by frost. So you can plant spinach or peas seeds “as early as you can work the soil”, according the package, but they may not germinate for weeks if the soil is cold – and they may rot.
Seeds can rot in cold, wet soil. Corn seeds are particularly susceptible to rot, and many are treated with fungicides to prevent rotting. But as organic gardeners, we should avoid treated seeds.
If you are in a hurry, can warm up the soil. First, rake off any fall leaves or other mulch from you garden beds. That will allow the sun to warm the soil, and air to evaporate some of the melted snow and spring rains that make the soil soggy.
Raised beds help with drainage. My vegetable garden is near a stream and the water table is high, especially in spring when it is occasionally flooded. Each fall I shape my beds for spring, raking soil into the beds before covering them with leaves. In the spring I rake the leaves into the walkways, but after the soil has warmed up in mid-June I will put down hay and newspapers around my plants.
I you want to warm the soil and kill any annual weeds that start growing early in the season, you can cover the soil with clear plastic. If you get what is called “4-mil” plastic, you can re-use it. Flimsy stuff sold to painters is not usually reusable. Be sure to pin down the edges, or better yet, put soil or boards over the edges to keep wind from lifting the plastic and cooling the soil.
On a sunny day the temperature under the plastic can exceed 100 degrees, “solarizing” weeds and killing them. Perennial weeds and grasses will have their tops browned, but it will not kill the roots unless you do this for a long time.
So what seeds can you plant early? Spinach, peas, lettuce can be planted 3 to 6 weeks before last frost. In the fall I let a few lettuce plants flower and go to seed. Those seeds fall on the soil and start up much earlier than I plant any lettuce. But I also start lettuce indoors to get nice sized plants in the ground in May for early eating. Carrots, beets, onion sets and radishes can go in the ground a week or two before last frost.
Tomato, pepper and squash family seedlings I plant in mid-June, well after last frost because I want the soil to reach at least 60 degrees before planting. Because I am bothered by a beetle that eats my cukes and squash I start those indoors instead of by seed outdoors. When the vines are about 6 inches long I plant them outdoors. By then they will survive any beetle munching.
Before planting any seedling outdoors, be sure to harden off the plants. That means to start putting the seedlings outdoors a few hours a day and increasing their exposure over the period of a week or so. You should do this for store-bought seedlings, too, as they have probably been protected from sunburn and windburn inside a greenhouse. But ask at the nursery if they are hardened off.
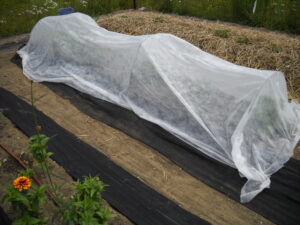
Row cover with hoops helps to keep insects off and keep plants warm
You can protect seedlings from light frost by covering them with something called row cover, Reemay, or Agribon. These are spun agricultural fabrics that come in 5 foot wide swaths that you can cut to fit your rows. Unlike plastic sheeting, this stuff breathes and allows moisture to pass through it. Buy the wires sold to support it and form hoops over your plants. It will also keep bugs off your plants, but you need to remove it when vine crops start to bloom – they are insect pollinated.
The more you garden, the more you know. But we never know exactly when a late killing frost will come. So I am always the last on the block to get my garden planted – but my plants catch up.
Henry is a gardening consultant and the author of 4 gardening books. Reach him at
henry.homeyer@comcast.net or PO Box 364, Cornish Flat, NH 03746. Please include a SASE if you wish a response by mail.
It’s Time to Prune Fruit Trees
Posted on Tuesday, March 16, 2021 · Leave a Comment
When I was a boy I loved to climb trees. I had no fear of heights, and loved the unique perspective I got looking down from the top of a tall pine or maple tree. Now that I’m all grown up, I no longer climb trees – unless I have the excuse of pruning, which I also love. On a recent warm, sunny day I got out my pruning tools and ladders to give my fruit trees “haircuts”.
A word about timing: conventional wisdom has it that you must prune apples and other fruit trees in March. Hogwash. You can prune then any time. I generally stop pruning when flower buds start to open, but prune again in August and in late fall after leaf drop.
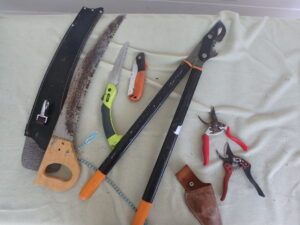
Pruning saws come in various sizes; loppers are a quick way to cut branches too big for your pruners
Good tools are important for doing a good job. You need sharp by-pass pruners (not the anvil pruners that crush the stems), a pair of good loppers and a small handsaw – folding saws with sharp teeth are good. I have bigger saws for large branches and even a small electric chain saw, but rarely use them.
Start by walking around the tree a few times and really looking at the structure of the tree. I want my trees to have enough open space that sunlight can get to every leaf. Sunshine feeds the tree and dries out leaves, helping to minimize fungal diseases. A robin should be able to fly right through a mature apple tree without getting hurt.
My first cuts are usually the biggest branches that need to be removed. It’s easier to remove one 3-inch thick branch than snip away 50 small branches on it. If you prune every year, you may not have a big branch to remove, but it’s surprising how quickly water sprouts turn into big branches going straight up through the middle of the tree. You can often reduce the height of a tree by shortening big branches.
These thin water sprouts clutter up the interior of the tree and should be removed each year
Water sprouts grow every year on most fruit trees. The first year they are pencil-thin and 12 to 36 inches long. Cut them off as they will just clutter up your tree. Trees grow them in response to a need for more food for the roots, and are most common in shady parts of the tree where leaves are not getting enough sunshine. Some varieties are more prone to growing water sprouts than others, and a hard pruning may stimulate them to grow in large numbers.
Dead wood should always be removed. In winter there are no leaves on the tree, and it can be tougher to determine what is dead. Look for dry, flaking bark. But the sure test is to take your thumb nail and scratch off a layer of bark. If you see green, it is alive. If not? It’s dead.
Look for rubbing branches, or branches so close that they will grow together. Choose one, and cut it off. Some trees, maples, for example, often send up branches that originate at the same point and are growing in the same direction. Remove one before they grow together and fuse (which results in a weak spot subject to breakage). Maples and birches, by the way, should not be pruned now when the sap is flowing fast. Do them in the fall, or even mid-summer.

These two branches will grow together and create a week spot so remove one or both
Branches often grow away from the center of the tree, as they should, but compete with another branch directly above or below it. Decide which is the better branch, and remove the other. I also look for branches that are headed into the interior of the tree and remove them.
When pruning, don’t leave stubs. Cut back each branch to its point of origin: the trunk, or a bigger branch. This will promote healing.
Fruit spurs on apples and pears produce flowers and leaves, and are indicators where you will have fruit later this year. They are easy to identify: they are short gnarly branches (3 to 6 inches) that have fruit buds. Fruit buds are bigger and fatter than leaf buds. They do not generally appear on young fruit trees. Learn to recognize them: when deciding which of two branches to remove, keep the one with more fruit spurs.
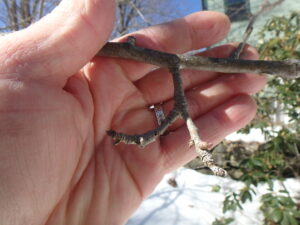
Fruit spurs are short with a fat bud or two
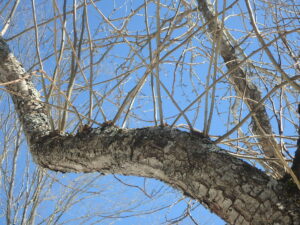
Fruit most often develops on what are called scaffold branches – sturdy branches that leave the trunk on an angle that is almost parallel to the ground, or aiming up slightly. Branches that go more straight up, older water sprouts for example, produce little or no fruit.
You can change the angle of growth of a branch that is only an inch or less thick. Once winter is over, attach string or rope to a branch and tie it to a peg in the ground or to a weight to bend it down. A half-gallon milk jug works well. Just add water until you have the correct angle on the branch. Forty-five to sixty degrees off vertical is fine. You can remove the weights in June.
When pruning, don’t overdo it. Trees need their leaves to feed the roots and fruit. In any given year don’t take more than 25% of the leaves (woody stems don’t count when calculating how much you have taken off).
One last fact: a well pruned tree will produce fruit that is bigger, sweeter and tastier than a tree that has been neglected. I don’t want lots of little fruit and try to remove some each year in June to encourage fruits to grow to full size. Leaves that get plenty of sunshine will produce more sugars for the fruit, so it will taste better. So get to work!
Henry is a gardening consultant living in Cornish Flat, NH and is the author of 4 gardening books. Contact him at
henry.homeyer@comcast.net or PO Box 364, Cornish Flat, NH 03746.
Starting from Seeds: It’s Time to Get Ready!
Posted on Tuesday, March 9, 2021 · Leave a Comment
I love starting seedlings indoors when it’s still cold and raw outside. It makes me dream of summer and the first red tomato. For me, it is still too early to plant most things, and I certainly don’t want to have to baby my seedlings along for 12 weeks or more. But if you haven’t ever set up grow-lights and don’t have all the equipment for indoor growing, now is the time to get everything you need before the stores sell out.
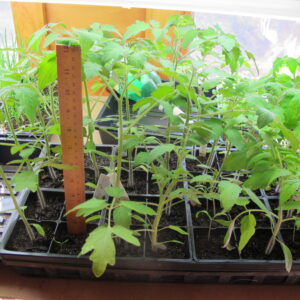
Tomato seedlings that are almost ready for the garden
First, some basics: you need lights over your seedlings in order to get good plants. Yes, I know some people grow things on a bright windowsill for a few weeks, but getting sturdy tomato plants or zesty zinnias requires supplemental lighting.
Second, you can’t use garden soil to grow your seedlings. Ordinary garden soil is too heavy and gets compacted with watering, and it may harbor fungal diseases. You need to purchase potting soil.
Last, you need a place that is at least 60 degrees, but no more than 70 degrees. Cooler temps at night are good. Electric heat mats place under your seedlings will help get quick, even germination, but are not required.
There are several types of lights for growing seedlings. For years I used fluorescent lights: 4-footers with fat T-12 tubes. These work, but now have been replaced with more energy efficient, slimmer, T-8 tubes. There are also LED grow-lights of various sorts that use even less energy, though those can be very expensive.
Sold as shop lights, T-8 2-tube fixtures should cost around $20 each, plus the fluorescent tubes which cost around $8 each. But do not, I repeat, DO NOT spend the money to buy full-spectrum tubes which cost upwards of $35 each. You are not raising plants for sale, and for the short time they will spend in your basement, regular cool white tubes are fine. Or mix cool and warm white to get a broader light spectrum.
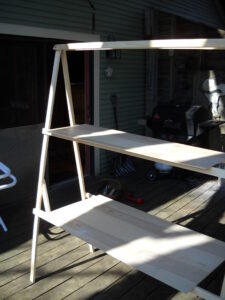
A simple homemade plant stand
If you have a warm basement, I’d suggest that the easiest approach for a starting a few things would be to use a card table and 4-foot fluorescent fixtures hanging from the ceiling. Put plastic over the table to protect it from water spills.
You can also go to my web site,
www.Gardening-Guy.com and search for “Building a Plant Stand”. That will give step-by-step directions for building an inexpensive A-frame plant stand that will hold 6 flats, and have room below it for 4 to 6 more flats on the floor.
Your hardware store can sell you something called “jack-chain” that will allow you to adjust the height of your lights as your plants grow. Ideally, your lights will hang about 6 inches above the top of your plants. Two four-foot fixtures, each with 2 tubes, hanging a few inches apart will illuminate 4 flats (or trays) of seedlings. When you buy your flats, be sure to get those that do not have holes in the bottom, as some do.
The flimsy “six-packs” that fit into the flats come in various sizes, but I always look for the biggest, deepest cells. So, yes, you can get tiny cells that will allow you to plant 48 or even 72 plants in a flat, but there is not much room for roots.
The flimsy 6-packs tend to self-destruct easily, particularly if you try to wash them out for re-use. But there are heavy duty planting trays and cells that will last many years. Gardeners Supply sells them, along with clear domes to go over them. They cost more, but will last forever, and some have self-watering features.
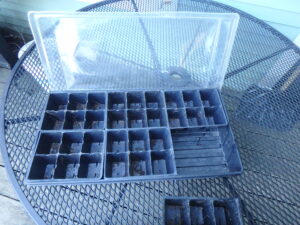
A flat with 6 packs for starting seeds and a plastic cover to contain moisture
What about the soil mix for growing? Buy good quality “Seed starting mix” labeled as such. I mix it with high quality compost in a 50-50 ratio. Sometimes I make my own starting mix using peat moss, perlite, vermiculite, compost and a slow-release organic bagged fertilizer. I start about 10 flats of plants each year, so there are cost savings for making my own mix.
Seeds are very susceptible to drying out, which can be lethal. One way to keep that from happening is to check on them often. Once a day is fine. Or, if you have a busy schedule, buy clear plastic covers that fit over each flat. These, like the flats, are re-usable. They will steam up, and rain the moisture back onto your plants, just like a tropical jungle. Remove them when most cells have plants that have germinated.
How deep should you plant your seeds? About 3 times the length of the seed. Tiny seeds need just a thin sprinkling of soil mix over them. Bigger things like pumpkin seeds can be covered with half an inch of soil mix. Press down lightly with your fingers after covering the seeds so the soil mix is in good contact with the seed.
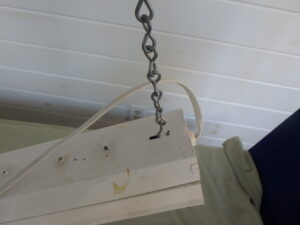
Jack chain easily allows you to adjust the height of your lights
Lastly, water them. I like a soda bottle for watering, as it can deliver a nice slow trickle. Water the soil mix before planting, because if it is too dry, it is resistant to absorbing water.
The bottom line is that starting seeds is fun. And it lets you choose plants you might not find at the garden center. So get your materials and set up your lights. I start tomatoes and other frost-sensitive plants 6 to 8 weeks before I would put them in the garden.
You may reach Henry by e-mail at
henry.homeyer@comcast.net, or by mail at PO Box 364, Cornish Flat, NH 03746. He is the author of 4 gardening books.
Pollen, Allergies and Plants
Posted on Tuesday, March 2, 2021 · Leave a Comment
If you suffer from spring allergies, this would be a good time to know what plants are affecting your comfort. Right now, many trees are dumping their pollen. Most trees are wind pollinated and produce lots of pollen. They depend on the wind to move pollen around – and up your nose.
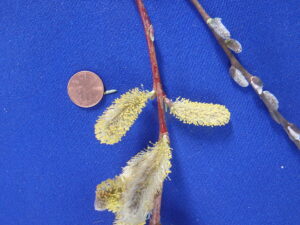
Male pollen producing pussy willow flowers on left with female flowers on right
Although some trees and shrubs produce both male and female flowers, many are dioecious, meaning that male and female flowers are on separate plants. It is thus to their advantage to produce their (insignificant-looking) flowers and lots of pollen before the leaves get in the way. Which for me, is right now. Showy flowers do not necessarily mean that trees like catalpa are low on the aggravation index (they are rated 8 of 10 on the index), but others like magnolias are lower. Both of those are pollinated by insects.
Of the trees, male poplars are among the worst – and in my area, they are just starting to bloom. Other culprits include willows, birches, oaks and some maples, but not all. If you are buying trees, look for trees that have separate male and female plants (as opposed to both on one). Always buy the female specimen if you can, as it is the males that produce the pollen, and cause the allergic reactions. Not all plant tags will tell you if the plant is male or female, but good nurseries may know.
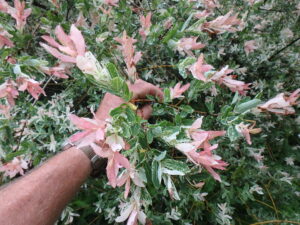
Hakuru nashiki willows do not produce blossoms or allergic reactions
Very popular in the landscape industry right now is the ‘Hakuru nashiki’ willow. It has tri-colored (green, white and pink) leaves in June, and is sold either as a multi-stemmed shrub or as a “standard”. Standards are created by grafting branches on the top of a straight, bare-of-branches stem that is generally about 4 feet tall. As far as I know, Hakuru nashiki willows are all female, so they do not create those fuzzy “pussies” and pollen.
Want a nice pussy willow ( Salix caprea)? Not all are bad for the allergy-prone. It is worth consulting a book like Tom Ogren’s “Allergy-Free Gardening” that lists trees and flowers species-by-species, (and often with cultivars) with their potential for making you miserable. Ogren’s book lists ‘Weeping Sally’ as a pussy willow with the lowest rating for causing allergies, while the male forms of white willow ( Salix alba) are among the worst rating. Even so, many of the males are sold as named cultivars for decorative purposes.
Not all pollen is created equal. Each spring I notice all the yellow pollen dropped on my car by pine trees. Pines produce huge amounts of pollen, but it is waxy and not very irritating to your nasal membranes. And it’s heavy, so it doesn’t fly far.
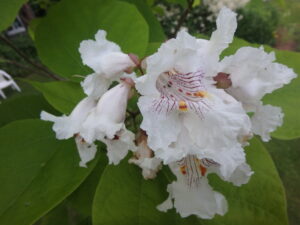
Catalpa blossoms are showy and insect pollinated but still can cause hay fever
After the trees do their thing, along come the grasses. The seven worst offenders are introduced species of grass, including orchard grass, blue grasses and timothy grass, which is commonly grown for animal feed. Grasses are wind pollinated, and their pollen can float long distances. Your lawn should not be a problem so long as you never let the grass get tall enough to blossom. But fungal spores in the lawn can cause allergic reactions, and can be stirred up by mowing, so if you get hay fever, you have a good excuse to get your spouse or kid to do the mowing.
Flowers with flashy form and generally are not significant allergy-producers. Tulips, delphinium and peonies are obviously trying to get attention. They are the flirts – and insect pollinated. Others such as hostas are among those least likely to cause an allergic reaction.
According to Lucy Huntington in her book, Creating a Low-Allergen Garden, members of the daisy family have flowers that are insect pollinated, but their pollen is highly allergenic to most sufferers. Chrysanthemums, asters, marigolds and zinnias can bother folks with allergies. I suppose that is particularly the case if you enjoy sniffing their scents. She also suggests avoiding geraniums (Pelargonium hybrids), strawflowers, dahlia hybrids, foxglove, sunflowers, nicotiana, and cosmos.
Huntington’s book is full of lists and suggestions for low-allergen plants. Here are some of her suggestions for plants suitable for people with pollen allergies:
Annuals: Snapdragons, petunias, annual phlox, scarlet sage (Salvia splendens), purple salvia (S. farinacea), pansies, bacopa, California poppies, nasturtiums and verbena
Perennials: columbine, astilbe, bellflowers (Campanula spp.), bleeding heart, delphinium, daylilies, Siberian iris, peonies, oriental poppies, penstemon, garden phlox, Jacob’s ladder (Polemonium caeruleum), hollyhocks, alliums, globe flower (Trollius spp.), lady’s mantle, coral bells, catnip, hosta, foamflower (Tiarella cordifolia) and periwinkle (Vinca minor).
The good news is this: pollen is generally released in the morning, and by evening much of it has settled down, so evening should be a better time to garden. And rain knocks the pollen out of the air, so run outside and pull weeds after a nice downpour. You don’t have to cut down the culprits, and wearing a Covid mask will help if pollen is really bugging you!


 Click Here to buy from Cobrahead