July Chores for the Gardener
Posted on Tuesday, July 4, 2023 · Leave a Comment
For me, July has started off wet: rains, heavy at times, three days a week and going on for weeks. Although I like not having to water my new plantings in the vegetable garden and flower beds, some plants are having a tough time- they need sunshine!
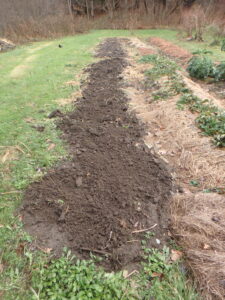
It’s fortunate that I make raised beds in my vegetable garden which is near our stream. Hoeing up the earth from the pathways and adding compost has helped me considerably. Even though the beds are only six inches above the walkways, it helps to drain soggy soil. Of course it’s too late to do that if you have already planted on the flat of the garden – but remember for next year, as we may see these conditions again.
If you haven’t thinned your carrots, beets and other root crops yet, now is the time to do so. I try to get that done by July 4th, but later is okay. You can thin to one inch if you want to thin them again to two inches in a few weeks, or you can just thin to two inch spacing now. The advantage to thinning twice is that your carrots will be big enough to eat when you thin them the second time.
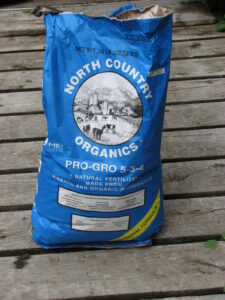
Carrots are heavy feeders, so you may want to side-dress the rows with a little slow-release organic fertilizer like Pro-Gro or Espoma Garden Tone. Just sprinkle a thin line of fertilizer alongside the carrots, and then use a hand tool to work it in a little.
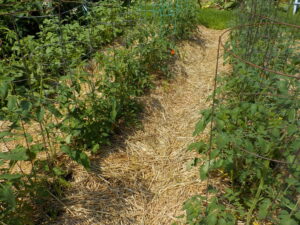
Straw placed over newspapers keeps down weeds in my vegetable garden
I recently finished mulching my pathways and around bigger plants like tomatoes. I put down a layer of newspaper – four sheets or more – and cover it with straw. This does a good job of keeping down the weeds. Hay is cheaper, of course, but has seeds which can grow.
For onions, carrots and other things planted close together in straight rows I tear strips of newspapers and cover them with grass clippings or, better still, chopped leaves from last fall. FYI: newspapers rip well from top to bottom, but not across the page.
I did lots of staking of peonies in June, as many of them have such heavy blossoms that they bend over and land on the ground, particularly after a rain. Tall fall asters and goldenrod and even phlox will fall over later on as they get too tall to stand up to rains and wind.
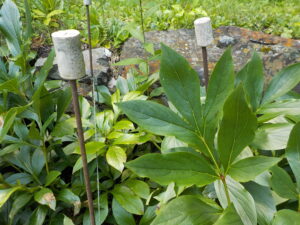
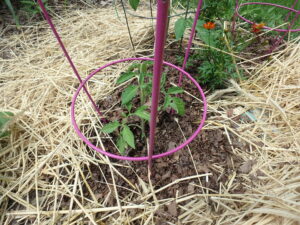
Wine corks placed on tips of iron rods protect me against a poke in the eye when bending over to sniff the peonies
I have lots of 4-foot and 5-foot quarter-inch diameter iron rods I had custom-made for me for holding up these fall beauties. The iron rods go deep into the soil more easily than thin bamboo stakes, and are stronger. To avoid getting poked in the eye when bending over, I put a wine cork on the top of each one. I drill a quarter inch hole into the cork and slide it on. They are a good excuse to buy a nice bottle or French red from time to time with a real cork!
It’s getting late in the season to cut back tall flowers to keep them shorter, but you might try cutting back some phlox or asters now if they haven’t start making flower buds yet. Traditionally this is called the “Chelsea Chop” and is named after the Chelsea Flower Show in London, which occurs in late May each year. After the Chelsea show English gardeners prune back big tall plants. They bloom later, are shorter, and often have many more blossoms. Good candidates for hard pruning include asters, Boltonia, purple cone flower, Joe Pye weed, sneezeweed (Helenium), bee balm, Russian sage, phlox, obedient plant, Rudbeckias of all sorts and Culver’s root.
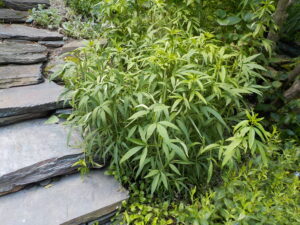
This tall coreopsis was cut back by half in late June to keep it a manageable size
Not all flowers respond well to the Chelsea Chop. Do not do this with lady’s mantle, columbine, goats beard, astillbe, delphinium, gas plant (Dictamus), fox glove, geraniums, daylilies, hostas, iris, lupines or oriental poppies, among others. You can find lists of which to cut and which to leave alone in Tracy DiSabato-Aust’s fine book, “The Well-Tended Perennial Garden”s. Everyone should have a copy of it.
Weeding flower beds is loved by a few gardeners, but avoided by many. I am so lucky that both my wife Cindy and I like to weed. Cindy is a formidable weeder, even better than me – and she has much more endurance than I do. If you don’t enjoy weeding, set a goal: work for half an hour. Work until this small bed is weed free. Weed every morning or evening for 15 minutes. Small efforts done every day really make a huge difference.
My advice? Get a good weeding tool that you like, one that will get under the roots so that you can lift from below and pull from above. For us, that is the CobraHead weeder (
www.CobraHead.com). It’s made like a curved finger with just a single tine. I can tease out roots that, if broken, would re-sprout. It’s important to get the entire root system out so you don’t have to pull the same weed over and over.
We use ground fall leaves in the flower beds, or lacking enough, we buy double-ground bark mulch. But be careful: if you use too much, you can starve your plants of water from light rains. An inch and a half is what I strive for. Anything less than an inch looks good, but won’t do much to deter weeds. And if there are roots from things like goutweed or Japanese knotweed, no amount of mulch will deter those culprits.
It’s Time to Buy Your Strawberry Plants!
Posted on Tuesday, April 27, 2021 · Leave a Comment
Traditionally, June is the month for eating strawberries. I dream of big, fat, juicy local berries that melt in my mouth and swim in juice when cut and made into strawberry shortcake. But you can, in fact, grow varieties of strawberries that produce berries all summer, or that produce berries in June and again in the fall. In any case, now is the time to buy your strawberry plants before they are all sold out.
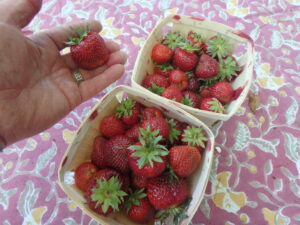
Day neutral strawberries first picking
First, some basics: there are three basic types of strawberries: June-bearing strawberries, so-called ever-bearing strawberries, and day-neutral strawberries. Plant June-bearing berries this summer, and you will need to wait until next summer for your first berries (pick off any blossoms this year so they develop good roots). Ever-bearing berries are not really ever-bearing: they will deliver a load of fruit this fall, and again in future years in June and the fall. Day-neutral berries are not affected by day length, and are truly ever bearing. The first year, however, you will not get any June berries from them.
Strawberries are sold in clumps of bare root plants, usually 25 per bundle. They should be planted when the soil is at least 50 degrees, and when risk of hard frost has passed. A hard frost is one that is colder than 28 degrees, and lasts for 12 hours or more.
You can buy plants starting in early May at your local garden center or feed-and-grain store. You can also go on-line and order from seed companies, but many varieties were already sold out at Fedco Seeds and Johnny’s Selected Seeds when I checked in late April. Nourse Farms in Massachusetts prefers that you order in the fall, but still had several varieties available when I checked.
Strawberries in spring mulched with straw
All strawberries like rich, well-drained soil. If you have a heavy clay you will need to make raised beds and add lots of compost. Work the compost in with a fork or shovel to make the soil fluffier. Even average soil needs compost for best results, as does sandy soil. Sandy soil will hold moisture much better if you stir in plenty of compost.
You do not need to create wood-sided beds. Just mound up the soil to create a bed about three and a half feet wide that is four to six inches taller than your walkways. For 25 plants, a wide bed twenty feet long should do. For day-neutral berries, you can plant a two rows of plants 12 to 18 inches apart in a bed. June berries need more space, so plant just one row per bed, and space 18 to 24 inches. But always read the directions that come with the berries and space accordingly. Don’t crowd your plants or they will produce smaller berries.
I recommend the day-neutral berries. They do not require as much work as June bearing plants, which send out runners that need to be rooted in or pinched off. The day neutral plants stay in nice tidy clumps. And they produce berries all summer long, starting in the second year. Their berries are smaller than June berries, however.
Assuming you have just average soil, you should work in some minerals and fertilizer in addition to compost before planting the berries. Five pounds of an organic, slow-release fertilizer in a 20-foot wide row should be adequate. A good organic bagged fertilizer will add the three most necessary minerals – nitrogen for green growth, phosphate for strong roots and good flowering, and potassium for strong cell walls and resistance to drought and cold.
Organic fertilizers also add other nutrients that do not come in a bag of chemical fertilizer, things like calcium, magnesium, sulfur, manganese, chlorine and iron. Organic fertilizers are made from things like seaweed, chicken manure, peanuts hulls and cotton seed meal. These break down over time and supply nutrients to your plants.
There are a number of ways of planting your strawberries, but the main thing to focus on is getting good contact with the soil. To plant your berries, I smooth the soil surface, then dig shallow holes with small mounds of soil in the center of each. I spread out the roots over the mound, and then cover the roots with soil and pat it down. It’s important not cover the crown, (the growing point where the leaves begin).
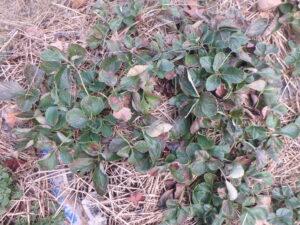
Strawberries mulched for winter
An alternative way is to just cut a slice in the soil with a putty knife and push the roots into that slice with the putty knife. The crown needs to be at the soil surface, and the soil well patted down. Nourse Farms ( www.noursefarms.com) has a video on how to use that method.
After planting, water well and then water two or three times a week until they are well established. All berries are high in water content, so don’t let the plants dry out if we have a drought again this summer.
Strawberries hate weeds, so always plant into a weed-free bed. Grasses will compete with your berries, reducing the size and number of your berries. One way to minimize the labor of weeding is to mulch well. I put down 4 to 6 sheets of newspaper over the soil between beds and cover it with straw, mulch hay or dry leaves.
Strawberries are a relatively easy crop to grow, and will reward you nicely. Most varieties will come back for a few years, but eventually they lose vigor. Still … strawberry shortcake anyone?
Watering in Dry Times
Posted on Tuesday, July 7, 2020 · Leave a Comment
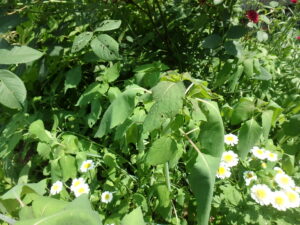
These limp leaves tell me it is time to water
June, for most of us, was a very dry time. When weeds and established perennials started to droop, I knew it was time to water, and I did. But watering done well takes time and, done poorly, wastes a lot of water – or doesn’t do the job. I have no crystal ball to know what the rest of the summer will be like – July started well with plenty of rain – but it’s good to plan ahead
First, how much rain do we need each week to be able to avoid watering? About an inch. If you have sandy soil, water runs right through it, so you need more. Clay soil has tiny soil particles and holds onto moisture nicely. But if clay goes bone dry, it can turn into something like cement that will let water run off the surface and downhill instead of soaking in.
In either case, you can make watering easier and your plants more vigorous by adding compost to your soil. That is easiest to do before planting, of course, but you can top dress the soil with compost and let earthworms, roots and rain work it into the soil over time. Half an inch of compost on the lawn each spring and fall will help a lot. And mulching with compost, an inch or so, will help your flowers and veggies considerably.
In general, I don’t like overhead watering systems. Yes, they do mimic a rain storm, but they waste a lot of water, and water the walkways and weeds as well as the plants. So long as the soil is not parched, I like to water plants using a watering wand.
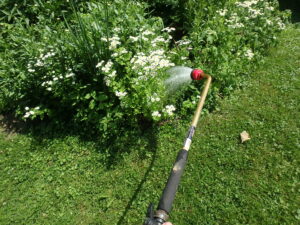
A watering wand directs a soft spray just where you want it
My watering wand is a 30-inch long aluminum tube with a watering rose on the end and a shut-off valve that allows me to increase or decrease the flow of water. I like those made by Dramm, a company that specializes in watering devices and has figured out how to deliver lots of water while not disturbing young plants.
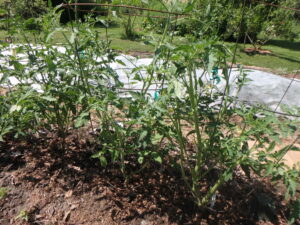
In the vegetable garden, I walk up the rows directing the water around my tomatoes or irrigating the lettuce. The wand allows me to spray water close to the ground level – it’s not falling from waist high, the way a nozzle on the end of a hose would. I place hardwood grade stakes at the end of each row to guide the hose and keep it from damaging plants
But during an extended period of hot and dry weather, I know I need to water each bed entirely, from side to side, but not the walkways. If I just water right around the tomatoes, for example, the surrounding soil will wick away the moisture that you gave to your plants. So you need to soak the soil around your plants, not just at the stem.
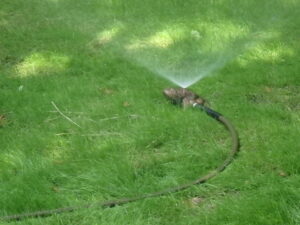
This simple, stationary watering frog waters a circle 20 feet across
When watering newly planted trees, or those planted last year, water in a circle around the tree or shrub that extends at least to the drip line. Later on, when a tree is mature, the roots can go far beyond that. If the soil is dry, you might be surprised how long you need to water around a tree in order to get water to get down 6 or 12 inches – which is where the roots are.
Another way to keep your plants happy in dry times is to mulch them well. This will keep the soil moisture from evaporating and will minimize those thirsty, greedy weeds.
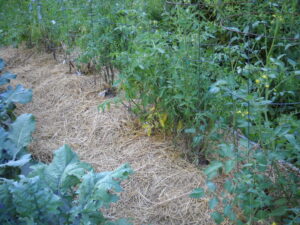
In the vegetable garden I put down 4 to 6 layers of newspapers or a single layer of cardboard or large brown paper bags, and then cover that with straw. To make sure a light rain gets to my plants, I don’t mulch right up to the plants. Or I’ll mulch with chopped fall leaves or grass clippings right next to the plants. Leaves or grass let rain pass through more easily than paper and straw, but keep down weeds.
This young tomato is mulched with a circle of chopped leaves, paper, and straw
Why use straw instead of hay? Straw generally costs more than straw – $10 a bale or more versus $5 or less. Mulch hay has seeds, that’s why. Straw is not supposed to have seeds, though occasionally it does. I was told that even if you see seeds in straw, they are immature and won’t germinate.
I don’t like to use black plastic in the garden. It does keep down weeds and holds in moisture, but it ends up in the landfill a year later. And it may interfere with the beneficial microorganisms in the soil – it gets pretty hot under the plastic. It can also create pools of water, a good breeding place for mosquitoes. So I avoid it.
In flower beds I prefer to grow plants so close together that few weeds grow there. But in new beds I use finely ground bark mulch. Never the colored kind, orange or black, as they have chemicals I don’t want.
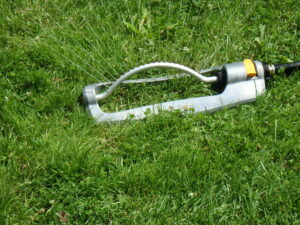
A flip flop watering device can cover a lot of space
For big areas of new plants or lawn, a sprinkler of some kind is good. I like a Melnor brand flip-flop sprinkler, model XT360 M. It is easy to use, and comes with a lifetime warranty. For small areas, I like a fixed sprinkler like my brass frog that waters calmly in a 20-foot circle.
Plants will usually recover from getting dehydrated, but it takes a week or more, so you lose valuable growing time. I want my tomatoes sooner, not later. So I make sure they don’t dry out too badly in dry times.
If you pay attention to your plant, if you really look at them, you will see when they start to wilt. That’s the time to water. So get a good watering device, and be ready!
Henry can be reached at
henry.homeyer@comcast.net. He is the author of 4 gardening books, and can make house calls to offer advice about your garden if you live nearby. He lives in Cornish Flat, NH.
As we move from dreaming to planting, we all want to offer our plants the perfect soil. This leads some gardeners to buy a big bag of 10-10-10 and sprinkle it heavily on everything. For others, manure or compost is the answer to increasing soil productivity and plant health. And then there are bagged minerals, organic bagged fertilizers, rock powders and more.
What do plants need? Scientists agree that plants need minerals for health: nitrogen (N) for promoting green growth; phosphorous (P) for better roots and promoting flowers, seeds and fruits; potassium (K) for strong cell walls to survive drought and cold. These three elements are often called “the big three” and listed as percentage by weight on fertilizer bags (5-10-5, for example). Chemical fertilizers have just those three elements, plus inert fillers (which would be 80% in the example cited).
Additionally, there are elements that are needed in smaller amounts including magnesium, calcium and sulfur. In very small amounts plants need iron, chlorine, manganese, zinc, copper, boron, molybdenum and nickel. None of those are found in chemical fertilizers, but are present in unlisted amounts in bagged organic fertilizers, and in good compost.
These are slow release fertilizers. Most of the ingredients are not water soluble, but are broken down and utilized in concert with bacteria and fungi in the soil. That is good, as they are not washed away in rainy times the way many chemical fertilizers are.
I’ve been adding finely ground granite dust to my soil for 20 years or so, and a commercially prepared rock and mineral soil supplement called Azomite for nearly as long. I’ve done side-by-side trials of plants with rock powders and without them, and have seen dramatic differences. Soils with rock powders have helped plants survive drought, and have increased crop yield in my peppers.
The mechanism by which rock powders work is unknown. I interviewed a soil scientist who pointed out that every 10,000 years or so we’ve had glaciers come down and deposit ground rock, distributing obscure minerals in the soil. Maybe the rock powders I add are just mimicking what the glaciers have done – though not recently.
What about compost? It is pure gold, from a soil perspective. It has all the minerals needed by plants and good compost also has literally millions of beneficial bacteria, fungi and other living things in each spoon of goodness.
Beneficial organisms in compost work with your plants, sharing minerals with your plants; they benefit from sugars exuded from the roots each night. That’s right, over eons the plants and microorganisms have developed a mutually beneficial system.
How much compost should you use? I have been putting an inch or two over my vegetable beds every year, and working it in. If you are buying it by the bag, even half an inch is good – with some extra in the hole with each tomato.
What about trees and shrubs? Most do not need fertilizer or those tree fertilizer spikes sold at hardware stores. Mother Nature does not provide fertilizer, she adds organic matter to the soil over time as leaves decompose and living beings of all sorts die and add to the soil.
That said, if you live in a new subdivision, your soil may be nothing but sterile subsoil with a thin layer of “topsoil” spread by the contractor. Adding organic matter to the soil in the form of compost will help it become biologically active. It will add minuscule amounts of the less common minerals.
Treat your soil to some compost at planting time. And if you use fertilizer, don’t overdo it – more is not better. Read the directions of anything you add to the soil.


 Click Here to buy from Cobrahead