Tips for Growing Great Garlic
Posted on Tuesday, October 10, 2023 · Leave a Comment
If you lean toward lazy (or have kids, dogs and a job), growing garlic may be just the ticket. It is the easiest of all vegetables to grow. Once planted and mulched, it requires little or no work until harvest. A good harvest is guaranteed if follow my instructions. Even with all the strange weather we’ve seen, I’ve never had a bad crop in the past 25 years or so of growing garlic.

Hard neck garlic cloves surround a stiff neck and are best for New England gardens
Now is the time to buy garlic for planting – unless you have some from your own garden saved for that purpose, as I do. You’ll want to get your garlic planted a month before the ground freezes, so depending on where you live, you may want to plant some soon. Garlic needs to establish roots now, and is not generally planted in the spring.
There are two categories of garlic: hard neck and soft neck. Both will grow in New England, but hard neck is the type grown by most farmers, and the most cold-hardy. It produces a stiff scape or stem each summer that is edible. Soft neck garden generally comes from California, and is good in the kitchen; it is also the type braided and hung from the ceiling in Italian restaurants as decoration. Hard neck garlic generally has more flavor; a wide variety of flavors is possible, depending on the type you grow.
Garlic does best in rich soil that drains well. If you have a heavy clay soil (one that is sticky when wet), you will need to add plenty of compost to your soil. Adding sand will not help, as sand added to heavy clay produces something like concrete that hardens up in dry times.
If you have poor soil, you may want to build a wood-sided raised bed, and add plenty of compost and topsoil that you purchase in bulk or in bags. I find Moo-Doo brand composted cow manure and topsoil are a good soil additives that are sold in bags in many garden centers. A 50-50 mix of your soil (or purchased topsoil) and compost should work well.
When making a wood-sided bed, I don’t recommend treated lumber. Even though most treated lumber is safe to handle and much less toxic than 20 years ago, I don’t want any chemicals leaching into my soil. I use rough-sawn lumber from a local sawmill, preferably hemlock. It generally lasts about 10 years. Eight-inch wide planks are wide enough to make a nice box.
Plain pine boards will work, too, and metal corners are readily available at garden centers or from catalogs like Gardeners Supply and Lee Valley Tools. The corners make constructing a garden box easy even for non-carpenters. All you need is a cordless drill to drive the screws. Carrots and other root crops do well in garden boxes, so you can alternate them with garlic in subsequent years if you build 2 or more boxes.
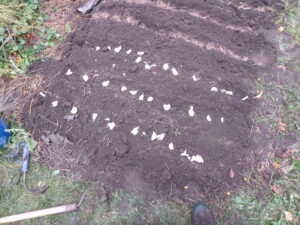
Place your garlic cloves on the soil to establish spacing before planting
I generally use my own garlic for planting, as it has adapted to my soil and climate over the years. But if I see big, fat bulbs of garlic at a farmers market, I sometimes buy some. I don’t recommend buying garlic for planting at the grocery store as most has been treated to prevent it from germinating, and so it will last longer.
Where can you get garlic for planting? If there is none at your local farmers market, you can get organic garlic from Johnny’s Selected Seeds in Maine (877-564-6697 or
www.johnnyseeds.com). But don’t wait too long – they sell out most years.
Once the soil is loose and weed-free, I plant. I take a CobraHead weeder, a nice single-tined weeder, and make furrows in the soil of my raised bed. I keep the furrows about 8 inches apart. I sprinkle some organic bagged fertilizer into each row, and stir it in.
I break the garlic bulbs apart, separating the cloves – there are usually 5 to 10 cloves per head. I push the cloves into the loose soil, pointy end up, about 3 inches deep, and 4 inches apart. I cover with soil, and then pat it gently.
The last step is key if you want a weed-free garlic bed: put a foot of fluffy mulch hay or straw over the planted garlic. The straw will pack down over the winter and make a nice mulch that will keep most weeds from growing, but the garlic will push through it. It will be ready to harvest next July.
D
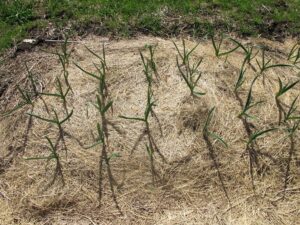
Garlic grows through th mulch, shown here in May
epending on when you plant, the soil temperature, and when real cold weather comes, your garlic may send up a few green shoots this fall. Don’t panic! It won’t hurt your garlic. When cold weather comes, it will go dormant and do just fine next spring.
I believe that garlic is a healthy and tasty addition to my diet. It may even be medicinal – it has been used that way for centuries. Some believe that if you crush your garlic and then wait 10 minutes before cooking, it will generate cancer-fighting compounds. Who knows? Certainly it can’t hurt.
And this winter if you chew on a clove of garlic before going to the store, you’ll never get a cold – because people will stand back from you in line!
Henry lives in Cornish Flat, NH. He is the author of 4
gardening books and is a UNH Master
Gardener. His e-mail is
henry.homeyer@comcast.net.
Putting the Garden to Bed
Posted on Tuesday, October 3, 2023 · Leave a Comment
To me, this felt like the summer that never was. It was rarely hot and sunny. The rainy gray days felt more like those in Portland, Oregon than in New England. Even so, the summer we had is largely over and it’s time to clean it up and get ready for winter. Let’s take a look at what we need to do.
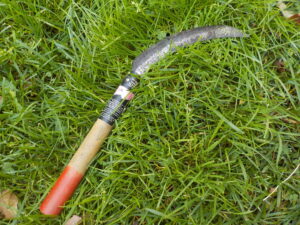
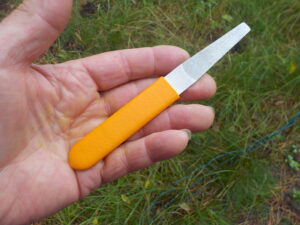
This harvest sickle is great for cutting back stems of flowers
It’s time to start cutting back flowers that are no longer blooming. I like using a small serrated “harvest sickle” for the job instead of hand pruners. It’s available from www.OESCOinc.com for about $8. I grab a handful of stems and slice through them with the tool, getting several stems at once. Of course you could use an old steak knife instead. I leave stems bearing seed heads that the finches, cardinals and other seed-eaters might munch on this winter. Wear gloves when you use the tool – it is very sharp!
I am conscious of erosion when removing plants in the fall. I think it’s better to cut off the stems of big zinnias, for example, than yank them now. That way I am not opening up the soil, making it vulnerable to erosion or providing a nice resting spot for air-borne weed seeds. Many weed seeds are tiny and can blow in from your next-door neighbor’s garden. I can always dig out roots in the spring when I plant something else, and they may decay and add some organic matter to the soil in the meantime.
Once you have cut back and cleaned up the garden a bit, you should pull all the weeds. I know this can be a tedious chore, it’s better done now than in the spring. Weeds in spring will start growing long before you start planting – and before the soil is dry enough for you to work it.
Weeding is easiest to do when the soil is moist. If you have big, deep-rooted weeds like burdock, you should use a garden fork to loosen the soil. Plunge the fork into the soil and tip it back, loosening the soil. Do that in a few places for a big weed. Then pull s-l-o-w-l-y. A quick yank will break off roots that will survive and grow next summer. Any weed that is loaded with seeds should go in a separate compost pile -otherwise the seeds could come back to haunt you, even years later. For smaller weeds, I like my CobraHead weeder.
And here’s a little mentioned fall task: getting rid of the flowers that have not done well in the past few years. That’s right, not everybody gets to ride the bus. This is a good time to say to plants that have not performed, “You’re off the bus. Go live in the compost pile.” A plant that is too aggressive – or one that just won’t bloom – should be exiled. Next spring, that gives you license to buy something nice – you have a gap to fill in the perennial border.
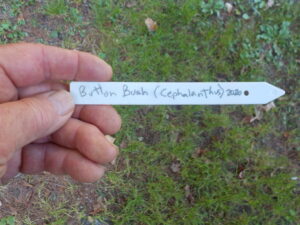
Plastic tags are good reminderrs of plant names
What else? Place labels in the back right corner of any clump of flowers that is relatively new. By spring you may have forgotten what it is. I like those narrow white plastic labels. Not to look at, but to do a job. I use a #2 pencil or a special crayon to write the name, and then I push the label deep into the soil so that only a smidge is showing. If I can’t come up with a name, I know where to look. Back right corner.
Outdoor flower pots need to be emptied, cleaned and put away after frost. Don’t wait until December to do this – if a pot full of wet soil freezes, it will crack. You may as well clean out the pots now – rather than in the spring. And save all that potting soil. You can invigorate it in the spring by adding compost and some organic fertilizer. So fill up a trash can or a few buckets with that potting soil and re-use it.
The vegetable garden needs to be weeded, and preferably mulched with chopped up fall leaves. If, like me, you make mounded wide beds, re-shape the beds now by hoeing up some soil from the walkways. Pull dead plants and get rid of them.
If you have an asparagus patch, look to see if your plants are loaded with those little red “berries”, their seeds. If you see seeds, cut down the stems right now. Some of those seeds will settle in and start more asparagus plants – and they will fight for moisture and minerals just as weeds do.
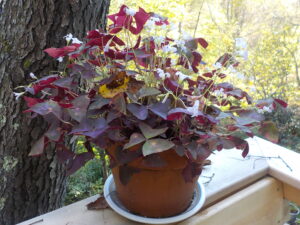
Empty out flower pots before they freeze and burst – or bring the plants inside for the winter
If you have old maple trees, think about giving them some ground limestone or agricultural lime this fall. Acid rain dissolves and washes away the calcium they need. Adding some lime will increase the vigor of your trees. And remember that soil compaction is bad for tree roots. Don’t park your car near a tree you love. Sprinkling a little compost over the soil will loosen it up as earthworms move it down and microorganisms break it down. Roots go far from the trunk of trees – much farther than the “dripline” of the branches.
My last task is always to rake the leaves. I chop mine in a chipper-shredder, but you can also run over them with a lawnmower. Leaves are full of good nutrients for plants, and are much loved by night crawlers and microorganisms. Rake the leaves onto a tarp and drag them away – that’s much more efficient than packing them into a wheelbarrow. Once it has rained, the leaves will settle in and make your plants feel cozy and loved.
Reach Henry at PO Box 364, Cornish Flat, NH 03746 or by email at
henry.homeyer@comcast.net. He is the author of 4
gardening books.
Fall Flowers Are Important for Pollinators and Birds
Posted on Tuesday, September 26, 2023 · Leave a Comment
Despite my best efforts to support monarch butterflies, this year was discouraging: I only saw two monarchs visit my gardens. I have a small bed just for milkweeds, both the common one and swamp milkweed (Asclepias incarnata). But no monarchs laid eggs there this summer, no larvae ate the leaves, and I saw no butterflies sampling the nectar.
I know the importance of food for migrating monarchs at this time of year. They need to fill up on carbohydrates, fats and protein before flying long distances. That holds true for birds, too. Right now I have plenty of flowers blooming for monarchs and other pollinators, and seed heads waiting for the birds. I’m a bit discouraged, too, by the lower numbers of birds I am seeing. Let’s take a look at some of my fall favorites that migrating creatures could be feasting on.
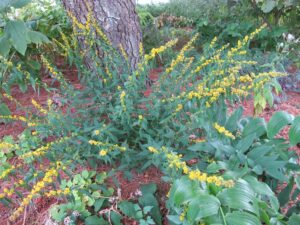
Blue stemmed goldenrod or Solidago caesia grows in shade
According to Doug Tallamy, the guru of native plants for pollinators, the number one plant we should all have is golden rod – and we probably all do. There are dozens of species of native goldenrod, all popular with bees, moths and butterflies. Many gardeners pull them out when they show up uninvited. A few species spread by root and can take over a flower bed – but others are clump-forming. Even if you don’t want them in your beds, think about leaving them at the edges of your fields or woods.
Of those species easily found for sale in garden centers, the best is Soldidago rugosa ‘Fireworks’. This plant is 3 to 5 feet tall, and stays in an ever-expanding clump in full sun or part shade, but does not take over. Its blossoms last a long time, the stems curving gently outward, like fireworks. And no, goldenrod does not cause hay fever – that is ragweed, which blooms at the same time.
Less common is blue-stemmed or wreath goldenrod (Solidago caesia). I bought a plant 20 years ago and it is blooming now in dry shade. It really has not expanded its reach very much. It grows just 1- to 3-feet tall, but usually is about 18 inches for me. It has delicate flowers that help light up a dark spot.
New York ironweed (Vernonia noveboracensis), is a tall native plant in the aster family with purple blossoms. It is still blooming for me, a month after starting to bloom. It does this by producing lots of buds which open sequentially – so it is not always a dramatic flower in a vase. But the bees love it. It is happiest in full sun in moist soil, but there it got too big for me, so I moved mine to dry soil with only morning sun. Now it is more manageable, but still a big plant. I’ve read that if you cut it back to the ground when it is 2-feet tall, it will stay smaller – but I never remember to do so. Sigh.
Speaking of asters, there are many native species, all good for pollinators and loved especially be monarch butterflies. This year the woodland asters are quite dramatic. They are a pale lavender, and grow in shady places. Elsewhere a taller wild cousin stands 4 to 6 feet tall with deep purple or pink flowers. These grow in full sun and are often seen by the roadside at this time of year. Asters of all sorts are readily available at garden centers. Ask for native ones, not fancy hybrids.

Joe Pye weed ‘Gateway’ blooms longer and better than wild forms
Joe Pye weed (Eutrochium purpurea) is another tall plant in the aster family. It can get huge – over 6-feet tall if grown in rich, moist soil. A named cultivar called ‘Gateway’ has longer lasting flowers and richer colors than the wild ones, though those are nice, too. Smaller varieties such as Little Joe, Baby Joe and Phantom are nice, and better suited for smaller gardens. I haven’t grown them but see they are sold as being 3- to 4-feet tall. Monarchs and other pollinators love them. All appreciate soil that does not dry out.
One tall annual that monarchs love is Brazilian verbena (Verbena bonariensis). It grows tall stalks that are remarkably tough – they grow 4 or 5 feet tall, but rarely need staking. Its flowers are in small clusters. It often drops seeds which send up new plants the following year.
Lastly for pollinators, I have to recommend fall crocus – which is not a crocus at all, but a Colchicum. This is a bulb plant that flowers on a six-inch stem (actually the throat of the blossom) in pink, white or lavender. It sends up foliage in the spring that dies back, then each bulb sends up a cluster of blossoms in September, or even earlier. They do best in full sun and rich soil, but do fine with some shade. They like to be fertilized each year. I often see small bees and wasps buzzing around in the blossoms.
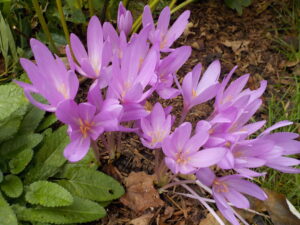
Colchicum or fall crocus
I know that many gardeners are already cutting back their flowers in preparation for winter. But hold on! Flowers with lots of seeds can be left as winter snacks for our feathered friends. Among the best are black-eyed Susans, purple coneflower, sunflowers, zinnias, Joe Pye weed, coreopsis, sedums and ornamental grasses. Wait until spring to cut those back so that finches, chickadees, cardinals and other seed-eaters can enjoy them, especially on those cold, snowy mornings when you don’t want to go fill up your feeder.
And of course, leaving some work for spring means less work now! So leave some seeds for the birds, and enjoy watching them in the winter.
Sharpening Pruners
Posted on Tuesday, September 19, 2023 · Leave a Comment
Fall is a good time to prune deciduous trees and shrubs. Once the leaves have dropped you can see the form – and the clutter – and decide what to take out. But before you begin, think about sharpening up your pruning tools, replacing blades, or buying new ones. Dull pruning tools are like dull kitchen knives: they’ll do the job, but not very well.
This sharpener is embedded with industrial diamond chips and costs under $10
How tough is it to sharpen your own pruners? It’s really not that difficult. The biggest problem people have is overcoming their initial fear of ruining their tool by doing it wrong. You need to learn the proper angle, have the proper sharpening tool, and the patience needed to do it right. Experience will tell you if you have done well, and you won’t ruin those Felcos (the most common brand of by-pass pruners out there) even if you don’t get it quite right the first time. It’s fun, once you get the hang of it.
What do you need for sharpening tools? The best sharpeners for hardened steel tools are made using synthetic monocrystalline diamonds embedded in nickel. I like the diamond sharpeners because they are very efficient. As a rule, five to ten minutes on a conventional oilstone is equal to about a minute with a diamond sharpener. Coarse files are fine for most pruners, while fine files are better for scissors and knives that are kept very sharp.
What’s the first thing you need to do when starting off? I clean the pruners, which usually are covered with dried sap and dirt and sometimes rust. You can use soap and water, but I prefer a product called Sap-X. I let it work for 30 seconds and then scrub the blades – first with coarse steel wool and then, after reapplying the solvent, with a green scrubbie or fine steel wool to get the rust. If you don’t clean your pruners prior to sharpening, all of that debris will end up clogging your sharpener.
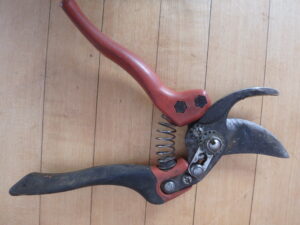
Felco pruners come in various sizes
Then what? Grasp the pruner in your left hand (if you are right-handed), holding on to the handle that extends to the cutting blade. The cutting blade is the one that moves when you open and shut the pruners, and is the only one that you need to sharpen. Steady it by placing the pruner on the edge a table. Working under a bright light helps, because it will help you to see the shiny edge that develops as you sharpen.
Start sharpening as near to the throat of the pruners as you can (where the two handles join). Place the narrow tip of the tapered file at the throat, and push the file away from you, sliding it down the length of the beveled edge. With practice you will be able to use the full length of the file as you run it down the blade.
How will you know if you are sharpening at the correct angle? What you’re trying to do is restore the edge of your pruners to the original angle set when it was manufactured. Before you start take a magic marker and “color” the steel on the beveled edge of the moveable blade. This will help you to see what you’re doing – you want to remove the marks evenly across the beveled edge with your sharpener. If only a small portion of the blade turns shiny, you need to change the angle of your file slightly.
How much pressure should you apply on your sharpening tool? Not much – let the diamonds do the work. Sharpening will feel awkward at first, but gets easier as you do it. Use nice slow even strokes.
If you don’t have pruners, buy the best ones you can afford. If you take care of them, they will outlast you. Yes, you can buy some that look like good for $10, but the quality of the steel will not be the same as buying good ones. Plan on spending $50 or more. If you can try them out before buying some, -or use a friend’s pruners- that would help you make a good choice. They all come in various hand sizes, and some are right or left handed.
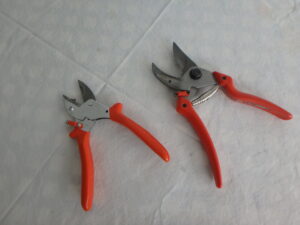
These Bahco pruners are French made and my favorties
I have tried many kinds of pruners, but my favorites are made by Bahco, a French company. I’ve had some for 20 years that have a good ergonomic design and will cut branches up to 1.25 inches in diameter. I got mine from a company in Massachusetts, OESCO (1-800-634-5557 or www.OESCOinc.com).
And what if you can’t seem to get sharpening right, then what? I’m sure with a little practice you’ll get it right! But good pruners have replaceable blades, so if you’ve been cutting steel fencing with your pruners and ruined them, you can buy a new blade.
A replacement blade for a pair of Felco pruners (which cost $60 or more new) only costs about $20. Changing a blade requires a few basic tools, some common sense, and less than 5 minutes of work. And you need to look carefully at your pruners to see which model you have. Felcos have a number on the stationary blade, depending on the model you have, anywhere from 2 to 12.
As a last resort, look in the Yellow Pages under “Sharpening Services” and you should be able to find someone to do it for you – and maybe even show you how to do it yourself next time.
Henry lives in Cornish, NH. You can reach him at
henry.homeyer@comcast.net. He is the author of 4
gardening books and offers PowerPoint presentations to
gardening clubs and libraries.
Invasives: What are they? What can you do about them?
Posted on Tuesday, September 12, 2023 · Leave a Comment
I’m lucky. Unlike many houses built in the 1800’s or early 1900’s, mine had no invasive plants when I bought it in 1970, probably because it was built as a Creamery, or butter factory. Decorative plants were not needed. Most older houses are plagued with plants brought from Asia or Europe by well-meaning people who did not know that once imported, those handsome plants might not have any predators that could keep them under control. Most of our native insects will not eat foreign plants.
Plants including Japanese knotweed, Asian bittersweet, goutweed, purple loosestrife, yellow pond iris and multiflora roses have thrived in New England – and all are nearly impossible to get rid of, once established. Unfortunately, I now have four of the six mentioned above. But no Japanese knotweed or bittersweet, thankfully (they are two of the worst).
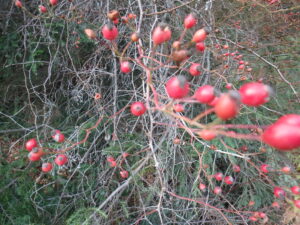
Multiflora rose hips are eaten by birds but the plants are invasive and should be removed.
Multiflora roses just showed up on my property last year, probably by birds that dropped seeds. It is easy to see roses growing in your woods or fields, or even in a garden bed and pass it by as “just a rose”. But the roses we love don’t just appear.
The multiflora rose was introduced from Asia in the 1860’s as a vigorous ornamental rose and as a source of rootstock for grafted roses. In the 1930’s it was widely introduced as erosion control and alongside highways – a mature planting is so dense it can prevent cars from going over median strips. But the birds liked the rose hips – their seed pods – and it escaped cultivation.
So what am I doing to eliminate it on my property? I am digging it out. Most effective for one or two year old plants, I am using a curved, single-tine hand tool called the CobraHead (
www.Cobrahead.com) to carefully excavate the roots until I can lift the plant out.
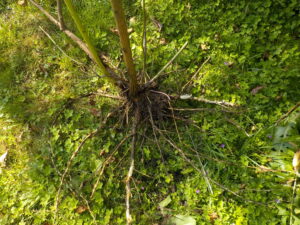
Multiflora rose roots radiate out from the central stem
First, I dress appropriately: jeans, long-sleeved shirt, a hat with a brim, and heavy winter leather work gloves. This culprit wants to hurt anyone trying to uproot it. I cut off the branches, just leaving a foot or so to grab onto when pulling it out. Then I loosen the soil and pull weeds around it. The roots radiate outward from the stem like spokes on a bike. I loosen each root and tug gently when they are small enough to remove.
I do not burn brush anymore because of global warming, and don’t want any errant seeds to escape, so I cut up the branches and brought them to our town recycling center. I put them into the trash going to the landfill, along with the roots. It took me about an hour to remove and cut up one plant – and I have several. But this plant can grow 10 feet or more in a year, and strangle trees or shrubs.
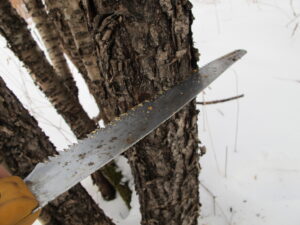
Girdling buckthorn twice with a pruning saw will slowly starve it to death
I’ve read that just cutting back the stems to ground level will stimulate the roots to send up new shoots everywhere, causing a bigger problem. There is no easy answer. Invasive plants are always difficult to remove – usually a scrap of root can generate a new plant – or several.
Buckthorn is another invasive that is common along streams and at the edge of fields. Like multiflora rose, cutting it down stimulates the roots to send up new shoots. The best way to eliminate it is to starve the roots: Take a pruning saw and cut through the bark and the green layer of cambium beneath that. Go all the way around the trunk, then repeat six inches above the first cut, and repeat. This will not kill the tree until the third year, but this slow death will not stimulate the roots to grow. Best done in winter or fall after leaf drop.
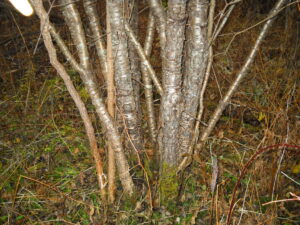
Buckthorn often grows with several stems in a tight grouping
Since buckthorn are often multi-stemmed, it can be difficult to use that method. Do it up high enough that you can get your saw in between the stems. But I’ve done it, and it works.
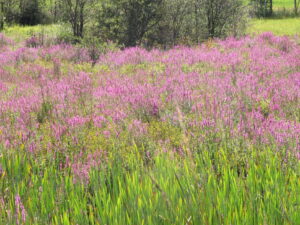
Purple loosestrife is blooming now in swamps and wet places – it is gorgeous, but outcompetes many of our native wetland plants that feed pollinators and other animals. Like many invasives, it produces huge numbers of seeds and these seeds don’t all germinate the next spring – many stay dormant for years. I’ve read that multiflora rose seeds can stay viable up to 20 years – a good reason to clear plants out when young.
My approach to purple loosestrife is to dig out new, young plants. I recognize them by their square stem, the leaf shape and the color of the stem which is often reddish. But for big established plants I just use a curved harvest knife to slice off the foliage once or more than once each summer. This prevents seed production, and reduces plant energy.
As regular readers of
this column k now, I only use organic techniques in the
garden.
This means no chemicals including herbicides. From what I have read, most herbicides will not kill the invasives mentioned in
this article. They will set them back considerably, depending on the age of the plant and the dose of the chemical. But learning to recognize all the invasives is best. And if one appears on your landscape, get rid of it immediately! And remember, persistence is important
Henry is the author of 4
gardening books and lectures at
garden clubs and libraries. He lives in Cornish, NH. His email is
henry.homeyer@comcast.net.
Gardening Better As We Age
Posted on Tuesday, September 5, 2023 · Leave a Comment
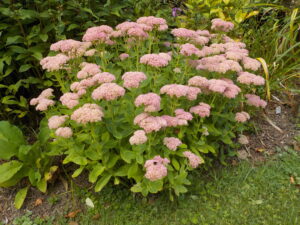
Sedum ‘Autumn Joy’ is a reliable and easy perennial
As a Certified Senior Citizen I sometimes wonder if I am too ambitious in my garden. I have about an acre of gardens with 200 or more kinds of flowers and a good-size vegetable garden. These gardens please me greatly, and I visit them daily all year, even in winter. In gardening season I spend considerable time weeding, pruning, mulching and admiring our gardens. I am blessed with a wife who loves to garden, and even loves weeding and edging!
Still, I know that my body will not always be able to work as hard as I ask it to now. So what can we do as we get older to make our work easier? First, we can stop buying new plants and creating new garden beds when our current beds are full. That is a hard choice to make, but I do my best to follow that rule.
We can also diminish the size of our gardens. For years I have grown 35 to 50 tomato plants each year. But I will try to drop down to 25 next year, and a few less each year after that. I do love the tomatoes and freeze and dehydrate many each summer for year-round use. But we do have plenty of farm stands growing great veggies, and I could use them more.
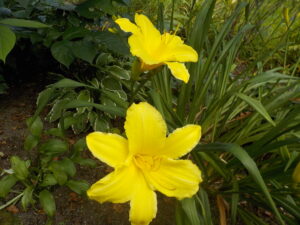
Daylilies are easy to grow and require little work
Raised beds make gardening easier on us, too. I have one nice deep cedar gardening “trug” that is six-feet by two and a half-feet in size and stands 30 inches tall. I got it from Gardeners Supply several years ago and it has held up well. I grow mostly kitchen herbs in it, along with a little lettuce and a few hot peppers. It is just steps from the house, while the vegetable garden is downhill and a few hundred steps away. I might get another, or build one.
I recently visited my friend Fred Sullivan, a retired dairy farmer, who lives nearby. His wife of many decades, Shirley, passed away last year; she did most of the vegetable gardening but Fred has taken it on. Some years ago he made Shirley four nice raised beds using landscape timbers. Each is 4 ft by 8 feet and about 20 inches tall. He grows tomatoes, cucumbers, summer squash and some Swiss chard.
I asked Fred about his gardening efforts. He told me that the doctor said he needed to stay active if he wanted to stay healthy. Gardening is a good form of gentle exercise for someone in their 80’s, and you get “free” food, too! His best advice: “Be good to your soil, and it will be good to you.”
The raised beds make it easier to work. If you want raised beds, many companies are producing easy-to-assemble beds that are reasonably priced. Although most require quite a bit of soil mix, you can re-use the soil from year to year. I add fresh compost and some slow-release fertilizer each spring to my raised beds.

Sydney and her dog, Phoebe
I recently called my friend Sydney Eddison at her home in Connecticut to talk about gardening as we get older. She is the author of many gardening books and a few nice small books of poetry in recent years. Her book, “Gardening for a Lifetime: How to Garden Wiser as You Grow Older” (Timber Press, 2010) if full of good ideas.
Sydney told me, “Cultivate imperfection.” She said that as we get older we have to accept that our gardens can never be perfect. But she emphasized choosing plants that are reliable under any conditions, and that are low maintenance plants. I agree.
Delphinium and peonies, for example, are wonderful plants but most need to be staked and looked after to keep them from flopping or breaking in a heavy rain. I can’t imagine ever getting of my peonies, but maybe I don’t need quite so many – I could share a few with younger friends.
A plant that Sydney loves is a sedum called ‘Autumn Joy’. She has a dozen or so mature plants, each clump 30 inches wide, and they look good even in winter wearing what she calls “snowy hats”. Daylilies are also wonderful – and a mainstay in her garden. She pointed out that they can bloom for nearly 2 months if you pick early, mid-season and late season varieties.
Shrubs are less work to maintain than perennials or annual flowers. Plant them, or have someone plant them, and they will require little – so long as they are not varieties that grow inordinately fast. There are plenty that can go several years without pruning.
One of my favorites is called fothergilla (Fothergilla major). It has nice white bottle-brush blossoms in May and spectacular fall foliage. Mine, after 20 years and very little pruning, is only 5 or 6 feet tall and wide. It’s hardy to Zone 4.
And of course, the easiest plant to grow is lawn grass. Once established it really only requires a weekly mowing. There are plenty of people who are willing to do the mowing for a reasonable fee – and there is little they can do to damage it.

Sydney Eddison’s book is full of good advice for aging gardeners
Sydney Eddison gave me good advice: if someone offers to help in the garden, accept! And if no one does offer, try to hire a younger person to help. Offer to teach them about gardening and both of you will be happy. At the end of the day sit in the garden and drink tea and eat homemade cookies. Both of you will be happy.
Henry has been
gardening for over 70 years as he started as a toddler. He is the author of 4
gardening books. You may reach him at Po Box 364, Cornish Flat, NH 03746 or by email at
henry.homeyer@comcast.net.
Cooking and Gardening: A Marriage Made in Heaven
Posted on Tuesday, August 29, 2023 · Leave a Comment
I love to cook, and I love to eat. I got started gardening in the vegetable garden more than 70 years ago, in part, because everyone I knew loved to eat homegrown vegetables – raw in the garden, fresh in the kitchen, or cooked for dinner. I’d pull a carrot and rinse it off with a hose – or just wipe off the dirt on my shirt. My mother didn’t care if I ate some fresh (organic) soil with my carrot, she was just glad I liked carrots.
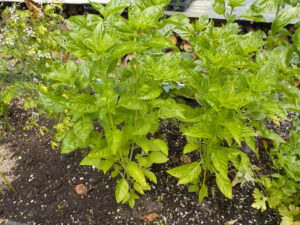
Pick basil before it flowers if possible
This is the season for pesto, a dish that is heavenly – and simple to make. It has just 4 basic ingredients: fresh basil, garlic, Romano or Parmesan cheese, olive oil and nuts (and salt and pepper to taste). I used to use pine nuts, but when their price went north of $20 a pound I switched to walnuts. They taste great, too.
We grow a lot of basil each year – 20 plants or more this year. You can grow it in big pots if you don’t have space for a vegetable garden. But this year, if you didn’t grow basil, visit your local farm stand and get a couple of big bunches. For my recipe you will need 2 cups of basil leaves packed down in a 2-cup measure.
If you grew your own basil, hopefully it has not started to bolt – get tall and flower. It will still be useable even if it has, but it is tastier before that happens. Throw away any flowers that have appeared – and snip off flowers on other plants that you are not harvesting today. Blossoming makes the basil a bit bitter.
Wash the basil, then spin dry in a salad spinner if you have one. Remove the leaves from the stems and then pat the leaves dry with a cloth towel. You need enough basil to fill a 2 cup measuring cup with leaves packed down firmly, which is a lot of leaves.
Place leaves in a food processor and add 1/3 to ½ cup of roasted walnuts or pine nuts and pulse a few times. I brown the raw nuts in a cast iron fry pan at medium heat. They brown better if you lightly oil the pan. But be careful, they can easily be burned, so stay right there, stirring constantly until they just brown. I find roasting improves the flavor considerably.
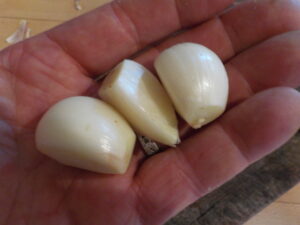
I used these 3 cloves in one batch of pesto
Next prepare the garlic. You can use a lot or a little, depending on your love of raw garlic. I crush 3 large or 6 small cloves of garlic in a garlic press, add to the blender and pulse. I grow my own garlic but you can buy it if you don’t. Hard neck garlic is more flavorful than soft neck – ask for it at a farm stand, as grocery stores don’t tend to sell it.
Add a third to a half a cup of olive oil slowly with the food processor running. Blend the ingredients until the leaves, nuts and garlic are totally blended. Finally add half a cup of grated Parmesan or Romano cheese and pulse until well mixed in. Taste immediately on a toasted baguette or an English muffin. This is heaven.
This has not been a stellar year for tomatoes. All the rain and the paucity of sun has caused many tomatoes to get overwhelmed by fungal diseases. Fortunately, one of my favorites has done well. It’s called Sun Gold. It’s a cherry tomato that is not only delicious, it is relatively productive and disease resistant. I grow a dozen plants each year and each plant gives me a 100 tomatoes or more. They grow in clusters of 10-to-20, producing from early to late in the season.
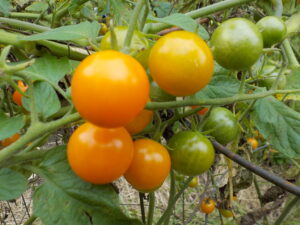
‘Sun Gold’ cherry tomatoes are one of my favorites
I dehydrate most of my Sun Golds, but also love them fresh in salads, sandwiches, or cut in half and mixed with pesto. When I put them in a food dryer, I cut them in half with the cut side up. They turn into little nuggets of summer I use all winter in soups and stews.
Pesto is also good with boiled homegrown potatoes. I serve it as a potato salad with fresh tomatoes and a little celery. Yes, after giving up on celery years ago, I grew it this year and it has done well with all the rain. Although in the past it was tough, stringy and attracted slugs, this year it has been a pleasure to grow. I don’t harvest it all at once, but go down to the garden and cut what I need for that day. The stems are much smaller than commercial celery, but I’m glad I grew it.
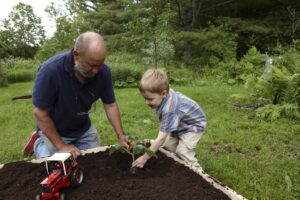
Get your grandkids involved in the garden
I think the world would be a better place if every child learned to garden -and learned the joy of eating fresh vegetables. You can teach your kids or grandchildren to love gardening the way my family did: welcome kids to the garden, offer them meaningful jobs that are easy and fun, and never leave them alone to pull weeds. Let little ones ride in a wheelbarrow on top of a pile of weeds you pulled.
One of my first jobs in the garden was to stir the “tea” my Grampy brewed in a wooden barrel full of rain water and hen manure. I stood on an apple crate and stirred it with a long stick. It was a messy job, and a bit stinky, but it seemed like real work to a three-year old. Eventually I was allowed to dip out the tea in a metal frozen orange juice can, and give each tomato plant one full can. I’ve been hooked on gardening ever since.
Gardening really should be for everyone, so get your little people to spend time with you in the garden, even if they only search for toads and bugs or push trucks around.
Henry is a lifetime organic
gardener living in Cornish, NH. He presents at
garden clubs and libraries around the region, and is the author of 4
gardening books. Reach him at
henry.homeyer@comcast.net.
How to Reduce Your Time Weeding
Posted on Thursday, August 24, 2023 · Leave a Comment
The recent rains have kept many gardeners from getting outdoors to weed, and weeds have loved the rain and are growing like Boy Scouts on “Free Ice Cream Day” at the Ben and Jerry’s factory. But don’t give up. Weeds also pull well now, with the soft, moist or soggy soil, so get to work!
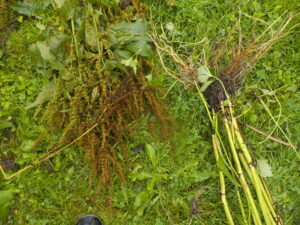
Seeds and roots of dock, a big weed
Recently I spent an hour or so pulling dock (Rumex spp.), a coarse, tall weed that can get to be five-feet tall or more. There are several species of dock, but all are about the same. And all have deep, fleshy roots that often fork and divide deep in the ground.
I took a garden fork and plunged it into the soil a few inches from each clump of weeds and tipped back he handle to loosen the soil. For the biggest clumps I used the fork in up to four places – once on each side. Then I grasped the clump of strong stems down low and leaned back, allowing all my weight to slowly pull out the weed. And out they came, roots and all. Very satisfying. If I tried that when the soil was dry, it would have been much more difficult and resulted in broken roots which would re-sprout the pesky weeds.
I worked on those dock plants now as they had already flowered and had formed seeds – which I don’t want in the soil. If pressed for time, I could have just cut the plants at ground level so the seeds would not be dispersed, but I favored pulling the weeds and getting rid of them once and for all.
Herbalists use dock for various concoctions, not the least of which, I have read, is to prevent “elf sickness”. Not much of that around here, but if you have a problem with it, consult “Just Weeds: History, Myths and Uses” by Pamela Jones (Chapters Publishing, 1994). It’s an interesting and amusing read.
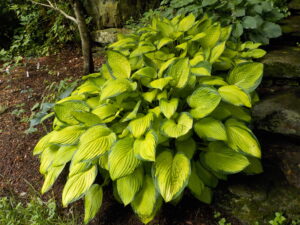
Weeds can’t compete with these big hosta plants
I’ve been working on most of my flower gardens for at least 40 years and have lots of mature plants. This allows me to brag that in some beds I need not weed at all – or only very occasionally. How is that? The plants are growing so close together that most weeds cannot compete. The weeds are shaded out – or starved for nutrients and moisture by plants with deep roots and thick leaves.
One of those plants good for outcompeting weeds is the ever-present shade lover, hosta. Although I sometimes plant daffodils between hostas, the daffies bloom and the foliage dies back by the time hostas are fully leafed-out. Most common weeds will not compete well with hostas.

Bigroot geranium makes a nice groundcover that out competes most weeds
Bigroot geranium (Geranium macrorrhizum) is another plant that outcompetes weeds. I use it as a groundcover – the leaves stand 12-inches tall or more, and it blooms with pink, magenta or white flowers in early summer. It works well in dry shade, but will grow in sun or shade. It spreads by root, so plant three plants a foot apart in a triangle and let them fill in the space. Once well-established, it outcompetes most anything.
What else? Sweet Woodruff (Galium odoratum) is good for sun or shade and once established, spreads well. It stands about 8 inches tall, and has fragrant white flowers in the spring. It may be a bit too aggressive, though. It can run roughshod over more delicate plants, growing right up to them and stealing moisture and nutrients. This year I plan to weed some out of a dry shade bed where it is diminishing the effectiveness of some primroses.
Dead nettles (Lamium spp.) is another shade to part-shade ground cover and like the plants above, is non-native here in the United States. It is low-growing with green and silver or white leaves and attractive small flowers that can be pink, white or even yellow, depending on the species. Rarely do I see grasses or weeds coming through plantings of it.
As to full-sun plants there are many that, once established outcompete weeds. Among those are Amsonia, astillbe, black-eyed Susans, daylilies, daises, European wild ginger, Siberian iris, Helenium, phlox, iris, and goldenrod. But even these take time to establish themselves. Not only that, you need three or more of each in a planting, and patience.
A perennial plant that will form a clump two or three feet wide when mature will come in an 8-inch pot. For most plants, it will take three years – or more – to get to full size. If you plant them 18 inches apart, they will fill in and their leaves touch sooner than if you plant them farther apart. Think of dice with 3 or 5 dots. Those are good patterns for planting if you want overlap, much better than planting them in a row.
Weeds will grow almost anywhere, even in your gravel driveway. Cultivated plants need some help to get established. So when you plant, dig a wide hole, say two feet wide for an 8-inch potted plant. Put in two or more shovels of compost and stir it up, mixing the native soil with the compost. I always add some organic slow-release fertilizers to the hole, too. That first year water when dry.
Mulch helps young plantings to get established. They help keep weed seeds from germinating and hold in moisture. You will still have to weed for a few years while getting your flower bed to maturity.
There is no such thing as a weed-free garden. But with time and effort, you can reduce the work considerably once established.
Hydrangeas: You Always Win
Posted on Wednesday, August 23, 2023 · Leave a Comment
Unlike the games of chance at our local fair, you always win when you buy a hydrangea. They generally bloom their fool heads off every year, even if you have poor soil and a poor track record in the garden. When I was a boy I noticed that every cemetery had hydrangeas, so I called them cemetery bushes (my parents knew few names of plants). Now is the time they are blooming so it is time to go to your local, family-owned garden center and buy one – or more than one.
If you want a tall plant with instant curb appeal, buy what is called a hydrangea “standard”. A standard is a shrub that has been grafted onto a tall stem, usually about 5-feet tall. Hydrangeas start out low and often wide, but if you get a standard, you get something that looks a bit like a lollipop – or an instant small tree.
I have six different hydrangeas, each differing in bloom time, color, size of blossom and shape of blossom. Two of mine are standards and are about 25 years old. Each is 15 to 20 feet tall and wide.
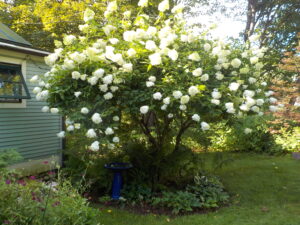
My PeeGee Hydrangea always puts pn a good show
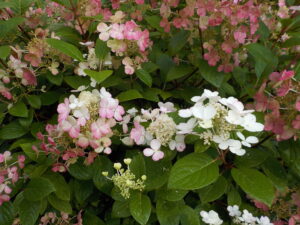
The first standard I planted is what’s called a “PeeGee” hydrangea. PeeGee is shortened from the Latin name, Hydrangea paniculata grandiflora (which means large flower head). This is the classic cemetery plant, one that has been around since it was imported from Japan in 1862.
My PeeGee hydrangea has blossoms of various sizes, from 5 inches across to 8 inches or more across. Most blossoms are roughly globular, but some are a bit elongated, especially towards the top of the plant. The panicles are a mixture of fertile and showy, infertile florets. The blossoms start out a green-tinged white, transforming to white, then pinkish, and finally brown after frost. If you pick the blossoms before frost and put them in a dry vase, they will stay looking pinkish all winter and beyond.
I love my “Pink Diamond” hydrangea; it is also a H. paniculata grandiflora, and lives up to its name even better than a PeeGee. Its uppermost flower panicles can reach 12 inches long and 8 inches wide. The woody stems are thicker and stronger than on most hydrangeas, so they do not flop the way some others do when wet from rain. The pink panicles are a delight to behold.
There is one native hydrangea, called smooth hydrangea (Hydrangea arborescens). It stays small, only 3-to 6-feet tall and wide. It does well in partial shade, but is intolerant of dry soils. It will tolerate full sun only if the soil stays moist. ‘Annabelle’ is commonly sold in the nursery trade but I can’t imagine why. Yes, it does have huge panicles, but it has flimsy stems so the panicles droop or flop onto the ground.
According to the Mt. Cuba research station, the best hydrangea for pollinators is the smooth hydrangea called ‘Haas Halo’, a native one. I planted several for a client one fall and they were immediately consumed by deer. But they came back the following spring and I surrounded them with wire fencing to keep the deer away. In year three they are blooming nicely. The center of each flat flower head is full of small, fertile flowers surrounded by larger white flat, infertile florets.
‘Quick Fire’ has a nice mix of pink and white florets right now
Another favorite of mine is called ‘Quick Fire’. Now in year five for me, it is a shrub about four feet tall and wide; it is loaded with 4- to 5- inch flower heads. It opens greenish white, then turn white, then pink. The pink color comes on earlier than most others, hence the name. What I like about it is that it keeps a nice mix of white and pink panicles. I am now pruning it yearly to keep it at its current size. It blooms on new wood, so I won’t lose any blossoms if I prune it now – or even in the early spring.
Many New England gardeners would like to be able to grow blue hydrangeas, so they buy them and find they really only perform well for one year. A variety called ‘Endless Summer’ came out in the nineties with much fanfare, claiming it would do as well here as it does in the mid-Atlantic region. But it didn’t do well. Most buds are set the year before and winter tends to kill them.
Readers often write me asking how to get the numerous blue panicles in years two, three and beyond. I tell them to treat them as expensive annuals. Dig them up and throw them on the compost if they don’t succeed. Instead of Endless Summer, I call them Endless Disappointment. There are now other blue hydrangeas sold, and some may be okay for our climate.
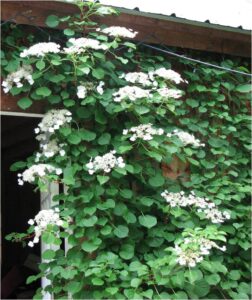
Climbing Hydrangea on the north side of my barn
My favorite hydrangea is the climbing hydrangea, H. anomola subspecies petiolaris. Climbing hydrangea is usually sold as a small vine in a one-gallon pot. It takes a long time to get to blooming size – often five or six years. Then it takes off and grows rapidly.
The great thing about this vine is that it will bloom in full shade – I have it on the north side of my barn. It will attach to stone or brick surfaces but not wood, though it can climb trees. As it started growing it up my barn I attached it to the barn with a special plastic chain designed for staking young trees. Then later it grew through cracks in the boards and now needs no support – and usually blooms inside my barn! Like all hydrangeas, its flowers stay on and look interesting most of the winter.
So if you like the look of hydrangeas, go get one. I think most are wonderful.
Henry is the author of four
gardening books. Reach him at
henry.homeyer@comcast.net or at PO Box 364, Cornish Flat, NH 03746.
Big Plants, Tall Plants
Posted on Tuesday, August 15, 2023 · Leave a Comment

This large coneflower stands 111 inches above the ground
If Jack, of Beanstalk fame, were to visit my garden, I think he would be impressed. I’m not sure how tall his beanstalk grew, but I got out my 10-ft tripod Hasegawa pruning ladder and took a picture of a flower blossom while standing on the top step. The flower, a black-eyed Susan stood 111 inches tall on a thick stem that has withstood the wind and rains of recent weeks – without any staking. It is truly a Goliath.
But this is no ordinary black-eyed Susan. Its Latin name, Rudbeckia maxima gives you a clue about its inclinations. It wants to be bigger and better than any other in the same genus, or family group. Its common name is large coneflower, which is appropriate as the flower does have a large black cone surrounded by yellow petals. I’ve read that is commonly grows 6-to 8-feet tall, but this year it has exceeded that – and may still be growing. The leaves are few, but large, and blue green in color. Quite interesting. The leaves are mostly clustered towards the bottom of the stalk.
Large coneflower is not commonly sold in nurseries. But if you find one – or better yet, three – plant it where it can strut its stuff. It does well in full sun, and average, moist soil. Perhaps because my soil is above average (it is rich, black and fluffy), my plants are taller than average. A few words of warning: Rudbeckia maxima hates to be moved and can take a couple of years to recover from transplanting, or at least mine did.
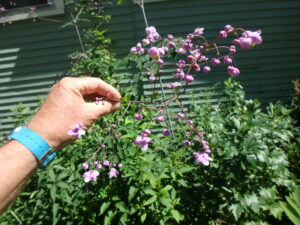
Meadow rue Lavender mist
Another tall, lanky plant I love is a meadow rue called Thalictrum rochebrunianum ‘Lavender Mist’. My go-to flower book is ‘Manual of Herbaceous Ornamental Plants by Steve M. Still. This is an 800-page text that tells me most everything I need to know about any flower I want to grow: where a plant will grow best, zone hardiness, flower description, how best utilized, related species and much more.
Still’s book says ‘Lavender Mist’ commonly grows 4-to 6-feet tall with delicate lavender sepals, no petals, and “primrose-yellow stamens’. Like the Rudbeckia above, mine get tall, often 8-feet or perhaps more and has large parts of the stem bare of leaves. The finely cut leaves are on a few side branches along the tall stem. This one does need staking sometimes to keep it erect in rain storms. It is a splendid cut flower, very dramatic in a tall vase. ‘Lavender Mist’ does well in part shade and rich soil. Half a day of sun is fine.
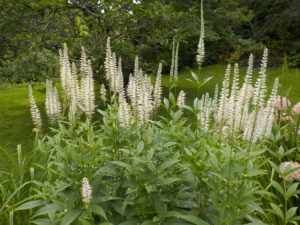
Native Culvers root is delicate looking, but strong
Some years ago at a garden-design competition in the Loire Valley of France I happened upon a Culver’s root (Veronicastrum virginicum) called ‘Fascination’. It is a tall plant, 6- to 7- feet tall for me. The flowers are lilac-rose colored spikes and quite striking. But no one had them for sale in the States until I finally found one for sale at a Mom-and-Pop roadside corn and tomato stand that also sold marigolds and geraniums. Huh. How did it get there? I don’t know, but I bought it and still have it 20 years later.
‘Fascination’ flops in rainy weather and needs to be surrounded by three strong stakes and a barrier of string. But if I remember to cut back the stems by half in mid-to-late June, it does not flop and produces many more flower spikes. Instead of one per stem, it produces six or so smaller ones, and a bit later in the summer. Mine is blooming now.
I’ve come to love the common white Culver’s root even better than ‘Fascination’. It only gets to be four-feet or so tall, but needs no staking. Bees and wasps love it, too.
While visiting a farmer in Ohio I spotted a fascinating big plant called teasel, growing in his corn field. I was told that teasel (Dipsacus spp.) was a horrible weed, and that I was crazy to collect seed from it (though I did anyway). It is biennial with a spiny stalk and leaves, and sculptural blossoms that are not like any other I have seen. Hard to describe, see the photo with this article.
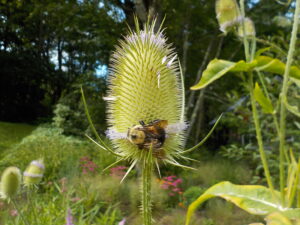
Teasel is a weed loved by bees. The flowers and stems are very prickly, so wear gloves when picking them
Each spring I pull out all but two or three first-year teasel plants so they do not take over my garden. I have three this year, and one is easily 8-feet tall. The flowers are fabulous in an arrangement, and can be used dry all winter. Outdoors the stems stand up in wind, snow and ice and are endlessly fascinating to me.
Another favorite tall native plant of mine is called snakeroot, bugbane or black cohosh. Its scientific genus used to be Cimicifuga, but now it has been changed to Actaea. I grow two species, Actaea racemosa and A. ramosa. They bloom starting in August and are a great treat for pollinators, especially bees of all sizes and types. They bloom in alphabetical order, A. racemose first, then A. ramosa. They can have a VERY strong scent, which I like as much as the bees do.
Snakeroot is a native woodland plant, but will do well in full sun or part shade so long as there is plenty of moisture. There are also named cultivars such as ‘Hillside Black Beauty’ that have leaves that are deep purple to almost black and are very striking in the garden. This spring I had ‘Hillside Black Beauty’ growing next to a Rodgersia with big almost-orange leaves, and the combination was breathtaking. Later those orange-tinted leaves turn green.
If you garden on a flat area, think about growing some tall perennial plants to give your garden a more interesting look. And mix in some shrubs or small trees to give you height in winter. But that’s an article for another day.
You may e-mail Henry at
henry.homeyer@comcast.net. He is a
garden consultant and the author of 4
gardening books. He lives in Cornish, NH.


 Click Here to buy from Cobrahead