Six Summer Beauties
Posted on Tuesday, June 12, 2018 · Leave a Comment
I love the song “Summertime” by George Gershwin. Yet I fail to comprehend why Gershwin didn’t include any flowers in the song. Yes, the cotton was high and the fish were jumping. So what? There’s no mention of peony or iris. Let’s look at some great flowers of summer he might have included.
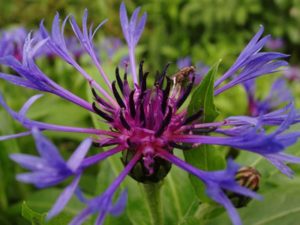
Bachelors button close up
Starting in late May, bachelor buttons (Centaura montana) adorn my landscape. Big, bold blue flowers, each a work of art. Actually, they now come in more colors than blue: white, purple, pink, bi-color and more. They love full sun but are not too fussy about their soil, though good drainage is important. Divide them in the fall every 2 or 3 years to keep them vigorous, and cut them back after blooming if you want a second show in the fall.
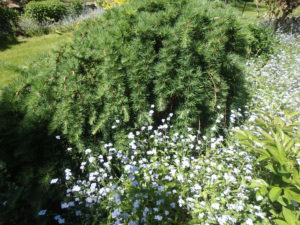
Bleeding heart (Dicentra spectabalis) is another early summer favorite. The stems are 2 to 4 feet long, arching over on hollow stems that originate in a central point and go in all directions. Pink heart-shaped blossoms hang down from the stems. Morning sun or part shade is best for this one, and rich soil. Hot afternoon sun will yellow the foliage early, so avoid it.
June is peony season for me. They come in pink, white, red and more. They come as singles (with just one circle of petals) or as doubles (with many petals). Yes, they flop when it rains, so I install stakes around them, and surround them with string to keep them upright. Singles can stand up to rain, most times.
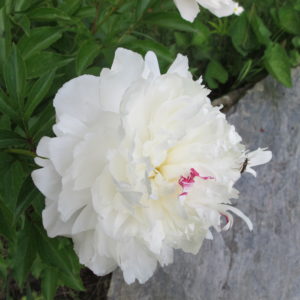
Peony Festiva maxima that my grandmother grew
Peonies last forever. I have one of my grandmother’s, and she died in 1953. If yours doesn’t bloom, you have buried the growing point, or eyes, too deep. They should be covered with just an inch of soil, not more. And keep back the mulch, which will act as soil in discouraging blooming. Peonies need lots of sun – 8 hours or more for best results. Some of mine were getting shaded, so I removed a lot of branches from a nearby tree last summer, and this summer they are much more impressive.
Iris pair up well with peonies. Many types of iris will bloom with peonies, and their purples and blues go well with them. There are several species including Siberian, bearded, and Japanese iris. Each has its own benefits and needs.
The Siberian iris (Iris sibirica) I grow are very intense purples and blues, though whites are available. They have long narrow leaves that are 2 to 3 feet long and stay handsome all summer. They will bloom in part shade, but prefer full sun. Older clumps tend to die out in the middle, largely because the plants have used up all the nourishment in the soil. To avoid this, sprinkle organic fertilize over the clump once a year, or divide and re-plant clumps in the fall.
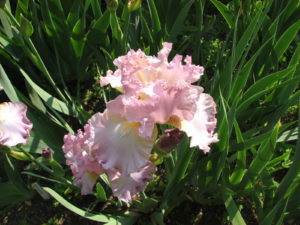
Bearded Iris
Bearded iris (Iris hybrids) can produce very showy larger blossoms in a wide variety of colors, some of them quite flashy. Their leaves are wider than those of Siberian iris, up to and inch and a half wide, and a lighter green color. When dividing or planting the rhizomes (roots), be sure not to bury the rhizomes or they will rot. Just settle the rhizomes into the soil with the top half above the soil line.
Japanese iris (Iris ensata) love moisture. They can grow in standing water, or moist soil in full sun or partial shade. These have wide flowers, up to 6 inches across. These are great cut flowers but do not last too long in a vase.
Two other summer beauties aren’t blooming yet for me, but will soon: hollyhocks and beebalm. Both are worth having.
Hollyhocks are biennials or, sometimes, short-lived perennials. They are easy to start from seed – the seeds are large enough to handle individually, and I have found their germination rates near 100%. Last year I planted 32 seeds in 4-packs, one per cell, and every one grew! I scattered the small plants around the flower garden, and this year they will reward me with 5-foot tall stalks that bloom from bottom to top.
As biennials, hollyhocks should die after blooming in the second year. I have found that if you cut the stalks down after blooming is finished, you are much more likely to get the plants to come back and bloom again the following year. On the other hand, if you let the stalks stand, they will drop seeds – some of which will grow the following year.
Beebalm is another favorite of mine. I love the minty fragrance of the blossoms and the leaves, which can be used in herbal teas. Hummingbirds love them, too. Most of mine grow 4 or 5 feet tall and spread by roots that adventure off into nearby spaces. Fortunately, the wandering plants are easily uprooted if you don’t want them.
Two years ago I discovered miniature beebalm. There is a trademarked series of beebalms, “Balmy Pink” is one. I also have purple, rose and lilacs miniatures. As trademarked plants, one cannot propagate them. For me it has not spread by root, though each clump gets bigger across each year. It grows to be 12 to 16 inches tall. A nice, tidy plant. Other companies have trademarked miniatures, including the “Petite Delight” series.
It’s true that I want to try every new variety of perennial that appears on the market, but sometimes the old favorites are best. I still love my grandmother’s ‘Festiva Maxima’ peony and feel lucky to have it.
Read my blog at https://dailyuv.com/henryhomeyer. My e-mail is henry.homeyer@comcast.net.
Three Keys to a Successful Garden
Posted on Tuesday, June 5, 2018 · Leave a Comment
Being a great gardener is pretty simple. Know what your plants need in terms of sun, soil and water. Do that, and make adjustments as necessary, and your plants will thrive. Of course, that is often easier said than done.
Sunshine is what drives plant growth. Vegetables and many flowers do best with full sun. Full sun is generally defined as 6 hours of direct sun. But not all sun is equal. The sun at noon is much stronger than sun at 6am. An hour of afternoon sun is, in my opinion, worth nearly 2 hours of morning sun.
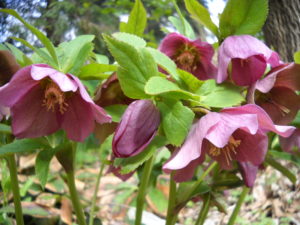
Hellebore
But many trees, shrubs and perennials want part sun or light shade. That’s where the gardener must decide. Put those hellebores on the north side of the barn? Or perhaps under the dappled sun that filters through a maple? That’s why I like to buy perennials in multiples. Try some here, some there. To do so, starting some by seed makes sense as you have more plants to play with – without breaking the bank.
Starting perennials by seed is easier than you might think, but requires patience. Unlike annual flowers, most perennials will not flower the same year they are planted. Biennials like hollyhocks and many foxglove will bloom the year after you start the seeds, then die. But some hollyhocks defy the odds and come back to bloom, year after year – for good gardeners who cut them back right after they bloom.
The right soil is key for most plants. Some want sandy soil that drains quickly and stays relatively dry in winter because wet soils will rot their roots. Others need moist soils all summer or they go limp on hot days. You can learn by trial and error, but I try to minimize errors by reading up on a plant to see what soil it needs. My go-to book for this is Steven M. Still’s book, Manual of Herbaceous Ornamental Plants. It is over 800 pages of great information.
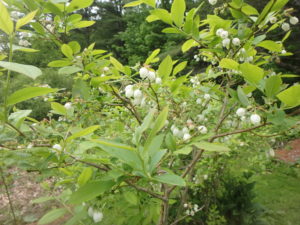
Blueberry blossoms tell me the soil is acidic
Soil pH, a measure of acidity, is important to plants. Most perennials do best in soils with a pH of 6.2 to 6.8 which is just shy of neutral (7.0). Know your pH by testing every 3 to 5 years, as pH is easy to adjust. Want blueberries? You must have very acidic soil, in the 4.5 to 5.5 range. You can spread elemental sulfur around the bushes, or add an acidic fertilizer made for holly and rhododendrons. Do that right after blooming.
I recommend getting a soil test done by a good lab every three years. Cooperative Extension in your state can do that for a fee. It will give you useful information about everything except nitrogen. Nitrogen levels vary considerably over the short term, so most labs do not measure them. But if you have good levels of organic matter, your probably do not have a major deficit. Organic fertilizers applied at planting time will boost nitrogen and add some for later in the form of slow-release nitrogen components in the mix. But don’t add too much fertilizer, especially chemical fertilizers that can burn roots and push fast, unhealthy growth.
Soil tilth and texture is important too. That’s what an experienced gardener learns by picking up a handful of soil and feeling it. Excellent soil is fluffy and does not compact easily. It has space for water and air. Moisten some soil and rub it between your fingers. If it feels sticky, it’s dominated by clay. If you feel many sharp bits, it’s sandy. A good loam is somewhere in between the two. You can improve clay or sandy soils but adding compost, lots of compost.
I make compost, but also buy it each year. I add some to every planting hole and every new bed. I mix it in with potting soil for container growing. I spread it over the lawn to improve it, and to nourish the roots of an aging maple with roots under the lawn. Earthworms will work the compost into the soil, so I don’t have to.
Moisture is key for all plants. For most, all growth stops when the soil dries out. And watering a plant that is flopping over and gasping for breath does not fix the problem immediately. Yes, most plants will look better within a day of watering, but it can be a few days or a week before they recover fully and start growing. In hot times, monitor moisture by eye or finger, especially for seedlings just planted.
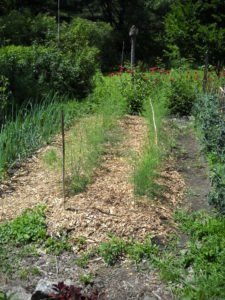
Asparagus, newly mulched
Mulch is great for holding in moisture. It protects the soil from the sun’s desiccating heat. It minimizes evaporation. It helps to prevent weeds from growing.
An inch and a half or two inches of finely ground bark mulch will do a good job of preventing most annual weed seeds from growing – but will not deter roots of pernicious weeds from sending up sprouts. Heck, I’ve heard stories of Japanese knotweed growing right through asphalt driveways, and I know witch grass and ferns will pop up through most mulches.
One of the great things about getting older is that I’ve made plenty of mistakes – and learned from them. We all kill plants. But doing your homework and paying attention is really important. Learning from our errors and omissions makes us great gardeners.
Henry’s website is www.Gardening-Guy.com. You can reach him by e-mail at henry.homeyer@comcast.net or send a letter to P.O. 364, Cornish Flat, NH 03746. Please include a SASE if you want a mailed response.
Gardening As We Get Older
Posted on Tuesday, May 29, 2018 · Leave a Comment
I reached the age of 72 recently and have been thinking about the future. What will my gardens be like when I’m 82? Will I be gardening at 92? I realize I won’t always have the strength, stamina and energy to manage all I do now. Here are some thoughts about how I shall cope – and my ideas about what to do, starting now.
First, I’ll need to make choices about what flower and vegetable beds I want to keep. Growing lawn is the easiest of all gardening activities. I can see myself riding around on a mower when I can’t bend over easily to weed. And there are plenty of people who will cut the grass for a price. No special knowledge about plants is needed.
So at some point, I can let some beds revert to lawn. There are plenty of people who would be glad to come dig up and take away peonies or delphinium. If I put an announcement in the town list serve, I will find takers. Last fall I dug up some big clumps of phlox and offered them free and I found homes easily. When I want to downsize, I will make the takers do the digging!
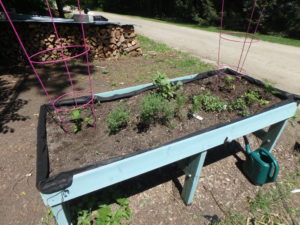
Veg Trug
Right now I grow 35 to 50 tomato plants a year. I start them indoors, plant them, tie them to tomato cages, cut off diseased leaves, and harvest them. Do I really need so many? We have plenty of good growers in the region, and a number of great food co-ops. I suppose in 10 years I could downsize to a dozen plants or less.
For two summers I’ve had a garden trug, a planting box on legs that I got from Gardeners Supply Company (www.gardeners.com). I have it near the front door, next to the woodpile, with quick access to the kitchen. I grow one or two tomato plants each summer there, along with plenty of lettuce and herbs. It’s waist high, so no bending is required. It’s made of cedar, and I can see using it in perpetuity. It is 6 feet long by 32 inches wide, and 16 inches deep in the middle – fine for tomatoes.
Shrubs are less work to maintain than perennials or annual flowers. Plant them, or have someone plant them, and they will require little – so long as they are not varieties that grow inordinately fast. There are plenty that can go several years without pruning.
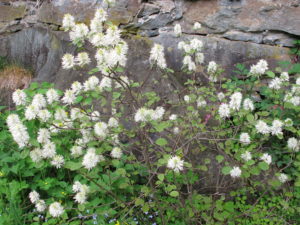
Fothergilla
One of my favorites is called fothergilla (Fothergilla major). It has nice white bottle-brush blossoms in May and spectacular fall foliage. Mine, after 15 years and very little pruning, is only 5 or 6 feet tall and wide. It’s hardy to Zone 4.I love my weeping larch tree (Larix laricina ‘Pendula’) that grows in a flower bed. Weepers flow and bend, but do not get tall. Mine will never get more than 3 feet tall. The foliage is soft to the touch. Larches do well in wet soils, and are quite salt tolerant.
There are, in fact, dozens of trees and shrubs sold as miniatures. Some of these are just very slow growing (like the lilac ‘Miss Kim, which can get large), while others really will never get tall, even in 25 years. These miniatures do well in flower beds.
Weeping Larch
Purple foliage is great to add color to a flower bed but I wouldn’t recommend common ninebark (Physocarpus opulifolius) ‘Diablo’ – it grows too fast and gets to be 10 feet tall before you know it. Now there are a couple of miniatures on the market, ‘Tiny Wine’ and ‘Little Devil’. I shall try one or both of those.
Of course, as we get older, it makes sense to hire some help in the garden. I have been lucky to get a teenager who not only likes being outdoors, but likes gardening and knows the difference between a weed and a flower! Even 4 hours a week makes a big difference.
If you can’t afford to have someone helping all summer, perhaps you can get someone to help clean up the gardens in spring and fall. Once beds are weeded out and mulched, the work of maintaining a garden is not too onerous – even for geezers.
I recently re-read Gardening for a Lifetime: How to Garden Wiser as You Grow Older by Sydney Eddison. Sydney is a friend of mine who lives in Connecticut, and has written many fine books. She has lots of good ideas, including the necessity to accept imperfections in the garden.
Many good gardeners are perfectionists. But as we get older, we have to accept that we can’t keep the garden perfect, or at least not without lots of help. It’s important to change one’s attitude as one ages.
Sydney also recommends getting rid of high maintenance plants and letting easy plants dominate. Daylilies, for example, have nice foliage all summer, great blossoms, and are not overly ambitious (Most don’t try to take over space allocated for other plants.) So grow plenty!
As we get older, so do our trees, creating more shade. Embrace shaded areas as weeds are sun-lovers and there are plenty of fine perennials that will do well in shade.
Some day perhaps I’ll retire and have more time for gardening. In the meantime, I’ll just try to downsize a little every year.
Follow Henry’s blog posts at https://dailyuv.com/henryhomeyer. His e-mail is henry.homeyer@comcast.net.
It’s About Time to Plant the Vegetable Garden
Posted on Tuesday, May 22, 2018 · Leave a Comment
One of the highlights of my year is planting my vegetable garden. It’s a time full of hope and anticipation as I nestle seedlings into the soil and sow seeds. I started many seeds indoors, growing tomatoes, peppers and more under lights. They are the right size now to plant.
Traditionally, Memorial Day weekend is the time many New Englanders plant things that are frost-sensitive. I prefer to plant tomatoes, peppers, squashes and other cold-adverse plants in June, even up to mid-June. I find that it’s better to wait until the soil really is well-warmed, and nights are warm, than rushing to plant. A night in the mid-thirties won’t kill your tomatoes, but it does set them back a bit. I find that tomatoes planted in June easily catch up with tomatoes planted earlier.
Of course, I have already planted some plants that don’t mind cold weather: lettuce, kale, onions, Brussels sprouts, broccoli and lettuce. These went in the ground in early May and are well established by now.
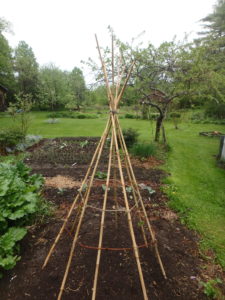
Bean Teepee
I built a nice bean teepee while waiting for summer to arrive, and will plant some Kentucky Wonder pole beans around it. I’ll wait until after any chance of frost has passed, as beans are frost-sensitive. I like pole beans because they keep on producing beans for many weeks if picked regularly. Bush beans produce beans for about 2 or 3 weeks, then are done.
To build the bean teepee I prepared a plot about 5 feet square, removing weeds and adding some compost. I had purchased 8 bamboo poles, each 7 feet tall. With one hand I held the poles together near their tops- say a foot from the top – and with the other I splayed out the bottoms of the poles one at a time. I tried to place the poles evenly, about 20 inches apart on the ground.
This project would be easier with 2 people working together, but I was alone in the garden and got the teepee made. I used a 2-foot length of thin copper wire to wrap around the place where all the poles crossed near the top of the teepee. String would also work fine.
In order to stabilize the teepee I then ran a string around each pole about 4 feet off the ground. I made sure the string was snug and then tied it to each pole using a clove hitch I learned in the Boy Scouts eons ago.
I did a second loop around the teepee with a flexible piece of grape vine, weaving in and out between poles, and then tying the vine to each pole with a short piece of string. I used grape vine because I had some, and I liked the way it looked, but you could stick with string if that is all you have.
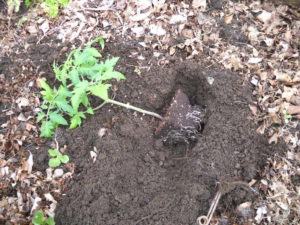
Planting tomatoes sideways
When the time comes to plant my tomatoes I will take steps to ensure their roots develop well. Often tomatoes I start get long and “leggy” by the time I’m ready to plant. If I just planted the root ball, those tall stems would flop over. But I can convert that long stem into a root-bearing portion of the plant by burying it.
This can be done either by burying the root ball about 6 inches deep in a raised bed, or by planting the stem sideways. In either case I snip off the lower 2 to 4 branches, leaving leaves just at the top of an 8 to 12 inch stem.
To plant a tomato sideways, I dig a hole for the root ball and a trench for the stem. The top I bend and turn up, so those leaves are above the soil line. I cover the stem and root ball with soil, and I’m all done. You might fear you will break the stem when bending it, but that has only happened to me once in many years.
When planting tomatoes, don’t crowd them! Fungal diseases are a real problem most years, but can be minimized if the plants get good air circulation and lots of sunshine.
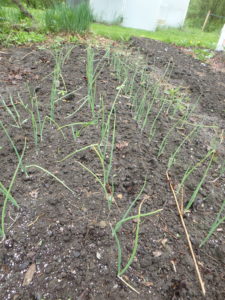
Onions are frost hardy and growing now
“Harden off” your tomatoes (and all plants) before putting them out. Ask at the garden center if the plants have been hardened off. If they’ve been in a greenhouse and never been outside in the sun, you’ve got to get them used to the sun. Greenhouse plastic reduces the sun’s ultraviolet rays and also protects plants from dehydrating in the wind.
If you buy plants that haven’t been hardened off and really, really want to get them in the ground, remember this: if you sunburn your plants, or dehydrate them, you will lose 2 weeks of growing time. You won’t kill them, but they will sulk. So don’t plant this weekend if the plants you buy aren’t hardened off.
Here’s how I harden off my tomatoes: I put them out for morning sun on my north-facing deck for 2 to 3 days, then in afternoon sun for 2 to 3 hours for a couple more days. Then they go out in the garden all day and night in their pots. Finally, I plant. I water the plants each day so they won’t dehydrate.
Gardening should be fun. It’s most fun when everything works and you harvest great vegetables. Don’t rush to get your plants in the ground, keep them well watered, and you should do just fine.
Follow Henry’s blog posts at https://dailyuv.com/henryhomeyer. His e-mail is henry.homeyer@comcast.net.
Spring Wildflowers
Posted on Wednesday, May 16, 2018 · Leave a Comment
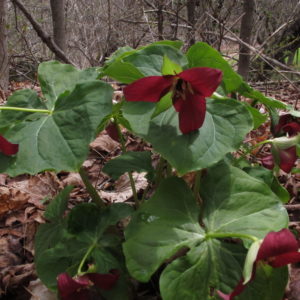
Common Red Trillium
Every spring Mother Nature gives me gifts. Or that is how it seems when she sends the blossoms of trillium, hepatica, Jack-in-the Pulpit, bloodroot, trout lily, blue cohosh, Dutchman’s breeches, squirrel corn and more to my woods and shade gardens. Of course, I have helped nature by planting wild flowers in places where I know they will be happy.
Some wild flowers I find elsewhere on my property and move to more visible locations. Others I dig from the woods of friends who are willing to share. For the rarer things, I have found garden centers and bulb companies that have sold me plants, bulbs or roots.
One of the best ways to succeed in the garden is to do your homework. Know what an individual plant needs, and what other plants grow in the same environment as the plants you wish to grow. If trillium grows in my woodlands, I can be pretty sure that Jack-in-the pulpit will do well there, too, for example, because they grow together in the wild.
In nature plants live in communities, and when designing gardens it’s important to consider that. I plan to attend a hands-on design workshop with author Claudia West in Windham, Vermont about this topic on June 9. If you are interested in attending this all-day workshop, e-mail cheath58@gmail.com. It’s a Master Gardener workshop, but open to all who are interested. Fees apply.
But what can you do if you are just starting a woodland garden, and don’t know what plants grow in areas like those you have? Visit other gardens. Walk in the woods, and observe what grows together. A maple and beech forest is quite different than one dominated by hemlocks and pines, even if a few of the others are there. Pay attention. Learn names.
I recently visited an amazing display of spring wild flowers at Garden in the Woods, in Framingham, Massachusetts. This 45 acre site is 20 miles west of Boston. The month of May is the peak bloom time, but many wildflowers continue to bloom in June, and throughout the summer. Not only that, they have an extensive nursery that sells wildflowers that I have never seen and only dreamed of growing.
My partner Cindy Heath and I walked around the property with Mark Richardson, Garden Director, and the co-author of the lovely paperback, Native Plants for New England Gardens. We were there on May 9, smack dab in the middle of Trillium Week. Garden in the Woods grows 21 of the 30 species of trillium that are native to the United States, Richardson told me. Not all were in bloom, but I saw several spectacular types.
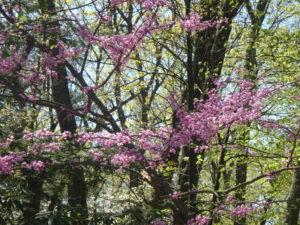
Redbud
Of the trees in bloom, two trees nearly made my heart stop with their beauty. First was the redbud (Cercis canadensis), a fine specimen of which was blooming right at the entrance. This tree, Richardson explained, exhibits cauliflory, meaning that it flowers directly on the trunk or branches of a woody plant. It has small fuschia-colored flowers that seem to pop right out of the trunk at random.
Redbud is hardy to zone 4, and is an understory tree, or one that blooms at the edges of woods. I had purchased one the week before coming to The Garden in the Woods, so seeing it there, in the woods, gave me a better idea of where to plant it in my garden.
The other tree in bloom that I saw (and bought) at Garden in the Woods is Carolina silverbells (Halesia tetraptera). Like redbud, this is a small tree for part shade and hardy to Zone 4. It has small white flowers that hang from branches before leaves appear. Mine has yet to flower or show leaves, but I am hoping to see flowers soon.
I asked Richardson to name a few of his favorite spring flowers. He explained that he liked some of the common ones, that rare flowers are not necessarily the most alluring to him. He mentioned blue cohosh (Caulophyllum giganteum), moss phlox (Phlox subulata) and pinkster bloom azalea (Rhododendron periclymenoides).
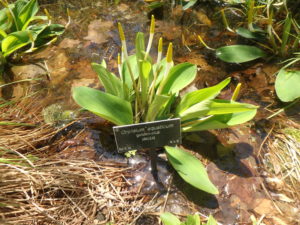
Golden club
I also asked Debbi Edelstein, Director of New England Wild Flower Society, what her favorite spring flowers are. She e-mailed her response, saying, “My favorite part of spring isn’t the reappearance of particular plants, but the explosion of different shades of green and the layers of textures and colors.” I agree. I look forward each spring to the day the sugar maple on the east side of my house first displays its leaves. When the morning sun comes through the leaves I feel so lucky to be alive.
Edelstein continued, saying “That said, who doesn’t love a redbud (Cercis canadensis) in full bloom? At the Garden this time of year, I’m also drawn to the golden club (Orontium aquaticum), which is rare in New England and is weird and elemental and probably overlooked by most people; and Trillium erectum (red trillium or red Wake-robin), because it’s a deep red and is more delicate and less glamorous than, say Trillium grandiflorum.
So go out, look for wildflowers, and plant a few.
Read Henry’s blog posts at https://dailyuv.com/gardeningguy. His e-mail is henry.homeyer@comcast.net.
What Your Roses, Peegee Hydrangeas and Lilacs Need Now
Posted on Thursday, May 10, 2018 · Leave a Comment
My roses are waking up, and starting to show leaf buds along their stems. This is a good time to cut back dead stems, which will stimulate new growth and start them off well for the summer season. It’s time to shape your roses so that they are as good-looking now as they were when you bought them.
When I was a boy, roses were fussy. My parents bought a house in the country in June, when all the roses were in bloom. Those roses, I imagine, helped clinch the deal. But within a few years they were gone. Diseases, bugs and beetles had ravaged them. We didn’t spray with toxic chemicals, and many of those roses depended on toxic sprays, I suppose.
Now breeders have created roses that rarely get black spot, and are not very attractive to rose chafers and Japanese beetles because they don’t have a strong floral scent. Sure, Japanese beetles sometimes find my bodacious pink or red blossoms, but I just pull them off the beetles and drop them in soapy water – or crush them.
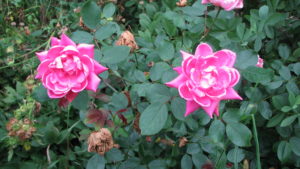
Knockout rose in summer
My favorite series of roses are the ‘Knockout’ roses. These beauties start blooming in June, and continue to produce blossoms until hard frost. It’s not unusual for my plants to be blooming at Halloween. There are others that are probably just as good, so ask at your local family-owned garden center. ‘At Last’, a Proven Winner rose, is another favorite of mine, in part because it is lightly fragrant, too.
On a recent sunny afternoon I took my pruning shears and went outdoors to give my roses a haircut. It was a harsh winter, and many stems were dead near their tips, and a few canes were dead all the way back to the ground.
I took time to really look at the stems of the roses. What I wanted to do was remove the dead material back to the highest bud that was alive and active – and outward facing. I looked for signs of life, which were buds starting to produce leaves. Dead stems are generally brown, and live stems are green or reddish.
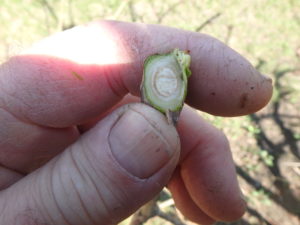
Cut back until you see green beneath the outer bark
How should you make your cut? On an angle, just a little above a bud. Look at the piece you cut off. If it is brown all the way through, you are looking at dead wood. You should cut lower down the stem until you see a layer of green just beneath the bark.
If you had a stem or two last year that grew more vigorously than the others, you may wish to cut them back past the first green bud. What I want is a well-balanced plant, not a lopsided plant, or one with a very tall leader. Some rosarians (rose-obsessed gardeners) like to cut back most stems to within 6 inches of the ground, and let the entire bush grow up each year from the ground.
Some roses bloom on old wood, not new growth. Rugosa or beach roses are like that, as well as some once-a-season old fashioned roses. Those are best pruned for shape of the bush after blooming, but dead wood can be taken out now.
This summer you will want to snip off spent blossoms. After blooming, cut back the stem to a mature leaf cluster which has 5 or 7 leaves. Cutting back to clusters of only 3 leaves won’t stimulate the rose to re-bloom.
A word on fertilizing. I am not keen on fertilizing roses, as it tends to make them grow too fast. Often fast growth is weak, with stems that flop. But if you feel you need to fertilize, do so after the first flush of blossoms, not now. Re-blooming roses like the Knockouts tend to re-bloom every 5 to 6 weeks.
I admit to being negligent when it comes to pruning back my PeeGee hydrangea, so this year I have given it a good hard prune. It’s best to do while the plant is still dormant, or just waking up. I cut last year’s stems that blossomed back to big, fat older stems. These hydrangeas bloom on new wood, and pruning now will stimulate new growth – and lots of blossoms. The PeeGee is a shrub, but can get too tall and wide unless you prune it.
When pruning, you will find some stems that are dead near their tips. Cut those back until you see a layer of green beneath the bark. That indicates that it is alive there. As with roses, always cut back to just above a bud, or to a bigger branch.
Remove any spindly, weak branches, or any that aim back into the middle of the plant. If you have branches that have the potential to poke someone in the eye, cut them back!
Do not hesitate to prune your hydrangeas hard. Decide what size plant works best in the space you have, and prune until you have reached the right size. You won’t kill your plant by pruning. Opening up the middle of a shrub allows more sunlight to reach the leaves, which helps prevent fungal diseases.
Lilacs will be blooming soon, so you may want to wait until after they bloom to prune them. Pruning now just means that you will have fewer blossoms this spring. But if you want to help your lilacs to have better blossoms next year, spread some limestone or wood ashes in a circle around them. Lilacs like neutral or slightly alkaline soil, and limestone helps to achieve that.
Pruning, to me, is like sculpting. Done well, it creates plants that are gorgeous – even when they are not in bloom.
Henry can be reached at henry.homeyer@comcast.net. Read his blog posts at https://dailyuv.com/gardeningguy.
Early Spring Chores
Posted on Thursday, May 3, 2018 · Leave a Comment
The snow is gone, and I am ready for gardening. And although I have been able to do a few things in the garden, the soil is wet and easily compacted, so I can’t do much until it dries out.
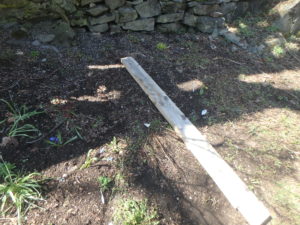
A plank can be used to distribute your weight on wet soil to minimize soil compaction
Many of my flower beds are six feet or more deep (from front to back). This means I can’t stand on the lawn and reach to the back to remove leaves or sticks. I don’t want to walk into the beds and risk compacting the soil. Plants get their oxygen through their roots, and compacted soil has little space for air. The solution? I place a plank on the soil and walk on that. It spreads out my weight.
I generally advise gardeners to wait until the lawn gets green before raking out the sand and dirt that was dumped by the snowplows. I say this because dormant grass is easily pulled up by vigorous raking. But this year I had a lot of sand, and I feared the mess would choke out large sections of lawn near the road. So I used a plastic rake, and raked gently, and I was able to clean up with very little damage to the lawn.
Other chores? If you have decorative grasses in your perennial border, it is important to cut back last year’s stems now, before new growth occurs. I don’t cut back decorative grasses in the fall: I like to see them standing up in the snow, waving in the winter wind.
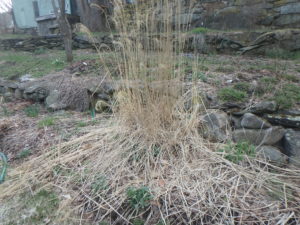
Cut back decorative grasses now before growth starts
I have a big clump of tall maiden grass, Miscanthus sinensis, a variety called ‘Morning Light’. Last year it had started growing before I got around to cutting it back, and there was no way to remove the bottom 8 inches of dead grass, which was unsightly. This year I cut it back low to the ground early and won’t have that problem. Hand pruners work best for cutting back the stems.
The moles and voles always make a mess of the lawn, digging up soil and leaving lumps and squiggles of soil they displaced in winter. I’ve been cleaning that up now, too. I have an aluminum grain scoop/shovel that is 14 inches across and very lightweight. I use a short-tined rock rake to dislodge the lumps and get them onto my shovel. I consider this soil a gift from the rodents. It is good soil that I use to fill holes and top-up raised beds that need some added topsoil.
Although I know people have already started their peas and spinach, my soil is awfully cold for them. Yes, you can plant the seeds when the soil is 50 degrees F, but waiting until it is 60 degrees makes sense to me. Seeds germinate much more quickly in warmer soil, so there is less chance of the seeds rotting.

Soil thermometer
A soil thermometer is not an expensive item and will last a lifetime. I have a few, and they all have dials like old-fashioned oven thermometers. The sensor is right on the tip. Keep that in mind when checking soil temperatures. If you push the tip down 6 inches, the soil will be cold at this time of year – but you are not planting seeds that deep. Instead measure the soil temperature an inch down, which means holding the thermometer upright for a couple of minutes while it adjusts. Otherwise it will fall over – hence the impulse to push it down deep.
Near the end of April I moved my cold frame out of the barn and into the garden. This is a cedar box with polycarbonate lids that allow sunshine into the box, and hold heat in. The polycarbonate helps diffuse the light, reducing chances of cooking the plants. The lids are on a slant, and open on hinges.
After a couple of sunny days the soil inside the box had warmed up, and I planted seeds of lettuce, kale and carrots inside. Once they sprout, I’ll lift the lids a little each sunny day to allow air circulation and to moderate temperatures. The box itself is 8 feet long and 2 feet across. I got mine from Gardeners Supply (www.gardeners.com or 888-833-1412).
Meanwhile, indoors, I have 5 flats of seedlings growing under lights. These require daily attention, though not much. I water, and I pluck out or snip off extra seedlings that grow. I want just one tomato plant per cell, for example, though I always plant 2 per cell just to be sure that I get one to grow. It’s hard to kill a cute little tomato plant, but I know that the survivor will do better if it’s not competing for water and nutrients.
Other early plants I have started include lettuce, kale, purple cauliflower, 3 kinds of flowers and Happy Rich. Happy Rich is a non-heading broccoli I get from Johnny’s Seeds. It produces the equivalent of side shoots on regular broccoli, but it is quicker to produce, and keeps on cranking out its green blossoms well into the fall. The part we eat is really the buds of its flowers. I have never seen Happy Rich seedlings for sale in a nursery, so I start my own each year.
Another recent chore involved taking the straw mulch off my strawberry plants. Once the plants and the new plants started by runners are awake and growing, I’ll cut any runners connected to the mother plant.
There will still be frosty nights here, and raw rainy days. But I know the worst is over, and summer is just around the corner.
Read Henry’s blog posts at https://dailyuv.com/gardeningguy. Henry is the author of 4 gardening books, and is a Lifetime Master Gardener. E-mail him at henry.homeyer@comcast.net.
Harvesting Now from the Vegetable Garden
Posted on Wednesday, April 25, 2018 · Leave a Comment
It occurred to me as I walked up from my vegetable garden recently with a dozen fat parsnips, that gardening has something in common with fishing: you never know if you’re going to come home with something for dinner or not. Those parsnips, which were planted last summer, had spent the winter in the garden. Mice or voles might well have eaten them up – but they didn’t.
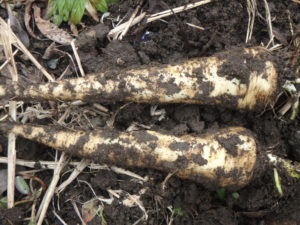
Parsnips fresh from the garden in mid-April
Parsnips, carrots and potatoes can spend the winter in the ground without injury –other than the risk of rodent damage. In fact, I leave most of my parsnips in the ground each fall because they taste sweeter in the spring. I mulched them well with straw in the fall.
Once the soil has dropped below 50 degrees F some of the carbohydrates turn to sugars. That’s why commercial potato growers store their spuds in temperature-controlled places that are above 50 degrees. MacDonalds and other big buyers of potatoes don’t want potatoes with high sugar content – they burn, or darken, when frying. So they carefully monitor temperatures, ensuing they stay a little above 50 degrees.
It’s not time to plant parsnip seeds yet, but I bought my seeds this week. Parsnip seeds are only good the year you bought them, so if you have left over seeds from last year, toss them out and buy new seeds.
Parsnip seeds take forever and a day to germinate – I have been known to wait a month to see them appear, even though the seed package might say they’ll start growing in 2 weeks. Wait until the soil warms up well before planting – late May or even early June is best.
Plant parsnip seeds half an inch deep and an inch apart in rows that are 6 inches apart. In a wide raised bed you can plant multiple short rows across the bed. Then, after your parsnips are a couple of inches tall, thin them to 3 to 4 inches apart. Even though they tend to grow straight down into the soil, they send tiny roots laterally and don’t like to be crowded.
If you are not familiar with parsnips, go to your local food co-op and buy a few and cook them up. After you’ve tasted them, you’ll know if you want to grow them or not. They are related to carrots, but have their own distinct flavor. You can steam or boil them like carrots, and serve with butter and a little hot maple syrup if you like.
Another recipe I like uses potatoes, parsnips and sorrel, an early-season green. Just peel and chop a pound of potatoes and 3/4 pound of parsnips; boil them until soft. Cut up a cup of sorrel and sauté in 2 ounces of butter until soft and mushy. Mash the root crops when cooked, add the sorrel and some heavy cream. Yum!

Sorrel
My sorrel is up now, and will be ready to harvest in early May. Sorrel is a great favorite of French cooks who make a soup with it. Although I grow it, I sometimes forget it’s there and overlook it. It’s a bright leafy green that comes back, year after year. It has a sharp lemony flavor, a bit like wood sorrel.
My problem with it is that when you cook it, it practically disappears. It has little substance. But it’s easy to grow, and adds a unique flavor if added to a salad or even a sandwich. Plants are often sold at garden centers in the herb section.
What else is coming up in the garden? Rhubarb. This sharp-flavored perennial stalk is a favorite of mine. Some varieties have deep red stems, others are green with just a hint of red. All will make you pucker up if you take a bite raw. The leaves contain oxalic acid, and are said to be poisonous.
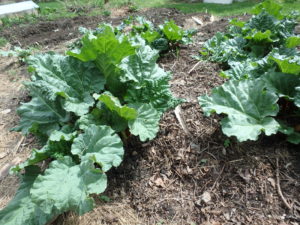
Rhubarb
I love rhubarb pie, strawberry-rhubarb pie, rhubarb sauce and rhubarb tea. You know the pies and sauce, I suppose, but the tea? It’s easy to make. Chop up a few stems and boil in an equal quantity of water. Once it gets mushy you can strain it and add more water and some sugar until you have a nice drink. I just use a little sugar – I like the tea plenty tart. I like to use red stems for the tea, as it looks so nice in a glass or cup. I drink it cold, too.
Chives are another perennial vegetable or herb. Mine are just up now and a couple of inches tall, despite the snow nearby in the same bed. This tasty fellow is best known as a garnish for baked potatoes, along with sour cream. It is one of the few things that will winter over easily in a pot on the kitchen window sill. But look for yours now, when there is little fresh in the garden to harvest.
I also grow garlic chives, but mine aren’t up yet. Garlic chives are bigger than chives and the flavor is bolder. I like them for their fuzzy white flowers that appear in early summer. The leaves are not hollow like chives, but flat. They are commonly used in Asian cooking. They’ll be along shortly.
I wish I had more perennial vegetables. Wouldn’t it be great if our tomatoes and squash came back like rhubarb, year after year?
Henry is a UNH Master Gardener and a gardening consultant. He is the author of 4 gardening books. His web site is www.Gardening-Guy.com.
What to Do About Those Wile Woodchucks!
Posted on Wednesday, April 18, 2018 · Leave a Comment
Woodchucks, alas, are out and about. Fortunately I don’t have lettuce or green beans growing in my garden yet, as I saw my first one lounging in the sun on April 11 in a neighbor’s field. It was looking relaxed and happy. If you’ve have had woodchucks in the past, now is the time to take action to remove or repel them – before they have a litter of babies to join in the carnage of our gardens. They know danger and are willing and able to relocate – at least as far away as the next-door neighbor’s house.
When my corgi, Daphne, was a youngster I was working in a garden in Woodstock, Vermont when I saw a woodchuck sunning by my client’s barn. I let her out of the car and told her to “Go get it.” That was a new command, but she got the idea immediately and took off at a dead run.

Woodchucks are waking up from winter Mary Holland photo
The woodchuck was not paying attention – and barely made it down its hole before Deadly Daphne got there. Daffy tried to go down the hole, and got her front end in, but then perhaps a turn in the tunnel blocked her way. But I could hear the terrified woodchuck squealing inside the hole. My client reported that she never saw a woodchuck again. Not that summer, not the next. Perhaps, like 1930’s hoboes, the woodchuck left an “X” on the barn to warn the next marauding woodchuck that the place was not safe.
Woodchucks have 2 to 6 babies which are usually born in April or May. Females are generally have one litter in their second summer, but occasionally they will have young their first year of life. It is important to encourage woodchucks to relocate now, before they have babies. Since I have snow on the ground and little for them to eat, I am confident they haven’t had babies yet. Farther south? Who knows?
If you’ve had woodchucks in the past, you should check to see if their dens are active. Put strips of newspaper or stuff some hay in the openings, loosely plugging them, and check them daily. Each den will have 2 to 5 openings, each hole about 8 inches across. The back door(s) may be well hidden. I once saw a woodchuck disappear into a stone wall, but that may have been a temporary move – my dog was chasing it.
Once a mother woodchuck has had babies, it will be hard or impossible to get her to leave her den. For humane reasons you should defer relocating woodchucks until 3 weeks after the babies are born.
So how do you evict a woodchuck? According to the Humane Society Website, You can scare it away by partially digging out the opening and cutting away any vegetation near it. Or you can put urine-saturated cat litter down the hole, and then shovel some dirt in to loosely seal the burrow. They also suggest reflective Mylar strips hanging near ground level in the garden.
To keep woodchucks from returning to their burrow, close off the entrances with wire mesh screening with openings no bigger than 3 inches across. Cut a 3-foot square and stuff it into the entrance. Woodchucks have been known to return to a good home up to several years later.
What other options do you have? You can fence your garden with 3 to 4 feet of metal fencing such as chicken wire. Leave the top 18 inches floppy so that even an ambitious ground hog will find it hard to get over the top. Bury the bottom in the soil, and pin it down with landscape staples.
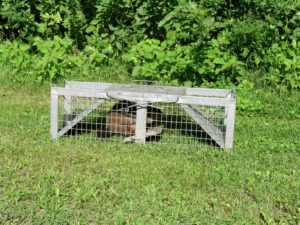
Only use a Hav-a-Hart trap to relocate a woodchuck if all attempts to get it to relocate have failed
If you’ve tried everything else and want to use a Hav-a-Hart trap to catch one, bait the trap with something fruity and fragrant. Sliced apples or watermelon work, though I know someone who used green beans. It makes sense to use something not available outside the trap. And place the trap along the pathway from the den to the garden.
According to Vermont naturalist Ted Levin, catching a rodent (woodchucks included) in a Hav-a-Hart trap and moving it away is generally a death sentence. When they land in new territory they are likely to fall prey to a fox, coyote or other predator. Food is uncertain, too, especially if yours is dependent on your garden produce. So please, only use Hav-a-Hart traps as a last resort. In some communities trapping wild animals is prohibited, so check with your town clerk or animal warden before investing in a trap.
I happen to like woodchucks. They remind me of fuzzy little bears. I love seeing them standing up and looking around like miniature grizzlies. I just don’t want them on my land. So if one turns up, I’ll try to scare it away. Daphne can earn her kibbles!
Read Henry’s blog posts at https://dailyuv.com/gardeningguy. His e-mail address is henry.homeyer@comcast.net. Henry is a UNH Master Gardener and the author of 4 gardening books.
Native Plants for New England Gardens
Posted on Saturday, April 14, 2018 · Leave a Comment
It’s rare that I find a book that is as useful, accurate and easy-to-read as Native Plants for New England Gardens by Mark Richardson and Dan Jaffe, both on staff at the New England Wild Flower Society in Framingham, Massachusetts. This book presents over 100 species of wildflowers, trees and shrubs, grasses, ferns, vines and lianas (woody vines). And even though I grow the vast majority of plants in this book, I learned so much that I felt like a third grade boy on an outing with a PhD.
First, the authors define native plants: those that were growing in North America when the first colonists arrived. They stress, right off the bat, that it is important to put the right plant in the right place. Instead of shopping for pretty flowers, they recommend knowing about plants and seeking them out. The glossy photos of the book will help you put together a plant list; their instructions will help you decide if you have a place for a particular plant.
I have always enjoyed eating wild harvested plants. The book covers ramps, which I grow, but also other wild edibles I grow – including two that I didn’t know are edible.
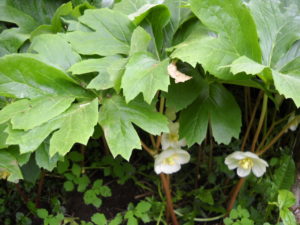
May apple
I have a large patch of Mayapple (Podophyllum peltatum). As the authors point out, it spreads robustly and shades out other plants. The blossoms appear beneath the big, wide leaves and are not easily seen; they suggest planting it on a steep incline, so that one can see them – and the fruit, bright red “apples” when standing below the planting. I have seen the fruit, but never knew it was edible until reading about it. Apparently the fruit is also eaten by box turtles. Who knew? Note: “Since writing this, I read elsewhere that that the seeds and rind may be toxic, so better to avoid eating May apples.”
Another edible fruit described in the book is produced by American spikenard (Aralia racemosa). The authors note that spikenard gets big enough to serve as a handsome shrub, but since it dies back to the ground each fall, it won’t be damaged by snow falling off your roof if you plant it near the house. I grow it in part shade and it gets to be 6 feet tall and wide, and produces masses of berries each fall. The berries start off white, change to red, and end up a deep purple. I shall taste them this fall.
I grow all 3 of the milkweeds described in the book: common, swamp or rose, and butterfly milkweed. The authors explain the pluses and minuses of each, where to plant them. “If you are looking for a well-behaved garden plant, then common milkweed is not the best choice.” It spreads by root, they explain and is suited for “meadows, hell strips or as competition against invasive species.”
Yes, I knew that milkweeds are essential for monarch butterflies, but they point out that they also support tussock moths, swallowtails, and a variety of beneficial beetles. “The plant (swamp milkweed) seemingly supports whole ecosystems on its own, often playing host to bees, ants, and various spiders waiting to eat an unsuspecting pollinator.”

Cardinal flower
I love cardinal flower (Lobelia cardinalis) and have grown both the native species and modern hybrids varieties in a moist, full-sun garden. I no longer grow the hybrids, as they are less hardy than the native species and have all died out. The authors refer to work done at the University of Vermont that showed that at least one of the hybrids produced only 20% of the nectar energy produced by the wild species. So hummingbirds, who love these bright red flowers, get something akin to diet nectar if you grow the hybrid variety. It’s best to avoid planting them, so read the plant tags carefully before buying.
I love the bright red leaves of staghorn sumac (Rhus typhina) growing by the side of the road, but would never consider planting it on my property. Although a native plant with fruit beloved by returning migratory birds in early spring, it can spread very aggressively and is hard to remove. But the authors introduced me to another variety, fragrant sumac (Rhus aromatica), that is smaller, “much slower growing, and fairly easy to control even in a formal garden setting.” I shall look for it, and try to learn from others who have grown it (Please e-mail me if you have grown it).
I grew up in Connecticut where spicebush (Lindera benzoin) was a wild shrub with tasty leaves and twigs that I chewed as a breath freshener. But it is hardy to Zone 4, and I got one two years ago. According to the book, it is an understory shrub that does well in moist soil. I knew it as a plant for dry shade, and hence planted it here in a dry location, and it has done fine.
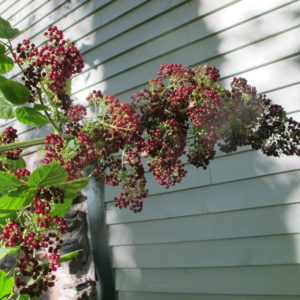
Aralia berries
What I did not know, until reading Native Plants for New England Gardens, is that spicebush is dioecious – there are male and female plants. That would explain why I have not gotten any of the bright red berries used by the authors in a tea that is “magical for fighting off the common cold and is packed with vitamin C.” I shall get another, and hope for pollination.
One last tip from the book: if you want to grow wintergreen, a low-growing ground cover with tasty red berries, plant it under your blueberries. The sulfur you give your blueberries will make the soil right for wintergreen.
I loved this book. I predict you will, too. And come spring, I’ll go to the Garden in the Woods in Framingham, MA (where the authors work) and buy some wildflowers in the nursery there.
You may e-mail Henry at henry.homeyer@comcast.net or write him at P.O. Box 364, Cornish Flat, NH 03746. Please include a SASE if you want a response by USPS mail.


 Click Here to buy from Cobrahead