Holiday Gifts for the Gardener
Posted on Monday, November 20, 2017 · Leave a Comment
By the time you read this, Black Friday will have passed us by. I know that some people stand in line that day, starting before the sun comes up to get special deals on electronic games and various widgets, but I have never done so. And won’t. My love ones get good, practical presents that will last. Here are my ideas for gardeners to give – or get.
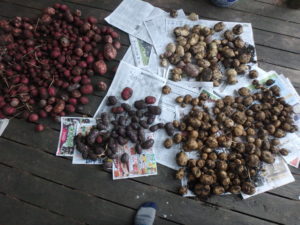
Actually, not all my presents will last. Some are edible presents. Each year, for example, I dehydrate cherry tomatoes, apples, pears and hot peppers. A pint bag of dried cherry tomatoes represents a lot of work – and love. First I had to start the seeds and raise the seedlings. Then plant, stake and weed the plants. Harvest when ripe, cut in half, dry for 18 hours or more, and then bag them up. A pint of these babies is about 240 dried cherry tomato halves. A delectable gift.
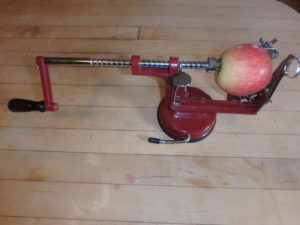
Apple Tool
Dried apples and pears are easier presents. I have a kitchen tool that will peel, core and slice apples and pears. You skewer the apple, turn a crank, and it’s ready to use in a jiffy. Much less time consuming than cutting cherry tomatoes in half and arranging on a tray. And of course, a few dried apples will fill up a quart bag, and a good tree will last a lifetime. The slicer I have is called the Triple-Action Apple Machine and it’s available from King Arthur Flour (www.king arthurflour.com) for about $25.
As to the dehydrators, those are serious presents. I have 2 kinds, and like both. The Cadillac of dryers is the Excalibur. Mine has 9 trays, a timer and a thermostat. The hot air blows across the trays, so all dry in equal time. Mine, Model 3926T sells for around $300 (www.excaliburdehydrator.com).
For a more economical price you can get a NESCO American Harvester dehydrator. They come with heat and blowing units either on the top of the bottom of a stack of trays. Those closest to the heat dry first, so you have to keep checking them and moving trays around. But they only cost $130 to $150 from the manufacturer. (www.nesco.com). I like the dehydrator with bottom heat best. But they take longer and use more electricity than the Excalibur (1000 watts per hour of use versus 660 watts per hour for the Excalibur).
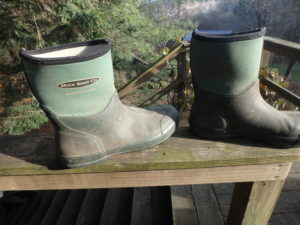
Muck Boots
I spend a lot of time working outside when the grass is wet or paths are muddy. I like dry feet, and nothing compares with my Muck brand boots. I’ve had them for over 10 years, wear them nearly every day in spring and fall, and they are not even thinking of wearing out. Mine are 10 inch high slip-ons, green, insulated. Warm. Looking on line, I think it is called the scrub boot. They cost $60-70 a pair. Of course I bought mine on sale for less.
At this time of year I’m battling mice and squirrels that want to get in the house to find food and lodging. My old house has a stone foundation, so it lets them in, here and there. Recently I got something called, “Mice Magic” from Gardeners Supply (www.gardeners.com) which claims to repel them – avoiding the need for trapping them.
Mice Magic comes in sachets like tea bags that are very fragrant – with spearmint and peppermint. Each lasts, it says, for 30 days. And one only needs one in a room to discourage the mice. So I have them in my basement and in the attic storage areas that tend to accumulate rodents. So far, they seem to be doing a good job, and these would be good presents. A box of a dozen (item # # 8592441) costs $29.95.
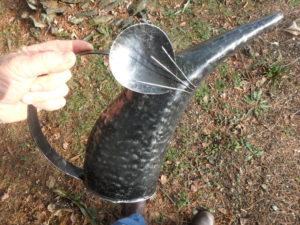
Mouse Watering Can
Speaking of mice, I recently got a watering can shaped like a mouse – complete with ears and whiskers! This is a metal watering can for indoor plants that makes me smile every time I use it. It pours nicely and holds a nice amount of water. Available from Gardeners Supply for $19.99. (item # 38-315)
Every Christmas when I write this column I mention tools, including the CobraHead weeder. This is, simply, the best weeder in America. It’s a single-tined weeder shaped like a bent finger – or a rising cobra. It can get under weeds and grasses, and tease them out. Available at garden centers everywhere and most seed companies, it is also available on line at www.CobraHead.com for $24.95.
Other tools I’d recommend? A collapsible rake. These can be adjusted to open widely, to 24 inches, or closed down to just 8 to 12 inches. There are several brands, and prices range from under $10 to about $25. All metal.
Books are great for gardeners, too. This fall I attended a lecture by Thomas Rainer and bought his book, Planting in a Post-Wild World: Designing Plant Communities for Resilient Landscapes, co-authored by Claudia West. It’s an interesting read, presents many provocative ideas, particularly for urban and suburban gardeners. They explain, for example, that we often plant gardens with plants that would never be together in the wild – they have entirely different needs for sun, water, pH – and we could do better planting those that have similar requirements. (Timber Press, $39.95).
Last winter I attended a talk by Celeste Longacre and bought her self-published book, Celeste’s Garden Delights: Discover the Many Ways a Garden Can Nurture You (available for $25 at www.celestelongacre.com). It’s a nice book that not only gives tips for growing vegetables, but also for storing and using them. I got some good tips from it, including a better way to store beets.
So Santa, I don’t really need anything this Christmas, but if you want to drop off a load of reindeer droppings, they’d be great for my compost pile.
You may reach Henry at henry.homeyer@comcast.net or by mail at PO Box 364, Cornish Flat, NH 93746. Please include a SASE if you want a response by mail. Read his blog at https://dailyuv.com/gardeningguy.
Forcing Bulbs
Posted on Tuesday, November 14, 2017 · Leave a Comment
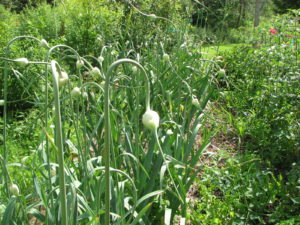
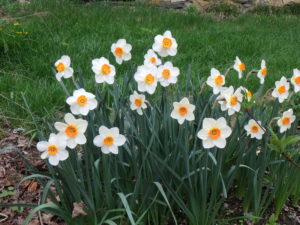
Daffodils for forcing
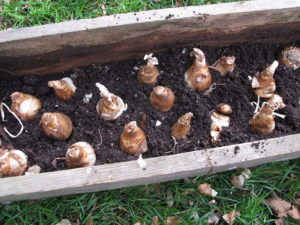
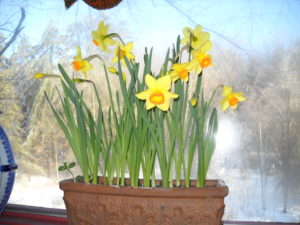
Each fall I pot up daffodils, tulips, crocus and other bulbs for indoor blooming. Now is the time to do it. It takes a long time for bulbs to establish roots and get ready to bloom, come spring, so the sooner you do so the better. Most bulbs need three to four months before they are ready.
Most bulb packages will specify early, mid-season or late blooming times. When selecting bulbs for forcing, choose early-blooming or mid-season varieties. Species tulips like Fosteriana and Kaufmanniana are both early. The Darwin hybrids are early- to mid-season varieties that force well. Triumph tulips are also good.
Forced Tete-a-tete daffodils
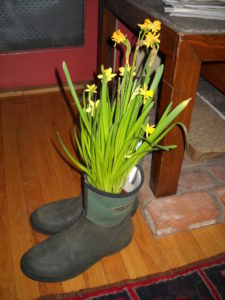
Of the early daffodils my favorite is Tete-a-Tete which produces small gold flowers, 2 or 3 blossoms per bulb. These are readily available in grocery stores in early spring and I buy them already blooming in small pots for under $5. One of my favorite things to do with them is to put a pot in a rubber boot in the mudroom, their blossoms poking out of the boot. It always evokes a reaction from visitors.
So how do you force bulbs? Plant them in ordinary potting soil in pots and keep them in a cool spot that stays slightly above freezing, and never more than 50 degrees. I have a cold, above-ground basement that is perfect for that. But you can keep them in the garage or perhaps the bulkhead.
No harm is done if temperatures drop below freezing for part of the time they are getting ready, but no growth occurs when they are frozen, so keeping them above freezing is better.
Bulbs have everything they need to bloom already packaged inside. You don’t need to fertilize the bulbs when you plant. Each fall I clean out all the pots that had annual plants on the deck and save the potting mix in a big contractor bag. I use that potting material to fill other pots for forcing bulbs.
Mice can be an issue if planting tulips or crocus, though daffodils and alliums are of no interest to them. I cut squares of plywood large enough to cover any pots I use for tulips. I put a brick on top of the plywood to keep mice out – they can squeeze through incredibly small spaces.
Most gardening books warn against watering the soil mix in which you have planted bulbs. They say bulbs will rot if too wet. That may be true, but I’ve found that in winter my problem has been more with the soil drying out too much. Humidity is very low in winter, and the potting mix, which is peat-based, loses moisture quickly by evaporation. I check the soil once a month and water if the soil feels dry. One year I let the mix dry out to much and did not get many blossoms. Always start with lightly moist soil mix.
Forced daffodils
Clay pots may look good to you, but they can allow moisture to evaporate quickly from the sides of the pot. Plastic, fiber glass or porcelain containers are better for bulbs because they hold the moisture of the potting mix, minimizing water loss.
So how close can you plant your bulbs? Basically as close as you want. I have some nice Italian pots that I use each year for forcing. They are rectangular, roughly 14 inches long, seven inches wide and six inches deep. I put 8 to 10 bulbs in each one. In a 10-inch round pot I put 10 daffodils. An inch or two between bulbs is fine.
Most pots do not allow the same planting depth you would have outside. Instead of 6 inches of soil covering a tulip or a daffodil, two or three inches is fine. I put a thick layer of soil in the bottom of the pot, then arrange the bulbs on it. I push down on each bulb to set if firmly in place, and then cover with soil mix. A light watering is good after patting the top of the soil to firm it up a bit.
If you do have a deep pot – 10 inches or so – you can plant 2 layers of bulbs. Plant daffodils near the bottom of the pot, add soil mix, and then add some small bulbs like crocus or snowdrops near the soil surface. Just leave a little more space between the small bulbs than you might otherwise so that the daffodils can grow up between them.
How do you know when your bulbs are ready to bring into the warmth of the house? Make a tag for each pot that tells you what is planted, and when it was planted. Eight to twelve weeks is fine for daffodils, and 16 weeks for tulips. But look at the pots. If buds are up and craving light, bring them up a little early if you wish. But never bring tulips up before the end of February or they won’t bloom.
Winter is often a hard time for gardeners. We crave working in the soil and seeing things grow. Forcing bulbs indoors is one way we can satisfy our need to have flowers – even with snow on the ground.
You may reach Henry at PO Box 364, Cornish Flat, NH 03746. Please include a SASE if you want a written reply. Better yet, e-mail him at henry.homeyer@comcast.net. You may read his blog posts at https://dailyuv.com/gardeningguy.
Tips for Fall Transplanting
Posted on Tuesday, November 7, 2017 · Leave a Comment
Now is a good time to divide and transplant some of your perennials. I recently dug up and moved Shasta daisies, Siberian iris and snakeroot (Cimicifuga spp). Most perennials can be divided in either spring or fall, and experience is the best way to know what season is best for any given plant. Most plants are not too fussy.
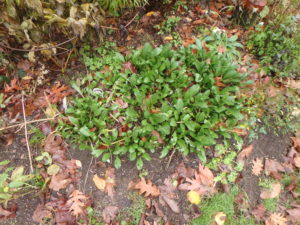
Shasta daisies in need of division
Shasta daisies tend to die out if they are not divided every 3 to 5 years. And you probably have seen iris with a big dead section in the middle of a clump. It’s my belief that the center dies out because the plants have used up all the needed minerals in the soil. This starts in the middle where the original plant began its life.
Why bother digging up and dividing flowers? Some develop into huge clumps that overwhelm a garden bed, or elbow out nice plants next to them. This is particularly true for plants that spread by root like beebalm (Monarda didyma), common orange daylilies and obedient plant (Physostegia virginiana). Those plants can be quite aggressive.
Other plants, heavy-feeders, need to be divided in order to enrich their soil. Once a year I generally sprinkle some slow-release organic fertilizer like Pro-Gro or Garden Tone over Siberian iris to help replenish minerals that get used up. This minimizes the need to divide and re-plant. But digging up and adding compost and fertilizer will help considerably to re-energize a plant.
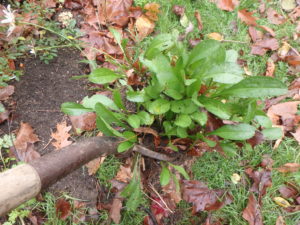
Slide a fork under the plants and lift
Here is what I do: I use a garden fork or drain spade (an extra-long spade) to loosen up the roots of a plant by sliding it in under the plant at a 45 degree angle and prying upward. Some plants – daylilies and Siberian iris, for example, hold on tightly. Others, like Shasta daisies and bearded iris have roots near the soil surface and come up easily. You may have to go all around the perimeter with your fork, or just on 2 sides.
I lift the plant out of the ground and place it in a wheelbarrow or on a tarp to minimize soil loss and messiness. Then I use my hands, a shovel or a sharp serrated knife to divide the plant. I like to just split it into several smaller chunks with my hands if possible. But a big chunk of Siberian iris will not pull apart, so cutting through the roots is necessary. I know that seems brutal, but the plant will survive nicely.
If you have invasive weeds or perennials growing near the plant you are dividing, you should be very attentive to the roots. Know the color and texture of goutweed roots, for example. If you see even a smidgen of goutweed root in with the plant you are dividing, STOP! You don’t want to move it to a new area of your garden.
If you are receiving plants from friends, always ask if they have invasives. I got goutweed from a dear friend who kindly gave me some iris – with goutweed roots mixed in. Twenty years later I am still fighting a losing battle with that goutweed.
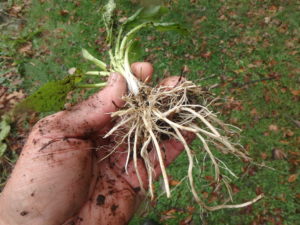
Bare rooted plant
If you think there might be roots of an invasive plant, either throw it out or bare-root it. Bare-rooting a plant means removing all the soil from the root mass. I do this with a sharp stream of water from my hose. It’s a messy procedure, but getting rid of the soil will allow you to see what roots are part of the plant you want, and what else may be mixed in. Most invasives have distinctive roots.
When you bare-root a plant it is important, when re-planting it, to make sure you get soil to cover all the roots. I will make a hill of soil in the planting hole and drape the roots over it. With my fingers I press soil around the roots, and cover them well. Then I water to get soil to fill in air pockets. Even though air is needed by roots, air pockets will dry out roots, damaging them.
After your plants are lovingly tucked in for the winter, spread some mulch over them. This will slow the soil from freezing, and give the plant more time to establish its roots. I like chopped leaves or pine needles, but chopped bark mulch is fine, too.
When you are cleaning up your flower beds this fall, think about cutting back annual flowers instead of pulling them. If you pull a big sunflower or zinnia, you are leaving an open space that will practically invite weed seeds to infiltrate your garden. If you leave the roots and a little stem, those may decompose over the fall and spring and add organic matter to your soil. And if your flower bed is on a slope, even a gentle one, a bare spot of soil will allow heavy rains to wash off some of your precious topsoil. You can pull those roots when you are ready to plant next spring.
This is also a good time to dig up and get rid of plants that you don’t like, are too aggressive, or are just not thriving. You don’t have to keep every plant. If you don’t like it, get rid of it!
Cold weather is on the way, so if you need to divide plants, you’d better get going!
You may reach Henry at henry.homeyer@comcast.net or by mail at PO Box 364, Cornish Flat, NH 93746. Please include a SASE if you want a response by mail.
How to Minimize Garden Pest and Disease Problems Next Year
Posted on Wednesday, November 1, 2017 · Leave a Comment
As an organic gardener, I am always looking for ways to minimize the chances of pests or diseases in my garden. I don’t use fungicides or insecticides, even those that are all-natural and are approved for use by organic farmers and gardeners. I want it all: tasty veggies and healthy plants – but no interventions. And generally, I get that.
How do I avoid pests and diseases? Give plants what they need for optimal growth. Plants growing in great soil with appropriate amounts of sun and moisture are generally healthy plants. It has been scientifically proven that healthy plants are less attractive to pests and diseases.
A corn plant that is pumped up with chemical fertilizer, for example, is more attractive to corn borers than one has been raised organically and had its soil amended with manure.
Organic Corn from my Garden
I attended a lecture by Dr. Larry Phelan of Ohio State University in which he presented results of trials comparing conventional corn with organic corn. His data was convincing. Yes, chemical fertilizers can produce big yields, but excess nitrogen from chemical fertilizers will attract borers.
Then there is the problem of tomato hornworms. These nasty, aggressive critters are a real problem for some gardeners, but I have not seen one in my tomato patch in years. Why? I’m not sure, but the last time I saw one, it was being parasitized by small wasps.
If you see what look like grains of rice on a tomato hornworm, they are being attacked by a braconid wasp. The “rice” grains are larvae that are slowly sucking the hornworm dry. If you see this happening, don’t kill the hornworm. Just remove it (wearing gloves) and carry it far from the tomatoes. The larvae will do the rest.
How can you encourage parasitic wasps to live in your garden? First, do not kill them – though they are not very noticeable. And do not use chemicals to kill other pests such as Japanese beetles or potato bugs.
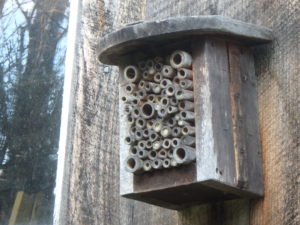
A home for solitary wasps
I have a small “home” for solitary wasps attached to my barn. It is a box filled with bamboo tubes of different sizes, their ends facing out. These tubes offer shelter for insects and places where they can lay eggs or stay out of danger. I don’t see it used much, but I know that solitary wasps do need such places. Nature offers the best places, I’m sure, so if I don’t rake and manicure every inch of my property. A naturalistic setting offers many sites for good bugs. Mother Nature, left to her own devices, tends to have a balance of good critters and bad. I try not to second guess her too often.
But what about introduced species that are a problem with our crops? They can easily cause damage and get out of control. One such pest is the spotted winged drosophila (SWD), an Asian fruit fly that arrived in 2011. Instead of just eating overly ripe fruit laying on the ground (as most native species do), this one will attack good fruit on the bush. Mushy fruit (complete with bugs) is the result. Blueberries have been severely affected in some places.
I recently phoned Dr. Alan Eaton, the state entomologist for New Hampshire, to see if any progress has been made in controlling this pest. No, he explained, they are still in the learning phase at present. Early reports had suggested that early-ripening crops of blueberries and strawberries were less susceptible to SWD. But he told me that this year they were finding earlier and earlier reports of damage. And this year they had reports of SWD on cherries for the first time.
These fruit pests are just one twelfth of an inch in size, so netting (always a friend to organic gardeners) musts be very fine to keep them off our crops. Most commercial growers are resorting to chemical sprays. Me? I’m rooting for the birds and other insects to take charge.
It is important to clean up under you apple trees
So what can you do to reduce chances of pest and disease problems next year? Clean up your garden well this fall. Apple scab, for example, causes deformed, inedible fruit. The disease can be minimized by simply raking up leaves and fruit- right now. This year I took it a step farther and used a pole to knock off any apples left on the tree, and raked them up, too. Many of those left on the tree were clearly rotten. I’ve read that spreading compost under apple trees introduces beneficial microorganisms and may help control diseases, too.
According to Dr. Eaton, destroying vines and leaves of plants in the squash family – cucumbers, squash, pumpkins, melons etc. – is important at this time of year. Striped cucumber beetles over-winter in plant debris, so getting your garden clean is important. I put vine and tomato plants on my brush pile and burn it once snow has fallen, but you can also bag it and send it off with household trash. Composting is not usually an effective way of ridding your garden of these pests.
Remember: well-tended plants are less susceptible to diseases and less attractive to pests. I am always amazed at how healthy my garden is despite – or because – I use no chemicals – and have always used organic methods. It takes a while to develop a good supply of beneficial insects, I suppose, but get started!
Henry is a UNH Master Gardener and the author of 4 gardening books. He is available to give talks at garden clubs and libraries. Reach him at henry.homeyer@comcast.net or P.O. Box 364, Cornish Flat, NH 03746.
How to Eat From Your Garden All Year
Posted on Tuesday, October 24, 2017 · Leave a Comment
This was a good gardening year. Adequate rain, adequate sun. I know that I will have food from the vegetable garden that will allow me to eat something from it every day all year. Eating something every day from my garden is a bit of an obsession, but not all that hard to do. I am putting my root crops away for the winter now, and drying herbs.
My best crop this year was potatoes. In a 30-inch wide (double) row that was nearly 50 feet long I harvested about 125 pounds of potatoes including 5 different varieties. I had no potato beetles even though I used no pesticides, not even the organic Bt bacterial spray. My tip for doing so? Plant late. By mid-June potato beetles have started eating something, somewhere else. Maybe they were munching my neighbors’ potatoes, I don’t know.
When researching a book project in 2002 I drove around the country visiting farms and talking to farmers. In Idaho I worked for 3 weeks as a farm hand on an organic farm that grew potatoes, among other things.
Potato harvest 2017
I learned that potatoes need to be stored in a cool environment with high humidity. Commercially that meant storing them right at 50 degrees. At cooler temperatures some of the starches are converted to sugars. That would mean that French fries – America’s favorite potato product – would tend to darken up too much. I don’t make fries, and store my potatoes in a cold basement where they stay between 33 and 50 degrees. They’re very sweet.
Before I store my potatoes I harden them off outside for a few days. I place them on my north-facing deck where they get a good breeze, but not too much sun. I roll them over once a day so that all sides face up for a while.
If you don’t have a cold basement, get a spare fridge. These are often offered for sale used at $100 or less – and over the years I have gotten a couple free. They will keep root crops cool and keep mice from nibbling the harvest. If you keep it in the garage it will never run all winter, though you may need to add some heat inside it in January. A seed-starting heat mat will provide low heat for just a few pennies a week. Keep a thermometer inside it to monitor the temperature.
What else will store well in a fridge? Beets, carrots, rutabagas, kohlrabi and celeriac. Leeks should store well, but don’t. Those I clean, cut up, pack in zipper bags and freeze. Carrots will store well in the ground, but are targets for mice, so I pull them now.
Dried foods last all year, too. I dry tomatoes, herbs, apples, pears, berries and hot peppers. Cherry tomatoes, cut in half, are easy to dry and add great flavor to soups, stews and stir fries. Hot peppers I grind in the coffee grinder so that I can add just a little pepper powder to spice up a dish gently.
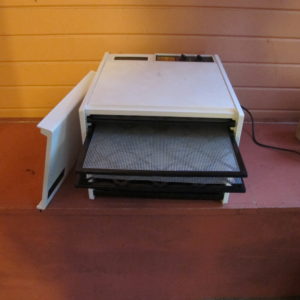
Excalibur dryer
Any type of dehydrator will work fine, but the two I like best are the Excalibur and the NESCO American Harvester. The Excalibur is more efficient, but also more expensive to buy.
A cool dry location is good for storing garlic, onions and winter squash. Winter squash like Waltham butternuts and blue Hubbards will store until next summer under the right conditions. A cold spare bedroom is a good spot – 50 degrees is great. Some kinds of onions store better than others. Yellow onions store well, but start to sprout by spring. Then I use my frozen leeks to substitute for onions in cooked dishes.
Freezing garden produce is good, but a bit time consuming. The easiest vegetables to freeze are tomatoes because they’re so easy to freeze. I just put clean tomatoes in a zipper bag and freeze whole, removing them to use in soups and stews like canned tomatoes. And running hot water over a frozen tomatoes will separate the skin from the flesh in just a moment.
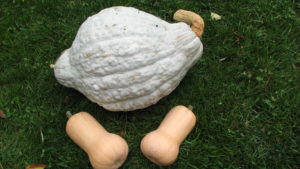
Blue hubbard squash with Waltham butternut squash
Most vegetables need to be briefly boiled before freezing – a minute or less. That is called blanching. But tomatoes, leeks, berries and peppers do not require blanching. Some gardeners blanch kale, while others do not. Blanching kills aging enzymes in food, so if you are going to eat frozen vegetables within 3 months it probably is not needed. But if you want to eat kale, beans, broccoli or summer squash 6 months from when you picked it, blanching is recommended.
One last word on freezing. I recently read a paper from University of California at Davis that explained that I could freeze garlic. Just separate the cloves, put in a freezer bag and freeze. I’ve never done that, but I will try that this year as garlic tends to dry out or sprout after a few months. I have also dehydrated garlic and ground it into a powder.
However you store your food, having something from the garden to eat during a February blizzard will bring a smile to your face- or at least it does from me.
Read Henry’s blog posts at https://dailyuv.com/gardeningguy You may reach him at henry.homeyer@comcast.net or PO Box 364, Cornish Flat, NH 03746.
Life After Frost: Gardening Is Not Over
Posted on Tuesday, October 17, 2017 · Leave a Comment
Frost was late this year. It was nearly mid-October before we had a hard frost, one that murdered the zinnias and blackened the basil. For me, hard frost is a day to mourn a little, to spend a few moments missing the summer that passed, for the tomatoes that brought me such great pleasure and the flowers that graced my table.
But autumn is grand, too. I still have plenty of garden veggies to harvest and process, and those fall days full of sun and a few monarchs are full of surprises and delights.
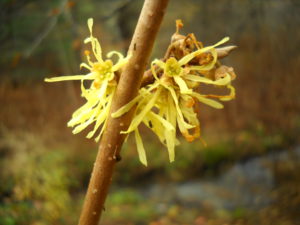
Common witch hazel
I’m always delighted by plants that bloom now –especially woody plants. I have two witch hazels (Hamamelis virginiana) that bloom subtly each fall. The blossoms are not obvious because they are small, yellow, and their leaves are yellow (and green) and have not yet fallen. But those curly blossoms will persist even after the leaves have dropped. Witch hazel is a native tree that lives in shade or part shade. It’s a small tree or a shrub, depending on the variety. It blooms either now, or in very early spring.
Another interesting shrub in bloom now is disanthus (Disanthus cercidifolius). Although most books describe the flowers as “insignificant”, I disagree. They are small – just half in inch across, and close to the stem – but they are in pairs, back to back, each like a small purple starfish. I‘ve had my disanthus for 4 years, and this is the first time it has bloomed, or at least the first time I have seen it bloom. So I yelped with excitement when I first saw the blossoms.
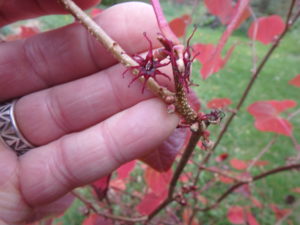
Disanthus flower
The best thing about disanthus is the leaf color. The leaves are deep red and purple, and have been so for many weeks. The color is better than that of the now prohibited invasive, burning bush (Euonymus alatus). But unlike burning bush, disanthus doesn’t litter the countryside with babies like a stray, unspayed dog. It stays in one place, and grows slowly to a 6 to 10 foot height and width.
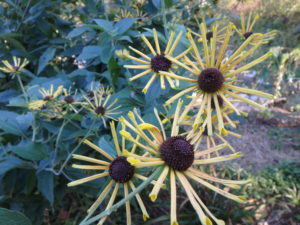
In the flower garden my fall asters are about done, but I still have one Rudbekia or black-eyed Susan looking great. It is Rudbeckia subtomentosa, a variety called ‘Henry Eiler’. It’s taller than I am. Its petals are very delicate and are spaced apart in an airy fashion. The stems of this plant are quite thick, but not thick enough to stand up to fall winds without staking.
Grasses are nice now, too. They generally bloom in fall, producing subtle green flowers that most people don’t recognize as flowers. My favorite grass is a Chinese feather grass (Miscanthus sinensis), a variety called ‘Morning Light’. The leaves have a central white stripe and each stem stands up 4 to 6 feet, or even more. This grass will look good all winter waving above the snow.
Each stem of feather grass has 20 or so thin strands of flowers that will produce seeds. This plant does not reproduce from seed, however. The clump gets bigger each year, and can be divided to create more plants. I’ve read that the time to divide it is in the spring, not now.
The milkweed plants I started from seed this year stayed small and did not flower. But I will harvest some seeds elsewhere and plant some more. The seeds need a cold period before they will germinate, so planting outside now makes sense. Last spring I planted seeds in flats indoors, then put them in the fridge for 6 weeks before they would grow. The red milkweed I planted the year before did great this year, blooming and attracting pollinators. I will plant some of their seeds when I see the pods are ripe and ready to burst open.
Henry Eiler Rudbeckia
I’ve cut down some of my perennials, and pretty much all are ready for the knife or shears. I’ll leave things with stiff stems and interesting seed pods for winter viewing and as food for the birds. But the more I can do now, the better. One landscaper told me she figured that every hour of fall clean up reduces spring work by three hours.
One of my last tasks each year is to run over the lawn with my lawnmower, chopping leaves into perfect mulch. I rake it onto a tarp and pull the tarp to my vegetable garden where I spread the leaves over the by-then weeded beds. It keeps weed seeds from germinating in the spring, and adds organic matter to the soil as it breaks down and is eaten by earthworms.
My gardening friend and fellow garden-book writer Sydney Eddison of Connecticut always saves her chopped fall leaves in contractor bags and uses them in the spring on her flowers. I have filled up 6 huge plastic bags with grass clippings and leaves another friend gave me, and have stored them in the barn for use in the spring. Sydney Eddison has the best soil I’ve ever seen after mulching with chopped leaves for 40 years or so.
Don’t forget to plant your spring bulbs now, too. You can plant into November, but it will be cold by then, so get going!
Read Henry’s blog at https://dailyuv.com/gardeningguy Youi may reach him at henry.homeyer@comcast.net and see his web site at www.Gardening-Guy.com
Planting Garlic
Posted on Wednesday, October 11, 2017 · Leave a Comment
Growing garlic involves less work than anything else I grow. There really are only 3 steps: plant it, mulch it, and harvest it. It’s also the least expensive, once you have an established bed of garlic. I will plant this year’s crop from last year’s crop, and that one I planted from the crop of the year before. You really only have to buy garlic once – so long as you save some each year for planting.
There are basically just two kinds of garlic: soft neck garlic, which is what you probably get at your grocery store, and the stuff we grow here in the Northeast called hard neck garlic. Most soft neck garlic comes from California and keeps nearly forever. Hardneck garlic has a stiff stem in the middle of each bulb, and has a much more complex flavor (in my opinion). It will keep in a cool place until spring, but not much longer. Then it either sprouts or dries up.
Planting Garlic
October is the time to plant garlic. If you don’t have any seed garlic, you might be able to get some at your farmers market. Don’t plant grocery store garlic, even if you can find hard neck garlic, because it is often treated so that it will not sprout. By now most catalog-sellers of garlic have sold out.
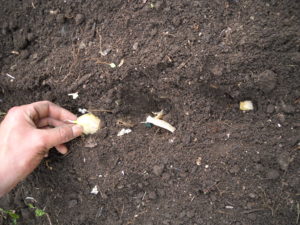
Take a bulb (or head) of garlic and separate it into the cloves that surround the hard “neck” or flower scape. Depending on the variety of garlic, you might have just five cloves, or as many as a dozen. I like big cloves, as they are easier to peel and use. So each year I select for big cloves and plant them. Over the years my crop has produced bigger bulbs and bigger cloves.
Garlic needs full sun (defined as 6 hours of sun) and rich soil. I always add compost to my garlic bed and some organic bagged fertilizer. I rake soil from the walkways into a raised bed that is perhaps 30 inches wide and six inches higher than my walkways. Ideally, by adding compost, your soil will be rich and fluffy.
To plant, I draw furrows about 8 inches apart with my CobraHead weeder, a single-tined tool that is curved like a bent finger. I loosen the soil about 6 inches deep withit, than push cloves into the soil so that they are 3 inches apart and about 3 inches deep. Always plant them with the pointy end up. Afterwards I pat the soil down with my hands to firm the soil.
The last step is to mulch your garlic. I use mulch hay or straw and put almost a foot of fluffy material over the bed. Fall rains and winter snows will cause the hay to settle – I end up with about 4 to 6 inches of material in the spring.
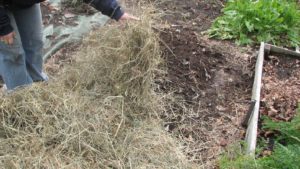
Garlic Mulch
The mulch keeps the soil from freezing until January, allowing roots to get well established before the garlic cloves go dormant. It also prevents most weeds from germinating and growing next year, though I weed the bed before planting. Garlic is tough stuff and will push right through my layer of mulch, though most weeds do not.
Depending on the weather and when you plant, your garlic may send up green stalks this fall. Don’t fret if it does. Those sprouts will die back in winter, but the garlic will send up new ones in the spring.
Garlic Scapes
In early summer the scape, or flower stalk, will perform for you, “dancing” to create loops, swoops and circles of green. I use these in flower arrangements. Each scape produces a flower on top of the scape that will, if left, produce seeds. Those seeds are not useful for the average gardener, as they will not produce edible garlic for 2 years. But the stems and flowers are great for early summer stir fries. Garlic scapes are a taste treat.
Some believe that cutting off the scapes early on will produce bigger cloves of garlic, but I have never been able to tell if that is true or not, though it makes sense. Producing flowers and seeds uses energy that might otherwise go to producing bigger bulbs.
Next July the garlic you planted this year will be ready to harvest. Each bulb grows about 7 long pointy leaves that also surround the cloves and protects them. When 3 or 4 leaves have turned brown and started to dry up, it’s time to harvest. If you wait too long, all the leaves will have dried up and the garlic will not store as well – it will dry out too soon.
I’ve been told that after harvesting that garlic should be cured in a cool shady place for a week or two before you cut off the tops. Why? Because nutrients in the leaves – some of which are allegedly good for preventing cancer – will migrate to the bulbs and be absorbed.
You can store garlic best in a cool, dry place. Ideally 50 degrees with moderate humidity. I recently read an article produced at the University of California at Davis that you can freeze garlic instead of storing it at room temperature. Separate the cloves, but don’t peel them. You can freeze them in a zipper bag or jar for a year or more. I shall try that. Don’t store garlic at room temperature in oil, as it can produce deadly botulism.
Garlic may or may not repel vampires and viruses. I do know it makes food taste better, and is full of vitamins and minerals. So I grow it, and you should, too.
You can reach Henry at henry.homeyer@comcast.net. Read his blogs at https://dailyuv.com/gardeningguy.
Planting For the Birds
Posted on Wednesday, October 4, 2017 · Leave a Comment
I’ve never calculated how much I spend each year on bird seed, but it’s considerable. I know people some spend a lot more, who think nothing of buying big bags of 2 or 3 kinds of specialized seeds for the birds every few weeks, and who maintain half a dozen feeders much of the year.
Does Mother Nature buy bags of booty for birds? No. We can reduce our expenditures and help the birds through judicious management of our wild spaces and our gardens. Now is a good time to plant a few things for the birds.
To support birds, it’s important to provide them with food all year, nesting places, and safe places out of the reach of cats, foxes and hawks. Agreed, it is easier to feed black oil sunflower seeds to provide food in winter than to plant trees, but there are trees and shrubs that do provide fall and winter food.

Pagoda Dogwood berries
Shrubs are great for summer and fall treats. Pagoda dogwood (Cornus alternifolia) provides berries that are eaten voraciously in mid-August, but are long gone now. Same for blueberries, which, alas, are enjoyed by the birds as much as they are by us.
Three shrubs that produce fall berries are silky dogwood (Cornus amomum), red osier dogwood (Cornus sericea) and gray dogwood (Cornus racemosa). The first two grow wild in wet areas in part shade to full sun. Gray dogwood appears at the edges of dry forests. All produce berries enjoyed by birds. I went out in early October and found just a few berries left on silky dogwood growing wild near my stream. All have berries from August to October.
For winter food, nuts and cones are the best source of bird food. It’s true that most birds cannot break open a walnut, chestnut or acorn – though I have seen crows feeding on walnuts broken open on the road. But as the winter progresses, nuts soften and the interiors become available to birds. Squirrels are messy eaters, and often leave parts of nuts scattered on the ground and available to birds, too.
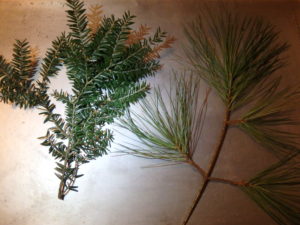
Hemlock left, White Pine right
Two of the most popular trees with birds are the white pine and Canadian hemlock. Not only do they provide food – seeds from their cones – they provide shelter and nesting places. The eastern white pine is used by more than 40 species of birds, and Canadian hemlock is used by more than 25 species.
If you are interested in learning more about trees and shrubs used by birds, I highly recommend a book by Richard M. DeGraaf, Trees, Shrubs and Vines for Attracting Birds (University Press of New England, 2nd edition, paperback at $24.95). This book lists, for each common species of woody plant, the birds that use it, and how they use it.
Is this a good time to plant trees and shrubs? Yes. Actually there are two schools of thought about this. Scientists have determined that trees and shrubs extend their roots in the fall, even after leaf drop. So many plantsmen, myself included, vote for fall planting. Not only are roots going to grow, the climate is usually cooler and wetter, so the chances of drying out are smaller.
The other school of thought maintains that planting in spring is better. They say that so long as you are attentive to your plants, and keep them watered, they have more time to get settled in before the stress of winter. I’m a careful gardener, but a busy person, and I know how easy it is to forget about watering for a week or two – which in august can be deadly. So I say plant now – or in September, but not after early November.
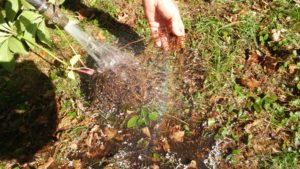
A stream of water is good for loosening roots
I recently went to a gardening workshop where one of the presenters advocated removing much of the soil from perennials purchased in pots before planting. The idea is that plants grown in pots get their roots all snarled up over time, and have roots circling the plants. I have always teased out plant roots with a finger or a tool, but have never used her suggestion – a stream of water.
So recently I tried using the hose to loosen plant roots, and, much to my surprise, it worked very well. I thought I’d be holding a handful of mud and a disintegrating root ball, but it worked fine. So next time I plant a tree or shrub, I shall try using a sharp stream of water to wash away some of the soil and to allow me to tease out the roots more easily – without breaking them.
But back to the birds. Here is a list of plants that DeGraaf’s book list as helping 20 or more species of birds: balsam fir, sugar maple, serviceberry (Amelanchier spp.), birches, flowering dogwood (Cornus florida), beech, Eastern red cedar, apples and crabapples, red mulberry, black tupelo, spruces, pitch pine, cherries of all kinds, oaks and American elm. That list includes some Zone 5 and 6 trees, so not all are appropriate everywhere.
Of the shrubs, here are some of the best: dogwoods of all kinds, hawthorn, huckleberry, bayberry, staghorn sumac, roses, brambles of all sorts, elders and blueberries. Common grapevine is also highly useful for birds.
It’s true most of us do not have garden space for more big trees, but there is always space for a few more shrubs along the edges of our space. So get out your shovel and get to work!
You may reach Henry by e-mail at henry.homeyer@comcast.net. Read Henry’s regular blogs at https://dailyuv.com/gardeningguy.
Putting the Garden to Bed
Posted on Tuesday, September 26, 2017 · Leave a Comment
Early autumn is a great time to work in the garden, and it’s not too early to start putting your garden to bed. I can work early in the morning without layers of wool, and my hands don’t need gloves to stay warm. Too often we gardeners wait until later, when frost is on the garden, to clean up. Start now, do a little each day, and the job will not be onerous.
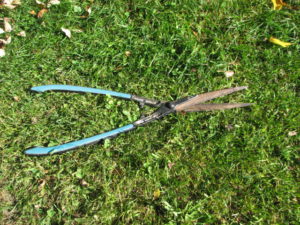
Hedge shears
Start by removing anything that is ugly. Your bleeding hearts (Dicentra spectablilis) has foliage that is yellow and has collapsed. Cut it out! Peonies may have dark blotches on the leaves – a potential sign of a fungal disease called botrytis – and should be removed.
Anything that looks like it is diseased should not go in the compost pile, but in the household trash or on a burn pile for winter. Be sure to cut right to the ground when removing foliage. Yes, you have to bend down a little lower, but the close to the ground, the better. That way you will be more likely to remove any diseased portions, and it will look better in the spring.
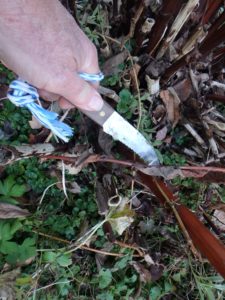
Serrated knife is good for cutting down flower stems
I know many gardeners like hand pruners to remove foliage, but I find that a bit tedious. I like a serrated knife. I hold a handful of tops, and with one swipe of my knife I cut through it all. The same group of stems might take a dozen snips. I’m all for speed and efficiency when working in the garden.
Other techniques? Hedge shears will make quick work of a big clump of iris leaves. But make sure they are sharp. Modern electric hedge clippers work, too, but I have been known to cut off the cord. Be sure to plug into one of those special outlets with reset buttons (GFCI) if you using electric hedge clippers – they’ll save you from getting electrocuted!
I have one 50 foot bed that is 8 to 10 feet wide. I call it my Darwin bed, as plants compete for space. No weeding. It’s full of tall plants like Joe Pye weed, turtlehead, phlox and more (including goldenrod for the pollinators). In late October, but before snow, I will run over the entire bed with a riding lawn mower, blade all the way up, engine racing at full throttle. It works!
You may wish to leave some flowers for the birds. Nice seed pods on purple cone flowers and black-eyed Susans will please the finches in winter, and look great above a thin layer of snow. Decorative grasses will sway in the winter wind, and look good for at least a month or two. You can always clean them up in the spring, or during a winter thaw if so inclined (and wearing wool).

Phlox in November
As you cut back your perennials you will notice some volunteer plants. Phlox is forever planting itself around my garden, as is great blue lobelia and (dis-) obedient plant. It is natural to say, “Oh, how nice, the phlox is spreading.” But do I really want more phlox? NO, if I did want more, I would have planted more. I’d really like a new color, not more of the same. So I’ll dig it up and put it at the end of the driveway in a throwaway plastic pot. “FREE” will stop traffic.
As you cut back, weed! That will require different body motions – and fewer aches and pains. You probably already know some weeds by name, and by root. Some are perennials or biennials with deep tap roots. Others have lateral roots with nodes that send up more weeds. Annual weeds pull up with little effort and have small roots – but thousands of seeds. Try not to shake out seeds from weeds that have bloomed and set seeds. They will be back to annoy you for years to come.
I bring 2 tools with me for weeding: a garden fork and a CobraHead weeder. The fork is great for deep-rooted weeds. I plunge it in or step on it to force it into hard soil, then tip it back, loosening the soil. The weed, along with the deep root, will come right out, particularly if the soil is moist.
The CobraHead weeder has a single curved tine with a widened tip. It has become an essential tool for me; it’s like a curved finger. I use it to get under a weed. It allows me to lift and loosen soil beneath a weed while I tug on the top. If there are lateral roots, I tease them out, tugging and loosening until I have the entire darn thing.
Nothing beats crawling on your hands and knees for finding weeds. You are at their level. But if it’s hard for you to get back up, maybe you’d like to sit on something, particularly if the soil is cold and wet. I sometimes use a 5-gallon pail, but have seen some nice kneeling seats designed for gardeners, and have heard nice things about them. But to each her own.
Mulching? That can be the last step of fall clean up. Finely ground bark mulch or chipped leaves can be good for keeping down weeds, but don’t use too much. And try to keep it back from the crown, or center growing area of the plant. You can ruin peony’s ability to bloom by covering it with 3 inches of bark mulch. And avoid buying bagged mulch that is “color enhanced”. It has chemicals in it.
Me? I like flower gardens that have big clumps of perennials and lots of groundcover plants to cover bare spaces. That’s what Mother Nature does. I don’t like big swaths of bark mulch, though I use some in newer beds.
So go get to work on a nice day. It will save you time in the Spring.
Read Henry’s blog posts at https://dailyuv.com/gardeningguy You may e-mail him at henry.homeyer@comcast.net.
When – and How – To Plant Bulbs for Spring Blossoms
Posted on Tuesday, September 12, 2017 · Leave a Comment
When the soil drops to 60 degrees Fahrenheit at proper planting depth, you can plant bulbs. You’ll need a soil thermometer, but that’s a handy device anyway – they’re useful in the spring to see if the soil is warm enough to plant tomatoes or eggplants without making them recoil in shock like a sixth grader wading into a chilly pond.
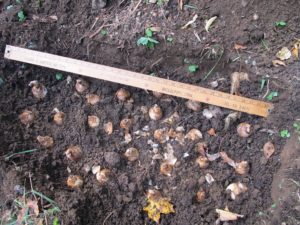
Daffodils planted in a 36-inch diameter hole, about 6 inches deep and 3 inches apart
Soil thermometers are similar to the probes sold for testing turkey temperatures in the oven. A steel probe with a dial on top. You just poke it into the soil and wait a moment. Sometimes I put a pieces of tape at different locations: 3 inches for crocus, 6 inches for daffodils, 8 inches for tulips. Then I can easily see the temperature without digging. They are available at garden centers, or on-line.
Why sixty degrees? In soil warmer than that, your bulbs may sprout, thinking it’s spring. That’s not lethal, but not desirable. You do want the soil warm enough so that the bulbs will establish roots now, getting them ready for action in spring and holding them in place against frost heaves.
I tested the soil in a few places recently to see if it’s ready to plant. In full sun in my vegetable garden, the soil was slightly above 60 degrees, but in a shady flower bed the soil was in the high fifties. And down 8 inches it was 4 or 5 degrees cooler. I’ll plant crocus later, as the soil at crocus depth (3 inches) is warmer than deep down.
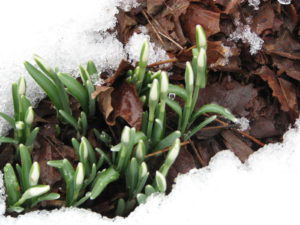
Snowdrops in bud on March 1
I bought my house 47 years ago, and I’ve been planting bulbs most years ever since. Most places suitable for bulbs, have bulbs. So this year I shall plant some in the lawn. Not daffodils, as the foliage can’t be cut back until July, and that would keep the lawn looking unkempt. But I could plant small bulbs like crocus, snowdrops or scilla. Their foliage dies back early enough that I’ll be able to mow the lawn when needed without compromising the bulbs. I’ll plant them by poking holes in the lawn with my CobraHead weeder (www.CobraHead.com).
Some years ago I was visiting a garden in Wales. The gardener had a bucket of tennis balls, and was tossing them onto the lawn. “What in the world are you doing,” I asked. He explained that he wanted to plant bulbs in a random pattern. Wherever a ball landed, he planted a bulb. Maybe I’ll try that.
I like to consider tulips as annuals. They do come back in year two at about 50 percent of year one, and year 3 is usually about 50 percent of that. So in general I buy 100 tulips, plant them all in the vegetable garden, and enjoy a big burst of color. I cut most and use in the house, or as gifts. I plant right over them after blooming, not worrying at all if they survive. A few will pop up in the lettuce the following year.
Daffodils are deer-proof
Daffodils are not attractive to rodents or deer as bulbs or as flowers. In fact, they are vaguely poisonous. But tulips are tasty to critters. Last year I planted a few cloves of garlic in with my tulips to repel rodents. I don’t generally have trouble with deer – I have a ferocious corgi who scares them off. They think she is a wolf, I suppose.
If you have deer problems, you probably will want to plant tulips in big swaths and then surround them with a temporary fence before they bloom. Even a 4-foot chicken wire fence should deter them, I think. There are repellents, of course, but I’ve never used any with tulips.
I have 3 books in my personal library about bulbs. All say to plant tulips and daffies 6 inches apart. I don’t. It uses too much space. I plant them three inches apart, and they do fine.
There are two keys to success when planting most spring-blooming bulbs: First, plant in full sun. Yes, in principle, you can plant daffodils in the woods if there are no evergreens and they will get enough energy from the sun before the maples leaf out. But they will do better in a sunny border. Root competition from trees diminishes their vigor.
Second, plant bulbs in soil with good drainage. Soggy soil is a death knell to most bulbs. If you have a heavy clay soil that holds water, plant your bulbs on a slope. Toss away half the soil you dig out and mix a light, fluffy compost with the other half. Dig deeper than needed, and fill with that same fluffy mix.
I don’t regret a penny I’ve spent on bulbs. Yes, some can be expensive. Yes, some don’t perform well. But by the end of a long New England winter I am so ready for blossoms I am willing to do almost anything (short of a deal with the devil) to get flowers blooming outdoors.
So go buy bulbs now. Later, when it’s time to plant, the best ones will be sold out. Start at your local garden center and look on-line for a few fancy things. Do this every year, and you’ll be delighted!
Is it okay to prune shrubs now? Learn which ones can be pruned by reading Henry’s blog post at https://dailyuv.com/news/920694. His e-mail address is henry.homeyer@comcast.net.


 Click Here to buy from Cobrahead