Six Fall Chores to Do This Weekend in the Vegetable Garden
Posted on Tuesday, September 5, 2017 · Leave a Comment
Labor Day has come and gone. Big yellow buses are slowing traffic twice a day. But it’s not time to give up on gardening and move on to watching football and waiting in a Lazy-Boy for the maple leaves to turn red. Your gardens still need you. Let’s look at the vegetable garden.
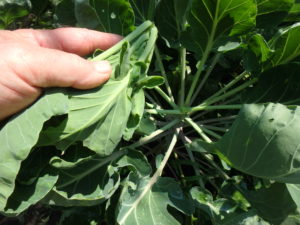
Remove top leaves of Brussels sprouts to get bigger sprouts
My Brussels sprout are the size of peas, very small for the time of year. But I know how to fix that. I just cut off the top cluster of leaves. That will prevent the plant from using its energy to get taller. Instead it will pump up the “sprouts” we love to eat into big, healthy veggies.
Pumpkins and winter squash need the knife, too. They will continue to elongate their stems, growing out of the garden and across the lawn. But a blossom starting now will have little chance of maturing into a potential Jack-O-Lantern. So nip off that vine and let the energy from the sun and the minerals from the roots go to the fruits that have some chance of success.
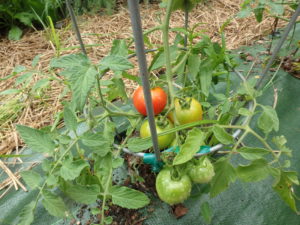
Most tomatoes are what we call “indeterminate”. That means they will continue to grow taller until they are killed by frost. Most Roma-type tomatoes (plum) are determinate, as are a few others used mainly for canning or growing in pots. They reach full size and then concentrate on producing one load of fruit that can be picked and canned. But Big Boys and most heirlooms will continue getting taller, which can be a problem.
I’ve seen tomato plants 30 feet tall in commercial greenhouses. They grow up ropes that can be lowered down for picking. But you probably are not equipped to deal with tomato plants that are even 8 feet tall. So nip off the tips of tall branches.
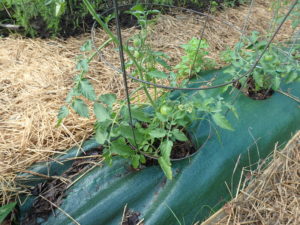
If you haven’t been paying attention to your tomatoes for a few weeks, you might well have some fruit laden branches laying on the ground. These are much more susceptible to rot than fruit that is tied to a stake or cage. Lift the branches and tie them to the outside of the tomato cage. I recently was give some old panty hose that I cut into strips and used to tie up mine. It’s soft and stretchy, and does a great job. String is not perfect for the job as it can cut into the stems. Old bed sheets can be cut into strips for the job instead.
Potatoes are reaching full size for many gardeners. I plant mine later than most (mid-June) and they still have nice green leaves that are turning sunshine, carbon dioxide and water into carbohydrates that will keep me plump all winter. But if yours have brown leaves, you can dig them now. Or you can steal a few by reaching under a plant or two and grabbing a spud for dinner, but leaving the plant itself undisturbed.
As with any plant that is susceptible to fungal diseases, I do not toss potato plants onto the compost pile. Squash, tomatoes and potatoes all fall into this category. I carefully dig all the plants (including leaves and roots) and put them on a brush pile I will burn this winter after snow falls. If you don’t have a burn pile, you can put them in household trash or create a separate pile in a far corner of your property. I do that to minimize fungal diseases next year.
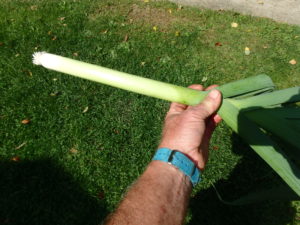
This leek has 12 inches of useable stem once a few leaves have been pulled off
Leeks are ready to harvest, but can stay in the ground a few more weeks. I use leeks not only for leek and potato soup, but also as a substitute for onions. And you don’t have to just use the white part of leeks. Commercial growers hill soil over the leeks as they grow, keeping a longer portion white than I do. But most of the green part of the stem is good to use, too. I pick every other one now, thinning them out, and leaving some to get even bigger.
My peppers are pathetic this year. I only planted a few, some Hungarian wax and a few sweet peppers. I got a few of the hot wax peppers early on, but the cool, rainy summer has not encouraged most plants to blossom and produce fruit.
By now my peppers must be scared that winter is coming and they have not produced enough seeds to keep their line of DNA alive. We had one night where the temperature went down to 33 degrees! That should have been a wake-up call. So I am hoping that they will bloom and produce some fruit during the hot Indian Summer days that are sure to come.
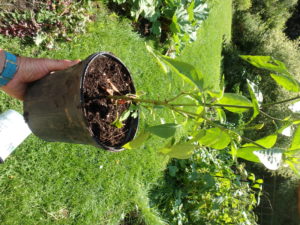
Transplanted pepper plant
I am trying an experiment with my peppers this year. On Labor Day I dug up 2 Hungarian hot wax peppers and transplanted them into 8-inch pots. I used potting soil, not garden soil in the pots as it will stay fluffier than garden soil, which tends to compact in a pot. I am keeping them in the garden, but will carry them inside any time the temperature is predicted to go much below 50 degrees. Then I’ll carry them outside again in the morning, sort of like walking the dog. They are wind-pollinated, so being indoors will not be a problem. I’ll let you know if I get some peppers this way.
As a rabid, mad-dog gardener I never stop thinking about my garden. There is always something to try – which keeps me young.
Do you suffer from hay fever? Read about the true culprit at Henry’s blog https://dailyuv.com/news/918785. You can e-mail Henry at henry.homeyer@comcast.net. His mailing address is PO Box 364, Cornish Flat, NH 03746. Please enclose a SASE if you wish a reply from him by mail.
Planting a Tree
Posted on Wednesday, August 30, 2017 · Leave a Comment
I fell in love this summer. With a tree, that is. The Northern catalpa (Catalpa speciosa) is a fast-growing tree that blooms beautifully in late June in my part of the world. The flowers, about 2 inches long and wide, are white with 2 lobes and purple or lavender stripes inside. They are deliciously fragrant. I got a 10-foot tall specimen at E.C. Brown Nursery in Thetford, Vermont.
It is very important to find the “trunk flare” before planting a tree. That is the lower part of the trunk that flares out above ground in the trees planted by Mother Nature. The flare is waterproof, but if buried in soil or mulch it will rot and the important cambium layer can be damaged, injuring the tree. When young trees are put in pots the flare is often covered by 3 inches of soil or more.
If not corrected, trees with buried trunk flare often die in 6 to 10 years because their trunks are essentially girdled by the rot. If you have a tree with a trunk that doesn’t flare at ground level, pull back some soil until you can see the trunk flaring out. Cut away the little roots you will encounter.
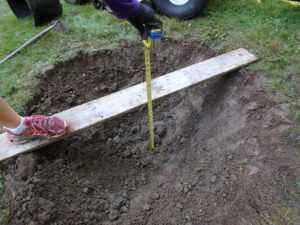
The hole should be wide not deep
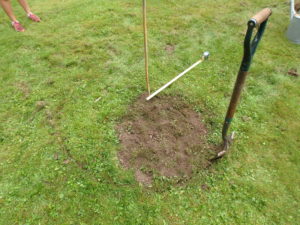
It’s important to dig the hole for a tree the proper depth. You want to place the root ball on unexcavated earth so that it will not settle into a lower position that will fill in with soil or mulch, covering the trunk flare. The hole should be wide, not deep. I uncovered the trunk flare in my catalpa, which was just an inch or so below the soil line in the pot. There were plenty of small roots in that inch of soil I removed, and I just cut them away.
I also looked for roots encircling the root ball because it’s important to cut those back, and to tease out roots from the root ball before planting. I used my fingers to loosen roots at the edge of the root mass after removing the tree from its plastic pot.
Next, I measured the root ball. It was 16 inches wide and 12 inches deep. I dug a hole 3 times the width, and just an inch or two deeper than the depth of the root ball. I dug the hole with sloping sides down to the bottom. I used a hoe to scrape the bottom of the hole to make it flat.
As I dug, I placed the soil from the hole in wheelbarrows. One wheelbarrow was for topsoil, another for the poor-quality subsoil I encountered at the bottom of the hole. I was fortunate to find just a thin layer of subsoil – heavy clay, then sand beneath that. The sand will ensure good drainage.
Dig a hole 3x as wide as the pot the tree came in
If you have only a shallow layer of decent topsoil, you may want to replace some of the subsoil you encounter with topsoil that you purchase in bags. But don’t replace all your soil, even if it’s not of good quality. Mix topsoil 50-50 with the crummy soil only if most of the soil is of poor quality.
A teacher at Vermont Technical College once told me to imagine a tree as a wine glass sitting on a dinner plate. The wine glass is the tree we see, the dinner plate is the root system. So the tree needs to spread its roots far and wide. Creating a planting hole full of compost and rich topsoil will encourage the roots to stay in the original hole instead of spreading out. That’s known as the “bathtub effect.”
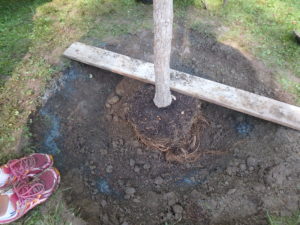
Make sure the tree is straight in all directions
To dig the hole the proper depth, I use a board (or a rake handle) to span the hole, measuring from time to time as I approached the proper depth. I dug down 14 inches for my 12 inch rootball, and in the bottom of the hole I added some of the better topsoil I’d dug up. I packed that down so it wouldn’t settle later.
Mother Nature does not use fertilizer when she plants trees. I don’t either. Fertilizers contain nitrogen, which stimulates fast green growth. But I want my tree to get established, spread its roots, and grow at a moderate rate. But I did add 2 mineral products that I bought in bags.
First, I added trace minerals in a mix sold as Azomite. It is a mix of some 70 minerals from volcanic and sea sources, mined and packaged in Utah. I have found it to add vigor and resistance to stress in plantings. The other product is called green sand. It is mined from a formerly undersea deposit in New Jersey. It is a good source of potassium and trace minerals. Potassium helps build strong cell walls.
I also paid attention to the north-south orientation of the tree when planting. Trees develop thicker bark on their south sides because they get more sun there. If a tree is planted with the north side from the nursery facing south at your house, the bark can develop sun scald in winter, crack, and damage the tree. Trees generally have more branches on the south side, so I planted the bushier side facing south.
Watering trees is important the first year, and even in dry times during the second year. I made a ring of soil around the tree to keep water from running away. And an inch or two of ground bark mulch will help to keep the soil from drying out.
Planting trees is not rocket science. Take time, do it well, and your tree will please you for the rest of your life.
Read Henry’s blog posts at https://dailyuv.com/gardeningguy.Reach him by e-mail at henry.homeyer@comcast.net.
Shady Ladies: Hostas and Other Wonderful Shade Plants
Posted on Tuesday, August 29, 2017 · Leave a Comment
It took me a long time to appreciate hostas. When I was a young gardener, I wanted bright flowers with lots of pizazz. Roses. Daffodils. Peonies. But over time I have come to appreciate the subtle colors of green, the soothing textures, the dependable nature of hostas. Let’s look at a few.
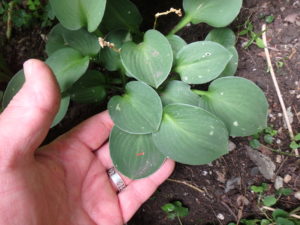
Blue Mouse Ears
I took a walk around my gardens and counted about a dozen different kinds of hostas. The smallest, ‘Blue Mouse Ears’ has little leaves just 2 inches long. My largest hosta is probably Hosta montana, ‘Stephen Parish’ from Cider Hill Gardens in Windsor, VT (www.ciderhillgardens.com). It stands 3 feet tall in a clump 5 wide – even though I divided it in half 3 years ago. I have to admit I don’t know the names of many of my hostas, having gotten divisions from friends, or just plain lost the tags.
Some basics: hostas do well in shade and thrive in rich, dark well-drained soil that never dries out. That’s a tough demand. But they will grow and survive even in shade with dry, poor soil. They just won’t get as big or look as impressive.
I have my biggest hosta growing in 2 different locations. The first is the ideal soil described above, the second place is in shade with dry soil and plenty of tree roots competing. The difference is remarkable. The plants in ideal soil are a full foot taller, and much more vigorous. One might even think they are different species.
I shudder when I drive past a house with hostas growing in full sun. It’s like tying up your dog in full sun, in August, with no water bowl. Inhumane. The hosta leaves bleach out, develop brown edges and practically scream at their owners. Some morning sun is fine for many hostas, but afternoon sun is brutal for most. That said, it’s almost impossible to kill a hosta, so they survive.
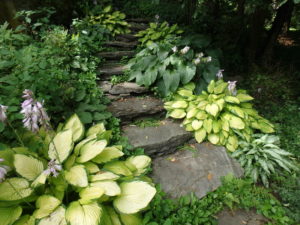
Henry’s stone steps with hostas
Most hostas are hardy to Zone 3 (minus 40 in winter) or Zone 4 (minus 30). So unless you live in the arctic, you can grow hostas. Having selected a nice spot with gentle sun, enrich the soil with plenty of compost and a little organic bagged fertilizer mixed in. Always water right after planting, and once a week or so until the plant is well established.
Problems? Slugs love hostas, and so do deer. When the leaves come up in the spring, rolled up like cigars, squirrels and chipmunks will eat them like asparagus. I once spayed liquid fish fertilizer on those early rodent treats, and was rewarded with the sounds of a squirrel screaming after taking just one bite! I was working in a public garden, and got a serious glare from a patron who thought I’d poisoned the poor thing.
As to slugs, some years are worse than others. There are chemical slug remedies, but I’m not sure even the so called organic one, which uses iron phosphate, is safe. According to one report I read, the “inert ingredients” which are not listed, may actually be toxic to the slugs – and us. I say pick off the slugs and put them in soapy water, or let them munch your hostas. Saucers of beer are attractive to slugs, too, and will drown them. But that might be too good a demise for slugs.
I recently went to see Gary and Sarah Milek of Cider Hill Gardens in Windsor, VT because I have gotten many of my favorite hostas from them, and they have splendid display gardens. Here are a few of the hostas I liked:
Gold Regal. Large leaves, all of a yellow-green.
Gold Standard. Large yellow-gold leaves with green edges.
Sagea. Large, dark green leaves with white or yellow edges
Brother Stephan. Yellow/chartreuse leaves with dark green edges
Curly Fries. This name is worthy of a giggle. The leaves are very narrow and long, green and white, with scalloped edges.
Empress Wu. Nice rich green leaves. Gary says it is the largest of all hosta plants, sometimes standing 5 feet tall!
Hosta leaves will shade out most weeds, so they can be used as ground covers. Jewell weed will grow up through hostas, however. I like to plant daffodils between clumps of hostas as I don’t need to cut back the daffodil leaves – the hostas will obscure them by the time they are getting old.
Spikenard Sun King looks great in shade
While at Cider Hill I also got a chartreuse spikenard (Aralia cordata) that really looks great in shade. It’s a variety called ‘Sun King’ and I also got one last year. This year it is a nice large plant that does not attract slugs, and has maintained its color all summer.
I also got a nice creeping sedge for a shady groundcover while at Cider Hill. It has leaves 8 to 12 inches long, green with white edges. It’s a variegated Carex. I’m hoping it will out-compete the spotted deadnettle (Lamium spp.) that is currently taking over empty places in my shade garden.
So don’t ignore those shady places. Hostas and plenty of other plants will grow just fine there.
Reach Henry by e-mail at henry.homeyer@comcast.net or by writing him at P.O. Box 364, Cornish Flat, NH 03746. Please include a SASE if you wish a mailed response. See his multi-weekly short blogs about gardening at https://dailyuv.com/gardeningguy.
Getting Ready for Winter
Posted on Tuesday, August 8, 2017 · Leave a Comment
Here it is, early August and I’ve just picked my first tomatoes, but I’m already thinking about winter. No, I don’t anticipate frost until mid-October or later, but I depend on my garden to feed me much of the year. So I start early getting food processed for storage. I freeze, dehydrate, can and store veggies for winter. Let’s look at tricks you can use to save you time and labor as you save your harvest.
Tomatoes are ripening
Tomatoes are key to almost any soup, stew or stir fry I make, and I don’t want to be buying tomatoes in February, or to depend on cans of sauce processed in factories in California. I want to cook with tomatoes that I grew myself, or that are from a local farmer I trust.
If you grow just a few tomato plants for sandwiches and salads, or even if you planted half a dozen ‘Romas’ for making some sauce, you can have a wealth of tomatoes for freezing if you talk to your local farmer. Most sell “field grade” or “canners” by the bushel at very reasonable prices. They are not as pretty as top grade fruits, but I’ve bought a bushel – 50 pounds –in years when my own crop succumbed early to blight.
Many farmers now grow tomatoes in hoop houses which means they get tomatoes earlier than we do, and they largely avoid blight. So there are times when farmers are practically swimming in tomatoes. That’s when to buy them.
What can you do with 50 pounds of tomatoes? I would freeze most of them. Wash and dry the fruit, then fit them into freezer-grade plastic bags, not storage bags. Freezer-grade bags cost just pennies more per bag, but are much better for the job.
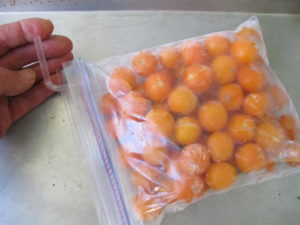
A straw used to remove air from a bag of cherry tomatoes
Suck out any excess air from the bags with a common drinking straw. Just close the bag 99% of the way, suck out the air and snap it closed with 2 fingers – just as you pull out the straw.
Later, to get them ready for use, I run each frozen tomato under hot water while rubbing it gently so that the skin comes right off. After I set it aside for 5 minutes it softens enough for me to cut out the stem attachment point. Then I quarter it, chop it, and put it in the pan.
If you like to make homemade sauce but hate the canning process, just freeze it. Cook up your tomatoes with fresh herbs and onions, and let it cool. Then pack in freezer bags or plastic containers.
I’ve had both front-opening freezers and chest freezers, and I recommend the front-opening ones. It is easy to lose track of what is buried in the bottom of the chest-type freezers. But you’ll find the last bag of kale if it’s on a shelf where you can easily see it. And after a year or two in a freezer, food loses its flavor and often becomes unappealing.
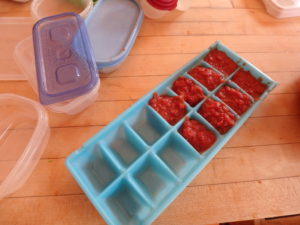
Cube trays
I also freeze ice cube trays filled with my homemade tomato paste. I use my less-perfect tomatoes for paste, which I freeze in ice cube trays. To make paste, I wash tomatoes, and then core them with a paring knife. I squeeze out the seeds and extra juice, which makes for less boiling time and fewer seeds. Then I quarter them and puree them, skins and all, in my food processor.
I cook the puree at low heat in a big enameled cast iron pot (which helps prevent scorching on the bottom of the pot). I know it’s done when I can literally stand up a soupspoon in the paste – after 3 hours or more. I let it cool overnight (or 8 hours) with the cover off the pot, allowing a little more moisture to evaporate. Then I spoon the paste into the ice cubes trays. After they are frozen, I remove the cubes and put them in freezer bags.
Most years I dehydrate several bags of “sun-dried tomatoes”. Except they aren’t sun-dried. They are dried in an electric food dryer. Mostly I dry cherry tomatoes, a variety called ‘Sun Gold’. I cut them in half and place them face up on the screens. It takes from 12 to 24 hours to do a batch, depending on which kind of machine you use, and how juicy your tomatoes are.
I have 2 brands of dryers, a NESCO American Harvester and an Excalibur. The Excalibur uses less electricity (660 watts per hour vs. 1,000 watts per hour) and is more efficient because the flow of hot air goes across the drying screens, not from top to bottom as the NESCO dryer does. But it costs roughly 3 times as much, depending on the model. Both brands are very good.
I also use my dehydrators to dry apples, pears, hot peppers and more. I especially like drying hot peppers because I can get them brittle, and then grind them up in my coffee grinder. That allows me to just add a little in a dish – or a lot if I’m not having company.
So don’t wait until fall. Start putting up food for winter like the proverbial squirrel. Winter is just around the corner.
Henry is the author of 4 gardening books. His web site is www.Gardening-Guy.com. See extra photos for his newspaper articles at https://dailyuv.com/gardeningguy and get daily tips.
Vines Worth Growing
Posted on Saturday, July 29, 2017 · Leave a Comment
As a boy I was fascinated by the idea that Tarzan the Ape Man could move through the jungle above the forest floor by swinging from vine to vine. I doubt that I ever saw a real Tarzan movie, but my imagination was good. I knew I wanted that ability to swing from vines. Now I just grow them. Let’s look at a few so you can decide if you’d like to plant one this summer.
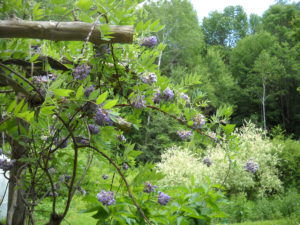
Amethyst Falls Wisteria
Wisteria is a vine loved by many, particularly gardeners who have moved to New England from warmer parts of the country where it thrives. For decades, wisteria was a frustration for northern gardeners: it would grow nice green vines, but never blossom. That was because it set buds one summer for blooms the next spring. It bloomed before growing leaves and shoots. Our winters in the North Country killed the buds.
Then two new varieties appeared on the market: ‘Blue Moon’ and ‘Amethyst Falls’. Both are hardy to Zone 4 (minus 30 in winter) and bloom on new shoots that appear each spring. Mine bloom in late June or early July for about 3 weeks. The scent of Amethyst Falls I do not find pleasant (overtones of cat?), but the blossoms are smaller than those on Blue Moon and seem to last longer. I grow it on a cedar trellis that serves as an entrance to my vegetable garden.
The soil for my wisterias is rich, dark, and moist; they will grow anywhere, I think, given at least half a day of sun. The more sun, the more blossoms. I have heard from friends in southern New England that wisteria can be a pest because birds eat the seeds and spread them around, starting them at the edge of the woods. That has not happened for me.
Clematis Betty Corning
Clematis is another great vine. I have 5 different kinds of clematis, and fully intend to buy another this summer – I just saw a great one while on a recent garden tour. That one, I learned from garden designer Cyndy Fine of Westminster, VT, is a Clematis viticella called ‘Betty Corning’. It blooms most of the summer and into the fall. It is has nodding bell-shaped flowers that are lavender to blue. Hardy to Zone 3 (minus 40 degrees).
The most vigorous, reliable of my clematis in one called Clematis jackmanii. It has nice purple blossoms and grows up wires I have attached to the front of my house. It easily grows 10 to 12-feet tall, and blooms enthusiastically most of July.
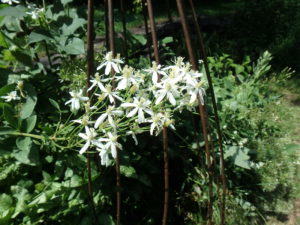
Clematis recta
Then I have one called Clematis recta. Unlike most of the others, it does not climb up a trellis, but flops on the ground unless supported by something solid – a fence of some sort that can contain it. It blossoms appear in huge clusters of small white blossoms, followed by delicate airy seed heads. It dies back to the ground each winter. But each year it gets bigger and more bodacious.
All clematis want essentially the same thing: hot tops and cool feet. Plant perennials in front of your clematis to shade and cool the roots, but provide plenty of hot sun for the vines. They like rich soil, and plenty of moisture.
Then there is an amazing vine form of hydrangea: Hydrangea anomala ssp. petiolaris. This will attach itself to brick or stone with holdfasts, as opposed to twining vines like wisteria and most clematis. I have it on the north side of my barn as it grows well and blooms without much need for sunshine.
I originally used plastic ties to attach my climbing hydrangea to the barn, as its “feet” won’t grab wood. Now it has sent shoots in between the rough barn boards and it no longer needs support. It sends out “arms” 3 to 4 feet from the barn, each loaded with large white flower panicles that seem to defy gravity. Even in winter it is gorgeous.
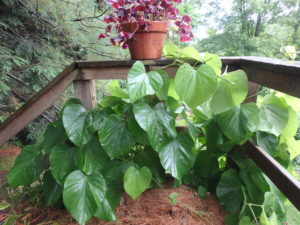
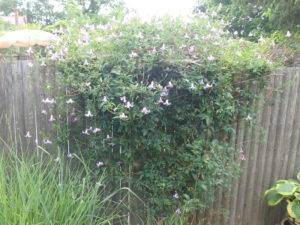
Dutchman’s Pipe
Dutchman’s pipe (Aristolochia macrophylla) is another vine I grow that is very adaptable. It will grow in crummy soil in sun to shade, but does not want to be terribly dry. It has huge leaves, and small white blossoms reminiscent of little ivory pipes. Once established, it would be impossible to pull out. I have it growing on the north side of my deck, and it climbs up and tries to twine around potted plants growing on the rail. It completely hides the mess beneath the deck!
As for Tarzan, only wild grapes would do for his exploits. These are pests sometimes in the forest, as they can climb up trees and choke out nice trees. When I see that they are a problem, I cut them off at the base with roots loppers – a quick and easy, but temporary solution. But the birds do love the fruit when it is ripe, so I often do nothing about them.
Henry is the author of 4 gardening books. His web site is www.Gardening-Guy.com. See extra photos for his newspaper articles at https://dailyuv.com/gardeningguy.
How to Minimize Tomato Blight
Posted on Wednesday, July 19, 2017 · Leave a Comment
John Denver introduced me to a Guy Clark song called, “Home Grown Tomatoes” with a refrain that goes, “Only two things money can’t buy. That’s true love and homegrown tomatoes”. How true. I love tomatoes.
Healthy tomato plants in mid-July
Growing disease-free tomatoes is nearly impossible. Usually by this time of the year, gardeners see lower leaves turning yellow and getting spots. Stems turn black early on. Some summers, we only get a few fruits, those tomatoes that started early. Other years we get late blight half way through the season and our plants and fruit turn to disgusting black mush.
So what can we do? According to companies that produce seeds, we can choose varieties of tomatoes that are disease resistant. Breeders using old-fashioned breeding techniques have been successful in breeding resistant hybrids. But some say the flavors are not always as good as the old fashioned heirlooms. I grow both kinds.
This year I am growing ‘Brandy Boy’ (a hybrid produced by Burpee Seeds) that is supposed to taste as good as the heirloom Brandywine, one of my favorite heirloom varieties, and have improved disease resistance.
I know I like ‘Defiant’, a medium-sized hybrid with high resistance to late-blight, produced by Johnny’s Seeds. But Defiant does get early blight, which reduces its production. Still, I grow it each year.
This year my tomato plants are beautiful. Only a few leaves on a few plants showed any signs of yellowing leaves by mid-July. Here are a few things I have done to help prevent tomato diseases.
At planting time I mulched my tomatoes with leaves that I collected last fall. Some fungal disease reside in the soil, and when it rains, or when you water, splash-up sends spores onto the tomato leaves, causing disease. Mulching helps minimize splash-up. Grass cuttings are good, too.
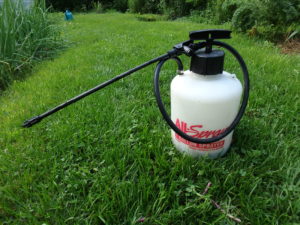
A simple one gallon sprayer is used for applying bio-fungicide
This year I got a soil drench from Gardeners Supply Company called “Root Shield”. This is a bacterial powder that I diluted with water and applied to the soil around each tomato. It is approved for use by organic gardeners. The bacteria attacks the pathogenic fungi in the soil, minimizing the chance of them getting on the tomato plants.
The other bacterial fungicide I applied is called “Serenade”, which I also obtained from Gardeners Supply Co. This contains Bacilius subtilis, a broad spectrum bio-fungicide. It is designed to be sprayed on leaves and stems once a week – and before signs of infection are seen. I have sprayed just twice, not keeping up with the schedule, but will. It’s easy to forget about disease when your plants are disease-free. Once plants are infected, both bio-fungicides are not going to solve the problem.
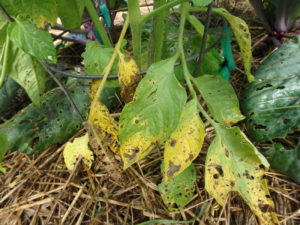
Diseased tomato leaves are often a problem
What else can you do? If you have tomato leaves turning brown, cut them off and put in the household trash, not the compost pile. I did this pretty regularly last year, and I think it helped.
If you get late blight – which basically causes a total meltdown of the plants – quickly bag everything in contractor bags and get everything affected out of the garden. Fortunately, late blight does not survive New England winters. But if you do get it, do not overwinter potatoes, or allow ‘volunteer’ potatoes to grow, as they can carry the blight. Tomatoes and potatoes are in the same plant family.
Fungal diseases often require moisture on the leaves so that fungal hyphae (their root-like appendages) can penetrate the leaves. So do not water at dusk. Water in the morning if possible, and try to keep the leaves dry.
I use a watering wand, not an overhead sprinkler. This is a hand-held watering device – a 30-inch long wand with a sprayer on the end – that allows me to deliver water around the roots, but none on the leaves. In a normal summer I rarely water tomatoes – my soil stays lightly moist most of the time just with rain. But if we go a week or so without rain, I do water.
Many tomato plants will grow taller until the fall over or are pruned back. It’s better to cut off tall branches and keep your plants supported by their cages or stakes. Cutting back plants allows them to spend their energy making tomatoes, not stems and leaves.
As a gardener I am always optimistic. I think this year’s crop of tomatoes from my 37 plants will be the best ever. But I’ll be happy with whatever I get.
Read Henry’s twice-weekly blog posts at https://dailyuv.com/gardeningguy You can sign up for an e-mail alert each time he posts. You may reach Henry at PO Box 364, Cornish Flat, NH 03746 or henry.homeyer@comcast.net.
Ten Fabulous Annual Flowers I Love to Grow
Posted on Tuesday, July 11, 2017 · Leave a Comment
I want colorful flowers growing alongside my front walkway every day from May to November, and generally have them. I do so by growing annual flowers. I grow more than 100 species of flowers elsewhere on my property but the vast majority are perennials that only bloom for a few weeks each year.
All plants (and most animals) have a strong need and desire to maintain their genetic lineage. Their “goal” in life is to pass on their DNA to a new generation. Perennial plants and trees can assume that if they don’t have any descendants this year, they can next year. Not so for annuals. If they don’t bloom and produce seeds this summer, their lineage stops. There is no second chance.
So to get continual blooms from your annual flowers, all you have to do is pluck off the flower heads once they start to look bedraggled. That is known as “deadheading.” The flowers seem to ”know” that if the flowers are gone, so are the potential seeds, and they keep on blooming. Here are some of my favorite annuals.
Pansies. These are my early bloomers. I buy field grown pansies and plant them in the walkway or in a whisky barrel in April or May for early color. By now they are lanky and fading, so I will either cut them back hard for fall blooms, or just yank them.
‘Senorita Rosalita’ cleome. This is a Proven Winner trademarked variety, so it cannot be purchased as seed or in 6-packs. It is generally sold in 4-inch pots or larger and costs more than common annuals. Unlike ordinary cleome, ‘Senorita Rosalita’ stays short and compact, has no thorny protuberances on the stems, and does not have a strong noxious scent. And it blooms continuously all summer. It likes full sun and does well in hot, dry locations. ‘Senorita blanca’ is a similar white variety. I grow this each year, often starting plants from seed, though they need at least 12 weeks to get to the size needed to plant outside. Like all the plants on my walkway, these like plenty of direct sunshine. The flowers are cute little round balls of color- magenta, pink, white. The stems dry well, and I often keep their bright blossoms in a dry vase all winter. I hang them upside down until the stems are dry enough to support the flowers.
Brazilian verbena (Verbena bonariensis). This is one of my favorites, and adds height to the display. It has thin stems up to 5 feet tall, but rarely needs staking because the purple blossoms are quite small. If you cut it back as it grows, it will branch nicely, providing more blossoms. The blossoms keep on looking good even after light frost.
Licorice plant (Helichrysum petiolare). This is a foliage plant with no flowers that I’ve ever seen. It stays low and branches nicely with silver-gray or yellow-green foliage. I mainly use it in my window box by the front door, but it also works in the ground. Cut stems are fabulous in a vase, too.
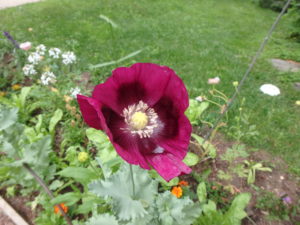
Annual Poppy
Annual poppies. These are blooming for me right now in various colors: orange, purple, yellow (California poppy) and polka dots. Some are doubles, meaning they have extra petals. Annual poppies are an exception to the rule that annuals keep on blooming all summer, but I don’t care. I love these beauties with their gray or silver foliage and delicate blossoms. Many annual poppies scatter their seeds and will start up next spring on their own.
Scaveola. This plant takes abuse, so I put it in my window box with licorice plant – where drying out is more of a problem than in the ground. It can look dead from dehydration, but a watering brings it right back. Its stems are generally 6 to 12 inches loaded with small purplish-blue flowers.
Gomphrena
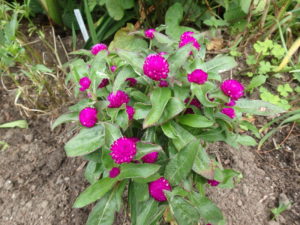
Gomphrena. A variety of verbena, this comes in purples, magenta, white, pink and more. It creates a cascading mass of bright flowers that bloom all summer.
Zinnias. Fabulous flowers. They come from short (Profusion series are under a foot tall) to tall (Benary’s Giant, 4 feet tall). Keep picking them for vases, and they will branch and produce more flowers. A wide variety of colors, including lime green. I plant these by seed in a bed in my vegetable garden, just scattering last year’s dried flowers over and raking them in.
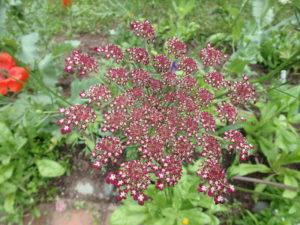
Wild Carrot
Wild carrot. (Daucus carota ‘Dara’). One of my new favorites. This looks like Queen Anne’s lace, which is a biennial wild flower, but this is an annual that comes in a variety of colors – white, pink and burgundy. I bought some started plants and they are blooming nicely.
Salvia. There are hundreds of kinds of salvias, both annual and perennial. I grow annual salvias mainly for their vertical form (8 to 24 inches tall spikes) and their intense blue and purple. They also come in fire engine red (which I tend to avoid), white and bi-color. All are tough as nails in hot sun.
I realize it’s hard to find nice annuals now – many nurseries have sold all the good ones. But many can be started by seed, even starting now. Just read the seed packets to see how long they need to bloom. I love my annuals, and their long-running show of beauty.
Henry is the author of 4 gardening books. His web site is www.Gardening-Guy.com. See extra photos for his articles at https://dailyuv.com/gardeningguy
Veggies You Can Plant Now for Fall Eating
Posted on Wednesday, July 5, 2017 · Leave a Comment
Most gardeners don’t think of July as the time to plant seeds in the vegetable garden. But it should be. This is a good time to plant many things including broccoli, Happy Rich, lettuce, kohlrabi, fall radishes, carrots and beets. With good warmth and plenty or rain (or water from your hose), these plants will probably do better now than in if they were planted in the spring.
If you planted peas, spinach or lettuce early this spring, you probably have a bed that is empty now. Instead of just growing weeds, why not get out your seed packets and plant a second crop in that bed?
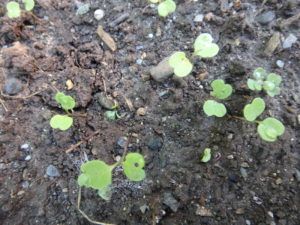
Arugula seeds germinate quickly
In the spring I generally plant seeds in those little black plastic 6-packs. I do that because the soil outdoors is cold and wet, and seeds are prone to rot. Now, however, the soil is warm and seeds will germinate much more quickly. All you have to do is check them daily to be sure that the soil has not dried out.
Broccoli, if you read the seed package, takes about 55 days to maturity. So if you plant in mid-July, you should be picking heads of broccoli in mid-September or even a bit earlier. Read the seed packets carefully: as I peruse my Johnny’s Selected Seeds catalog, I see broccoli varieties that mature in anywhere from 48 to 80 days. Some varieties like ‘Arcadia’ (63 days) are listed as “Tolerant of cold stress.” That one also says it makes lots of side shoots. Since broccoli produces well into October for me, getting side shoots is important.
So how should you plant broccoli if you have always put it in as nice little plants that you – or the local grower down the road – has grown? I would suggest planting 3 seeds in groups about 16 inches apart. Why 3 seeds? First, not every seed will germinate, so I like to ensure that at least one will come up. But rather than plant them like carrots in a long line, just plant a few seeds where you want one plant. Then as soon as the plants have 2 real leaves, pull out all but one. And since you’ll see leaves in clumps every 16 inches, you won’t have a hard time identifying them – even if you have never done it before.
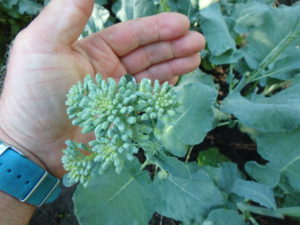
Happy rich
One of my favorite veggies is one you might not know: Happy Rich. It is a non-heading broccoli type plant. Instead of one big head, it produces many small heads similar to side-shoots on standard broccoli. I get seeds from Johnny’s Seeds. A similar plant is piricicaba, which I get from Hudson Valley Seed Library. Both are quick to mature and have sweet flavored florets. I find they are tasty even if the florets don’t get picked on time and they produce white or yellow flowers. And the leaves are tasty, too!
Carrots and beets can take 55 days to maturity, or up to 80 days. Select early varieties for fall crops now. Yaya and Mokum are both under 60 days, while most storage carrots are about 75 days – which still means they will be ready by the end of September – and long before hard frost.
I suggest buying pelleted seeds for carrots if planting now. Pelleted seeds are coated with a layer of clay, which means they are much larger and easier to handle. Plant them an inch or two apart and they will not be competing with each other as tiny seedlings – and will grow faster. Planted an inch apart you will not have to thin them until they are edible-sized.
I planted lettuce and arugula seeds in late June. Arugula, which is basically a weed, germinated right away. Both need little or no soil cover – they need light to germinate. I try to plant lettuce once a month all summer and into the fall to keep it coming. Hot weather encourages lettuce to bolt, or produce flowers and seeds. Once the plants start to elongate in preparation for flowering, they get a bit bitter. Edible, but not as sweet.
Swiss chard is another quick and easy crop that you can plant now. My High Mowing organic seed catalog has half a dozen different varieties that mature in 50 to 60 days, and produce baby greens in 25. I particularly like the ‘Rainbow Mix’ that has stems of yellow, red and orange. And did you know that beets and Swiss chards are just variations on the same species? Yup. And you can eat the roots of Swiss chard like beets when you pull them in the fall.

Red Meat Radish
My favorite radish is one that I will plant soon: ‘Red Meat’ radish from Johnny’s seeds. It is red in the middle instead of white like a watermelon. It never has the sharp bite of a spring radish, and stays nice even when the radishes get to be golf ball-sized and bigger. If planted in spring, it bolts.
In the past I’ve had good luck planting daikon radishes in the summer for fall use, too. These Japanese radishes get huge, and have a distinctive bite. Many use them for pickling.
So get out there and plant some seeds. Just be sure that they stay well-watered and most things will do just fine. Even many green beans only need 55 days. So if you were too busy to plant before the 4th of July, get started now.
Read Henry’s twice-weekly blog posts at https://dailyuv.com/gardeningguy You can sign up for an e-mail alert each time he posts. You may reach Henry at PO Box 364, Cornish Flat, NH 03746 or henry.homeyer@comcast.net.
When Good Flowers Get Out of Control
Posted on Tuesday, June 27, 2017 · Leave a Comment
Every garden has a few thugs. Nice flowers with handsome blooms that somehow get too rambunctious and take over. They can choke out other plants as easily as weeds. That happens, in part, because we are reluctant to pull them. In general, they have roots that extend and send up new shoots. Let’s look at a few.
I recently pulled up a lot of beebalm (Monarda didyma). That was tough for me to do because it is such a great flower, and it has not yet bloomed. But it had run roughshod over most of one large flower bed, and it had to be brought under control.
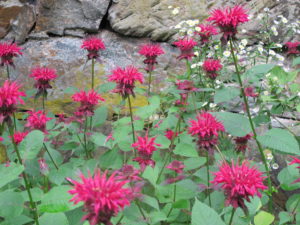
Beebalm
Beebalm likes morning sunshine and soil that does not dry out completely. There is also a native beebalm (Monarda fistulosa) that I’ve seen wild in the Mid-west and Rockies. It is shorter, and has pale lavender colored flowers. It does well in hot, dry locations. Our garden beebalm comes in six or more colors from purple to pink – but it does best out of the hot afternoon sun. It sends roots up to a couple of feet, and because it is tall, it can shade-out and out-compete other flowers. As the Red Queen in Alice in Wonderland pronounce, “Off with her head!”
For removing any plant with extended roots, I like the CobraHead weeder. It is curved like a single steel finger, and can be used to loosen the soil under and around weed (or thug-like flower) roots. I gently tug on the flower stem, while loosening the roots. Beebalm, like most plants with long roots, has nodules in the roots. If you break the root, new plant stems will grow from a nodule.
Another difficult plant is Obedient Plant (Physostegia virginiana). What a funny name for a plant that is not the slightest bit obedient. Its roots are problematic because they break so easily, more so than any other plant I know. They send down a tap root that breaks off, even if you have loosened the soil. And it can take over a garden in just a season! I no longer allow it in any of my garden beds, but have moved some to the edge of the woods where deep shade on one side, and lawn on the other, can control it.
All that said, Obedient Plant is a lovely cut flower. It has strong square stems (like mints), and for me it grows up to 5 or 6 feet tall. It lasts well in a vase, with pink or white spikes of many small flowers. I had it in full sun in rich, moist soil, and it ran like crazy!
There is a form of Obedient Plant that has green and white leaves, and it is much more obedient! Like any variegated-leafed plant, this one has less vigor because it has less green chlorophyll to make the food that feeds the roots and flowers. I grow this one, though I find I often need to stake it to keep the flower stems from flopping over.
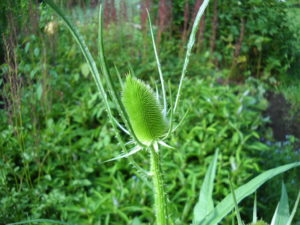
Teasel
Another potential thug that I allow in my garden is common teasel (Dipsacus fullonum). Hated by corn farmers in the Mid-West as an invasive weed, it spreads by seed, not root. It’s a biennial. The first year of its life it does not flower, but produces distinctive long, light-green leaves (often with little wart-like bumps) in a low rosette. The second year it sends up a flower stalk up to 6 or 7 feet tall, and produces a seed head that is like a piece of sculpture.
Individual teasel flowers are very small and a light purple, but they don’t all appear at once. Bees love them! The seed head is very showy, a 2-inch spiny extravaganza that looks great in a vase as a cut flower, or later as a dried flower. I wear leather gloves to pick it, and then rub off the spines on the stems for use in vases.
The key to controlling teasel is to learn to recognize and pull the first year plants. That, and picking the stems with flowers before they distribute seeds. I suppose I will get e-mail telling me how stupid I am for allowing this thug in my garden, but I have been able to keep it under control – and I introduced it 20 years ago! Don’t introduce it to your garden unless you can pay attention to it, and keep it controlled.
Sometimes we make mistakes. We see a well-controlled plant blooming in its pot and buy one (or more). We put it in the garden, and only later decide that it has some bad qualities. It has taken me a long time to realize that it’s great to recognize that a plant is not for me, and then be able to dig it up and toss it into the compost.
I recently needed space for a new plant, and decided that I did not like my Siberian Bugloss (Brunnera siberica). I bought it because I have another species of Bugloss (B. macrophylla) that I like a lot. ‘Jack Frost’ Brunnera has lovely small blue flowers in spring and low green and white leaves all summer. But the Siberian relative does not stay in a compact mound, and is a bit floppy. So I yanked it in favor of something new.
Call me fickle if you wish, but I have a limited amount of garden space, and I reserve the right to remove any plant that does not, at least occasionally, cause me to say with glee, “I love that plant!”
Read Henry’s twice-weekly blog posts at https://dailyuv.com/gardeningguy You can sign up for an e-mail alert each time he posts. You may reach Henry at PO Box 364, Cornish Flat, NH 03746 or henry.homeyer@comcast.net.
5 Things You MUST DO in the Vegetable Garden This Weekend – or Soon
Posted on Tuesday, June 20, 2017 · Leave a Comment
Okay, nobody likes to be told what they have to do. Or when they have to do it, so I apologize for telling you what to do. And you don’t really have to do these things immediately, but doing them soon will help you later on.
- It’s time to thin root crops- my least favorite task in the garden. But by now carrots, beets, parsnips and so forth need to be thinned in order for them to develop well.
- You need to put in your tomato supports to keep the plants off the ground, either tying them to stakes or surrounding them with wire cages.
- You need to hill up your potatoes if they have six to twelve inches of green growth by now.
- Cut off those tall flower spikes from your rhubarb. Quick, easy, productive.
- Weed.
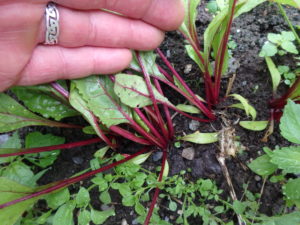
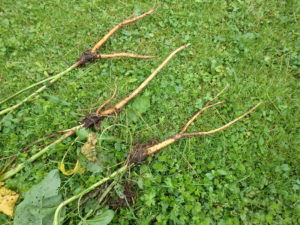
Beets ready for thinning
Let’s take a look at each of these tasks. First, it’s important to thin root crops that are too close. I’m assuming you planted these frost hardy plants in late April or May, and they have gotten to be 3 inches or so tall by now. They’re big enough that you don’t have to wear your reading glasses to distinguish individual plants.
Carrots and beets can compete with each other just as they would have to compete with weeds. Nutrients from the soil, water, even sunshine is minimized if veggies are too close. So thin your carrots and beets to an inch apart now, and 2 to 3 inches in a month. Yes, you can get a crop without thinning, but the production is vastly reduced. And you can eat the thinnings.
Beets seeds are actually seed capsules with 2 to 3 seeds inside each one. So no matter how well you space your seeds, you will need to thin them. There are monogerm beets like ‘Moneta’ from Johnny’s Selected Seeds that only have one beet embryo per seed capsule, but those are rare. You can re-plant the thinnings, but it’s not always successful. Take a pencil, poke a hole, drop in the roots of the beet, and firm up the soil. Or you can just eat the beet greens.
When I was young and very busy raising kids, I didn’t stake up all my tomatoes. Some I let flop over and lay on piles of straw. Those on the ground suffered from diseases much more than those I caged. I now use 4-legged cages that are 54 inches tall – the biggest commercially available.
This year a friend gave me a home-made cage made from sheep fencing. The fencing is made into a 24-inch cylinder that stands 48 inches tall. Each cage needs a 6-foot grade stake to keep it from tipping over and openings that are big enough for your hand to pass through to pick tomatoes. I’ll decide if this cage is worth replicating next year.
Depending on the weather and where you garden, it may be time to hill your potatoes. This means adding soil over the planted seed potatoes. Roots go down from the seed potato, and new potatoes form above the seed potatoes. If you want lots of potatoes, there has to be room for them to grow. So adding soil from the walkways or your compost pile is essential to having enough depth for good production. Another way to do that is to pile on a thick layer of hay or straw, a technique I am trying with some of my potatoes.
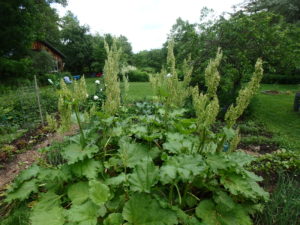
Rhubarb with seeds ready to cut off
Rhubarb, I have heard, is one of the last flavors to be lost by the elderly as their senses diminish. That’s why, I suppose, that homes for the elderly serve rhubarb desserts at this time of the year. It’s very easy to grow- once established there is little to do other than occasionally add some compost to the soil, or to scratch in some organic fertilizer.
By now, however, rhubarb is sending up tall shoots with white flowers to produce seeds. They are quite spectacular as flowers go – they grow as fast as Jack’s proverbial beanstalks. But like all seeds, they consume energy and minerals from the soil, so it makes sense to cut them down.
Last, but not least, you need to weed. You know that. I find that if weeding becomes a regular part of you day – like brushing your teeth or making your bed – the weeds will not overcome your garden. Even 10 or 15 minutes a day will make a huge difference.
Right now I have been concentrating on tall, deep-rooted weeds like dandelions and burdock. I find that since the soil is moist down deep, it is easier to get these weeds more easily than later in the summer when the soil is dry. I use a garden fork to loosen the soil down a foot or more, then apply even, gentle pressure pulling on the top of the plant. Most come out all in one piece. That’s good, as a broken tap root will send a new plant up later.
Deep rooted weeds pull nicely when soil is wet
Never let weeds go to flower or set seeds. If nothing else, snip or pull off the flowers to keep the weeds from producing seeds. If you have particularly virulent weeds like goutweed, dispose of the flower heads in the trash going to the incinerator or land fill. Some weeds can produce viable seeds even after being pulled or having their flowers cut off.
So get busy in your vegetable garden. There’s lots to do.
Read Henry’s twice weekly blog at https://dailyuv.com/gardeningguy. Reach him by e-mail at henry.homeyer@comcast.net.


 Click Here to buy from Cobrahead