-

Now available for $24.95 including shipping. -

Now available for $21.00 including postage. Vendors I Like
 Click Here to buy from Cobrahead
Veggies You Can Plant Now for Fall Eating
Most gardeners don’t think of July as the time to plant seeds in the vegetable garden. But it should be. This is a good time to plant many things including broccoli, Happy Rich, lettuce, kohlrabi, fall radishes, carrots and beets. With good warmth and plenty or rain (or water from your hose), these plants will probably do better now than in if they were planted in the spring.
If you planted peas, spinach or lettuce early this spring, you probably have a bed that is empty now. Instead of just growing weeds, why not get out your seed packets and plant a second crop in that bed?
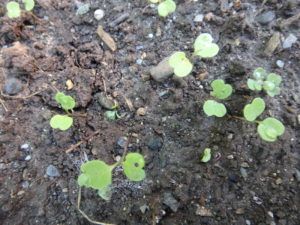
Arugula seeds germinate quickly
In the spring I generally plant seeds in those little black plastic 6-packs. I do that because the soil outdoors is cold and wet, and seeds are prone to rot. Now, however, the soil is warm and seeds will germinate much more quickly. All you have to do is check them daily to be sure that the soil has not dried out.
Broccoli, if you read the seed package, takes about 55 days to maturity. So if you plant in mid-July, you should be picking heads of broccoli in mid-September or even a bit earlier. Read the seed packets carefully: as I peruse my Johnny’s Selected Seeds catalog, I see broccoli varieties that mature in anywhere from 48 to 80 days. Some varieties like ‘Arcadia’ (63 days) are listed as “Tolerant of cold stress.” That one also says it makes lots of side shoots. Since broccoli produces well into October for me, getting side shoots is important.
So how should you plant broccoli if you have always put it in as nice little plants that you – or the local grower down the road – has grown? I would suggest planting 3 seeds in groups about 16 inches apart. Why 3 seeds? First, not every seed will germinate, so I like to ensure that at least one will come up. But rather than plant them like carrots in a long line, just plant a few seeds where you want one plant. Then as soon as the plants have 2 real leaves, pull out all but one. And since you’ll see leaves in clumps every 16 inches, you won’t have a hard time identifying them – even if you have never done it before.
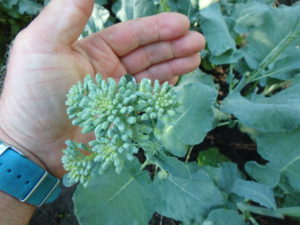
Happy rich
One of my favorite veggies is one you might not know: Happy Rich. It is a non-heading broccoli type plant. Instead of one big head, it produces many small heads similar to side-shoots on standard broccoli. I get seeds from Johnny’s Seeds. A similar plant is piricicaba, which I get from Hudson Valley Seed Library. Both are quick to mature and have sweet flavored florets. I find they are tasty even if the florets don’t get picked on time and they produce white or yellow flowers. And the leaves are tasty, too!
Carrots and beets can take 55 days to maturity, or up to 80 days. Select early varieties for fall crops now. Yaya and Mokum are both under 60 days, while most storage carrots are about 75 days – which still means they will be ready by the end of September – and long before hard frost.
I suggest buying pelleted seeds for carrots if planting now. Pelleted seeds are coated with a layer of clay, which means they are much larger and easier to handle. Plant them an inch or two apart and they will not be competing with each other as tiny seedlings – and will grow faster. Planted an inch apart you will not have to thin them until they are edible-sized.
I planted lettuce and arugula seeds in late June. Arugula, which is basically a weed, germinated right away. Both need little or no soil cover – they need light to germinate. I try to plant lettuce once a month all summer and into the fall to keep it coming. Hot weather encourages lettuce to bolt, or produce flowers and seeds. Once the plants start to elongate in preparation for flowering, they get a bit bitter. Edible, but not as sweet.
Swiss chard is another quick and easy crop that you can plant now. My High Mowing organic seed catalog has half a dozen different varieties that mature in 50 to 60 days, and produce baby greens in 25. I particularly like the ‘Rainbow Mix’ that has stems of yellow, red and orange. And did you know that beets and Swiss chards are just variations on the same species? Yup. And you can eat the roots of Swiss chard like beets when you pull them in the fall.
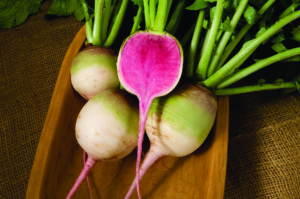
Red Meat Radish
My favorite radish is one that I will plant soon: ‘Red Meat’ radish from Johnny’s seeds. It is red in the middle instead of white like a watermelon. It never has the sharp bite of a spring radish, and stays nice even when the radishes get to be golf ball-sized and bigger. If planted in spring, it bolts.
In the past I’ve had good luck planting daikon radishes in the summer for fall use, too. These Japanese radishes get huge, and have a distinctive bite. Many use them for pickling.
So get out there and plant some seeds. Just be sure that they stay well-watered and most things will do just fine. Even many green beans only need 55 days. So if you were too busy to plant before the 4th of July, get started now.
Read Henry’s twice-weekly blog posts at https://dailyuv.com/
How to Make a Halloween Stew Using Veggies Fresh from the Garden
Here it is, late October and I’m still harvesting food from my garden. All of it could have been picked earlier, but I love letting vegetables stay in the garden as long as possible, and eating them the day they were picked. And I enjoy making a dish that uses as many of my own ingredients as possible.
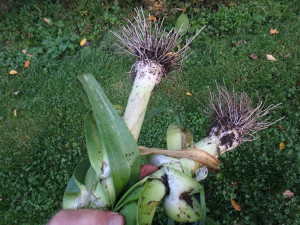
Fresh leeks
For my Halloween stew I used potatoes, leeks, carrots, kale, parsley and thyme directly from my garden, and have others including Brussels sprouts, arugula, celeriac and non-heading broccoli. You could get any of these you need from your local food Coop, which will have them from local farmers. In my opinion, local food is better by far than food trucked across the country.
This stew is really just a variation on my old favorite, leek and potato soup. To make a Halloween stew I think you need something bright orange – reminiscent of Jack-o-lanterns. I made it first with winter squash that I steamed in big pieces and then scooped out in balls with a melon baller, but I didn’t find that the flavor worked with the other ingredients. So I next tried it with carrots, which tasted much better. If you have little kids, the carrots can be made into round balls by steaming them and using a melon baller; otherwise chunks are fine.
Cut 4 strips of thick lean bacon lengthwise, and then into pieces half to three quarters of an inch long. Cook them on low heat in a heavy iron pot. Prepare 2 cups of chopped leeks by cutting them lengthwise into quarters, and then chopping into half-inch pieces. Brown in the frying bacon. Have at ready 4 cups of potatoes chopped into half-inch cubes, and add to the leeks. Brown for a few minutes, then add a quart of water. Bring to a boil, then reduce the heat to a simmer.
Next add 1 or 2 cups of carrots – either as chunks or balls, as mentioned above. Kale is optional in this stew. It adds a nice green color, and I like the flavor, but not everyone does. If you add kale, you will need to add extra water. Toss in a sprig of fresh thyme and a quarter cup of chopped fresh parsley. I like the flat-leafed kind best, though I grow curly parsley, too.
Simmer the stew for 20 minutes or until the potatoes are soft and ready to eat. Add a cup of milk and a dash of nutmeg at the end, but don’t let the stew boil after the milk has been added.
To make this recipe I picked all the vegetable the day I made it – October 19. Carrots are frost hardy and mine had already been through a hard frost. In fact, you can leave your carrots in the ground through the winter, digging them as needed. I’ve done this and know they get even sweeter after getting very cold –some of the carbohydrates in root crops like carrots and potatoes turn to sugars below 50 degrees F.
To leave carrots in the ground for winter eating, put a stake at each end of the bed: otherwise you might not find them easily if you get a lot of snow. I cover the bed with a few inches of whole fall leaves, and then a layer of mulch hay or straw. That will keep the soil from freezing solid.
There are two problems with storing your carrots this way, however: some carrots need to be picked before they get too big or they will split. But if yours are still in the ground, you should know already whether that is a problem. I grew some great purple carrots this year, but the bigger ones split, so I dug them all. A split carrot will rot if left in the ground too long.
The other problem? Rodents. Mice, voles, chipmunks, field rats and some squirrels might gnaw on your carrots if left in the ground. That’s why I like having a spare fridge in the cellar to store vegetables for the winter.
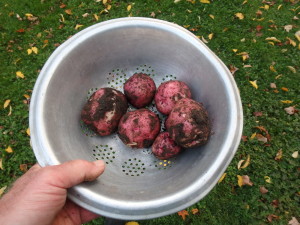
New red potatoes
I try to grow between 25 and 50 pounds of potatoes each year. My plants produce between 1 and 3 pounds of potatoes each, so I generally plant 25 to 35 plants. This feeds me, allows me to give some away most years, and provides me with organic seed potatoes to start next year’s crop. I once went 20 years without buying a potato, though I only had them to eat for 9 or 10 months each year. I don’t mind eating seasonally, in fact I think it makes me appreciate my food even more.
I’ve tried several different techniques for storing my potatoes. I’ve stored them in a cement-block bin (with a plywood lid) in a cold basement. Last year I put them in an antique 25 gallon crock with a plywood lid. Often I’ve stored them in a spare refrigerator. The trick is to maintain high humidity and a temperature between 33 and 50 degrees F. Putting an inch of wet sand in the bottom of a storage bucket works great for that, though you will have to re-moisten the sand after a while.
This year I did 2 plantings of potatoes: the main planting was in early June, the second in early August. For that second planting I had found some sprouted potatoes in the storage crock I had used, and decided to see what would happen if I planted them in August. Not all of the potatoes sprouted – they had been lurking in a dark basement for months – but those that grew did fine. They had about 10 weeks of growing time and were full sized and healthy. No bugs, either.
Growing my own food isn’t just about saving money, though I like that. Really it’s about the satisfaction of eating food that’s fresh, that tastes great and that has never been sprayed with chemicals.
Read Henry’s twice-a-week blog posts at https://dailyuv.com/