Looking Back on Gardening Projects and Thinking About the Future
Posted on Tuesday, January 3, 2023 · Leave a Comment
It’s gray and chilly outside, but I have a fire in the new woodstove that warms the house and pleases me as I look through its glass window. I’ve been in the same house since 1970, so I’ve had plenty of time to plan and execute projects. I’d like to share with you some of my memories of those efforts in hopes that some of you will be inspired to take on similar projects of your own.
The biggest projects I did were in the 1980’s after returning from my time with the Peace Corps in Africa. My house came with just an acre when I bought it, but I had been able to buy another acre or two while away, and I wanted to utilize it well for gardens. My home was built as a butter factory in 1888 on a hillside. The land dropped off sharply to a field alongside a little stream and some woods.
My first project was to terrace off the hillside behind the house and make a gently sloping access for wheel barrows, people and dogs to the field where I planned to grow vegetables and flowers. I wanted to terrace off part of the hillside so that I could have drier soil for growing fruit trees – fruit trees hate wet feet!
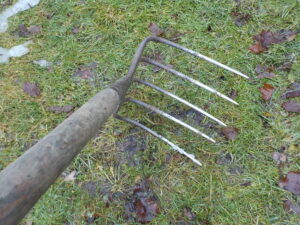
This potato hoe is great for preparing soil for planting
I was 36 years old when I returned from Africa and had plenty of energy but limited cash reserves, so I did almost all the work myself. I found a local fellow who sold me 13 dump truck loads of topsoil. He looked at the site and told me he couldn’t drive to the far end of the potential terrace with soil, so he dumped it all in one place and I had to move it with a wheelbarrow! The area for fruit trees was 10 to 20 feet wide and 80 feet long, but that did not daunt me at all.
After creating a nice flat place for apple trees and a gentle road 10 feet wide built to the lower field, I constructed an 80-foot long stone retaining wall. I had plenty of stones on the property so I went about harvesting them using a borrowed a “stone boat”. It was a wooden sled on runners about 3 feet wide and 6 feet long.
I had a chain attached to the front runners of the stone boat so I could pull it with my riding lawn mower (I’ve never thought I needed a tractor). I rolled or flipped big stones end to end until I got them out of the woods to the stone boat and dragged them away. A neighbor also let me have some large rounded stones from a fallen-down stone wall.
I built the wall before the days of the internet and endless U-tube videos, so I asked friends what to do. Drainage is important they all said: dig out below the site for the wall and put small stones there and behind the wall. Unfortunately, instead of buying crushed stone, I bought pea stone – small round pebbles. Big mistake. Round stones act a bit like ball bearings- allowing stones to move and tumble as the winter frost lifted them. Over the years I have had to repair and re-build the wall many times. But it still pleases me even though it is not a perfect wall.
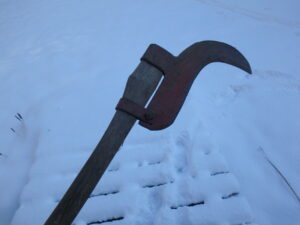
This brush hook is great for clearing out brambles and small trees
The back field had grown up in willows, alders and brambles over the years I was away. I used a brush hook – a simple hand tool with a curved sharp blade to cut them down. Then, with a cheap used riding lawn mower, I mowed the land to keep things from growing back, and I dug out roots where I could.
The next year I had a farmer with a moldboard plow on his tractor come and plow the area I wanted for a large vegetable garden. This type of plow digs up the soil deeply about 8 inches deep and flips it over, burying all the grasses and weeds. That mostly killed them, and allowed me to start growing vegetables.
I also bought several truckloads of aged manure from a farmer and worked it into the soil with an old potato hoe – a 5-tined tool like a rake, but with 2-inch spaces between the 8-inch teeth. Each year for a decade, at least, I worked in a truckload of old manure, increasing soil fertility and improving tilth.
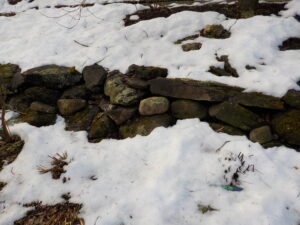
This stone retaining wall has moved some since I built it 30 years ago
I like having stonework, arbors and sculpture in the garden. Over the years I’ve made plenty of bentwood arbors for the entrance to the vegetable garden. Since neither of the “rot-resistant” trees (cedar and locust) grow here, I used maples saplings that were plentiful, but only lasted three or four years. I placed them 4 feet apart and bent the tops together over the walkway, and wired them together. I wired on one-inch branches to make places for decoration and for vines to grab onto.
Later, I decided to use cedar fence posts to make garden structures. Cedar posts are available locally and last for many years. I have one 10-foot diameter hexagon that I built to support grapes and wisteria vines that only now, after more than 20 years, is falling apart. I plan to extract the vines from the structure this summer and re-build the whole thing.
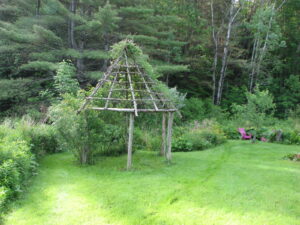
This vine structure is now old and falling down, ready for replacement
Big projects are fun to take on, but at age 76 I am not looking for more of them. I plan to build some more raised beds for vegetables this year – they are great as one need not bend over so far to plant, weed and harvest. I also find that there are fewer weeds and grasses than in-ground beds as many weeds just creep into the beds from adjacent areas. Even an 8-inch tall wood bed will prevent that from happening.
I don’t see myself ever giving up on gardening so long as I can still get around. Yes, I may eliminate some high-maintenance plants and substitute shrubs, perhaps. But I started young, and hope to garden till the day I die. Winter is the time to plan, so think of your own projects now, too, and tell me what they are if you wish. I’m always interested.
E-mail Henry with your own ideas of projects for 2023 at
henry.homeyer@comcast.net or write him at PO Box 364, Cornish Flat, NH 03746.
This Year’s Lessons from the Garden
Posted on Tuesday, December 27, 2022 · Leave a Comment
At the end of the year I always like to take a little time to reflect on what worked well in the garden – and what didn’t. This year I also called some gardening friends – some experienced, some less so – to ask what they had learned so I could share their thoughts with you, my loyal readers.
I’ll go first. In 2021 I planted some bare root oaks I bought from the State of New Hampshire and planted them for a client in an open meadow in what had previously been a lawn. Most did well last year and really took off this year. Based on that success, I planted even more this year in part because I could get unusual trees not available locally – northern pecan, hardy persimmon, pawpaw and more. We’ll see how they do next year.

Peonies are best divided or transplanted in the fall but can be moved anytime
Bare root trees are usually the thickness of a pencil and have a foot or so of root with 18 to 24 inches of bare trunk. Although I found a grower in Vermont willing to sell them to me, most growers sell them to nurseries that pot them up and sell them in a year or two. But if you go on-line you can find growers who will ship bare root trees and shrubs in the spring. They are easy to ship – no soil is included – and are less expensive than trees that have been tended and watered for a couple of years.
The downside is that bare root trees are generally only sold when dormant, and need to be planted soon after arrival. Some growers keep big coolers full of bare root material, but you still need to get them in the ground soon after you get them. Look for them now and order what you want for spring delivery.
A friend bought a house in southern New Hampshire and had her first vegetable garden this year. She was surprised and delighted that there was no blight on her tomatoes. This did not surprise me at all. The fungus that blights so many tomatoes lives in the soil, and in a new location it rarely shows up until year two.

Raised beds need to sit on soil with good drainage
She also reported that some of her new raised beds were placed on ground so hard that she couldn’t even get a shovel in it. The wood beds were 8 inches tall, but didn’t drain well and none of her root crops did well. In the spring she is going to dig out the soil, remove the beds, and put two inches of coarse sand on the ground. Then she will replace the wood-sided beds and soil, and hope for the best. I predict that will solve the problem, particularly if she adds lots of compost to the soil in the beds.
Some dear friends of mine, now in their eighties, sold their house and downsized their gardens considerably this year. “The concept of growing has been in our hearts all our lives, and we are not going to stop now”, I was told. They have some help in the garden, and utilize raised beds to grow some vegetables. The beds are far enough apart so that someone with a walker can maneuver easily. Although they will no longer grow potatoes or carrots, they will continue growing lettuce, herbs and a few tomatoes. “Gardening is still in our brains,” my friend said.
Another friend was reminded this year that if a perennial is not “happy” where it is planted, move it! She said she had divided some phlox and lacking a good spot for it all, put some in a place that was too shady for it. So she dug it up and moved it to a better place late in the season. Almost anything can be moved, just do it on a cool cloudy or rainy day. Even peonies can be moved if you are careful.
Another friend said that he learned to use hydrogen peroxide as a preventive for fungus on grapes. He bought some industrial strength peroxide (30% concentration) and diluted it (10 parts water to 1 part peroxide). He then filled his big sprayer to apply it. He sprayed after pollination but before the grapes had appeared. Unlike chemical sprays, he says it just breaks down to water and oxygen.
Another friend moved to Vermont from New York and has been working to maintain and personalize the large flower gardens that came with the house. She spoke of the work-life balance. It is important, she said, to recognize how much energy is needed to properly maintain a large garden. She has learned to focus on one area at a time.
She also said she has learned that is important to act on your own ideas, even if you have inherited wonderful gardens. I agree. We each need to personalize our own spaces, and grow plants that we love. For example I learned that I love flowers called burnets (Sanguisorba spp.) and I collect them.
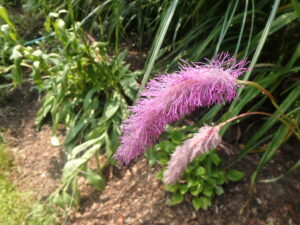
Lilac Squirrel Sanguisorba blossoms are delightful to touch and see
Burnets bloom in mid- to late-summer and come in size from miniature (6-inches tall) to huge (6-feet tall) and do best in sun with moist soil. Each year I add a few. My most recent addition is a S. hakusenensis called ‘Lilac squirrel’. I think of it as “the pink squirrel” as it’ blossoms are fuzzy and much like a squirrel’s tail, though much smaller. Mine are pink, not lilac in color. Not common in most garden centers, it is available from Digging Dog Nursery in California.
Lastly, even very experienced gardeners make mistakes. One friend this year cut the tops of her Brussels sprouts off around Labor Day as is recommended to get large sprouts. But she forgot to harvest them until November. By then the spouts were bigger than golf balls and some had gone by.
So yes, we all learn new techniques, try new plants and do our best to be good gardeners. But I like what my friend said who suggested we not beat ourselves up if we mess up! All my best to you for the year ahead.
What to Do after a Big Winter Storm
Posted on Tuesday, December 20, 2022 · Leave a Comment
We recently got hit by a big winter storm that dropped at least 15 inches of heavy, wet snow. It clung to branches, breaking some and bending others to near their breaking points. If you suffer the same sometime this winter, here are some things you might consider to help your woody plants.
First, the best thing to do is be proactive. Even before the storm had finished I went outside and started shaking branches to get snow off them. Wear a hoodie! Snow can go right down your neck if you don’t. For shrubs and small trees, you can shake the central stem, and it will clear the snow from the entire plant. For larger trees, you will need to shake individual branches.
A good tool for clearing snow is a bamboo pole, the longer and thicker the better. Some hardware stores and feed-and-grain stores will have them. I used one to knock snow off branches I couldn’t reach.
So what can you do to repair cracked and broken branches? Generally, nothing. Take a sharp saw or loppers and remove the branch back to its point of origin – the main trunk or a large branch. But don’t cut flush to the trunk if you can avoid it. And never leave a stub as it will have to rot back to the branch collar to heal.
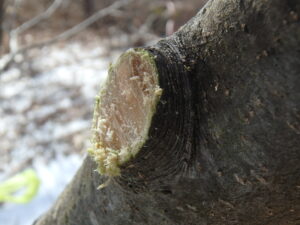
Cut back a broken branch to the branch collar
The tree heals itself at what is called the branch collar. The branch collar is a swollen area at the base of each branch. If you cut that off flush to the trunk, it will be harder to heal and take longer. Often the branch collar has ridges or rings around it, and you should leave them in place.
Two winters ago we had a big snow storm and my small leatherwood shrub (Dirca palustris) split up the middle. The break was not complete: there was still an attachment point for both halves of the shrub. I didn’t notice the damage for a few days, but when I did, I decided to try to repair it.
Grafting is a well-known but difficult skill whereby a skilled person can add a branch to a living tree. This is most often done with fruit trees, allowing orchardists to add other varieties of apple on a tree. I have an apple with three different flavors of apple because it had other varieties grafted to the original tree. Truth be known, the tree came like that. I’ve taken classes in grafting and tried to do it, but have never succeeded. It’s an art.
But back to my little leatherwood tree. Because it was still hinged at the bottom of the break, I moved it back together and used some stretchy green plastic tape to wrap the two halves together. I wound it tightly, and low and behold, it worked! I removed the tape (which is usually used for tying flower stems to stakes to keep them from breaking in the rain) after 2 or 3 months. Now, two years later, the shrub shows no signs of ever being damaged- other than a little scar tissue.

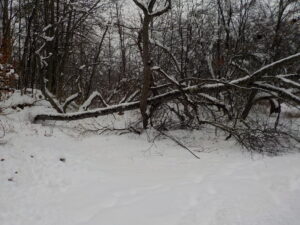
These willows probably will recover from being bent by the snow.
What else did the storm do? It almost flattened a small grove of willow trees I had planted 20 years ago. They are a variety of Salix integra called ‘Hakuro Nishiki’. Very popular, these willows have tri-colored leaves (green, white and for part of the summer, pink) and are fast growing. There is nothing I can do for them. They are bent over and weighed down by snow, but should recover once the snow melts in a week or two. And if they don’t spring back up? I will lop off the bent stems and let them re-grow. It’s difficult to kill a willow, and they should have been shortened long ago.
The storm also knocked down a large tree on our property, a wild black cherry (Prunus serotina). The black cherry doesn’t produce cherries we can eat, but birds eat them. The fruit is just a third of an inch across with a pit. Not much food for anybody, really. The blossoms are not important, either, but it is a good plant for pollinators, one of the keystone species.
The tree we lost had a diameter of 14 inches at its base and stood over 67 feet tall – I measured it after it fell. It was not one I had planted, but a bird probably dropped a seed in our woods. I will count the growth rings when it gets cut up for firewood. Where it grew is a good example of where not to plant a tree.
So what was wrong with our tree? Most trees do not have tap roots going down deep into the soil. Two feet is probably average. But they spread widely. I was told in a horticulture class to think of a tree as a wine glass sitting on a dinner plate. The plate represents the root system, the wine glass the trunk and branches.
This cherry tree grew on ledge and was knocked over in the recent storm
But ours was growing right next to a rock ledge that was actually showing above ground. The roots could not grow that way, so all the roots were on just three sides. The wind came from the fourth side, and with the snow load, it blew over. So if you plant trees, be mindful of bedrock and ledge. Keep away from them. You can use a steel rod or crowbar to poke the soil to find ledge before planting.
Although I will miss that big tree, I try to never mourn a plant that dies. After all, it provides me a chance to plant something else there. My best wishes to you all for the holidays.
Henry lives and gardens in Cornish Flat, NH. He is the author of 4 gardening books and is a UNH master Gardener. Reach him at PO Box 364, Cornish Flat, NH 03746 or by email at
henry.homeyer@comcast.net. Please include a SASE if you wish a response by mail.
Enjoying the Winter Landscape
Posted on Friday, December 16, 2022 · Leave a Comment
Normally at this time of year I can go out to the stream behind my house and pick stems of a shrub called winterberry (Ilex verticillata) to use in vases and on my wreath. It is generally loaded with small red berries that persist until mid-winter when hungry birds eat them, or they just plain fall off.
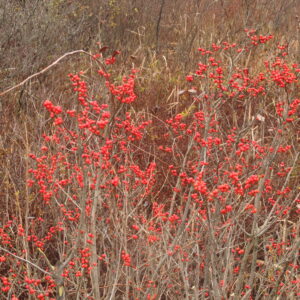
Winterberry grows best in wet places
Winterberry is a great decorative shrub in winter that prefers wet feet, but will grow in ordinary garden soil, too. It is dioecious, meaning that it requires male and female plants – usually one male will take care of all the females. This year I didn’t get many of those bright red berries I like so much for decoration, and I have heard from other gardeners that they had few, too.
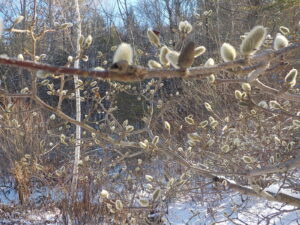
This prompted me to walk around my property looking at my woody shrubs to see what might substitute for winterberries. I didn’t find any berries at all. But I did cut some red-twigged dogwood (Cornus sericea) to use in a vase, and some budded branches of a Merrill magnolia (Magnolia x loebneri).
The magnolia buds are a bit like pussywillows on steroids: an inch long and very fuzzy. I have some in a vase on the table, and they look very good, and will for many weeks ahead. I’ve done this before, and will occasionally get a few buds to open into white flowers. I cut some greenery to go with them, a few stems of white pine. Hemlock would look good instead, but doesn’t hold needles well indoors.
It struck me that winter can be pretty bleak for people who don’t have nice looking winter shrubs and trees. Judicious pruning can turn transform a messy tree full of small branches going every which way into sculpture. I recently helped a client prune a 50-year old Japanese maple into sculpture that will keep it looking great for several years – with only a few minor pruning cuts each year.
When pruning, I ask myself, what will this little branch, currently the thickness of a finger, look like when it is the thickness of an arm – or a leg. If it is growing sideways toward a walkway, it must come off. Going through the middle of the tree? Remove it! The maple I pruned had many small dead branches that had been choked out because bigger branches had blocked off the sun, effectively starving them.
Bark is important. I like plants that have exfoliating bark, which means bark that is shaggy and peeling off – thus showing more than one color. My Seven Sons Flower Tree (Heptacodium miconioides) is one of those. In addition to the nice bark it offers me a display of small white flowers each fall. White birch (Betula papyrifera) and river birch (Betula nigra) are others with interesting bark. In fact all the birches have handsome bark.
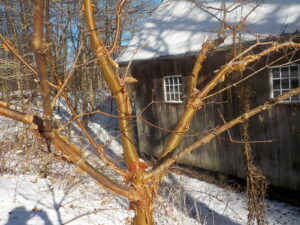
Paperbark maple has interesting bark for winter appreciation
I’ve been growing a paperbark maple (Acer griseum) for about 20 years. It has lovely shaggy reddish-brown bark that is very handsome. It is a very slow-growing tree, at least in this climate. It is listed as a Zone 5 plant (good to minus 20 F) but mine has survived colder temperatures. It looks great in winter
One of my favorites – but one I do not grow – is sycamore (Platanus occidentalis), which I knew growing up in Connecticut but is rare in New Hampshire where I live. It reminds me of the English plane tree, so common in Europe. The bark peels off in big swaths, showing light gray-green in some areas, dark brown in others. It is just barely hardy to Zone 4, and prefers to grow in river bottoms, but will grow in drier soils, too.
Of the bigger trees, I like American beech (Fagus sylvatica) for its smooth gray bark. Unfortunately, beeches are prone to a fungal disease that mars the bark and eventually kills the tree.
That same smooth bark is a prominent feature of a shrub known variously as shad bush, serviceberry and Saskatoon bush. All belong to the genus Amelanchier but bear different species names. Most are multi-stemmed bushes that get no more than 10 feet tall, though I have a wild one more than twice that height. Their blossoms are similar to apple blossoms. They do well in partial sun, often growing and blooming on roadsides.
Apple trees, particularly crabapples, can look great in winter. Some crabs hold onto their fruit throughout much of the winter, some drop their fruit in fall and many provide fruit for the birds to eat (that disappears before winter is done). Ask at the nursery when you buy a crabapple if the birds like the fruit. The form and bark of a well-pruned apple or crabapple is gorgeous to my eye.
So if your landscape has little to offer you in winter, plan on adding some winter interest come planting time. And if your trees and shrubs are drab, think about adding some strings of little winter lights to brighten them up, at least at night.
Henry is lifelong organic gardener, a UNH master Gardener, and the author of 4 gardening books. Reach him at PO Box 364, Cornish Flat, NH 03746 or by e-mail at
henry.homeyer@comcast.net.
Composting: It’s Important, Even in Winter
Posted on Thursday, December 8, 2022 · Leave a Comment
When I was a boy it was one of my many jobs to take out the kitchen scraps every few days and dump them in our woods in a compost pile. Like the postman, this was a job I did no matter what: “Neither snow, nor rain, nor heat, nor gloom of night stays this boy from the swift completion of his appointed rounds.” I would not say that the postman nor the boy enjoyed their tasks in a blowing rain. But I did it. Now, older and wiser, I still do it.
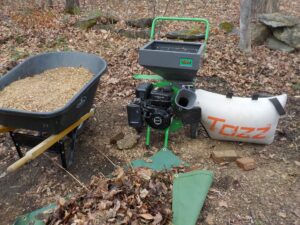
This gas-powered chipper-shredder helps make mulch and compost materials
Making good compost is easy. Plenty has been written about the best way to create that “black gold” we all love to give our plants. There should be the proper mix of ingredients that are high in nitrogen and those that are high in carbon. That will help our microbe pals breakdown leaves, weeds and kitchen scraps into useful biologically active material to support plant growth. Now, in winter, composting is even more of a challenge.
Scientists disagree about the ratio of carbon and nitrogen materials to get a compost pile “working”. Some say an even 50-50 mix of materials, but others say up to 30 times more carbon-based materials than those high in nitrogen. Me? I aim for a 3 parts dry, brown material to one part high nitrogen material. Eventually, everything breaks down and turns into compost.
What ingredients are high in nitrogen? Grass clippings, green leaves and weeds Animal manures are good, but you should never use cat or dog waste. Vegetable scraps, raw or cooked fall in this category, too, and coffee grounds. Moldy broccoli from the back of the fridge? Sure.
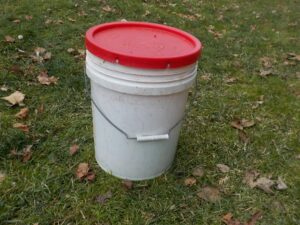
A 5-gallon pail will transport plenty of kitchen scraps to a local farm that can use them to make compost
High carbon materials include dead leaves, straw, tea bags, even a little shredded paper. If using newspaper, avoid glossy pages and things with lots of color. Newspapers are pretty benign these days, as they use soy inks and no heavy metals. I keep a supply of fall leaves next to my compost pile and spread a layer over the kitchen scraps every time I empty the compost bucket. That also minimizes flies in summer.
A good compost pile also needs oxygen to work well. And if your pile stays soggy, it won’t allow the microorganisms to get enough oxygen. But if your pile is too dry, the working microbes won’t be able to thrive, either. If you grab a handful and squeeze it, it should feel like a wrung-out sponge. People who really want a fast-acting compost pile turn over the compost with a garden fork regularly to help aerate it, but I don’t have the time or energy to do that.
In winter, most compost piles stop breaking down plant material because it is too cold for the organisms that cause decomposition. In summer, if yours is working well, temperatures can go up over 140 degrees F, which will kill weed seeds. In fact I‘ve done experiments and found that 125 degrees for a couple of days killed the seeds of the annual grass I placed in it – though some weeds may be tougher to kill than that. To get my compost pile that hot I layered in fresh lawn clippings. Still, the pile had cooler pockets and hotter ones.
So how does all this help you in winter? First, accept that your kitchen scraps will be frozen and not breaking down. Even those big plastic drums that rotate compost probably won’t work in winter – the material will be one big lump impossible to turn.
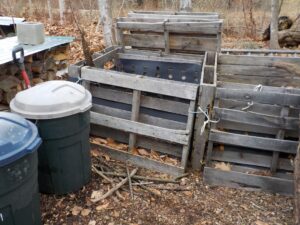
I keep chopped leaves in a barrel next to my compost pile to spread over kitchen scraps
I used to keep my compost pile near the vegetable garden so I could throw weeds in it. But the problem was that in winter I needed boots or snowshoes to get to my compost pile. If you don’t want to build a bin or trudge to a distant compost pile in winter, think about just using a big trashcan and saving all your scraps until spring when things thaw out and temperatures are good for composting. This will also keep dogs and skunks out of it. Recently I built a nice bin made of wood pallets that is next to my woodpile, near the house – and more accessible all year.
Not all compost is the same. The microbes attracted to material made from woody plants is different than that made from kitchen scraps and grass clippings. Think about the soil in an established forest: it is dark and rich, formed by the breakdown of leaves, twigs and branches over a long period of time. You can mimic that and speed up the process to create mulch or compost to put around newly planted trees and shrubs. Just compost you autumn leaves, twigs and small branches. I shred them in a chipper-shredder machine.
If you collect scraps (no meat or oil) and are a member of a CSA, they may accept your kitchen scraps for their composting system. If you have a 5-gallon pail with cover, you can easily transport it to a farm or recycling facility that accepts food scraps. When we were on vacation in Maine, we brought out kitchen scraps to a farm that used them for compost.
Aside from helping your plants, making compost helps keep food waste out of the landfill, which is important: we are running out of space in landfills. So do your part, even in winter. And whatever you make will enhance your soil when you add it in at planting time.
Henry is a UNH Master Gardener, the author of 4 gardening books and a lifetime organic gardener. Reach him at
henry.homeyer@comcast.net or PO Box 364, Cornish Flat, NH 03746.
Holiday Gifts for the Gardener
Posted on Tuesday, November 29, 2022 · Leave a Comment
First on my list for holiday gifts for the gardener is this: a subscription to this newspaper. Our local papers need subscribers in order to deliver to you the news you want but cannot get on-line. Yes, local news, gardening tips that fit your climate, obituaries and more. If your loved ones do not have subscriptions, think about giving one.

Consider a donation to a good non-profit like the Kilham Bear Center (photo by KBC)
Next, since most of us really need very little, think about a donation to a non-profit in your loved one’s honor. One of my favorites is a non-profit that for decades has nurtured orphan bear cubs, the Kilham Bear Center in Lyme, NH. The Center this year is nurturing and caring for more than 100 baby bears whose mothers have been killed by cars or hunters, and that would otherwise not survive. The Center has over 19 acres of fenced forest for the bears, and serves Vermont, New Hampshire and Massachusetts.
You can donate to The Kilham Bear Center at PO Box 37 Lyme, NH 03768 or go on-line to
https://kilhambearcenter.org/. On-line there are photos and videos of the bears. Visiting is not possible, as they want the bears to have as little contact with humans as possible because their goal is to return all to the wild where they avoid humans.
Other non-profits I like include The Native Plant Trust, the Audubon Society and the Nature Conservancy. As a supporter I get the Nature Conservancy magazine and I never cease to be amazed at all the good projects they initiate or support. And of course most states have nice non-profits supporting public gardens and wildlife areas that need our support.
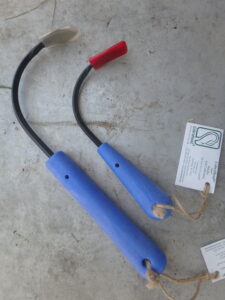
Cobra Head weeders now come in two sizes
Along with new products I like, each year I have to mention a few old favorites. The Cobra Head Weeder is a simple, well-made tool that virtually all gardeners love once they’ve tried it. Shaped like a curved steel finger, it will get under weeds or flowers to lift them from the earth. I use it for planting as well as weeding. Found at most garden centers or on-line at www.cobrahead.com for about $30. They now have a version for smaller hands and a long-handled weeder as well.
Books are a great present. I usually mention author Michael Dirr, my favorite expert on trees and shrubs. All his books are well researched, complete, and opinionated. My favorite is his classic, the “Manual of Woody Landscape Plants: their Identification, Ornamental Characteristics, Culture, Propagation and Uses”.
Another classic is Barbara Damrosch’s “The Garden Primer”. This book is a good reference on almost anything a gardener would wish to know. And at under $20 in paperback, it is great value for an 800-page book. More reliable than many of the on-line experts, I dare say.
Lastly a pair of books that work well together. First, Doug Tallamy’s “Nature’s Best Hope: A New Approach to Conservation That Starts in Your Yard”. This explains in readable, layman’s terms why what we select for our gardens impacts birds and pollinators.
A good companion to Tallamy’s books is “Essential Native Trees and Shrubs for the Eastern United States” by Tony Dove and Ginger Woolridge. This book supplies all you need to know for selecting the right trees and shrubs for your land to support wildlife.
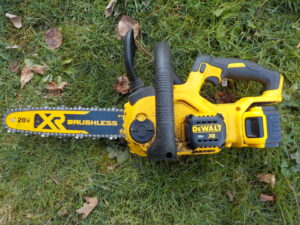
An electric chain saw can be useful for small project
But on to other needs of gardeners. Consider a small electric chain saw. They are safer, quieter, and easier to start and to use than gas powered ones. I have a DeWalt DCCS620 chain saw that has a 20-volt battery, 12-inch bar and weighs just 9 pounds. Great for cutting up downed branches, removing small trees and more. Available locally at $250 or less.
For gardeners who start seeds indoors each spring, there is an alternative to all those flimsy plastic 6-packs. You can buy a metal soil blocker that you can use to make small cubes of a soil mix for your seeds. Available from Johnny’s Seeds or Gardeners Supply, about $40.

With this simple tool, you can make Soil blocks for starting seedlings
Another great product for starting seedlings are electric heat mats. These sit under flats of seeds planted indoors, providing heat that speeds up the germination process. They are available in two sizes – enough for one flat or a big one for four or more flats. Great for things that take a long time to germinate.
For stocking stuffers I like seed packets. Give your loved ones seeds of less common vegetables and flowers that they might not find at the plant nursery. Garden gloves are great gifts, we all use them in spring and fall, and some people use them all summer, too.
Lastly, my wife, Cindy, swears by a natural bug repellent made in New Hampshire, White Mountain Deet-Free Insect Repellent (
http://www.whitemountaininsectrepellent.com). It doesn’t take much of this stuff to keep away black flies, she says. It comes in a 4-ounce bottle of all-natural ingredients (no fillers) for $15 plus shipping. Great stocking stuffer.
Use your imagination. There are so many nice things a gardeners will appreciate, including your own time promised for weeding in the spring!
Henry is a garden consultant, public speaker and the author of 4 gardening books. Reach him by e-mail at
henry.homeyer@comcast.net or PO Box 364, Cornish Flat, NH 03746.
Winter Tree Care
Posted on Monday, November 21, 2022 · Leave a Comment
Living in New England is a joy, but we gardeners do have some challenges: cold winter winds, deer, rocky soil and more. As we get ready for winter, one of the biggest challenges for many of us are the deer. They are hungry and relentless. In my part of the world, there was a crop failure for acorns this year, a staple for hungry deer. The deer don’t care that you spent $275 on a nice tree. If they want to browse it, they will … unless you take steps now to protect it.
The most expensive but most sure method to prevent deer from damaging you plants is to fence your entire property with 8-foot tall deer fence. That will keep them from your flowers – tulips are a favorite – as well as vegetables, shrubs and trees. It’s what most arboretums do. You don’t need to have a metal fence – though metal posts are best – as plastic mesh deer fencing is readily available.
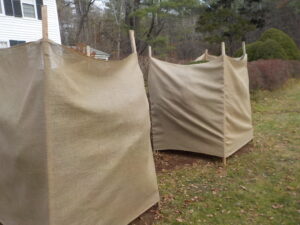
Burlap will protect these yews from deer all winter
Alternatively, you can protect plants that have suffered damage in the past, or, if new, are known as “deer candy”. Yew is an evergreen favorite of deer. I recently wrapped a pair of yews with burlap for a client whose plants had suffered deer damage in the past. The plants stand seven feet tall or so, and are about as wide. I used a 6-foot wide roll of 10 oz. burlap to wrap the shrubs and four 8-foot tall stakes for each plant. I left the top open to avoid breakage due to heavy snows. The burlap came from www.burlapsupply.com.
Various repellent sprays may deter the deer, too. But if they wear off before you re-apply, the deer will let you know. Rain and warmer weather can affect how long they last.

Hardware cloth will keep rodents from chewing the bark and killing this young cherry tree.
Voles and other rodents can be a problem, too. Years when we have deep snow are the worst because owls and hawks are less able to eat the rodents that may eat the bark and girdle a tree. Wire mesh known as hardware cloth is great for keeping away rodents, but now plastic spiral wraps are available and easier to install. Young fruit trees are the most vulnerable, so do protect yours until they are 5 years old or so. Protection should go up 18 to 24 inches of the trunk.
What about those evergreen rhododendrons that have their leaves shrivel up? When the ground freezes the roots can’t take up water to replace water used in photosynthesis on sunny days or water that just evaporates from the broad leaves. There is a product called Wilt-Pruf that works as an anti-transpirant for up to four months in winter. It is available in ready-to-use form, or as a concentrate.

Rhododendron leaves often shrivel up in winter but recover in spring.
According to its literature, Wilt-Pruf “contains a film-forming polymer which offers high density, good efficacy, and even coverage across foliage.” Talking with a local arborist, I was advised to spray both top and bottom of leaves or needles, and to do so late in the fall. He also said it may also make foliage less attractive to deer. Shriveled leaves do recover, come spring.
If you planted new trees this year, think about mulching with bark mulch now if you haven’t done so. Trees do much of their root growth now, after leaf drop and before the ground freezes deeply. Trees have stored carbohydrates for use by roots even though they are no longer producing them.
By now I have about an inch of frozen soil on the surface, but roots are deeper than that – most are within a foot of the surface. So you can still put down two inches of mulch over the roots to slow the freezing of the soil.
Although traditionally farmers pruned their apple trees in late winter or early spring, I have always assumed that the reason for this is that they had time on their hands then. But if you want to do some pruning now, after the garden has gone to bed, feel free!
Begin pruning by removing any dead branches. This is a bit trickier now than when leaves are on the tree. Just look for cracked or damaged branches. Dead branches have bark that is a bit different than the rest: dry, flakey, lifeless. Rub small branches with a thumbnail. If you see green beneath the outer layer, the branch is alive. If there is no green, the branch is dead.
The goal of pruning is to allow every leaf to get sunshine. If the density of branches is too great, inner leaves will not do their job. Leaves have two major jobs: to feed sugars to their roots and to help produce flowers, fruit and seeds. If you prune back too much, a tree will respond by growing lots of new shoots, usually those vertical water sprouts. Don’t take off more than 20% of the tree in any one season.
Look for rubbing branches, branches growing towards the center of the tree or branches that parallel others closely. Those are all good candidates for removal. And any time a fruit tree is getting too tall, reduce the height. Finally, pruning should make your tree or shrub beautiful to look at – especially in winter.
Henry is a UNH Master Gardener and a lifelong organic gardener. Reach him at PO Box 364, Cornish Flat, NH 03746 or
henry.homeyer@comcast.net.
Include Some Homegrown (or Local) Vegetables in You Holiday Feasts
Posted on Wednesday, November 16, 2022 · Leave a Comment
I personally think that the Canadians have the right idea: they have their Thanksgiving feast the second Monday in October, right after the harvest. By the time our Thanksgiving rolls around, many gardeners have eaten all their home-grown veggies. It need not be so, of course, if they are properly stored.
Not all of you have them time, the space and the desire to grow veggies. I think everyone appreciates that having local farmers is important, and many of you have signed up with a farm CSA to get a box of vegetables each week during the summer. Even now many CSA’s have fall or winter programs to supply you with root crops and spinach or brassicas like Brussel sprouts or kale. If you can’t get into a CSA program, think about buying local vegetables at your local food coop.
Why are local vegetables important? I have read that the average vegetable in a big grocery store travels over 2,000 miles at some times of the year. That’s right, we in New England get veggies from California, Florida, Texas and other warmer places. I am interested in reducing my carbon footprint by reducing the use of fossil fuels. Those big 18-wheelers crossing the country use a lot of diesel fuel. And fruits from Mexico and South America? I avoid them. I can (mostly) live without fruit that travels long distances.
I am not claiming I have given up citrus fruit to save the atmosphere. But instead of getting a case of oranges, I can buy a few and get my citrus fix from orange juice which is much more concentrated than fresh fruit, and easier to transport. Local apples are available pretty much year-round, store well and are tasty and nutritious.

Cure potatoes for a few days before storing.
So what will I have on my table for holiday feasts, both now and in December? Potatoes, for sure. They are easy to grow, very productive and store well. In a bed 50 feet long and three feet wide in full sun I can grow 50 pounds of potatoes – unless the blight that starved the Irish long ago comes along.
I keep a large spare refrigerator in the basement dedicated to storing potatoes and other garden vegetables. Potatoes, carrots, celeriac and rutabagas store well at 33 to 50 degrees, and do best with high humidity. A modern fridge takes a lot of the humidity out, though the drawers are better at keeping in humidity. On the shelves of the fridge I store potatoes in heavy paper bags to reduce moisture loss – in plastic bags they might rot, as they need to breathe.

Celeriac with carrots, leeks and Brussels sprouts. All store well in the fridge.
Brussels sprouts are very cold resistant and will be fine outdoors until late December – if the deer don’t find them. That’s right deer love Brussels sprouts, kale, broccoli and will munch them unless protected. I had no problem with deer this summer because of our dog, Rowan, who leaves scents around the property and advertises himself as a wolf. But deer are hungry now – very few nuts this year – so they have moved in to my late fall plantings, and are even eating the tops of my rutabagas.
If you want to eat directly from the garden in November and December, some fencing is probably a good idea. I recently spread an old bedspread over my kale plants to keep deer away until I had time to pick and freeze them. But if you just have a few plants and like to pick fresh veggies from the garden now and in the weeks to come, think about some chicken wire fencing.
Although fencing an entire garden requires an 8-foot fence to keep deer from getting in, a small space with 6 kale or Brussels sprouts plants can easily be surrounded with 3- or 4- foot wire. Tie it onto stakes with string or zip ties. They can’t get in, and I doubt they will lean over and grab food.
I freeze a lot of vegetables each year as it is easier than canning them. Tomatoes are the easiest. I freeze them whole, skins and all. In past years I have put them in zipper bags, but we are now trying to lead a plastic-free life.
Plastic can potentially leach chemicals onto food, particularly if the food is hot. Even “food-grade” plastic may not be 100% safe. So this year we started storing frozen foods in wide-mouth jars. Next summer I will cut large tomatoes into chunks to fit into jars for freezing. I use frozen tomatoes for stews and soups.
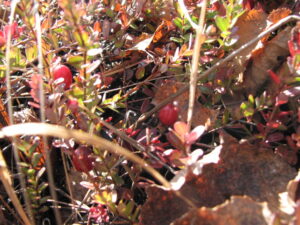
Cranberries do not require a swamp or bog. You can grow them in your garden.
I remember that many years ago there was a recall of fresh cranberries at Thanksgiving time due to some chemical that had been sprayed on them. Afterwards we all went back to eating cranberries and forgot about the scare. Now I try to get organic fruits and vegetables whenever possible, and grow my own organically – without the use of any chemicals.
I got some cranberry plants from a friend this summer and hope to be able to supply our needs within a few years. They do not require a swamp to grow, although they are found in wet places in the wild. They do require acidic soils, but that is easily provided with elemental sulfur or soil acidifier. They do best in full sun, though my friend who grows them has them in part sun/part shade and they do well for her. She uses pine needles to mulch them. Some plant nurseries sell potted cranberry plants so might try some next year.
Henry is a lifelong organic gardener and the author of four gardening books. Reach him by email at
henry.homeyer@comcast.net.
Consider Bringing Some Nature Inside This Winter
Posted on Wednesday, November 9, 2022 · Leave a Comment
When I was in the third or fourth grade, way back in the 1950’s, I decided I wanted to grow something indoors in the winter months. My mom grew African violets, but I had little interest in them. I wanted to bring inside some wild plants that I could tend … and watch grow. So, with help from my mom, I built a terrarium. It was a huge success.
My terrarium was simple: I used a wide-mouth one gallon jar lying on its side to contain mosses other small plants I found in our woods. I delighted in seeing moisture build up on the top of the jar, which was shut with a lid, and “rain” on my plants.
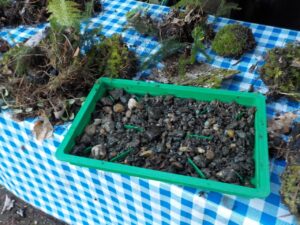
An inch or more of gravel should be at the bottom of the terrarium
I decided recently to see if I could re-create my terrarium, and perhaps even improve on it. I found an old gallon jar for the purpose, but also found something easier to work with, given that my hands are so much larger now. Gardeners Supply (www.gardeners.com) sells something they call a “Deep Root Seed Starting System”. It consists of a heavy duty base tray roughly 15 by 9 inches wide and 1.5 inches deep. It comes with an 8-inch tall heavy-duty clear plastic cover. An old aquarium fitted with an improvised cover could be even better – bigger and deeper.
I went out to my nearby woods to gather the plants. But first I went to a little stream with a large tin can and scooped up small pebbles and rough sand. I got enough to put an inch or so of it in the bottom of my terrarium. This is to catch water and keep the soil well drained.
I put the gravel in the base tray, and then covered it with a piece of screen I cut from an old window screen. The screen helps to keep soil from washing down into the gravel and wicking water up to the root zone of my plants. Most plants do not want soggy soil.
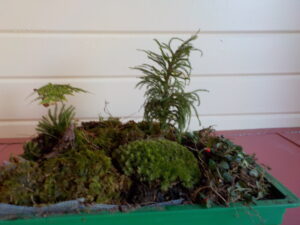
Terrarium ready for the cover
On top of the gravel I put down good soil I collected in the forest where I found my plants. Forest soil is full of fine roots, so digging up some soil requires a good tool. I used my CobraHead Weeder, which has a single tine that digs through roots easily, loosening the soil to allow me to harvest soil and plants. I put about 2 inches of rich, dark soil on top of the gravel, mounding it so it is deepest in the middle and slopes toward the sides.
I brought a long, low basket to bring home plants collected in the woods. First I got some mosses as they are great in a terrarium. They require little and transplant easily. You can literally just pick them up off the ground. I collected sphagnum moss which seems to grow everywhere in the woods, often on dead logs. Another moss, one which grows in a tidy, tight pincushion shape, was also easy to collect, though I haven’t learned its name as yet.
I noticed foamflower (Tiarella cordifolia) growing here and there in the woods, and collected a small plant and installed it in my terrarium. It has maple leaf-shaped leaves and lovely flowers that come in spring on pointed spikes. It will be fun to see if mine will bloom “in captivity” or not. It is commonly propagated and sold in plant nurseries.
Ferns are lovely but most are too large to go in a terrarium. But I did find one small fern to include, as yet unnamed. Most ferns have yellowed and died back by now but this one had not, so I assume it will stay green all winter.
Although not common in most woodlands I walk through, I saw plenty of wintergreen (Gaultheria spp.) and brought plants home for the terrarium. It is a low groundcover that has red berries that persist all fall and winter, as apparently birds are not fond of them. Its roots run, so it can spread quickly in moist, rich, acidic locations.
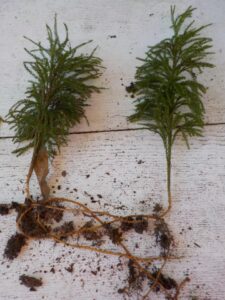
Ground pine roots spread long distances in the wild
Lastly, I collected ground pine – which is not a pine at all – but is common in the woods. It is a club moss with the scientific name Lycopodium dendroideum. Like ferns, club mosses reproduce by spores, not seeds. Its roots run long distances and can be a nice addition to a woodland garden. It is evergreen and has even been used in wreathes in the past.
When collecting plants for a terrarium it is important to harvest responsibly. Never harvest all the plants in a clump, and do not collect plants unless you see them commonly. If you are not on your own land, ask permission from the landowner before collecting anything.
Try to get as much root with a plant or small clump of plants as possible. I went around each plant with my CobraHead Weeder, loosening the soil enough so that I could get my fingers under it. Then I tried to determine what kind of roots a plant had, and follow each one out, loosening it before lifting the plant.

This terrarium will fog up if put in direct sunshine
If you have city water with fluoride or any other added chemicals, do not water your plants with it. Instead, catch rain water or melt snow. Because a terrarium is a closed environment, you will not need to add water often.
My plants should look good all winter. They do not need bright sunlight as they do fine in shade in the wild, but a little morning or late afternoon sun will be good. It will be fun to see what they do as the winter progresses.
Henry is a lifelong organic gardener, a UNH Master Gardener, and the author of 4 gardening books. Reach him by e-mail at
henry.homeyer@comcast.net.
Improve Your Soil Now for Spring Plantings
Posted on Monday, October 31, 2022 · Leave a Comment
After you’ve weeded your garden, raked your leaves and cut back some of your perennials (and left some for the insects and birds), you may think you are done. You are not. This is a great time to work on improving your soil.
Soil amendments do not act instantaneously. Changing the pH level – a measure of acidity or alkalinity – takes time. Kits are sold inexpensively (under $10) at garden centers that will tell you what your soil pH is. It’s important to know soil pH along with the needs of specific plants.
Blueberries are a prime example. According to Paul Franklin of Riverview Farms in Plainfield, NH, soil pH is THE determining factor for getting berries. Sunlight? Adequate moisture? Soil texture? Sure, those are all important. But, he told me, if you don’t have the right pH you will get handsome bushes but few berries.
Soil pH numbers are not on a linear scale, but a logarithmic scale. That means that for each number you drop down from neutral (7.0), the acidity is multiplied by 10. And 10 times again for the next number down. So a pH of 5 is about 100 times more acidic than a number near 7. Blueberries, unlike most plants, do best with a pH of 4.5 to 5.5. Except in rare instances, soils in New England are not that acidic, so you need to work on it if you plan to grow blue berries.
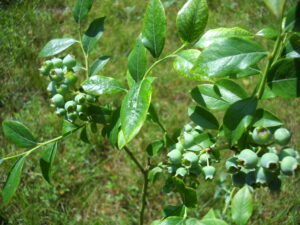
Blueberries support nearly 300 kinds of pollinators
In the fall of 2021 I prepared the soil for six blueberry plants in a sunny, open field. First, the sod was removed in 4-foot diameter circles eight feet apart for the bushes. Then some compost was added to the holes. Finally I added agricultural sulfur – bright yellow sulfur purchased at my local feed and grain store. I could have added a sulfur-containing fertilizer such as Holly-Tone or Pro-Holly. Those both also add some organic material for improving the minerals in the soil.
When adding a soil acidifier, follow the directions on the bag. What I used said that each 100 square feet needs 12 pounds of it to drop the pH one point. But if you want to drop it two points, don’t try to do it all in one year, take two years. A pound of the soil acidifier is 2 cups. A 4-foot circle is roughly 12 square feet, and needs about 3 cups to drop the pH one point.
We planted blueberries in the spring of 2022, and they produced well and grew well. I will check the pH in the bed again this fall, and will add more sulfur if needed. I will test the soil at the edge of the circle, not right near the root ball. The root ball probably arrived with plenty of sulfur already in it.
Most perennials and vegetables do best with a pH of 6.2 to 6.8. If you soil pH is more acidic than that (with a lower number on the pH scale), you can improve it by adding lime to the soil. Lime is ground up limestone and approved for organic gardeners (as is sulfur). For soils with a pH less than 6.0, you can add 5 pounds of lime per 100 square feet. For mildly acidic soils, 2 pounds per 100 is fine. Never add more than 5 pounds per hundred square feet in a single season. Clay soils require more lime than loamy soils.
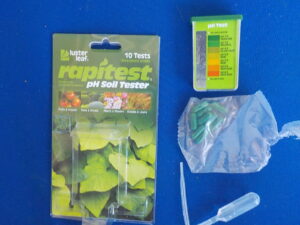
A simple pH test kit costs under $10 and does fine
It is good to have your tested your soil every three years or so. You can Google “soil testing” along with your state. Most states have their own labs for testing through the Extension service, and they provide a standard gardening test for a moderate price that will test for calcium, magnesium, potassium, phosphorus, soil pH, organic matter content, and a lead screening analysis. Both conventional and organic fertilizer recommendations are given. In New Hampshire, that is $20. Nitrogen does not show up in soil test as it changes daily.
The labs offer testing for other things, and I recommend paying extra ($4 in NH) to learn the percentage of organic matter in the soil. That is important to know. Aim for 8% organic matter. If you have less than 4%, you need to add compost and work it into your soil. If you have a good level of organic matter, you probably also have good nitrogen levels.
Although in NH the lab will test to determine the percentage of sand, silt, & clay particles in the soil for $30, I do my own test. My way is simple. I take some soil and wet it. Then I rub it between my thumb and forefinger. If it is a clay-dominated soil, it will be sticky. If it is a sandy soil, you will feel the particles of sand. If it is a good loam, it will feel good, with just a few bit of sand and a tiny bit of stickiness. Not scientific, but good enough for me.
Drainage is important, too. You can test soil drainage by digging a hole 24 inches wide and 8 inches deep. Fill it with water, and see how quickly it drains. If your garden is flat and over shallow bedrock, or if you have clay soil, it might take more than a day. If so, plant things that like moist soil. If you have sandy soil, it might drain in an hour so. If so, plant things that do well in dry soil. Do your test after a week of dry weather.
You can always improve your soil by adding compost and working it in. If starting a new bed, you can work compost in everywhere. In established beds, add compost every time you plant a new perennial. Do not add sand to a clay-based soil – it will turn to concrete when the soil dried out. Add compost.
I’ve been working on my soil for 40 years, and it is dang near perfect. But I still add some compost and organic fertilizer in the hole when I plant a new flower. The results are happy plants.
Reach Henry by email at
henry.homeyer@comcast.net, or by mail at PO Box 364, Cornish Flat, NH 03746. He is the author of 4 gardening books.


 Click Here to buy from Cobrahead