Looking Back on Gardening Projects and Thinking About the Future
Posted on Tuesday, January 3, 2023 · Leave a Comment
It’s gray and chilly outside, but I have a fire in the new woodstove that warms the house and pleases me as I look through its glass window. I’ve been in the same house since 1970, so I’ve had plenty of time to plan and execute projects. I’d like to share with you some of my memories of those efforts in hopes that some of you will be inspired to take on similar projects of your own.
The biggest projects I did were in the 1980’s after returning from my time with the Peace Corps in Africa. My house came with just an acre when I bought it, but I had been able to buy another acre or two while away, and I wanted to utilize it well for gardens. My home was built as a butter factory in 1888 on a hillside. The land dropped off sharply to a field alongside a little stream and some woods.
My first project was to terrace off the hillside behind the house and make a gently sloping access for wheel barrows, people and dogs to the field where I planned to grow vegetables and flowers. I wanted to terrace off part of the hillside so that I could have drier soil for growing fruit trees – fruit trees hate wet feet!
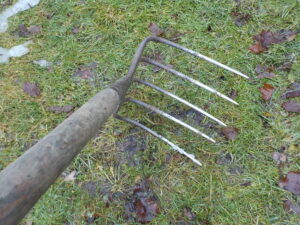
This potato hoe is great for preparing soil for planting
I was 36 years old when I returned from Africa and had plenty of energy but limited cash reserves, so I did almost all the work myself. I found a local fellow who sold me 13 dump truck loads of topsoil. He looked at the site and told me he couldn’t drive to the far end of the potential terrace with soil, so he dumped it all in one place and I had to move it with a wheelbarrow! The area for fruit trees was 10 to 20 feet wide and 80 feet long, but that did not daunt me at all.
After creating a nice flat place for apple trees and a gentle road 10 feet wide built to the lower field, I constructed an 80-foot long stone retaining wall. I had plenty of stones on the property so I went about harvesting them using a borrowed a “stone boat”. It was a wooden sled on runners about 3 feet wide and 6 feet long.
I had a chain attached to the front runners of the stone boat so I could pull it with my riding lawn mower (I’ve never thought I needed a tractor). I rolled or flipped big stones end to end until I got them out of the woods to the stone boat and dragged them away. A neighbor also let me have some large rounded stones from a fallen-down stone wall.
I built the wall before the days of the internet and endless U-tube videos, so I asked friends what to do. Drainage is important they all said: dig out below the site for the wall and put small stones there and behind the wall. Unfortunately, instead of buying crushed stone, I bought pea stone – small round pebbles. Big mistake. Round stones act a bit like ball bearings- allowing stones to move and tumble as the winter frost lifted them. Over the years I have had to repair and re-build the wall many times. But it still pleases me even though it is not a perfect wall.
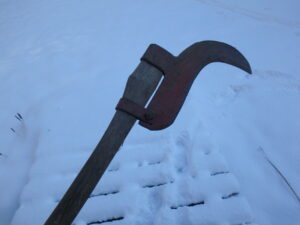
This brush hook is great for clearing out brambles and small trees
The back field had grown up in willows, alders and brambles over the years I was away. I used a brush hook – a simple hand tool with a curved sharp blade to cut them down. Then, with a cheap used riding lawn mower, I mowed the land to keep things from growing back, and I dug out roots where I could.
The next year I had a farmer with a moldboard plow on his tractor come and plow the area I wanted for a large vegetable garden. This type of plow digs up the soil deeply about 8 inches deep and flips it over, burying all the grasses and weeds. That mostly killed them, and allowed me to start growing vegetables.
I also bought several truckloads of aged manure from a farmer and worked it into the soil with an old potato hoe – a 5-tined tool like a rake, but with 2-inch spaces between the 8-inch teeth. Each year for a decade, at least, I worked in a truckload of old manure, increasing soil fertility and improving tilth.
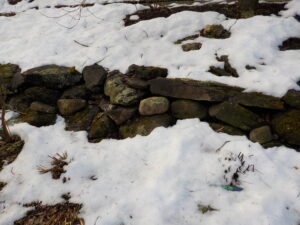
This stone retaining wall has moved some since I built it 30 years ago
I like having stonework, arbors and sculpture in the garden. Over the years I’ve made plenty of bentwood arbors for the entrance to the vegetable garden. Since neither of the “rot-resistant” trees (cedar and locust) grow here, I used maples saplings that were plentiful, but only lasted three or four years. I placed them 4 feet apart and bent the tops together over the walkway, and wired them together. I wired on one-inch branches to make places for decoration and for vines to grab onto.
Later, I decided to use cedar fence posts to make garden structures. Cedar posts are available locally and last for many years. I have one 10-foot diameter hexagon that I built to support grapes and wisteria vines that only now, after more than 20 years, is falling apart. I plan to extract the vines from the structure this summer and re-build the whole thing.
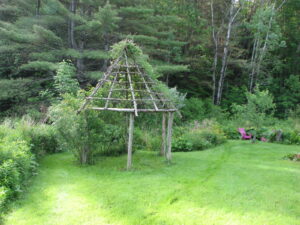
This vine structure is now old and falling down, ready for replacement
Big projects are fun to take on, but at age 76 I am not looking for more of them. I plan to build some more raised beds for vegetables this year – they are great as one need not bend over so far to plant, weed and harvest. I also find that there are fewer weeds and grasses than in-ground beds as many weeds just creep into the beds from adjacent areas. Even an 8-inch tall wood bed will prevent that from happening.
I don’t see myself ever giving up on gardening so long as I can still get around. Yes, I may eliminate some high-maintenance plants and substitute shrubs, perhaps. But I started young, and hope to garden till the day I die. Winter is the time to plan, so think of your own projects now, too, and tell me what they are if you wish. I’m always interested.
E-mail Henry with your own ideas of projects for 2023 at
henry.homeyer@comcast.net or write him at PO Box 364, Cornish Flat, NH 03746.
Is It Time to Plant Yet?
Posted on Sunday, May 17, 2020 · Leave a Comment
Some folks in my part of New England plant seeds in the ground on Mother’s Day and seedlings on Memorial Day weekend. Not me. Others use Mother Nature’s clues: plant spinach when the forsythia blooms, potatoes when the leaves of an oak are the size of a mouse’s ear. That sounds good, but who really knows how big a mouse’s ear is?
I start a lot of seedlings indoors, some as early as February, and (like any good mother) I am protective of my young. I only put out plants or plant seeds when I am sure that they will succeed. So I plant my tomatoes and other heat-loving plants in June, generally after the tenth of the month. Those heat lovers include tomatoes, peppers, eggplants and all the vine crops – cukes, squash, pumpkins. Even broccoli, which is frost-hardy in the fall, does not go in early. It is much more sensitive now to frost.
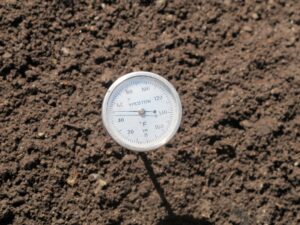
A soil thermometer will tell you if it’s warm enough to plant
What I have found is that soil temperature is very important to success. Yes, you can plant peas or spinach “as soon as the soil can be worked” (as described on the packages), but those seeds won’t germinate and grow if the soil is in the forties. And the seeds can rot. Seeds have triggers that tell them when to grow. That’s why starting seedlings indoors on heat mats speeds things up. The seeds think it is summer when the soil is 72 degrees. Generally the soil must be 60 degrees to get a good quick germination.
So how do you determine the soil temperature? Buy a thermometer designed for it. Generally these thermometers look like a meat thermometer. The probe is 6 inches or so long. Push 3 inches into the soil and wait for a reading. I gather digital ones now exist, too.
What can you do to warm your soil up? If you’re in hurry, rake off winter mulch and expose the soil to the sun. Do that now. Then you can cover the soil with a plastic sheet, either clear or black. I’ve found clear plastic is best. Sun heats the soil directly and the plastic holds in the heat (but be sure to seal the edges of the sheet with soil to keep the heat in). On a sunny afternoon in the sixties, the temperature under the plastic can exceed 100 degrees.
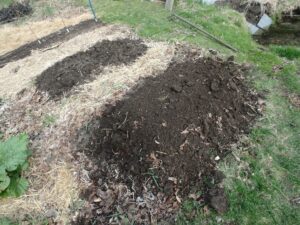
Raised beds warm up quicker than flat beds in spring
Another advantage of warming the soil with plastic for a few days is this: you can cook and kill annual weeds. They are sensitive to high temperatures when they first come up. Dandelions or witch grass, which are perennial, have root systems you know and hate. A few hot days under plastic will only make them giggle.
I’m not keen on rototilling. Yes, it will make your garden look very pretty, not a weed in sight. But for some weeds, each scrap of weed will produce a new plant. Chop up some witch grass and watch it take off! And if you get the top six inches of your garden warmed up, and then rototill, all that cold soil below will cool down the rest.
I like to think of the all the living things in the soil as my friends. Earthworms, beneficial fungi and bacteria, little arthropods? All of these help to break down organic matter and make it available in a form useable by my plants. And I think of the layers of soil as the floors of an apartment building. Some people like the penthouse, others want a ground floor room. When you rototill, you jumble up the order of things and put the penthouse in the basement.

Hoe, garden fork, and potato fork are 3 useful tools for making garden beds
So how do I prepare my garden? I create wide, raised beds using only hand tools. I have a 5-tined potato fork or hoe that has been in my family for 50 years or more. I use it to loosen the soil and shape the beds. But you can use an ordinary garden fork and a hoe to accomplish the same. I pull up soil from the walkways to raise the level of the beds and shape them. I try to disturb the soil as little as possible.
Most of my raised beds are between 24 and 36 inches wide and are 6 to 8 inches above the walkways, which I keep narrow, so as to not waste space. Generally they have no wood sides, though I do use planks to contain the soil in a few. I like a wood-sided raised bed for growing carrots, as they need fluffy soil with no rocks in order to get to be 12 inches long, my goal each year. With wood-sided beds you can build whatever soil you want by mixing in the ingredients.
Before putting your plants in the ground, harden them off. Whether you bought your tomatoes or started them indoors yourself, they can get sunburned or wind-burned if they go outside to a full day’s sun without some preparation. Start with 3 hours of morning sun, then add some afternoon sun. Watch for signs of stress. After 5 to 7 days of protection from too much wind and sun, they will be ready for planting
I like to do some cold season plantings, and have a cold frame to get a few things growing in April. But I also know that my tomatoes planted in mid-June will catch up with any planted on Memorial Day weekend. Each of us has to figure out what works best.


 Click Here to buy from Cobrahead