A Few Thoughts on Planting Trees
Posted on Tuesday, August 9, 2022 · Leave a Comment
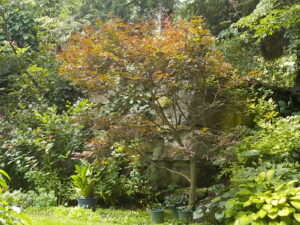
This Japanese red maple was dug up and transplanted from Connecticut to my garden on a hot August day 20 years ago
First, August is not the best time for planting trees. Most experts suggest spring or fall when it is cooler and rain more regular. But let’s face it, I’m a gardener, and if I see a nice tree for sale, especially one in bloom or one I’ve been looking for, I am going to get it – no matter what the experts say. And I bet many of you do the same.
I confess to acquiring four trees in late July. I bought three that I had been looking for, and I got a nice one as a gift. And since I have these new trees, I am not going to keep them in their pots until fall. I will plant them, and water them daily, if needed, through the heat of summer. They will do better in the ground than in a pot where roots can easily dry out on hot days. I have planted a few trees and shrubs in my garden this summer, and all are doing fine.
If you are planning on buying trees, allow me to give you some advice. First, NO IMPULSE BUYING! Learn everything you can about the particular tree you are considering well before you buy it. There are books and web sites by universities or botanic gardens that provide excellent information. I suggest avoiding web sites of companies selling trees. Talk to knowledgeable friends. Ask questions.

Dr. Dirr’s book is my bible for woody plants
Of the tree books on my shelves, I depend most commonly on books written by Michael Dirr. A retired professor, he has been learning about trees and testing trees and talking to growers for more than 50 years. All his books are readable, dependable – and opinionated. His classic is “Manual of Woody Landscape Trees: Their Identification, Culture, Propagation and Uses”.
At nearly 1200 pages, his Manual really does cover every tree I have ever wanted to learn about. It’s not flashy: there are no glossy photos to drool over. Just line drawings of the leaves for most species, and lots of good info. If you want a copy, it lists for $81.80 for the most recent (sixth) paperback edition from Stipes Publishing. Or get your library to order one. Second hand copies are probably available, too.
So start by seeing what the hardiness of a tree is. No point in buying a tree you remember from your time living in North Carolina unless it is hardy in your zone, too, which it might well be. Then look at what he calls culture: soil, pH, and sun/shade requirements.
Read what Dr. Dirr says about size. He generally tells you how big a tree will get in the garden, how fast it grows, and the biggest size known. Let that be a guide. It is so easy to buy a small tree and plant it without really thinking what it will be like in 50 years. I remember a little evergreen growing in front of our house when I was growing up. When we bought the house in 1954, we decorated it with Christmas lights. Then in later years we used a stepladder to put more lights on. By the time I left for college, it was nearly as tall as the 2-story house – and blocking the view from some windows.
So before buying a new tree, try to see what a mature specimen looks like in your town or state. Go to a public park or arboretum (a zoo, of sorts, for trees). Pay attention to the width of the tree, not just the height.
Looking in a forest to see how close trees grow together is not the answer. Trees are wonderful, and many people have done research on how trees communicate with each other (see “The Hidden Life of Trees: What They Feel, How the Communicate”, a NY Times bestseller in 2016 by Peter Wohlleben), but they aren’t very smart (by our standards, at least). And they don’t plan very well. Where a seed lands, it will try to grow – even if it is right next to another tree, or in a shady place where it will not thrive.
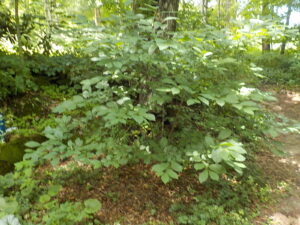
Spicebush is a great native shade shrub
Some years ago I planted a spicebush (Lindera benzoin). This is a native shrub that thrives in the shade, even in dry shade. It has fragrant, spicy leaves, twigs and berries. I used to chew on the twigs when I was a boy in lieu of chewing gum, which was prohibited by my parents. Dr. Dirr says it grows 6 to 12 feet high “with a similar spread”. Mine now is 6 to 8 feet high and an 8 foot spread. My new specimens are in 2-gallon pots, just 24 inches tall. I was about to plant them 3 or 4 feet apart, but stopped myself. If a mature tree is 8-feet wide, it is 4 feet from the center of the tree to the outside. So a pair of them should be about eight feet apart, or at least six.
In the past two years I’ve been working to develop a private arboretum on what was a 5-acre lawn, now a meadow. Last summer we planted about 100 native trees and shrubs of many species, including a dozen oaks of various kinds and sizes. It’s a five year project.
A mature oak can be can be 75 feet tall with a spread of 50 feet or more. But I did not plant them 50 feet apart. I want the roots to interact, sharing nutrients and knowledge. And in a storm, intertwined roots can help prevent trees from toppling over. So I planted most about 30 feet apart. I’ve seen oaks in a meadow like the one I’ve been planting: the branches between trees touched, but did not intrude on their neighbors. On the sides facing the meadow, the branches were longer. Yes, somehow they communicate.
So feel free to wait until the weather is cooler and rain more frequent to plant new trees. But if you must plant now, keep everything well watered!
Henry may be reached at PO Box 364, Cornish Flat, NH 03746 or at
henry.homeyer@cocast.net. He is the author of 4
gardening books.
Have Happy Houseplants in Summer
Posted on Tuesday, August 2, 2022 · Leave a Comment
Just like kids on school vacation, your houseplants may want to go outside to play. And like your kids, don’t put them out in full sun all day without sunscreen. Well…there is no SPF 30 for houseplants, so you will have to make other accommodations.
If you haven’t brought out your houseplants, you may want to consider it now. Plants have widely differing needs for light, and many houseplants are popular because they can sit on a table in the living room without any direct light. These will do best on a covered porch for the summer, not on a sunny deck.
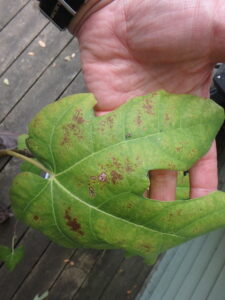
This fig leaf go sunburned and will never recover.
But even plants that thrive outdoors in full sun need to be introduced to the outdoors slowly. I have a potted fig tree that I bring into the house each winter. It drops its leaves and takes a snooze, so I keep it in a cold basement, which it seems to like. I water it once a month during the winter as the low humidity indoors would desiccate its roots if I didn’t give it a little water. Then in March I bring the fig upstairs into a cool, bright room. Soon its buds swell, and it produces leaves.
When all danger of frost is past, I bring our fig outside and put it on the deck we have on the north side of the house that just gets morning sun. After a couple of weeks of morning sun, I bring it down to the lower deck which gets more sun, and it generally rewards me with a few tasty figs before frost. This year I put it into afternoon sun too early, and the leaves showed signs of sunburn. They yellowed, and a few got brown edges. It will recover, but it just reminds me how sensitive leaves are to strong sun. It may punish me with no figs this year.

Growing Figs book cover
If you are interested in growing figs, you should get a copy of Lee Reich’s book, “Growing Figs in Cold Climates”. It covers cultivar selection, over-wintering and pruning techniques, even how to tell when your figs are ripe. It’s in paperback and is fully illustrated with nice photos. Lee lives in upper New York State, and was an Associated Press garden writer until he recently retired. Check out his website and blog at https://www.leereich.com.
My potted banana tree has been outdoors on my north-facing deck for several weeks, and I keep edging it further out into the sun from time to time. It is a tropical plant and can take lots of sun, but once again, I am careful not to shock it by too much sun too early on. Unlike my fig tree, I bought it knowing that the banana is never going to produce fruit. But I love its big, wide leaves and that it brings up memories of my time in Africa as a Peace Corps volunteer.

This banana tree thrives outdoors in summer but does not produce fruit.
If you have your houseplants outdoors, be sure that they are not getting over-watered by Mother Nature. When we got an inch and half of rain I went around to look at my houseplants that are sitting in saucers and drained off excess water. Water in a saucer will get soaked up into a pot by capillary action – or even greedy roots that sneak out through holes in the bottom of a pot. Most houseplants don’t need as much water as garden plants, and continually wet roots tend to rot.
What about insects getting on your houseplants if you let them outdoors? Yes, you probably will get some aphids on them. But other insects like ladybugs will probably keep them in check all summer. You will need to give your plants a brisk shower with the hose at the end of the summer to wash off any remaining aphids and/or their eggs. Or you can spray them with a dilute soap solution that will kill the aphids. Things like “Safer” brand insect killing soap are safe and approved for organic gardeners. It dissolves the fats in their outer shell, and they dehydrate and die.
Scale insects are another pest your houseplants may encounter while enjoying their life outside – though you can get them inside, too. Scale insects are a group of some 8,000 species of insects that suck sap from your plants, and may excrete honeydew that attracts a black mold that you might notice first.
Most scale insects are small, under a quarter of an inch in size, and have a wax mono-shell that covers them as they suck the plant’s juices. The shell can be one of many different colors. But if you see them early on, you can get rid of them easily by wiping them with a cotton ball soaked in rubbing alcohol. I have only gotten them once.
Can you take your houseplants out of their pots and put them in the ground? You bet. But if you do, they will get bigger during the summer, and may not fit into their pots, come fall, or not so easily. But if you don’t mind potting up plants, and want your geraniums, for example, to really thrive, plant a few in the ground. Real soil and sun? It’s what houseplants dream of.
Henry is a lifetime organic
gardener and the author of four
gardening books. He
gardens in Cornish Flat, NH. Reach him by e-mail at
henry.homeyer@comcast.net.
What You Should Be Doing Now in the Vegetable Garden
Posted on Tuesday, July 26, 2022 · Leave a Comment
Heat descended on us recently like opening the door to a roaring woodstove. The old adage about colonial India was, “Only mad dogs and Englishmen go out in the noon day sun.” I think that applies here, too. I, for one, have no desire to work in the garden when temperatures get to be in the eighties or more.
My strategy is to go bed earlier, and get up at 6am – or even earlier if I can. In general I’m not a morning person. I like coffee, the newspaper in my hands, and a leisurely breakfast. But with the heat, I feel a need to see what plants need some water, and what veggies should be picked early in the day.
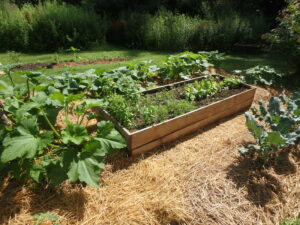
Raised beds need more water than plants in the ground.
The most vulnerable plants are those that have just been transplanted or installed. I recently moved some small Swiss chard plants from a somewhat shady place to a raised bed in full sun. Gravity works on water, not just Newton’s apple. Raised beds tend to drain of water and dry out faster than beds in the ground. The soil is warmer, too. So those Swiss chard seem to need water every day now.
I can reduce my need to water that raised bed by mulching it well. I’ve mulched the rest of my vegetable garden with four to six pages of newspaper, covered with straw or hay. That is primarily for keeping the weeds down, but it also reduces the need for watering. But the raised bed was built later, and I haven’t mulched it yet. Gotta get on it!
I also regularly water a bed of zinnias that were only planted by seed in June. Anytime you plant seeds, you should water daily until they germinate to avoid drying out the seeds at a critical time. And when the plants are small, they need regular watering, too.
We have thinned all our root crops by now, which is important. If you haven’t, you should. Carrots, beets, parsnips, radishes and rutabagas need room to grow – an inch, at least, from their nearest neighbors. You can eat the small vegetables you pull. The leaves of beets are a tasty treat when steamed lightly and served with butter.
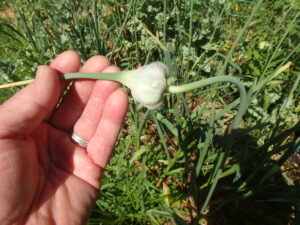
Garlic scapes like this are tasty when chopped and added to a stir fry.
I’m harvesting garlic now, too. Not the entire crop as yet. I just pull one or two for cooking as needed. I’ll pull them all in August when the leaves start to brown up. When I pull the main harvest I leave the tops on and hang them in the cellar upside down to cure. I’ve read that the bulbs will absorb additional nutrients from the leaves and stem while they cure.
Fresh garlic is nearly impossible to peel. I just use a sharp paring knife to make 2 slices into a bulb – one on each side of a clove. When it pops out, I can peel off the outer layers and insert the clove into a press, or smash it with the wide blade of a French kitchen knife and then chop it finely.
I’m often asked if cutting off scapes, those curly tops of garlic, helps to grow bigger, better bulbs of garlic. I’ve been experimenting with that for years, and don’t see a significant difference. So I cut off scapes to use in stir fries, salads or stews, but don’t bother to remove them all.
I picked a few ‘Early Girl’ tomatoes in mid-July this year, which is early, even for them. Although I started almost all my tomatoes by seed in April, I did buy a few bigger plants to get those early tomatoes. Next up will be my ‘Blue Beauty’ tomatoes, which I did start by seed indoors. They are a gorgeous deep purple, with green at the bottom. When the green turns red and they soften up, they will be ready to pick.
For once I have planted lettuce regularly all summer, so I have had enough to eat and to share. And I have lots of small plants to transplant and separate. I recommend that you plant some lettuce seeds directly in the ground now for early fall eating, and in a month, do it again. Mark your calendar! After all, some spaces will be opening up in the garden as you harvest radishes, peas, beets and more. Look for heat resistant or hot weather lettuce varieties like Adriana, Monte Carlo or Red Cross – all available from Johnny’s Seeds. Cool weather lettuce quickly bolt in August heat.
I am picking heads of broccoli now. But the best if yet to come. I once made a little garden in the lawn for an elderly friend, and planted 2 broccoli plants there. Unfortunately, my friend pulled out the broccoli once they had yielded their first big heads. Little did she know that broccoli will send out side shoots, smaller spears of broccoli, for the rest of the summer and fall! Just keep on picking. And if the side shoots start to open with yellow blossoms, pick and eat them anyway. They will still be tasty.
Potatoes will be ready early this year. Start digging them after they flower.
I seem to be having a great year for potatoes (I have not seen a single potato bug), and should have plenty to eat and share. I planted 100 chunks of potato, and each plant should give me one to two pounds of spuds. I will start harvesting a few after they have blossomed. I like to slip my hand under a plant and “steal” a potato or two for dinner before I start the harvest. If you grow potatoes, be sure to let your children or grandkids help you when you harvest them. All kids are excited by the buried treasure!
So beat the heat: get up early and go out to your garden. There is always something to do.
Henry is a lifelong organic
gardener, and a 20 year veteran of the UNH Master
Gardener program. He is the author of 4
gardening books. Reach him at
henry.homeyer@comcast.net.
Plants to Avoid If You Can
Posted on Tuesday, July 19, 2022 · Leave a Comment
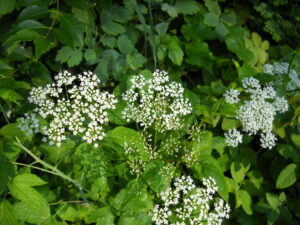
This is the time of year when wild parsnips are in full bloom. They stand anywhere from two to six feet tall, and are topped with clusters of tiny flowers facing upward and arranged in a flat cluster called an umbel. The blossoms are similar to those on Queen Anne’s lace, but yellow.
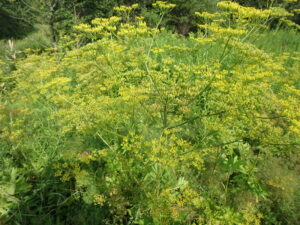
Wild parsnips often grow along the roadside. Many people are easily burned by the sap.
Avoid wild parsnips because you can get terrible burns from the sap of this plant. When the sap on you is hit by bright sunshine, most people develop painful blisters. This is unfortunate, as this common plant is spread by seed, often creating large patches in fields and along roadsides. If you get sap on you, wash it off with soap and water immediately, cover the area, and stay out of direct sunshine for 48 hours.
How can you get rid of wild parsnips? Wild parsnips are biennials – meaning they die after blooming in their second year. I’ve read that mowing a patch of them right after they bloom (but before they produce seeds) will get rid of them, but only if you do this for three to five years. Presumably the repeated mowing is needed to kill plants that come back from seeds that did not germinate in year one.
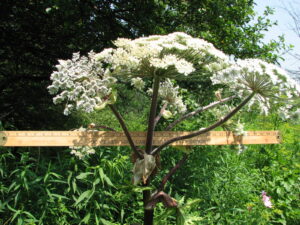
Giant hogweed is an invasive that can burn you with its sap.
Giant hogweed (Heracleum mantegazzianum) is in the same family as parsnips, but is bigger, harder to get rid of, and even more toxic. I saw it for sale some 20 years ago and was intrigued by its size (6 to 12 feet tall) and blossoms that are up to three feet across. I bought it and planted it, having been told that it was not a perennial, though it is.
Even though I didn’t know its sap could cause burns, I quickly decided that giant hogweed was not a plant I wanted – it popped up 50 feet away from where I planted it, and could grow in full sun or full shade, wet soil or dry. I decided it had potential to be a thug.
At first I just cut off the flower heads before they produced seeds, but in year two or three I decided to pull it by the roots, I was lucky that I was able to get out the roots which can go down two feet or more. And even more fortunately, either I did not get sap on me, or I am not allergic to it. It is not widely distributed in New England, though it is a real pest in parts of California and elsewhere.
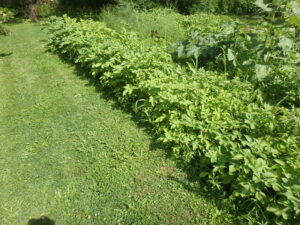
I was less fortunate when it came to getting rid of the Japanese butterbur (Petasites japonicus) I purchased long ago. I was told that yes, it could run, but it was easy to contain with a lawnmower or a stream. Not so. This plant can send roots 20 feet or more, then send up new plants. It is an aggressive plant that will smother almost any other. It likes moisture, and does well in shade as well as sun.
Depending on the variety, this plant can produce clumps of huge leaves that stand up to five feet tall. It has small flowers that erupt from the soil before the leaves. The roots go down deep and break easily, making it tough to remove. In its native Japan, it is considered an edible, but I have no interest in eating it.
I have lost control of our Japanese butterbur. It crossed the stream and gone under the lawn to other beds, and generally become a pest. Even though it is interesting to look at, enough is enough! I wish I had never bought it!
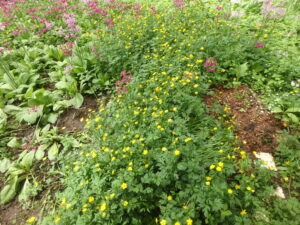
Buttercups are pretty but tough to control
Another pest I have will surprise you, perhaps: buttercups (Ranunculus repens). Like some of the others mentioned above, at first I welcomed this bright harbinger of spring which displays cheerful yellow blossoms. But it has become a problem because it spreads not only by root, but by seed, and once established it is difficult to weed out. And it will choke out other plants. It is glorious in bloom, but very tenacious. If you have moist, rich soil in part shade, watch out. I’d advise removing it early before it starts crowding out other plants. This one is native to Europe, but there are native species that are not a problem, I am told.
Years ago a friend gave me some iris that had the roots of goutweed (Aegopodium podagraria) tangled in with the iris roots. It quickly took over the iris bed, choking out everything else. A native of Asia and parts of Europe, it can form a dense mat that outcompetes everything else. The roots are brittle, and thus hard to remove. Even a scrap of root can start a new plant.
Goutweed will outcompete any other plants and is difficult to eradicate
I dug out all the goutweed, took away the soil down to 12 inches and replaced the soil after putting down a heavy weed mat. Still … 5 years later it crawled out from under the mat. If you have it, accept you will probably always have it, though with persistence and a good weeding tool, it is possible to control. But I wouldn’t buy a house that has it!
A variegated form of goutweed called ‘Snow on the Mountains’ has green and white leaves and was sold as a groundcover in the past. But sometimes it reverts back to the more aggressive all-green form and tries to take over the world. So avoid both forms.
Let’s face it: plants take advantage of us if they can. We like good looking, interesting plants, so they put on a good show. But among the good ones, there are those aggressive thugs that deserve no mercy. All you can do is be attentive, and act quickly when a new plant starts to take over your gardens.
Henry is the author of 4
gardening books, and a lifetime UNH Master
Gardener. Reach him at PO Box 364, Cornish Flat, NH 03746 or by e-mail at
henry.homeyer@comcast.net.
How to Move a Shrub
Posted on Tuesday, July 12, 2022 · Leave a Comment

A tree spade can move good-sized tree, but it is expensive to do so
I remember talking to a gardener some years ago who, when I mentioned that her tall pines were interrupting the view, waved a hand and said, dismissively, “Oh, yes, I’ll have someone move them.” I nearly choked. Moving shrubs is not difficult, but big trees? Though theoretically possible using a big machine called a tree spade, it’s a very expensive proposition.
I have moved several shrubs over the years. I bought a Carolina allspice or sweetshrub (Calycanthus floridus) which, according to the literature, can be planted in full sun or part shade. I planted it in full sun in rich, moist soil. The first year the leaves got sun burned and developed brown edges. Oh well, I thought, perhaps it had been grown in deep shade. If so, it will recover and next year it will be fine. But the next year it burned again.
So that fall I moved my shrub to a shady place which got just a little dappled sunshine. It did not burn, but it didn’t flower much the year or the year after. “Huh”, I thought. “Maybe it needs more sun”. I waited a few more years, and never got many blossoms.
Finally, like Goldilocks of Three Bears fame, I found just the right place. I moved it into dappled shade under a big pear tree. It has flowered magnificently ever since. Which shows, I suppose, the persistence is important in the gardening world. I was tempted to let it just muddle along, but was rewarded for my effort moving it.
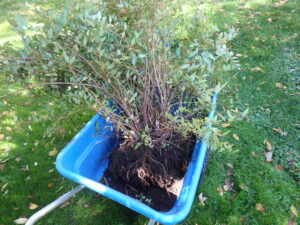
Moving a shrub is hard work but possible
It is much easier to move a shrub in the first year or two of its life in your garden. It takes a few years for roots to grow out and away from the root ball. Early in its life in your garden you will be able to see its original rootball when you dig it out.
When I plant a tree or shrub I generally facilitate root expansion in two ways. First, I dig a wide hole for the root ball – at least three times as wide as the root ball. If the soil is very compacted, I dig an even wider hole. All that digging is intended to leave the soil fluffier, and easier for tiny roots to penetrate.
Secondly, I loosen the roots, tugging them away from the root ball. I pull away any encircling roots. I use my CobraHead weeder to tug on bigger roots that are firmly tangled to get them loose and ready to spread out into the soil. And if I break some smaller roots? I don’t worry. It will stimulate the roots to grow.
The hole should only be as deep as the root ball, not deeper. Your tree should sit on un-excavated soil so that it will not settle in time. If soil or mulch covers the trunk flare, the trunk will rot. It is a slow process, but soil and bark mulch have fungi that will destroy the bark of a tree, slowly killing it – it takes six to ten years.
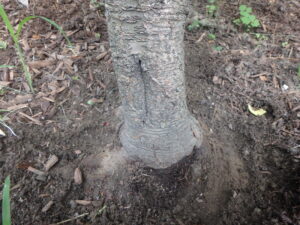
Trunk flare should never be covered with soil or bark
What is the trunk flare? That is the area at the base of the tree that flares out and often sends out above-ground roots that gently descend into the soil. It is most obvious in large trees, but some swelling in small trees should be evident at the base of the tree. That area is often buried with soil when you buy a tree, and you need to expose it.
If the flare is buried after planting, you may notice tip die-back at the top of the tree, and early fall coloring. Both are signs of trouble. Check out trees you have planted – and pull back the mulch or soil that is covering the flare. Do it now, and your tree may recover (depending on how long the flare has been buried).
If you are planting trees this summer, remove the tree from its pot or burlap covering. Expose the trunk flare before you dig the hole so you will know how deep to dig. I put a rake handle or wood stake over the hole to help me measure how deep it is before placing the tree into the hole. It is better to have the hole a little shallow than a little too deep. You can always mound the soil to bring it up to the proper amount of coverage.
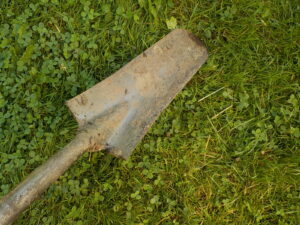
This drain spade is good for transplanting perennials and shrubs
For moving shrubs, the best tool to use is a long narrow shovel called a drain spade. The blade on mine is about 6 inches wide and 15 inches long. I push the blade into the soil in four places around the shrub. Each time the blade goes into the soil on about a 45 degree angle, with the idea of getting under the center of the shrub itself. I push down on the handle, and it lifts the shrub a little. After loosening the shrub I push down hard on the shovel and the shrub is ready to lift out.
The best time to move a shrub is in the afternoon of a drizzly or cloudy day, not on a hot, sunny day. Move the shrub right into a prepared hole at its new home. I generally do not add fertilizer to the new hole as I don’t want to force rapid new growth. Slow-release organic fertilizer is safe to use, but not too much, and a little compost is good, too.
Be sure to press the shrub down firmly in the hole after you have filled in the space around the root ball with soil, and to pack the soil in around it firmly with your hands. Water well at planting time, and at least every other day during hot, sunny times.
Lastly, I recommend looking at where other people have planted shrubs of the same species as yours that are doing better. And if you need to move yours to a better location? Go for it!
The Battle between the Mower and the Grower
Posted on Tuesday, July 5, 2022 · Leave a Comment
In most households, one person is the gardener, and another takes care of the lawn. Or perhaps a hired service or teenager does the mowing and string trimming. But it is common that there is conflict between the two parties. There are ways to minimize the problems if both parties are willing to compromise – and perhaps do a little extra work.
The mower generally wants to get the job done quickly. There are other things to do in summer – other lawns to mow, ponds to swim in, or hammocks to doze in. What can the gardener do to help the mower?
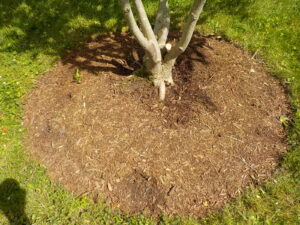
Keep mulch from touching the tree. This ring will keep mowers and trimmers away from the trunk.
First, create a nice mulch ring around trees and shrubs. This will accomplish a couple of things: it will protect the bark of a tree from damage by a string trimmer. And it will hold in moisture and keep down weeds, benefiting the tree. For the mower, it will speed up the process of mowing round the tree and may even obviate the need to use the string trimmer. But never let the mulch touch the tree – it can cause it to rot, eventually killing it.
What else can the gardener do to help the mower? Remove low hanging branches. Apple trees, among others, often have low branches that reach out way beyond the circumference of the mulch ring. And yes, it is nice to be able to pick apples of those low branches, but do you really need them at the three or five-foot level?
Quite frankly, I think trees look better if the lower branches are removed and the bark of the trunk is on display. Many trees have nice looking trunks with interesting bark. I like to see the “legs” of a shrub or tree.
And what can the mower do to help the gardener? Blow the grass away from the flower or vegetable beds. There are few things more annoying than weeding and mulching a flower bed, only to have a person with a mower blow grass and perhaps dandelion seeds into the bed. And yes, I have seen professionals then blow the grass off the bed, but it is so much easier (and quieter) to just point the mower so that it blows the grass away from the beds.
Keep hoses off the lawn where you can
Then there is the issue of hoses. Mowers generally do not want to be bothered disconnecting hoses that cross the lawn. They say that a mower with blades set at three inches should clear the hose, running right over it safely. But sometimes the front wheels of the mower will somehow push the hose up. And then the hose can be damaged.
So what can you do? If you are depending on a hose for regular watering of new trees or perennials, you probably need the hose to cross the lawn so it can be used every day or two. Think about burying the hose. If you are crossing a section of lawn that is heavily traveled, you may wish to dig a six-inch deep trench and slide the hose inside a section of plastic pipe.
To avoid having to re-seed the trench, use an edging tool to slice through the grass and lift strips if sod out carefully and set them aside. Dig a shallow trench and after pushing the hose through the pipe and placing it in the ground, cover the pipe with some good top soil. Then take the sod and fit it back where it was before.
The advantage of the pipe system is that you can pull the hose out of the pipe if it develops a leak, or if you want to put it in the barn for the winter. Quite frankly, I don’t think you need to bother with a pipe – or even burying it completely. Just take your edging tool or a straight-bladed shovel and slice into the lawn. Pull the handle back and forth, creating a “V” in the grass. Push the hose into the “V” and step on it. Push hard enough so that the top of the hose is not sticking up into the grass, but is right on the soil line. As the grass grows, you will not see the hose. I have done this, and left hoses in the ground for years with no ill effects.
People who mow, generally, also like to string trim the edges of beds and around trees. A common mistake is to trim the edges too close to the ground, “scalping” the grass near the flower beds. I have no suggestions on how to avoid this, except to politely ask the mower NOT to trim so darn close. Maybe growl a little.
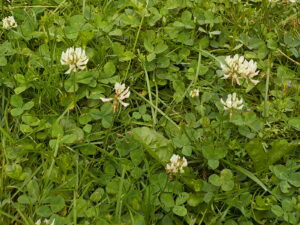
Clover in the lawn is good for bees and pollinators
Then there is the question of how often to mow. People who mow commercially like to have a regular schedule, and as often as possible. But if your spouse or child is the mower, point out to them that you want to let the grass get a little taller before mowing. Explain that the Dutch white clover that only blooms when the lawn is a little long is much loved the bees and pollinators. Get them to think of the lawn as the lunch buffet for bees.
If you set the mower at three or four inches, your lawn will thank you. Yes, I know that the infield of Fenway Park is cut at less than an inch, but your half acre of lawn need not be. Grass plants need to feed their roots so they can grow deep into the soil – where the moisture is in dry times. The longer each blade of grass, the more food it can make by the miracle of photosynthesis.
If you keep your lawn longer, it will compete better with crabgrass and weeds. And you will get used to seeing it longer, and like it – or at least I do. You should not think it is a sign of indolence to have a lawn that doesn’t look like a green buzz cut.
There Is a Free Lunch!
Posted on Tuesday, June 28, 2022 · Leave a Comment
My father, may he rest in peace, always told me that there is no such thing as a free lunch. Wrong, Dad. I grow at least three tasty vegetables that require no work to speak of: I just plant, mulch and harvest. If you are a lackadaisical gardener and like garlic, rhubarb and horseradish, you are in luck.
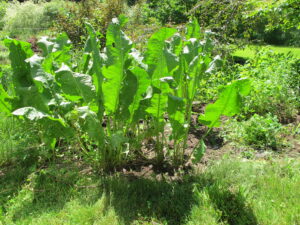
Horseradish is big plant. The roots can be used to make a spicy condiment for sandwiches.
Let’s start with horseradish: It’s in the broccoli family, and once planted, it will never ask anything of you. Yes, it does slowly expand the patch of ground it claims as its own, so you may want to dig some up each year and make horseradish sauce. But if you plant it bordering a lawn on one side and a barn, house or path on the other, it won’t travel far.
The roots of a mature horseradish plant will grow deep, probably all the way to China. So when you dig it, some will always be left in the ground to come back. I have extracted roots longer than 18 inches. The plant is tall, easily three or four feet, and the leaves are wide and a bit coarse looking. Not a particularly pretty plant. And although it produces little white flowers, it doesn’t produce viable seed. You can start it from a scrap of root you get from a friend at harvest time.
The sauce can be very powerful or more mild – depending on how you make it. Wash the roots with a scrub brush, then peel with a potato peeler. Chop into chunks under an inch in size, and put in a food processor or blender. A cup of chunks will make all I need for a year. I blend the chunks with half a cup of water or so. It takes a few minutes of blending to get it to the right consistency as this stuff is fibrous and tough to break down. Don’t overheat your blender, so stop and start.
If you want mild horseradish add a third of a cup of vinegar pretty much right away. If you want it hot (which I do), wait a few minutes after blending, then add it. The mix should be spreadable with butter knife and juicy. Store it in a glass jar, preferably with a plastic lid. Metal lids rust and dissolve from the fumes in less than a year.
The fumes when blending are powerful, so don’t get your eyes and nose by looking into the blender. You may even want to do the job outside on the deck.
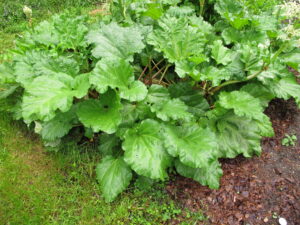
Rhubarb does best in rich, moist soil but will grow most anywhere
Rhubarb is a wonderful vegetable, even if old-fashioned. Like horseradish, it is a forever plant that once planted should provide you with treats for the rest of your life. You can buy a plant or get a friend to divide and share some roots. Some rhubarb has red stems, others green stems. They taste the same, but I like the red color. The leaves contain oxalic acid and are not edible.
Since rhubarb is going to live forever, I recommend adding lots of compost and some slow-release organic fertilizer at planting time. If dividing rhubarb, early spring is the best time to do it, but anytime it all right. It grows best in full sun, but as a leafy green it will thrive in part sun, too.
I like making rhubarb punch as an early-summer refreshing drink. Pick a few stems, and cut into one-inch chunks. Add an equal amount of water, and boil until the rhubarb is falling apart. Sieve through a colander or sieve. The add water – a cup of fruit will easily make a quart of punch, or even two, depending how you like it. Add sugar to taste and serve cold.
Garlic should be planted in October, and it is ready to harvest in July. This year mine started to blossom in late June, sending up curly stalks called scapes that are edible and decorative. I will resist picking any bulbs of garlic until mid-July or later so it can reach maximum size. But don’t wait too long: if you do, the outer layers of leafy material that cover each bulb will start to break down, and it will not store as well.
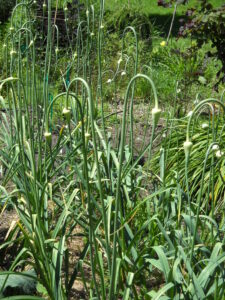
Garlic that is near ready to pull.
Okay, I looked at mine today and did see a few weeds I should pull. But it really is essentially a work-free crop. I plant cloves three inches apart and three inches deep in rich, compost-containing soil. Full sun is best. Once planted, I mulch it heavily – up to a foot of fluffy mulch hay or straw. Over the winter it will pack down to just three or four inches. In the spring the leaves will grow right through the straw, but weeds do not.
Garlic stores well in a cool, dry place. By now, some of last year’s garlic is starting to sprout in the kitchen. I have made garlic powder by drying it in a food dehydrator, then grinding in a coffee or spice grinder, but normally I just store it. I have read that one can freeze it, too, but haven’t done so yet. Don’t store it at room temperature in oil – as a root crop there is always the possibility of getting botulism.
Whatever you plant in the garden will reward you well beyond the work it involves to grow. To get good results do these things: prepare the soil well, and add compost. Provide plenty of sunshine – even if it means planting in the front lawn. Water regularly in hot times, especially early in the season. Pick you veggies when they are small and tender, that’s when they will taste best. And lastly, don’t let the weeds get ahead of you. Never let weeds blossom and distribute their seeds. Mulch is an easy way to keep weeds at bay, particularly if you put down a few sheets of newspaper under the straw or hay.
Henry is a lifetime organic gardener who stores and eats something from his garden every day of the year. He lives in Cornish Flat, NH and is the author of four gardening books.
Early Summer Chores
Posted on Tuesday, June 21, 2022 · Leave a Comment
With the advent of summer, it is time to buckle down and get a few jobs done in the garden. In the vegetable garden it’s time to thin out extra plants that are crowding each other. In addition to carrots and beets, others like rutabagas, kohlrabi and parsnips that are started by seed in the ground may need thinning.
Carrot seeds are tiny, so we don’t often plant them one-by-one. Instead we tend to sprinkle them and –by gum- most of them grow. I maintain that thinning carrots needs to happen by the Fourth of July, so get to work. If they are real close together, you may want to use scissors to cut off the extras at the soil line to avoid pulling up carrots you are trying to save.
I like to be efficient at whatever I do, and that includes keeping a relatively weed-free garden. Many weeds quickly mature, flower, and produce seeds. Your job is to keep them from producing seeds or crowding out your plants.

The first step of mulching as I do it is to put down newspaper
One way to control weeds is to keep them from getting the sunlight they need to grow. You can do this by mulching. I spread out newspapers over the soil and cover them with straw, hay or leaves. Four to six pages of newspaper keeps out light, inhibiting weeds. Three or four inches of straw will keep the papers in place. Earthworms eat the paper over the summer, and newsprint is done with soy-based inks, so you are not adding heavy metals to your soil (which was the case years ago).
This method works well on walkways and around big plants in the vegetable garden, but is more problematical for onions and carrots which are small and closer together. I use grass clippings or chopped leaves, without the newspaper, around small plants.
Mulching in the flower garden is good, too. It keeps down weeds and holds in moisture. But beware: too much mulch can keep rain from reaching the roots of your perennials. An inch or two of ground bark helps a lot, but 3 or 4 inches will keep quick showers from getting water to your plants.
Some gardeners use landscape fabric under bark mulch, but I generally do not. I find pernicious weeds eventually send roots through the woven fabric and this makes weeding very difficult. Landscape fabric can also constrict perennials as they expand over time, choking them.
What about plain old black plastic? I don’t use it. Sunshine breaks it down over time, and makes a mess. It also keeps air and water from getting to the soil, which must affect soil microorganisms. Additionally, the plastic ends up in the waste stream, which I want to avoid.
This is the time to prune lilacs, forsythia and other spring and early summer-blooming trees and shrubs. They set their buds for next spring in the summer, so if you wait until fall to prune, you will reduce the number of blossoms. But don’t take a hedge trimmer and just buzz of a foot or two. Make each cut thoughtfully.
I start by deciding the perfect height and shape for the shrub. I recently reduced the height of some lilacs from 12 feet or more to a more manageable eight feet or so. I cut back each stem to a place where two branches meet. If you cut any branch to a random spot, the branch may not heal well. It heals best where two branches meet. Try to hide your cuts by cutting bigger branches in places where foliage from other branches will obscure your surgery.
You can also cut back tall fall-blooming perennial flowers by a third to delay blooming and create shorter plants. This is best done in mid –May, but it’s not too late. Sometimes I will cut back the outer stems of a big clump and leave the center stems at full length. That gives me a longer bloom time, and the lower stems help support the taller stems.
Be forewarned: not all perennials will bloom if you cut them back. I wouldn’t do it for peonies or iris, for example, but anything like an aster will respond well. Experiment with just a few plants at first. Better yet, read Tracy DiSabato Aust’s book, The Well Tended Perennial Garden: Planting and Pruning Techniques. It has detailed advice for most common garden plants.
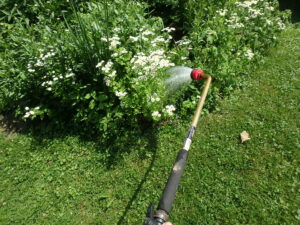
A watering wand directs a soft spray just where you want it
If we have a dry summer, you may need to water. Established perennials should not need added water, but your vegetable garden might. I don’t favor overhead sprinklers because they water everything: plants, walkways and weeds. I prefer a watering wand, which is a device I attach to my hose. It is a 30 inch aluminum wand with a sprinkler head and a valve. I can direct the water exactly where I want it. I like a brand called Dramm because the sprinkler head allows fast, gentle watering.
Watering cans are good, too. They allow you to see just how much water you are applying. This is important for new trees, which need 5 gallons a week or so. A sprinkler might seem like it is delivering a lot of water, but may not be.

A timer will allow you to water when away. 001
A watering timer will deliver water while you are away on vacation. They attach to your spigot and allow you to use an overhead sprinkler or a soaker hose. So don’t let your garden dictate your vacation schedule. With mulch and a watering system you can come back from vacation with nothing worse than a lawn that needs cutting!
Some Native Shrubs to Consider for Your Landscape
Posted on Tuesday, June 14, 2022 · Leave a Comment
Many of the “cast iron” shrubs that no one can kill are now deemed invasive: barberry, burning bush, multiflora rose and bush honeysuckle. And many others, while not invasive, have been overused: lilacs, rhododendrons and spirea, for example are nice but not too exciting. Today I’d like to share some nice native shrubs that support wildlife and add beauty to your landscape. These are arranged here roughly in order of season of interest (for flowers, bark, berries)
Spicebush (Lindera benzoin): I grew up chewing on the twigs and leaves of this small native with a distinctive flavor that I like. It grows in dry shade and has yellow flowers early in the spring, and red berries in the fall. But to get berries you have both males and female plants (and they are not sexed the way winterberries are). The leaves can be used to make a spicy tea. It tolerates some drought, but prefers moist rich soil.
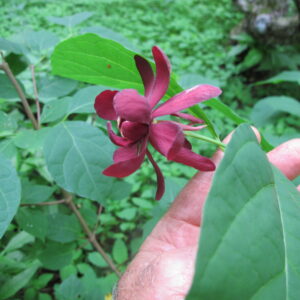
Calycanthus or sweetshrub is a shade-loving shrub I love
Common sweetshrub (Calycanthus floridus): This can be a fussy plant – I have moved mine twice to find just the right amount of sun. I have it growing under a tall, sparse pear tree and right now it is loaded with wine-red blossoms, each a bit like a miniature peony. Allegedly fragrant, mine is not, so buy in bloom and sniff first if fragrance is important to you. Reference books generally say it does best in full sun with moist soil, but mine burned in the sun, even with wet soil. Native to the south, but hardy to Zone 4.
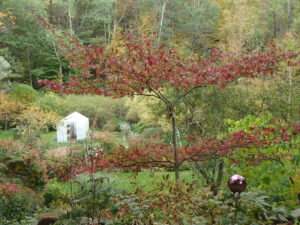
Pagoda dogwood showing fall color and interesting branching patterns
Pagoda dogwood (Cornus alternifolia): This is a native that often plants itself – with the help of birds- in semi-shaded places. It’s structure is fabulous – it often has 2-feet of stem between horizontal branches arranged in tiers. It prefers part shade, but I do have it in full sun growing out of a high rock wall. It grows 15 to 25 feet tall. Birds love the berries (drupes, actually) in August. White, subtle flowers in June. Not often sold in nurseries, but try it if you can find it. Avoid the variegated-leafed variety, it is not nearly as tough a plant and often fails to thrive
Blueberries: So many gardeners avoid blueberries because “the birds will just eat them”. Well, why not plant some for them? They have lovely white blossoms in June, nice fruit for feeding the birds and lovely red foliage in the fall. The trick to success? Test your soil, and then add sulfur or a fertilizer-containing sulfur designed for hollies and such. You need the soil pH to be between 4.5 and 5.5 to get good fruit production. And who knows? You might get a few berries yourself – even without netting. (I avoid netting as birds get tangled in it and die).
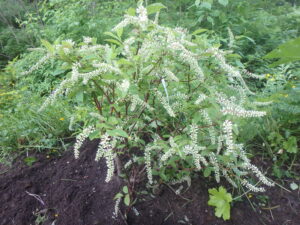
Sweetspire grows alongside my stream and has nice fall color
Virginia sweetspire (Itea virginica): New to me, I just bought one at Spring Ledge Farm in New London, NH when I saw one in bloom. It was gorgeous, and although rated as Zone 5 plant and I’m a little colder than that some years, I had to try it. It has bottlebrush white flowers in June and red fall foliage. Best of all, for me, it does well alongside water or in wet places in full sun to part shade – and I have plenty of that. It stays 3 to 4-feet tall, but can spread by root. Full sun to full shade.
Smooth hydrangea (H. arborescens): Along with oak leafed hydrangea, this is a native that grows wild in the forest as an understory shrub. It is stoloniferous (it spreads by roots) and only gets to be about three feet tall, but can form large clumps. I recently read an article about these on research done that cites a named variety called ‘Haas Halo’ that is said to be the best of all hydrangeas for pollinators. Fortunately, I had already purchased some ones last fall. It is, however, attractive to deer. They got eaten last fall, but came back from the roots vigorously this spring.
Rosebay rhododendron (R. maximum): This is another understory shrub, but can get quite large. I like it because it grows in shade or sun, and blooms (for me) in July. It is native to Appalachia, and large specimens dug in the wild are often sold in the nursery business. It can have either white or pink blossoms. Rhododendron State Park in Fitzwilliam, NH is worth a visit in July – there are 16 acres of rhododendrons and mountain laurel.
Summersweet (Clethra alnifolia): This is an August bloomer, fragrant and handsome. It blooms well in light to moderate shade, and thrives in moist soils (where full sun is tolerated). The bottlebrush flowers are upright and range from white to pink to red. Many selections are sold as named varieties.
Red-twigged dogwood (Cornus sericea): Common in the wet places in the wild and in roadside ditches. Its best attribute is the bright red bark in winter of first or second-year stems. To keep it looking bright, cut back older stems each year. It can grow new stems up to five-feet tall in one year!
Winterberry (Ilex verticillata): Common in nurseries, these bear bright red berries in winter that are great in wreaths – and for hungry birds. In the wild they grow in standing water, but once established they will do fine in most gardens. Buy a male cultivar for every 5 or so females.
So visit your local nursery, talk to someone knowledgeable, and buy some new shrubs. Ask for native shrubs that are good for our birds and pollinators. There are plenty of others not mentioned here that are nice, too!
Henry is the author or four gardening books, and is available as a speaker to libraries and garden clubs. Reach him at
henry.homeyer@comcast.net.
It’s Not Too Late to Start Some Less Common Veggies
Posted on Tuesday, June 7, 2022 · Leave a Comment
It’s not too late to plant some more things in the vegetable garden. It’s only June, and there is still time. Here are some tips for some less commonly planted veggies – for growing and/or using. It’s way too late to start most things from seed, but you can sometimes buy started plants at a good local greenhouses or garden center.
Artichokes: These are big plants, so you need a two-foot wide square in good, rich, moist soil in full sun. You will get one good sized “choke” on the top of the plant, and a few more as side shoots. Grow them because the foliage and chokes are beautiful, even if not much food. They are nice in the flower garden, too.
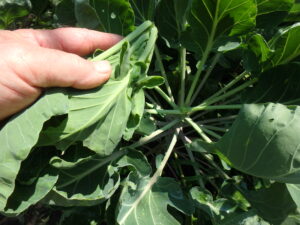
Remove top leaves of Brussels sprouts to get bigger sprouts
Brussels sprouts: I get many emails complaining that the little green globes that we eat never get big. But that’s easy to fix: on Labor Day weekend, go to the garden with a sharp knife. Then, as the Red Queen of Alice and Wonderland said, “Off with their heads!” That’s right, slice off the top four inches or so of the plant and it will plump up the sprouts and stop putting all its energy into getting taller. They are incredibly frost hardy so you can harvest as late as Christmas if you wish.
Cauliflower: These guys are fussy. If they get too cold, too hot, too wet or too dry they will only produce a ”button” of a head. But if you’re lucky, you’ll get a mouth-watering delight. And they come in purple, too! But cooked, the purple turns gray – so use them in a salad where the purple will amaze your guests.
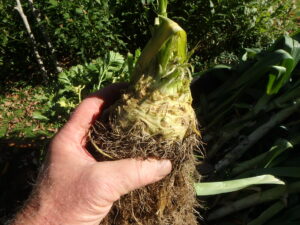
Cut away the fine roots of celeriac to expose the bulbous root used for cooking or salads
Celeriac: These are root crops related to celery, but easier to grow. My home grown celery was always stringy and attracted slugs, so I stopped growing it. But celeriac is easy – if you have soil that stays moist. They need lots of water. I usually start seeds indoors in March but forgot this year, so I just bought some plants in a 4-pack at my local nursery. Harvest late in fall to let them get as big as possible.
Kale is a favorite of the Birkenstock crew, but should be grown by everyone. Why? It’s a green vegetable that is easy to grow and, unlike lettuce or spinach, it freezes well. I blanch it, and freeze it in zipper bags to use in soups, stews and smoothies all winter. Your garden center may still have seedlings, but you could start some by direct seeding in the ground for a fall crop. Each plant needs about 16 inches of space, so if starting from seed, plant several seeds in a group at that spacing, and then thin our all but one after they germinate.
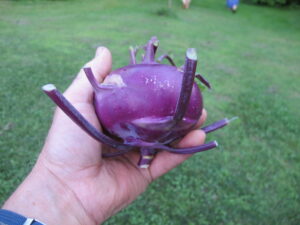
Kohlrabi
Kohlrabi: These are in the cabbage/broccoli family but are an above-ground root (actually an enlarged stem). The leaves pop out of the purple or light green above-ground sphere. Some should be harvested at the size of baseballs, others are still perfect when the size of a duckpin bowling ball. The seed packet will tell you which you have. They taste a bit like broccoli and can be used raw in salads or cooked in a stir fry or soup. Some like ‘Gigante’ will store for 6 months in a cool cellar or fridge. These grow fast, so you can plant seeds now.
Parsnips I usually plant by seed around June 15 because they won’t germinate in cold soil. Seeds only are good for one year, so share the seed packet with your neighbor. Us “older folks” love parsnips. Parsnips grow like carrots, but get bigger. I leave them in the ground all winter, and harvest them the first thing in the spring. I steam them and serve them with butter and (real) maple syrup (of course).
Pole beans: Unlike bush beans, they keep on producing all summer if you keep on picking them. ‘Kentucky Wonder is the classic, but the tastiest I’ve eaten in ‘Kwintus’, which is still good when picked big. Kwintus seeds are hard to find, but I see they are available from Fedco Seeds.

Rutabagas get big and keep well
Rutabagas: Why do people never raise their hand when I ask a group, “Other than me, who has grown these gems? “ I admit, it’s an old fashioned vegetable, one our grandparents grew. But it’s easy to start from seed, it’s tasty and produces a lot food. Use it just like potatoes in a stew. Its advantage is that it won’t crumble and fall apart after re-heating the stew a few times. And potato beetles aren’t a problem. Just thin them to four inches apart and you will get roots bigger than any of your potatoes. Start by seed now.
Swiss chard is actually the same species as beets, but has been selected for big leaves, not big roots. Plant by seed (or plants if you can find them) now. Bedrock Gardens in Lee, NH (one of New England’s quiet gems) used purple-leafed ones in their garden last year (or was that a purple-leafed beet?). ‘Bright Lights’ Swiss chard offers stems in red, purple, yellow, orange and green. Plant them in the flower garden, eat them raw or steamed.
Tomatillos are used in Mexican dishes and can be grown here. But you need two plants to get proper pollination. I didn’t know that and only planted one the first time I tried it. It made fruit capsules, but with nothing inside! Look for plants at your local greenhouse.
Thank you, John Lenat (1888 to 1967), my maternal grandfather. You not only taught me how to make a good compost pile, you taught me the joy of eating fresh vegetables only minutes after picking them. I am eternally grateful.


 Click Here to buy from Cobrahead