This Year’s Lessons from the Garden
Posted on Tuesday, December 27, 2022 · Leave a Comment
At the end of the year I always like to take a little time to reflect on what worked well in the garden – and what didn’t. This year I also called some gardening friends – some experienced, some less so – to ask what they had learned so I could share their thoughts with you, my loyal readers.
I’ll go first. In 2021 I planted some bare root oaks I bought from the State of New Hampshire and planted them for a client in an open meadow in what had previously been a lawn. Most did well last year and really took off this year. Based on that success, I planted even more this year in part because I could get unusual trees not available locally – northern pecan, hardy persimmon, pawpaw and more. We’ll see how they do next year.

Peonies are best divided or transplanted in the fall but can be moved anytime
Bare root trees are usually the thickness of a pencil and have a foot or so of root with 18 to 24 inches of bare trunk. Although I found a grower in Vermont willing to sell them to me, most growers sell them to nurseries that pot them up and sell them in a year or two. But if you go on-line you can find growers who will ship bare root trees and shrubs in the spring. They are easy to ship – no soil is included – and are less expensive than trees that have been tended and watered for a couple of years.
The downside is that bare root trees are generally only sold when dormant, and need to be planted soon after arrival. Some growers keep big coolers full of bare root material, but you still need to get them in the ground soon after you get them. Look for them now and order what you want for spring delivery.
A friend bought a house in southern New Hampshire and had her first vegetable garden this year. She was surprised and delighted that there was no blight on her tomatoes. This did not surprise me at all. The fungus that blights so many tomatoes lives in the soil, and in a new location it rarely shows up until year two.

Raised beds need to sit on soil with good drainage
She also reported that some of her new raised beds were placed on ground so hard that she couldn’t even get a shovel in it. The wood beds were 8 inches tall, but didn’t drain well and none of her root crops did well. In the spring she is going to dig out the soil, remove the beds, and put two inches of coarse sand on the ground. Then she will replace the wood-sided beds and soil, and hope for the best. I predict that will solve the problem, particularly if she adds lots of compost to the soil in the beds.
Some dear friends of mine, now in their eighties, sold their house and downsized their gardens considerably this year. “The concept of growing has been in our hearts all our lives, and we are not going to stop now”, I was told. They have some help in the garden, and utilize raised beds to grow some vegetables. The beds are far enough apart so that someone with a walker can maneuver easily. Although they will no longer grow potatoes or carrots, they will continue growing lettuce, herbs and a few tomatoes. “Gardening is still in our brains,” my friend said.
Another friend was reminded this year that if a perennial is not “happy” where it is planted, move it! She said she had divided some phlox and lacking a good spot for it all, put some in a place that was too shady for it. So she dug it up and moved it to a better place late in the season. Almost anything can be moved, just do it on a cool cloudy or rainy day. Even peonies can be moved if you are careful.
Another friend said that he learned to use hydrogen peroxide as a preventive for fungus on grapes. He bought some industrial strength peroxide (30% concentration) and diluted it (10 parts water to 1 part peroxide). He then filled his big sprayer to apply it. He sprayed after pollination but before the grapes had appeared. Unlike chemical sprays, he says it just breaks down to water and oxygen.
Another friend moved to Vermont from New York and has been working to maintain and personalize the large flower gardens that came with the house. She spoke of the work-life balance. It is important, she said, to recognize how much energy is needed to properly maintain a large garden. She has learned to focus on one area at a time.
She also said she has learned that is important to act on your own ideas, even if you have inherited wonderful gardens. I agree. We each need to personalize our own spaces, and grow plants that we love. For example I learned that I love flowers called burnets (Sanguisorba spp.) and I collect them.

Lilac Squirrel Sanguisorba blossoms are delightful to touch and see
Burnets bloom in mid- to late-summer and come in size from miniature (6-inches tall) to huge (6-feet tall) and do best in sun with moist soil. Each year I add a few. My most recent addition is a S. hakusenensis called ‘Lilac squirrel’. I think of it as “the pink squirrel” as it’ blossoms are fuzzy and much like a squirrel’s tail, though much smaller. Mine are pink, not lilac in color. Not common in most garden centers, it is available from Digging Dog Nursery in California.
Lastly, even very experienced gardeners make mistakes. One friend this year cut the tops of her Brussels sprouts off around Labor Day as is recommended to get large sprouts. But she forgot to harvest them until November. By then the spouts were bigger than golf balls and some had gone by.
So yes, we all learn new techniques, try new plants and do our best to be good gardeners. But I like what my friend said who suggested we not beat ourselves up if we mess up! All my best to you for the year ahead.
Is It Time to Plant Yet?
Posted on Sunday, May 17, 2020 · Leave a Comment
Some folks in my part of New England plant seeds in the ground on Mother’s Day and seedlings on Memorial Day weekend. Not me. Others use Mother Nature’s clues: plant spinach when the forsythia blooms, potatoes when the leaves of an oak are the size of a mouse’s ear. That sounds good, but who really knows how big a mouse’s ear is?
I start a lot of seedlings indoors, some as early as February, and (like any good mother) I am protective of my young. I only put out plants or plant seeds when I am sure that they will succeed. So I plant my tomatoes and other heat-loving plants in June, generally after the tenth of the month. Those heat lovers include tomatoes, peppers, eggplants and all the vine crops – cukes, squash, pumpkins. Even broccoli, which is frost-hardy in the fall, does not go in early. It is much more sensitive now to frost.

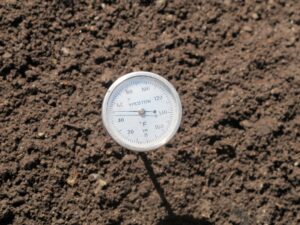
A soil thermometer will tell you if it’s warm enough to plant
What I have found is that soil temperature is very important to success. Yes, you can plant peas or spinach “as soon as the soil can be worked” (as described on the packages), but those seeds won’t germinate and grow if the soil is in the forties. And the seeds can rot. Seeds have triggers that tell them when to grow. That’s why starting seedlings indoors on heat mats speeds things up. The seeds think it is summer when the soil is 72 degrees. Generally the soil must be 60 degrees to get a good quick germination.
So how do you determine the soil temperature? Buy a thermometer designed for it. Generally these thermometers look like a meat thermometer. The probe is 6 inches or so long. Push 3 inches into the soil and wait for a reading. I gather digital ones now exist, too.
What can you do to warm your soil up? If you’re in hurry, rake off winter mulch and expose the soil to the sun. Do that now. Then you can cover the soil with a plastic sheet, either clear or black. I’ve found clear plastic is best. Sun heats the soil directly and the plastic holds in the heat (but be sure to seal the edges of the sheet with soil to keep the heat in). On a sunny afternoon in the sixties, the temperature under the plastic can exceed 100 degrees.

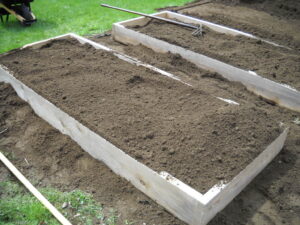
Raised beds warm up quicker than flat beds in spring
Another advantage of warming the soil with plastic for a few days is this: you can cook and kill annual weeds. They are sensitive to high temperatures when they first come up. Dandelions or witch grass, which are perennial, have root systems you know and hate. A few hot days under plastic will only make them giggle.
I’m not keen on rototilling. Yes, it will make your garden look very pretty, not a weed in sight. But for some weeds, each scrap of weed will produce a new plant. Chop up some witch grass and watch it take off! And if you get the top six inches of your garden warmed up, and then rototill, all that cold soil below will cool down the rest.
I like to think of the all the living things in the soil as my friends. Earthworms, beneficial fungi and bacteria, little arthropods? All of these help to break down organic matter and make it available in a form useable by my plants. And I think of the layers of soil as the floors of an apartment building. Some people like the penthouse, others want a ground floor room. When you rototill, you jumble up the order of things and put the penthouse in the basement.

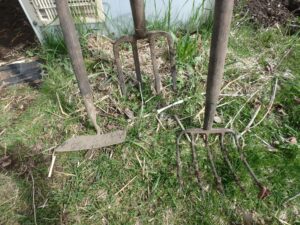
Hoe, garden fork, and potato fork are 3 useful tools for making garden beds
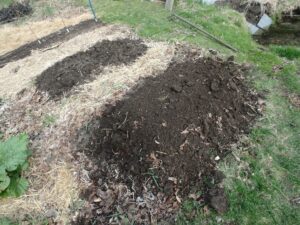
So how do I prepare my garden? I create wide, raised beds using only hand tools. I have a 5-tined potato fork or hoe that has been in my family for 50 years or more. I use it to loosen the soil and shape the beds. But you can use an ordinary garden fork and a hoe to accomplish the same. I pull up soil from the walkways to raise the level of the beds and shape them. I try to disturb the soil as little as possible.
Most of my raised beds are between 24 and 36 inches wide and are 6 to 8 inches above the walkways, which I keep narrow, so as to not waste space. Generally they have no wood sides, though I do use planks to contain the soil in a few. I like a wood-sided raised bed for growing carrots, as they need fluffy soil with no rocks in order to get to be 12 inches long, my goal each year. With wood-sided beds you can build whatever soil you want by mixing in the ingredients.
Before putting your plants in the ground, harden them off. Whether you bought your tomatoes or started them indoors yourself, they can get sunburned or wind-burned if they go outside to a full day’s sun without some preparation. Start with 3 hours of morning sun, then add some afternoon sun. Watch for signs of stress. After 5 to 7 days of protection from too much wind and sun, they will be ready for planting
I like to do some cold season plantings, and have a cold frame to get a few things growing in April. But I also know that my tomatoes planted in mid-June will catch up with any planted on Memorial Day weekend. Each of us has to figure out what works best.


