Chores to Do Before Real Winter Arrives
Posted on Tuesday, December 15, 2020 · Leave a Comment
Our gardens are put to bed for the winter: veggie stalks are pulled and composted, perennials are cut back, weeds pulled, leaves raked. Everything is a snug as a bug in a rug. But I’m not done quite yet – and you might have a few chores to do before deep snow arrives, too.
Young trees, especially young fruit trees, are often targeted by voles in winter. If they chew all the way around a tree, removing bark and the cambium layer beneath it, they will die. This is called girdling and happens most often in winters with deep snow because rodents live beneath the snow and are less likely to be caught by owls or other predators.
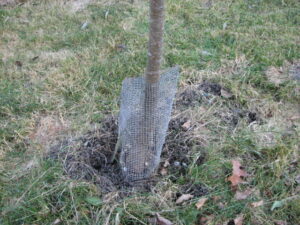
Hardware cloth to protect apple tree from voles
To prevent girdling, you need only surround young trees with a protective shield of “hardware cloth” made with quarter-inch wire mesh. It is sold at hardware stores and comes in rolls of various widths. I use 24-inch wide hardware cloth and cut it with tin snips. It is too tough to cut with scissors. I cut pieces that will go around the trunk and overlap a little, and tie it with wire or string. I squeeze the top after encircling the trunk so that no ambitious mice can drop down from the opening.
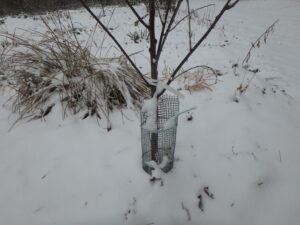
Hardware cloth will keep rodents from chewing the bark and killing this young cherry tree
Another rodent-related task is to protect my riding lawn mower from mice that want to spend the winter inside the air filter. They have done that in the past, causing problems. Now? I just put a few moth balls in a sock, lift the hood, and lay it inside. It keeps away the mice.
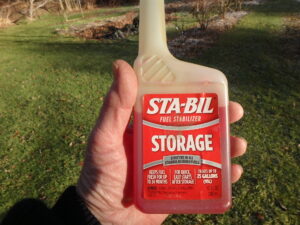
Fuel stabilizer will save headaches in the spring
I have already winterized my mower. This means I added something to prevent the gas from going flat during the months of non-use. I use a product called Sta-Bil. Add it to the gas, then run the engine for 5 minutes. Come spring, my mower starts right up.
I find that it is useful now, in the fall, to go outside with a clipboard and pencil to draw this year’s vegetable garden. Yes, the garden is all cleaned up, but I still remember exactly where everything was. Come spring I might not remember just exactly where the leaks or beans were.
I use wide raised beds for my veggies, and leave them in place from year to year. It is good to pick a new spot each year to plant the regulars – tomatoes, potatoes, squash, etc. I like to rotate plantings so that insects and diseases are less likely to find their favorites. Rotation doesn’t stop diseases or pests, but it makes sense to minimize them by moving crops from year to year. In small gardens, this is almost a futile effort and even in large gardens you will have tomato diseases each year no matter what you do.
I don’t believe in pampering my plants. They have to make it on their own, without too much fussing from me. So I have never been one to build shelters over shrubs to shelter them from cold winds or ice falling off the roof. I don’t plant shrubs beneath the drip line of the house.
This year I got a small cut leaf Japanese red maple and planted it about 10 feet from the drip line of my house. It was a perfect planting spot except for one thing: when the relatively flat roof of the house is shoveled after a foot or more of snow, the ice and snow could land on it – after a 30 foot drop. Yikes. I decided to build a simple shelter for it, as I had spent $125 on the tree and don’t want it broken.
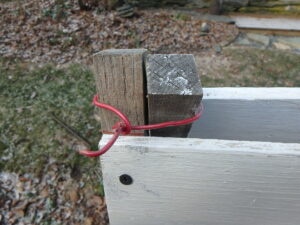
Wire the 2 sides of the A-frame together
Here is what I did: I got four 5-foot long wooden grade stakes and a piece of half-inch plywood. I had a scrap of plywood 60 inches by 40 inches, and cut it in half to create two pieces 30 by 40 inches. I painted the plywood to keep it from delaminating, and then screwed the plywood to the stakes. I left two inches of each stake clear at the top before attaching the plywood, and drilled holes sideways through them.
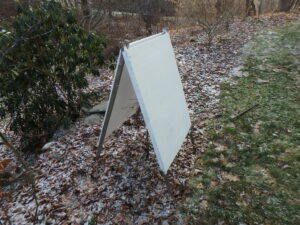
A simple plywood A-frame will protect a shrub from snow and ice coming off the roof
To set up the shelter, I pushed the bottom of the stakes into the soil at an angle, meeting in the middle over the small tree. Then I tied them together with a strand of copper wire going through the holes I had drilled in the stakes. It seems sturdy, and strong enough to deflect any snow pushed off the roof.
I have a number of hand tools with wooden handles that are 50 to 75 years old, tools that my parents and grandfather used and that were passed on to me. I treasure them. To keep them in good condition, I clean and oil those wooded handles in the fall, and recommend you do yours, too.
First, I wipe off any soil from handles and blades. Blades get brushed with a wire brush if needed. Handles get a quick touch up with fine steel wool or sand paper if there are rough spots. Then everything gets wiped down with rag moistened with boiled linseed oil. That oil is available at hardware stores – even in this day of fiberglass handles, which don’t need treatment. The oil on metal parts will minimize rusting. Motor oil would work, but I don’t want it going in the soil next spring.
An old saying goes, “A woman’s work is never done.” That’s true for gardeners of both genders. I’m sure I will find something else to do before deep snow flies that is not on my list. Meanwhile, I can dream of finding time to read good books by the wood stove.
Henry’s book,
Organic Gardening (not just) in the Northeast, has sold out. A second printing is underway, but some orders will not be shipped until after Christmas. You may e-mail Henry to check on the status of your order at
henry.homeyer@comcast.net.
Feeding the Birds – Naturally
Posted on Wednesday, December 9, 2020 · Leave a Comment
By now many of us are providing seeds to the neighborhood birds. Of course the seeds we provide are just a part of the diet of a wild bird. It’s important to grow a diverse selection of native trees, shrubs and perennials to help provide shelter and nesting places for our wild friends, and to provide food all year long. Why native? Native species evolved with the birds and they are genetically programmed to feed on them.
Doug Tallamy, an entomologist living in Pennsylvania, counted the number of butterflies and moth species that, as caterpillars, fed on an oak tree on his property. He counted over 400 species. He also counted species on a non-native shrub, burning bush ( Euonymus alatus), and found only one. The caterpillars of those butterflies and moths are what birds feed their babies each spring and summer, providing protein and fat needed for their development.
If you watch the birds at your bird feeder carefully now you will see that not only are many of the birds eating the seeds you provide, they are also nibbling things on the trees they perch on. In crevices in the bark are dormant insects and their larvae. Chickadees, nuthatches and woodpeckers – three of the most common birds at our feeders – are constantly pecking at bits of food.
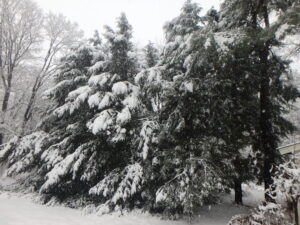
Hemlocks provide shelter for our birds
There is a huge native cherry tree ( Prunus serotina) right by our feeders, a white pine and several Canadian hemlocks along with a couple of mature pear and apple trees nearby. The birds grab a seed at the feeder, zoom off to eat it and rest before returning. But while they are in those trees they almost always find something to tasty to peck at. Planting trees near your house and bird feeders is a good plan if you want to support your birds.
Fruit trees are great for your birds. Apple, pear and especially crabapple trees hold onto some fruit in winter. And while a chickadee might not tear into a dry and wizened apple, bigger birds do. I have seen turkeys feeding in a small weeping crabapple tree that could barely support them. Blue jays, crows, cardinals, grosbeaks and finches and other birds enjoy fruit in winter, too.
So what shrubs have edible fruit that is available to your birds in winter? Right now I see berries on cranberry bush viburnum (Viburnum opulus) and nannyberry (Viburnum lentago). Winterberry (Ilex verticillata), a native deciduous holly, produces myriads of bright red berries visible now in swamps and drainage ditches along the road. It is only eaten by a few birds, so the berries linger on into the winter – and are great for decorating wreaths. Junipers, a low-growing bush on low-fertility fields has berries now, too. Eaten by grouse, pheasants, grosbeaks and others, juniper berries are also used to flavor gin!
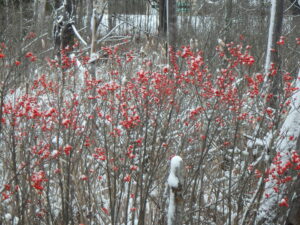
Winterberry grows best in wet places
Alders (Alnus spp.) generally are considered weedy and not planted in the landscape. They grow in wet places as large shrubs or small trees. They are nitrogen-fixing plants, and their seeds are eaten by sparrows and finches, among others. The seeds persist well into December.
Roses that bear fruit are important food sources, too. The invasive climbing wild multiflora roses (Rosa multiflora) are loved by birds, but they drop seeds which grow and take over and smother other shrubs and trees. Beach roses ( Rosa rugosa) produce lots of rose hips, and these are eaten by some birds. And although this species of rose is originally from Asia, it does not seem to take over the landscape the way multiflora roses do.
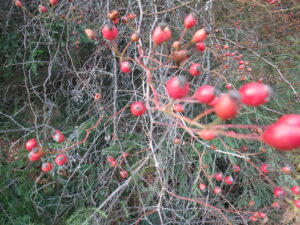
Multi flora rose hips are eaten by birds, but the plants are invasive and should be avoided
Of the big trees useful to birds, white pine (Pinus strobus) and Canadian hemlock (Tsuga canadensis) are two of the most important. Some 40 species of birds eat seeds of the white pine, and at least two dozen eat seeds of Canadian hemlock. Importantly, both are used in winter for shelter. They hold their leaves (needles), providing a break from cold winter winds. Both are used for nesting in the summer.
Any plant that holds onto its berries or seeds into winter is eventually eaten by birds. One of the small trees, staghorn sumac (Rhus hirta) is the least favorite of our birds. The red fruit generally is ignored until spring when returning robins and other migratory birds arrive when food is scarce. The fruit is sour and low in the fats that birds love, but a hungry robin will chow down on sumac if earthworms are not available. Sumacs grow mainly along roadsides in sandy, low-fertility soil. They spread by root and I don’t recommend planting them. But if you have some, leave them be if you can.
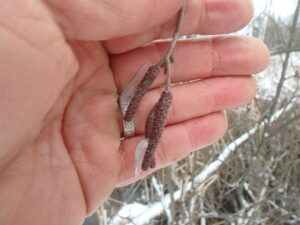
Alder catkins provide seeds now
Mentioned above as food for caterpillars that feed baby birds, oaks are important winter food sources, too. Acorns are a preferred food for turkeys and grouse, but can be cracked by a surprising number of small birds. Others eat the meat of acorns that are broken by cars or people, or clean out shells opened by large birds or mammals. Bears and squirrels love acorns, too.
Gray squirrels have been pirating my bird feeders, so I looked up on-line just how much they eat per day. Only a quarter of a cup of sunflower seeds per day will feed one, so I am letting the two portly, geriatric squirrels eat, and only chase them away if they get too greedy when my little chickadees are waiting.
Henry is offering one of his books, Organic Gardening (not just) in the Northeast, a Hands-On, Month-by-Month Guide as a holiday special for $15 including shipping. To get a signed copy, mail him a check at PO Box 364, Cornish Flat, NH 03746.
Holiday Gifts for the Gardener
Posted on Wednesday, December 2, 2020 · Leave a Comment
I love the holiday season: the lights, the carols, the cookies and more. It’s a good antidote to the news, and to the gray and chilly weather. Last summer many gardening necessities sold out as so many people were quarantined at home and took to gardening. So I recommend getting presents now, before everything is sold out. Here are some ideas for presents to gardeners.
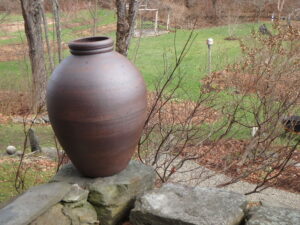
Stephen Proctor pot enhances the garden
Nice pots are good presents, both for growing plants on the deck or just for their sheer beauty. For my birthday this year my wife gave me an urn made by Brattleboro, Vermont potter Stephen Procter. It is 20 inches tall, a foot wide in the middle and tapering to a 6-inch neck. His website,
www.stephenprocter.com, shows mostly huge pots, some 6-feet tall, but he makes smaller things like mine, too. And your garden center will offer a wide variety of nice pots for growing things, too.
We all need hand tools, and sometimes we lose them. So you can always give a weeder to your loved one. The best of these, in my opinion, is the CobraHead weeder with its curved single-tine that is great for teasing out roots of grasses and invasive weeds, or for use at planting time to loosen the soil. Available locally or from CobraHead.com for about $28 including shipping. Made in America.

A 4 way splitter provides for hoses going in different directions
Last summer was dry, so watering devices and accessories were hard to buy locally much of the time. One item that is a bit of luxury, for me, is a 3-way or 4-way splitter for the hose. Look for a good, heavy duty metal one at your local garden center. Why 4-way? One for each hose. No more disconnecting and reconnecting hoses. Price? Around $30. Give a 5 or 6-foot hose to go with it, to attach to the spigot and the splitter. Under $10.
Another watering device is a watering wand. Dramm is the best because their wands deliver a lot of water in a gentle fashion. I like a 30-inch wand with a built in on-off controller. Around $25.
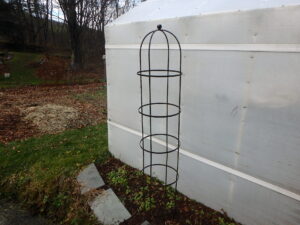
Essex Round Trellis
I like adding height to the garden, and an easy way to do this is with Gardeners Supply’s “Essex Round Trellis”. It comes in 5-foot and 7-foot heights, and I selected the taller one to grow my morning glories next year. Metal, easy to assemble, $60 or $80. It will look good in the garden all winter, too.
Also from Gardener’s Supply I got some metal edging. It comes in a variety of lengths and assembles and installs easily. Sold as 12 to 24-foot kits in a variety of metals and finishes for $43 to $80. These bend nicely, and create a finished look for a flower bed.
Organic-Gardening-book-cover.pdfI love gardening books. I realize that the web has a lot of information, but nothing beats a book in my hands as I settle in on a cold and snowy day.
Norwich, Vermont garden designer Bill Noble came out with a beautifully illustrated book this year, Spirit of Place: The Making of a New England Garden (Timber Press, $35). It is a lovely description of his gardens – and the thought processes that went along with doing this over a long period of time.
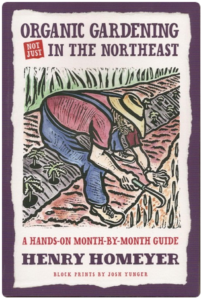
Organic Gardening book cover
I have a few cases of my last book, Organic Gardening (not just) in the Northeast: A Hands-On, Month-by-Month Guide (Bunker Hill Publishing, 2015) collecting dust. It came out at $17.50 in paperback, but I am offering it now at $15 including shipping. It’s a collection of my best articles arranged by month. Send me a check at PO Box 364, Cornish Flat, NH 03746.
Storey Publications (
www.storey.com) is one of my favorite publishers for garden books, not only because their books are practical and well written, but many are in paperback and very affordable. Their
Vegetable Gardener’s Bible by Ed Smith ($24.95 in paper) is a classic, and a must-have even for experienced gardeners.
New to me this year are these, all looking interesting. Best of all is a great book on soil by Dianne Miessler, Grow Your Soil: Harness the Power of the Soil Food Web to Create Your Best Garden Ever. It explains very well how soils work, what soil test results mean, and how to correct deficiencies. You don’t need to be a scientist to read this one. ($16.95 in paper)
The Gardener’s Weed Book and The Gardener’s Bug Book, both by Barbara Pleasant ($14.95 each) are very useful No color illustrations, but the drawings are fine. Written for organic gardeners.
Saving Container Plants by Alice and Brian McGowan is a useful book for all of us in New England that want to winter over tender perennials that we have grown in pots on the deck all summer, but that can’t survive the winter outdoors. A stocking stuffer at $9.95 in paper.
Lastly, give your loved one a pile of … manure. Farmers and garden centers sell hot-composted or aged manure that is great for the garden. It will improve the soil and nurture soil organisms. Three yards is a small dump truck load, or you can go get a load in a pick-up truck.
All my best to you, my readers, in this holiday season. Don’t be naughty, and Santa may bring you what you want.
Steps You Can Take to Ensure Your Trees Survive and Thrive
Posted on Monday, November 23, 2020 · Leave a Comment
I’ll have to admit that I see many fewer volcanoes of mulch snuggling up to trees in public places. I think the word is out, at least with municipal workers, that trees can be damaged or killed by over-exuberant mulching. Among homeowners? I’m not so sure. Let’s take a look at the problem.

Don’t create mulch volcanoes like this. 003
Tree bark is wonderful stuff: no matter the weather, bark protects its tree from rain, snow, cold or drought. But it is only rated for above-ground use. Bury tree bark, or cover it with mulch, and microorganisms will break it down and attack the green layer of cambium beneath the bark.

Tip die back due to damage to trunk flare
So what is this cambium layer? It is an active, growing layer of cells that produce the phloem and xylem tissue that provide for the transportation of necessary liquids and that provide mechanical strength. If the cambium layer is destroyed, the tree will die – but not right away. Most experts say that if the cambium layer is compromised, it can take six to ten years for a tree to decline and die. First signs of the problem include tip dieback – top branches losing leaves – and earlier fall color than previously seen.
When you mulch around a tree, you should leave space between the tree trunk and mulch. Some say, leave a donut hole around the tree. How much? Four to six inches is good, depending on the size of the tree. Bigger tree, bigger space. And even if you have started with a mulch-free space around the tree, don’t assume there is still a space. Go look. Gravity works 24/7, and rain and wind can move mulch a little.
Don’t get me wrong: I am not against mulching around trees. It serves two important functions. It keeps down weeds, and it keeps away exuberant guys (usually) with weed whackers. No mulch? That guy with ear protection and a raging string trimmer can girdle your tree in a heartbeat. And that would be as bad as letting mulch slowly rot the bark.
By pulling away the bark mulch, you can save the tree. I have removed mulch and seen damaged bark. But if the cambium is still functioning, the tree can recover, and I’ve seen that, too.
There is another way that the cambium layer can be compromised: covering the trunk flare with soil at planting time. Burying the portion of the tree that should be above ground will lead to a slow death.
Growing trees is an industry. Americans buy hundreds of thousands every year. They are sold at family-run nurseries and big box stores, but often started in nurseries in the warmer regions of the United States. Trees are often grown in fields, like corn, and then lifted and potted up to be sold to your local nursery.
If you ask how deep to plant your little tree, the most likely answer (from my informal survey of homeowners) is “Plant it just like it is in the pot.” But that is generally bad advice. The process of taking a field grown tree and getting it into a plastic pot is not precise. Time is money, so trees are often plunked in containers with little regard for the depth they were growing in the field. The trunk flare (that part that should be above ground) is often buried.
To recognize the trunk flare of a tree, go outside and look at a tree planted by Mother Nature. You will see at the base of a tree that there are above-ground roots heading away from the tree, and that the base of the tree widens just above ground level. That wider portion is the trunk flare, and must be above ground.
Before planting a tree, take your fingers and pull away the soil from the tree trunk at the surface until you can see the trunk flare. If the tree has been in the pot for a few years (often the case for larger trees) and the flare has been covered, little roots have started to grow out of the trunk flare, and should be cut off.
Larger trees for sale at nurseries have often been moved from their original pots or bags to larger ones. At that juncture, soil is added, and often covers the trunk flare. I have planted trees that came from the nursery with four to six inches of soil over the trunk flare. By removing that, I saved the trees.
What should you do if you planted a tree without regard to trunk flare? Take a look at it carefully. If your tree trunk is as straight as a telephone pole at the soil surface, you need to do some digging. You need to expose the trunk flare.
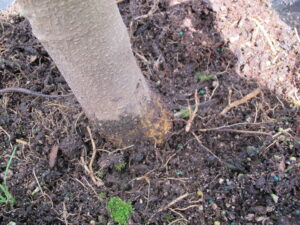
I have removed 2 inches of soil to expose trunk flare, but need to remove more
I like to use a single-tine hand tool called the CobraHead weeder ( www.CobraHead.cm) to expose the trunk flare. I gently and slowly loosen soil and pull it back with my hands. In fact, I use my fingers as much as possible, as I don’t want to damage the bark on the trunk flare. Once you see the flare, re-grade the soil around the tree trunk. It is not as scary a proposition as it sounds. You can do it.
Trees are our friends. It’s not enough to give them a hug from time to time (as I have been known to do, on occasion), you have to be sure they are properly planted and tended. So go outside and look at yours. You may have to do some work on the next warm day.
Dealing with Deer
Posted on Tuesday, November 17, 2020 · Leave a Comment
Winter is near, and, for most of us, so are the deer. They need extra food now, to get ready for winter, and some of what they eat – green leaves and grasses– are not readily available. So they are eating evergreen plants like yew, arborvitae and rhododendrons in our yards. There are steps you can take to help save your shrubs.
What can you do? You’ve probably heard the solution, but might not like it: an eight-foot deer fence around the perimeter of your property. Even then you might get an occasional Olympic deer that can sail over it. But generally deer are kept out by such a fence.
You don’t have to have a steel fence – lightweight plastic fencing will work, too. And you can use poles to support the fencing, straight young tree trunks you cut yourself from the back forty. And you don’t have to fence your entire property. You could put up temporary fencing just for the winter around a tree or shrub that is particularly attractive to deer that has been browsed in the past.
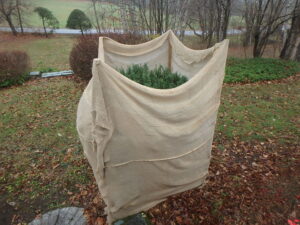
Burlap can be used to keep deer away from tasty shrubs
Recently I helped set up barriers around a pair of large yew shrubs. The shrubs are about 6 feet tall and wide, and in past they have been stripped bare by deer. I got four 8-foot hardwood stakes and drove them into the ground around each shrub– I needed a stepladder and a 3-lb sledge to do it.
The widest burlap we could buy was 44 inches wide, so my wife Cindy sewed 2 strips together to make an extra wide band. We draped the cloth over the stakes, and stapled the cloth to the stakes – all the way to the ground. We did not cover the top of the shrub, just the sides, so snow will fall through and not weight down the cloth. It worked well last year – the poor deer went hungry.
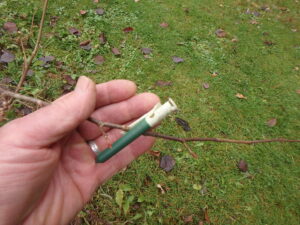
Garlic clips work well for me to deter deer
What else? There are numerous repellents that work to a greater or lesser degree. I’ve had great luck using little garlic clips that I get from Gardener’s Supply Company. Each has a clothespin type clip to attach it to a shrub, and has little cylinder filled with garlic oil. When you poke the device with a tool they provide, it releases the odors for up to 6 months. I use 2 per shrub, or more for bigger things or more attractive deer food.
Coyote urine is sold as a deer repellent, too. It is sold with one-ounce plastic bottles that have holes in the sides, a hanger on top and a cotton ball in the bottom. Dribble a little of their magic potion on the cotton, and hang it in a tree. Of course, you can also just bring your dog around the property and let him mark trees and shrubs. Some people hang bars of Irish Spring soap to discourage deer.
There are numerous sprays, too. Bobbex, Deer Away, Liquid Fence and Plantskydd are some of the most commonly sold varieties. Most use rotten eggs, garlic, or fish oils. You might not want to spray your plants the day of a garden party, but most odors disappear to us after a few days. If deer pressure is high, you might want to alternate which one you use.
Deer are creatures of habit. If they know you have good browse, they will come. If they think you have a pet coyote, they will stay away. No dog? Get dog hair from your local pet groomer. Some people hang sachets containing human hair out in their yard, or hang bars of Irish Spring soap to repel the deer.
There are ways to scare deer away, too, but most take some effort to set up. You could install a motion detector attached to a radio with an all-talk radio format. When the deer arrive, Rush Limbaugh comes on and scares them away, I suppose. I’ve seen motion detectors that attach to a hose, and send out spray when deer are detected. That only works in summer, obviously.
In areas of high deer population, gardeners sometimes choose their plants based on their appeal to deer. People, Places and Plants magazine (Now, sadly, out of business) asked its readers to rate plants eaten by deer. They published the results in Issue #45 (summer, 2004). Here is some of what they said:
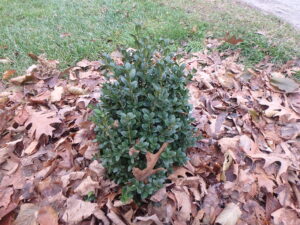
Boxwood are generally not eaten by deer
Seldom eaten shrubs include boxwood, dogwoods, forsythia, and spirea. Occasionally eaten shrubs include blueberry, hydrangeas, lilacs, summersweet clethra, and viburnums.
Trees rarely pruned by deer include birch and ginkgo. Their survey listed occasionally eaten trees as Japanese maple, pear, pine, magnolia, spruce, willow and crabapple. I raised an eyebrow when I saw crabapple, as I frequently see apple trees that have been browsed by deer. Crab apples, I assume would be the same, but please let me know if I’m wrong.
In areas with lots of deer, it makes sense to plant perennials that deer love near the house, and those eschewed by deer farther away. So hostas and tulips, loved by deer, should be right near the house. The survey found flowers usually eaten include lilies, daylilies, hollyhocks, black-eyed Susans, and asters. Scented things like lavender, artemesia and oregano are generally of little interest, and those seldom nibbled include balloon flower, bleeding heart, astillbe, foxgloves, columbine, peonies, Russian sage, yarrow and monkshood.
For a more complete list of deer preferences, you may want to consult a book on the issue. One I like is Outwitting Deer by Bill Adler Jr. But remember, if you have a plant that is dear to you, fence around it – there is almost nothing a hungry deer won’t eat.
Henry is the author of 4
gardening books. He is an organic
gardener and long time UNH Master
Gardener. You may reach him by e-mail at
henry.homeyer@comcast.net.
Giving Thanks
Posted on Tuesday, November 10, 2020 · Leave a Comment
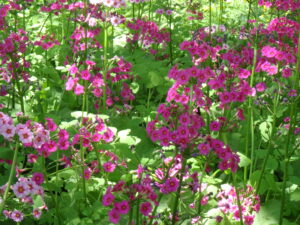
Candelabra primroses delight me each June
I think it’s important to take time to count my blessings. I try to take time each day to reflect on how grateful I am for living the life I do. And on a sunny afternoon near Thanksgiving I like to sit outside and reflect on everything I have to be grateful for. Here are some thoughts about my life, and how gardening helps to make my life full, satisfying – and rich in flowers and vegetables.
I am grateful to have a loving family and wonderful friends. On July 1 of this year Cindy Heath and I got married, after 11 years of partnership. Our family and friends attended via Zoom. Cindy is a wonderful person, an accomplished fiber artist and a terrific gardener. Not only that, she loves to weed! The gardens here in Cornish Flat have never been so well tended. I am so grateful to have her in my life.
I am very pleased to have a newspaper column that has kept me writing and learning for 22 years. On November 11, 1998 my first gardening column appeared in the Valley News of West Lebanon, NH. In that article I reflected then on how important it is to clean up the garden each fall, and to get rid of weeds before their seeds get in the soil.
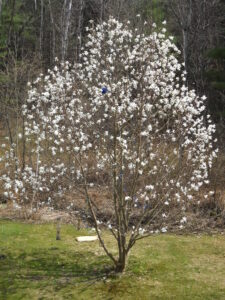
My ‘Merrill magnolia blooms magnificently each April
I also noted that “As insects may have laid their eggs on or in vine crops, tomatoes and potatoes, it is not a good idea to compost these plants.” Diseased or insect-prone plants I recommended for the burn pile or the household trash – or perhaps a pile in a far corner of the property, well away from garden beds. I am happy that our vegetable garden is fully cleaned up and put to bed.
I am grateful for my gardens. My huge ‘Merrill’ magnolia tree that blooms with a thousand white blossoms on my birthday in April. The primrose garden with hundreds of blossoms in the shade of old wild apple trees in June. The peonies that are seemingly everywhere. Milkweed that attracts and nourishes the gorgeous Monarch butterflies. Fall asters, and so many more.
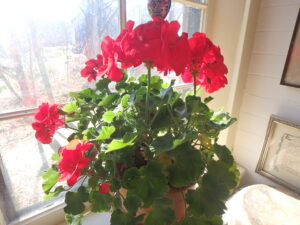
I am grateful for bright red geraniums on my windowsills
Although this may sound silly, I am grateful to have so many potted geraniums in the house. This year we brought in all our geraniums ( Pelargonium spp., not to be confused with perennial geraniums of a different plant family that winters just fine outdoors). They sit on bright windowsills and will bloom off and on all winter, and go outside next summer. Their bright red blossoms give me joy.
I am happy and grateful that I have a small crape myrtle tree in a pot, and have learned how to overwinter it indoors. I bought it in Florida in 2018 and brought it home as carry-on luggage.

My crape myrtle is a source of joy
Last winter I brought it indoors and overwintered it in our cold, dark basement that stays in the 35 to 50 degree range. I didn’t think it would survive, but it did and bloomed magnificently this summer. The fall foliage was a great red, the leaves dropped, and it has now settled in for its winter rest.
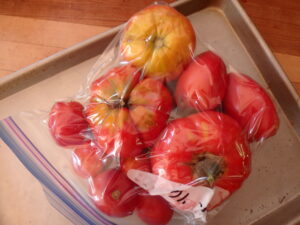
Freezing tomatoes extends the season feeding me even in winter for which I am grateful
I am grateful that we have put up so much food for the coming months. We froze lots of whole tomatoes in zipper bags for use in soups and stews, along with dried cherry tomatoes and some tomato sauce. What else is in the freezer? Lots of leeks, zucchini, kale, Hubbard squash, beets, blueberries and peppers.
I’m happy to have good farm stands nearby. I only had a few peppers this year, so I bought half a bushel from Edgewater Farm in Plainfield, NH at the end of the year. They are great farmers who use the IPM method: Integrated Pest Management. As IPM farmers, they use many of the techniques of organic farmers but reserve the right to use pesticides if a crop is in danger. I prefer to buy organic produce, but trust them to use the least toxic chemicals, and only if necessary. I buy my corn from them and I am always pleased when I get a corn worm: it means that they did not have to spray.
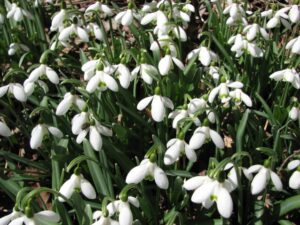
Snowdrops are the first of the bulb flowers to bloom in Spring, and always make me happy when they appear in March
I am happy and grateful that I have been able to plant bulbs each fall for decades. Winters are long here, and the thought of all those little balls of energy waiting in the soil for the onset of spring to come up and share beauty with me makes me happy.
At age 74 I like to point out that I will make it through another winter just because I want to see what else did. I regularly take chances with plants that are not supposed to be hardy in my climatic zone. This year I planted a cut-leaf Japanese red maple, a variety called ’ Tamukeyama’. The cut-leaf varieties are generally less hardy than the standard varieties, of which I have three.
The grower of our Tamukeyama, John Lyon of Newbury, NH (Lyon Family Nursery) told me it is one of the hardiest varieties. We’ll see. I’m happy to have it, and if it does not survive a cold winter, so be it. Although I have never done this before, I will protect it from the wind with a little A-frame shelter made of plywood. I do love the plant.
I am happy and grateful for you, my readers. Each week I get nice e-mails or thoughtful hand-written notes thanking me for sharing my knowledge and sharing personal experiences, and only occasionally disputing my assertions. When my corgi, Daphne, passed away last summer, I was inundated with messages of sympathy. Thank you. Please write to tell me what you are grateful for, where you live, and if I can quote you in a future column.
Lastly, I am grateful that all the newspapers that carry my column are still in business. Subscribe! Buy the paper. Donate to the paper if you get it free. Advertise if you have a business. Local newspapers are the lifeblood of our communities.
Tips for Forcing Spring Bulbs to Bloom Indoors
Posted on Wednesday, November 4, 2020 · Leave a Comment
November is the gloomiest month of all. It’s cold and raw, but usually without enough snow to XC-ski on. It rains nearly every day, or seems like it does. The garden is put to bed, or if I‘ve neglected to do something, it probably won’t happen until spring. But this is a good time to force bulbs for early spring blooming indoors.
To force bulbs means preparing them in such a way as to force them to bloom early indoors, before they would bloom outdoors. Daffodils or crocus, for example, can be made to bloom by mid-February indoors, and tulips in March.
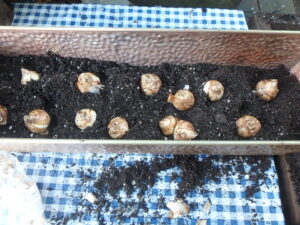
Daffodil bulbs ready to be covered with soil
On a raw day recently I planted 20 “Tete-a-Tete” daffodils in pots. Each of these will produce one or more brilliant yellow blossoms just when I’m sick of winter, and re-new my faith that spring is on the way. Bulbs have everything they need in order to bloom. All we have to do is offer a suitable place to spend the winter. Here is what I did:
First, I selected nice deep pots for planting. In the soil outside, daffodils are planted with six inches of soil over their pointy little noses. But in a pot, three inches is fine. I selected pots that were five or six inches deep, and placed 3 inches of potting soil in each. It’s fine to place the bulbs close together, just a couple of inches apart.
The potting soil I used was already damp, but after the bulbs were covered and ready for their winter sleep, I watered lightly. I will check them from time to time throughout the winter to make sure the soil does not dry out. The bulbs need moisture to develop roots and prepare to bloom. But be moderate: a soil mix that is soggy can rot roots.
I have a cold basement that I keep lightly heated to avoid freezing temperatures – my old house is set on a hill, and the basement is above ground in the back of the house where I keep my bulbs. The ideal temperature for forcing bulbs is around 40 degrees for good root development. You can begin the process by leaving your pots outdoors until real cold weather is upon us. Cover the pots with leaves to minimize temperature fluctuations.
If you have a warm basement, you can try placing pots in an unheated garage or mudroom, or perhaps in the bulkhead if you have one. Everything I have read says to keep the pots in a dark place, though I think that only matters once the bulbs have started to send up leaves or buds. The bulbs can’t know about light while covered with soil. So put the pots in a cardboard box if you have them in a garage with windows.
How long do bulbs need to stay dormant? The little bulbs – crocus, snowdrops and such – only need 8 to 10 weeks, daffodils need 12 weeks, and tulips need 16 weeks. I always place a plant tag in the pot with the date I started the process. And tulips will not bloom if you bring them into the warmth of the house before March.
Beware of mice and squirrels! Most old houses harbor at least a few mice. Once the mice go into my pots and ate all the tulip bulbs! Daffodils are mildly poisonous, so rodents will not bother them, and I’ve never had trouble with mice eating any alliums, which are good for forcing, too. I’ve had mice dig up bulbs, only to find they were daffodils and leave them on top of the pots, those rascals.
One way to know if your bulbs are ready is to look for roots poking out through the drainage holes of the pots. If you have daffodils that you planted 12 weeks ago but have not sent out any roots, they may be ready, but it would be safer to wait another week or two.
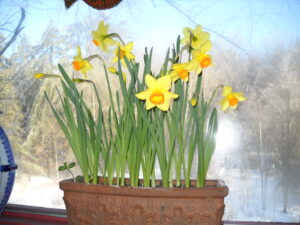
Forced daffodils blooming in early March
Once you bring your bulbs up into the house it will take two to four weeks more for them to bloom. Place the pot on a south or east windowsill and check daily. Water if the soil surface feels dry.
Will the bulbs bloom again next year? Tulips probably will not ever bloom again for you, even if you plant them outdoors in the spring. Daffodils can bloom again, but might take a couple of years to rebuild their energy enough to bloom.
Paperwhites are bulbs that can be forced without soil and an extended dormant cold period. These beauties are in the daffodil family and are sold for forcing in a bowl of gravel and water on a sunny windowsill. Most have a very strong fragrance, though not everyone likes it.
Select a deep bowl without a drainage hole. Place a one-to two-inch layer of gravel or small stones in the bottom, then place your paperwhites on it, shoulder to shoulder. Add water to the bowl until it just kisses the bottom of the bulbs. You don’t want water so deep the bulbs are wet, it is just for the roots that will grow.
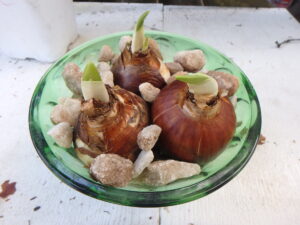
Paperwhites are easy to force in pebbles and water
Next add more stones or gravel up around the bulbs. This will help to keep your flower stems from tipping over. Another way you can do is to keep stems short by giving them some gin! Start them in water, and after a week drain the water, and add a mixture of five parts water to one part gin. That will stunt the growth. Paperwhites started by the third week of November should bloom by Christmas. They will never bloom again, so put them in the compost after blooming.
We all need flowers. Starting some now is a great way to do it economically, so get going!
Henry can be reached by email at
henry.homeyer@comcast.net or at P.O. Box 364, Cornish Flat, NH 03746. He is the author or 4
gardening books.
Vegetables I’m Still Eating Fresh from the Garden
Posted on Tuesday, October 27, 2020 · Leave a Comment
Granted, I have a vegetable garden mainly so I can have fresh, succulent tomatoes from July until some time in October. But I also have grown, I think, all vegetables that will grow in our climate. Right now, in late October, my saved tomatoes are all eaten, but I am enjoying plenty of other fresh veggies, and I am storing others for eating later.
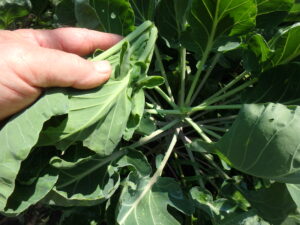
Remove top leaves of Brussels sprouts to get bigger sprouts
For late fall, nothing beats Brussels sprouts. The trick to having good Brussels sprouts is to cut off the top of the plant in early September. I say do it on Labor Day, but even a bit later is fine. If you fail to do that, the plants will use all their energy to grow taller and taller. If you cut off the top 3 inches and it stops growing taller, it sends its energy to bulking up those cute little green “cabbages” that pop out of the stalk. Some years I’ve continued picking until late December, despite snow and cold.
Now I realize that for many people, a serving of Brussels sprouts is as appetizing as dead skunk left on the side of the road for a couple of days before serving. Those are people who probably were served overcooked sprouts in public schools. Mushy, grayish-green sprouts are not appetizing.
If you cook your sprouts “al dente”, you may change your opinion. Steam them until just tender enough to spear with a fork, or cut them in half and sauté in butter or olive oil and walnuts, and you may change your mind. I happen to like steaming them, then sprinkling Marukan brand seasoned gourmet rice wine vinegar over mine – tasty, and without the calories of the butter preferred by many.
Kale gets tastier as the season goes on. A few hard frosts sweetens it up, and if the deer don’t get it after snowfall, I often have it until Christmas. I like it in a breakfast smoothie: in a blender I put 2 leaves of kale with midribs removed, a banana, a cup of orange juice and a cup of water, some fresh ginger (to taste), the juice of half a lime, and some frozen blueberries or raspberries from the garden and stored in the freezer.
Kale can also be used for salad. Our friend Eliza Bergeson makes a great kale salad: she removes the midrib and chops the kale. She then massages it for about 5 minutes with a dressing of olive oil and lemon. She adds honey mustard, salt and pepper. The massaging makes the kale tender, and works in the dressing. She adds feta cheese crumbs, dried cranberries, walnuts and fresh red peppers for color.
My broccoli continues to produce side shoots, despite the frosts. If you keep on cutting them off, they keep on flowering. Some years I grow non-heading broccoli relatives. One is called piricicaba, the other ‘Happy Rich’. Neither produces a big head, but both produce lots of little florets and persist well into the fall. I get seeds from Johnny’s or Fedco and start them in April, as these are not readily available as starts in most garden centers.
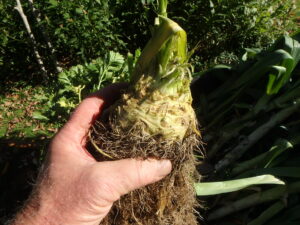
Cut away the fine roots of celeriac to expose the bulbous root to use for cooking and salads
I just harvested a 5-gallon pail of celery root, or as it is often called, celeriac. This is a celery relative that is grown for its roots, not stems. The leaves look and smell the same, but celeriac does not produce edible stalks. I clean and chop celeriac roots and chop them to use in soups and stews. It has a nice celery flavor.
I start celeriac in March by seed indoors. It is a slow grower at first, but once in the ground it takes off if in moist soil and full sunshine. Spacing is important, too. Crowd celeriac and you’ll get little. This summer I spaced them 6 inches apart in 3 rows 8 inches apart in one wide bed, and they did well. I watered in dry times.
I also just harvested a 5-gallon pail of leeks. Leeks are great, in my book, because you can use them in lieu of onions when cooking, and unlike onions, you can freeze them.
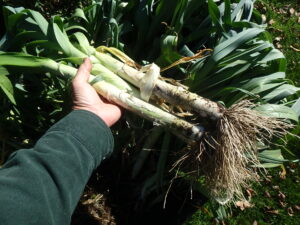
Leeks are easy to grow and a good substitute for onions when cooked
Leek and potato soup is one of my fall favorites. I just made some, and here is what I did. I started by dicing and frying 2 or 3 strips of thick cut bacon in a large cast iron, enameled pot. Of course, vegetarians can substitute butter instead. Then I added some olive oil and 4 cups of potatoes, cut into half-inch cubes. I browned the potatoes a little, then added 4 cups of leeks. Since I am rich in celeriac, I chopped up a whole one and added it to the mix.
Then I added 8 cups of water, and simmered slowly. I added 1½ teaspoons of a dried herb called ‘Herbes de Provence’. That is a mix of various Mediterranean spices (savory, marjoram, rosemary, thyme, oregano and lavender). And I added a couple of tablespoons of vegetarian vegetable broth powder (Seitenbacher brand) to give some added flavor. Then I added a handful of fresh chopped parsley.
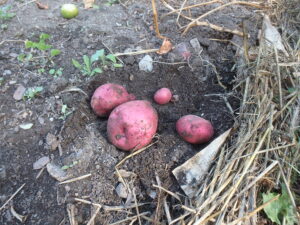
Fenway Red potatoes are productive and tasty especially for Red Sox fans
I cooked the soup until the potatoes were done. I used a red-skinned potato I grew this year, one called ‘Fenway Red’. It is a productive potato, and holds together well in a soup. Just don’t overcook it. I like a milky leek and potato soup, but don’t like to cook the milk, so I just added a quarter cup to each bowl at serving time. Yum!
As with any soup, I vary my leek and potato recipe whenever I make it. Sometimes I add dried cherry tomatoes, or peas. Kale would be good – it goes will with potatoes at my St. Patrick’s Day meal, colcannon. That’s the great thing about fresh vegetables. You can’t go wrong.
So when you plan your garden for next year, be sure to grow some veggies that survive frost and are tasty on a cold fall night.
Henry is the author of 4
gardening books and a longtime UNH Master
Gardener. Reach him at
henry.homeyer@comcast.net or P.O. Box 364, Cornish Flat, NH 03746.
Garlic Needs to Be Planted Now!
Posted on Tuesday, October 20, 2020 · Leave a Comment
When I was growing up, my mom served meat and potatoes nearly every night. Our vegetable was peas or cooked carrots, and once a week or so we had an iceberg lettuce salad with cucumbers, tomatoes and carrots with dressing from a bottle. So I don’t really know how I developed a taste for complex flavors. But I grow – and cook with – a lot of garlic, and find it adds depth and intensity to soups and stews. Now is the time to plant some for next year.
Growing garlic involves less work than anything else I grow. There really are only 3 steps: plant it, mulch it, and harvest it. Once you have an established bed of garlic, it’s also the least expensive crop. I planted this year’s crop from last year’s crop, and that one I planted from the crop of the year before. You really only have to buy garlic once – so long as you plant some extra and save it each year for planting. I choose my best looking, biggest garlic each year for planting.
The hardest part of planting garlic for the first time might be to find garlic sold for planting. You can’t just go to the grocery store to get garlic because much of it has been treated with chemicals to prevent it from sprouting, and most is the wrong kind for New England.
I went on-line to see about buying “seed” garlic. Many major suppliers are already sold out, and prices have sky rocketed since last year. Try your local farmer or farmer’s market – they may still have some.
There are basically just two kinds of garlic: soft neck garlic, which is what you probably get at your grocery store, and the stuff we grow here in the Northeast called hard neck garlic. Most soft neck garlic (the kind that is braided and hung on walls) comes from California and keeps nearly forever. It is less hardy than hard neck garlic, a bit bland, and less interesting to cook with.
Hardneck garlic has a stiff stem in the middle of each bulb. In my opinion it has a much more complex flavor. It will keep in a cool place until spring, but not much longer. Then it either sprouts or dries up. There are many named varieties of hardneck garlic- but all are excellent.
To plant garlic, take a bulb (or head) of garlic and separate it into the cloves that surround the hard “neck” or flower scape. Depending on the variety of garlic, you might have just five cloves, or as many as a dozen. I like big cloves, as they are easier to peel and use. So each year I select for big cloves and plant them. Over the years my crop has produced bigger bulbs and bigger cloves.
Garlic needs full sun (defined as 6 hours of sunshine) and rich soil. In a 30-inch wide raised bed I add a couple of inches of compost, and stir it into the soil, loosening the soil in the top 6 inches. To plant, I draw furrows 8- to 12-inches apart with my CobraHead weeder, a single-tine tool that is curved like a bent finger. Next I push cloves into the soil so that they are 3 or 4 inches apart and about 3 inches deep. Always plant them with the pointy end up. After covering them with soil I pat the soil down with my hands.
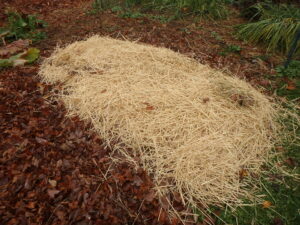
This thick layer of hay helps to prevent weeds in the garlic
The last step is to mulch your garlic. I use mulch hay or straw and put almost a foot of fluffy material over the bed. Fall rains and winter snows will cause the hay to settle – I end up with about 4 to 6 inches of material in the spring.
The mulch keeps the soil from freezing until January, allowing roots to get well established before the garlic cloves go dormant. It also prevents most weeds from germinating and growing next year, though I weed the bed well before planting, which helps, too. Garlic is tough stuff and will push right through my layer of mulch, though most weeds do not.
Depending on the weather and when you plant, your garlic may send up green stalks this fall. Don’t fret if it does. Those sprouts will die back in winter, but the garlic will send up new ones in the spring.
Next July the garlic you planted this year will be ready to harvest. Each bulb grows about 7 long pointy leaves that surround the cloves and protect them. When 3 or 4 leaves have turned brown and started to dry up, it’s time to harvest. If you wait too long, all the leaves will have dried up and the garlic will not store as well – it will dry out too soon.
You can store garlic best in a cool, dry place. Ideally 50 degrees with moderate humidity. You can also freeze garlic instead of storing it at room temperature, I’ve read (but I’ve never tried that). For freezing, separate the cloves, but don’t peel them. You can freeze them in a zipper bag or jar for a year or more. Don’t store garlic at room temperature in oil, as it can produce deadly botulism.
For centuries some cultures have believed that garlic helps ward off colds and the flu. Maybe it will even help to defeat Covid-19. Or maybe good garlic breath will just get that guy behind you in the check-out line with no mask to stand back a little!
Trees, Shrubs and Flowers That Bloom in October
Posted on Tuesday, October 13, 2020 · Leave a Comment
Summer has faded and gone. Autumn’s bright foliage does compensate, somewhat, for the dearth of flowers, but a few of my trees and shrubs (and several perennials) bloom in October, and I treasure them. Let’s take a look.

Heptacodium blossom
Starting in early September, but varying greatly from year to year, my Seven-Son Flower Tree ( Heptacodium miconioides) blooms. This year, in early October, its white flowers were in bloom, despite 4 hard frosts. Some years even one frost will ruin the blossoms, but not this year. The flowers are white, small (half-inch in diameter), and borne in clusters of flowers mostly near the top of the tree.
After the blossoms finish, the tree will often display small, purplish-red fruits (½” drupes) crowned by very showy, rose-pink sepals which elongate after bloom and can last into late fall. But frost usually interrupts that display in colder parts of our region.
The Seven-Sons Flower tree is typically a small one. Most sources refer to it as 15 to 20 feet tall and 8 to 10-feet wide. But it is fast growing, and can produce branches 5 to 8 feet long in a single season once it is well established. It has interesting bark – gray and dusty brown, variegated and exfoliating. In winter the bark stands out well against the snow.
Although this small tree was introduced to the United States from China in 1907, it was not readily available until it was re-introduced in 1980. I’ve had mine for more than 15 years and have not noticed any seedlings or root sprouts. I am always on the lookout for invasive tendencies for newly-introduced species, but this one has given me no reason to worry.

Disanhus flowers are small but interesting
A lesser-known shrub that blooms for me in October is disanthus ( Disanthus cercidifolius). This shrub likes rich moist slightly acidic soil in part- to full-shade. It is a polite shrub – it does not spread out and take over the area, and rarely needs pruning. During the summer is has nice dark green leaves similar to those on a redbud tree. But in fall the leaves turn an intense reddish purple and hold on well into the fall. I think the leaf color is better than that on burning bush, which is an invasive and no longer sold.
The blossoms on disanthus are tiny, and I didn’t even notice them for a couple of years after planting mine as they are right on the branches, and obscured by leaves. But it is fun to have something special to look for now, in autumn – and to show to friends. Mine haven’t appeared yet, but should appear soon.
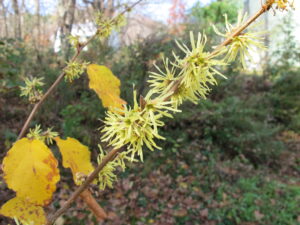
Witchhazel blossoms
Then there is the witchhazel tree ( Hamamelis virginiana). I remember the first time I encountered one. I was hiking in late October, and came upon a native tree covered in yellow blossoms. Although the blossoms were small, it had petals that were curly and bright – and I was not expecting anything to be blooming.
So of course I had to have one. The foliage turns yellow in September, and holds on, obscuring the blossoms a bit. But eventually the leaves drop, exposing the flowers. There are also early spring-blooming varieties as well. ‘Arnold’s promise is a nice one with red and yellow flowers.
Although I have never seen pollinators on the flowers, they are fragrant and brightly colored, so I assume they are trying to attract something. The only source for information I have found on this comes from Bernd Heinrich in a 1987 Scientific American article. He witnessed the night-flying owlet moth feeding on the nectar and pollinating the flowers in November when most other insects are no longer around.
Of the garden flowers blooming now, you must have seen big, bold New England asters and perhaps some of the more shy wild woodland asters. Some of my phlox are still blooming, as are some black-eyed Susans. Of those, a Rudbeckia called ‘Henry Eiler’ is the most dramatic. Over five feet tall, it will bloom all month in a huge clump. I just wish I didn’t have to tie it up to keep it from flopping.
I have an absolutely stunning goldenrod (Soldiago rugosa), a cultivar called “Fireworks”. It is one I purchased several years ago and it is now a nice tight clump 4 feet across and 3 feet tall. The blossoms arch over gently, and point in different directions, creating a stunning display, a little like the finale of a good fireworks display. Unlike wild goldenrod, it does not seem to spread quickly by root or seed.
Also in bloom for me now is Knautia macedonia with deep wine-red flowers reminiscent of Scabiosa or pincushion flower. It has been blooming for months, and is a delight. The stems are thin and tend to bend over a bit when blooming, but the blossoms never seem to fall to the ground. It is not a good cut flower, but earns its place in the garden because if its long bloom time.
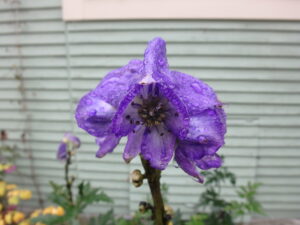
Fall blooming monkshood is a poisonous beauty
Most species of monkshood bloom in June, but I also have one species, Aconitum carmichaelii, which blooms now with intense blue flowers on 5-foot stems that do not flop. All monkshood species have poisonous sap, and some were said to be used to poison wolves in Russia. Agatha Christie probably had someone use it for tea, to get rid of an annoying relative, but I don’t recommend that.
I have always tried to expand the growing season here in my cold Zone 4 garden. I should have a few blossoms into November, and then there will be a hiatus until early March when my first snowdrops bloom. But I can buy flowers for my table in winter, and I do have plenty of houseplants.
Henry is the author of 4
gardening books, a lifetime organic
gardener, and a frequent public speaker on many
gardening topics. You may reach him at
henry.homeyer@comcast.net.


 Click Here to buy from Cobrahead