-

Now available for $24.95 including shipping. -

Now available for $21.00 including postage. Vendors I Like
 Click Here to buy from Cobrahead
Garlic Needs to Be Planted Now!
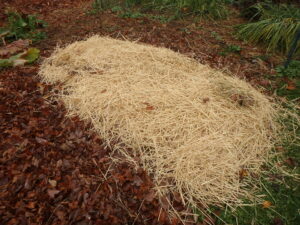
This thick layer of hay helps to prevent weeds in the garlic
The last step is to mulch your garlic. I use mulch hay or straw and put almost a foot of fluffy material over the bed. Fall rains and winter snows will cause the hay to settle – I end up with about 4 to 6 inches of material in the spring.
Now is the Time to Plant Garlic!

Hardneck Garlic ready for planting
Here in New England we should plant hard neck garlic, which has a stiff “scape” or stem that starts in the middle of the bulb, and grows up as the stalk and produces a flower in July. The fresh scapes can be cut and used in sauces or omelets.
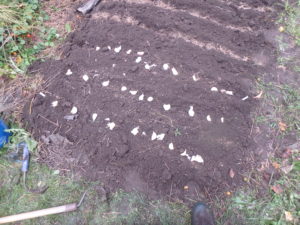
Place your garlic cloves on the soil to establish space before planting
When I plant the second row I stagger the cloves so that they are not lined up with the first row. In the third row I match the cloves with those in the first row. Staggering the bulbs insures a little extra space between bulbs. When all are in the soil I push soil over the cloves and pat the soil down with my hands. If your soil is sandy or a heavy clay, adding some compost before planting is good.
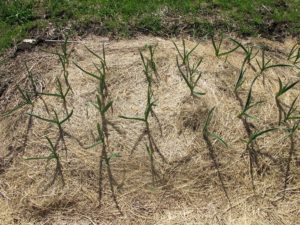
Garlic grows through th mulch, shown here in May
Sometimes garlic will send up a green shoot in the fall. When this happens, gardeners write me, asking if their garlic will suffer if it grows in the fall. Nope. The frost will kill the greenery, but not harm its potential, come spring.
Fire Cider book cover
Rosemary Gladstar and a group of her colleagues and students have put together a lovely book called, “Fire Cider! 101 Zesty Recipes for Health-Boosting Remedies Made with Apple Cider Vinegar” published by Storey Publishing in 2019. Nearly every one of the recipes includes garlic. The book also tells the tale of how a company tried to trademark the name Fire Cider, though recently, I have learned, the upstarts lost in court.
Garlic
Garlic is the least work of any vegetable I grow: I plant it, mulch it, harvest it. Some years I need to weed it once, too. But properly mulched in a weed-free bed, little or no weeding is required. And it’s essentially free: I will plant next year’s crop from this year’s harvest. October is the time to plant.
I’ve been growing my own garlic for decades, and each year I plant the biggest, best looking bulbs. Over time I’ve been able to develop varieties that work best in my climate and my soil.
There are two types of garlic: hard-neck and soft neck. Soft neck garlic is the kind you generally find at the grocery store, and some of it now comes from China, which I try to avoid as I don’t trust their use of chemicals. Most soft-neck garlic is pretty much the same in terms of flavor. It stores well but soft neck garlic is adapted for growing in warmer climates, so I don’t recommend it for New England.
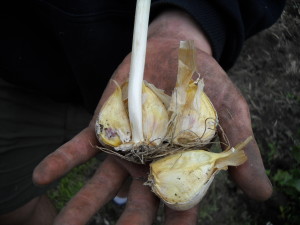
Hardneck garlic ready for planting
Hard-neck garlic is so named because each bulb has a stiff stem that is surrounded by the cloves. There are several distinct types (purple striped, Porcelain, and Rocambole, among others) and each has its own distinct flavor. Just as not all tomatoes taste the same, not all garlic is the same.
Plant garlic by separating the cloves of a head or bulb of garlic and planting it in rich soil well amended with compost and a little organic fertilizer. Cloves should be planted about 2 inches deep, pointy end up. Space them 3-4 inches apart in rows that are 8 to 12 inches apart. Grocery store garlic has probably been treated to prevent sprouting, so do not plant it.
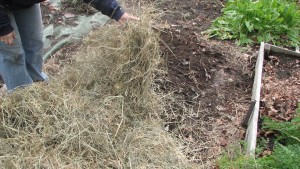
Garlic mulching
Here is the key to success: mulch your garlic bed well with straw or mulch hay when you plant. A 6- to 12-inch layer of well fluffed mulch hay accomplishes two things. First, it insulates the ground as the cloves of garlic get their roots started. The soil is warm now and the roots will grow until the soil freezes. You want as much root growth now as possible, and the mulch will hold in the heat. Second, the mulch will keep weeds down next summer. Garlic doesn’t compete well with weeds, so keeping it mulched keeps it happy.

Garlic in May
Your fall-planted garlic will establish its roots and may even send up shoots before snow flies, but don’t worry about that. Come spring it will send up new leaves. Garlic will push up through your layer of mulch, but weeds generally won’t.
The garlic scapes, or stems with flowers, will shoot up in mid-summer, twisting and turning in sculptural forms. Some gardeners believe that cutting the scapes will increase bulb size, though I have never noticed that it makes any difference. The scapes make wonderful components in flower arrangements, and are tasty in a stir fry.
Some herbalists say that you should smash or crush your garlic and then let the garlic rest for 10 minutes before putting it in the frying pan. They say that doing so allows garlic to release chemicals that help to prevent cancer. Who knows? For years now I have prepared it, set it aside, and let it rest before using. It can’t hurt to do so.
Michael Phillips, a garlic and apple grower in Groveton, NH taught me that garlic needs to cure before you cut off the tops. Harvest it, and then let it hang in a cool dry location for a couple of weeks before you cut off the tops. He said the bulbs will reabsorb some of the nutrients in the stalk while it cures. I store my garlic on a wooden orchard rack I got from Gardeners Supply (www.gardeners.com) in a cool, dry location.
If you have excess garlic, here is a simple recipe that I love.
Roast Garlic with Goat Cheese on Toast
Peel several cloves of garlic – 4 or 5 for each dinner guest – and place in a small ceramic oven-proof baking dish. Drizzle with olive oil and sprinkle with Herbes de Provence. Bake at 400 degrees for half an hour or until the garlic turns golden brown, soft, and slightly translucent. Toast slices of a baguette and spread with the now-soft garlic. Then spread Feta or any soft cheese on top. You’ll see that the sharpness of the garlic has disappeared. Yum!
Looking to buy some seed garlic? Try your local farm stand or farmers market. If none is available locally, you can get some organic garlic from High Mowing Seeds (www.highmowingseeds.com). They have several good varieties.
Garlic may not really keep away vampires, but it’s so tasty and so easy to grow you should try it. Once you do, you’ll grow it forever – and probably live longer for doing so.
Read Henry’s blogs at https://dailyuv.com/
Garlic
If you’ve harvested everything but the kale and Brussels sprouts in the garden, pulled the weeds and shaped your raised beds in anticipation of spring, you may think that you’re all done. But unless you‘ve planted at least a little garlic, you are not. If you love Italian or French food as I do, you simply must plant some garlic. It’s the simplest, easiest crop I grow.
First, unless you have saved garlic from your harvest in July, you need to buy garlic. Do not just buy garlic at the grocery store. Much garlic sold is “soft neck” garlic grown either in California or (shudder) China. It is not as hardy as the “hard neck” garlic we grow here in New England. I’ve read that garlic at the supermarket has been chemically treated to prevent sprouting, too. I, personally, will not eat anything imported from China as their regulations about the use of chemicals are much less stringent than ours.

Hardneck Garlic
There are two basic types of garlic. The hard neck garlic I grow has a stiff stem in the middle, around which the cloves of garlic grow. It is plenty hardy in our climate, going through the winter unscathed. Soft neck is the type that is braided and hung in restaurants and kitchens. It last longer, but is not as hardy in the winter, and is less pungent than hard neck. I think hard neck garlic tastes better.
Go to your local farm stand to buy locally grown garlic, preferably organic garlic. Tell them that you are buying it to plant, and ask if they have more than one variety. Try 2 or 3 varieties, and label the garlic as you plant it. Each bulb has from 4-8 cloves, so buy enough to meet your needs in the kitchen – if stored properly it should last all year. One clove a day does not seem like much – but it would be 50 bulbs or more, depending on the number of cloves per bulb. I plant a hundred or more each year, as I also save garlic for planting the following year.
If you can’t get garlic at the farm stand, try your garden center. As a last resort, go to a seed company or search on-line. I like to buy locally, not only to support our farmers, but also because the garlic is best adapted to our local climate.
Mid October is the proper time for planting. It will grow roots and get established before the ground freezes. Some years it will also send up green shoots that will die back when winter comes, but that’s not a problem.

Planting Garlic
Here is what to do. First, inspect your garlic and reject any damaged or discolored cloves. Crack open a bulb and pay attention to the shape of the cloves. The rooting end is flatter, the growing tip is more pointy. You should plant the pointy end up, though planting it upside down wouldn’t kill it – just wastes energy.
Prepare the bed by working in 4 inches or more of compost if you have it. Garlic grows best in rich, dark, well-drained soil that also holds moisture. If you have sandy soil it will dry quickly in summer, so adding compost or chopped leaves will help to hold moisture. Garlic should not be grown in soggy, wet soil either. Clay soils hold water; if you have clay, amend it with compost and shape up the soil into raised beds for better drainage.
Next I take my favorite hand tool, the CobraHead weeder, and mark straight lines in the soil with its single finger-like steel tip, creating furrows. I sprinkle some Pro-Gro organic fertilizer into the furrows, and then run the CobraHead through it again, loosening soil to a depth of 4 to 6 inches and mixing in the fertilizer. In general, I plant 3 rows down a raised bed that is 30 inches wide.
Then the fun part: planting. Just push the cloves of garlic into the soft soil. The pointy tip should be a couple of inches deep. I plant cloves about a hands-width (5 inches) apart. I don’t cover the cloves until I have finished a row, so I can see my spacing as I go along. Then I gently cover the row and firm the soil in place by patting it gently.
The last part of the planting is to cover the soil with a thick layer of straw or mulch hay. I put on 6 inches or more, and the winter snows pack it down so that it becomes a 2-3 inch layer. Garlic sprouts will push right through the hay in spring, but most weeds will not germinate and compete. Garlic, like most plants, does best without weeds.
So that’s all you have to do. In June the garlic scapes, or flower stems, will be tall and curly. Great for use in stir fries. I also use them in flower arrangements as they are very interesting to look at, swooping around in curves and loops. Then in late July or early August I harvest the garlic. Store it in a cool dry place. I just wish growing tomatoes was as easy as growing garlic. Sigh. But that would be too easy!
Henry’s new book is in bookstores! Wobar and the Quest for the Magic Calumet is a fantasy-adventure for children 8-12 about a boy and a cougar. For more, go to www.Gardening-Guy.com.