Dealing with Pests and Diseases
Posted on Tuesday, June 16, 2020 · Leave a Comment
My gardening grandfather came over from Germany around 1910. He was an organic gardener, perhaps because there were few chemicals sold to kill bugs and diseases back then. He gardened the old fashioned way: hen manure for fertilizer, hand picking to keep potato beetles under control, and a good compost pile to nurture the soil.
When Organic Farming and Gardening Magazine started up in the 1940’s, Grampy was an early subscriber – and a believer in organic gardening. He grew great vegetables and prize-winning flowers. I grew up spending time on his small farm every summer, and helping in the garden. I’ve always believed in organic gardening: gardening without chemicals.
That said, I understand why many gardeners use chemicals: something is threatening their roses or their broccoli. Flea beetles are making holes in their cabbage. And what about chemicals to make the tomatoes grow faster and bigger? I get the urge, too. But there are alternatives.

Row cover with hoops helps to keep insects off and keep plants warm
First, I want to explain that chemical fertilizers are generally salts of nitrogen, phosphorus and potassium. They are water soluble and can be taken up fast by plants, pushing fast growth. But fast growth is not always good: stems are often weaker, and excess nitrogen in plants attracts insect pests. Bugs need it to form proteins needed to grow and have babies. Not only that, a few days of heavy rain can dissolve your fertilizer and wash it away.
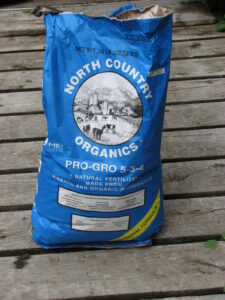
But if you are used to using bagged fertilizers, you can use bagged organic fertilizers. They are made from things like seaweed and ground oyster shells, cottonseed meal or ground peanut shells. They are broken down by microorganisms in the soil and made available over a much longer period of time. Unlike chemical fertilizers, they can’t burn root hairs if too much is applied.
Then there is compost. Compost improves soil qualities as well as adding needed minerals to the soil. It makes heavy soils fluffier, and it makes sandy soils better able to hold water. Make your own, or buy it bags or by the truckload. You can use it as mulch, and let the earthworms carry it down into the soil.
What about bugs? First, please understand that not all bugs are bad. There are many beneficial insects, bugs that eat the bad boys. I have few insect pests, but never spray anything to kill bugs. If you spray your roses to kill the Japanese beetles, you may be killing beneficial parasitic wasp larvae that are on the roses but unseen.
My first line of defense is always to hand-pick problem bugs. I get to recognize them, and then pick them and drop them in soapy water. If you don’t like handling Japanese beetles, get a gallon milk jug and cut away part of the top, leaving the handle. Add soapy water and hold the jug under the leaf and tap it until the culprit falls in. Or you can just crush them with your fingers, as many gardeners do. They are easy to catch early in the morning, before they have had their coffee (or perhaps warm up in the sun).
Gardening practices can help, too. For example, I plant my potatoes in June, long after most books say to. I find that I get fewer potato beetles that way. And once the leaves are up, I check for beetles often. I look under the leaves for orange egg masses, and scrape them into a jar of soapy water. I drown the larvae and beetles if I see them.
I have read that the life cycle of a Colorado potato beetle from egg to adult is 35 to 40 days. Plant in early April, and each potato beetle can start another generation 4 or 5 times or so before harvest. Break the cycle early to keep numbers down, as each momma beetle lays many eggs.
I have had trouble with a beetle eating my cucumbers and squash plants, defoliating them when they are small. The beetles are fast and hard to catch. So what do I do?

Row cover with hoops helps to keep insects off and keep plants warm
I drape a light-weight gauzy film of agricultural fabric over plants to keep bugs from physically getting to my plants. This cloth allows sun and rain to pass through, but not bugs. It’s called row cover or by trade names like Reemay and Agribon. There are other brand names, too.
Sometimes I use wire hoops to keep the row cover off the plants, other times I just lay it over them. I pin the cloth down with earth staples to keep it from blowing off. Since vine crops are insect pollinated, I need to take it off once the plants start to bloom.
Row cover is not perfect: striped cucumber beetles live in the soil, and sometimes will appear under the row cover, but mostly it prevents them from getting to the plants. To be on the safe side, I start cukes and squash inside the house 3 weeks or more before planting time (or buy a 6-pack of starts). That gives me good-sized plants that can survive some beetle munching.
As an organic gardener I accept that sometimes bugs or diseases win. But my garden always feeds me, and I love working in it.
You can e-mail questions to Henry at
henry.homeyer@comcast.net. But be patient! Henry is outdoors most of the time at this season.
How to Prepare for a Garden Party
Posted on Tuesday, June 9, 2020 · Leave a Comment
In these times, garden parties are few and far between. But if you practice social distancing (tea at ten feet) and wear masks as needed, you can still share your garden with others. And despite all the hoopla about how people are gardening more, we all still have weeds. But don’t let that daunt you. Here are some tips for making the garden look great, weeds and all – and sharing it with others.
Lyme, New Hampshire has an informal group of gardeners that associate in a “not-quite-a-garden-club”. No dues, no meetings – except a mid-winter potluck. Someone manages a list serve with good info, links to articles, questions, offers of free plants, and more.
Each summer members take turns hosting a weekly “Pardon-My-Garden” event. All members are invited to pop by a garden, tour around, share libations and snacks, pull weeds, offer suggestions. These are wonderful. But this year some are hesitant to attend, or to host. Here are a few ways brave souls have reduced risks:
1) Instead of having a garden open for 2 hours in the evening, some are saying, “come anytime between 1pm and 7pm”. That makes the population density at any time lower.
2) Attendees are invited to bring their own glasses, if they want to enjoy a drink. Or hosts serve drinks in single-serving cans or bottles. At one event, box wine was served – no need to touch a cork or bottle. For snacks, there were little zipper bags full of nuts, presumably prepared wearing gloves and a mask.
3) Everyone is very respectful of interpersonal space. Hard not to hug friends after weeks of isolation, but we all just have to wave.
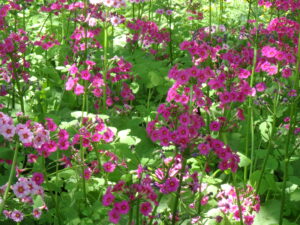
Moist rich shady soil is good for Primula japonica
June is the best time in my garden. I have a primrose garden in the shade of old apple trees with many hundreds of candelabra or Japanese primroses ( Primula japonica) in full bloom. So I want to share this with friends, and recently invited 2 other couples to join Cindy and me for a tour and a chat.
So how did I get the garden ready? First, I mowed the lawn the day before the event. I also have a nice battery-powered string trimmer that I used to tidy up those corners and edges the mower doesn’t get. A nice lawn sets a good first impression.
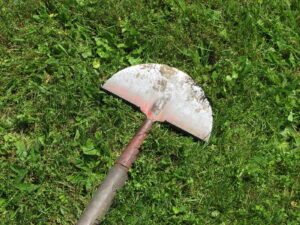
An edging tool helps cut nice edges, but a shovel will work
My partner, Cindy, loves cutting sharp edges around flower beds. She uses an edging tool that looks like a half moon on a long handle to shape nice curves to beds. She also uses a tool that you could make: 30 feet of strong masons twine wrapped around 2 nice wooden pegs with points. She pushes a peg into the ground, unwinds some string, and pulls the string tight from the other end. She then pops the second peg into the ground. That gives her a perfectly straight edge if she needs one. Great in the vegetable garden.
Next, I look for tall weeds, things that tower over our tidy flowers. Got a clump of tall timothy grass that came, via seed, from last year’s mulch hay? Dig it out. And any weed that is blooming should be pulled before it goes to seed and creates more work later on. Don’t worry about weeds in beds with nothing blooming – no one will pay attention.
Look for empty spaces. After getting the most obvious weeds, there will be spaces. You can cover these with mulch, if you wish. Or you can divide a large clump of perennials and put a few in the space. Of course, you can also go to the garden center and spend your Covid-19 relief check on new plants, too. Annuals are easy fillers – and many bloom all summer.
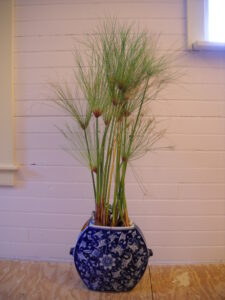
This Papyrus will spice up a garden if moved outdoors
Plants in pots are good fillers, too. I have a large blue and white Chinese vase with papyrus growing in it. It has been wintering over in the house for several years, and is a big, handsome plant. I am not above moving it from the deck to the garden to fill in somewhere, or to add interest to a place with no blossoms.
So far, most things aren’t tall enough to flop, but peonies are about to bloom for me, and a hard rain will knock many of them to the ground unless they are surrounded by peony cages or tied up with stakes. Best to support them now, before they flop. The same goes for delphinium, those lovely tall flowers that are famous for flopping and breaking in a hard rain. Like weeding, staking takes time and patience, but makes for a much better experience, over all.
Lastly, clean up the front of beds. Weed, and if you like mulch, add some. I mulched the first 4 feet of my huge primrose garden, and a friend thought I’d done the whole thing!
Some feel that gardening is a solitary venture. Not me. Yes, working alone, or with Cindy, is fun. But sharing the garden with others is even better. And when I do invite people over, I generally have some “spare” plants potted up to send home with my guests. And the great thing is, I know when I visit their gardens, I will go home with something I love.
Henry lives and gardens in Cornish Flat, NH. Write him at PO Box 364, Cornish Flat, NH 037476. Please include a SASE if you wish a response by mail. Better yet, e-mail Henry at
henry.homeyer@comcast.net. He is the author of 4 gardening books.
How to Have a Better Lawn in Summer
Posted on Tuesday, June 2, 2020 · Leave a Comment
Let’s face it: most of us do not have a lawn that looks like the grass on a major league infield. And I for one, don’t want one that does. Most professional ball fields are doctored weekly with chemicals: fungicides, herbicides, fertilizers, insecticides. They are cut very short, and look “perfect”. Yes, I want a lawn that is green, but also full of diversity – clover, different kinds of grass, and (I can see some of you shuddering) even a few dandelions.
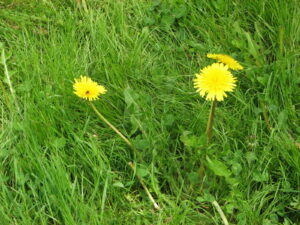
Dandelions and clover in the lawn are not bad
The turf grass industry decided long ago that clover is a weed. Why is that? Because the herbicides they promote to control weeds like dandelions and plantain also kill clover – but not grasses. But clover is not a weed. It is a nitrogen-fixing legume that actually adds nitrogen to the soil. It is a friend to your lawn – and your children, who delight in finding good luck with a rare 4-leafed clover. Add Weed-n-Feed and the clover is gone.
So what can you do to have a better lawn when the heat of summer arrives? I talked to Paul Sachs, of North Country Organics, an organic fertilizer company in Bradford, Vermont. Paul has written books about lawn care and soil biology, and really is a very knowledgeable lawn guy. He mentioned several things you can do, first among them: adjust your mower blades up high.
Paul Sachs explained that cutting the lawn at 3 to 4-inches will help to shade the crown of the grass and keep it cooler, which is good. Hot weather stresses most grasses. Taller grass will also develop a deeper root system because the longer blades will produce more food to nurture the roots.
I don’t recommend that you bag the clippings when you mow the lawn. If you are tending your lawn organically (avoiding all chemicals), the clippings will break down, creating a thin layer of compost. Earthworms will turn that organic matter into the soil, too, like little rototillers. The chopped grass will serve to shade the soil a little, helping to reduce heat stress.
The only time I collect the grass clippings is when we get a week or more of hot, rainy weather and I can’t or don’t mow. When there are big lumps of grass, it can smother the grass and turn it yellow, eventually killing it. Fresh grass clippings, added to a compost pile, will add lots of nitrogen and heat up the compost quickly, and helping it to break down the carbon-based brown matter.
If you have bare spots in the lawn, now is the time to plant some grass seed. Do that as soon as you can, as the hot weather ahead will make it harder for new lawn to establish itself. You want to get new grass established before annual crabgrass takes over. The best choice for that is a perennial rye grass, according to Paul Sachs. It germinates quickly – in 5-to7-days.
Start by loosening the soil in the bare spots with a short-tine garden rake. Scratch it back and forth to loosen the soil, and to remove any rocks. Scatter a layer of seed, then use a lawn rake to work it into the loose soil. I turn the lawn rake upside down, so I can drag the back of the tines across the seed. This will cover most of the seed.

Cover seeded areas with straw and water often scaled
You can help your new planting by shaking out some straw over the area, providing a thin layer to shade the soil. It is important that the seed not dry out once it has begun to grow. So if the weather is hot and dry, check the soil every day, and water as needed.
Paul Sachs told me that if you have an irrigation system for your lawn, you can help your lawn by giving it a tenth of an inch of water every day at the heat of the day. That light watering evaporates, cooling the soil and your grass. It’s similar to what we do when we sweat to cool down. Then once a week, he said, give your lawn an inch of water for a deep watering – if we have not gotten that moisture from the sky.
Another way you can help your lawn to grow better and avoid heat stress is to add mycorrhizal fungi to your soil. These fungi work with plant roots in a symbiotic relationship – one in which both organisms benefit. According to Paul Sachs, these are best added at planting time when preparing the soil.
The mycorrhizal fungi coat plant roots and benefit from sugars produced and exuded by the roots. In turn the mycorrhizal fungi breakdown soil minerals and provide needed nutrients to the green plants in a form they can use. Not only grasses benefit from mycorrhizal fungi, most green plants do. Learn more at
https://mycorrhizae.com/. A number of commercial products are available to provide these beneficial organisms, and many are present without treatment.
One last thought: if we could purchase daffodils that would grow in the lawn and re-bloom after mowing, we would pay big bucks for them, right? Especially if they would send out seeds and show up even where we have not planted them. But call them dandelions, and some people declare war. Me? I love those bright harbingers of spring and summer and don’t mind them in my lawn. A diverse lawn is a healthy lawn. I like to say, if it’s green and I can mow it, it’s a lawn!
Henry is now offering workshops on-line using Zoom to garden clubs and library groups. Contact him at
henry.homeyer@comcast.net. He is the author of 4 gardening books.
How to Divide Flowers to Get More Plants – for Free!
Posted on Tuesday, May 26, 2020 · Leave a Comment
I spend a lot in plant nurseries. At $10 or more a pop, it is easy to spend a hundred dollars quick as a blink. But I’m also a firm believer in dividing my perennials so that I don’t have to spend so much. Once you have established a good plant palette, you can increase numbers by dividing plants. Don’t be afraid to give it a try.
You need to learn a little about each plant in order to know if the roots can easily be separated, allowing you to divide plants. And although horticulturists may tell you that the time of year is important, in my experience you can divide most things anytime. Peonies are supposed to be moved or divided only in the fall after they have gone dormant, but I once moved 50 peonies for a client in June and they thrived.
One way to learn about propagation is by using a good text. My bible is Manual of Herbaceous Ornamental Plants by Steven M. Stills (Stipes Press, paperback, 814 pages). Although the publisher sells new copies at $58.80, used copies are readily available for a fraction of the price.
The book tells when to divide (spring or fall) and whether plants spread easily by seed. It also gives cultural tips about where and how to plant each flower. Most common and many unusual plants are included, one or two pages on each. There are drawings for each, with a few color photos in the back.
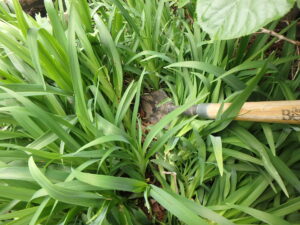
Don’t be afraid to cut through leaves or roots when dividing a big patch of daylilies
Another way to learn about dividing plants is to just do it. Dig up a plant and examine the roots. I use a drain spade to do this. A drain spade is a pointed shovel with a long, narrow blade (commonly 6 inches wide and 16 inches long). I plunge it into the soil and pry back a little. Then I repeat the procedure on all sides. When the plant is loose, I lift it out.
Some plants have long, deep roots. Others, such as peonies, have roots that look like tubers. Most have lots of string-like roots going in all directions. If the bed you are working in is full of weeds, it is important to distinguish between grass or weed roots and those of your plant. Observe the color and texture of the plant roots and remove any roots that are different. Daylily roots, for example are very distinctive in both color and shape.
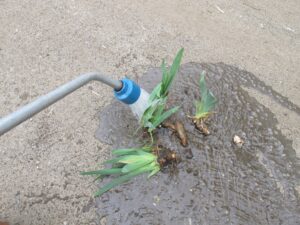
Barerooting with a hose will ensure you have no weed roots
When dividing a plant, you may wish to actually bare-root it. Do this by shaking off any soil attached, or washing the root system with a hose to remove the soil. Weed or grass roots will be obvious when you do that. I normally do that for any gifted plants because I want to avoid getting any invasive weeds that might come with it. I learned that lesson the hard way, having accepted some nice iris plants that had goutweed roots embedded that then have plagued me for 30 years.
If all the roots are attached to a single stem, you cannot divide the plant. But most plants are not like that. You can usually tease the roots apart, taking sections of the clump apart. Each chunk will give you a nice plant.
Hostas are common shade plants with lovely foliage. They do produce white flowers in mid-summer, but most people grow them for the foliage. Big clumps commonly are created as the plant expands, roots sending up new plants. Dig up a big clump, and you might get a dozen plants – or more.
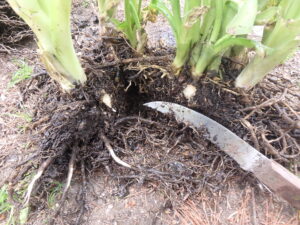
Dividing hostas roots with a serrated knife is easy
I was dividing some hostas recently, and found some clumps hard to pull apart. So I used a curved, serrated knife to cut through some roots, allowing me to separate them. If you don’t have a garden knife, buy a steak knife at a yard sale or junk shop – on sneak one out of the kitchen – and it will work just fine.
And then I wanted to move some common orange daylilies. These send out long roots, which then send up new plants, so one plant can become many just in the time it takes to get a bottle of orange pop from the kitchen. Or a year to two.
With the daylilies, I used a shovel to cut through the roots between plants to get them into clumps of a manageable size. Don’t worry about damaging roots or leaves, these puppies are indestructible. Just dig up, cut apart and move.
For spring blooming plants, digging now may hinder flowering this year. For fall blooming plants, that is less of a problem. Some plants benefit by digging, dividing and fertilizing. Steven Stills’ book mentions how often to do that: for purple cone flower, for example, it is every 4 years. For Shasta daisies, every other spring is best. And so on.
Always choose a cool, cloudy day for dividing plants. Even a drizzly day. Plants can go into shock if divided at noon on a hot day. I like to do it in the evening when rain is in the forecast.
The great thing about digging up a big perennial is not only that you have more plants: your friends will, too. I often put a blurb in my town list serve offering free plants. I’ve made some very nice friends that way!
Henry is now teaching Zoom classes to gardening clubs and libraries. Contact him at
henry.homeyer@comcast.net. He is the author of 4 gardening books.
Six Less Common Veggies You Might Like
Posted on Sunday, May 17, 2020 · Leave a Comment
I don’t mean to sound like I’m bragging, but if it will grow in Cornish Flat, New Hampshire, I’ve probably tried it. Scorzonera? Sure, once, but I was not enthralled by this long, thin root. Peanuts? Once, didn’t get many. Gilfeather turnips? You bet. Many of the things I try I don’t continue to grow – they have to taste good, and be productive to qualify. Let’s look at a few that I do like, and that you might not grow – as yet.
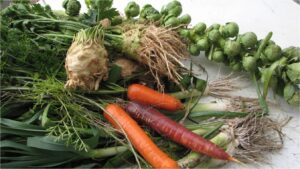
Celeriac with carrots, leeks and Brussels sprouts3
One of my favorites is celeriac, or celery root. This is a close cousin to celery, but less attractive to slugs and snails, and easier to grow. It is a funny looking root crop with many fat roots. It tastes very much like celery in a soup or stew, though it is not usually eaten raw. I peel the roots, and chop the round bulb into chunks for cooking. If stored in the vegetable drawer or a cold cellar with high humidity and cool temperatures, it will store all winter.
Celeriac grows best in rich moist soil. I start it indoors in March and plant it outside in late May, spaced 6 to 8 inches apart. If crowded it will not produce well. It also needs lots of moisture, so don’t plant it in dry, sandy soil. It takes a long time to grow to transplant size, so look for it at good garden centers – some will have starts for sale.
Kohlrabi is another funny-looking root vegetable. This has much of the bulbous root above ground, with leaves popping out on stems from the bulb. I’ve heard it likened to a space alien. But it’s delicious! Crisp, with a nice snap, it’s in the same family with broccoli and kale. It’s good in salads as well as stir fries. There are purple varieties, and white or green ones, which tend to be slower growing and good for long-term storage.
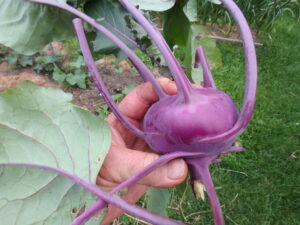
Try growing kohlrabi this summer
Kohlrabi germinates in less than a week and grows fast. Although you can start them indoors, you don’t need to. In most places you can start them now. Plant seeds outdoors 3 to 4 inches apart and thin every other one if all grow. They like consistently moist soil, so add compost at planting time.
Artichokes need a long growing season, so you should have planted them indoors back in early March. But more and more good garden centers are growing them, so might be able to find plants for sale.
They are big plants, up to 2 feet across with nice grey-green leaves. I sometimes plant them in the flower garden. In fact, the vegetable you eat is a flower bud. If you don’t pick them, they will open up and be quite pretty. I once saw them as flowers in an ancient abbey on the island of Iona, Scotland and they were quite striking. They’re related to thistles. Your artichokes will be smaller than store-bought.
In California artichoke plants are perennials, but even with mulch I have never had one survive a winter here. One called Imperial Star is an annual, and is best for growing here. They need rich, dark soil with plenty of compost and some organic fertilizer. Plenty of moisture is needed, too.
Although I once had a bumper sticker that said “Eat More Kale”, kale has become mainstream and needs no advertising. But I’d get one that said something like, “Rejoice in Rutabagas!” to put on my truck, if I could. They are easy to grow, mild and tasty, and don’t suffer from things that make potatoes problematic (potato beetles and fungal blight). I use them as a substitute for potatoes in stews.
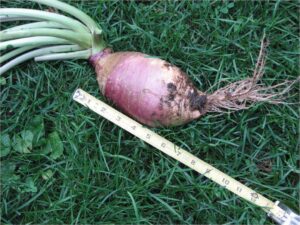
Rutabagas are a good substitute for potatoes
Rutabagas are also relatives of kale and broccoli, members of the Brassica family. I plant them by seed in June, and thin to 8 inches as these are big root crops that will not produce well if crowded. Although flea beetles can bother them, I’ve never had anything eat mine. Cover with row covers if you have a problem.
The skin of a rutabaga is reddish purple, and the flesh is yellow or orange. They store well – all winter in a cold cellar or spare fridge. ‘Helenor’ and ‘Laurentian’ are the varieties I‘ve grown, but I imagine all are fine.
Leeks are some of the easiest veggies I grow. Buy them as small plants at a good garden center, or start them from seed indoors in March. Space them 4 to 6 inches apart in a trench 3 inches deep. Fill in the trench a month later. If you want more of the white part of the leek, you can mound up the soil around them.
In the fall I harvest leeks, wash them and cut off the roots. I chop them and put them right into the freezer. They are then available as an onion substitute, or to make one of my favorite soups, leek and potato.
Tomatillos are not commonly grown – even by me, but they are commonly required for Mexican dishes. They are big plants, like a tomato, but I have read that they do best sprawling on the ground, not in a cage.
The first time I grew them I just planted one, and got no fruit: you need 2 plants or more for cross pollination. So buy 2 or more plants, and plant them 2 weeks or so after you plant your tomatoes. Remember, they would much rather be growing in Mexico!
Think about digging up some of your lawn this spring to increase the size of your garden. Hungry times might be ahead, who knows? The good thing about that is, a new garden is much less likely to have tomato blight problems. So grow some tomatoes in your front yard. And since your garden will be visible from the street, you’ll do a better job weeding, I bet!
Henry Homeyer started growing vegetables with his Grampy in 1948 or so, and generally eats something he has grown every day of the year. He is the author of 4 gardening books. E-mail him at
henry.homeyer@comcast.net.
Is It Time to Plant Yet?
Posted on Sunday, May 17, 2020 · Leave a Comment
Some folks in my part of New England plant seeds in the ground on Mother’s Day and seedlings on Memorial Day weekend. Not me. Others use Mother Nature’s clues: plant spinach when the forsythia blooms, potatoes when the leaves of an oak are the size of a mouse’s ear. That sounds good, but who really knows how big a mouse’s ear is?
I start a lot of seedlings indoors, some as early as February, and (like any good mother) I am protective of my young. I only put out plants or plant seeds when I am sure that they will succeed. So I plant my tomatoes and other heat-loving plants in June, generally after the tenth of the month. Those heat lovers include tomatoes, peppers, eggplants and all the vine crops – cukes, squash, pumpkins. Even broccoli, which is frost-hardy in the fall, does not go in early. It is much more sensitive now to frost.
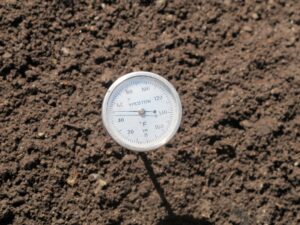
A soil thermometer will tell you if it’s warm enough to plant
What I have found is that soil temperature is very important to success. Yes, you can plant peas or spinach “as soon as the soil can be worked” (as described on the packages), but those seeds won’t germinate and grow if the soil is in the forties. And the seeds can rot. Seeds have triggers that tell them when to grow. That’s why starting seedlings indoors on heat mats speeds things up. The seeds think it is summer when the soil is 72 degrees. Generally the soil must be 60 degrees to get a good quick germination.
So how do you determine the soil temperature? Buy a thermometer designed for it. Generally these thermometers look like a meat thermometer. The probe is 6 inches or so long. Push 3 inches into the soil and wait for a reading. I gather digital ones now exist, too.
What can you do to warm your soil up? If you’re in hurry, rake off winter mulch and expose the soil to the sun. Do that now. Then you can cover the soil with a plastic sheet, either clear or black. I’ve found clear plastic is best. Sun heats the soil directly and the plastic holds in the heat (but be sure to seal the edges of the sheet with soil to keep the heat in). On a sunny afternoon in the sixties, the temperature under the plastic can exceed 100 degrees.
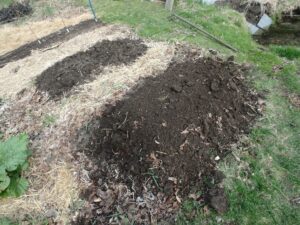
Raised beds warm up quicker than flat beds in spring
Another advantage of warming the soil with plastic for a few days is this: you can cook and kill annual weeds. They are sensitive to high temperatures when they first come up. Dandelions or witch grass, which are perennial, have root systems you know and hate. A few hot days under plastic will only make them giggle.
I’m not keen on rototilling. Yes, it will make your garden look very pretty, not a weed in sight. But for some weeds, each scrap of weed will produce a new plant. Chop up some witch grass and watch it take off! And if you get the top six inches of your garden warmed up, and then rototill, all that cold soil below will cool down the rest.
I like to think of the all the living things in the soil as my friends. Earthworms, beneficial fungi and bacteria, little arthropods? All of these help to break down organic matter and make it available in a form useable by my plants. And I think of the layers of soil as the floors of an apartment building. Some people like the penthouse, others want a ground floor room. When you rototill, you jumble up the order of things and put the penthouse in the basement.

Hoe, garden fork, and potato fork are 3 useful tools for making garden beds
So how do I prepare my garden? I create wide, raised beds using only hand tools. I have a 5-tined potato fork or hoe that has been in my family for 50 years or more. I use it to loosen the soil and shape the beds. But you can use an ordinary garden fork and a hoe to accomplish the same. I pull up soil from the walkways to raise the level of the beds and shape them. I try to disturb the soil as little as possible.
Most of my raised beds are between 24 and 36 inches wide and are 6 to 8 inches above the walkways, which I keep narrow, so as to not waste space. Generally they have no wood sides, though I do use planks to contain the soil in a few. I like a wood-sided raised bed for growing carrots, as they need fluffy soil with no rocks in order to get to be 12 inches long, my goal each year. With wood-sided beds you can build whatever soil you want by mixing in the ingredients.
Before putting your plants in the ground, harden them off. Whether you bought your tomatoes or started them indoors yourself, they can get sunburned or wind-burned if they go outside to a full day’s sun without some preparation. Start with 3 hours of morning sun, then add some afternoon sun. Watch for signs of stress. After 5 to 7 days of protection from too much wind and sun, they will be ready for planting
I like to do some cold season plantings, and have a cold frame to get a few things growing in April. But I also know that my tomatoes planted in mid-June will catch up with any planted on Memorial Day weekend. Each of us has to figure out what works best.
Six Wildflowers You Should Grow
Posted on Tuesday, May 5, 2020 · Leave a Comment
I love wildflowers. Right now several species are blooming in my woods, and others are on their way. They are a demure smile before the serious romance of summer blossoms in the main gardens. But after winter, they are loved as much as the bodacious peonies and brilliant poppies that will come later.
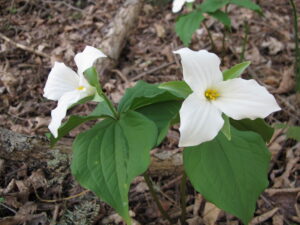
White trillium or Trillium grandiflorum
One of my favorites is Trillium. That is both a scientific name and a common name, though the common wine red species, Trillium erectum, is also called Purple Trillium, Wake-robin and Stinking Benjamin. It does best in light shade and acidic soils. Its flower has three petals and stands up above the foliage. As it matures over the years, the clumps get bigger. A related species, T. grandiflorum, or white trillium is similar in looks, but with white petals that fade to pink. It’s very lovely.
Another favorite of mine is Jack-in-the Pulpit ( Arisaema triphyllum). The flower has a hood over a “preacher” that is hidden inside. It is designed so that little flies will crawl down inside the flower, pollinating it as they go. It has both male and female parts, but only one or the other are fertile at a time, to prevent self-pollination. They grow well in woodlands, in deep rich acid soil. As the plants grow older, they get larger, sometimes reaching two feet tall.
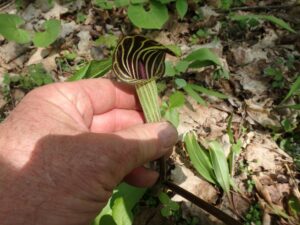
Jack in the pulpit
Hepatica is one of the earliest wildflowers to bloom in my woods. The common name, Hepatica, is also the scientific name, though there are two similar species: H. acutiloba or Sharp-lobed Hepatica, and H. americana or Round-lobed Hepatica.
Hepatica grows in light shade, and does best with a few hours of sunshine. They do best in rich, dark, humusy soil. They form tidy clumps, each about the size of a big African violet. The blossoms are numerous: an old clump in my woods has about 50 one-inch wide lavender flowers on it now, each with six petals. This plant does not spread much, so buy enough to make a statement.
Bloodroot is a beauty that spreads well by root, though is never obnoxious about it. This fabulous wildflower has blossoms similar to those on Hepatica, but bigger, and white with a yellow center. The blossoms are quite ephemeral, blooming and then littering the ground some days later with petals. The flowers close up at night (when pollinators are sleeping) or on cold, rainy days.
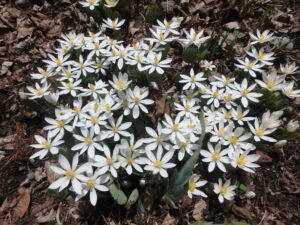
Bloodroot likes good drainage and more sun than most wildflowers
The leaves are dramatic. When they first appear, they are rolled up like a cigar, standing vertically in your forest duff. Later the leaves open and flatten out, getting large for a wildflower: six to eight inches wide. These persist much of the summer, creating a nice groundcover.
Bloodroot gets its name from the red liquid it oozes if you break a root. You can propagate the plant by diving roots when dormant in the fall and planting in light shade or morning sun in moist, well-drained soil.
Another of my favorites is Dutchman’s breeches ( Dicentra cucularia). This is a true spring ephemeral: it produces flowers and leaves, and then everything disappears after a few weeks until next year. It is in the same genus as Bleeding Heart, a dramatic pink or white June-blooming perennial. The flowers are white, and look like little pants hanging upside down, with several flowers on each stem.
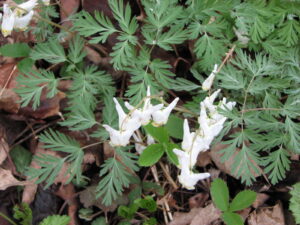
Dutchman’s breeches
The foliage is as pretty as the flowers: it is finely cut, and reminiscent of its cousin, wild bleeding heart ( Dicentra exemia) which is sold everywhere as a shade perennial. When Dutchman’s Breeches dies back, the leaves just disappear without yellowing and lingering on, which is a nice feature. It does best in moist, rich soil in shade or part sun. The corms are tiny.
Finally, you should have some trout lily or Dog-toothed Violet ( Erythronium americanum). This diminutive plant has nice spotted leaves and spreads like a groundcover in shady, humus-rich woods. But in the wild, they bloom infrequently, and only after they have two leaves – and most of mine have just one. The flowers are yellow on 4 inch stems.
So how do you get started? Most garden centers do not sell these plants, and seeds are not readily available – and often need to be planted right after picking. You should not dig them up in the wild and doing so is prohibited in most states.
I called Barry Glick of Sunshine Farm and Gardens in Renick, West Virginia. His farm is 60 acres of flowers at 3,650 feet of elevation, so Zone 5. He agreed to put together a package of the plants I have featured here, three plants of each, ready to go in the ground for $89.10 as a special deal for my readers. They will be shipped free by Priority Mail. E-mail him at
barry@sunfarm.com for details and tell him I sent you.
In interest of full disclosure, Barry sent me a set of plants for free, but I am not profiting from his sales. The plants (or bulbs or corms without leaves) are not huge, but are 3 to 5 years old, and ready to bloom next year. They come in half gallon Ziplock bags, packed in peat moss and ready to plant. All mine looked great, and I planted them in an open woodland with rich soil.
So think about getting some wildflowers, and remember you shouldn’t just go dig them up in the wild! Wildflowers bring me great joy when they bloom, and I bet they will please you, too.
How to Improve Your Soil
Posted on Tuesday, April 28, 2020 · Leave a Comment
As we move from dreaming to planting, we all want to offer our plants the perfect soil. This leads some gardeners to buy a big bag of 10-10-10 and sprinkle it heavily on everything. For others, manure or compost is the answer to increasing soil productivity and plant health. And then there are bagged minerals, organic bagged fertilizers, rock powders and more.
What do plants need? Scientists agree that plants need minerals for health: nitrogen (N) for promoting green growth; phosphorous (P) for better roots and promoting flowers, seeds and fruits; potassium (K) for strong cell walls to survive drought and cold. These three elements are often called “the big three” and listed as percentage by weight on fertilizer bags (5-10-5, for example). Chemical fertilizers have just those three elements, plus inert fillers (which would be 80% in the example cited).
Additionally, there are elements that are needed in smaller amounts including magnesium, calcium and sulfur. In very small amounts plants need iron, chlorine, manganese, zinc, copper, boron, molybdenum and nickel. None of those are found in chemical fertilizers, but are present in unlisted amounts in bagged organic fertilizers, and in good compost.
Organic fertilizers contain more healthy minerals than chemical fertilizers 002
Bagged organic fertilizers are made from natural ingredients, things like ground oyster shells and seaweed, or dehydrated chicken manure, or cotton seed meal and peanut hulls. Added to the mix are minerals such as rock phosphate (a good source of slow-release phosphorus) and green sand (a source of potassium from the sea).
These are slow release fertilizers. Most of the ingredients are not water soluble, but are broken down and utilized in concert with bacteria and fungi in the soil. That is good, as they are not washed away in rainy times the way many chemical fertilizers are.
Here in the Northeast most soils are a bit acidic due to acid rain, so adding limestone is good for getting your soil near neutral. But not all plants need the same things in the soil. Blueberries, for example, need very acidic soil. Instead of lime, they may need sulfur to make the soil more acidic.
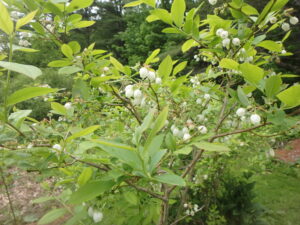
Lots of blueberry blossoms tell me the soil is acidic enough
A simple soil pH test kit can be purchased for under $10, or you can send a sample to your state Extension Service for testing, Go online and search for soil tests in your state, and you will find how to collect the soil, and where to send it. A basic soil test will tell you much in addition to the soil pH.
I’ve been adding finely ground granite dust to my soil for 20 years or so, and a commercially prepared rock and mineral soil supplement called Azomite for nearly as long. I’ve done side-by-side trials of plants with rock powders and without them, and have seen dramatic differences. Soils with rock powders have helped plants survive drought, and have increased crop yield in my peppers.
The mechanism by which rock powders work is unknown. I interviewed a soil scientist who pointed out that every 10,000 years or so we’ve had glaciers come down and deposit ground rock, distributing obscure minerals in the soil. Maybe the rock powders I add are just mimicking what the glaciers have done – though not recently.
What about compost? It is pure gold, from a soil perspective. It has all the minerals needed by plants and good compost also has literally millions of beneficial bacteria, fungi and other living things in each spoon of goodness.
Beneficial organisms in compost work with your plants, sharing minerals with your plants; they benefit from sugars exuded from the roots each night. That’s right, over eons the plants and microorganisms have developed a mutually beneficial system.
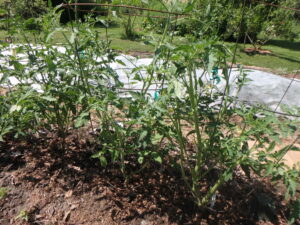
Tomatoes benefit from a little slow release fertilizer at planting time
I should explain that compost is not high in nitrogen. But most vegetables and annual flowers don’t need a lot of nitrogen. Nitrogen will make veggies like peppers or tomatoes grow big plants, but often those big plants do not produce a lot of fruit. Most annual flowers do not need much nitrogen.
How much compost should you use? I have been putting an inch or two over my vegetable beds every year, and working it in. If you are buying it by the bag, even half an inch is good – with some extra in the hole with each tomato.
What about trees and shrubs? Most do not need fertilizer or those tree fertilizer spikes sold at hardware stores. Mother Nature does not provide fertilizer, she adds organic matter to the soil over time as leaves decompose and living beings of all sorts die and add to the soil.
That said, if you live in a new subdivision, your soil may be nothing but sterile subsoil with a thin layer of “topsoil” spread by the contractor. Adding organic matter to the soil in the form of compost will help it become biologically active. It will add minuscule amounts of the less common minerals.
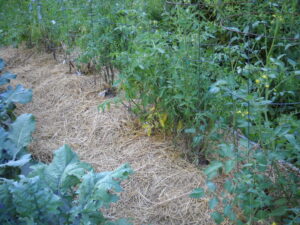
Hay and straw make good mulches
Mulch all your beds with ground leaves, grass clippings, mulch hay or straw. These will break down with time, and add organic matter to the soil. Breakdown of that mulch is done by bacteria and fungi.
Treat your soil to some compost at planting time. And if you use fertilizer, don’t overdo it – more is not better. Read the directions of anything you add to the soil.
Henry Homeyer can be reached at
henry.homeyer@comcast.net. He is a long time UNH Master Gardener and the author of 4 gardening books.
Oh Dear: Dealing with Deer, Woodchucks and More
Posted on Tuesday, April 21, 2020 · Leave a Comment
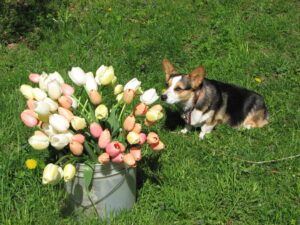
My dog Daphne tells the deer a wolf is near
I’ve never had much trouble with deer eating my vegetables or flowers. I know gardeners who have wept when they saw that their lovely tulips had been munched by deer just when they were achieving perfection. But I’ve always had dogs, and dogs leave scents that are scary to deer. My little corgi, Daphne, leaves messages saying to the deer, “I am actually a wolf.” And they believe her.
So what do you do if you don’t have a resident wolf? Some gardeners use deer repellents. In general, they work for a while and then the deer get used to them, and come for lunch. Irish Spring brand soap, little containers with cotton balls soaked in coyote urine, rotten-egg based repellents. Yes, the work, but if you have a lot of deer and they want to come in, they will.
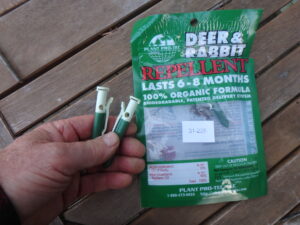
Garlic clips
The best repellent I’ve found are called garlic clips that I get from Gardeners Supply. These are little devices that hold garlic oil and clip onto branches. You must first puncture a seal with a little tool that comes with it. They’ve worked all winter for me on tasty shrubs.
But the only truly sure-fire solution is to put up an 8-foot tall fence. In recent years manufacturers have come up with good sturdy plastic fine-mesh fencing that weighs little and is affordable. But you still have to put up the fence posts – which is hard work or can be a considerable expense.
You can buy 8-foot steel posts that can be pushed and pounded into the ground. You can buy cedar posts and use a post hole digger. Ten-foot pressure treated 4 by 4 posts last forever, but may leach chemicals into the ground.

OLYMPUS DIGITAL CAMERA
I saw an alternative method once. The gardener bought lengths of plastic pipe, the kind used by plumbers. He cut it into 12- to 24- inch sections and buried them in the ground every 10 feet. He used either a crow bar or an auger to make holes big enough for the pipe.
Then he cut saplings of an appropriate size, say and inch and a half across at the base, and 10-feet tall or more. He just slipped the sticks into the pieces of pipe. They were a little loose inside the pipe, and wobbled a little, but the fence worked – and he didn’t have to buy fence posts.
The slick part of the whole operation was the “door”. He just put 2 extra pieces of pipe in the ground along the fence line, one at the end of the run of fencing, the other 10 feet back. He lifted the final pole (with the attached fencing), and walked it back to an empty pipe 10 feet away and dropped it in. The netting was attached to the fence using plastic zip ties.
I saw another alternative method at a public garden at Fort Ticonderoga, NY. They used electric fencing enhanced by little pieces of aluminum foil that were attached to the fence with clothes pins. Each piece of foil got a dollop of peanut butter, which attracted the deer.
When a deer licked the peanut butter it got a non-lethal but very unpleasant jolt. The power to the fence was turned off each day when visitors were present, and the fence was rolled up, along with the fiberglass rods that supported it. This system has an initial start-up expense of the fence charger, wire and 4-foot posts, but it worked perfectly. The deer did not forget the jolt, even if they were hungry and they certainly could jump the fence.
A less serious, but very aggravating problem is with your neighbor’s cat, who, at this time of the year uses your freshly prepared and seeded carrot or lettuce bed as its personal kitty box. An easy fix? Prune your roses or raspberries and place the thorny branches over them. Felix the cat will stay away, and before long your plants will make it look less inviting.
Then there are the rodents: woodchucks, chipmunks and squirrels, possums and raccoons. Again, there are repellents and fencing, with fencing working better. Every 10 or 15 years I am inundated with squirrels. The only method I have found to salvage my garden is to trap them in Hav-a-Hart traps and deport them 5 miles away (that may be overkill) on a lonely road, far from a house.
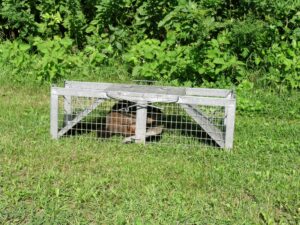
Woodchuck in Havahart
Trap size is important: a woodchuck or large animal needs a trap with a 12-inch square opening that is about 36 inches long. Squirrels do fine in something with a 6-inch square door that is 18 inches long.
In order to catch a rodent, it is best to use a trap that only has one door, or to wire one door shut if the trap has two. Put the bait food past the trigger, so the animal will have to step on the trigger to get to the food. Woodchucks like watermelon, apples or beans. Squirrels and chipmunks love sunflower seeds and peanut butter on a cracker. Chunky or smooth? They don’t seem to care.
Trapping is not a solution I like. Why? A released rodent has only a small chance of survival, I am told. Also, in some towns there are laws against transporting wild animals. Maybe we should all just learn to share our bounty with the critters.
Henry is a long-time UNH Master Gardener and the author of 4 gardening books. Write him at
henry.homeyer@comcast.net or PO Box 364 Cornish Flat, NH 03746.
Early Edibles from the Garden and Woods
Posted on Tuesday, April 14, 2020 · Leave a Comment
Okay, you may not want to go to the grocery store so much anymore. Tired of eating canned beans? Want something new for your taste buds? Here are some early things I look forward to each spring. These plants are all perennials, so if you don’t have them, you will need to plant them this year for future years.
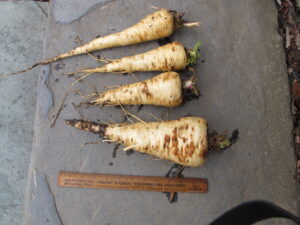
Parsnips
Parsnips that I planted the previous spring are always one of my first garden treats. I harvest them as soon as the soil thaws. Yes, it’s an old fashioned vegetable, but it’s tasty if prepared properly and easy enough to grow.
Plant parsnip seeds in early summer for next spring’s fare. But if you have seeds saved from last year, don’t use them. Although most vegetable and flower seeds are good for 3 years, parsnip seeds are only good for one year – as are onion and parsley seeds.
Parsnips take an interminable time to germinate – 3 weeks, on average. The roots survive winters in the ground, but the seeds like warm soil to germinate. And as with most root crops, no one starts them indoors to get them going early. Just plant them in the ground in late May or early June. Thin to 2 or 3 inches between plants by the Fourth of July.
As to eating parsnips, don’t overcook them. Steam lightly or sauté them in butter and coat with maple syrup at the last minute. The syrup will glaze them and make the dish fit for a queen. You can cook them with carrots or add fennel seeds for a change of pace.
Next I go to my woods for a real treat: ramps. These are also called wild leeks, and are related to onions, leeks and garlic. They grow wild in moist, dark soil, often alongside streams in maple and beech forests. They often grow in huge swaths, thousands growing in one area. But they are slow growing, so don’t over-harvest them.
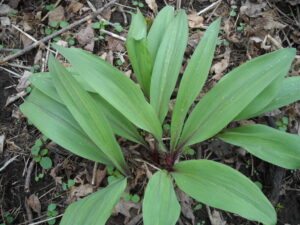
Ramps growing in my woods
For several years I dug up and planted about 50 ramps plants each year in my woods, and they have multiplied by offsets nicely. Two or three years ago I started harvesting seeds in late summer and sprinkling them on the soil and covering with just a little forest duff. These have grown and are doing nicely, though they are still too small to eat.
If you want to start some ramps in your woods, find a friend who will teach you how to recognize them. Ramps have pointed green leaves roughly the shape of a canoe and 6 to 9 inches long. They grow from a single point, each plant having 2 to 4 leaves. Frequently the base of the stem is maroon, but it may be green. And the key is this: they smell like garlic. You need to dig down 4 inches or so in the soil to harvest the bulbs, which slightly resemble leeks.
I use ramps the way I use onions – I add them to stir fries, scrambled eggs and stews. The nice thing is, you can eat the leaves, not just the little bulbs.
Another early spring treat is a perennial green called sorrel. Although seeds are available, I recommend buying plants at your local garden center if possible because it takes a long time to get big plants from seed. This plant’s leaves are very tart and almost lemon flavored.
When cooked, sorrel leaves cook down to almost nothing. Fortunately, I found a recipe in Deborah Madison’s fabulous cookbook, Vegetable Literacy, which takes advantage of sorrel’s sharp flavor, but mixes it in with other veggies to bulk it up. Here is what you can do:
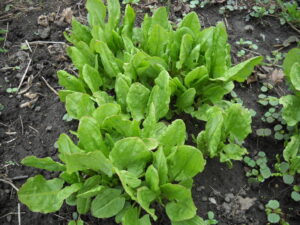
Sorrel in early spring
Melt 1 tablespoon of butter in a pan, add 5 ounces of leeks (I always have some frozen from my garden) and 1 cup of water, and simmer 10 minutes covered on medium heat. Add 1.5 cups of peas and 3 cups water and simmer for 5 minutes. The stir in 2 to 3 cups sorrel, allow to wilt, and puree in a blender. Finally stir in a little cream, crème fraiche or yogurt.
The last of my early spring treats is another old fashioned one: rhubarb. Like sorrel, this has a tangy, sharp flavor. I love it in pies, tapioca pudding and jam. Some cooks spoil it by cooking with strawberries, but I feel that diminishes its flavor.
Rhubarb is easy to grow. You will need to buy plants or get roots from a friend – although rhubarb produces flowers stalks and seeds by the gazillion, it does not easily reproduce that way, though I’m told it can be done.
Amend the soil with lots of compost and/or aged manure. Add some organic fertilizer, too, as the roots will be in the same soil for decades – rhubarb lasts forever. I have some plants over 25 years old and going strong. Full sun is best, but like any leafy green it will produce in part shade. Four hours of sunshine will be fine.
One of my favorite rhubarb uses is to make punch. Chop up a few stems and boil in an equal quantity of water. Once it gets mushy you can strain it and add more water and some sugar until you have a nice drink. I just use a little sugar – I like the tea plenty tart. I like to use red stems for the tea, as it looks so nice in a glass or cup. Most people who grow rhubarb have plenty, so you might beg a few stalks if you don’t have your own – yet.


 Click Here to buy from Cobrahead