Now is the Time to Plant Garlic!
Posted on Thursday, October 24, 2019 · Leave a Comment
The easiest crop I grow every year is garlic. I plant it in October, mulch it well, and harvest it in early August. That’s it. If it’s well mulched, I don’t even have weed the bed more than once or twice. Not only that, I use this year’s harvest to plant next year’s crop, so it’s free. Each year my garlic crop gets better as I use the best of this year’s harvest to plant next year’s crop. My garlic is well adapted to my soil and climate.
If you want to grow garlic but don’t have any for planting, you can buy some “seed garlic” on-line, or you can check with a local farm stand for garlic you can plant. Don’t use grocery store garlic. Much commercial garlic has been treated with chemicals to prevent sprouting. And most grocery store garlic is the wrong kind for planting in New England – and some of it is from China. I avoid anything grown in China, due to concerns about toxic chemicals used there.
There are two basic categories of garlic: soft neck garlic and hard neck garlic. Grocery store garlic is usually soft neck, the kind you see braided and hung up in Italian restaurants. It is less hardy than hard neck garlic, a bit bland and less interesting to cook with.
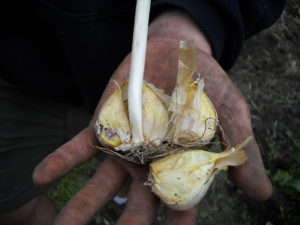
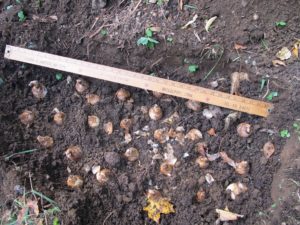
Hardneck Garlic ready for planting
Here in New England we should plant hard neck garlic, which has a stiff “scape” or stem that starts in the middle of the bulb, and grows up as the stalk and produces a flower in July. The fresh scapes can be cut and used in sauces or omelets.
To plant garlic, begin by selecting a bed in full sunshine. Weed it well and make sure the soil is loose and fluffy. In a bed 24- to 30-inches wide I plant 3 rows of garlic. I make furrows with a hand tool or hoe and add some organic fertilizer which I then stir into the soil.
Divide a bulb of garlic into individual cloves for planting. Mine vary from 4 or 5 cloves per bulb up to a dozen. Most have 6 or 8 cloves per bulb. I plant my cloves a hands-width apart, which is about 5 inches. I push each bulb into the soil so that the bottom of the clove is about 3 inches deep, or with the tips 2 inches from the soil surface.
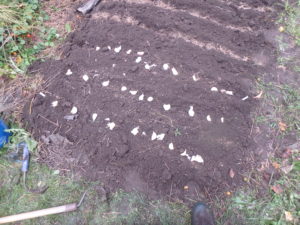
Place your garlic cloves on the soil to establish space before planting
When I plant the second row I stagger the cloves so that they are not lined up with the first row. In the third row I match the cloves with those in the first row. Staggering the bulbs insures a little extra space between bulbs. When all are in the soil I push soil over the cloves and pat the soil down with my hands. If your soil is sandy or a heavy clay, adding some compost before planting is good.
The last step is mulching your bed. You can use straw or mulch hay. Straw should not have any seeds, but it is much more expensive to buy – usually more than $10/bale. Mulch hay is just hay for cows that got wet and is no longer tasty to them. It should be under $5/bale.
Take a section of a bale and shake it over the bed. It will fall apart and spread out. I put 8 to 12 inches of loose hay or straw over the bed. By spring it will have compacted to 3 inches of mulch, and the garlic will grow right through it – though weeds won’t. The mulch will keep the soil warm for a while this fall, which is good. The garlic needs to grow roots and get established before the soil freezes.
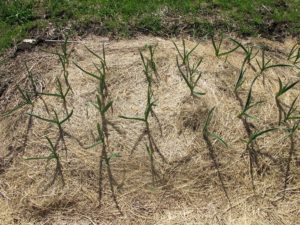
Garlic grows through th mulch, shown here in May
Sometimes garlic will send up a green shoot in the fall. When this happens, gardeners write me, asking if their garlic will suffer if it grows in the fall. Nope. The frost will kill the greenery, but not harm its potential, come spring.
Garlic has many uses. Not only will it scare away vampires, it is an important ingredient in many dishes. And it can be used medicinally. Vermont herbalist Rosemary Gladstar is famous for her fire cider recipe. This concoction is used to help prevent colds and other winter plagues. It contains garlic, raw apple cider, horseradish, hot peppers and other natural ingredients. It can have quite a kick, depending on how you make it.

Fire Cider book cover
Rosemary Gladstar and a group of her colleagues and students have put together a lovely book called, “Fire Cider! 101 Zesty Recipes for Health-Boosting Remedies Made with Apple Cider Vinegar” published by Storey Publishing in 2019. Nearly every one of the recipes includes garlic. The book also tells the tale of how a company tried to trademark the name Fire Cider, though recently, I have learned, the upstarts lost in court.
What else is garlic food for? Here is my recipe for garlic bread, which is good with almost any dinner: Crush 2 to 3 cloves of garlic in a press, and mix with a stick of butter that is soft and slightly warm. Add 3 tablespoons of grated Romano or Parmesan cheese and ½ teaspoon of tarragon, and mix with a fork. Slather liberally on sliced Italian or French bread, wrap in aluminum foil, and heat in a 350 degree oven for 15 minutes. Consume! This has no calories if you use your own garlic.
If you don’t have a vegetable garden, plant some in a flower bed. The scapes in mid-summer are curly and stiff, and great in flower arrangements. So get some garlic, plant some, eat some and stay healthy!
E-mail Henry if you are interested in joining him on a Viking Cruise from Paris to Normandy and back next June. He’s at
henry.homeyer@comcast.net or PO Box 364, Cornish Flat, NH 03746.
It’s Time to Plant Bulbs for Spring Blossoms
Posted on Thursday, October 17, 2019 · Leave a Comment
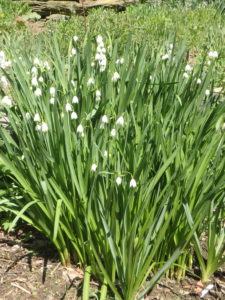
Leucojum
This is the season for planting bulbs – from mid-October until the snow flies. Actually, I’ve shoveled snow off a bed to plant bulbs in November, and they did fine. Bulbs have everything inside them needed to succeed their first year. If you want them to keep on thriving, they will generally need plenty of sunshine, good drainage – and you must not cut off the foliage before it starts to die back.
That said, there are exceptions. The small bulbs like snowdrops, crocus, scilla and glory of the snow are fine in the shade of deciduous trees. That’s because they will bloom early and re-charge themselves before the trees get dressed in leaves that will shade their beds. No bulbs that I know of thrive in the shade of pines, hemlocks or other conifers.
Deer can be a problem for some sorts of bulbs. Tulips are tasty to them, and many a gardener has wept tears of frustration when the deer ate their tulip buds the night before they were to open. Repellents can work – my aging corgi, Daphne, is still a great deterrent – but there are commercial repellents as well.
Garlic, soap, coyote urine and nasty repellents made with rotten eggs and blood meal can keep deer away – unless they are really hungry, or just plain mean. If deer are a problem, you can protect bulbs with wire mesh. No need to build an 8-foot fence, just build a dome or cage over them using chicken wire.
Squirrels, mice, voles and chipmunks can eat bulbs. Some folks buy cheapo hot pepper powder to sprinkle in the bulbs, but it is probably only good for one season. You can put sharp cinders or oyster shell meal (sold at feed and grain stores for chickens) into the hole at planting time. Alternatively you can feed the rodents all winter, or catch and deport them in a Hav-a-Hart trap. Peanut butter with a sprinkling of sunflower seeds will attract them to your cage. They can’t resist.
In the past I have always planted 25 to 50 bulbs in a hole at once. I dig to the appropriate depth, loosen the soil at the base, add some fertilizer and scratch it in. Usually I just use a slow-release organic fertilizer like Pro-Gro, but there are mixes made specifically for bulbs, often called Bulb Booster. I place the bulbs in the hole, pointy end up, and fairly close together. I plant bulbs closer than the directions say – and no bulb has ever complained.
I recently attended a presentation on bulbs by a Dutch expert, Jacqueline van der Kloet. She proposed random plantings. She showed slides of wheelbarrows filled with bulbs of various types, sizes and bloom dates. She mixed them together and then tossed them out onto a flower bed for planting. Her people used trowels to plant every bulb individually. That seems like a lot more work, but the look in spring was interesting.
Daffodil bulbs planted in a 36-inch oval hole, ready to cover with soil
On a recent Sunday I gave random planting a try. We had 25 daffodils, 150 crocus of various types and 6 big alliums. The bed for the bulbs was about 2 feet wide and 10 feet long. The soil is very rich and fluffy, so planting was easy. Even with a fruit tree and 4 peonies in the bed there was room for the bulbs. We will plant annuals in that bed, come June, so we may inadvertently disturb some of the bulbs when we do that.
Instead of using a trowel to plant, I pulled back the soil with a curved hand tool with a single-tine called the CobraHead weeder. For crocus, planting was easy: they only need to be 3 inches deep. To get down 6 inches for the daffodils and allium, I needed to use my fingers to keep the loose soil from falling into the planting hole as I prepared it. Still, it went along quite quickly.
Most bulbs don’t like soil that is constantly wet. Much of my property is on the flood plain of a little stream, and in winter and spring does stay quite moist. In the past I have had good luck in the moist areas with Camassia (Camassia sp.), Summer Snowflake (Leucojum aestivum) and some daffodils. I have done tulips there, too, but in raised beds to improve drainage.
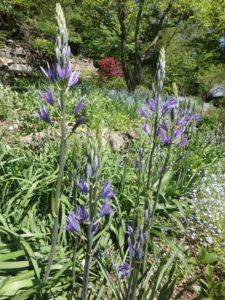
Camassia
Camassia is a lesser known flower, generally in shades of blue or white. The stems are about 18 inches tall, with many florets along the top part of it. They bloom in May or June and hold up well on the stem and in a vase.
Summer snowflake has tall white flowers that resemble snowdrops on steroids: they are on stems that are 12 to 18 inches tall, and each stem has 3 or 4 flowers. I got 25 bulbs about 20 years ago, and now have a huge clump each spring. They bloom in mid-May for me.
Ms. van der Kloet recommended two varieties of daffodils that do well in damp soil: Jenny and Thalia. Thalia I have grown: it’s a nice white one, and fragrant. My recommendation for gardeners with moist soil? Add lots of compost to the soil, including under the bulbs, and raise the beds as much as possible. Even 4 to 6 inches will help. But if you have truly soggy soil, your bulbs may rot, so experiment before planting in large numbers.
Winter is long, and I want something to look forward to. Spring bulbs are worth every penny I spend on them. And if a few get eaten by rodents or succumb to soggy soils? So be it. I will always have plenty to enjoy.
Henry Homeyer is a gardening coach, speaker, and consultant and is the author of 4 gardening books. He can be reached at henry.homeyer@comcast.net.
Putting the Garden to Bed
Posted on Tuesday, October 8, 2019 · Leave a Comment
Pardon me for saying so, but it’s time to get ready for winter. That’s right. A few days ago (or was it weeks?) we were swimming in the ocean and lounging in the sun. But we’ve had frost, and I’ve seen serious snow as early as October 15. Here are some of the things on my list:
Clean up the vegetable garden. Harvest the last of the root crops, pull the weeds and mulch everything with leaves. The key here is this: pull the weeds.
Annual weeds will die with the cold, of course, but most have produced seeds by now that will guarantee that their progeny will appear next year. When you pull them, try to avoid knocking loose the seeds. Be gentle.
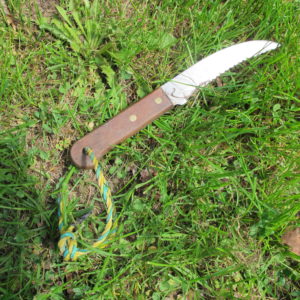
This knife has a serrated edge and is great for cutting back flower stems
Perennial weeds and grasses have serious roots that are hard to pull, and will survive the winter. If you can get them out now, you will have less work next spring. In the spring the soil will be wet, the air cold. We will still have some nice warm days for weeding before winter.
Use a good weeding tool to get all the roots out. I like the CobraHead weeder to tease out the roots and comb though the soil. It’s a simple hook that slides through the soil easily and lifts up scraps of root. You can suppress weeds in the spring by putting down old newspapers and covering them with straw or leaves.
Insect pests and fungal diseases can be minimized next year by getting rid of plants this fall. Tomatoes generally have at least some leaf blight, and squash family plants often have both insects and fungi by the end of the summer. Potato bugs may have visited your plants. So get rid of these plants by putting them in the household trash or by adding them to a pile of brush you will burn after snowfall. I suppose you could drag them off to a far corner of the property, but I know that potato bugs, at least, will hike a long way for a free lunch.
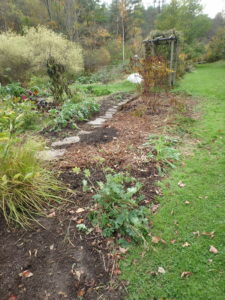
Most perennials were cut back in this bed
Clean up the flower garden. This entails cutting back most flowers and pulling weeds. I say cut back most flowers, but suggest leaving a few tall flowers for the birds – they like seeds of sunflowers, black-eyed Susans and purple coneflower, among others. Those tall plants also provide a little winter interest for you silhouetted against the snow.
Instead of cutting back your perennials with your pruners, try using a serrated knife. Next yard sale you see, stop and buy a steak knife. They work great. Grab a clump of stems and saw them off. I suppose one of those folding pruning saws would do it, too – but wear gloves and be careful using one. They are very sharp.
I’ve used hedge clippers, too, for fall cleanup, but often old clippers don’t do a good job on heavy stems; things get stuck between the blades. I have a pair that works well made by Barnel, their B1000L hedge shears. Available from www.oescoinc.com.
Should you rake the leaves out of your flower beds? That all depends. If you leave the leaves, they will help suppress weeds in the spring, and will eventually decompose. Still, many gardeners like the look of a clean flower bed. The choice is yours. Me? I generally leave them.
Another fall task involves improving the soil, particularly in the vegetable garden. Adding a layer of compost after weeding is always a good plan. Add an inch of more of compost and stir it in with a tool, and it will stimulate your soil to become more biologically active by adding and feeding soil microorganisms.
Many garden centers sell compost by the truckload for a price considerably more reasonable than by the bag. Dairy farms often sell aged manure or hot-composted manure (which is even better). Some will deliver it to your garden. If you keep your raised beds in place each year, just add the compost to the beds, don’t waste it on the walkways.
Fall is a great time to get your soil tested. Your state Extension Service offers this service, just go on-line and download the form. If you have never had soil tested, pay extra and get tested for heavy metals if you grow edibles. Houses built before 1978 (when lead was banned in paint) often have lead in the soil nearby – which is dangerous. A good soil test will not only tell you if your soil is deficient in minerals, it can tell you if it has adequate organic matter and a soil pH that works for your plants.
For a more in-depth soil test, you can do a test with Logan Labs (https://loganlabs.com/) and for a fee of $30, talk with a soil scientist about the results.
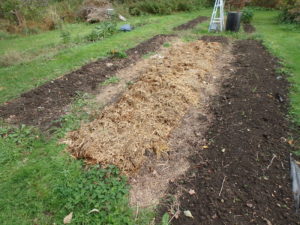
Mulch on a vegetable garden will keep down weeds in the spring
Last, rake the leaves, or better yet, chop them with the lawnmower and then rake them up. Chopped leaves are fantastic mulch, and a real boost to your soil. Earthworms love them, and will bring the organic matter down into the soil. When you cut the lawn at the end of the season, lower the blades a little because long grass is more susceptible to winter fungal problems.
There are plenty of other tasks to do in the garden, so play hooky on a sunny day and get back out into the garden. You’ll never regret doing so.
I now have pricing for the Viking River Cruise I hope to lead from Paris to Normandy and back next June 19 to 26. E-mail me for the details at henry.homeyer@comcast.net. This could be great fun, and I plan to do some gardening talks in the evenings.
Easy Ways to Get and Store Juice from Your Fruit
Posted on Tuesday, October 1, 2019 · Leave a Comment
For me, this has been a banner year for grapes. I have just a couple of plants, but they are large and vigorous. They are the Concord type with big seeds. I know one is a ‘Purple Valiant’, but the other name is long forgotten. They are quite tart for fresh eating, and the birds seem to enjoy them more than I do, so they get most of them. Not this year. I had enough to make some juice, and a neighbor gave me even more.
Six years ago I bought a NorPro brand “Steamer/Juicer” while visiting friends in Seattle, Washington. The salesperson had convinced me it would be great for making all kinds of fruit juices, plus, it was on sale! But until recently, I never did much with it.
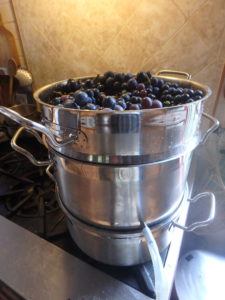
The juicer/steamer cooks the fruit for about an hour to get all the juice out
The juicer consists of 3 parts, all heavy duty stainless steel: an 8.5-quart water pot, which sits on the stove burner and produces steam. Fitting into that is a 4-quart juice catcher with a volcano-shaped opening in the middle that sends steam into the fruit basket sitting above it, and catches the juice that drips down. Finally, on top, is an 11 quart fruit basket that is full of holes. And of course there is a nice glass lid.
It works like this: First, wash the fruit and remove any bad fruit. Bring water to a boil in the water pot, then place the juice catcher on top of that. The juice catcher has a drainage pipe attached, and a hose with a clamp on it, allowing you to easily drain off the juice. The steam passes up through the juice catcher and into the fruit basket, cooks the fruit and releases the juices. Each batch of grapes makes 3 to 4 quarts of grape juice.
Previously I had made grape and elderberry juice with something called a jelly cone. This is a V-shaped metal cone full of holes like a colander. To make juice, I removed the stems and cooked the berries until they are a mush. It comes with a V-shaped wooden pusher that is used to squeeze the cooked fruit against the sides of the cone. That releases the juice while most of the pulp stays in the cone.
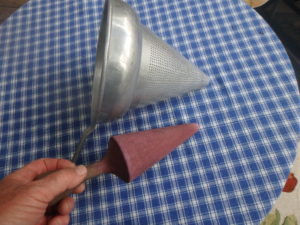
A jelly cone is a low tech way to make juice
It sounds easy to use, but is actually quite messy and tedious. To make elderberry juice, for example, each elderberry has a tiny stem that must be separated from the berry. The nice thing about the steamer/juicer is that you can leave all the stems on.
Another way to make juice is to use a muslin jelly bag and hand squeeze the cooked berries to get the juices out. I gather that it is messy, but effective. I see that commercially made jelly bags are available on-line if you don’t want to make one.
In addition to grapes, I used my steamer/juicer to make juice from crabapples. I have one crabapple tree that produces large fruit – up to an inch and a half in diameter – with nice wine-red skins and tasty fruit. So I picked 150 of them and used them to make one batch of juice in my steamer. I cut each apple in half before steaming to facilitate juice production. The result was a nice pink, mild-flavored apple juice. I got nearly a gallon of juice.
I made over 4 gallons of juices and obviously could not drink it all before it would begin to ferment. What did I do? I could have canned it in glass jars in a hot water bath. According to the video I watched, 5 to 10 minutes fully submerged in a boiling pot of water would preserve it for storage on a shelf. But that’s a lot of work, too.
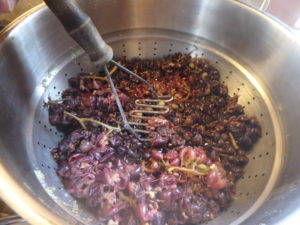
After cooking you can mash the fruit to get a little more juice
Instead of canning the juice, I decided to freeze it. I went to my local apple orchard/cider producer and bought half gallon plastic jugs with snap-on lids. I decanted my juice from the steamer into half gallon glass bottles when hot, and allowed it to cool. Plastic is not suitable for boiling or very hot liquids.
After it cooled I poured the juice into the plastic jugs for freezing. I left at least an inch and a half of air space at the top of each jug so that when the juice froze and expanded it would not push off the lid and spill into my freezer. Half gallon jugs just fit on the door of my freezer.
Making grape or elderberry juice is a job for old clothes, dark-colored ones, as the juice will stain as badly as red wine. I put down a thick layer of newspaper over the wooden countertop in case I spilled any.
I love eating something I grew every day of the year. I store, dry and freeze all kinds of fruits and vegetables. Making juices allows me to expand my list of foods available in winter. It takes a lot of time to prep everything, but I know that the food I put up is chemical free, too, which is important to me.
Join me on a Viking River Cruise from Paris to Normandy and back next June. Just e-mail me for information: henry.homeyer@comcast.net.
Fall Lawn Care
Posted on Tuesday, September 24, 2019 · Leave a Comment

This robot mower from the Chelsea Flower Show is quite a leap from the sheep that were the original mowers
I have to admit that I don’t pay much attention to my lawn. I mow it as needed, but don’t fuss about dandelions, which I consider cheerful. But I realize many gardeners DO care about their lawns, so I will share with you a few tips for the fall.
There are often places on lawns where someone left a wading pool or forgot a pile of weeds. Now is a good time to re-seed. Why? The soil is warmer than in the spring, and it is less likely to dry out now than in the summer.
To fill in a bare spot, first scuff the area with a garden rake – the kind with strong, short tines. Then spread some good compost, perhaps half an inch of it. Mix that in with your rake. Compost encourages healthy bacteria and fungi to live in the soil, supporting your lawn.
Next, spread seed over the area. For small areas, you can just take seed in your hand and fling it. Seed spreaders are sold if you have a large area. After seeding, drag a lawn rake over the area upside down – with the tips of the tines up. That will mix the seed with the soil and compost, but not rake the seed away the way it would if the tines were down. Pat down the area with a tamper, your feet, or a lawn roller if you can get your hands on one.
There are special fertilizers available for lawns, but I’m not a fan of chemical fertilizers for a number of reasons: they are made with chemicals that are not suitable for organic gardeners. Some are even combined with pesticides of various types – to prevent weeds, insects, grubs, fungus or moss. Even organic fertilizers need to be used with care: phosphorous (the middle number in the 5-10-5 designation) is prohibited in any lawn fertilizer in many states because phosphorous can cause problems in waterways.
Some people like to shade the newly planted area by spreading a thin layer of mulch hay or straw. That helps to keep the new seed from drying out in the sun. The grass will grow right through it. Be sure to water if the soil starts to dry out. It is critical to keep the seeds from drying our once planted.
Over-seeding is good to do now, too. That means adding some seed to thin places, not just those bare spots. Follow the same procedure: scuff, add compost, seed, mix in with your rake.
What seed should you use? I generally recommend a “conservation mix”. This has a mixture of varieties of tough grasses including tall fescue. I like Dutch white clover in the mix, as it will take nitrogen from the air and add it to the soil – free fertilizer. Clover, however, is killed by the herbicides sold to kill weeds in lawns. Kentucky bluegrass is sometime touted as the best grass for lawns, but it is a high-maintenance variety, and should never be more than 20% of a mix.
If you have trees shading your lawn, get lawn seed designated for shady areas. If not, it will not thrive. And over time, a sunny lawn often becomes a shady lawn as trees along the perimeter get bigger. Maples steal a lot of water and nutrients from a lawn, and their roots extend way past their drip line.
What should you do about moss in the lawn in shady spots? I like it. You can let it take over, or you can rake it out and add limestone to sweeten the soil – moss likes acidic soil. And I guess you have to cut down some trees or lop off branches to get more sun on those mossy places. Me? I live with it. I’ve seen labels on bags on “Death Row” (the chemical aisle at the garden center) that promise “No More Moss for a Year” and shudder at thoughts of my earthworms and beneficial fungi and bacteria dying from the moss killer. Ugh!
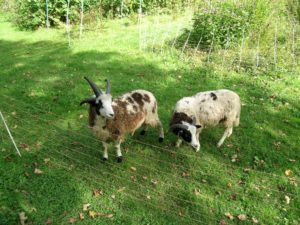
I used sheep as lawnmowers for part of my lawn one summer., but they were a lot of work!
Fall is a good time to send off a soil sample to your state university extension service to see what the soil is like in your lawn. If the soil pH is less than six, you should add some limestone this fall. It will raise the number, but slowly, so it’s good to do it now. The report will tell you how much limestone to add, and should also tell you if you need to add organic matter, phosphorous, potassium or magnesium. If you are low on magnesium, buy dolomitic limestone, not calcitic limestone.
If you walk across the lawn in the same path every day, eventually the grass will get so compacted it will stop growing, particularly if you walk on it when the grass is wet. The solution? Put down stepping stones or pavers as lawn will not thrive in compacted soil.
If you plan to put down stones, cut out the grass underneath them first. Do this by using an old steak knife. Cut around a stone, then move it and dig out the sod and any soil needed so that the stone will be about level with the lawn. I like a CobraHead weeder for that. By having the stones level with the lawn you can mow over it without hitting them with the mower.
Fall leaves are great for the grass. Put the mulcher attachment on your mower to chop them up fine, starting now, and let the earthworms feast on them. Don’t leave too thick a layer, however, as it can choke the grass.
A little lawn is a nice thing. But my philosophy is this: if it’s green and you can mow it, it’s a lawn. I’ll never get hung up on having a magazine-perfect lawn.
Henry hopes to help lead a Viking Cruise from Paris to Normandy next June, including a stop at Monet’s garden in Giverny. For more info, e-mail Henry at henry.homeyer@comcast.net. He will be giving gardening lectures evenings on the boat.
Six New-to-Me Trees to Consider for Planting
Posted on Tuesday, September 17, 2019 · Leave a Comment
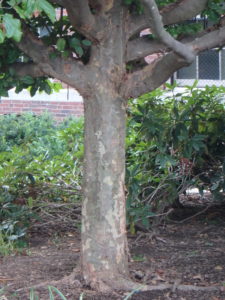
Persian ironwood has interesting bark
The Amherst campus is a perfect place for a tree walk: they have been planting trees for over 100 years, and have not only some state champion trees, but at least one national champion. Mike Dirr, a UMass graduate, has been consulting with the landscape personnel for years. Here are 6 trees I did not know, but am considering for use in my own gardens.
- Three flowered maple (Acer triflorum). I had never seen one before, and although it is available in some nurseries, it is not common. Hardy to Zone 4 (minus 30 degrees). It is a small maple, up to 20 or 30 feet tall and wide with great fall color. The exfoliating bark is interesting, giving the tree winter interest. It gets its name from its yellow-green spring flowers that come in clumps of three. This would be a nice street tree.
- Amur maackia (Maackia amurensis). This is another small tree, getting to be about 30 feet tall and 20 wide. It has an upright form with glossy dark green compound leaves. One of its main virtues is that blooms when many other trees are done blooming – probably in July in New England. The flowers are small and white, arranged on 6-inch vertical panicles.
It is a great street tree because it will grow in any type of soil and is not fussy about soil pH. It is hardy to about minus 40 degrees.
- Tuliptree (Liriodendron tulipifera). In contrast to the trees above, this is a majestic tree that has grown to be up to 200 feet tall in the wild, though generally 70 to 90 feet in cultivation. It has a strong straight trunk. I first fell in love with it in New York City’s Central Park. One planted by George Washington is still alive at Mt. Vernon, and both he and Jefferson loved this tree.
The leaves are tulip-shaped and up to 8 inches wide. The flowers appear in late spring and are yellow tinged with orange in the center, 3 inches in size. According Dirr’s new book, it is unfortunate that the flowers appear so high up, as they are difficult to see. I have used the seed pods as Christmas tree decorations.
Tulip tree Emerald City is not as tall as wild ones
What I had never seen before is the cultivar ‘Emerald City’ which is a smaller and hardier version of the classic. Although it can grow to 55 feet tall and 25 to 30 feet wide, Mike Dirr said in our climate it will probably not exceed 30 feet tall, and is hardy to as much as minus 35.
- Persian ironwood or Parrotia (Parrotia persica). This is another small tree (to 30 feet), one that can be multi-stemmed or single-stemmed. The tree I saw on the tour was single-stemmed and had wonderful mottled bark. The bark would be enough to make the tree a worthwhile investment – after all, flowers last but a moment, and we have many months of winter without leaves.
Parrotia blooms very early, in late winter at the time some witchhazel are blooming. The blossoms are small, and without petals according to Dirr’s book. They appear as “clusters of maroon-red stamens along the branches, bringing cheer to the cold dreary landscape.” In the fall the leaves often show yellow, orange, red and purple. Leaf borders in spring can be tinged with purple. Hardy to Zone 4.
- Swamp white oak, columnar varieties (hybrids of Quercus bicolor). Mike Dirr suggested to the landscape staff at UMass Amherst to plant some columnar oaks about 6 years ago in front of Herter Hall, and a variety of them are quite remarkable now, already reaching to 25 or 30 feet tall, but only 8 to 10 feet wide.
My favorite of the columnar oaks is ‘Beacon’, one called “Bonnie and Mike”, named after Dirr and his wife. It is one they discovered and introduced to the trade. It will grow to 50 feet but stay just 15 wide. Lovely foliage.
- Japanese snowbell (Styrax japonicus). This would be my first choice for a new tree on my landscape but it is only hardy to Zone 5 (minus 20, so it is “iffy” for me. It apparently has lovely fragrant white flowers in spring. It grows well in sun or part shade, and grows to 30 feet tall and 35 feet wide, though it grows just a foot or two per year.
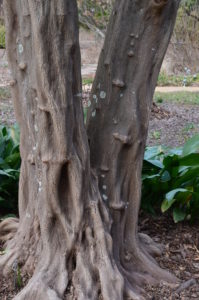
Japanese snowbell bark is unusual
But the selling point for me is the bark: “gray-brown, smooth, sinewy, developing irregular, orange-ish brown, interlacing fissures” according to Dirr’s new book.
I remember interviewing Tasha Tudor and being amazed that she was still planting trees when she was in her 90’s. So I shouldn’t hesitate to plant more trees now that I am in my 70’s. Finding the right tree and having enough space is my major challenge.
Henry is the author of 4 gardening books. You may reach him at henry.homeyer@comcast.net.
Tips for Squeezing Out a Little More Food from Your Vegetable Garden
Posted on Tuesday, September 10, 2019 · Leave a Comment
Want to maximize the output of your garden? Now is the time to act. Here are a few things you can do that will help.
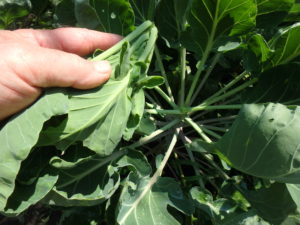
Remove top leaves of Brussels sprouts to get bigger sprouts
Brussels sprouts: Have you had trouble getting full-sized sprouts? These plants need to be topped in the fall to get the tiny sprouts to develop into full-sized ones. I do it each year on Labor Day, but you can do it now. Cutting off the top cluster of leaves means that the plants will no longer continue getting taller, and put all energy into beefing up those tiny cabbage-like sprouts to their full potential.
Brussels sprouts are very tough when it comes to frost – they will survive cold weather and snow without blinking. I’ve been known to wait until December to pick my sprouts, or to finish harvesting them. But be forewarned: deer love Brussels sprouts in the winter.
Swiss chard: Both Swiss chard and beets are in the species Beta vulgaris. Hundreds of years ago some plants were selected for their tasty roots, others for their leaves. But you can eat the roots of Swiss chard just as you do beets, and the flavor is almost identical. I like red-leafed Swiss chard roots the best. They are smaller, but sweet and tender – and a free dish you weren’t expecting when you planted them. Be sure to peel Swiss chard roots as they have fine roots that feel a little fuzzy if you don’t.
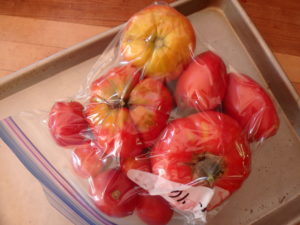
Freeze tomatoes to extend the season
Tomatoes: Right now I have more tomatoes than I can eat fresh, and don’t have time to make sauce. What to do? I freeze whole tomatoes raw, un-blanched. I just place whole tomatoes in zipper freezer bags. In winter when making a soup or stew I remove them from the freezer, run them under hot water in the sink. That loosens the skin, which I rub off. Moments later I chop the tomatoes and use for cooking.
Kale: In case you forgot to plant some, or the deer ate yours, there are alternatives. You can eat the leaves of any crucifer-family veggie (broccoli, cauliflower, cabbage, kale, bok choy, arugula, Brussels sprouts, collards, watercress and radishes). Pick newer leaves, as the older leaves may be tough. I recently used some Brussels sprouts tops in a smoothie, and they were fine!
Asparagus: Yes, I know the harvest is long over. But this is the time to maximize next year’s harvest. Weed your bed, rake off any mulch, and add an inch of good compost and some organic fertilizer. At the same time, pull out any new asparagus seedlings that have started from the little red “berries”, as they will compete with the mature plants.
Actually, modern breeding techniques have made better varieties available. Anything with “Jersey” in the name is all male, and will not produce berries that produce seedlings. Wait to cut back the fronds until they turn brown – green foliage is still feeding the roots.
Pumpkins and squash: Some vines will continue to grow until frost, but now is the time to rein them in. Cut back growing tips and let the existing vines feed your winter squash or pumpkins, and don’t let new blossoms remain on the vines. It’s too late for all but some fast-growing summer squash to produce food from blossoms appearing now.
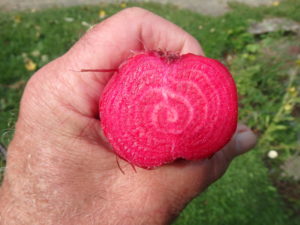
Sliced Swiss Chard root looks and tastes like a beet
Be sure to pick or cover your vine crops on nights when the temperature approaches 32. Last year I picked some small un-ripe pumpkins on a late afternoon when frost was forecast, and they ripened on my steps to a full orange. I brought them into the mudroom when frost was forecast, and by Halloween I had quite a nice display of orange fruits.
Cabbage: Instead of pulling your plants now, cut off the cabbages to harvest. Then cut an X into the stem. It’s a little late for this, but you might still get some small cabbages ranging in size from golf ball to softball. I have gotten 4 little cabbages from each stem by doing this.
Chives: This is the time to dig some up and leave outside in plastic pots (which won’t be damaged when they freeze). You can then bring them in, one at a time, and when they thaw, the leaves will be fresh and tasty. When finished harvesting, just put them outside until spring and re-plant. They will be no worse for wear.
Rosemary: Another good herb for winter use. I grow mine I pots and bring them in and grow on a sunny south or west-facing window. If you have some in your garden, pot it up now. But don’t bring it inside. Let it get used to being in a pot right where it has been growing.
Rosemary is hardy to about 25 degrees, and a little frost will help minimize problems with aphids when you bring it in. Do not fertilize when you pot it up, but do shake off some of the soil and pot it in potting mix to improve drainage. Don’t overwater, but never let potted rosemary dry out completely – it will die.
If you have some tips for squeezing out a little extra food from the garden, please send them to me either at P.O. Box 364, Cornish Flat, NH 03746 or at henry.homeyer@comcast.net. Thanks! And contact me if you are interested in going on a Viking River Cruise with me next June from Paris to Normandy and back, with a stop at Monet’s garden in Giverny.
Fall Color in the Flower Garden
Posted on Tuesday, September 3, 2019 · Leave a Comment
Big yellow buses are growling as they lumber down country roads, delivering their children to school. Soft serve stands are warning of imminent closure. Favorite flowers are finishing their blooms. Sigh. Fall is here. But don’t despair: there are plenty of colorful plants to fill vases and warm our hearts. Let’s look at a few I like.
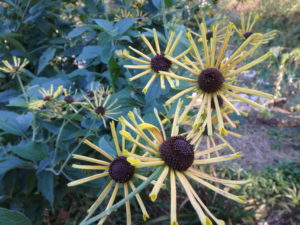
Henry Eiler Rudbeckia blooming in October
Most of us have black-eyed Susans (Rudbeckia spp.) of some sort blooming now, either wild or planted. ‘Goldsturm’ is one of end most common, a nice one that has branched stems loaded with blossoms. But do you know one called ‘Henry Eiler’? It is much taller, and has narrow petals spaced out around the blossom, giving it an airy look. For me it blooms well into October. I have a big clump several years old, and need to tie it to keep the 5- or 6-foot stems from flopping. ‘Prairie Sun’ is wonderful one with a green eye that blooms consistently from July to after Halloween.

Turtlehead
Turtlehead (Chelone lyonii) is one of my favorite fall bloomers. Each stem has numerous pink helmet-shaped blossoms an inch long that resemble, well, a turtle head. I love it in part, because it attracts bumblebees that force their way into the blossoms and disappear. I can hear them buzzing inside the blooms.
It does best in rich soil that is consistently moist to wet, but will grow in less desirable soil. I recently saw it on the Maine coast growing in hot, dry sandy soil, though it was much shorter than the 4-to5-foot stems I have. I grow it in full sun and also light shade, and each year the clumps get bigger. I never have trouble with it flopping, but have read that can be a problem in shady locations.
Joe Pye Weed (Eutrochium purpureum) is a native wildflower that appears alongside streams and in wet places. It can be grown in average garden soil, but if it is a dry location, some shade will help it. The small flowers are a pinky purple arranged in panicles that are about 6-inches across. The stems, a dark purple to almost black, contrast nicely with the deep green leaves.
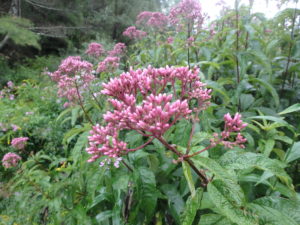
Joe Pye weed Gateway blooms longer and better than the wild forms
Joe Pye weed is a big plant that requires lots of space. I have one clump that is now more than 8 feet tall, though 6 feet in average garden soil is more the norm. ‘Gateway’ is the best of the named cultivars, I think, but I have heard that a smaller variety called ‘Baby Joe’ is only 3 to 4 feet tall and 2 to 3 feet wide. I’m looking for one to try, as Gateway is too big for most beds. Moving a mature clump is almost impossible without a back hoe – or dynamite. I did it once, and won’t again.
When find a flower I like, I collect other species of the same genus. So it is with the burnets. First I planted Canadian burnet (Sanguisorba canadensis), our native species that grows by streams and wet places. It has white bottle-brush flowers on stems 4- to 6-feet tall in a wet area near my stream. It will bloom well into November.
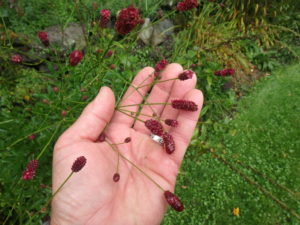
Burnet makes a good cut flower
Other burnets that I grow vary from a 6-inch tight cluster of variegated leaves and tiny burgundy blossoms to 6-foot tall plants with deep burgundy bottle-brush blossoms. Sanguisorba obtusa and S. stipulata are two of the species I grow, though the plant tags are long gone, so I’m not sure which is which. The foliage for most of the summer is very nice. I grow burnets in sun and rich garden soil.
Blooming now, obedient plant (Physostegia virginiana) is one of the least obedient plants I have grown. I have banished it to the edge of the woods in areas that would otherwise be just weeds. The pink or white flower spikes are great cut flowers, but the plant just won’t sit still. Its roots move fast, colonizing and pushing out well behaved plants. And it is tall: 3 to 8 feet!
The variegated form, however, is not a thug. It grows just to 3-feet tall; it does tend to flop, but it blooms later and doesn’t attempt to take over the world. It too, has pink flowers. Worth trying. Mine is yet to bloom this season.
Although I am a little far north to make my Arkansas amsonia (Amsonia hubrechtii) as big and bodacious as it is in places like Pennsylvania, it is still a great plant. Its steely blue flowers in June and July are nice, and the finely cut foliage is good all summer. But in the fall it excels: its leaves turn a lovely yellow that would make the plant worth growing, even without any flowers. Mine now stands nearly 3 feet tall and wide, and it gets even bigger in warmer locations.
Lastly I have to tip my hat to all those wonderful hydrangeas. Hybridizers have developed so many different named cultivars that I can’t keep track of them all. I’m not talking about the blue one, mysteriously called ‘Endless Summer’ which should be ‘Endless Disappointment’. It often fails to perform well after year one.
The classic PeeGee hydrangea has big white clumps of flowers that, if cut now, will look good in a dry vase all winter. And I love the pink ones like ‘Pinky Winky’ and ‘Pink Diamond’ (my personal favorite). ‘Limelight’ is a white blossom with green overtones, another great one.
So go to your local, family-run garden center and ask what they have that blooms now, and until late fall. Your garden doesn’t have to be dull now.
Next June I hope to help lead a Viking River trip down the Seine from Paris to Normandy. Interested? Just e-mail me at henry.homeyer@comcast.net. I’ll be giving garden talks in the evenings, and we’ll see Monet’s garden along the way.
Growing Flowers in Shade with Root Competition
Posted on Saturday, August 31, 2019 · Leave a Comment
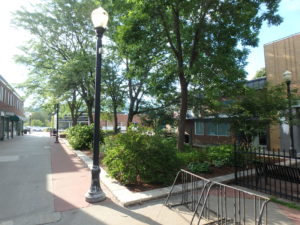
This shade garden has had 10 years of care
Folks who only have shade often give up on gardening because they cannot grow things like poppies and peonies, and only know “boring” shade plants planted for their foliage rather than their blossoms: hostas, pachysandra and myrtle. But even those plants don’t necessarily grow vigorously in shade. More often the not, the problem is not shade, but root competition.
Ten years ago my partner, Cindy Heath and I accepted the task of designing and installing a garden for the city of Lebanon, NH on the mall near two nice restaurants. The space is 30 feet wide and 60 feet long. When I took on the job it had 3 locust trees and 2 green ash trees which kept most of the potential garden in shade. The soil was covered with 3-4 inches of bark mulch, many weeds, and half a dozen hostas. We got the city to remove one tree, so there are sunny places now.
When I dug into the bark mulch I found roots from the trees everywhere; when I dug into the soil I found gravel, sand, bricks and rubble. Not a place conducive to gardening – even the weeds were struggling and undersized. Anything planted in the space would be competing with the trees for both minerals and water.
So here is what we did: we had good soil and compost brought in and spread out everywhere – 3 or 4 inches deep. We covered the mulched wood chips with soil to break down over time, adding much needed organic matter.
Next we built berms: mounds of soil and compost 8-12 inches deep arranged in large beds with curved lines. The tree roots eventually migrated into these “root free zones”, but by then the plants there had established themselves and were better able to compete with the tree roots.
At planting time we added plenty of slow release fertilizer and mineral supplements. I used a slow-release organic fertilizer, along with green sand and rock phosphate.
Green sand is a natural soil supplement that increases potassium levels and adds many micronutrients from the sea, where it formed millennia ago. It promotes strong cell walls, which helps plants withstand drought, heat and cold.
The rock phosphate, which is a finely ground rock containing significant quantities of slow-breakdown phosphorus-containing minerals, will not wash away and breaks down over a multi-year period. It promotes good root growth and flowering.
We top-dressed the plants most years with extra fertilizer and minerals, knowing that they are competing with the tree roots. A local volunteer waters during dry times, which helps a lot.
What did we plant? We had been given hostas and daylilies by local citizens, along with a few irises. I timed the sun traveling across the sky and saw there were places that got 6 hours of sun – enough for the daylilies, iris and few annuals. New Guinea impatiens and impatiens have done well most years, and in the sunnier spots zinnias, marigolds and cleome are welcome color.
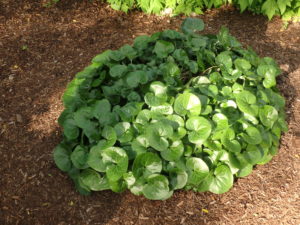
European has spread and thrived in deep shade and root competition
What plants have thrived, now 10 years later? Hostas did great. European wild ginger (Asarum europaeum), with its glossy green leaves has thrived, forming big clumps. We planted a small patch of snakeroot (formerly Cimicifuga racemosa, now Actea racemosa) that has done fabulously, with flower stalks standing 5 feet tall with white, bottle-brush, fragrant flowers. It has spread to fill in its bed nicely.
Bigroot geranium (Geranium macrorrhizum) has done fine, with spring flowers and nice leaves all summer long. I also planted fringed bleeding heart (Dicentra exemia), which also did fine.
What disappeared or failed to thrive? A ground cover known as spotted dead nettle (Lamium maculatum). Normally dead nettle thrives in shade, but the root competition was too great, and it is virtually gone. Also almost gone now is lungwort (Pulmonaria officinalis), another shade stalwart. Coral bells (Heuchera spp.), which does well in shade elsewhere, did not survive. Daylilies, even those tough common orange ones, have survived – but have not thrived.
Snow Hills hydrangea aborescens
We also planted a few tough shrubs, and all have done well: a Miss Kim lilac, 2 shad bushes (Amelanchier spp.) and a pair of hydrangeas (Hydrangea arborescens), a variety called ‘Hills of Snow’. This has smaller blossoms than the popular ‘Annabelle’, but does well in shade and the small flowers do not flop so much on rainy days. When planting the shrubs I dug extra wide holes to keep the existing tree roots at bay a little longer. We cut back any tree roots we found at planting time.
So don’t despair if you lack a nice sunny spot for flowers. Even in dry shade you can have flowers – but you may have to try several to find just the right ones for your situation.
I am hoping to help lead a Viking River Cruise next June from Paris to Normandy and back with stops along the way – including Monet’s magical garden, Giverny. If there is enough interest, we might have 3 days in Paris looking at gardens there. If you are interested, e-mail me at henry.homeyer@comcast.net.
Beware the Purple Invader
Posted on Friday, August 30, 2019 · Leave a Comment
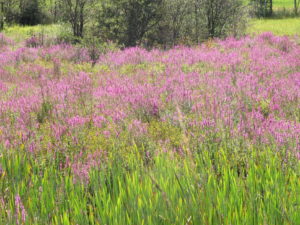
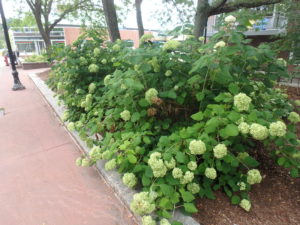
Purple loosestrife can take over a wetland, but will also grow in dry places if given a chance
This is the time of year when swampy areas often are ablaze with gorgeous pink-purple flowers that dominate the wetland. These are the flowers of purple loosestrife (Lythrum salicaria), an invasive plant that you should not encourage – but that you probably can’t get rid of once established.
Most invasive plants come from another continent, start easily from seed, are difficult to eradicate, and often have no natural predators away from their homeland. That is certainly true of purple loosestrife.
But why worry about this purple invader? It’s such an aggressive grower that it out-competes native plants. It moves into shallow wetlands where fish and frogs lay their eggs among native plants, creating a dense mono culture. Biodiversity is healthy for the environment, and purple loosestrife inhibits many other kinds of plants from growing.
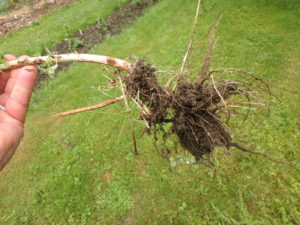
Roots of purple loosestrife spread and send up new plants
Mature plants develop massive root systems that will challenge even the strongest backs so they can’t be dug out. They also develop long side-roots that will easily break off and start new plants if you try to remove the clumps.
A big clump can produce up to 2.7 million seeds in a year. And like time-release cold capsules, the seeds become active over time, not all in one year. And since they grow in wetlands, you can’t use herbicides. So what can you do? There are steps you can take to reduce the problem.
If you have big, established plants the best thing to do is cut them down multiple times each summer, just above the soil line. This will prevent them from flowering and producing seeds. It will also reduce the vigor of the plants. It won’t kill them, so this is a lifetime job, like it or not. A string trimmer will do the job, if you have one.
You can, however, pull out or dig out first or second year plants, so need to be able to identify them. Look for plants with a square stem that quickly get 18 to 24 inches tall, and may have a reddish-brown tinge to their stems. Older plants get to be 3 to 7 feet tall or more. Leaves are long and narrow with a smooth edge, and they attach directly to the stalk – without an attachment stem. Leaves generally appear in pairs, across from each other on a stalk. Many flower stems arise from the main stem.
There is, perhaps, relief in sight. In some states, including Rhode Island, Connecticut and Massachusetts in New England, have programs to introduce non-native beetles that will eat the purple loosestrife. Two beetles, Galerucella calmariensis and Galerucella pusilla, have been introduced and found effective in reducing stands of loosestrife.
Will those beetles eat your peonies or tomatoes? No. The process for introducing a new species is carefully regulated by our government to protect our crops and gardens from new pests. These two species of beetles were tested on many crops while kept in quarantine before being released. They specifically eat purple loosestrife, but not other plants.
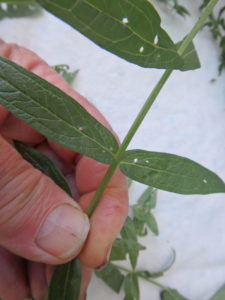
Loosestrife leaves attach directly to the stems and are opposite each other
The beetles will never completely eradicate loosestrife. As loosestrife populations dwindle, so do numbers of the beetles. If the loosestrife starts to spread, the number of beetles rebounds. The bad news? You can’t buy these beetles. I’m not sure why.
Purple loosestrife, like most problem plants, is from another continent – in this case, Europe and Asia. I’ve read that the seeds of purple loosestrife probably came on sailing vessels that used sand or soil as ballast to balance their loads in the 18th century. That soil was dumped on arrival and a few seeds found a foothold. Without any natural predators, the plants spread.
Birds are often agents of distribution of seeds of invasive plants. They eat the seeds, which are often covered with a non-digestible outer coating. The birds get little benefit, and the seeds are distributed to new locations. Waterfowl can carry seeds on their feet. So even if you don’t care about loosestrife on your land, or think it is pretty, be aware that leaving it to bloom and go to seed means that it will spread to other areas. You are doing a service to the environment if you inhibit the loosestrife from spreading.
Storm drains are another vector for spreading invasives, particularly in cities. Rains wash seeds into the drains, which take the water to a river or wetland which then spreads them further. So even if you live in a city, try to rid yourself of invasive plants like purple loosestrife. Each state has a list of prohibited plants that is available, with pictures, on-line.
I was shocked to read that seeds for purple loosestrife on-line. Most nurseries stopped selling them decades ago. And even if a cultivar is listed as “sterile”, I wouldn’t buy any. The chances of non-sterile seeds arriving in the mix are too great. Purple loosestrife is a plant I really don’t want in my garden – or yours!
I am hoping to help lead a Viking River Cruise next June from Paris to Normandy and back with stops along the way – including Monet’s magical garden, Giverny. If there is enough interest, we might have 3 days in Paris looking at gardens there. If you are interested, e-mail me at henry.homeyer@comcast.net.


 Click Here to buy from Cobrahead