Primroses and Other Great Plants for Shade
Posted on Tuesday, June 13, 2017 · Leave a Comment
If I were to be consigned to life on a remote island, what one flower would I bring along with me? That’s a bit like asking you which child is your favorite, or which piece of music you could listen to for all eternity.
There are so many wonderful flowers, but some years ago I pondered the question and selected the peony ‘Festiva Maxima’. That’s a double white one with a spot of red in the middle, and a fragrance so alluring, I wrote, that it could make one swoon. I acknowledged that Festiva Maxima does have a flaw: rain weighs down the blossoms, and sometimes the flowers break their stems – even if in a peony support cage.
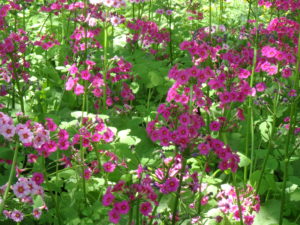
Primula japonica
But if you were to ask me today, I would say my favorite flower is the Candelabra or Japanese primrose, Primula japonica. I have a patch of them blooming in the shade of 3 old wild apples in moist, dark soil. I started with just a few plants, but they drop seeds and fill in spaces, overtaking what was once a meager, struggling lawn.
I estimate that right now I have 200 to 250 square feet of primroses in full bloom; in a 3 foot by 3 foot square, I counted about 25 or 30 plants in bloom – so I have more than 500, perhaps even 750. All this in 10 or 15 years, and no work other than a once-a-year weeding of Jewel Weed, which also loves the conditions.
Each plant has a rosette of light green leaves and sends up a flower stalk 12 to 36 inches tall. Flowers ring the stalk in tiers, starting with one tier, and working up to 4 tiers of blossoms on the oldest plants as the season progresses. At each tier there are a dozen small blossoms – or up to 20 – pointing out like bugles. Each blossoms is about an inch across.
The colors vary as they hybridize. My favorites are a deep magenta. At the other end of the spectrum are the whites, though not pure white. Then there are pink, and dark pink ones. All are fabulous. Fragrance? Nothing much. But that would be like expecting a prize poodle to be able to read the newspaper.
The bloom period starts for me in late May and goes through most of June. A month or more with some blossoms. At any given moment a plant might have just one ring of flowers, or up to 3. As the flowers fade and die off, some develop a nice light blue.
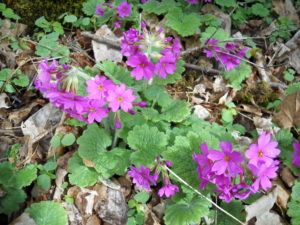
Primula kisoana
Before the candelabra primroses bloomed came another nice one, albeit with no common name, Primula kisoana. This one, unlike the other, will grow in either moist or dry shade. It has lovely pink blossoms that pop up just 6 inches above the fuzzy leaves that are so dense that they keep weeds from appearing. The leaves are 5 inches or so wide with a scalloped edge and a light green color.
One of the greatest things about the Primula kisoana is that it spreads by root. But unlike mint or bee balm, this little beauty does not run over and outcompete other plants. It will politely meet up with the roots of another, and move to the left or right instead of grasping for every inch of soil. Where I have it in dry shade it gets some morning sun, but no afternoon sun.
Another nice plant I have blooming now, and which can act as a ground cover, is bigroot geranium (Geranium macrorrhizum). To avoid confusion I should explain that the bright red or white geraniums popular in window boxes are not geraniums at all, but are in a genus (scientific grouping) known as Pelargonium. Geranium is a genus of hardy perennials.
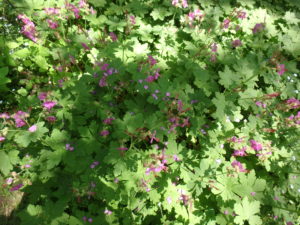
Geranium macrorrhizum
The bigroot geranium thrives where other perennials may survive, but few love: dry shade with competition from tree roots. Maples and locust are notorious for sucking everything out of the soil, yet I have planted the bigroot geranium under those trees, and had them thrive. Will they grow under hemlocks or pines? No, that’s asking too much.
Bigroot geranium comes in at least three colors: white, pink and dark pink. The leaves are about a foot tall, with the flower stems standing above them at about 20 inches. Their leaves form a dense mass of foliage that most weeds find inhospitable.
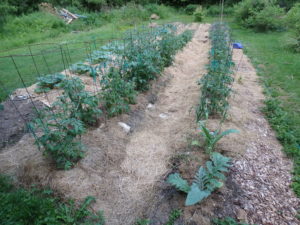
On another note, many readers have been complaining that their tomatoes are yellow-leafed and miserable looking. Not to worry. Tomatoes need sunshine, and early June was, for most of us, rainy and cold. They will recover soon.
Plants suck up moisture that contains the minerals they need – but only if the moisture is required to replace water that the plants have given off. They don’t give off much water vapor when it’s chilly and wet, so they can get nitrogen-starved. With heat and sunshine they will recover.
I have set up Adirondack chairs near my primroses and spend at least some time there every day. And even though I’ll never have to pick just one flower to grow, these primroses are a real delight to me.
Read Henry’s twice weekly blog at https://dailyuv.com/gardeningguy. Reach him by e-mail at henry.homeyer@comcast.net.
Mulching: Hay, Straw and More
Posted on Tuesday, June 6, 2017 · Leave a Comment
If weeds are the bane of the gardener, mulch is the gardener’s friend. Not only that, mulch can hold in moisture in dry times, and give a nice, tidy look to the garden.
Let’s start in the vegetable garden. Properly mulched, weeding can be minimal – say an hour a week for a big garden like mine. I keep down weeds in my walkways and around all large plants like tomatoes with a one-two punch: a layer of newspapers (4 to 6 pages thick) and a layer of straw or mulch hay (4 to 6 inches thick before it packs down).
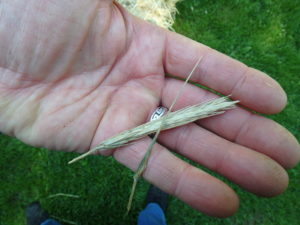
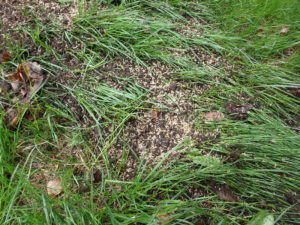
This straw seed head has no seeds
What is the difference between mulch hay and straw? Price, for starters. You can easily pay $8 to $10 a bale for straw, and as little as $2 or $3 for hay. Why is that? Straw is grown as a crop specifically sold as mulch, and it has no seeds. You might see what appear to be seed heads, but they are empty as the farmer grows rye, then cuts it before pollination takes place.
Hay is a waste product: food for dairy cows that got rained on, and is no longer edible. Picky eaters, those dairy cows. And it has plenty of seeds. The newspapers I put beneath it generally keep hay seeds from growing in the garden. But some seeds will escape and grow – particularly in the spring of year two unless you did a phenomenal job of cleaning up in the fall.
Many gardeners use black landscape fabric in the flower garden, covered with bark mulch or wood chips. The fabric is a good barrier, though the roots of some weeds and grasses can get through it, making it difficult to remove. Other gardeners use bark mulch directly on the soil, and that can be effective, too.
If you use wood chips or bark mulch, be sure not to place too thick a layer down. Two to three inches is good, 4 to 6 inches is bad – the mulch will keep a quick rain shower from getting moisture to the roots of your plants.
Hay & newspapers used as mulch
Some gardeners worry about bark mulch stealing nitrogen from the soil as it breaks down. Don’t. Yes, the microorganisms that break down the mulch need some nitrogen, but I have never seen plant leaves turn yellow (the sign of nitrogen deficiency) because of mulch. Or if you must worry, just put a layer of slow-release organic fertilizer on the soil beneath the mulch.
You can buy wood chips or ground bark mulch in bags or by the truckload. Buying it by the bag is convenient if you just need a little, but it is much more expensive that way.
If buying wood chips by the bag, read the label. If it says, ‘color enhanced’, I would avoid it. It means the chips have been dyed – and I am an organic gardener who does not want chemicals. I have heard that some cheap wood chips are actually construction waste that has been chipped and dyed – old 2-by-4’s and the like.
I like ground hemlock because of the color, and the fact that it tends to last longer than some others (except cedar, but I have only found that for sale in bags). I buy the hemlock by the pick-up truck load.
And please, for the health of your trees, do not create “mulch volcanos.” To keep down weeds some gardeners pile wood chips right up against the trunks of trees in a volcano shape. The wood chips may harbor fungi and bacteria that can attack the bark of your precious tree, eventually killing it in 6 to 10 years. Instead of a volcano, create a “donut.” Leave 3 or 4 inches of space between the tree and the mulch.

Leaves are great mulch
My favorite mulch? Fall leaves that have been run over by a lawn mower, then raked and stored for the spring. Full of goodness for the soil, and a good deterrent to weeds. Over the years, leaves will enrich your soil considerably. And they’re free!
Cocoa mulch is sold as a mulch, and I know some who love it. It has a very fine texture and looks nice. But it smells like chocolate chip cookies when it first goes down, and some dogs have been known to consume it – causing sickness and even death if one believes everything one reads on the internet. Chocolate products are bad for dogs. It also tends to mold, though that only lasts a week or so. It can be very slippery when wet; I advise against using it on a hillside.
Buckwheat hulls are an alternative to cocoa mulch, but they are not sold in many garden centers. Like cocoa hulls, they are very fine textured and look very nice, but are very expensive compared to bark or wood chips.
At the Chelsea Flower Show, which I attended recently in London, someone had quotes about gardening stenciled onto blank walls. One of my favorites was from Robert M. Pyle: “But make no mistake: the weeds will win. Nature bats last.” So mulch, but don’t expect to get a summer of weed-free gardening.
Read Henry’s blog at https://dailyuv.com/gardeningguy. He has a dozen photos from the Chelsea Flower show there now. You may e-mail him at henry.homeyer@comcast.net.
The Chelsea Flower Show
Posted on Wednesday, May 31, 2017 · Leave a Comment
It would be a bit of an exaggeration to say that I have always wanted to attend the Chelsea Flower Show in London. But not much. For years I’ve dreamed of going – and finally, this year, I went. Air ticket prices are down dramatically, the dollar is strong, and I decided there was no better time than now to cross off yet another item on my bucket list. It was well worth the effort.
Some basics: the Chelsea Flower Show is held on the grounds of the Chelsea Hospital in central London, which is now a retirement home for World War II soldiers. The show is bigger than anything in America: it encompasses 11 acres of displays, the vast majority of which are outdoors. That means that full-sized mature trees are installed, and in one case, a garden in a faux stone quarry was installed with blocks of stone stacked up more than 25 feet.
The show includes garden displays, rare plants, sculpture, food courts, vendors selling garden paraphernalia, music and much, much more. It has been an annual event since 1913 with the exception of a few years during the World Wars .
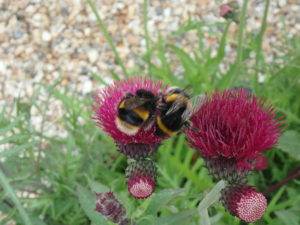
Cirsium rivulare Atropurpureum
Tickets for next year’s show go on sale August 1, and although prices are not yet posted, tickets are not cheap – this year a full day ticket went for 100 pounds (($128). Each year the number of tickets is limited and they generally sell out before the event – this year some determined attendees apparently paid scalpers 500 pounds and more. It’s the Super Bowl of gardening.
If you want to go next year, the best plan is buy a membership to the Royal Horticultural Society, which allows you to attend a day before the doors open to the public, and offers discounted tickets.
I go to flower shows to learn. I delighted in seeing new (to me) species of flowers and new ways of combining flowers in the garden. I loved meeting garden experts and artists who created sculpture for the gardens.
So what are some of the things I learned? Thistles, which we generally consider weeds, can look great when planted in the garden. There I was in a city of millions, and a thistle, Cirsium rivulare ‘Atropurpureum’, was loaded with bees of all sorts! Clearly a great pollinator. Although a quick internet search did not lead me to seeds for that magenta-purple variety I saw there, I did find some seeds for a species native to the U.S. – Cirsium discolor – that is not the weedy pest farmers hate. So I shall order some seeds and try growing it.
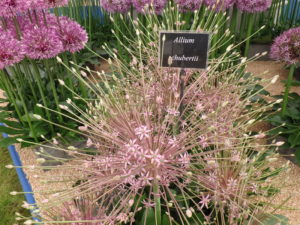
Allium schubertii
Alliums were in all their glory at the show. Big, dramatic balls of flowers on 18- to 30-inch stems were used in many of the gardens. These are bulb plants in the onion family, and I have a few. I shall look for Allium schubertii which has an other-worldly pinkish flower head about 16 inches across. Another good one was just labeled with its variety name, ‘Powder Puff’.
Angelica (Angelica gigas) is another flower that was often used in the show. This is a 3- to 5-foot tall purple-leafed flower that I grew 25 years ago, but it is a biennial that does not come back after flowering, and I dropped it from my plant palette. But I have already purchased and planted one since returning from the Chelsea show. It can be very dramatic in the garden.
Ferns were used as filler in many of the gardens at Chelsea, and I shall try using them, too. Of course, their gardens only had to look good for 6 days, so ferns that spread, or get too tall, were not a problem, though they might be in my garden. I have a patch of Japanese Painted Fern (Athyrium niponicum) which is great in dry shade. But this summer I will investigate other ferns. Many nurseries sell them, but I admit I haven’t paid much attention to them.

George Ball of Burpee
Interesting people I met? George Ball, owner of Burpee Seeds was there. He is a highly knowledgeable (and opinionated) plantsman who is passionate about seeds. I was interested to learn from him that Melania Trump’s grandfather was a Slovenian onion breeder.
Mr. Ball pointed out that most vegetable seeds originally came from Europe, which is actually farther north than we are – and hence not good choices here. He believes that modern hybrids, not heirloom seeds originally from Europe, are best. And he told me that in a blind taste test, 4 of 5 times, Burpee’s hybrid ‘Brandy Boy’ beat the heirloom ‘Brandywine’, which is one of my favorites for flavor. I am trying it this year, since it ripens earlier, and produces more fruit, according to him. I’ll let you know how mine do in August.
At a reception on press day by David Austin Roses for a new rose named after actress Dame Judi Dench, who was there, I met the 91-year old founder of the company. I was able to thank him for all the beauty he has introduced to the world.
The English know how to throw a party – or have a flower show. Picnics with champagne were everywhere. Women were dressed in flowered clothes and elegant garden hats; men wore suits, even in the hot sun. Of course, everyone was very polite. And I got to check off another item on my bucket list.
Read Henry’s twice-weekly garden blog at https://dailyuv.com/gardeningguy You may reach Henry at henry.homeyer@comcast.net or P.O. Box 364, Cornish Flat, NH 03746.
Tips for Growing Better Roses This Summer
Posted on Monday, May 22, 2017 · Leave a Comment
My grandmother and mom grew roses, even though their roses were often plagued by bugs and diseases. But in recent years the rose industry has produced a number of carefree roses that anyone with 6 hours of sunshine and even a slightly green thumb can grow.
Roses
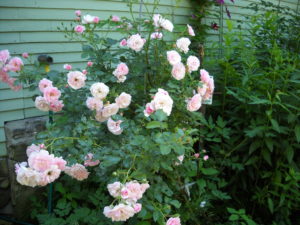
Probably the first place to start a quest for a great rose would be at a good family-run garden center. Find the rose expert there, and ask about good varieties for your area. In general, fragrant roses tend to attract Japanese beetles and other insect pests. I personally like the ‘Knock Out” rose series. These roses are highly disease resistant and, in my experience, they attract few pest bugs. There are other disease-resistant varieties, of course.
If you live in a cold place where winters reach minus 25 or more, I’d look at the Canadian Explorer series of roses. These were developed in Ottawa, Canada and include those tough rugosa roses in their gene pool. Rugosa roses are also called beach roses, since they often grow in pure sand on the dunes of Cape Cod and elsewhere.
A good resource for selecting and maintaining problem-free roses is a book I like very much, Roses for New England: A Guide to Sustainable Rose Gardening by Mike and Angelina Chute. This book is full of information relevant to New England gardeners, and reading it would be a good way to educate yourself about roses. It reinforces what I have learned about roses over the years – and taught me some things I didn’t know.
So what do roses want? Good soil with a slightly acidic pH, plenty of sunshine, soil that is slightly moist all the time, a little fertilizer, and someone who loves them and is willing to pull off the beetles and drown them.
The soil that roses want is a good loam amended with compost. Dig a hole that is about two and a half feet wide and 18 inches deep. Keep half the soil and mix it with an equal amount of compost in a wheelbarrow or on a tarp.
You could send away a soil sample to determine the soil pH and to see what minerals are deficient, though that might take a few weeks before you get a response. Or you could just go to your local garden center and buy a kit for testing soil pH. Much of New England has acidic soil, but roses like something in the range of 6.0 to 6.8 – slightly acidic.
You can improve your soil pH by mixing in limestone (which is available in bags at your garden center). Mixing in a cup per rose is a good start, depending on your soil pH. I knew a rosarian who always buried a 4 inch square scrap of Sheetrock (wallboard) beneath each rose to provide calcium and improve soil pH over time. A cup of bone meal or rock phosphate at planting time will add phosphate, a mineral that roses need.
Roses need sunshine to do well, the more the better. The Chute’s book taught me that if you have to choose morning sun or afternoon sun, go for morning sun. That way the dew dries up more quickly – and fungal diseases, which love wet leaves, are minimized naturally. Six hours of sun is considered adequate, but the Chutes mention that roses with fewer petals need less sun to bloom.
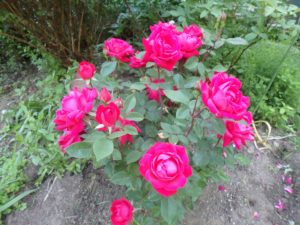
Knock Out rose
I have a rose right near my front door – and the hose that is connected there. It has bloomed well for decades, in part, because every time I fill a bucket, wash the car or use the hose, I give the rose a nice drink. Roses love water. I have a watering wand on the hose so that I can direct water to its base, and not wet the leaves. In dry summers watering roses is key. How much? At least 5 gallons per week for a mature rose.
I rarely fertilize my roses, but the Chute’s book says that fertilizing regularly increases blooming. I might try a couple of applications of an organic liquid fish fertilizer this summer. Be aware that too much fertilizer pushes fast growth that is more susceptible to diseases and insect damage.
What else should you consider when selecting roses? I like roses grown on their own roots, not grafted onto root stock. If the plant dies down to the soil over winter, a rose will sometimes send up shoots from the roots, which are different from the rose you planted if you buy grafted roses.
Also read the tag carefully to see if it is a one-time bloomer each season, or a re-bloomer. Some roses like the Knock-Out roses bloom for most of the summer. Be sure to cut off blossoms after flowering to encourage more blossoms.
Finally, now is the season to cut off any brown, dead portions on stems – most roses suffer a little winter damage. Cut above an emerging leaf.
I’m an organic gardener which means I don’t spray my roses, not for fungal diseases, not for insect pests. I firmly believe that if you have a rose in good soil with good sunshine and adequate water, your roses will be healthy and not attract many insects.
Henry is at the Chelsea Flower Show in London this week, and will not be answering questions. Read his report on the show next week!
It’s (Almost) Time to Plant Tomatoes
Posted on Tuesday, May 16, 2017 · Leave a Comment
Maybe you’ve already planted your tomatoes. I have not. I’m waiting until June 10. By then, even in my cold Zone 4 garden, I know there will be no more frost and the ground will be above 60 degrees. And the stars, moon and planets will be aligned from June 10 to 12 to promote success for fruits, one of the 4 categories listed in the Stella Natura calendar, a biodynamic guide that I follow (www.stellanatura.com).
I start my seedlings indoors in April, and I’m in no rush to put my babies outside in the cold, rainy world that I’ve been seeing in May. And even if you have planted yours, I bet mine will catch up with yours. Tomatoes hate cold feet and a few days of chilly rain will make them cranky – and slow their growth.
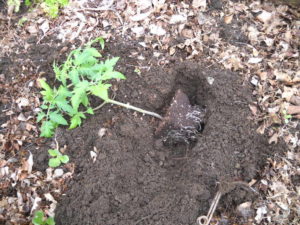
Tomatoes planted sideways develop more roots
Before my tomatoes and other plants get in the garden they get “hardened off.” If you are new to gardening, that just means I introduce them to the sun and wind over a period of time. An hour at first, or a morning on a north-facing deck. Later 4 hours of afternoon sun, and finally, if the temperature will stay up above 50 all night, they have a sleep over outside, but out of the wind. All this just means when they go in the ground, they will not be shocked.
Do you buy your seedlings? Ask at the garden center if the plants you buy have been hardened off. Even Brussels sprouts can be damaged if they have never been hardened off and go right in the garden.
I want my tomatoes to have lots of vigorous roots. To help ensure this I pinch off most leaves on the stem, leaving just those on the very top – sort of like a cartoon palm tree. Then I bury that stem and it develops lots of extra roots. Sometimes I just plant the root ball and stem down deep. Other times I plant the tomatoes sideways: I make a space for the root ball, and a little trench for the stem. I cover all that, and turn up the stem at the top so the few remaining leaves are barely above the soil line.
Leggy broccoli can be planted deeply, too, to help it stay erect, and to develop more roots. Legginess is common for seedlings started indoors that have been a little light-starved, and I think all can be planted deeply, but only have done this with tomatoes and broccoli.
What else gets extra care and a late planting date? Eggplants, peppers, cucumbers, squash of all types and basil. They all like hot climates, and come from them. I did plant seeds in May including peas, spinach, carrots, beets, parsnips, cabbage and lettuce. Those are all doing fine. Actually peas went in a bit late and are not up yet for me at the time of writing.
Peas can be very slow to germinate, and can even rot in the ground if we get a lot of cold rain. I plant most everything in raised beds, in part, to get the soil to warm up early and to dry out better. My garden is near a stream and we have a high water table, so raised beds help. I just mound up the soil from walkways and add compost to get nice raised beds.
Peas and beans of all types can benefit by being inoculated with a bacterium powder that is sold in garden centers and at my feed–n-grain store. Peas and beans are legumes, a group of vegetables with nodules in their roots. If these contain rhizobium bacteria, they take nitrogen from the air and “fix” it so that it stays in a form useable by plants. Free fertilizer, if you will.
Contrary to “rural legend”, the nitrogen fixed by peas and beans does not improve the soil very much. I always thought the rhizobium bacteria were pumping nitrogen into the soil. In fact, most of the production is used by the plants themselves.
The nodules that contain the bacteria are generally pink or reddish when producing well, and can be as big as a pea. When you pull a pea or bean plant, look at the roots. If you do not see lumps of nodules, be sure to introduce the bacteria next year (it may or may not be present in your soil naturally).
A few words about mulching: do not mulch your plants right away. Wait until the soil is very warm – 60 degrees or more – before mulching. Yes, the mulch will keep down weeds and hold in moisture, but it will also prevent the sun from warming the root zone.
I know gardeners that like to put down black plastic to kill weeds and add heat to the soil. I have used it –particularly for growing watermelons and pumpkins – but don’t like it. Most plastic lasts just one year and then has to go to the landfill. It’s not a sustainable practice.
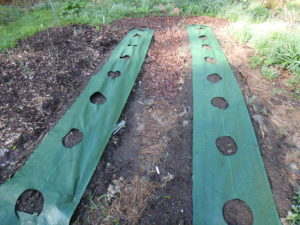
These GardenMats have pre-cut holes ready for tomatoes
I do like using woven landscape fabric, however. A Vermont company, GardenMats, produces rolls of fabric with pre-cut holes spaced for specific crops. These mats keep down weeds but let air and water pass through. The rolls are 4 feet wide, but I slice mine down the middle as my raised beds are only about 30 inches wide. I put leaves or mulch hay around the edges and in my walkways.
New England weather is never predictable, so I tend to plant later than many gardeners. Usually I am glad I did.
Read Henry’s blog at dailyUV.com.
Spring Lawn Care
Posted on Tuesday, May 9, 2017 · Leave a Comment
Lawns? My philosophy is this: If it’s green and you can mow it, it’s a lawn. Dandelions? Who cares? Their blossoms are cheerful. Creeping Charlie, plantain? Pests, but not awful. And so on. I love a lawn with some biodiversity. But bare and thin spots I like to fill in or over-seed. Now is the time to do that.
I recently called Paul Sachs of North Country Organics, manufacturer of Pro-Gro fertilizer and more, to talk about spring lawn care using organic products. Paul explained to me that all the New England states have laws against applying phosphate-containing fertilizer on lawns. Why? To minimize phosphate run-off into lakes, ponds and streams, thus reducing the growth of algae and other plants from running rampant and diminishing water quality.
Mr. Sachs explained that this law makes it technically illegal to fertilize your lawn – unless the middle number on your bag of fertilizer is “0”. Farmers who spread manure on the fields are exempt from this provision, and their fields are much more likely than you to cause run-off of phosphates.
There is a loop-hole to the law, however. Paul Sachs explained that you are allowed to fertilize with phosphate-containing fertilizers if you are also spreading seed. Most lawns have some thin spots, or bare spots, so adding seed makes sense. And if you use an organic fertilizer like Pro-Gro (a 5-3-4 fertilizer) there is very little soluble phosphate anyway. Its phosphorus content comes from rock phosphate, bone meal and bone char – all of which are only minimally soluble, and not normally a problem.
This lawn is thin, so it needed overseeding
What is involved in over-seeding? Basically, you need to spread 3 to 5 pounds of seed per 1,000 square feet of lawn (roughly 30 feet by 33 feet). First, cut the lawn a bit shorter than you would otherwise. Then rake the lawn to remove the cut grass and any dead material that is on the lawn. You want seed to be in contract with the soil. If you have the time and energy, you can scuff up the soil in bare spots with a garden rake before spreading the seed. You can spread seed with a mechanical seeder, or, for small spots, just fling it using your hands.
I buy a small truckload of compost each year for use on my gardens and lawns. It is loose and fluffy and is easy to distribute. After spreading some seed, I fling compost with a shovel over the seed, and then smooth it out using a lawn rake turned upside down. My goal is to spread a quarter to a half an inch of compost on the lawn, at least in the areas that look the worst.
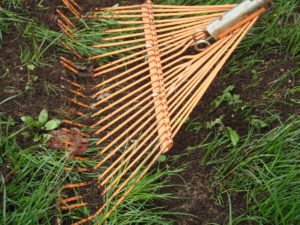
The back side of a lawn rake is good for spreading compost or seed.
Compost is not necessarily rich in nitrogen – the driver of green growth – but it has organic matter, beneficial microorganisms and micro-nutrients that would not be found in a chemical fertilizer. If you are really interested in a deep green lawn with lush growth, you could not only spread compost, but also some organic fertilizer – Mr. Sachs recommends about 20 pounds of Pro-Gro per 1,000 square feet of lawn.
Almost any store that sells seed will have something called “Conservation Mix”. That is what I use. A typical mix might have 35 percent creeping red fescue, 25 percent turf type tall fescue, 10 percent Kentucky bluegrass, 12 percent turf type perennial ryegrass, 15 percent annual ryegrass, 3 percent white clover.
A few words about clover. When I was a kid back in the 1950’s, we sometimes spent lazy afternoons rolling around on the lawn and looking for 4-leaf clovers, said to guarantee good luck. But since then chemical companies have perfected “Weed-n-Feed” products that provide herbicides along with fertilizers to “ensure a perfect lawn.” Those products kill clover. So what have they done? They have declared clover a weed.
Clover is not a weed. It is a beneficial plant that actually takes nitrogen from the atmosphere and fixes it in the soil, essentially giving you free fertilizer. The seeds are tiny, so a little in a mix goes a long way. If you get an organic fertilizer it has no herbicides, so of course. And when you buy a bag of conservation mix, you may want to turn it upside down and shake it a little. Clover seeds tend to migrate toward the bottom of the bag, potentially giving an uneven distribution.
A conservation mix has the advantage of biodiversity. If a pest or disease attacks one grass, another might not be affected. Kentucky blue grass, for example, is lush and gorgeous, but susceptible to many diseases. A little is better than a lot in a mix.
Unless your lawn is right on the edge of a stream or lake, you probably will not be causing any problems by fertilizing your lawn a little. Lawn is a great filter, and will generally prevent the migration of fertilizer into water bodies. And there are organic fertilizers that have no phosphates at all: North Country Organics has a 6-0-6 called Natural No-Phos.
I know that some gardeners remove their lawns and put plants everywhere. But before you do that, remember that lawn is the easiest of all plantings to maintain. A little work now, some mowing as needed, and it looks good. Especially if, like me, you are not worried too much about the presence of a few dandelions.
Read Henry’s twice-weekly blog at https://dailyuv.com/gardeningguy His e-mail is henry.homeyer@comcast.net and his snail mail is P.O. Box 364, Cornish Flat, NH 03746. Please include a SASE if asking for a mailed response to a question.
Cold Frames and Hot Boxes
Posted on Thursday, May 4, 2017 · Leave a Comment
I’m ready for spring. I’m ready to start growing – and eating – fresh veggies. Most years I wait until the soil warms up, but this year I planted lettuce, cabbage and spinach in April. I did it in a cold frame, and so far my plants are doing fine – despite some nights in the thirties.
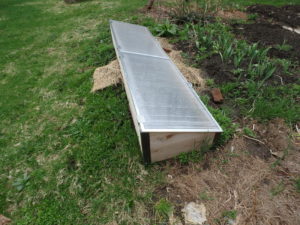
A cold frame heats up nicely on a sunny day.
A cold frame is a simple box with a clear slanted top that allow sunshine to come in and warm the soil and plants. The clear top on mine consists of two plexiglass panels on hinges that allow me to open the box on hot sunny days. You can build your own or buy one – mine came from Gardeners Supply (www.gardeners.com) and I was able to assemble it in less than an hour.
My cold frame is eight feet long and two feet wide. The opening lids are lightweight and easy to open. My grandfather had one and he used old wood and glass storm windows. They worked fine, but the glass was susceptible to breakage.
A cold frame should face south or east for maximum solar gain. The cedar panel at the front of mine is 8 inches tall, the back is 15 inches tall. That allows morning sun to get in through the slanted top.
Seeds are designed by Mother Nature to succeed. That means they have safeguards against starting to grow during the January thaw or too early in the spring. Pumpkin seeds in the compost pile, for example, seem to “know” that they shouldn’t start growing until after the danger of frost has passed. They know this because they have a temperature “switch” that prevents germination until the soil warms up so much that frost is unlikely.
So one of the things a cold frame does is warm up the soil. Prior to planting I kept the lids of mine closed, even on hot, sunny days. It is easy to get the air temperature up in the nineties. Once my seeds started growing, I open the lids to allow air to circulate and the temperatures to moderate.
I keep a thermometer in my cold frame that sends a radio signal to a device I keep on the kitchen counter that tells me the current temperature. If I see the temperature approaching 90 degrees, I open the lids. It’s possible to cook tender seedlings if it gets too hot.
Plants grow through series of complex chemical reactions involving energy from the sun, carbon dioxide, oxygen and water. In school you learned that this is called photosynthesis. Other reactions combine amino acids and soil minerals to build proteins and complex carbohydrates.
All these reactions are accelerated by increasing the temperature. Think of a box of tennis balls. The harder you shake the box, the more often they bump into each other. Likewise, warming up molecules makes them move faster and react more quickly – allowing a plant to grow faster.
On a cool, cloudy day my cold frame will heat up 10 or 15 degrees above the ambient temperature outside it. On a chilly night at 40, the temperature inside the box will be close to the temperature outside by morning. If I were to leave the cold frame closed up on a sunny day, it might get 30 or more degrees warmer inside.
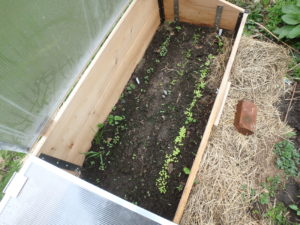
Lettuce and cabbage seedlings are growing well in my cold frame.
One of the uses of my cold frame is as a place to start seeds. My cabbage is up and growing inside mine, but I will move most of them outside before they get too large. Cabbage is relatively cold hardy, even surviving frost. But they need to be 12 to 18 inches apart as they mature. I sprinkled seed in a row inside the box and will thin them to 2 to 3 inches apart now. When they are 2 to 3 inches tall I will move all but one or two outside the box. I’ll have plenty – enough to give some away.
Another protection against cold nights is a layer of Reemay or row cover placed over the seedlings. Reemay and Agribon are trade names of agricultural cloth that breathes and allows sun and moisture to pass through. They can prevent frost from forming on plants down to temperatures of 25 or so – inside the box. It can also be used to keep striped cucumber beetles or other pests off plants.
Last year, my first with this cold frame, used it as a “hot box.” I dug a pit 18 inches deep the size of my cold frame and put a 12-inch layer of fermenting horse manure in the bottom. Then I placed a 6-inch layer of top soil. As the manure fermented it generated heat, warming the soil and keeping the cold frame warm, even on cold nights.
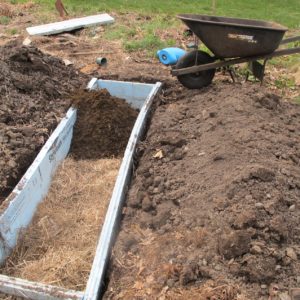
A hot box generates its heat from fermenting horse manure.
I also lined the hot box pit with 2-inch thick pieces of Styrofoam insulation. That keep the cold soil from cooling down the manure so much that it stops fermenting. That happened to me decade ago with an earlier version, and I had to dig out the manure and start over. It is important to get horse manure that is from a pile that is already hot and fermenting. Too much sawdust or straw will inhibit fermenting.
So I go about my garden, looking for ways to grow things. In another month, I’ll be nibbling on lettuce and other greens. Anything that helps accelerate the process is good!
Read Henry’s twice-weekly blog and see lots of photos at https://dailyuv.com/gardeningguy You can reach Henry at henry.homeyer@comcast.net or at PO Box 364, Cornish Flat, NH 03746.
A Taste of Spring!
Posted on Monday, April 24, 2017 · Leave a Comment
I’m already eating a few of my own fresh vegetables: ramps, dandelion greens and sorrel are ready, and soon will come those perennial delicacies, asparagus and rhubarb.
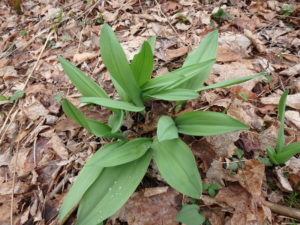
Ramps are up and ready to harvest
It took me nearly 10 years, but I now have a patch of ramps that produces enough of these wild members of the onion family that I don’t have to go hiking to dig up the ramps I need. I sauté both the bulb and the leaves, and find them a great spring treat in eggs or a stir fry.
Ramps are often found in areas with moist soil and filtered sun and shade. They are slow-growing, but I have added 50 or so plants most years for 10 years and the older clumps are ready for harvesting.
Ramps often are found in patches of a million or more, but that does not mean you can be careless about harvesting them – a patch that sizes takes a lifetime or more to develop. Dig a few in one spot, move to another – and never take all from any one location. If I dig out 25 from one spot, I am sure to leave half a dozen in the ground.
If you want to start your own patch, first learn to identify the plant. They have leaves that are 6 to 12 inches long and 1 to 3 inches wide with a pointy end. There is a groove down the middle of the leaf, and the lower stem may have some maroon coloring. And the scent is distinct, similar to garlic and leeks. The bulbs are half an inch wide or so, and two inches long or less, depending when you pull them. There is an outer sheath over the bulb which you should slide off when you cut off the roots.
To grow your own, carefully observe where you find them in the wild. Look at the trees: often maples and beech, sometimes ash or poplar form the canopy. Wildflowers that grow along with ramps include spring beauty, Dutchman’s breeches and trout lily.
The soil for growing ramps should be rich and dark. If you want some near the house and kitchen, dig some up and try to match the environment where you find them in the wild. Be sure to ask the landowner if you want to take some from a neighbor. These are spring ephemerals, so the leaves will die and disappear before mid-summer.
I know that many gardeners think of dandelions as pests, and they can be. But they are also tasty if you dig some before they bloom; after blooming they tend to get bitter.
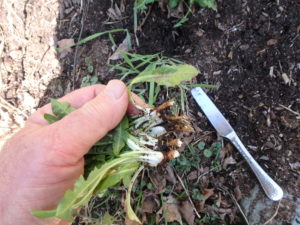
A kitchen knife is good for slicing dandelions
To harvest dandelions, bring a table knife with you to a patch of lawn or garden that has not been treated with chemicals – no herbicides, no chemical fertilizers, no pesticides. Slice the roots an inch beneath the soil surface and lift the dandelion carefully as you don’t want to sprinkle any soil onto the greens. The white portion just beneath the soil is delicious, but you can toss the brown-skinned tap root.
I wash the dandelions with the sprayer in my kitchen sink, and then leave the roots in a bowl of water to loosen any more soil. Then I return and rinse them after soaking. I like to steam them lightly, then serve with cider vinegar or a little butter. Although I eat them the same day I pick them, my late friend Rev Wightman used to freeze them and eat them throughout the year.
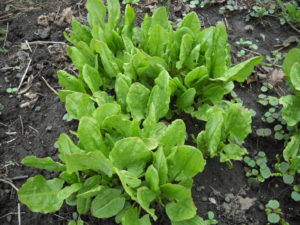
Sorrel is a perennial green with a lemony flavor
Sorrel is a great favorite of French cooks who make a soup with it. Although I grow it, I am not wild about it. It is a bright leafy green that comes back, year after year. It has a sharp lemony flavor, a bit like wood sorrel. My problem with it is that when you cook it, it practically disappears. It has little substance. But it’s easy to grow, and adds a unique flavor if added to a salad or even a sandwich. Plants are often sold at garden centers in the herb section.
My rhubarb is up! I love rhubarb for its sharp flavor, one that I have been told is among the last to disappear for the elderly when they lose their ability to sense flavors.
Rhubarb is easy to grow. It does best in full sun with rich moist soil. I have grown it in dry soil and although it grows in dry places, it is not as vigorous. It has a deep fleshy root. If you have a friend with a rhubarb patch, it is easy to dig some out and bring it home. Just plunge a spade into the middle of a plant, and then around it, and lift out a section of root. Add plenty of compost and organic fertilizer to the soil when you plant it.
Rhubarb comes in green-stemmed and red-stemmed varieties. I like the red, though I doubt there is a difference in taste. The leaves are a little toxic – they contain oxalic acid – but are not going to kill you if you eat some.
For a spring drink, chop a pound of stems, add water, and boil until soft. Drain off the mush, add some sugar and more water for a tasty pink drink that has got to be healthier for you than soda!
Eating seasonally is good for you – and I like having treats now that I only get once a year. Soon fiddleheads will be up – but more on that another day.
Henry’s blog appears twice a week at https://dailyuv.com/gardeningguy His e-mail is henry.homeyer@comcast.net
How to Prune Your Blueberries
Posted on Monday, April 17, 2017 · Leave a Comment
I recently spent half a day helping a friend prune her blueberries. Some rows hadn’t been tended too in a couple of years or more, and had gotten very bushy and overgrown. It is very satisfying work, knowing that bushes will produce better and be easier to pick once they have been pruned.
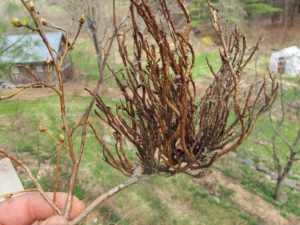
Witches brooms should be removed and destroyed
The first thing I did was cut out branches that had flopped over and were spread out in the walkways. It is important for both pickers and mowers to be able to go up and down the rows easily. I didn’t just cut off the ends of the intruding branches, I cut them back to their points of origin near the center of the bushes, just above the soil line. To do that, I used some nice geared loppers made by Fiskars to cut back the thick stems that were in the way. These geared loppers are 32 inches long and have a mechanical advantage built in which facilitates cutting stems up to an inch and a half without straining. The long handles meant I didn’t have to crawl into the bush to get to the base of a stem.
One note about spacing of blueberry bushes: gardeners often try to pack as many plants into a space as possible. Don’t. Crowding blueberries makes working in them more difficult. Space rows 10 feet apart at planting time. That might seem excessive, but it will be a big help later. The minimum space between plants should be 6 feet, and 8 feet is even better.
After clearing out walking space, I went down the rows with my hand pruners. I removed all dead branches. These have no fruit buds and are gray and flakey. Follow the branch back to its point of origin and cut back there. Some branches that appear dead have live side branches on them that you may want to keep.

Leaf buds are smaller and pointy
It’s important to be able to quickly differentiate between fruit buds and leaf buds. A fruit bud is fat and somewhat round. A leaf bud is smaller, and is narrow and pointy. A branch that is dominated by leaf buds is less valuable to you than one that has lots of fruit buds, though the fruit buds also produce leaves – and a cluster of berries. If you see no fruit buds on a stem, prune it out.
What else? When deciding between two competing branches, remove the older, less vigorous branch and leave younger stems, which on blueberries often have a green or reddish color. Prune away branches that are damaged or rubbing against another branch. In general, branches should be grow out, away from the center of the bush. Branches that aim into the middle will eventually cause problems.
Blueberries sometimes develop a viral infection that causes “witches brooms.” These are masses of fine twigs growing on one branch. Remove the entire thing and put it in the trash, or burn it.

Fruit buds are round and plump
Blueberries really are easy to grow. They need full sun, which means a minimum of six hours per day. But most importantly, they need very acidic soil. Now would be a good time to collect a soil sample and send it off for testing at your state Cooperative Extension laboratory. You can download the form on-line, just Google “soil testing” and your state.
If your soil is not acidic enough, you can add elemental sulfur. This is fine for organic gardeners, too, as it is mined from the earth, not manufactured in a chemical plant. You can add sulfur anytime, just follow the directions on the package. If you use an acidic fertilizer described as good for acid-loving plants, spread that right after the bushes bloom in June.
Changing the soil pH may take you a number of years. It is better to add some this year, and again next year (and in later years) than to dump too much on at once. Your ultimate goal is a pH in the range of 4.0 to 5.0. The scale is logarithmic, meaning that 4.0 is ten times more acidic than 5.0, and a hundred times more acidic than 6.0. Seven on the scale is neutral.
Many gardeners dread pruning, perhaps because they imagine cutting off branches as like removing limbs of a person or animal. Pruning is not. It’s more like getting a haircut. It is an essential part of maintaining a good-looking, productive plant. There is no deadline for when you must stop pruning, though the later you wait, the more buds will fall off as you work on the bushes – so get started soon!
Get used to pruning, and you will have more and better fruit. And for me, spending time outdoors in early spring is much more fun than being indoors on a computer.
Henry Homeyer is the author of four gardening books and a children’s chapter book, Wobar. Check out his website at https://gardening-guy.com.
Planting for the Unique Umami Flavor
Posted on Monday, April 10, 2017 · Leave a Comment
Umami is the fifth flavor we humans can detect, along with sweet, sour, bitter and salty. It is much more difficult to describe or quantify than the 4 standard flavors because we haven’t been raised to recognize it. I call it the flavor of contentment. The Japanese translate it, roughly, as “deliciousness.”
 Scientists have determined that there are receptors in our taste buds that are stimulated by umami, just as there are for salty or sweet. They send signals to our brain that says, “Oh boy, something really good is here!” The orbitofrontal cortex (right above the eyes) registers a highly pleasant sensation. Yum, it says.
The umami flavor is created when certain amino acids that contribute to protein formation are present, notably glutamate, inosinate and guanylate. Seaweeds are highest in these components, but seafood, meats and certain vegetables contain them, too. Oh, and it is found in breast milk. Maybe that’s why we like it.
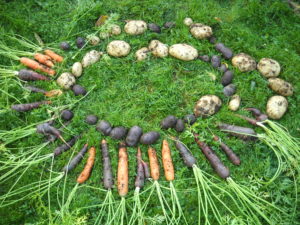
So what vegetables contain natural glutamate? Ripe tomatoes are highest of ordinary vegetables, which does not surprise me at all. Actually, dried tomatoes are even better because most of the water is gone. What else? Garlic, green peas and corn are excellent, as are beans, potatoes and carrots. Does that sound like a list of comfort foods? It does to me.
Mushrooms and fermented foods like soy sauce are good umami producers, as is cheese. Parmigiano-Reggiano cheese is particularly high, but cheddar is good, too.
If you want the highest level of flavor in your foods, grow it yourself. Pick your tomatoes dead ripe. That’s when the levels of umami-producing amino acids are at their highest.
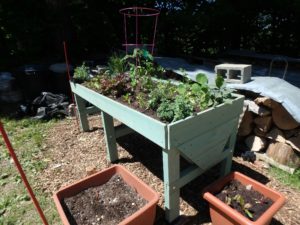
VegTrug with self-watering containers
Busy people say they have no time for a vegetable garden. Perhaps. But if you know that you can grow food that is super tasty, maybe you’d find some time. Here are 5 ways to get your umami-rich foods without dedicating your life to them.
- Get a big self-watering pot and plant one “patio tomato” in it. This pot should be roughly the size of a 5-gallon pail and have a water reservoir so it won’t dry out if you forget to water for a few days. Or go to the beach for the weekend. Fill it with a 50-50 mix of compost and potting soil. Put it in full sun in the middle of your lawn or along the driveway.
- Shiitake mushrooms are very high in umami. I have inoculated hardwood logs with spore plugs that eventually produce shiitakes. But it’s sort of like fishing, you never know when your logs will produce, or for how many years. But now companies are producing mushroom kits that come ready to go. Most of those are one-time kits that produce just one flush of mushrooms, but they’re easy.
- Potatoes are some of the easiest veggies to grow, and are good umami producers. If you want to tear up a 10-foot by 12-foot patch of lawn, you can become potato self-sufficient – for a year! You can build wide raised beds with a walkway down the middle and a little free space around the edges. Plant seed potatoes 18 inches apart and you can grow a lot of food.
- Then there is the Veg Trug. I had one last summer and loved it. About 6 feet long and 2.5 feet wide, it is a nice cedar planting trough on legs that is V-shaped in cross-section, so it is deep enough for tomatoes or potatoes. And you don’t have to bend over to pull weeds or harvest herbs. I grew lots of lettuce, herbs and one tomato. I got mine from Gardener’s Supply (gardeners.com or 888-833-1412).
- Visit your local farm stand, farmers market or, better yet, sign up now for a CSA. You don’t actually have to grow your own food just to get fresh produce at the peak of its flavor and ripeness.
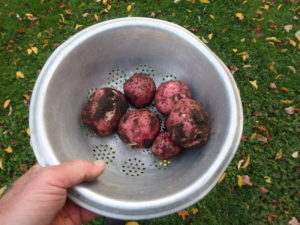
Fresh potatoes from one plant
The fact that we have receptors that are just for umami tells me that umami is something that is good for us. After all, our mouth also tells us when something is not good for us. We have evolved to recognize foods that are healthy. We respond well to sweets and fats because eons ago we needed calories to stay alive. Now, of course, we need to stay away from too much of those.
All this says you could and should grow your own food, and then cook it from scratch. I have written more than once that “Tomatoes are the queen of the garden.” In August I eat ripe tomatoes for breakfast, lunch and dinner. Why? I guess all this time I thought it was free will. Now I know it is an addiction to – or an affinity for – umami. Now is the time to plan your garden for the summer.
Read my twice-weekly blog at https://dailyuv.com/gardeningguy You may e-mail me at henry.homeyer@comcast.net.


 Click Here to buy from Cobrahead