Winter Pruning
Posted on Tuesday, December 6, 2016 · Leave a Comment
Traditionally farmers pruned their apple trees in late winter, but there is no reason not to do so now. Trees are dormant, and we’ve finished weeding and raking, so most of us should have time to work on our trees. Pick a sunny afternoon and get to work! Later, when the snow is deep, it won’t be so easy to prune.
Start by walking around the tree and looking at it from all angles. One of my goals in pruning is to create living sculpture, a tree with grace and elegance. A cluttered tree is never elegant to my eye. A bird should be able to fly through an apple tree – without danger of injury.
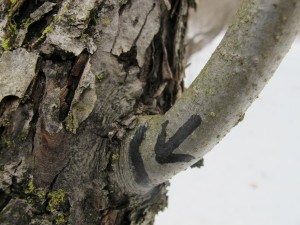
Branch Collar and Line to Show Where to Cut
Hesitant pruners often begin by nibbling away at a tree, taking dozens of small twigs and branches. I’m a bold pruner. I was taught that taking off big branches is better than tentatively snipping away at a tree. You want to open up the interior of the tree so that sunshine can get to every leaf. This creates a healthy tree. Do this by taking out the big branches if they are crowding others. More on that later.
But first, begin by looking for branches that are dead and removing them. They are doing no good for the tree and never will. If you scrape off a little bark, a live branch will show a green layer. Dead branches will only show brown. Cut the dead branch back to where it originates, but leave the branch collar.
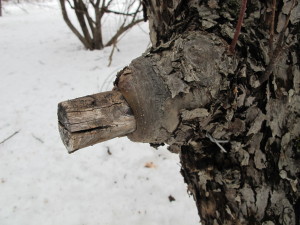
Stub Healing Back t o Branch Collar
The branch collar is a swollen area on the trunk of a tree or a larger branch where a new branch originates. The bark is often wrinkled at the collar. You don’t want to leave a stub when you remove a branch, nor do you want to cut flush to the trunk. Just leave that collar, as that is where the tree heals itself.
Low branches are the bane of many people who mow lawns. So take a look at any trees with lawn underneath, and see if you could remove a couple of low branches and make life easier. Some trees tend to shed lower branches, but most do not. Cut low branches back to the branch collar on the trunk, allowing space for you and your mower to cut the grass with ease.
Often trees, especially wild trees, grow too close to their neighbors. A single root system sometimes sends up 2 to 4 stems in close proximity. Cut out one or more to leave a single trunk. At this time of year I leave first year root suckers – those pencil thin shoots surrounding the base of apple and crabapple trees –and remove them in the spring.
So what else can you remove? Look for branches that are rubbing, crossing or growing parallel to others. Trees really are of very low intelligence. They grow branches that have no chance of growing to their full potential. They run into each other, or crowd others out. Your job is to train them to behave – with a saw! Ask yourself what a branch will be like in 5 years. If it will crowd another branch, remove it – or the other one.
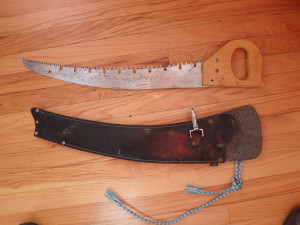
Corona Pruning Saw
Using the appropriate saw is important. Don’t use that rusty old bow saw that you bought 25 years ago when Sammy was a Boy Scout. Go to your local garden center or family-owned hardware store and get a tri-cut pruning saw. These saws are sharp! You can’t sharpen them, but that doesn’t matter. The steel is so tough they will be sharp long after you have stopped pruning.
Get something with a blade a foot long or more so you can cut large branches. Small folding saw are okay for many cuts, but my favorite is a long curved saw made by Corona. It has a 21-inch blade and the big teeth with gaps to remove sawdust and prevent it from clogging up and binding the saw. It’s model RS 7160 and is available from OESCOINC in Conway, MA for about $47; I have the sheath for it, which costs another $35, but really is needed for a saw with teeth that could hurt you when carrying it. It’s my alternative to a chain saw for large branches.
If you are removing a heavy branch, you need to make 3 cuts, not one, so that the branch doesn’t break off while you’re cutting it, causing the bark to rip off, thus damaging the trunk. Make an undercut about a third of the way through the branch a foot or more from the trunk. Then go farther out the branch and lop off the bulk of the branch, reducing its weight. The undercut will stop any tearing of the bark. Finally cut off the stub at the branch collar.
The nice thing about pruning is that there are few serious mistakes to make. Yes, you can “oops!” a branch, but the tree will fill in spaces in a year or two. Branches are not like our arms or legs. Pruning is more like giving a tree a haircut. And if you think of pruning as sculpting, you will want to do it every year.
Henry posts his weekly articles and others at https://dailyuv.com/gardeningguy. You can sign up for an email alert each time he posts. Contact Henry at henry.homeyer@comcast.net or by mail at P.O. Box 364, Cornish Flat, NH 03746. I you want a mailed response, please include a self-addressed stamped envelope.
Holiday Gifts for the Gardener
Posted on Wednesday, November 30, 2016 · Leave a Comment
It’s that time of the year again: time to figure out good gifts for Uncle Albert and your sister Sadie. If they’re gardeners, gifts are easy to pick. There are plenty of items that cost from $5 to $300, and generally, one size fits all. Let’s look at some things I have used and like.

Nitrile Gloves
After giving a talk at the Milford, NH Garden Club recently, I bought some gardening gloves that were being sold as a fund raiser. These cost me just $5, and have already earned their keep. These are nitrile gloves made by the Atlas Glove Company. They have a waterproof palm and a stretchy, breathable fabric back. I have big hands, and the x-large size was perfect. Mine are black with silver palms, but the smaller sizes come in a variety of colors.
I don’t generally wear gloves when gardening, as most are too thick – and I like the feel of the soil – but in cold weather I do wear them. These are thin enough that I can go easily in my pants pocket and pull out my pocket knife, or feel a tender weed. The nitrile glove is the Atlas 370B series. I’ve also used a thicker Atlas glove with a natural rubber palm, the 300 series. These are both available at most gardening centers.
Does your loved one start plants by seed? Gift cards at garden centers or seed companies are nice. I get my seeds from several places: the Hudson Valley Seed Library, Johnny’s Selected Seeds, High Mowing Seeds, Renees Garden and a young company in New York State, Fruition Seeds. All have wonderful selections.
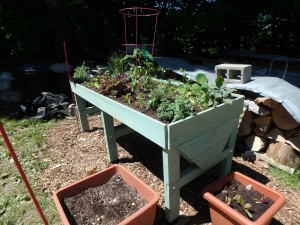
VegTrug
One of my favorite additions to my garden this year was a “VegTrug” from Gardener’s Supply Co. (www.gardeners.com, Item#8586918). This is a stained cedar planting box on legs, about 6 feet long and 32 inches wide that retails for $279, with free shipping. It is V-shaped in cross section with the deepest portion 16 inches deep – deep enough for potatoes or tomatoes. It stands 32 inches tall, so no bending is needed to weed or to pick.
In my VegTrug I grew one patio tomato and pretty much every kind of herb: basil, dill, marjoram, thyme, sage, purple sage, chives, oregano and parsley. I even had a nasturtium cascading over one end.
One reason I loved my VegTrug was the convenience: it allowed me to have herbs near the house in a spot not otherwise suitable for growing. And the plants grew well, although in the heat of the summer they dried out more quickly than my garden near the stream, so I watered pretty much every sunny day. It uses 380 liters of soil mix, so I made my own, a 50-50 mix of peat moss and compost. The bottom is slotted for drainage, but it comes with a woven liner to prevent soil from washing away.
Cobrahead
Every gardener needs a good weeding tool, and every year I recommend the CobraHead Weeder, because I believe it is the best weeding tool available. This tool has a single tine that is curved like the shape of a rising Cobra. I use it to tease out grass roots, to get under large weeds (so I can loosen the soil below them and pull from both top and bottom of the weed at the same time), and for preparing soil to plant. Now it seems a part of my right hand (though it is right-left neutral). At under $25 locally or from the manufacturer (a family business found at www.CobraHead.com), this tool is tough, strong, and made in the USA.
Every year I try to learn more about growing healthy plants. This year I paid $50 to join the Bionutrient Food Association (http://bionutrient.org/), and would like to suggest giving a membership as a nice present. One of the goals of the non-profit is to educate members about how to grow food that is nutrient-rich.
Much commercial agriculture depends on adding just 3 minerals to the soil (nitrogen, phosphorus and potassium) and basically ignoring the other nutrients that plants – and humans – need to be healthy. Growing vegetables year after year removes micronutrients from the soil that need to be replaced. The BFA offers information and workshops that I believe will help me to grow better food and stay healthy.
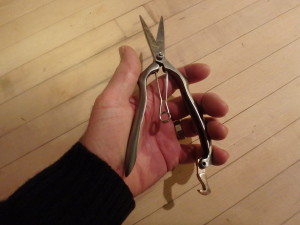
Garden Shears
Weeds are the bane of many gardeners. One way to minimize their presence is to weed daily, mulch, or to put down weed mats. A Vermont company, Garden Mats (https://gardenmats.com) produces heavy-duty woven mats with pre-cut holes in a variety of patterns for different vegetables. I’ve used them – and re-used them. They keep down weeds, hold in some moisture, but also breathe and let rain penetrate. They are 4 feet wide and come in lengths of 6, 12 and 18-feet for a cost of $11 to $31. They are definitely a labor-saver, and they claim the mats increase yields 10% to 20%, too. I like them, and also the fact that it is a small, family-owned business.
The last item for this year’s list is a lovely pair of stainless-steel garden shears for cutting flowers, herbs, and for use in the kitchen. Made in England, these shears are elegant as well as sturdy, and are said to be designed for small hands. Sold by Gardeners Supply (Item#8593404), they retail for $60 and come in a handsome gift box.
Santa, if you’re listening, I have everything I need. So you can just volunteer to come work in my garden next summer. I know it’s the off-season for you, and we both need to lose some weight, anyhow. We can pull weeds and eat cukes.
Read Henry’s blog at https://dailyuv.com/gardeningguy. You can get an email update every time he posts.
Winter Color on the Table
Posted on Monday, November 21, 2016 · Leave a Comment
I garden for many reasons. I want to grow my own chemical-free food, to have an excuse to be outside a few hours every day, and to have flowers on my table most of the year. Right now I have just 2 out of 3. A good batting average for a ball player – better than David Ortiz, for example – but not good enough for me. I want to hit one thousand. I need color and beauty in my house all year.
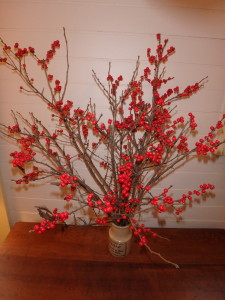
Winterberry
I almost always have a pair of pruners in my car, so when driving past an uninhabited swampy area recently I stopped to pick some winterberries. These red berries are the fruits of our native holly, Ilex verticillata. Unlike the evergreen varieties with shiny green leaves, winterberry drops its leaves in the fall, but clings to the red berries displayed on the female bushes.
Winterberry is dioecious, meaning that there are male and female bushes, and (remember that lecture you got ever so long ago about the birds and bees?) only the females produce fruit. And only if there are males present. If you buy winterberry plants, a good nursery will be sure to sell you a male to go along with your females. One male for 5 females is adequate.
Winterberry is a very satisfactory garden plant. It prefers moist soil and will grow in standing water – though I have seen it succeed in ordinary garden locations, though not in dry, sandy places. It does best in acidic soil, with a pH of 4.5 to 6.5, so add some sulfur to the planting hole. It produces the most berries in full sun. Soil rich in organic matter is a plus.
It is very cold hardy, surviving temperatures to minus 40 degrees (Zone 3). It is a moderate-sized shrub, rarely getting much more than 6 to 8 feet tall and 4 feet wide. I’m not sure why I haven’t planted much of it, as it brightens the winter landscape with its bright berries standing in contrast to the snow. Next year I will plant some more. Remind me!
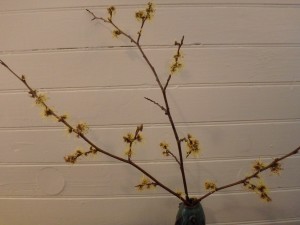
Witchhazel
Of my outdoor flowering plants, only witchhazel (Hamamelis virginiana) is still in bloom. Its yellow flowers have strap-like curly petals that remind me ever so slightly of yellow spiders dancing on the branches. The flowers are, theoretically, fragrant, but I have never noticed such.
Witchhazel will bloom in sun or shade and prefers moist soil. It has an open, branching habit. It is native to our area, and I first met it in the fall, hiking through a woods; I was intrigued to find something blooming after leaf drop, and looked it up. I have two that I planted, and after 10 years they are about 10 feet tall – but somewhat wispy. They are considered small trees or large shrubs and will grow up to 20 feet tall, but can be kept smaller with pruning.
My fallback position for color on the table is to visit my local florist on a regular basis for cut flowers. For 10 to 15 dollars I can get a nice arrangement of flowers that will last up to two weeks. Ask for flowers that will last a long time in an arrangement. Chrysanthemums are great, as are alstroemeria and carnations; lisianthus, spray roses, statice and monkey paws last well, too.
Each fall I also purchase an orchid. Orchids are thought by some as fussy or temperamental, but if you treat them right, they will bloom for months – and even come back and bloom the following year (though that is tougher). The most common orchids sold are Phalaenopsis orchids. Twenty years ago they were dreadfully expensive, but growers in Holland and Taiwan now produce them by cloning – producing hundreds of thousands of them for sale in big box stores.

Phaelanopsis
Phalaenopsis orchids like bright light, but no direct sunshine. They do not do well with cold temperatures, but home temperatures are generally fine – even though they come from greenhouses with temperatures in the 80’s. Don’t place them near radiators, woodstoves or doors to the outside. And never let the roots sit in water!
When buying an orchid try to find one that not only has pleasing colors, but also has plenty of buds. The stems will blossom from bottom to top, but usually you will only get blossoms from existing buds. I have cut back flower stems part way to the base after blooming, and gotten side shoots that blossomed, but that is rare.
Because you can buy a Phalaenopsis orchid for $10 to $15, some people just toss them out after blooming. Not me. I keep them, watering once a week until summer, when I bring them outdoors onto my shady deck. They come in pots with no drainage holes and would drown and die if I left them in those pots, but I lift out the inner pot which is just a stiff plastic mesh, which allows rain to moisten the roots but not rot them.
This year I have 2 Phalaenopsis orchids that I bought last year, and one has started a flower stem. It hasn’t yet started forming buds and I know I will never get it to bloom as magnificently as it did when I bought it. Still, it will add some color in a couple of months – and it cost me nothing this year.
Most Americans waste money on unnecessary items from time to time. Me? I’d rather waste a little money on house plants and cut flowers than most other things.
Read Henry’s blog at https://dailyuv.com/gardeningguy. He is the author of 4 gardening books.
Getting Trees and Shrubs Ready for Winter
Posted on Monday, November 14, 2016 · Leave a Comment
All right, I’ve managed to clean up my vegetable gardens and rake the lawn. I’ve gotten most of my flower beds cut back, weeded, and raked. So can I relax and watch football? NO, not yet. Smug though I may be for doing all that, there is still work to do. Trees and shrubs need attention now.
Garlic deer repellent
Let’s start with the deer. You know what trees and shrubs deer will eat. What can we do to protect those tasty treats? I’ve had good luck with a garlic repellent, one called, “Deer and Rabbit Repellent” made by Plant Pro-Tec. These are little cylinders (3 inches by half an inch) with a clothes pin type attachment that can clip onto branches.
Each package of 25 comes with a small tool to puncture the garlic oil storage compartments when you are ready to use them. They are rated for use by organic gardeners, and relatively inexpensive. I’ve used them on shrubs previously eaten by deer, and never lost a bud. They should be available at your local garden center or on-line at www.plantprotec.com.
Voles can be lethal to young fruit trees. Two years ago we had very deep snow and many gardeners lost fruit trees to voles – they girdled the trees, chewing off the bark and cambium layer, which eventually killed the trees. The deep snow allowed the voles to stay hidden from owls and hawks, allowing them to greatly increase in number.
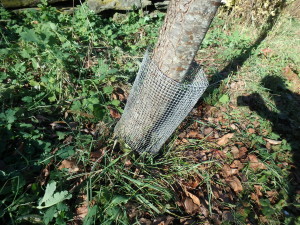
hardware cloth around a pear tree
To prevent that from happening, you can physically keep the voles away with fine-mesh screening called quarter-inch hardware cloth. It comes in 18- and 24-inch rolls, and I recommend the wider roll. A single layer of mesh screen around the base of the tree will keep the voles a bay. Remove the wire next spring to keep it from getting swallowed up by the bark as the tree grows (that would take a few years, but I’ve seen it happen).
Also available are plastic tubes slit up the side, allowing you to open the slit and slide the tube around young trees to protect them from rodents. These are generally 2 inches in diameter and 24 inches long. If your young tree has branches in its lower 2 feet of trunk, you will have to prune off those lower branches. But that is good anyway. And voles shouldn’t bother trees that are more than 2 inches in diameter anyway – their bark is thick enough to deter the rodents.
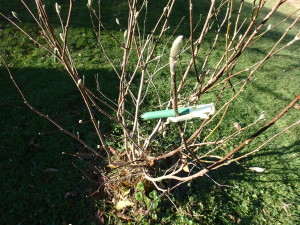
What about tender young shrubs? Will they survive the winter and bloom in the spring? Some gardeners like to wrap shrubs in burlap to protect them from cold winter winds. The winds can desiccate buds, preventing them from blooming. In 2015 I planted a kousa dogwood which is marginally hardy here. Last spring I only got a couple of blossoms – even though there had been more buds.
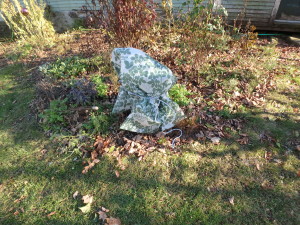
Polypropelene “jacket” over a kousa dogwood
So this fall I wrapped my dogwood with a synthetic fabric designed to keep the cold wind from damaging buds, but allowing it to breathe. The material came in 12-foot by 5-foot pieces, and was sold as a “Bush Jacket”. I was given some of this material some years ago and hadn’t used it. An internet search told me that Gardener’s Supply is one source for it, and they don’t have it as sheets, but as bags or “jackets” that fit over small, medium or large shrubs.
An advantage of wrapping shrubs with either non-woven polypropylene fabric or burlap is that will also keep deer from eating your shrubs.
On a nice sunny Sunday I worked on my blueberries, too. I weeded them, digging up the sod that had grown right up to the base of each plant. I created a space free of grass and weeds about 18 to 24 inches all around the bushes. Blueberries have fine roots near the surface, so I was careful not to dig deeply with my weeding tool. I found that once I got started I could peel back the sod in big pieces with my hands. I will sprinkle some agricultural sulfur over the soil, and then put down a 3-inch layer of ground branches I got from an arborist.
The sulfur helps to keep the soil pH very acidic, which will promote good fruit production. Next year’s fruit buds are already set, so applying sulfur this year will not affect next year’s production. But in following years the sulfur will be a big help.
My apple trees did not produce much this year – there was a hard frost in April when the buds were getting ready to open. Additionally, the year before had been extraordinarily fruit-productive and trees tend to alternate between good years and bad. But this fall the fruit spurs are loaded with flower buds for next spring.
I picked or cut off any dead fruit still attached to the trees. Often diseased fruit will dry up and stay on the tree, and I don’t want any fungal spores to infect next year’s crop. I used a pole pruner to cut or knock off dead fruit. Finally, I raked under the trees to collect rotten fruit or infected leaves. I put all that on my burn pile that is awaiting snow for an opportunity to burn it.
You could also prune your fruit trees now, or in the late winter or early spring. But that’s an article for another day.
Read Henry’s twice-weekly blog at https://dailyuv.com/gardeningguy.
Putting the Garden to Bed
Posted on Monday, November 7, 2016 · Leave a Comment
Each year about now I suddenly realize that I should have already finished putting my garden to bed. This year I had a good excuse: I’d gone to France to hike, and was away for 3 weeks. But in other years my excuse has been the weather, or finishing a book that I was writing. You get it … I can be a bit of a procrastinator. Most of us are. But if you haven’t finished cleaning up your gardens yet, now is the time to get to work. Winter is just around the corner.
First, and most important to me, is to clean up the vegetable garden and get rid of weeds. I mulch heavily with newspapers and mulch hay, but there are still weeds present. Last week I raked off any newspapers my hungry earthworms had not eaten, and the rotting mulch hay on top. Then I dug out my weeds and lugged them away. Because of the mulch, weeding was not too time-consuming.
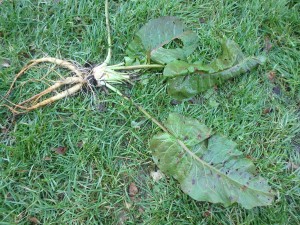
Dock
I did have some deep rooted weeds, mainly dock (Rumex spp.). The roots of this weed can easily go a foot deep in the first year. So I couldn’t just pull them, even with my favorite weeding tool in hand, the CobraHead weeder. They are a job for a garden fork. I push down on it with my foot, and the four tines go down a foot in the soil. I pull back, and it loosens the soil and lifts the roots a little. Then I am able to tug it out, roots and all. Later I will cover the beds with chopped leaves.
A buddy of mine called recently from Maine asking what to do with the leaves in their flower beds. Should he rake them out now or in the spring? I know a gardener who rakes all her leaves out onto the lawn, runs them over with the lawn mower, bags them up while nice and dry, and then stores them on the barn until spring. She cuts all her perennials down in the fall, too. Then, once the plants have all appeared in the spring, she mulches with the same leaves that were there in the fall.
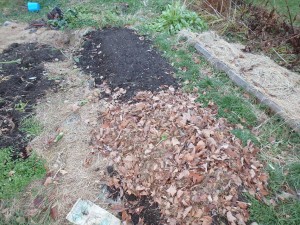
Leaves are a great mulch
That method works fine and the added organic matter from all those chopped leaves have built up her soil beautifully over the years. The chopped leaves hold in moisture and keep down weeds. But it’s a lot of work.
My approach is the Lazy-Boy way. I leave the leaves in place now – and in the spring, too, unless they are choking out small plants or covering something special. As a matter of aesthetics, if you don’t like the look of leaves, rake them up. Otherwise, leave them be and they will break down over time.
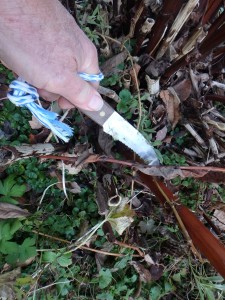
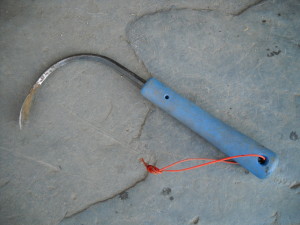
Root knife is good for cutting down flower stems
I will try to cut down most flowers before the snow flies. I leave some things with seeds for birds, sunflowers and black-eyed susans, for example. Instead of using hand pruners, I use a special serrated “root knife” that, unfortunately, is no longer commercially available. When I lose the last of my root knives, I’ll just use a steak knife – or find another manufacturer of the root knife, which has a nice curve to it. Why a knife? Cutting down hundreds of stems is tiring on the hands if using pruners.
You could also use a string trimmer or even a lawn mower to cut everything down. I have one long flower bed that I call my “Darwin bed”. It is full of tall flowers that can compete with the weeds – and each other. Asters, goldenrod, Joe-Pye weed, tall phlox, turtlehead and more compete for space. If a plant doesn’t survive, something else will fill up the space. In the fall I usually just run over it with my riding lawn mower, making it neat and tidy for a few minutes in the spring.
Another fall task involves improving the soil. I recently had my soil tested by Logan Labs (www.loganlabs.com). Their basic test gives a lot of information: pH, percentage of organic matter, mineral contents, trace mineral levels and more. As a member of the Bionutrient Food Association (http://bionurient.org), I was able to get recommended levels of minerals and trace minerals for top quality production, and what (and how much) to add. Of course, each state offers soil testing through their Cooperative Extension service.
My soil is excellent, but needs a little tweaking. Boron, for example, is a little low, as are my potassium levels. I will make some additions this fall so that the added minerals can be incorporated into the soil over the fall, winter and spring. Green sand, a bagged supplement, is a good source of potassium.
The key to any soil addition is to remember that if adding a little is good, adding more is NOT. Even useful additions to the soil need to be done in carefully measured quantities. I will mix the minerals I add to the soil with a measured amount of compost, making it easier to distribute small quantities over my garden. So, for example, I need to add half a pound of calcium borate per 1,000 square feet of garden space – or about a pound for my 1,700 feet of vegetable garden. By mixing it in with compost I can distribute that better.
My blueberries – and yours – need a little agricultural sulfur added every year to keep the soil acidity good for them. Blueberries produce much better if the soil is very acidic – around 4.5 to 5.0. My recent soil test showed that in my garden beds the soil is 6.6, or just slightly acidic and perfect for vegetables. So I add sulfur each year to the blueberries to keep it acidic enough to produce well.
If I have the time (and the right weather) I will also weed around my blueberry bushes before adding sulfur. Blueberries have fibrous roots near the surface, so I’ll need to be careful. After weeding and adding sulfur I will mulch heavily with chipped branches to keep down the weeds.
There is lots more to do, of course, so I better stop writing and head outside to the garden while the weather is nice.
Read Henry’s garden blog at https://dailyuv.com/gardeningguy. He is the author of 4 gardening books. His web site is www.Gardening -Guy.com.
It’s Time to Start Bulbs for Forcing in Spring
Posted on Monday, October 31, 2016 · Leave a Comment
At the end of a week of gray, raw, and drizzly days, I was at my wit’s end. Even my intrepid corgi, Daphne, was less than fully excited about taking walks in the rain. So I did what works best for me: I planted bulbs indoors so that I can force them to bloom in late winter. And it worked. Planting bulbs always picks up my spirits.
Almost any spring bulb can be kept in a pot indoors for 8 to 16 weeks (depending on the bulb type) and made to bloom. Choose early-blooming daffodils and they can be ready in 12 weeks. Tulips? About 16 weeks. ‘Triumph’ tulips are said to be the best for forcing. Crocus and other small, early bulbs can be ready in 8 to 10 weeks.
Your bulbs planted for forcing need a cold place to develop: 35 to 50 degrees F is right. A cold basement, garage or barn are possibilities. Even a spare fridge would be all right. But if the temperature goes below freezing for very long, the roots will stop growing – and growing roots is a big part of what has to happen if you are to get good blossoms.
All a bulb needs is a growing medium and a little moisture. I reuse the potting mix that I used for growing annual plants outdoors in summer. I just pull up the summer’s plants, fluff up the soil, add a little as needed, and make sure it is damp to start. If it is dry, I water it well before I plant my bulbs.
It is good to check the moisture levels in your bulb containers once a month during the time the bulbs are dormant and the roots are growing. Depending on the temperature, humidity and soil type, the soil medium can dry out. If it gets too dry, your flowers might not bloom. But too much water is also not good: it can rot the bulbs. That is more likely to happen if you used ordinary garden soil, which I don’t recommend as it holds water.
Instead of soil, use potting mix, or make a potting mix using peat moss, perlite or vermiculite, and compost. The mix should be fluffy and light. Dry peat moss, as it comes out of the package, is very dry and takes time to moisten thoroughly. Get your potting mix nicely moistened before planting any bulbs.
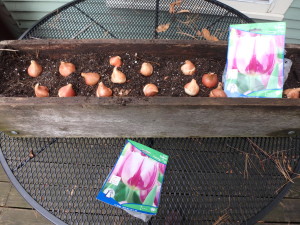
Tulips spread out and ready to plant for forcing
So how close can you plant your bulbs? Basically as close as you want. I put 20 tulips in my window box which is roughly 36 inches long and 7 inches wide. In a round pot with an 11-inch opening I put 10 daffodils. An inch or two between bulbs is fine.
I like to lay out my bulbs on top of the potting mix to see how close I should plant them. I don’t want to compress the soil, so I use a soup spoon or my fingers to make a hole for the bulb and pop it into place. Outdoors we plant tulips and daffodils 6 inches deep, but in a pot? There is often little space for soil over the tops of the bulbs. I leave an inch of free space above the soil line so I can water without spilling.
Clay pots may look good to you, but they allow moisture to evaporate from the sides of the pot. Plastic, fiber glass or porcelain containers are better for bulbs because they hold the moisture of the potting mix, minimizing water loss.
Be sure to label each pot with the date planted, and what is planted. Later, that will tell you when you can bring it into the warmth . Often bulbs will send roots out through the holes in the bottom of the pot or send up green shoots telling you they are ready. But don’t rush the process. Tulips brought up early will have nice green leaves, but no flowers.
Most bulbs that have been forced are not likely to flower the following year, even if you keep the foliage alive until spring and plant them outside. I’ve done it, and some daffodils will build up the energy to blossom after a while.
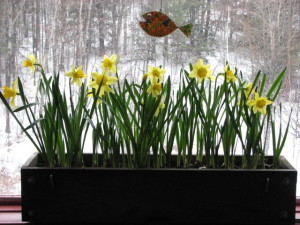
Daffodils blooming in April brighten a snowy day
You also need to remember that although daffodils are mildly poisonous and hence unattractive to rodents, most other bulbs signify “LUNCH” for mice and squirrels. Most of us living in the country have at least a few mice in the basement at this time of year. They are looking for a cozy place to spend the cold months, after all. Red squirrels are notorious when it comes to sneaking into old houses and causing mischief. So you must prevent rodents from getting to your bulbs stored inside.
Each year I bring in my big cedar window box and fill it up with bulbs for forcing. This year I decided to plant tulips in it, so I made a lid for it out of a scrap of plywood. I even screwed down the top to prevent industrious squirrels from lifting it up to get at the tulips. (“You hold it up, Larry”, I can imagine one saying, “I’ll get those tulips and toss them out.”). I made other lids for ceramic pots and placed a brick on each one.
When it’s time to bring your bulbs into the warmth of the house, put them on a sunny window to develop blossoms, but keep them out of direct sun when the flowers open so they will last longer. Get some bulbs and pot them up soon. It will help you feel better now – and in mud season!
Read Henry’s twice-a-week blog at https://dailyuv.com/gardeningguy.
How to Make a Halloween Stew Using Veggies Fresh from the Garden
Posted on Monday, October 24, 2016 · Leave a Comment
Here it is, late October and I’m still harvesting food from my garden. All of it could have been picked earlier, but I love letting vegetables stay in the garden as long as possible, and eating them the day they were picked. And I enjoy making a dish that uses as many of my own ingredients as possible.
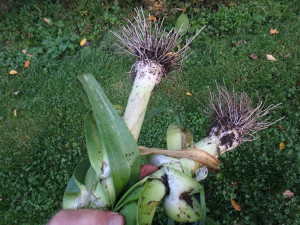
Fresh leeks
For my Halloween stew I used potatoes, leeks, carrots, kale, parsley and thyme directly from my garden, and have others including Brussels sprouts, arugula, celeriac and non-heading broccoli. You could get any of these you need from your local food Coop, which will have them from local farmers. In my opinion, local food is better by far than food trucked across the country.
This stew is really just a variation on my old favorite, leek and potato soup. To make a Halloween stew I think you need something bright orange – reminiscent of Jack-o-lanterns. I made it first with winter squash that I steamed in big pieces and then scooped out in balls with a melon baller, but I didn’t find that the flavor worked with the other ingredients. So I next tried it with carrots, which tasted much better. If you have little kids, the carrots can be made into round balls by steaming them and using a melon baller; otherwise chunks are fine.
Cut 4 strips of thick lean bacon lengthwise, and then into pieces half to three quarters of an inch long. Cook them on low heat in a heavy iron pot. Prepare 2 cups of chopped leeks by cutting them lengthwise into quarters, and then chopping into half-inch pieces. Brown in the frying bacon. Have at ready 4 cups of potatoes chopped into half-inch cubes, and add to the leeks. Brown for a few minutes, then add a quart of water. Bring to a boil, then reduce the heat to a simmer.
Next add 1 or 2 cups of carrots – either as chunks or balls, as mentioned above. Kale is optional in this stew. It adds a nice green color, and I like the flavor, but not everyone does. If you add kale, you will need to add extra water. Toss in a sprig of fresh thyme and a quarter cup of chopped fresh parsley. I like the flat-leafed kind best, though I grow curly parsley, too.
Simmer the stew for 20 minutes or until the potatoes are soft and ready to eat. Add a cup of milk and a dash of nutmeg at the end, but don’t let the stew boil after the milk has been added.
To make this recipe I picked all the vegetable the day I made it – October 19. Carrots are frost hardy and mine had already been through a hard frost. In fact, you can leave your carrots in the ground through the winter, digging them as needed. I’ve done this and know they get even sweeter after getting very cold –some of the carbohydrates in root crops like carrots and potatoes turn to sugars below 50 degrees F.
To leave carrots in the ground for winter eating, put a stake at each end of the bed: otherwise you might not find them easily if you get a lot of snow. I cover the bed with a few inches of whole fall leaves, and then a layer of mulch hay or straw. That will keep the soil from freezing solid.
There are two problems with storing your carrots this way, however: some carrots need to be picked before they get too big or they will split. But if yours are still in the ground, you should know already whether that is a problem. I grew some great purple carrots this year, but the bigger ones split, so I dug them all. A split carrot will rot if left in the ground too long.
The other problem? Rodents. Mice, voles, chipmunks, field rats and some squirrels might gnaw on your carrots if left in the ground. That’s why I like having a spare fridge in the cellar to store vegetables for the winter.
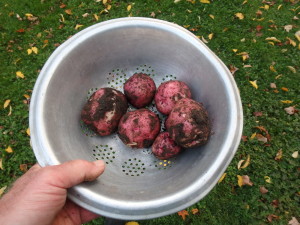
New red potatoes
I try to grow between 25 and 50 pounds of potatoes each year. My plants produce between 1 and 3 pounds of potatoes each, so I generally plant 25 to 35 plants. This feeds me, allows me to give some away most years, and provides me with organic seed potatoes to start next year’s crop. I once went 20 years without buying a potato, though I only had them to eat for 9 or 10 months each year. I don’t mind eating seasonally, in fact I think it makes me appreciate my food even more.
I’ve tried several different techniques for storing my potatoes. I’ve stored them in a cement-block bin (with a plywood lid) in a cold basement. Last year I put them in an antique 25 gallon crock with a plywood lid. Often I’ve stored them in a spare refrigerator. The trick is to maintain high humidity and a temperature between 33 and 50 degrees F. Putting an inch of wet sand in the bottom of a storage bucket works great for that, though you will have to re-moisten the sand after a while.
This year I did 2 plantings of potatoes: the main planting was in early June, the second in early August. For that second planting I had found some sprouted potatoes in the storage crock I had used, and decided to see what would happen if I planted them in August. Not all of the potatoes sprouted – they had been lurking in a dark basement for months – but those that grew did fine. They had about 10 weeks of growing time and were full sized and healthy. No bugs, either.
Growing my own food isn’t just about saving money, though I like that. Really it’s about the satisfaction of eating food that’s fresh, that tastes great and that has never been sprayed with chemicals.
Read Henry’s twice-a-week blog posts at https://dailyuv.com/gardeningguy. Henry is the author of 4 gardening books, most available at www.Gardening-Guy.com.
Moving Trees and Shrubs
Posted on Monday, October 17, 2016 · Leave a Comment
I recently fielded a query about moving a shrub: was this a good time to do so, or would the spring be better? I responded that either was all right, but that spring might be better. There is no clear answer among experts, some favoring spring, some fall.
I know from my readings that scientists have determined trees and shrubs use photosynthesis to create and store excess carbohydrates in their roots during the summer, and then use them to extend their roots in the fall. They do this even after leaf drop, only stopping when the ground freezes. This would lend credence to those who say, “Plant trees in the fall.”
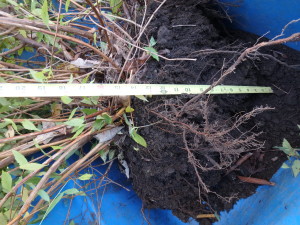
Root Ball
On the other hand, it is already late October, so plants moved now have less time to get established than those moved or planted in the spring. I wouldn’t want my shrub to get pushed up by freezing and thawing of the soil. The downside to planting in the spring is this: most of us are not likely to remember to water a new planting every week, and dry times can damage plants that have not settled in.
Despite all that, I recently moved a shrub that had gotten too big and was crowding a rhododendron next to it. The shrub, a pink spirea, had been in the ground about a decade, and was now about 5 feet tall and wide.
My favorite tool for digging up large plants is a drain spade. This is a shovel with a long, narrow blade – business end is 16 inches long and just 5 or 6 inches wide. It allows me to get under the shrub, severing roots and giving me leverage to pry it out of the ground.
Most shrubs have roots that are in the top 6 to 12 inches of soil, and this spirea, a tough and tenacious plant, had roots down a full 12 inches, perhaps more. I pushed the blade of the spade in under the shrub at a 45 degree angle, doing this repeatedly as I moved around the plant. I was able to get my spade under the center of the shrub, and each time I tipped the spade back, lifting the root ball a little. Eventually I was able to tip the spirea over onto its side and roll it out of the hole.
I measured the root ball so that I could dig an appropriate-sized hole in the new location. The root ball was 12 inches from top to bottom and about 2 feet from side to side – and weighed at least 50 pounds, I would estimate.
Root Ball
Whether planting a new tree or shrub or moving one, it is important to dig a hole just the depth of the root ball, not deeper. The new hole should be about 3 times the width of it. The reason for a wide hole is to allow roots to spread more easily and get well established more quickly. In my case I did not dig a 6-foot wide hole as the soil was not compacted, but loose and fluffy.
If I had been planting the spirea on a lawn with compacted soil, I would have loosened the soil in a wider zone. Even so, my hole was 4 feet wide or twice the width of the root ball. I dug a hole with a flat spot 12 inches deep for the roots and with sloping sides.
It is also important to plant a tree or shrub with the same compass orientation that it had before you bought it. For purchased trees, look for the least leafy side – that is generally the north side. The trunk of the north side, if planted facing south, can be sunburned or scalded by the winter sun. That is less a problem for multi-stemmed shrubs.
I don’t recommend giving fertilizers to trees and shrubs. I don’t want to force any fast growth, particularly now, nearing winter, and even a slow-release organic fertilizer will contain nitrogen (which pushes green growth). I do give my trees some rock powder – Azomite is a brand name of a bagged mineral powder I use. It contains many micronutrients that may not be in my soil, but no nitrogen. I added Azomite and some ground granite dust to the soil before I planted the spirea.
The final touches to this job were to water it well, helping it to settle in and getting rid of air pockets which can damage roots. Lastly, I spread a 3-inch deep layer of all-natural ground hemlock bark around the shrub. This will keep the soil warm longer, allowing my shrub to keep extending its roots. And I’ll try to remember to water it next summer if we have dry times.
Henry is the author of 4 gardening books. You may e-mail him at henry.homeyer@comcast.net or write him at P.O. Box 364, Cornish Flat, NH 03746. See Henry’s regular blog posts at https://dailyuv.com/gardeningguy.
Planting Bulbs
Posted on Tuesday, October 11, 2016 · Leave a Comment
For the past 3 decades or more I‘ve planted the bulbs of spring-blooming plants every fall. Some years it was just a couple of dozen, other years more than 100. October is a good time to plant them, though one year I was traveling and didn’t plant my bulbs until November. I had to shovel snow off the ground to plant bulbs that year.
I plant bulbs because it gives me something to look forward to during the depths of winter. I dream of clouds of purple scilla and white snowdrops, hillsides awash with golden daffodils, vases of tulips on every flat surface of the house. For the price of dinner for two at a moderate restaurant, you can buy 100 bulbs or more – and now is the time to do so.
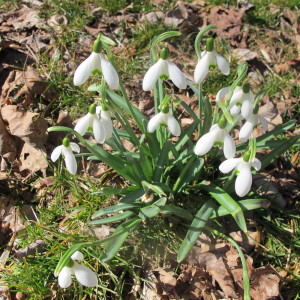
Snowdrops
I love snow drops (Galanthus nivalis). Granted, they’re small and their blossoms hang down so they’re hard to see their faces well, but they’re the first to bloom, often coming up through frozen soil in early March. I transplanted fifty or a hundred from my childhood home in Connecticut 35 years ago, and by now I have uncountable numbers. They sneak into my lawn, popping up far from where I put them. I don’t know how they move around – perhaps by seed, or perhaps with the help of those otherwise pesky rodents, the squirrels.
Other early bloomers are scilla (Scilla siberica) and glory-of-the-snow (Chionodaxa spp.), both blue to purple (glory-of-the snow also comes in pink and white). Like snowdrops, they’re small – so they need to be planted in groups of 50 or more to really look good.
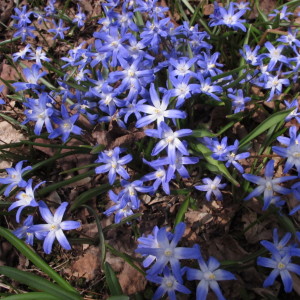
Glory-of-the-snow
Crocuses also can bloom early, though I’ve never had any as early as my snowdrops. There are at least 80 species of crocus and many hundreds of colors, but most garden centers and grocery stores just offer a couple of species and three colors – large purple, white or yellow. For that reason I study the bulb catalogs to explore other possibilities.
The bulb company McClure and Zimmerman has an excellent array of crocus, but I find their website awkward, so it is probably worth calling for a print catalog (800-546-4053). Brent and Becky’s bulbs is a family run business that is also excellent (www.brentandbeckysbulbs.com or 804-693-3966). You may be surprised to see that crocus bulbs can cost over a dollar each, but the rarer varieties are pricey.
Daffodils are wonderful, in part, because animals don’t eat them, not rodents, not deer. There are hundreds of kinds of daffodils in 13 major categories. Some bloom early, some late. Some produce one flower per stem, others several. I continue to explore the daffodils each year by buying some new ones- and you should, too.
If you grow hostas, you know that their leaves don’t get very big until June or July. I like to plant clumps of daffodils between clumps of hosta so that their leaves will cover the foliage of the daffodils after they bloom.
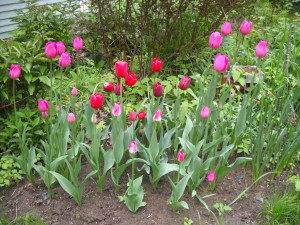
Tulips
In recent years I have been buying 100 tulips and planting them in one bed. I like them as cut flowers – and they make terrific gifts. I like having enough to pick dozens at a time, and having them all come into bloom at once.
Most tulips, for me, tend to run out of energy and get fewer in number as the years pass, so now I consider them annuals. I dig a hole about 4-5 feet long and 2 feet across and plant all 100 in one place. Then, once they are done, I cut off the foliage and plant annual cut flowers like zinnias for summer enjoyment. Wasteful? I suppose, but life is short, and I love them so.
I’ve found that my CobraHead weeder (www.CobraHead.com or 866-962-6272) works well for planting individual small bulbs like snowdrops or crocus in the lawn. I just push it into the soil the appropriate depth, pull back to create a small slice in the soil, take out the tool and drop in a bulb. The slice in the lawn closes up easily with a push of my hand.
My last bits of advice on planting bulbs: add some slow-release organic fertilizer (or bulb booster) at planting time, and mix plenty of compost into the soil. Bulbs need good drainage to thrive, and compost helps with that. If you are worried about rodents, you can sprinkle them with cayenne pepper, though its effect only lasts for a year.
Lastly, buy plenty of bulbs. Come spring, you’ll revel in their beauty and enjoy them much more than that ephemeral dinner for two you might skip now in order to afford their cost.
Read Henry’s blog about how to save your dahlia tubers for next year at https://dailyuv.com/news/862147. While there you can up for an email alert every time Henry posts his blogs.
Garlic
Posted on Monday, October 3, 2016 · Leave a Comment
Garlic is the least work of any vegetable I grow: I plant it, mulch it, harvest it. Some years I need to weed it once, too. But properly mulched in a weed-free bed, little or no weeding is required. And it’s essentially free: I will plant next year’s crop from this year’s harvest. October is the time to plant.
I’ve been growing my own garlic for decades, and each year I plant the biggest, best looking bulbs. Over time I’ve been able to develop varieties that work best in my climate and my soil.
There are two types of garlic: hard-neck and soft neck. Soft neck garlic is the kind you generally find at the grocery store, and some of it now comes from China, which I try to avoid as I don’t trust their use of chemicals. Most soft-neck garlic is pretty much the same in terms of flavor. It stores well but soft neck garlic is adapted for growing in warmer climates, so I don’t recommend it for New England.
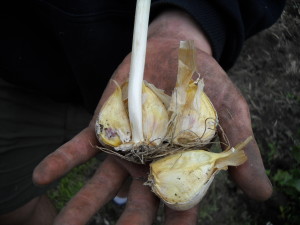
Hardneck garlic ready for planting
Hard-neck garlic is so named because each bulb has a stiff stem that is surrounded by the cloves. There are several distinct types (purple striped, Porcelain, and Rocambole, among others) and each has its own distinct flavor. Just as not all tomatoes taste the same, not all garlic is the same.
Plant garlic by separating the cloves of a head or bulb of garlic and planting it in rich soil well amended with compost and a little organic fertilizer. Cloves should be planted about 2 inches deep, pointy end up. Space them 3-4 inches apart in rows that are 8 to 12 inches apart. Grocery store garlic has probably been treated to prevent sprouting, so do not plant it.
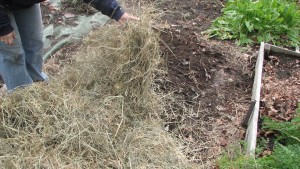
Garlic mulching
Here is the key to success: mulch your garlic bed well with straw or mulch hay when you plant. A 6- to 12-inch layer of well fluffed mulch hay accomplishes two things. First, it insulates the ground as the cloves of garlic get their roots started. The soil is warm now and the roots will grow until the soil freezes. You want as much root growth now as possible, and the mulch will hold in the heat. Second, the mulch will keep weeds down next summer. Garlic doesn’t compete well with weeds, so keeping it mulched keeps it happy.
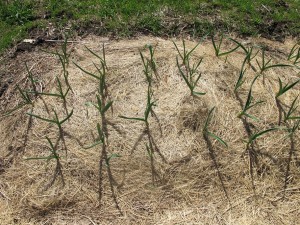
Garlic in May
Your fall-planted garlic will establish its roots and may even send up shoots before snow flies, but don’t worry about that. Come spring it will send up new leaves. Garlic will push up through your layer of mulch, but weeds generally won’t.
The garlic scapes, or stems with flowers, will shoot up in mid-summer, twisting and turning in sculptural forms. Some gardeners believe that cutting the scapes will increase bulb size, though I have never noticed that it makes any difference. The scapes make wonderful components in flower arrangements, and are tasty in a stir fry.
Some herbalists say that you should smash or crush your garlic and then let the garlic rest for 10 minutes before putting it in the frying pan. They say that doing so allows garlic to release chemicals that help to prevent cancer. Who knows? For years now I have prepared it, set it aside, and let it rest before using. It can’t hurt to do so.
Michael Phillips, a garlic and apple grower in Groveton, NH taught me that garlic needs to cure before you cut off the tops. Harvest it, and then let it hang in a cool dry location for a couple of weeks before you cut off the tops. He said the bulbs will reabsorb some of the nutrients in the stalk while it cures. I store my garlic on a wooden orchard rack I got from Gardeners Supply (www.gardeners.com) in a cool, dry location.
If you have excess garlic, here is a simple recipe that I love.
Roast Garlic with Goat Cheese on Toast
Peel several cloves of garlic – 4 or 5 for each dinner guest – and place in a small ceramic oven-proof baking dish. Drizzle with olive oil and sprinkle with Herbes de Provence. Bake at 400 degrees for half an hour or until the garlic turns golden brown, soft, and slightly translucent. Toast slices of a baguette and spread with the now-soft garlic. Then spread Feta or any soft cheese on top. You’ll see that the sharpness of the garlic has disappeared. Yum!
Looking to buy some seed garlic? Try your local farm stand or farmers market. If none is available locally, you can get some organic garlic from High Mowing Seeds (www.highmowingseeds.com). They have several good varieties.
Garlic may not really keep away vampires, but it’s so tasty and so easy to grow you should try it. Once you do, you’ll grow it forever – and probably live longer for doing so.
Read Henry’s blogs at https://dailyuv.com/gardeningguy. His website is www.Gardening-guy.com. He is on vacation and will not be answering-mail this week.


 Click Here to buy from Cobrahead