Putting the Garden to Bed
Posted on Monday, November 7, 2016 · Leave a Comment
Each year about now I suddenly realize that I should have already finished putting my garden to bed. This year I had a good excuse: I’d gone to France to hike, and was away for 3 weeks. But in other years my excuse has been the weather, or finishing a book that I was writing. You get it … I can be a bit of a procrastinator. Most of us are. But if you haven’t finished cleaning up your gardens yet, now is the time to get to work. Winter is just around the corner.
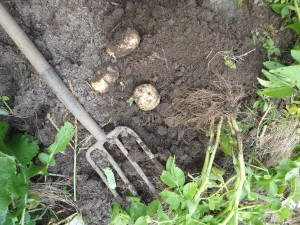
First, and most important to me, is to clean up the vegetable garden and get rid of weeds. I mulch heavily with newspapers and mulch hay, but there are still weeds present. Last week I raked off any newspapers my hungry earthworms had not eaten, and the rotting mulch hay on top. Then I dug out my weeds and lugged them away. Because of the mulch, weeding was not too time-consuming.
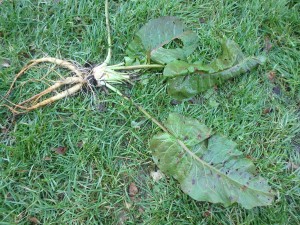
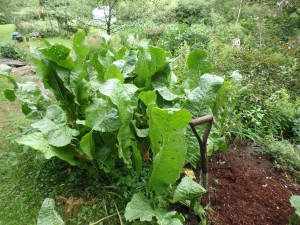
Dock
I did have some deep rooted weeds, mainly dock (Rumex spp.). The roots of this weed can easily go a foot deep in the first year. So I couldn’t just pull them, even with my favorite weeding tool in hand, the CobraHead weeder. They are a job for a garden fork. I push down on it with my foot, and the four tines go down a foot in the soil. I pull back, and it loosens the soil and lifts the roots a little. Then I am able to tug it out, roots and all. Later I will cover the beds with chopped leaves.
A buddy of mine called recently from Maine asking what to do with the leaves in their flower beds. Should he rake them out now or in the spring? I know a gardener who rakes all her leaves out onto the lawn, runs them over with the lawn mower, bags them up while nice and dry, and then stores them on the barn until spring. She cuts all her perennials down in the fall, too. Then, once the plants have all appeared in the spring, she mulches with the same leaves that were there in the fall.
Leaves are a great mulch
That method works fine and the added organic matter from all those chopped leaves have built up her soil beautifully over the years. The chopped leaves hold in moisture and keep down weeds. But it’s a lot of work.
My approach is the Lazy-Boy way. I leave the leaves in place now – and in the spring, too, unless they are choking out small plants or covering something special. As a matter of aesthetics, if you don’t like the look of leaves, rake them up. Otherwise, leave them be and they will break down over time.
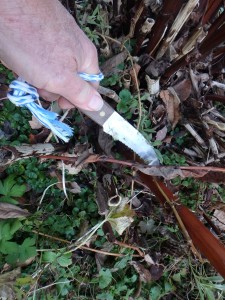
Root knife is good for cutting down flower stems
I will try to cut down most flowers before the snow flies. I leave some things with seeds for birds, sunflowers and black-eyed susans, for example. Instead of using hand pruners, I use a special serrated “root knife” that, unfortunately, is no longer commercially available. When I lose the last of my root knives, I’ll just use a steak knife – or find another manufacturer of the root knife, which has a nice curve to it. Why a knife? Cutting down hundreds of stems is tiring on the hands if using pruners.
You could also use a string trimmer or even a lawn mower to cut everything down. I have one long flower bed that I call my “Darwin bed”. It is full of tall flowers that can compete with the weeds – and each other. Asters, goldenrod, Joe-Pye weed, tall phlox, turtlehead and more compete for space. If a plant doesn’t survive, something else will fill up the space. In the fall I usually just run over it with my riding lawn mower, making it neat and tidy for a few minutes in the spring.
Another fall task involves improving the soil. I recently had my soil tested by Logan Labs (www.loganlabs.com). Their basic test gives a lot of information: pH, percentage of organic matter, mineral contents, trace mineral levels and more. As a member of the Bionutrient Food Association (http://bionurient.org), I was able to get recommended levels of minerals and trace minerals for top quality production, and what (and how much) to add. Of course, each state offers soil testing through their Cooperative Extension service.
My soil is excellent, but needs a little tweaking. Boron, for example, is a little low, as are my potassium levels. I will make some additions this fall so that the added minerals can be incorporated into the soil over the fall, winter and spring. Green sand, a bagged supplement, is a good source of potassium.
The key to any soil addition is to remember that if adding a little is good, adding more is NOT. Even useful additions to the soil need to be done in carefully measured quantities. I will mix the minerals I add to the soil with a measured amount of compost, making it easier to distribute small quantities over my garden. So, for example, I need to add half a pound of calcium borate per 1,000 square feet of garden space – or about a pound for my 1,700 feet of vegetable garden. By mixing it in with compost I can distribute that better.
My blueberries – and yours – need a little agricultural sulfur added every year to keep the soil acidity good for them. Blueberries produce much better if the soil is very acidic – around 4.5 to 5.0. My recent soil test showed that in my garden beds the soil is 6.6, or just slightly acidic and perfect for vegetables. So I add sulfur each year to the blueberries to keep it acidic enough to produce well.
If I have the time (and the right weather) I will also weed around my blueberry bushes before adding sulfur. Blueberries have fibrous roots near the surface, so I’ll need to be careful. After weeding and adding sulfur I will mulch heavily with chipped branches to keep down the weeds.
There is lots more to do, of course, so I better stop writing and head outside to the garden while the weather is nice.
Read Henry’s garden blog at https://dailyuv.com/gardeningguy. He is the author of 4 gardening books. His web site is www.Gardening -Guy.com.
It’s Time to Start Bulbs for Forcing in Spring
Posted on Monday, October 31, 2016 · Leave a Comment
At the end of a week of gray, raw, and drizzly days, I was at my wit’s end. Even my intrepid corgi, Daphne, was less than fully excited about taking walks in the rain. So I did what works best for me: I planted bulbs indoors so that I can force them to bloom in late winter. And it worked. Planting bulbs always picks up my spirits.
Almost any spring bulb can be kept in a pot indoors for 8 to 16 weeks (depending on the bulb type) and made to bloom. Choose early-blooming daffodils and they can be ready in 12 weeks. Tulips? About 16 weeks. ‘Triumph’ tulips are said to be the best for forcing. Crocus and other small, early bulbs can be ready in 8 to 10 weeks.
Your bulbs planted for forcing need a cold place to develop: 35 to 50 degrees F is right. A cold basement, garage or barn are possibilities. Even a spare fridge would be all right. But if the temperature goes below freezing for very long, the roots will stop growing – and growing roots is a big part of what has to happen if you are to get good blossoms.
All a bulb needs is a growing medium and a little moisture. I reuse the potting mix that I used for growing annual plants outdoors in summer. I just pull up the summer’s plants, fluff up the soil, add a little as needed, and make sure it is damp to start. If it is dry, I water it well before I plant my bulbs.
It is good to check the moisture levels in your bulb containers once a month during the time the bulbs are dormant and the roots are growing. Depending on the temperature, humidity and soil type, the soil medium can dry out. If it gets too dry, your flowers might not bloom. But too much water is also not good: it can rot the bulbs. That is more likely to happen if you used ordinary garden soil, which I don’t recommend as it holds water.
Instead of soil, use potting mix, or make a potting mix using peat moss, perlite or vermiculite, and compost. The mix should be fluffy and light. Dry peat moss, as it comes out of the package, is very dry and takes time to moisten thoroughly. Get your potting mix nicely moistened before planting any bulbs.
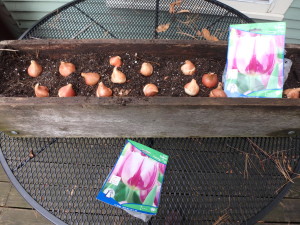
Tulips spread out and ready to plant for forcing
So how close can you plant your bulbs? Basically as close as you want. I put 20 tulips in my window box which is roughly 36 inches long and 7 inches wide. In a round pot with an 11-inch opening I put 10 daffodils. An inch or two between bulbs is fine.
I like to lay out my bulbs on top of the potting mix to see how close I should plant them. I don’t want to compress the soil, so I use a soup spoon or my fingers to make a hole for the bulb and pop it into place. Outdoors we plant tulips and daffodils 6 inches deep, but in a pot? There is often little space for soil over the tops of the bulbs. I leave an inch of free space above the soil line so I can water without spilling.
Clay pots may look good to you, but they allow moisture to evaporate from the sides of the pot. Plastic, fiber glass or porcelain containers are better for bulbs because they hold the moisture of the potting mix, minimizing water loss.
Be sure to label each pot with the date planted, and what is planted. Later, that will tell you when you can bring it into the warmth . Often bulbs will send roots out through the holes in the bottom of the pot or send up green shoots telling you they are ready. But don’t rush the process. Tulips brought up early will have nice green leaves, but no flowers.
Most bulbs that have been forced are not likely to flower the following year, even if you keep the foliage alive until spring and plant them outside. I’ve done it, and some daffodils will build up the energy to blossom after a while.
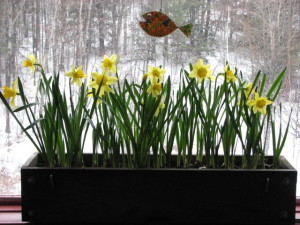
Daffodils blooming in April brighten a snowy day
You also need to remember that although daffodils are mildly poisonous and hence unattractive to rodents, most other bulbs signify “LUNCH” for mice and squirrels. Most of us living in the country have at least a few mice in the basement at this time of year. They are looking for a cozy place to spend the cold months, after all. Red squirrels are notorious when it comes to sneaking into old houses and causing mischief. So you must prevent rodents from getting to your bulbs stored inside.
Each year I bring in my big cedar window box and fill it up with bulbs for forcing. This year I decided to plant tulips in it, so I made a lid for it out of a scrap of plywood. I even screwed down the top to prevent industrious squirrels from lifting it up to get at the tulips. (“You hold it up, Larry”, I can imagine one saying, “I’ll get those tulips and toss them out.”). I made other lids for ceramic pots and placed a brick on each one.
When it’s time to bring your bulbs into the warmth of the house, put them on a sunny window to develop blossoms, but keep them out of direct sun when the flowers open so they will last longer. Get some bulbs and pot them up soon. It will help you feel better now – and in mud season!
Read Henry’s twice-a-week blog at https://dailyuv.com/gardeningguy.
How to Make a Halloween Stew Using Veggies Fresh from the Garden
Posted on Monday, October 24, 2016 · Leave a Comment
Here it is, late October and I’m still harvesting food from my garden. All of it could have been picked earlier, but I love letting vegetables stay in the garden as long as possible, and eating them the day they were picked. And I enjoy making a dish that uses as many of my own ingredients as possible.
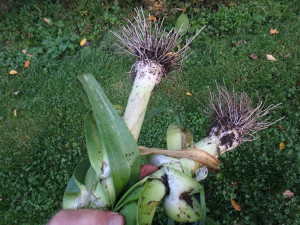
Fresh leeks
For my Halloween stew I used potatoes, leeks, carrots, kale, parsley and thyme directly from my garden, and have others including Brussels sprouts, arugula, celeriac and non-heading broccoli. You could get any of these you need from your local food Coop, which will have them from local farmers. In my opinion, local food is better by far than food trucked across the country.
This stew is really just a variation on my old favorite, leek and potato soup. To make a Halloween stew I think you need something bright orange – reminiscent of Jack-o-lanterns. I made it first with winter squash that I steamed in big pieces and then scooped out in balls with a melon baller, but I didn’t find that the flavor worked with the other ingredients. So I next tried it with carrots, which tasted much better. If you have little kids, the carrots can be made into round balls by steaming them and using a melon baller; otherwise chunks are fine.
Cut 4 strips of thick lean bacon lengthwise, and then into pieces half to three quarters of an inch long. Cook them on low heat in a heavy iron pot. Prepare 2 cups of chopped leeks by cutting them lengthwise into quarters, and then chopping into half-inch pieces. Brown in the frying bacon. Have at ready 4 cups of potatoes chopped into half-inch cubes, and add to the leeks. Brown for a few minutes, then add a quart of water. Bring to a boil, then reduce the heat to a simmer.
Next add 1 or 2 cups of carrots – either as chunks or balls, as mentioned above. Kale is optional in this stew. It adds a nice green color, and I like the flavor, but not everyone does. If you add kale, you will need to add extra water. Toss in a sprig of fresh thyme and a quarter cup of chopped fresh parsley. I like the flat-leafed kind best, though I grow curly parsley, too.
Simmer the stew for 20 minutes or until the potatoes are soft and ready to eat. Add a cup of milk and a dash of nutmeg at the end, but don’t let the stew boil after the milk has been added.
To make this recipe I picked all the vegetable the day I made it – October 19. Carrots are frost hardy and mine had already been through a hard frost. In fact, you can leave your carrots in the ground through the winter, digging them as needed. I’ve done this and know they get even sweeter after getting very cold –some of the carbohydrates in root crops like carrots and potatoes turn to sugars below 50 degrees F.
To leave carrots in the ground for winter eating, put a stake at each end of the bed: otherwise you might not find them easily if you get a lot of snow. I cover the bed with a few inches of whole fall leaves, and then a layer of mulch hay or straw. That will keep the soil from freezing solid.
There are two problems with storing your carrots this way, however: some carrots need to be picked before they get too big or they will split. But if yours are still in the ground, you should know already whether that is a problem. I grew some great purple carrots this year, but the bigger ones split, so I dug them all. A split carrot will rot if left in the ground too long.
The other problem? Rodents. Mice, voles, chipmunks, field rats and some squirrels might gnaw on your carrots if left in the ground. That’s why I like having a spare fridge in the cellar to store vegetables for the winter.
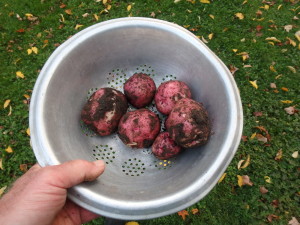
New red potatoes
I try to grow between 25 and 50 pounds of potatoes each year. My plants produce between 1 and 3 pounds of potatoes each, so I generally plant 25 to 35 plants. This feeds me, allows me to give some away most years, and provides me with organic seed potatoes to start next year’s crop. I once went 20 years without buying a potato, though I only had them to eat for 9 or 10 months each year. I don’t mind eating seasonally, in fact I think it makes me appreciate my food even more.
I’ve tried several different techniques for storing my potatoes. I’ve stored them in a cement-block bin (with a plywood lid) in a cold basement. Last year I put them in an antique 25 gallon crock with a plywood lid. Often I’ve stored them in a spare refrigerator. The trick is to maintain high humidity and a temperature between 33 and 50 degrees F. Putting an inch of wet sand in the bottom of a storage bucket works great for that, though you will have to re-moisten the sand after a while.
This year I did 2 plantings of potatoes: the main planting was in early June, the second in early August. For that second planting I had found some sprouted potatoes in the storage crock I had used, and decided to see what would happen if I planted them in August. Not all of the potatoes sprouted – they had been lurking in a dark basement for months – but those that grew did fine. They had about 10 weeks of growing time and were full sized and healthy. No bugs, either.
Growing my own food isn’t just about saving money, though I like that. Really it’s about the satisfaction of eating food that’s fresh, that tastes great and that has never been sprayed with chemicals.
Read Henry’s twice-a-week blog posts at https://dailyuv.com/gardeningguy. Henry is the author of 4 gardening books, most available at www.Gardening-Guy.com.
Moving Trees and Shrubs
Posted on Monday, October 17, 2016 · Leave a Comment
I recently fielded a query about moving a shrub: was this a good time to do so, or would the spring be better? I responded that either was all right, but that spring might be better. There is no clear answer among experts, some favoring spring, some fall.
I know from my readings that scientists have determined trees and shrubs use photosynthesis to create and store excess carbohydrates in their roots during the summer, and then use them to extend their roots in the fall. They do this even after leaf drop, only stopping when the ground freezes. This would lend credence to those who say, “Plant trees in the fall.”
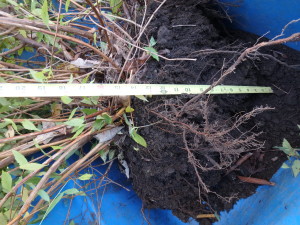
Root Ball
On the other hand, it is already late October, so plants moved now have less time to get established than those moved or planted in the spring. I wouldn’t want my shrub to get pushed up by freezing and thawing of the soil. The downside to planting in the spring is this: most of us are not likely to remember to water a new planting every week, and dry times can damage plants that have not settled in.
Despite all that, I recently moved a shrub that had gotten too big and was crowding a rhododendron next to it. The shrub, a pink spirea, had been in the ground about a decade, and was now about 5 feet tall and wide.
My favorite tool for digging up large plants is a drain spade. This is a shovel with a long, narrow blade – business end is 16 inches long and just 5 or 6 inches wide. It allows me to get under the shrub, severing roots and giving me leverage to pry it out of the ground.
Most shrubs have roots that are in the top 6 to 12 inches of soil, and this spirea, a tough and tenacious plant, had roots down a full 12 inches, perhaps more. I pushed the blade of the spade in under the shrub at a 45 degree angle, doing this repeatedly as I moved around the plant. I was able to get my spade under the center of the shrub, and each time I tipped the spade back, lifting the root ball a little. Eventually I was able to tip the spirea over onto its side and roll it out of the hole.
I measured the root ball so that I could dig an appropriate-sized hole in the new location. The root ball was 12 inches from top to bottom and about 2 feet from side to side – and weighed at least 50 pounds, I would estimate.
Root Ball
Whether planting a new tree or shrub or moving one, it is important to dig a hole just the depth of the root ball, not deeper. The new hole should be about 3 times the width of it. The reason for a wide hole is to allow roots to spread more easily and get well established more quickly. In my case I did not dig a 6-foot wide hole as the soil was not compacted, but loose and fluffy.
If I had been planting the spirea on a lawn with compacted soil, I would have loosened the soil in a wider zone. Even so, my hole was 4 feet wide or twice the width of the root ball. I dug a hole with a flat spot 12 inches deep for the roots and with sloping sides.
It is also important to plant a tree or shrub with the same compass orientation that it had before you bought it. For purchased trees, look for the least leafy side – that is generally the north side. The trunk of the north side, if planted facing south, can be sunburned or scalded by the winter sun. That is less a problem for multi-stemmed shrubs.
I don’t recommend giving fertilizers to trees and shrubs. I don’t want to force any fast growth, particularly now, nearing winter, and even a slow-release organic fertilizer will contain nitrogen (which pushes green growth). I do give my trees some rock powder – Azomite is a brand name of a bagged mineral powder I use. It contains many micronutrients that may not be in my soil, but no nitrogen. I added Azomite and some ground granite dust to the soil before I planted the spirea.
The final touches to this job were to water it well, helping it to settle in and getting rid of air pockets which can damage roots. Lastly, I spread a 3-inch deep layer of all-natural ground hemlock bark around the shrub. This will keep the soil warm longer, allowing my shrub to keep extending its roots. And I’ll try to remember to water it next summer if we have dry times.
Henry is the author of 4 gardening books. You may e-mail him at henry.homeyer@comcast.net or write him at P.O. Box 364, Cornish Flat, NH 03746. See Henry’s regular blog posts at https://dailyuv.com/gardeningguy.
Planting Bulbs
Posted on Tuesday, October 11, 2016 · Leave a Comment
For the past 3 decades or more I‘ve planted the bulbs of spring-blooming plants every fall. Some years it was just a couple of dozen, other years more than 100. October is a good time to plant them, though one year I was traveling and didn’t plant my bulbs until November. I had to shovel snow off the ground to plant bulbs that year.
I plant bulbs because it gives me something to look forward to during the depths of winter. I dream of clouds of purple scilla and white snowdrops, hillsides awash with golden daffodils, vases of tulips on every flat surface of the house. For the price of dinner for two at a moderate restaurant, you can buy 100 bulbs or more – and now is the time to do so.
Snowdrops
I love snow drops (Galanthus nivalis). Granted, they’re small and their blossoms hang down so they’re hard to see their faces well, but they’re the first to bloom, often coming up through frozen soil in early March. I transplanted fifty or a hundred from my childhood home in Connecticut 35 years ago, and by now I have uncountable numbers. They sneak into my lawn, popping up far from where I put them. I don’t know how they move around – perhaps by seed, or perhaps with the help of those otherwise pesky rodents, the squirrels.
Other early bloomers are scilla (Scilla siberica) and glory-of-the-snow (Chionodaxa spp.), both blue to purple (glory-of-the snow also comes in pink and white). Like snowdrops, they’re small – so they need to be planted in groups of 50 or more to really look good.
Glory-of-the-snow
Crocuses also can bloom early, though I’ve never had any as early as my snowdrops. There are at least 80 species of crocus and many hundreds of colors, but most garden centers and grocery stores just offer a couple of species and three colors – large purple, white or yellow. For that reason I study the bulb catalogs to explore other possibilities.
The bulb company McClure and Zimmerman has an excellent array of crocus, but I find their website awkward, so it is probably worth calling for a print catalog (800-546-4053). Brent and Becky’s bulbs is a family run business that is also excellent (www.brentandbeckysbulbs.com or 804-693-3966). You may be surprised to see that crocus bulbs can cost over a dollar each, but the rarer varieties are pricey.
Daffodils are wonderful, in part, because animals don’t eat them, not rodents, not deer. There are hundreds of kinds of daffodils in 13 major categories. Some bloom early, some late. Some produce one flower per stem, others several. I continue to explore the daffodils each year by buying some new ones- and you should, too.
If you grow hostas, you know that their leaves don’t get very big until June or July. I like to plant clumps of daffodils between clumps of hosta so that their leaves will cover the foliage of the daffodils after they bloom.
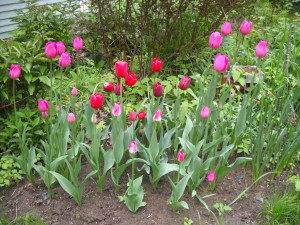
Tulips
In recent years I have been buying 100 tulips and planting them in one bed. I like them as cut flowers – and they make terrific gifts. I like having enough to pick dozens at a time, and having them all come into bloom at once.
Most tulips, for me, tend to run out of energy and get fewer in number as the years pass, so now I consider them annuals. I dig a hole about 4-5 feet long and 2 feet across and plant all 100 in one place. Then, once they are done, I cut off the foliage and plant annual cut flowers like zinnias for summer enjoyment. Wasteful? I suppose, but life is short, and I love them so.
I’ve found that my CobraHead weeder (www.CobraHead.com or 866-962-6272) works well for planting individual small bulbs like snowdrops or crocus in the lawn. I just push it into the soil the appropriate depth, pull back to create a small slice in the soil, take out the tool and drop in a bulb. The slice in the lawn closes up easily with a push of my hand.
My last bits of advice on planting bulbs: add some slow-release organic fertilizer (or bulb booster) at planting time, and mix plenty of compost into the soil. Bulbs need good drainage to thrive, and compost helps with that. If you are worried about rodents, you can sprinkle them with cayenne pepper, though its effect only lasts for a year.
Lastly, buy plenty of bulbs. Come spring, you’ll revel in their beauty and enjoy them much more than that ephemeral dinner for two you might skip now in order to afford their cost.
Read Henry’s blog about how to save your dahlia tubers for next year at https://dailyuv.com/news/862147. While there you can up for an email alert every time Henry posts his blogs.
Garlic
Posted on Monday, October 3, 2016 · Leave a Comment
Garlic is the least work of any vegetable I grow: I plant it, mulch it, harvest it. Some years I need to weed it once, too. But properly mulched in a weed-free bed, little or no weeding is required. And it’s essentially free: I will plant next year’s crop from this year’s harvest. October is the time to plant.
I’ve been growing my own garlic for decades, and each year I plant the biggest, best looking bulbs. Over time I’ve been able to develop varieties that work best in my climate and my soil.
There are two types of garlic: hard-neck and soft neck. Soft neck garlic is the kind you generally find at the grocery store, and some of it now comes from China, which I try to avoid as I don’t trust their use of chemicals. Most soft-neck garlic is pretty much the same in terms of flavor. It stores well but soft neck garlic is adapted for growing in warmer climates, so I don’t recommend it for New England.
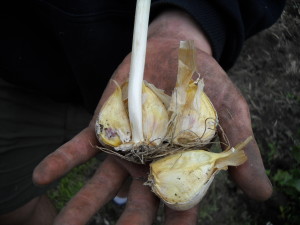
Hardneck garlic ready for planting
Hard-neck garlic is so named because each bulb has a stiff stem that is surrounded by the cloves. There are several distinct types (purple striped, Porcelain, and Rocambole, among others) and each has its own distinct flavor. Just as not all tomatoes taste the same, not all garlic is the same.
Plant garlic by separating the cloves of a head or bulb of garlic and planting it in rich soil well amended with compost and a little organic fertilizer. Cloves should be planted about 2 inches deep, pointy end up. Space them 3-4 inches apart in rows that are 8 to 12 inches apart. Grocery store garlic has probably been treated to prevent sprouting, so do not plant it.
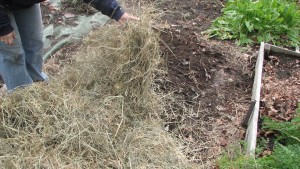
Garlic mulching
Here is the key to success: mulch your garlic bed well with straw or mulch hay when you plant. A 6- to 12-inch layer of well fluffed mulch hay accomplishes two things. First, it insulates the ground as the cloves of garlic get their roots started. The soil is warm now and the roots will grow until the soil freezes. You want as much root growth now as possible, and the mulch will hold in the heat. Second, the mulch will keep weeds down next summer. Garlic doesn’t compete well with weeds, so keeping it mulched keeps it happy.
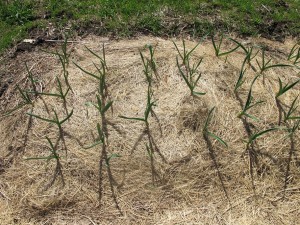
Garlic in May
Your fall-planted garlic will establish its roots and may even send up shoots before snow flies, but don’t worry about that. Come spring it will send up new leaves. Garlic will push up through your layer of mulch, but weeds generally won’t.
The garlic scapes, or stems with flowers, will shoot up in mid-summer, twisting and turning in sculptural forms. Some gardeners believe that cutting the scapes will increase bulb size, though I have never noticed that it makes any difference. The scapes make wonderful components in flower arrangements, and are tasty in a stir fry.
Some herbalists say that you should smash or crush your garlic and then let the garlic rest for 10 minutes before putting it in the frying pan. They say that doing so allows garlic to release chemicals that help to prevent cancer. Who knows? For years now I have prepared it, set it aside, and let it rest before using. It can’t hurt to do so.
Michael Phillips, a garlic and apple grower in Groveton, NH taught me that garlic needs to cure before you cut off the tops. Harvest it, and then let it hang in a cool dry location for a couple of weeks before you cut off the tops. He said the bulbs will reabsorb some of the nutrients in the stalk while it cures. I store my garlic on a wooden orchard rack I got from Gardeners Supply (www.gardeners.com) in a cool, dry location.
If you have excess garlic, here is a simple recipe that I love.
Roast Garlic with Goat Cheese on Toast
Peel several cloves of garlic – 4 or 5 for each dinner guest – and place in a small ceramic oven-proof baking dish. Drizzle with olive oil and sprinkle with Herbes de Provence. Bake at 400 degrees for half an hour or until the garlic turns golden brown, soft, and slightly translucent. Toast slices of a baguette and spread with the now-soft garlic. Then spread Feta or any soft cheese on top. You’ll see that the sharpness of the garlic has disappeared. Yum!
Looking to buy some seed garlic? Try your local farm stand or farmers market. If none is available locally, you can get some organic garlic from High Mowing Seeds (www.highmowingseeds.com). They have several good varieties.
Garlic may not really keep away vampires, but it’s so tasty and so easy to grow you should try it. Once you do, you’ll grow it forever – and probably live longer for doing so.
Read Henry’s blogs at https://dailyuv.com/gardeningguy. His website is www.Gardening-guy.com. He is on vacation and will not be answering-mail this week.
Horseradish
Posted on Monday, September 26, 2016 · Leave a Comment
The strong flavors of horseradish tend to create strong feelings: you either love it or you hate it. I love it on a roast beef sandwich or in a shrimp sauce. For most people, horseradish comes in a small bottle that languishes forever on the door of the refrigerator. But, just like tomatoes, fresh homegrown is better than the store-bought kind, so you may wish to grow your own. This is the time of year most people harvest and plant horseradish, though you can do either almost anytime.
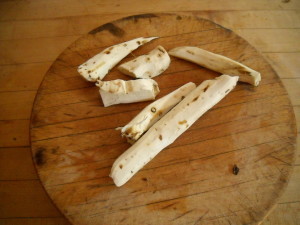
Peeled horseradish
Horseradish, along with rhubarb and asparagus, is one of the few perennial vegetables we can grow in New England. Once you have it, you will always have it – even if you decide you don’t want it anymore – so think where you want it before planting. Fortunately, a small patch doesn’t increase in size very quickly. About the only way to get rid of horseradish (or at least for an organic gardener who eschews herbicides) is to turn the patch into lawn. Even then, new shoots will come up through the lawn decades later.
Once established, the roots go down two feet or more into the soil. Because the roots branch and they are brittle, one can never get all the roots out. Even a scrap of the root will re-sprout, so the plants are there for life. Horseradish is as persistent as it is piquant.
Horseradish is in the cabbage family, but unlike its kissing cousins, it is the root, not the leaves, that you eat. And unlike other crucifers, horseradish is not started by seed, but by planting a cutting. The Johnny’s Selected Seeds catalog (www.johnnyseeds.com or 877-564-6697), one of very few that offer cuttings, explains that the seeds are not viable. They ship cuttings in April, “after danger of freezing in transit has passed.” But you can also get cuttings from a friend who is harvesting now and plant some this fall.
Prepare a horseradish bed by working in some well-rotted manure or compost. That will improve soil texture and keep the soil looser – for ease in future harvesting. Horseradish, which is essentially a weed, doesn’t need high levels of nitrogen, phosphorus or potassium.
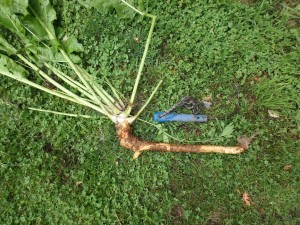
Horseradish root
To prepare a cutting for planting, dig a root from an existing plant and slice off the leaves. Plant the crown (where you cut off the leaves) and a section of root – 3 to 6 inches of root is fine. Plant the cuttings a foot or more apart. Water well, and surround with mulch to keep down the weeds. In a year or two you will be ready to harvest. Younger roots are easier to use for sauce than old, woody roots. Horseradish does best in well-drained soil, but really will grow anywhere. It will be most vigorous in full sun, but 4 hours is plenty.
To harvest, loosen the soil around a plant, either with a garden fork or a drain spade. Drain spades have blades that are about 16 inches long and 5 inches wide, and are great for digging out deep-rooted things like horseradish. A mature root will challenge even the strongest backs, so you may need to sever the root with your spade to remove it.
Prepare the horseradish for making sauce by hosing off the dirt, then peeling the dark brown skin to reveal its white interior. A potato peeler works just fine for that. The fumes of horseradish are very pungent, so think about working outdoors on a breezy day.
Horseradish root is tough stuff and can defeat your food processor unless you chop it up a bit by hand. Slice a chunk of horseradish lengthways into sections, then chop into pieces about ¾ inch in length before putting in the food processor. To prepare the sauce, grind the chopped roots in the food processor with a little cold water. Pulse the horseradish until it is coarsely chopped.
Grinding the roots releases the volatile oils (isothiocyanates), which give horseradish sauce its heat. Adding vinegar, besides adding flavor and helping to preserve the sauce, controls the level of heat. Add vinegar immediately, and the sauce is moderately hot. Wait 3 minutes before adding vinegar and the sauce will be spicier. In any case, blend the vinegar with the ground root until the consistency is moist and creamy. Add salt if you are so inclined. Put in a glass jar and store in the fridge.
Horseradish Plants
The nice aspect of horseradish, for gardeners who want it for their kitchen, is that it is essentially labor free. Plant it, and walk away. The outer leaves, which are a bit coarse-looking, will sometimes get brown and scraggly-looking, and slugs will occasionally nibble them, but the plants are trouble-free. They’ll be there, just waiting for you to harvest the roots. Now, if someone would just create corn and tomatoes that were so undemanding, everybody would garden.
Sidebar: Shrimp Cocktail Sauce
4 ounces tomato ketchup
1-2 tablespoons fresh, home-made horseradish sauce
Juice of ½ lemon
Sprinkle of Worcestershire sauce
Black pepper and salt to taste
Blend ingredients in a small bowl, sampling and adjusting until perfect.
Read Henry’s blogs at https://dailyuv.com/gardeningguy. His website is www.Gardening-guy.com. He is on vacation and will not be answering-mail this week.
Fall Flowers
Posted on Monday, September 19, 2016 · Leave a Comment
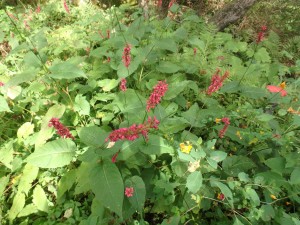
New York Ironweed
Almost every flower gardener has great June flowers: peonies are dramatic and go well with the Siberian iris that bloom at the same time. Bachelor buttons are blooming and poppies are popping out everywhere. But now, in September, some gardens have plenty of green but lack color. It need not be that way.
The first and easiest “quick fix” are the chrysanthemums that are for sale everywhere. Although many are sold as “perennial”, I treat them as annuals. That is because it order to get a clump of mums to have hundreds of blossoms, someone has to cut back the growing stems at least once, and probably twice.
After cutting them back in June, each stem sends out two or more new branches, each of which should flower. But on the occasions when I have let mums come back, I rarely did that. So to me, it is worth just buying new ones every year.
The same technique of cutting back early stems is used for those intensely purple fall asters that are for sale at farmers markets and grocery stores. I love them, and I am willing to pay someone to create that dense crown of blossoms. I often put them along my front walkway or keep them in pots on the front steps. Left on their own, they get much taller.
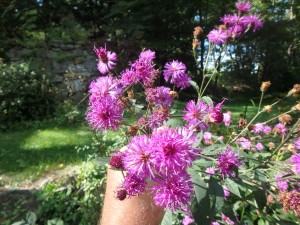
But what about perennials that come back every year? Sneezeweed (Helenium autumnale), tall New England asters, turtlehead, Sedum ‘Autumn Joy’ and Joe Pye weed are commonly planted. But let’s look at some others you may not know.
Persicaria
A lesser-known plant that has been flowering for me for many weeks and still looks good is pink bistort (Persicaria bistorata Superba, also called Polygonum bistorta). It has pink to red bottlebrush flowers that stand up 2 to 3 feet, rising above glossy green foliage. It is a skinny little flower – actually lots of little flowers on a forked thin stem. Each group of flowers is 2 to 3 inches. They grow, for me, near where my primroses bloom in spring – under an old apple tree with rich, moist soil. It does well in a vase.
Also in bloom for me is ‘Henry Eilers’, a named variety of Rudbeckia subtomentosa. It was found growing in the wild in Montgomery County, Illinois by Mr. Eilers, and introduced to the gardening world in 2003. It is unlike most black-eyed Susans (Rudbeckia) in that it has gaps between the petals, giving it a distinctive look. Each petal looks as if it were carefully cut out with scissors – with a straight edge and separated from the next, like teeth on a Jack-o-lantern.
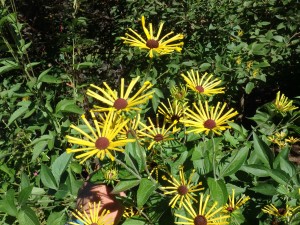
Henry Eilers Rudbeckia
Henry Eilers is usually a very nice plant and requires little or no staking. This year mine grew to be 6 feet tall and is flopping over. Each year any given plant tends to grow differently.
New York ironweed (Vernonia noveboracensis)is another tall plant in bloom for me now. According to my bible for flowers, a wonderful 800-page book called Manual of Herbaceous Ornamental Plants by Steven M. Still, ironweed likes full sun with moist acidic soil. I moved mine from such a location to a drier location with part shade. I did so because it was too vigorous and too tall and floppy, when given ideal conditions. Even so, it is about 6 feet tall and somewhat floppy. It has intense purple flowers similar to those short asters for sale right now.
Fall anemones (Anemone japonica and hybrids) are fabulous flowers, albeit a bit fussy. They come in shades of pink and white with lovely 5-petaled blossoms 2 to 3 inches across. I have lost them more than once as they really do not like moist roots in winter, but need plenty of moisture in summer. That’s a tough requirement. According to the book mentioned above, they want morning sun and filtered afternoon sun. But if they are happy for you they will spread and produce plenty of great fall blossoms. I’d say, plant them in rich dark soil in a well-drained location, and water regularly if it is a dry summer.
Another great fall flower is called “showy autumn crocus”, but they are not really crocus. They areColchicum, a different genus of bulb flowers. They look like crocus on steroids- they have 4 to 6-inch flowers on long tube-like stems. They pop up now without leaves; leaves appear in the spring, then disappear.
The stems have little strength, so they generally flop over. For me, they always flop over, except for a few of the doubles, which sometimes stand up. One way to avoid the flop factor is to plant a ground cover like myrtle or pachysandra in the same area. The vines support the flowers a little.
So go visit your favorite garden center. You might be surprised what you find – fall flowers are still blooming.
Read Henry’s blogs at https://dailyuv.com/gardeningguy. His website is www.Gardening-guy.com. He is on vacation and will not be answering-mail this week.
It’s Harvest Time!
Posted on Monday, September 5, 2016 · Leave a Comment
My garden is finally paying me back for all the work I’ve done this year. I’m putting up the harvest and eating vegetables until they (almost) pop out of my ears. It’s been a great summer.
Let’s look at how to know if your vegetables are ready to harvest, as it’s not always obvious. Potatoes, for example, are not obvious – the tubers are underground. The earlier you harvest, of course, the smaller the potatoes. But you can snitch a few after they have bloomed. If you have loose fluffy soil you can poke your hand into the soil under a plant and grab a spud without disturbing the plant – or the other potatoes that are still growing. Or you can dig up one plant and leave the others to grow.
To avoid damaging potatoes at harvest time, plunge a garden fork into the soil a foot from the plant, tip it back, and the roots – spuds and all- will be visible. Grab ‘em, but place gently in a bucket so as not to damage the still tender skins. Harden off in a cool, dark place – and leave the soil on if you want to store them.
Kennebec potatoes picked now are a good size
Generally I let potatoes grow through September, harvesting only after the leaves have yellowed and died back. But I keep testing to see if they have reached the size I like. Some varieties develop hollow spots in the center if they get too big. That’s not a big issue for me. But I don’t want them too small and I generally start mine in June, long after most gardeners have started theirs. I do that to minimize potato beetle damage, and it seems to work. I didn’t see one beetle this year!
I grew artichokes again this year, though I don’t always. It is often hard to know when to pick them – an immature artichoke looks exactly like a mature one, but for the size. Same color, same feel if you squeeze them. But if you wait too long, the leaves get hard and unappealing. I picked my first ‘choke when it was about 3 inches across and didn’t seem to be getting bigger. That plant also produced a second flower (artichokes are actually flowers), and I picked it when it was about half the size. Again, it seemed to have stopped growing.
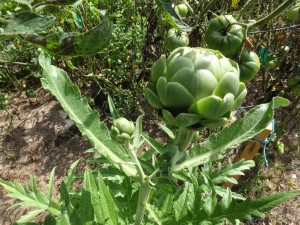
Artichoke
Summer squash can be picked at any size from tiny to mammoth. My favorite variety is ‘Romanesco’, which has stripes along its ribbed sides. I like it small, but it is still good to eat even if it “escapes” and gets huge. I just take a big spoon and scrape out the seeds. Generally I grate the big ones in my food processor and freeze the results in zipper bags for use in winter soups. I don’t blanch the squash, but do try to use it within a few months. Blanching kills enzymes that promote aging, while freezing does not. So squash is less appealing after months in the freezer.
It is tougher to know when winter squash is ready to pick. In general it is best to let winter squash like butternuts and hubbards stay on the vine until the leaves start to yellow and the stems turn brown and dry. But the best test is what I call the “fingernail” test: push your thumbnail against the skin. It should be tough enough that your nail leaves no mark. If you feel it digging in, stop pushing your nail against it.
When picking winter squashes or pumpkins, bring a sharp knife or a pair of pruners so that you can cut the stem, leaving a 3 inch “handle”. But don’t carry it by the handle, as you don’t want it to pull off. Most winter squashes also need some time in a warm sunny place to cure after being picked. Acorn squashes should go directly to a cool location, as they can get stringy if left in the sun. Always store winter squash in a low humidity area.
Never, I repeat never, let winter squash get frosted. If you don’t want to harvest them and frost is forecast, pull the comforter off you bed and cover them up. Or use an old sheet, I suppose, or even a plastic tarp.
Speaking of frost, which I hope is still weeks away, here are some veggies that will not survive even a light frost: basil, beans, cucumbers, eggplants, peppers, tomatoes and squash of all types.
On the other hand, plants that survive light frost include artichokes, beets, carrots, cauliflower, celeriac, lettuce, parsnips and Swiss chard. Plants that can still thrive after a hard frost include broccoli, Brussels sprouts, cabbage, kale, kohlrabi, parsley, radishes, spinach, turnips and leeks. I often pick kale and Brussels sprouts in December.
My onions were ready to harvest weeks ago. I know when they are ready to pull because the tops flop over. I cure them in a warm sunny place outdoors until the tops dry up. I store them, along with winter squash, in a low-humidity cool location indoors.
Growing vegetables really is for cooks. I probably would only grow flowers if I didn’t love fresh veggies so much. And of course being able to store and use my vegetables all year makes all that work even more worthwhile.
Want to have big Brussels sprouts? Read Henry’s blog for a 10-second trick: https://dailyuv.com/news/859799. Henry is the author of 4 gardening books. His website is www.Gardening-guy.com.
Are Blueberries For the Birds? Or For Us?
Posted on Wednesday, August 31, 2016 · Leave a Comment
I gave a lecture and slide show recently about good plants that support our feathered friends. I talked about good habitat for nesting and safe places to rest while avoiding cats. But when I showed plants birds like to eat, some gardeners were surprised when I showed blueberries: they didn’t want to share. Many of those same people buy black oil sunflower seeds in 50 pound bags every month all winter. But share the blueberries? No way. If you don’t want to share, let’s look at the options.
Years ago when I was in the category of “blueberries are for me, not the birds” I developed an easy netting system that kept the birds off – but I no longer use it. Netting allows the birds to see those ripe berries, taunting them if you will, and some will get caught in the netting trying to get in. A friend recently reported finding 3 dead and rotting birds in the blueberry netting of a friend who was away. I haven’t used nets in years.
But let’s assume you want to net and are willing to check the nets frequently for caught birds. I suggest using tall plastic hoops that will allow you to drape wide swaths of netting over the bushes and easily slide it off to pick.
Buy 10 foot lengths of PVC pipe that is ¾ inches in diameter. For smaller bushes, cut some pipes in half and glue them to full length pieces to produce 15 foot long pipes. For large mature bushes, use 2 full lengths. Every 10 feet of a row of blueberries needs a hoop. Just bend the pipe to make a hoop, and push into the soil. I kept the netting in place with hair clips, the kind with 2 rows of teeth and a spring. On the ground I used landscape staples to hold the netting down and keep birds out.
I called my buddy Chris Dye of Noda’s Blueberry Farm in Meriden, NH (www.nodafarm.com). He said they bought a noise maker to keep the birds at bay. It’s called a Bird Gard Pro. (http://www.birdcontrolpro.com).It makes random bird distress and predator sounds to keep birds away, protecting about an acre of berries. He has a 12-volt car battery to power it, and it sits up 10 feet or more in the air. Aside from the sounds of distressed birds, which would make me loony in no time, the cost would prevent me from getting one: $229.95. Of course, blueberries are his business, so he has to protect the 2 acres of berries they grow.
Then I called Riverview Farm in Plainfield, NH and talked to Nancy Franklin. She and her husband have a huge fruit operation – apples, blueberries, raspberries, pumpkins and more (http://www.riverviewnh.com/). Nancy said that their berries are mostly late-season varieties, especially one called ‘Elliot’. By the time they are ripe, many of the bird culprits are getting ready to migrate and have changed their feeding habits, and are less of a problem. So they share a few, but don’t lose too many.
One problem with late-season berries whether blueberries, raspberries or strawberries is a new pest that arrived a few years ago: the spotted winged drosophila, a foreign fruit fly. Unlike our native fruit flies, this one attacks good fruit, not rotten fruit. So I don’t recommend any late season varieties until someone develops a predator insect that will control this new pest.
Birds evolved to avoid large predatory birds like owls and hawks. So you can buy a plastic owl and put him out in your blueberry patch, but birds aren’t stupid. Unless you are going to move it from tree to tree, they’ll figure out it’s not real.
Birds don’t like shiny things, either. I’ve known gardeners to hang old music CD’s they no longer enjoy in the bushes. The wind blows them, and they shine light at the birds. But then again, in time, they might start rocking to “Grandma Got run Over by a Reindeer” instead of flying away.
I also have some Nite Guard Repellent tape. This is shiny tape designed to scare birds with movement, noise and light (http://www.niteguard.com/). At $15 for a 100 foot roll, it is affordable – and probably helps.
I have a bumper crop of blueberries ripening up now on my 7 bushes. I attribute that to the fact that I have been spreading agricultural sulfur around the bushes for a few years, getting the soil very acidic. Soil pH is very important, and you can add sulfur any time. But don’t add acidic fertilizer now (Holly-Tone, for example) as that should be done in early June. Fertilizer now would stimulate new growth which could easily be damaged in winter.
So this year I decided to put Reemay or “row cover” over my bushes. It’s a light-weight agricultural fabric designed to keep bugs off crops. I keep it in place with ordinary wooden clothes pins. It only cover the top of the bushes, or a little of the sides, but birds flying over won’t see it. And if my resident robins want to go on the ground and pick up berries, why not? There is nothing to harm the birds, and it is an inexpensive, quick–to-install solution. So put me in the category of “willing to share – a little – with the birds.”
See Henry’s twice-a-week blog at www.dailyuv.com/gardeningguy. He is the author of 4 gardening books, and a lifetime UNH MasterGardener.


 Click Here to buy from Cobrahead