Garlic
Garlic is the least work of any vegetable I grow: I plant it, mulch it, harvest it. Some years I need to weed it once, too. But properly mulched in a weed-free bed, little or no weeding is required. And it’s essentially free: I will plant next year’s crop from this year’s harvest. October is the time to plant.
I’ve been growing my own garlic for decades, and each year I plant the biggest, best looking bulbs. Over time I’ve been able to develop varieties that work best in my climate and my soil.
There are two types of garlic: hard-neck and soft neck. Soft neck garlic is the kind you generally find at the grocery store, and some of it now comes from China, which I try to avoid as I don’t trust their use of chemicals. Most soft-neck garlic is pretty much the same in terms of flavor. It stores well but soft neck garlic is adapted for growing in warmer climates, so I don’t recommend it for New England.
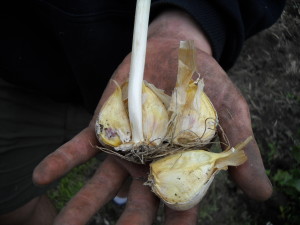
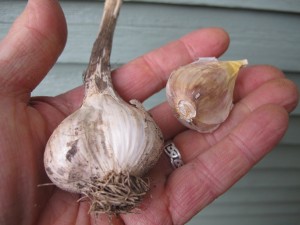
Hard-neck garlic is so named because each bulb has a stiff stem that is surrounded by the cloves. There are several distinct types (purple striped, Porcelain, and Rocambole, among others) and each has its own distinct flavor. Just as not all tomatoes taste the same, not all garlic is the same.
Plant garlic by separating the cloves of a head or bulb of garlic and planting it in rich soil well amended with compost and a little organic fertilizer. Cloves should be planted about 2 inches deep, pointy end up. Space them 3-4 inches apart in rows that are 8 to 12 inches apart. Grocery store garlic has probably been treated to prevent sprouting, so do not plant it.
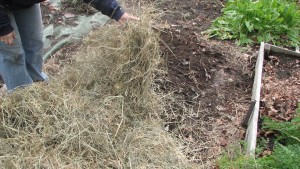
Here is the key to success: mulch your garlic bed well with straw or mulch hay when you plant. A 6- to 12-inch layer of well fluffed mulch hay accomplishes two things. First, it insulates the ground as the cloves of garlic get their roots started. The soil is warm now and the roots will grow until the soil freezes. You want as much root growth now as possible, and the mulch will hold in the heat. Second, the mulch will keep weeds down next summer. Garlic doesn’t compete well with weeds, so keeping it mulched keeps it happy.
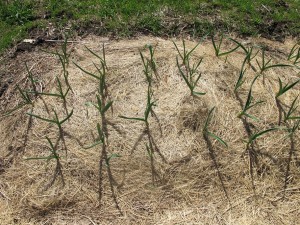
Your fall-planted garlic will establish its roots and may even send up shoots before snow flies, but don’t worry about that. Come spring it will send up new leaves. Garlic will push up through your layer of mulch, but weeds generally won’t.
The garlic scapes, or stems with flowers, will shoot up in mid-summer, twisting and turning in sculptural forms. Some gardeners believe that cutting the scapes will increase bulb size, though I have never noticed that it makes any difference. The scapes make wonderful components in flower arrangements, and are tasty in a stir fry.
Some herbalists say that you should smash or crush your garlic and then let the garlic rest for 10 minutes before putting it in the frying pan. They say that doing so allows garlic to release chemicals that help to prevent cancer. Who knows? For years now I have prepared it, set it aside, and let it rest before using. It can’t hurt to do so.
Michael Phillips, a garlic and apple grower in Groveton, NH taught me that garlic needs to cure before you cut off the tops. Harvest it, and then let it hang in a cool dry location for a couple of weeks before you cut off the tops. He said the bulbs will reabsorb some of the nutrients in the stalk while it cures. I store my garlic on a wooden orchard rack I got from Gardeners Supply (www.gardeners.com) in a cool, dry location.
If you have excess garlic, here is a simple recipe that I love.
Roast Garlic with Goat Cheese on Toast
Peel several cloves of garlic – 4 or 5 for each dinner guest – and place in a small ceramic oven-proof baking dish. Drizzle with olive oil and sprinkle with Herbes de Provence. Bake at 400 degrees for half an hour or until the garlic turns golden brown, soft, and slightly translucent. Toast slices of a baguette and spread with the now-soft garlic. Then spread Feta or any soft cheese on top. You’ll see that the sharpness of the garlic has disappeared. Yum!
Looking to buy some seed garlic? Try your local farm stand or farmers market. If none is available locally, you can get some organic garlic from High Mowing Seeds (www.highmowingseeds.com). They have several good varieties.
Garlic may not really keep away vampires, but it’s so tasty and so easy to grow you should try it. Once you do, you’ll grow it forever – and probably live longer for doing so.
Read Henry’s blogs at https://dailyuv.com/
Planting Garlic
Garlic is one of those magical flavors that give foods depth of flavor and the richness of another world. Italian food, French food, Indian food – these all include liberal use of garlic. Why the English decided on fish and chips and boiled dinners as their staples is a mystery to me. Maybe they can’t grow garlic. But I’ve been growing garlic for my kitchen for decades. It’s easy to grow and now is the time to plant it for next year.
Your first task is to find some garlic suitable for planting. You can’t just go the grocery store and buy some. Most commercial (non-organic) garlic has been treated with chemicals to keep it from sprouting. Instead, go to your garden center to buy some – or get a few heads of garlic from a farm stand or a friend who grows it.
Here in New England the recommended type of garlic is called ‘hard neck garlic’ and it survives our cold weather nicely. Soft neck garlic, commonly grown in California, is less cold tolerant. It is the type that can be braided and hung in the kitchen. Hard neck garlic sends up a stiff stalk, called a scape, which grows out of the middle of the bulb – a stiff neck, if you will.
Hard neck garlic generally has a stronger, richer flavor with more bite. It also comes in a wide range of flavors – just as different varieties of tomatoes and sweet corn have distinct flavors. Hardneck garlic is often classified as either rocambole, porcelain or purple stripe. Rocambole garlic has a tan outer covering and usually produces up to a dozen cloves per bulb. Porcelain garlic has a satiny white wrapper and tend to produce larger cloves with as few as four per bulb. Purple stripe garlic is one of my favorites – it is productive, tasty and generally a nice, plump size.
I like to say that everyone would be a gardener if growing all vegetables were as easy as growing garlic. There are just three steps to growing garlic: planting it, mulching it, and harvesting it. That’s right, if you mulch well it will grow well and you will never – or rarely – need to weed.
I grow garlic (and all my vegetables) in wide, mounded beds. Each bed is 30 to 36 inches wide, and mounded up 4 to 6 inches above the walkways. A short-tined garden rake or hoe is useful for shaping the beds, and to gather up loose soil from the walkways.
The first step when planting garlic is to remove any weeds from the soil. Then I enrich the soil by adding 3 or 4 inches of compost on top of the bed I am planting it in. I use a garden fork or my CobraHead hand weeder to loosen the soil and stir the compost into the top few inches of soil. Rototilling would mix the compost in deeper – good for drainage in a clay soil if you have it, but away from the roots of my garlic.
Rows of garlic need to be spaced 6 to 8 inches apart. Most years I plant short rows across my wide beds, but sometimes I will plant rows down the length of the beds – it really doesn’t matter which way you do it. I create furrows with a hand tool in the fluffy soil of my bed and sprinkle on some bagged organic fertilizer, then mix that in.
It is important to plant your garlic right side up. If you look at a bulb of garlic, you should be able to see roots, or where the roots have been cut off. The top of each clove has a slightly pointy tip, and the bottom has a small, flat scar. And of course, when looking at a bulb of hard neck garlic you can see where the scape grew. If you plant the cloves upside down, they use up a lot of energy trying to get started and grow toward the sun.
To plant, just push each clove into the prepared soil about 4 inches away from its nearest neighbor. The top of the clove should be 2 to 3 inches beneath the soil after you cover it up. Pat the soil with your hands to firm it up.
The last step is to mulch. I use mulch hay because it is inexpensive, but straw is fine, and should have fewer seeds. I put a thick, fluffy layer of hay over the entire bed – and about a foot deep. Fall rains and winter snows will compact the mulch to a 3 to 4 inch thick layer of mulch that should keep out all weeds – while allowing the garlic scapes to push through in the spring.
Garlic is ready to pick in July or August. The scapes will curl and dance as they grow, and are wonderful in a vase with flowers. The scapes are also tasty – you can chop them and add to stir fries or omelets. Store your garlic crop in a cool dark place for best storage. And don’t eat it all! Save some for planting your next crop.
I’ve been told that garlic has cancer-fighting compounds, and that it’s best to chop or press you garlic 10 minutes before cooking it to preserve the best effects. And it’s supposed to be good for keeping away vampires, not just cancer. Me? I find it necessary for a good spaghetti sauce!
Henry Homeyer is a garden designer, coach and the author of 4 gardening books. His web site is www.Gardening-Guy.com.


