Gardening in March
Posted on Friday, March 14, 2025 · Leave a Comment
Whether March came in like the proverbial lion or lamb for you, March is the time when you need to pay more attention to your houseplants. Instead of watering every Sunday, you probably need to water most things twice a week – except for cacti and a few plants that thrive in dry soil. But rosemary? It’s so easy to kill now. The sun is hotter, roots are growing, and they need more water. Don’t keep the soil soggy, but poke your fingers into the soil more often and make sure it’s not Arizona arid. A dry rosemary is a dead rosemary.
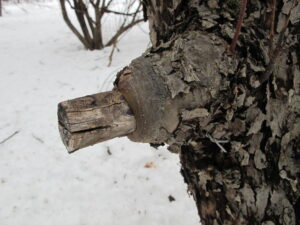
Don’t leave stubs, they have to heal back to branch collar
Although March is the time farmers tend to prune their fruit trees, I am waiting a bit. We still have too much snow to easily move around carrying ladders. Pruning experts will tell you that you can prune fruit trees any month of the year, something I have found to be true. But let’s go over a few rules for pruning.
Use sharp tools. A good pair of hand pruners, some loppers and a pruning saw are all you need. I don’t like bow saws – they can’t get into tight places. Know where to cut. Don’t cut branches flush with the trunk or a big branch. Each branch has a “collar” that should be left. This is the bulge where it heals. But don’t leave long stubs when you remove a branch. They will not heal properly, and look awful. Remove dead branches first.
Never remove more than about a quarter of the leaf-producing branches. Leaves are the engine that drive growth and flower and fruit production. Remove water sprouts each year or two. These start as pencil thin shoots growing straight up, but will get big and clutter up the interior of the tree. Remove branches that are rubbing or crossing others, or are growing in towards the center of the tree. Remember: sunlight should be able to reach every leaf. Open up the interior so this is possible.

Homemade A frame plant stand for starting seedlings
March is also the time I start planting seeds indoors. Onion family seeds and peppers, hot and sweet, can be started now. Artichokes and cardoon I start early, but tomatoes I don’t start until around April 10. That will give them 8 weeks to be ready to go outside in mid-June.
Actually, it is much easier to order onions as bareroot plants sold in bunches of 50, each a few inches long and ready to start growing in the ground in May. Johnny’s Select Seeds and others sell them, and your local nursery may sell onions in 6-packs, each cell with 4 to 6 seedlings. The main advantage to starting onions or tomatoes by seed is that you get a much wider choice in what you grow.
If you want to start plants indoors, you will need some lights. Yes, some people try a sunny window, but they generally get lanky plants leaning toward the sunshine. Kits with LED or fluorescent lights are sold at garden centers and online. I built my own, a simple A-frame wooden structure that has two plywood shelves and supports 4-foot lights. It can accommodate up to 12 flats of seedlings if I put some on the floor.

Metal planting cells from Gardeners Supply
Next you need 6-packs of either plastic (like the ones you get when you buy veggies or annuals at the nursery) or re-usable metal or heavy duty plastic ones. In my efforts to reduce my use of single-use plastic, I have switched over to re-usable plant cells. Yes, they are more expensive, but they last forever. In any case, get bigger cells, not smaller ones. Your babies are going to grow in them for 8 weeks or more and need plenty of room for roots.
You can buy seed starting mix, but if you do a lot of plants (as I do), it can get expensive. So you can mix the potting mix with good quality compost if you have it, or you can buy it. Seed starting mixes don’t have much nutrition in them, so adding compost helps. Or later, you can water with a dilute solution of liquid fertilizer, something like Neptune’s Harvest Liquid Fish and Seaweed Fertilizer.
You may wish to buy electric heat mats designed to provide consistent low-level warmth. This signals the seeds that spring is here, and gets them to sprout sooner and with better germination rates. Again, expensive, but they last forever.
Lastly, you can’t let your seeds/seedlings dry out. One way to prevent that is to buy clear plastic covers that fit over a flat of seedlings. Oh, and don’t forget to buy trays to hold your 6-packs. This keeps water from getting on to your table or floor.
Lastly, in March I am reading gardening books and magazines and planning out what I want to do in my flower gardens. I recently got a preview copy of a wonderful book by my friend Jill Nooney called “Bedrock: The Making of a Public Garden”. Jill and her husband Bob Munger have working on their property to develop beautiful spaces to try all sorts of plants. They bought the house in 1980 and have been working on them ever since. They turned over most of the land, gardens and Jill’s sculpture to a non-profit to own and manage last year, but they continue to live in the old farmhouse there and work in the gardens.
Why read this book? It is relevant to anyone who wants to develop great gardens. Jill is a plant collector who has tried just about anything that will grow in a Zone 4/5 garden, and the photos illustrate many of them. The color photos are numerous and beautiful. It is full of design ideas, too. And she has an engaging writing style. I loved the book.
Spring is just around the corner. Get busy now – it will help prevent the mud season blues!
Spring Is On Its Way
Posted on Thursday, March 13, 2025 · Leave a Comment
Here in Cornish Flat, this seems like an old fashioned winter. Temperatures have been consistently below freezing, and the ground has had at least a light covering of snow most of the time. No deep snow, the kind that insulates the ground and keeps tender perennials safe, but enough to sooth the eyes when looking at the landscape.

I planted these mini-daffodils last November and they are ready to bloom on a sunny windowsill.
But we gardeners are already thinking of spring. Fortunately, I planted many small pots of Tête-à-tête daffodils last fall, and stored them in my basement which stays at 40 degrees. The foliage is up now, and their roots are pushing though the holes in the bottom of the pots, so I know they are ready to bring up to the warmth of the house. I’ve been putting them in sunny windowsills, and many are blooming – and ready to give away. For me, this is a spring ritual: giving 4-inch pots of flowers to friends and neighbors.
If you are hungering for spring, you might consider going to a spring flower show. Unfortunately, many of spring shows have given up. Boston no longer has its extravaganza, so the Connecticut show in Hartford is now New England’s big event. It has many nice displays and many great classes to attend. This year it is February 20 to 23.
Then there is one of my favorites, the Vermont Flower Show in Essex Junction, Vermont on March 7 to 9. It’s small enough to see everything in one day, but has lots to offer.
In Rhode Island there is the Home Show from April 10 to 13, and it has a flower and garden portion, though I have not been down to Providence since the big flower show folded its tent in 2016.
For the travel-inclined there is the Philadelphia show, March 1 to 9. It was has been a spring tonic since1829. The poinsettia was introduced to American gardeners at that first show, and Ben Franklin may have attended that year. Go on a weekday for smaller crowds, and be prepared to spend a lot – but to have a lot of fun.
February is the month I go through my seed packets to see what I need to buy. Most vegetables and flowers stay viable for 3 years. Exceptions to that rule are all onion-family seeds and parsnips, so I buy them each year. I’ve found that shallots do very well for me and keep longer than onions in the winter, so I will buy new seeds and plant them indoors and keep under lights starting in early March. Peppers of all sorts need a long time to get big enough to plant outdoors, so I also start them in March. Tomatoes I start in April, usually around the 10th.
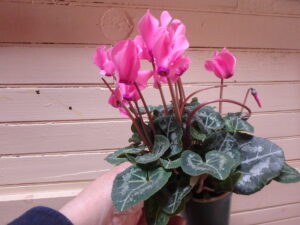
This Cyclamen will bloom for 8 weeks or more in a low light, cool spot
This is also the time of year to pay attention to your houseplants. The days are getting longer, roots and shoots are growing, and they need more water. If you are trying to overwinter a rosemary plant, double the water it gets. A fully dry rosemary is a dead rosemary, and late February or early March is the time of year most of us kill ours. I admit to failing with rosemary by keeping to my weekly watering schedule.
If you have the mid-winter blues, buy yourself some nice cut flowers at your local florist. I prefer buy from a florist, as they generally take better care of their flowers than big box grocery stores. Many years ago I went to the Boston flower market –leaving at 5am – with a friend who owned a florist shop to buy flowers for her shop. The flower market was the size of a football field and had every kind of flower you could imagine. What fun that was!
Some years ago the flower trade got a bad reputation because many of the flowers came from Colombia, South America, where the growers used pesticides liberally and paid their workers a pittance. But I believe that now many flowers in winter are grown in the States and done so with environmentally sound practices. You can always ask your florist where their flowers come from.
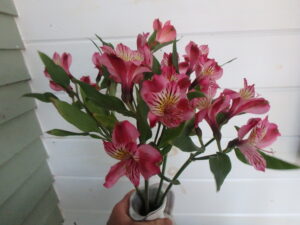
Alstormeria is a long lasting inexpensive cut flower
If you want cut flowers that last a long time in a vase, try alstromeria or lisianthus. Both hold up very well. Also excellent are chrysanthemums, asters, sea lavender and bells of Ireland.
Then there are a couple of gorgeous potted flowers that bloom for a longtime at this time of year: cyclamen and Phalaenopsis orchids. The key to these is to minimize watering and to keep them out of direct sunlight. The cyclamen are cheap enough that you can compost them when they are done booming (in 8 to 10 weeks). Phalaenopsis orchids are more expensive but can be saved from year to year.
Lastly, this is a good time of year to think about your outdoor gardens and how you can improve them, come spring or summer. Start by looking out your favorite window. What do you see now that gives you joy? If you only grow flowers, the landscape is bleak.
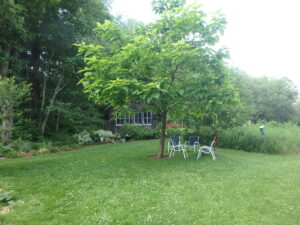
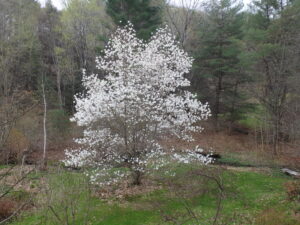
Think about trees, shrubs and decorative grasses that you could add to the landscape. Would a nice miniature or weeping conifer fit into a perennial bed? A Merrill magnolia in the middle of your lawn could offer a nice shape and buds and bark that please you. It will bloom magnificently with large double white blossoms in April. It will give you something to look forward to. And after all, isn’t that part of the reason why we all garden?
Looking Back On Our Gardens of 2024, And Ahead to 2025
Posted on Thursday, March 13, 2025 · Leave a Comment
I’m not a big fan of unrealistic New Year’s resolutions such as “keep my papers organized and desk tidy”, for example. But I do like to spend some time each January reflecting on the gardens of the past year and making decisions about what I will do in the coming months.
Let’s start in the vegetable garden. In 2024 I planted about 24 kale plants of all colors. In 2025, I shall be more moderate. Yes, kale is healthy for us and freezes well, but I was lax in picking and freezing it in the fall, and wasted some. Shame on me. I use it mainly in stews and soups, or frozen in smoothies.
A new salad green I loved and which, unlike lettuce, never bolted or bloomed, is sold as dandelion. No, it’s not the dandelion we have in the lawn. It’s an Italian “dandelion” which is actually a different species. It is sold fresh in our Coop, I tried it and liked it, so I started some from seed indoors last March, a variety I think is called ‘Clio’ from Johnny‘s Selected Seeds. The leaves get to be 12 to 16 inches long, and they will re-grow if cut, so I harvested it all summer and well into the fall and it never blossomed. I shall plant 6 plants again this year. FYI: it tolerates some shade.
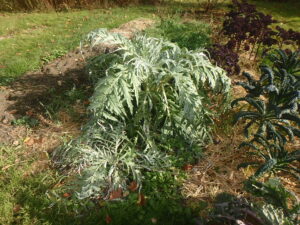
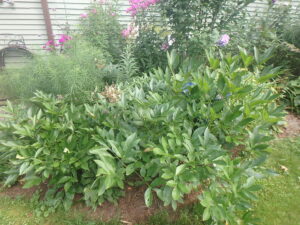
Cardoon has silver leaves and is easy to grow. Start from seed indoors early.
Also on the vegetable front, I grew cardoon this year and will do it again. It is very large leafy plant in the artichoke family. It does not bloom like artichokes, but you eat the midribs of the 3-foot long leaves in fall. I chopped the midribs, boiled till tender, and baked in a cheese sauce. They tasted just like artichokes, but created a lot more food.
This past summer was sunny and, for the most part, dry. We had a great tomato crop, and our flowers performed well too. I did have to water new plantings, as we got little rain.
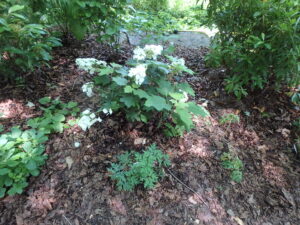
We are out of sunny spots to add shrubs, so in 2024 we dug out a patch of goutweed – my nemesis – and planted 9 shrubs and a Japanese red maple in an area of part shade, part sun. I was careful to water daily for 2 weeks, and then twice a week for the rest of the summer. The shrubs included 2 native viburnums and 2 mountain laurels, and 3 native hydrangeas, including a great variety for shade called ‘Haas Halo’ (H. arborescens). All did well.
The viburnums are Zone 5 and I have mostly considered our location a Zone 4 (with temperatures most winters colder than minus 20). But in recent years we have not seen lows of even minus 20 degrees, so I am willing to try some Zone 5 plants. Elsewhere I planted a kousa dogwood, a Zone 5 plant that I have tried and lost to winter kill more than once. The Stewartia tree I planted 3 or 4 years ago is also Zone 5, but is doing nicely. I’ll be 79 in April, and by gum, I’m ready to take some chances.
What else worked this past year? Opening our gardens to visitors. We worked hard in the spring to rid ourselves of weeds, sharpen edges of beds, and fill in empty spots. We opened our gardens on select days to various groups and invited friends for a glass of wine and a walk around with us in the early evening. No, our gardens were not perfect – none ever is – but these events were a great time. Try it!
This Catalpa planted 6 years ago provides a nice shady spot to chat or rest.
I’ve had three honey berry plants for 3 or 4 years now, but have not gotten any berries as yet. The bushes (Lonicera caerulea) are in the honeysuckle family and the blue berries are very tasty, I’ve been given some. But so far they have not been able to pick my own. They have not earned their place. I shall tell them this spring to produce berries or they will be gone. I’ve been told that birds love them and will pick them before they are fully sweet and ready for me to eat. The berries turn blue, but are not ripe for a while after that.
The Catalpa tree I planted 6 years ago as an 8-foot tall tree is now 35 feet tall and provides shade for us to sit and relax. It is great tree, blossoming in July. I prune the top each year now to keep it from reaching its 60-foot tall potential. It is a bit weak wooded, so I want to keep it from getting too big. The shade it provides encourages me to sit and relax in the garden, something I want to do more often in 2025.
My Merrill magnolia died suddenly without any obvious reason
I am saying a sad farewell to my Merrill magnolia that I planted in 2004. It bloomed reliably each year on my birthday in late April with huge double white blossoms. The shiny green leaves were gorgeous all summer, and the buds in winter look like pussywillows on steroids. It has 5 stems and stands about 60 feet tall and nearly 40 feet across at the crown. But it seems to have died last summer and unless it miraculously recovers in the spring, I shall have it cut down. Sigh.
Okay time for one last resolution: I will keep better records in 2025. I just haven’t found the right way to keep them. I start a yearly notebook, and record some plants. But not all. I’m often too busy working in the garden and plan to do it later. My camera is a good way to record things and I take photos of everything that blooms. But I have literally tens of thousands of photos – and most are largely just organized by date. This year I WILL do better. Happy gardening, and best wishes for 2025.
Holiday Gifts for the Gardener
Posted on Thursday, March 13, 2025 · Leave a Comment
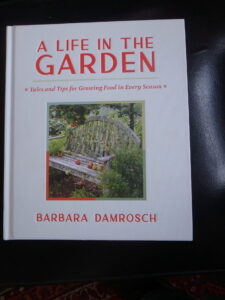
Barbara Damrosch’s new book is a good read.
I am a bit embarrassed to admit this, but I believed in Santa Claus longer than anyone I have ever met. Fifth grade, maybe sixth. To this day, some 70 years later, I still believe in the mystery and joy of giving wonderful gifts that suit the receiver, things that will surprise and delight the recipient – just as Santa always did for me. Let’s look at some great gifts you might consider for your loved ones this holiday season.
Books are always wonderful gifts. My favorite new book is by Barbara Damrosch, author of the fabulous “Garden Primer”. It is called “A Life in the Garden: Tales and Tips for Growing Food in Every Season”. It imparts lots of information from a lifetime of gardening and farming in Maine, alongside her husband, author Eliot Coleman. Along with good information, it has delightful snippets about her life and views. I learned that I can plant rows of carrots just 2 or 3 inches apart – each carrot needs just 4 square inches. I’ve been wasting space! Reading it is like sitting down with a knowledgeable Auntie and listening to stories and tips. Unlike most gardening books, it made laugh outloud, too. Hardback $40.
Another favorite this year is “Plants for the Winter Garden. Perennials, Grasses, Shrubs, and Trees to Add Interest in the Cold and Snow” by Warren Leach. Since we have 5 months or more of cold, this book is very useful. Leach is a prize-winning garden designer, and his book is nicely illustrated with lots of photos and useful information. Hardback $40.
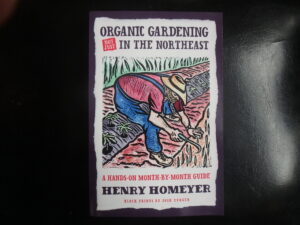
This is a reprint of Henry’s 2011 book.
I would be remiss if I didn’t mention that I have re-printed my book, “Organic Gardening (not just) in the Northeast: A Hands-On Month-by-Month Guide. It is a collection of my articles gleaned from 10 years of this column. Each of the 12 chapters has eight articles relevant to a month in the garden. Get a signed copy by sending $24 To Henry Homeyer, PO Box 364, Cornish Flat, NH 03746.
It’s not just regular visits to the
garden that make a good
gardener: it’s also tools. Good tools make
gardening more efficient, less work and more fun. Every year I mention my favorite weeding tool: the CobraHead weeder (
www.CobraHead.com). It is a curved single-tine weeder that easily gets under weeds and allows you to tease out all the roots. Mine is a steel extension of my hand, and I use it for planting, weeding, and more.
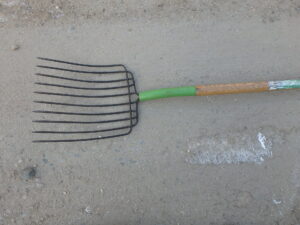
This bedding fork is auseeful tool.
New to me this year is the 10-tine bedding fork. The one I use is made by Ames and comes with a sturdy wooden handle (which is better than fiberglass, I believe). Originally made for cleaning manure out of stalls, it is perfect for moving mulch, wood chips, straw and compost. It can also be used to smooth out the mulch after spreading it.
Watering cans are often a disappointment. I no longer will buy plastic ones – the material often breaks down in the sun after just a few years. But good galvanized metal watering cans can be expensive, and are not often sold at your local garden center or hardware store. Here’s what to look for: get one with a handle that runs from the front to the back of the can. This allows you to easily carry it and to water with one hand. Handles going from side to side require two hands. Size is important. I like big: 2.5 gallons. Smaller people may want smaller cans. Water weighs 8 lbs per gallon. Make sure the rose (nozzle) is removable for cleaning out leaves. Mine is antique, and you might find a good one in a second-hand store.
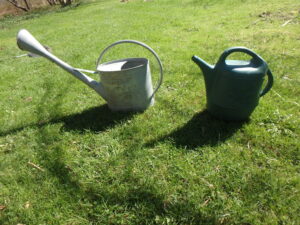
A metal watering can is better than plastic ones
Seeds are good stocking stuffers and offer friends new varieties to try. I started cardoon seeds indoor under lights this year, starting in early February. At maturity, the plants stood up to 3-feet tall with handsome gray-green leaves. Best of all, the ribs of the leaves, when cooked properly, taste just like their relative, artichoke – and provide much more food. Got a favorite winter squash? Give a packet of seeds. Kohlrabi is another lesser-known veggie with seeds you might give to a friend to try.
Heirloom, self-harvested tomato seeds you saved can also be shared if your recipient is willing to start seedlings indoors. Or give seeds from your favorite annual poppies or morning glories.

This bread bag is an alternative to plastic for home made bread.
My wife Cindy and I are committed to minimizing our use of plastic – both for the environment and for our health. Plastic is a petroleum product and has been found to exude micro-particles of plastic that we ingest. If you agree, think about buying glass containers for left overs and store purchases. I get all my deli meats wrapped in paper and transfer them to glass containers when I get home. I recently solved the problem of how to keep bread fresh from the bakery without using a plastic bag for storage: King Arthur Flour makes a cloth bags with an inner bag of waxed fabric. It really works!
Fend Off: Deer and Rabbit Repellent is another good gift. A package contains 25 small cylinders with a close pin attachments. They contain garlic oil and last all winter! These really work for me.
A gift certificate to your local, family-run gardening center is another great choice. It helps them make it through the winter, and it provides choice for your loved one.
Final Garden Chores to Do Before Winter
Posted on Thursday, March 13, 2025 · Leave a Comment
Winter is fast upon us. The shortest days of the year are ahead, but gardening is done for most of us. That being said, I still have flowers in bloom outside: my witch-hazel trees are showing gorgeous, twisty-petaled yellow flowers, even after a light snow and several hard frosts. And I still have a few blossoms on one of my ‘Knockout’ roses.
If you planted any trees or shrubs this year, make sure they go into the winter well-watered. We’ve had dry times this summer and fall, so a slow, deep watering is needed now. A woody plant’s roots are still growing now – even after leaf drop, and until the ground freezes around them.
I’m not sure why, but I saw very few Asian jumping worms this summer – perhaps the hot, dry weather inhibited their spread. I think I only have them on one portion of my property, but I am being careful about the possibility of spreading egg cases. I like to chop up my fall leaves and save them for use in the garden, but I don’t do that with leaves in the area where I’ve seen those dreaded worms. Instead I just use them for mulching beds already infected with the invasive worms.
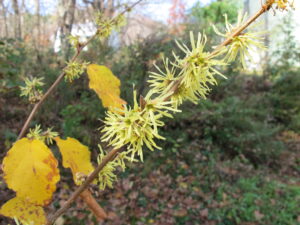
Witch hazel is blooming now, in November
This is the time of year to think about protecting our woody plants from deer predation. I can’t afford to encircle our 2.5 acres of gardens with an 8-foot tall fence, the best way to protect plants. And Rowan, our 4-year old Golden/Irish Setter mix helps discourage deer but he lives indoors and sleeps by the fire all night – just when hungry deer are marauding. Winter is when they want to munch your rhododendrons and other yummy things.
There are several ways to discourage deer. I have found that garlic clips attached to branches about 3 feet off the ground are good. I buy some called “Fend Off Deer and Rabbit Odor Clips”. These are little green plastic cylinders that contain garlic oil. They repel deer for up to 5 months. Unlike sprays that wash off after a hard rain, these really do a great job. I’ve seen footprints of deer that approached tasty shrubs, sniffed and walked away.
If you have had deer eat the lower branches of you yews, a favorite evergreen for deer, you can also protect your plants by wrapping them with burlap. Yes, tedious, but it is 100% effective. I have done it for years for a client.
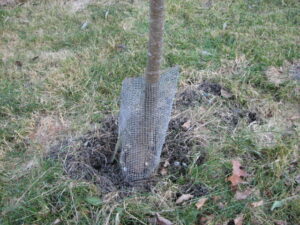
Hardware cloth to protect apple tree from voles 003
Voles, chubby rodents with short tails, are common everywhere and love to nibble on the bark of young trees, particularly fruit trees. You can protect your trees by placing a cylinder of quarter inch “hardware cloth” around them. It comes in 18-inch rolls, which you can cut with tin snips. Wear gloves, it’s razor sharp when cut. But don’t let your tree engulf the wire – which it can do in 3 years or so.
I know that March is traditionally the time for pruning fruit trees, but November is fine, too. And you shouldn’t have to wade through deep snow to do so. A quick reminder of how to do this: Start by removing any dead or damaged branches. Next evaluate the overall form of the tree: Is it a handsome plant? Can sunshine get to every branch? Is there clutter that should be removed? If so, get to those branches next. Evaluate the future of any branch in question: what will it be like in 5 years?
Branches on the outside of the tree that are headed back to the center of the tree should be removed. And of course, remove those pencil-thick upward racing water sprouts before they become big. Rubbing or crossing branches? “Off with their heads”, as the Red Queen would say in Alice in Wonderland.
It is not too late to plant spring bulbs. Selection in stores and on-line may be limited, but there is no such thing as a terrible tulip or disgusting daffodil. Daffodils are, generally, more successful than tulips as they are slightly toxic and not eaten by deer or rodents. But next spring you can surround or cover your tulip beds with chicken wire to keep deer from eating them. I generally plant 100 tulips inn my vegetable garden each year to use as cut flowers and as gifts or friends and the elderly. I treat them as annuals, pulling the bulbs to make room for tomatoes or lettuce in summer.
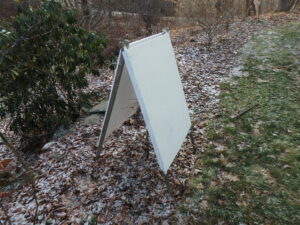
A simple plywood A frame will protect a shrub from snow and ice coming off the roof
If the previous owners of your house planted shrubs around the house, snow from roof may slide off and break branches, particularly if you now have a steel roof. You can save them by making little plywood A-frames. Do this by screwing legs made of strapping or hardwood stakes onto lightweight plywood. Drill holes at the tops of the legs allowing you to connect front and back with a piece of wire so you can spread the A-frame out as needed, and fold it up to put away in spring.
Be sure to drain your hoses and put them away before winter.
Thanksgiving is coming. I celebrate the harvest, as well as my good health, good friends and family, and living in a safe part of the world. I make a point of celebrating by serving vegetables that I have grown myself. This year I have, from my garden, potatoes, carrots, Brussels sprouts, Swiss chard, kale, Italian dandelion greens and garlic. And we’ll make extra applesauce to give to our guests.
So do a little more work in the garden now. It will help dispel the winter doldrums.
Henry lives and
gardens in Cornish Flat, NH. E-mail him at
henry.homeyer@comcast.net or write him at PO Box 364, Cornish Flat, NH 03746.
Planting in October
Posted on Thursday, March 13, 2025 · Leave a Comment
For some of us, planting time is long past – but not for me. I am always busy in the fall, planting everything I can. It is almost time to plant garlic, which is my easiest crop of all. And I’ll soon be planting spring bulbs, both in the ground and in pots for forcing. Now is the time to purchase bulbs and seed garlic if you don’t have any garlic of your own to plant.
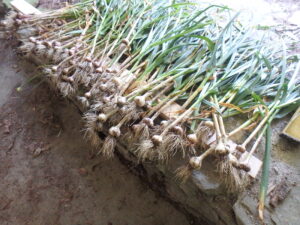
Cure garlic in a shady breezy location under covers.
Garlic is by far my least labor-intensive vegetable crop. I start by weeding out one of my wide, mounded beds and loosening the soil well. I use my CobraHead Weeder to loosen the soil and to make shallow furrows 8 to 12 inches apart. I sprinkle some granular organic fertilizer in the furrow, and run my hand tool through the soil again to work in the fertilizer.
Each garlic bulb has 4 to 8 cloves, which need to be separated for planting. Plant them 3- to 4-inches apart and about 3-inches deep. Cover and press down the soil over them, watering if the soil is dry. Lastly mulch with a thick layer of straw or mulch hay. I use 8 to 12 inches of loose straw which gets packed down to 4 inches by the winter snows. Garlic will grow up through the mulch, but most weeds will not.
To learn more about garlic, you might want to read “The Garlic Companion: Recipes, Crafts, Preservation Techniques and Simple Ways to Grow Your Own” by Kristin Graves. (Storey Publishing, 2024). A nice book, it taught me few things and has recipes I will try. Kristin is a Canadian farmer who grows 75,000 bulbs of garlic each year, so she knows her stuff!
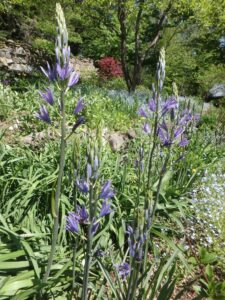
Camassia is a lesser known bulb plant that blooms in May for me.
I also plant a lot of spring-blooming bulb flowers in pots for early blossoms indoors and as gifts to friends. I mix used planting mix from summer pots with good compost and plant daffodils and tulips in planters and my window box. You can pack the bulbs close together in pots – and they need only a couple of inches of soil mix above and below them. Store them in a cool, dark place – 35 to 50 degrees is best. But even a cold garage will work if they can establish roots early and then snooze a little if the soil freezes.
Daffodils take about 12 weeks of dormancy before they should be brought into the warmth of the house, but tulips do better with 16 weeks. Little things like crocus can be forced in 8 to 10 weeks. Be sure to label them with the date planted and variety. Water lightly once a month. My favorites are Tête-à-Tête daffodils – small early daffodils in bright yellow. I pack 4 bulbs into a 4-inch pot and share them in February and March when friends need a pick-me-up.
This is also the time to plant bulbs outdoors for spring. Most bulbs like a sunny location with well-drained soil, but you can also plant bulbs under deciduous trees if they get enough sun filtered through them, or before they leaf out. If you have a site with good sun but moist soil, there a few bulbs that will work. “Thalia” is a white blossomed, late-blooming daffodil that does well even in fairly wet soil.
Camassia is a bulb plant that prefers damp soil. It produces blue to purple flowers on tall stems – up to 3 feet tall with hundreds of small blossoms. A good sandy loam is best, but it will do fine in any sunny soil that stays moist during the bloom season. It is not of interest to deer, and will keep coming back for years if happy where you plant it.
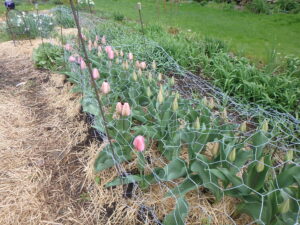
Tulips used as annuals and protected with chicken wire to keep deer out.
Tulips, on the other hand are delicious to deer as flowers, and to rodents as bulbs. During World War II some Dutch bulb growers avoided starvation by eating their tulip bulbs, though I have never been that hungry! To foil the deer I plant 100 tulips in my vegetable garden most years and surround and cover the bed with chicken wire. I grow them as annuals, pulling the bulbs after they bloom.
Planting 100 bulbs of the same kind means they all bloom at about the same time. So I cut them and put flowers in quart jars and deliver to friends, neighbors, the elderly and the infirm. It is so much fun to do so! Try it.
Over the years I have planted hundreds, nay, thousands of daffodil bulbs. Most survive and thrive – nothing eats them. I have a patch of daffies from bulbs I dug up at my boyhood home in the early 1970’s – some 50 years ago. To keep them producing well it’s good to top-dress the soil with ‘”bulb booster” or a good slow-release organic fertilizer- either now, or in the spring.
To plant 25 daffodils I dig a hole about 6 inches deep, a couple of feet long and about 18-inches across. I loosen up the soil in the bottom with my CobraHead Weeder, a single-tine cultivator. I sprinkle a cup or so of organic fertilizer in the bottom, and work it in, working in a bucket of compost, too. Then I plant the bulbs, pointy end up. The directions may tell you to plant daffodils 6-inches apart, but I tend to plant them 3- or 4-inches apart and they do fine. I press them down into the loose soil.
Lastly, I refill the hole. If the soil is full of rocks, I remove them. If it is sandy or full of clay, I mix the soil I use to refill the hole with a 50-50 mix of good compost and soil.
So take a sunny afternoon and go plant bulbs – either outdoors, or in pots for forcing. It’ll be something to look forward to all winter.
Henry is writing just one article per month. You can reach him at henry.homeyer@comcast.net
Fall Gardening Chores
Posted on Thursday, March 13, 2025 · Leave a Comment
Despite some hot sunny days, fall is fast approaching and it’s time to start thinking about cleaning up the garden and putting it to bed. No, I not suggesting you cut back all your perennials or pull all your vegetable plants. But October, the time most gardeners put the garden to bed, may be cold and rainy. We even got 5 inches of wet snow one October. So get started!
Let’s look at the most neglected area: the vegetable garden. By October many gardeners are sick of weeding, so they pick their peppers, pull the carrots, and quit. I recommend cleaning up each bed as soon as all the food has been harvested. So far I have pulled my garlic and dug my potatoes. Each time I took half an hour or so to weed the bed, cover it with old newspapers (4 to 6 pages) and then covered that with 4 to 6 inches of straw. That way, next spring, weeds and grasses won’t take over beds while the soil is still too cold and wet for planting vegetables.
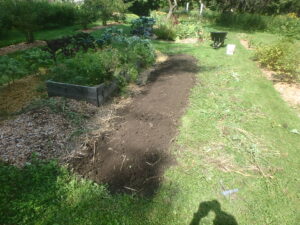
This potato bed is weed free and ready to cover with newspaperws and straw.
The leaves and stems of any vegetable that showed signs of blight should be treated with care: instead of putting the diseased plants in the regular compost pile, put them in a separate pile – one that will not be used to produce compost. Spores are the “seeds” of disease, and can survive most composting. Squash family plants often have fungal diseases, as do tomatoes and potatoes.
Your flower beds need weeding, too. If you don’t use an edging tool to create an impenetrable canyon around your flower beds, it is important to pull creeping grasses and vines like ‘Creeping Charlie’ that have probably been sneaking in all summer. Use a good weeding tool to go down deep when you weed. I like the CobraHead weeder best. (
www.cobrahead.com. It is a curved single-tine cultivator that can get below weeds so you can pull from below as you tug on the tops. It can tease out long roots of things like goutweed.
Once Jack Frost visits, you can cut back any annuals to the ground. If you pull them, you leave a bare spot for wind-borne weed seeds to settle in and wait for spring. And on slopes leaving loose soil exposed is likely to allow hard rains to wash away some of your good soil. You can pull the roots of those annuals when you plant more next summer.
This mature perennial bed is so densely planted weeds are shaded out.
I use three methods for minimizing weeding each year in my perennial beds. The best is to just fill every square foot of each bed with plants you love. Groundcovers like barren strawberry or foam flower will spread and fill in around the peonies and coneflowers – even if they are shaded by them. With time, most perennials create bigger clumps until weeds are shaded out and new airborne seeds don’t easily find a place to thrive.
The next alternative is to mulch those bare spots around existing plants with chopped autumn leaves. Chopped leaves break down more quickly than chopped branches or bark mulch. They provide organic matter to feed the soil organisms, enriching the soil. They also provide a soft landing and good places to hide for caterpillars that are ready to make their cocoons that become butterflies and moths. This fall think about running your lawnmower over the leaves on the lawn and either using a bagger, or raking them up. You can spread them this fall, or save in a pile to use in the spring.
Since I rarely have enough leaves, the third alternative for keeping down weeds is to buy finely ground bark mulch in bulk. For big gardens like ours it would be expensive to buy mulch in bags – but for around $50 a scoop of a front end loader, I can get a pickup truck load from my local sawmill or garden center.
I recommend buying a natural-colored bark mulch. The orange or black mulch has been dyed with chemicals, and I don’t want them in my garden. Hemlock and cedar are probably the longest-lasting bark mulches but hardwood mulch may be better for your plants and the soil. Never apply more than a couple of inches of bark mulch on your beds – otherwise moisture from short rains will not seep through to water your plants. And NEVER make “mulch volcanoes” around your trees – they will rot the bark and eventually kill the trees.
When your perennials look bedraggled it’s time to cut them back. But I leave flower stalks with seeds that birds can eat in winter. These include purple cone flower, black-eyed Susans, Joe Pye weed, sedum ‘Autumn Joy’ and anything else that would feed the birds.

This harvest knife is great for cutting back perennials.
You can cut back your perennials with your hand pruners, but I find it slow and tedious. I prefer to use a harvest sickle or even a serrated steak knife. These allow me to grab a handful of stems, and slice right through them all. You can use a string trimmer to work even faster, or even a lawn mower, I suppose.
By the way, if you haven’t cut the tops off your Brussel sprouts yet, do so today. This will keep the plants from getting taller, and they will instead make them produce big, fat “sprouts”. I did it much earlier than usual this year, and I am already getting nice big sprouts. Kale is very frost hardy, so I will leave mine alone, just harvesting what I need for smoothies or soups. It can last until Christmas in the garden.
So enjoy the warm and sunny days of September to get a jump start on your fall cleanup. And read a good book by the woodstove on those cold, gray, drizzly of October.
August in the Garden and Kitchen
Posted on Thursday, March 13, 2025 · Leave a Comment
It seems to me that summer has been zooming by. Of course, I did plant many vegetables two to three weeks earlier than usual and crossed my fingers that Demon Frost would not appear. It didn’t. We’ve had a very sunny summer, and my garden is thriving.
I planted 35 tomato plants this year. Why so many? I eat tomatoes 3 meals a day when they are available and like to have enough to share with friends and neighbors. But most importantly, I freeze them to use for the rest of the year. I eat stews with a tomato base all winter, and love having tomatoes that I know are organic and picked at their peak of perfection.
If you have a big vegetable garden, you probably should have a freezer. I have two. I cook with frozen vegetables from last year until this year’s crop comes ready.
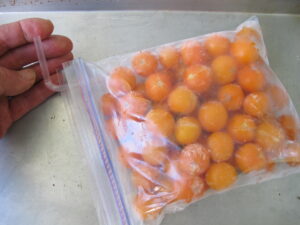
A straw used to remove air from a bag of cherry tomatoes
You can freeze whole tomatoes in freezer-grade Ziplock bags. Make sure the tomatoes are clean and have no bad spots. Close the bag right up to a straw that you place in the corner of the bag and suck out the air. Quickly pull the straw out and finish closing the bag. Put several bags in a single layer on a cookie sheet and put in the freezer. Nine medium tomatoes will fill a quart bag.
When you need some for a soup or stew, just take a few out, rinse them under hot tap water and the skins will rub right off. Put them on a chopping board for a few minutes and you can dice them.
I grow 8-10 ‘Sun Gold’ Cherry tomato plants each year. They are a delight popped in the mouth right there in the sunshine, but I usually dehydrate most of them. I cut clean, ripe Sun Gold cherry tomatoes in half and place them cut-side up on the tray of a food dehydrator. I start the process at high heat – say 150 degrees – for 30 minutes, then drop the temp to 125 or 130 so that I don’t damage the vitamins in the tomatoes. You can take them out when brittle, or earlier when they are leather-like. They store well in a dark cupboard, in the fridge, or in a freezer.
I love kale fresh or frozen. It is great in winter stews, smoothies or Colcannon, an Irish kale and potato dish. I blanch kale and other brassicas by dropping the chopped leaves into boiling water for a minute, then removing them and dropping in cold water in the sink. I drain, spin dry in a salad spinner, and spread out the kale on a cotton tea towel and blot dry. This process is easy if you have a blanching pot with an inner pot that has drainage holes so you can pull all the leaves out quickly.
Most green vegetables need blanching to store well in the freezer. This includes Brussels sprouts, broccoli, beans and squash. The quick boiling kills the enzymes that cause aging, making for a better product. I don’t blanch tomatoes, peppers, fruit or leeks. But for best results it is good to eat frozen foods in year one, not year four or five.
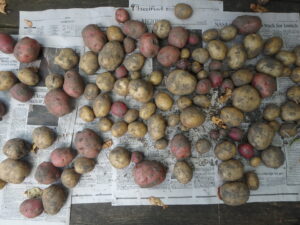
Let potatoes dry out for a few days before storing
The easiest way to keep food for eating all winter is to store it in a cool location. I have a cold basement and a cool area in the entry area of my house. Potatoes, carrots, kohlrabi, rutabagas store well in the basement with high humidity and temperatures in the 33 to 50 degree range. Cabbages store well there, too, but a fridge is better for long term storage.
Other veggies need low humidity and cool temperatures. Those include onions, shallots, garlic and winter squash. I keep them on a wooden rack I got from Gardeners Supply, their “orchard rack”. I have that in the main part of the house where I have a woodstove – hence low humidity. But I keep them near the mudroom, which is unheated. You can also keep squash under the bed upstairs in a spare bedroom with the heat off and the door closed.
When picking vegetables or fruit for later use, it’s important to pick when ripe – which is not always easy. Apples are easy. Pick one, slice it open and look at the seeds. If white or green, not ready. If the seeds are black or brown, they are ready to pick. They dry well for snacks all year.
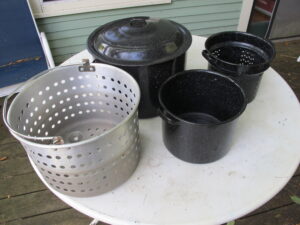
Blanching pots come in various sizes
Winter squash and pumpkins are trickier. You should use pruners to leave some stem when you pick, and that should be dry and a bit brittle. The outer skin thickens and toughens up more, the longer they stay on the vine. I recently ate a butternut squash that I’d stored on a shelf since last fall, and it was delicious.
Green beans get tough if you don’t pick them when ready. If you start to see the individual seeds as prominent lumps, they are probably over the hill. Cook some up and you may still find them edible, even if not perfect. Some varieties, such as ‘Kwintus’, are tasty even when big.
Garlic? When the leaves start to dry up at the base of the plant, you can pull them. I’ve been told to cure them in a cool, dry place before cutting off the stems. They are said to absorb some nutrients from the stalks into the bulbs.
The bigger your garden, the more you can store for winter. But you can also support your local farm stand and buy some produce in bulk for storage. I recommend it.
Creating a Better Environment For Us And Our Animal Friends
Posted on Thursday, March 13, 2025 · Leave a Comment
Fall leaves are used here under an oak leafed hydrangea and other native plants.
There is much gloom and doom spread in the news and on social media. Many people believe that our ecosystem is irreparable – climate change is bringing death and destruction to many of the animals that we share the earth with. But some gardeners believe that although the climate is changing, they can still plant many species of plants that will sustain our birds, butterflies, bees, moths and all the little animals that we share our space with. I am one of those optimistic ones.
If you want to help save our ecosystem, here are some suggestions:
Start by reducing the size of your lawn. Yes, keep space for badminton and a grill, if you like. But think of lawn as an area rug, not wall-to-wall carpeting. Most Americans inherited a large lawn when they bought their house. I’ve read that American lawns cover an area as large as New England. We can all do with less. Perhaps you can develop a five-year plan to reduce the lawn and add trees, shrubs and perennials.
This is not a quick fix, nor an inexpensive one. But you need not plant large trees. In fact, small trees are less shocked at transplant time, and take off and grow like crazy while bigger trees often stall and sulk.
Choose your trees wisely: plant trees and shrubs that are native to New England, not Japan or China. Why? Native trees co-evolved with our pollinators. Bees, butterflies and moths look for plants that they instinctively recognize. Plants that will benefit them. We all know that Monarchs rely on milkweed, but most pollinators have similar habits – they eat what their ancestors ate.

Common milkweed flowers are used by many insect, not just Monarch butterflies. The plants also spread by root.
According to PhD entomologist Doug Tallamy, author of Nature’s Best Hope: A New Approach to Conservation That Starts in Your Yard, oaks are the best trees to plant to support pollinators and birds. They are followed by other keystone trees: willows, birches, poplar and elm. Most maples, ash and beech are good, too.
You may wonder why native trees are so important. Dr. Tallamy explains in his book that all baby birds are fed caterpillars- even young hummingbirds. Using a game camera, he determined that a nest of chickadees needs between 6,000 and 9,000 caterpillars between hatching and fledging. Amazing! We don’t often see those caterpillars or the feeding they do on our trees, but they are there if we have native plants.
Birds need food, water, safe places for nesting and places to stay out of the wind in winter. A well thought-out garden can address all those needs. Yes, it is nice to offer seeds in feeders in winter, but birds need insects or seeds to eat all year. Native trees and shrubs can help significantly, particularly if all your neighbors plant well, too.
Plant trees in clumps – three, five or seven in a small grove. This way their roots will mingle, and if a storm with ferocious rain and high winds comes along, they will be much less likely to get blown over.
Instead of surrounding your new trees with lawn, think about planting native perennials, wildflowers or ground covers under them. When a caterpillar is ready to pupate and transform itself into a moth or butterfly, it will drop off the tree it has been feeding on. On a lawn compacted by heavy riding mowers, it will probably not survive. They need leaves to hide under, or soft earth they can burrow into. Autumn leaves make a great mulch, either chopped or whole.
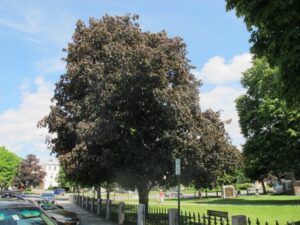
Norway maple ‘Crimson King’ is pretty, but invasive. Seedlings are not ususally purple-leafed.
As part of your planting efforts, remove all invasives. All New England states have laws naming the invasives to your state. These include, but are not limited to burning bush, barberry, Norway maple, oriental bittersweet, autumn olive, buckthorn, privet, honeysuckle and multiflora rose. Go on-line and educate yourself as to what these plants look like. Some can be dug out, but older specimens can be difficult to remove.
Apparently 82% of Americans live in cities or large towns. But city dwellers can make a difference, too. In Tallamy’s book he writes about a woman in Chicago with just a tenth of an acre of yard – right next to O’Hare airport. Over time she planted 60 species of native plants in her yard – and over time she identified 103 species of birds that visited her yard. Having water available, especially if it bubbles, is good. It also attracts migrating birds. Native plants provide food for migrating birds, too – insects and seeds that they need for their long flight.
Instead of just lawn, build rooms using native trees and shrubs where you and your family can relax – and observe nature. No, you will not see cougars in your garden, but seeing monarchs and bluebirds can give great joy. Build natural areas using 90% natives and start learning the names of the creatures that come.
Teach your grandchildren to watch nature with you, start them young to be love the outdoors – and gardening. My grandfather started me gardening when I was just a little tyke, and now, some 75 years later, I get great joy from my garden every day of the year.
Henry lives and
gardens in Cornish, NH. Send questions to him at PO Box 364, Cornish Flat, NH 03746 or by e-mail at
henry.homeyer@comcast.net.
Growing Roses and More
Posted on Thursday, March 13, 2025 · Leave a Comment
June is, traditionally, the month for weddings. It is also the time when old fashioned roses bloom, along with peonies, iris and many other great garden flowers. Is that coincidence? Perhaps. But maybe the two are linked. Let’s look at some great June flowers you can grow, and how to succeed with them.
My mom was an organic gardener who loved her roses. And although she is no longer with us to deny it, I think she may have cheated when it came to her roses. Back in the fifties and sixties roses were much fussier than they are now. They suffered from all kinds of fungal diseases and were eaten by ferocious Japanese beetles that made mincemeat of leaves and blooms. I think she used chemicals to kill the beetles and subdue the fungi.
Now we no longer have to resort to chemicals to have nice roses. Breeders have worked hard to develop roses that stay healthy and avoid predation from hungry beetles. The beetles were easy: they bred roses without scent to attract them. I don’t know how they developed roses resistant to diseases, but they have. I never see rose diseases, and I never spray.
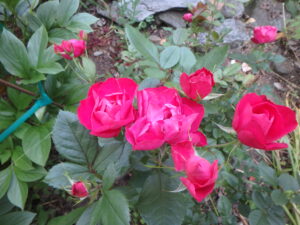
Knock out roses are reliable bloomers
My favorite roses are part of the “Knockout” series of roses, though I know others who really like the “Easy Elegance” series. They do not grow blossoms on long stems, but have multiple blossoms per stem. My “Knockouts” start blooming in June, bloom all summer, and up until hard frost – or even later.
Roses love full sun, but will grow in part shade. But the more sun they get, the better they do. Six hours of sunshine is considered full sun by most authorities. Afternoon sun is more potent than morning sun, so the west side of the house is better than the east.
Roses need good, rich soil. If you have sandy soil or a heavy clay, you will need to improve it in order to succeed. What does that mean? Mix in lots of compost when you plant, and add some organic fertilizer. Dig a hole that is at least 3 times as wide as the pot it was in when you purchased it. Mix the soil for the hole 50-50 with good compost- either your own, or a good bagged compost. I like Moo Doo or Coast of Maine brands.
Roses need more water than most other things, but do not want to sit in soggy soil. They should get an inch of water per week from rain, or a good dousing from your watering can applied slowly so it can soak in. A deep watering once a week is better than a little sprinkle every day.
Soil pH I important, too. The pH is a measure of the acidity or alkalinity of your soil. You can buy an inexpensive kit to test it, or send a sample out to be tested for pH and soil quality at your state Extension Service. Roses do best in slightly acidic soil – in the range of 6.0 to 6.8. If you soil has a lower number, you should add limestone and mix it in. But don’t add too much. A test should tell you how much to add.
Many roses are grafted onto rootstock. The bud union – a scar – should be buried in the soil. The scar is obvious on bare root roses, but is probably buried if you buy a rose in a pot. The colder the climate, the deeper that graft line or bud union should be. For Zone 4, it should be about 4 inches below the final soil line. Zone 5? 3 inches. Zone 6? 2 inches.
Peony ‘Festiva maxima’ that my grandmother grew
Want more blossoms? Roses do better if they get some fertilizer a few times during the course of the summer. An organic, slow-release bagged fertilizer called Rose Tone is designed just for roses, but I use Pro-Gro, my go-to organic fertilizer and sometimes use liquid fish and seaweed fertilizers made by Neptune’s Harvest. I add half a cup of Pro-Gro to the hole when I plant.
Other June flowers suitable for a wedding are peonies and iris. Peonies live forever if planted right – deep rich soil amended with plenty of organic matter. I have one from my grandmother, and she died in 1953. If you planted one that never blooms, you have probably planted it too deep. The “nibs” or growing points under the soil surface for next year’s growth should be no deeper than three quarters of an inch. You can feel them by poking around in the soil with your fingers. Pull away some soil if they are too deep, and it should bloom next year.

Siberian iris are tall and elegant
Siberian iris only bloom for a few days, but are magnificent. They come in a variety of blues and purples. Old patches tend to develop a dead spot in the middle because the plants have used up all the soil nutrients. Divide in the fall and re-plant, or add some organic fertilizer now.
There are too many gorgeous flowers to mention them all. But if you are planning a wedding, be advised that flowers do not bloom on an absolute calendar. Your favorite peony may bloom on June 15 this year – and June 21 or June 3 next year. You best bet is to have a good florist as a backup.
Henry is enjoying more time in his
garden, now that he only writes a column once a month. Feel free to send questions to him at
henry.homeyer@comcaset.net or PO Box 364, Cornish Flat, NH 03736. Please include a SASE if you wish an answer by regular mail.


 Click Here to buy from Cobrahead